Halcyon 6: Lightspeed Edition

Halcyon 6: Lightspeed Edition

157 ratings
Lightspeed Mega Guide
By Marisa Fan and 1 collaborators
This is the continuation of the Halcyon 6 mega guide this is a work in progress copy paste type of thing and is subject to change if you find a mistake please help us fix the guide and post it! Also every thing with a * on it is especially useful
3
   
Award
Favorite
Favorited
Unfavorite
Officer first pick (Default)


Tactical:


In my personal opinion tactical is the less useful of the others

Findable equivalent: Suki Sissoko (Stupid hard to get and incredibly useful but you can emulate her powers)

Doom Cannon (BOOM): Hits a single enemy and does Massive Damage™ based on the tier of your ship and it's specialties (harder hitting ships tier 5 and such will hit harder)

Dimentional flashbang: This works well with incisor beam and commando prestige class actually VERY well so keep that in mind.

Fire at will!: has the capacity to be quite useful with the doom canon but, in normal combat expect slight damage and nothing much else.

Into the Fray Boosts damage useful with doom cannon and a good thing to use with medatation boosts

Bridge Shot: i found this ability to do less damage than it says on the tin why? i don't know. Possibly the tendency for the enemy to resist Weapons Disruption.

Science:


In my personal opinion a good pick for high difficulties.

Findable equivalent: Inneborg Xiao (but you can emulate her powers)

Epic: Matter restoration:
Massive healing for everyone super useful overall!

Warp atomic structure: Super useful if you have an engineering officer with disintegrate hull i found myself not needing it so much after finding the beam attack with panic to crew aswell but it does do a little bit more damage than standard attacks something you might want to think about in a sticky situation.

Ablative Field:
The thing about this ability that makes it not just a cut rate protective field is extra resistance 35% compaired to just a normal protective field useful if you know one of your ships is going to take a real beating.

Siphon Dark matter Good for minor healing and crew panic overall it's just useful in certain situations.

Bend spacetime
Mostly useful in keeping one ship alive for quite a while even with low health.

Engineering


In my opinion deeply tied with science lucas scienceman.

Findable equivalent: Zulf Madox the man who you always find! (Unless you don't come prepared at New Terra, but you can emulate his powers)

Drone swarm Incredible attack that hits everything and causes high damage in the form of a status effect.

Broadside salvo useful it does insane amounts of damage to chruul with a hull breach or without

Quick tune up In my opinion this is the last resort no healing tools left kinda thing but can be useful

Repair drone overdrive: in my opinion marginally useful if you want extra ship powers or lots of healing but, the ship comes with a stock drone heal that seems more useful but in dire need it can save ships from critical state and keep healing them.
Choosing a Legendary Officer*
If You did not Skip the Prologue
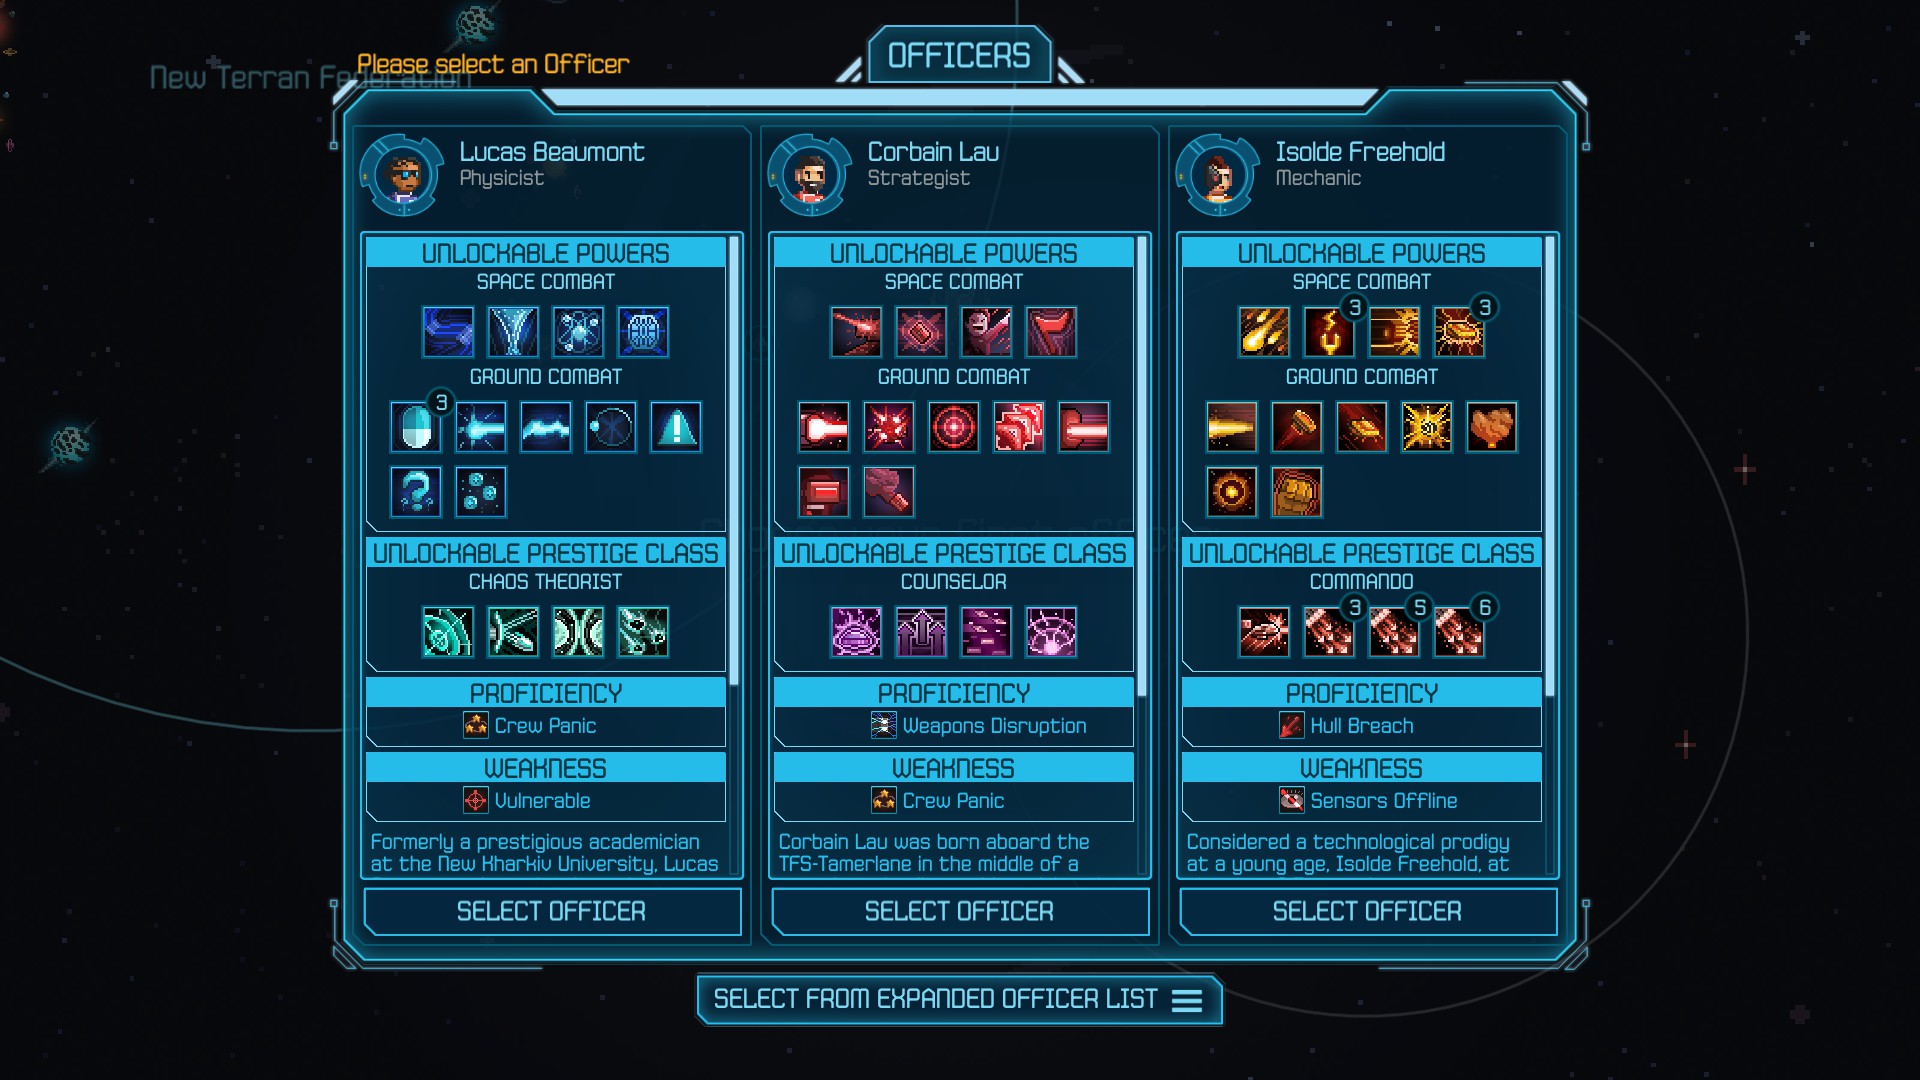
You will have to pick between Corbain Lau (Strategist), Lucas Beaumont (Physicist) and Isolde Freehold (Mechanic). The selection dialogue won't tell you their Epic powers. But never fear, this guide will tell you! Corbain Lau can unlock Doom Cannon. Lucas Beaumont can unlock Matter Reconstruction. Isolde Freehold can unlock Drone Swarm. See below for a description of each Epic power in detail.

If this is your first time playing, you will probably want Isolde Freehold, but choosing a different officer won't kill you.... or will it?

If You did Skip the Prologue
You can still pick Corbain Lau, Lucas Beaumont, or Isolde Freehold, but you can now choose to hit the button at the bottom that says "Select from expanded officer list." This will let you build a customized officer. If you decide you want one of the presets, you can always go back to them.

1. Choose your starting officer character
This step is purely aesthetic. Characters with the gold ring have bios. The other characters do not.

2. Choose your officer's class
Please see the sections below for a description of each class. You will get to pick a second officer soon, so you don't need to worry about choosing between two options that look equally good.

3. Choose your officer's unlockable epic power
Depending on which class you picked, you will have 5 options. See the section below for details. If you don't plan to use the epic power anyway, this step is fairly irrelevant.

4. Finalize your officer
Look over this page to make sure you have everything correct, then hit the confirm button.
Epic Powers (Legendary Officers Only)*
All Epic powers can only be used once per mission. They can be unlocked once the officer reaches Level 7.

Tactical Powers
Fade To Black Gives all allies +50 Evasion and +75% Damage until each ship attacks an enemy. Works well with Strategists who take the Counselor path and use Meditation Boost.

Doom Cannon Deals 500% Damage to one enemy, but inflicts Ship Disable (100%) and Engines Down (100%) on the user. If you have a good resistance to those effects, it isn't much of a problem, so it is best used by Operatives. Otherwise, it is best used as a finisher.

Nuclear Strike Deals 350% Damage to all enemies. Inflicts Vulnerable (100%) on enemies and Vulnerable (50%) on allies. Combos well with Triple Shot.

Aurora's Vengeful Aura Boosts damage for the next attack. The amount depends on how many times the ship gets hit. (35% for 0 hits, 50% for 1 hit, 75% for 2 hits, 100% for 3 hits.)

Bait And Switch Inflicts Entranced (100%) on one enemy. Also enables The Bomb. Entranced stuns the ship for 5 rounds, like Ship Disable, only longer and without the added resistance. The Bomb does 50% Damage against normal targets and 250% Damage agains Entranced Targets. This power has the unique ability to stun any boss.

Engineering Powers
Bremachandra's Maneuver Deals 300% Damage to all enemies. Exploits Engines Down, making it a great combo for Strafing Run. Reduces the user's damage by 50% for the remainder of the battle. Good for finishing off boss escorts or when the user will be mostly tanking afterward.

Dimensional Warhead Boosts threat by 800 when used. Inflicts an effect that boosts threat by 250 more and decreases damage resistance by 30%. Enables the Launch Dimensional Warhead power and the Power Dimensional Warhead power. Power Dimensional Warhead can be used to boost the damage of the launch from 250% to 500%, 750%, or 1000%, depending on how many times it is used. Launch Dimensional Warhead does the appropriate amount of damage to one enemy and exploits Crew Panic. It removes the Yabling's Parasitic Lash effect, the Voraash's Drain effect, Ship Disabled, and the Entranced effect (from Bait And Switch) from the target. It also removes the initial effect from the user. This power is good for drawing fire when tanking, so it is best used by Inventors.

Drone Swarm Does 150% Damage to all enemies and inflicts Drone Swarm for an additional 126% damage for each of 4 rounds. Removes buffs and the Entranced effect from the target.

Emp Overcharge Deals 50% Damage to all enemies, inflicts Ship Disable (95%) on all enemies, and inflicts Ship Disable (25%) on the user. Good for stopping attacks by fleets that do not resist Ship Disable.

Brace For Impact Prevents you from taking damage until you use the now-enabled ram attack. Also prevents you from using attack powers during that time. You will have to wait an extra turn before doing anything after bracing. The ram attack deals 400% Damage to one enemy and exploits Ship Disable. It also removes all the same effects that the Dimensional Warhead does. You can cancel the effect and forego the ram attack if you wish.

Science Powers
Causality Violation Removes all debuffs and adds +75% resistance to all standard status effects. Does not cost a turn to cast. This is good for removing DoT debuffs before they deal much damage.

Kistler's Ague Doubles the duration of the six standard debuffs on the enemy fleet. All but Hull Breach can be exploited for extra damage for the three rounds before they revert to the normal effects. Hull Breach does extra damage if you don't exploit it, Sensors Offline decreases aim by an extra 20, and Engines Down decreases speed by an extra 10. Use after Singularity to get the most effect.

Matter Reconstruction Heals the fleet for 1000% Damage and removes all debuffs. This can put your fleet back at full strength.

McKean's Hook, Line, and Sinker Forces the target to deal 200% Damage to itself on its next turn. Good for damaging large Tactical vessels (especially if they are Enraged).

Singularity Does 300% Damage to all enemies. Inflicts Singularity (100%) and the six standard effects (75% each). Singularity does 117% damage for each of the next 3 rounds.
Early game*


Speaking from experience your goals are gonna be this (in order):

1: Officer academy QUICKLY
2: Build your third ship QUICKLY
3: Destroy all chruul portals and evacuate far away/useless colony's or mines
4: GET TIER 2 AND TIER 3 AS FAST AS POSSIBLE AND RESEARCH EVERYTHING EVER (but only in commander and above then you can put that off for the most part)
5: Clear as many rooms as you can (you will need at least 8 or so for everything)
6: Get Pirates killed and on your side (pick a clan and attack them once)
7: get some extra officers if you can

Chruul portals and killing of those dirty reds:
When you kill a chruul portal it will be replaced in 20/10 or so days (don't quote me on that) Your mission is to make sure you have as many mineral mines as you can keep track of because when you set those up with upgrades and drones all you'll need to do is make sure they don't get completely destroyed.

When you see dark matter mines try and throw those away since they aren't very useful but sometimes you might need about 3 or 4 (dark matter everywhere man)

Fuel mines are not so useful when you build the halcyon fuel plant but, it is pretty good to have when fuel plants aren't something you have room for.

Researching everything you can!
This falls in line with the first one because you will need all the minerals you can think of now let me guide you through what you NEED to get. the ones that are more useful in this stage i will bolden

Officer academy
Tier 2 ships
Repair bay
Trithium reactor
Foundry

Cleanin' rooms
You will indeed need to balance what you do with clearing these rooms but, once you are done you are done and don't need to keep going but it will be useful to keep going if you want lots of fuel plants.

Pirates
Fight the pirates who argue over who is the best replacement for admirax and you will get a map then fight whoever you think should be admirax he will then talk with you and ask that you meet his main fleet then talk with him.
Class Overview*
There are six main classes (grouped into three types) and three unlockable subclasses. Each main class provides 4 unlockable space powers, 7 unlockable ground powers, a proficiency, and a weakness. Every officer will start with three ground powers already unlocked. The weakness gives the officer's ship a -50% resistance to the status effect. The proficiency gives the officer's ship a +50% resistance to the status effect. It also gives the officer an increased chance to inflict the status effect when using an appropriate attack. It starts at +10%, then goes up an additional +10% every three levels.

If you are willing to forego the unlockable subclass, you can get the basic versions of the other space powers available to your type. For instance, Biologists can learn Bend Spacetime if they don't become Counselors. Choosing the extra powers will prevent the officer from taking the subclass.

Each time you level up an officer, the officer will get 1 or 2 skill points, along with some small stat increases. Even levels give 1 skill point and odd levels give 2. You can only reach Level 15, so that gives a total of 21 skill points to use. Keep this in mind when selecting skills. Sometimes you may decide that you would rather have the high-end skills from the main tree instead of the training skills or the epic power.

Cadets don't level up, so you'll need to do tasks at the Cadet Barracks to increase their usefullness. (Unless you are just trying to get those "Greenshirts lost in battle" achievements.) There is one exception...

NOTE: When more than one number is listed below, each number corresponds to the corresponding tier of the power. (E.g. 100% / 115% / 140% for Backstab Maneuver means that Backstab Maneuver I does 100% of base damage, Backstab Maneuver II does 115% of base damage, etc.)
Operative Class (Tactical)
Operatives can become Commandos. In ground combat, they focus on doing lots of damage. In space, they can disable multiple enemies or take a risk for more damage. Using Cloak, then Weapons Supercharge, then Suicide Run can do heaps of damage without making you too vulnerable.

Proficiency: Engines Down
Weakness: Hull Breach

Space Combat
Weapons Supercharge is a two-edged sword. It provides +150%, 174%, or 200% damage, -50% damage resistance, and +100% threat for 1.33 rounds. The penalties usually outway the benefits unless you have complemetary powers like Into The Fray, Cloak, or Bend Spacetime.
Name
Target
Damage
Threat
Cooldown
Exploits
Inflicts
Backstab Maneuver
Single Enemy
100% / 115% / 140%
+7
6
N/A
Ship Disable (95%)
Cloak
Self
0%
-50/100/150
6
N/A
Cloak
Suicide Run
Single Enemy
135% / 150% / 175%
+7
6
Vulnerable
Vulnerable (20% self), Ship Disable (95% target, 20% self)
Weapons Supercharge
Self
0%
+5
6/5/5
N/A
Vulnerable (75%), Weapons Superchage

Ground Combat
Reckless provides +25%, 30%, or 35% damage, -25% aim, and -10%, 15%, or 20% damage resistance for 3 rounds. Stealth provides +25%, 30%, or 35% evasion and -25, 30, or 35 threat for 3 rounds.
Power
Target
Damage
Aim
Threat
Cooldown
Exploits
Inflicts
Kamikaze
Single Enemy
125% / 140% / 160%
+0%
+5
5
N/A
Reckless (self)
Phaser Blast
Single Enemy
110% / 125% / 145%
-10%
+5
0
N/A
Blinded (90%)
Point Blank
Single Enemy
100% / 115% / 135%
+20%
+5
3
Confused
N/A
Sabotage
All Enemies
70% / 85% / 105%
+0%
+10
3
Exposed
N/A
Shrapnel Grenade
All Enemies
90% / 105% / 125%
-20%
+10
4
N/A
Bleeding (75%)
Slice 'n Dice
Single Enemy
90% / 105% / 120%
+10%
+5
0
N/A
Bleeding (75%)
Stealth
Self
0%
N/A
-25 / -50 / -75
5
N/A
Stealth
Strategist Class (Tactical)
Strategists can become Counselors. In ground combat, they are good at shifting the hit-miss ratio in your favor. In space, they can boost your damage output or drop the damage coming from your enemies. They can also boost their group's XP gain at Level 4 if you so choose.

Proficiency: Weapons Disruption
Weakness: Crew Panic (Can be mitigated with Faultless Systems.)

Space Combat
Fire At Will removes the Voraash's Drain effect and the Yabling's Parasitic Lash effect from the target. The Fire At Will effect provides -50% minimum damage and +75%, 100%, or 125% maximum damage for 1.33 rounds, making the power a bit of a gamble. Into The Fray is a very useful power, once you find out what it does. Inspired provides +25%, 35%, or 45% damage and +25, 35, or 45 aim for 3 rounds.
Name
Target
Damage
Threat
Cooldown
Exploits
Inflicts
Bridge Shot
Single Enemy
150% / 165% / 185%
+5
6
N/A
Weapons Disruption (95%)
Dimensional Flashbang
Single Enemy
60% / 80% / 100%
+5
3
N/A
Engines Down (95%), Weapons Disruption (95%)
Fire At Will
Single Enemy
100% / 115% / 135%
+10
4
N/A
Engines Down (95% target), Vulnerable (75% self), Fire At Will
Into The Fray
Single Enemy
50% / 75% / 100%
+10
6
Sensors Offline
Inspired (allies)

Ground Combat
Targeting Assistance provides +25%, 30%, or 35% damage and +25%, 30%, or 35% aim for 2 rounds.
Power
Target
Damage
Aim
Threat
Cooldown
Exploits
Inflicts
Arc Laser
All Enemies
55% / 70% / 90%
+20%
+10
4
N/A
Blinded (70%)
Phaser Blast
Single Enemy
110% / 125% / 145%
-10%
+5
0
N/A
Blinded (90%)
Precision Shot
Single Enemy
100% / 115% / 135%
+20%
+5
2
Exposed
N/A
Shell Shock
Single Enemy
75% / 90% / 110%
-15%
+5
4
N/A
Afflicted (60%), Shocked (60%)
Shrapnel Grenade
All Enemies
90% / 105% / 125%
-20%
+10
4
N/A
Bleeding (75%)
Targeting Assistance
All Enemies
30% / 45% / 65%
+25%
+10
5
Confused
Targeting Assistance (allies)
Tear Gas
Single Enemy
45% / 60% / 80%
-10%
+5
3
N/A
Afflicted (15% self), Stunned (75% target)
Inventor Class (Engineering)
Inventors can become Chaos Theorists. They excell at AoE DoT's and damage resistance. Mine Toss is best used with Targeting Assistance or a confused enemy. Inventors are extremely good at tanking, both in space and on the ground.

Proficiency: Vulnerable
Weakness: Engines Down

Space Combat
Reinforce Hull provides +20%, 30%, or 40% damage resistance for 5 rounds. Supercharge Polarity provides +15%, 25%, or 35% damage resistance and +100%, 150%, or 200% threat to the user for 4 rounds. It also deals 30% damage to all enemies for each of 2, 3, or 4 rounds.
Name
Target
Damage
Threat
Cooldown
Exploits
Inflicts
Death From Above
Single Enemy
100% / 115% / 135%
+13
6
Crew Panic
Hull Breach (25% self), Ship Disable (95% target)
Reinforce Hull
Self
0%
+20
5
N/A
Reinforce Hull
Salvage Harpoon
Single Enemy
80% / 100% / 120%
+10
4
N/A
Vulnerable (95%), Hull Breach (95%)
Supercharge Polarity
All Enemies
25% / 40% / 55%
+35/50/75
6
N/A
Supercharge Polarity (self, target)

Ground Combat
Ghost Pepper Bomb does 66%, 105%, or 150% damage for each of 3 rounds. It does not remove Blinded when used, so those numbers can be twice as high. Grey Goo does 33%, 57%, or 99% damage for each of 3 rounds. NanoRepairs heals 210%, 240%, or 270% damage for each of 2 rounds and removes debuffs when first used. NanoShield provides +15%, 20%, or 25% damage resistance for 3 rounds. Personal Magnetism provides +25%, 30%, or 35% damage resistance and +100, 150, or 200 threat for 4 rounds.
Power
Target
Damage
Aim
Threat
Cooldown
Exploits
Inflicts
Activate NanoRepairs
Self
0%
+0%
+7
5
N/A
NanoRepairs
Electrocute
Single Enemy
90% / 105% / 125%
+10%
+5
0
N/A
Shocked (80%)
Ghost Pepper Bomb
All Enemies
25% / 40% / 60%
-5%
+10
3
Blinded
Ghost Pepper Bomb (75%)
Grey Goo
All Enemies
50% / 65% / 85%
+20%
+10
4
N/A
Grey Goo (100%), Exposed (75%)
Mine Toss
Single Enemy
135% / 150% / 170%
-25%
+5
0
Blinded
N/A
NanoShield
All Allies
0%
+0%
+0
5
N/A
NanoShield
Personal Magnetism
Self
0%
+0%
+10
5
N/A
Personal Magnetism
Mechanic Class (Engineering)
Mechanics can become Commandos. In ground combat, they excell at slowing down the enemies and making them take more damage. In space combat, they have extra healing powers and hard-hitting attacks.

Proficiency: Hull Breach
Weakness: Sensors Offline

Space Combat
Broadside Salvo and Ramming Speed remove the Voraash's Drain effect and the Yabling's Parasitic Lash effect from the target. Ramming Speed is good for getting Overkills. Quick Tune-Up provides 117%, 133%, or 150% healing for each of 3 rounds. Repair Drone Overdrive provides 75%, 87.5%, or 100% healing for each of 4 rounds.
Name
Target
Damage
Threat
Cooldown
Exploits
Inflicts
Broadside Salvo
Single Enemy
130% / 150% / 175%
+10
6
N/A
Vulnerable (40% self), Hull Breach (95% target)
Quick Tune-Up
Self
150% / 175% / 200%
+10
5
N/A
Quick Tune-Up
Ramming Speed
Single Enemy
170% / 190% / 215%
+15
6
Engines Down
Hull Breach (40% self)
Repair Drone Overdrive
Single Ally
100% / 150% / 200%
+14
4
N/A
Repair Drone Overdrive

Ground Combat
Power
Target
Damage
Aim
Threat
Cooldown
Exploits
Inflicts
Ball Lightning
All Enemies
90% / 105% / 125%
-15%
+10
4
N/A
Shocked (65% / 70% / 75%)
Drone Takedown
Single Enemy
100% / 115% / 135%
+0%
+5
0
N/A
Exposed (75% / 80% / 85%)
Electrocute
Single Enemy
90% / 105% / 125%
+10%
+5
0
N/A
Shocked (80%)
Kinetic Expulsion
All Enemies
25% / 40% / 60%
+0%
+10
5
N/A
Confused (25% self), Stunned (50% target)
Kirkish Haymaker
Single Enemy
100% / 115% / 135%
+0%
+5
0
Afflicted
N/A
Mine Toss
Single Enemy
135% / 150% / 170%
-25%
+5
0
Blinded
N/A
Smoke Out
All Enemies
55% / 70% / 90%
+15%
+10
3
Afflicted
Afflicted (15% self)
Biologist Class (Science)
Biologists can become Counselors. In ground combat, they are all about buffs. Their specialty is exploiting bleeding enemies to heal their allies. Their Battle Stims would be worth a fortune on the black market if they didn't have the chance of backfiring. (But you should still use the stims.) In space, they can hit hard or heal a lot of damage. They can also get extra Dark Matter from combat at Level 7, if you so choose.

Proficiency: Sensors Offline
Weakness: Weapons Disruption (Can be mitigated with Advanced Biocrystallization.)

Space Combat
Nano Restoration Field and Spin Maneuver each have a warmup of 2 rounds. Nano Restoration Field can only be used twice per mission; however, the last upgrade enables an extra use. Nano Restoration Field provides an additional 150%, 162.5%, or 175% healing for each of 4 rounds.
Name
Target
Damage
Threat
Cooldown
Exploits
Inflicts
Nano Restoration Field
All Allies
150% / 200% / 250%
+12
5
N/A
Nano Restoration Field
Solar Flare
Single Enemy
125% / 150% / 175%
+5
6
N/A
Sensors Offline (95%)
Spin Maneuver
All Enemies
100% / 120% / 140%
+10
6
Weapons Disruption
N/A
Stasis Lock
Single Enemy
50% / 65% / 85%
+7
5
Weapons Disruption
Ship Disable (95%)

Ground Combat
Battle Stims provide +75%, 100%, or 125% speed for each of 2, 2, or 4 rounds. Transfusion provides 66%, 99%, or 132% healing to allies for each of 3 rounds, or the same amount of damage to the enemy. Both Invasive Surgery and Transfusion remove debuffs on the user.
Power
Target
Damage
Aim
Threat
Cooldown
Exploits
Inflicts
Battle Stims
All Allies
0%
+0%
+10
5
N/A
Battle Stims, Afflicted (25%)
Blood Drive
All Enemies
45% / 60% / 80%
-10%
+12
5
Bleeding
Transfusion (50% / 60% / 70% allies)
Emergency Meds
Single Ally
250% / 350% / 450%
+0%
+7
4
N/A
N/A
Invasive Surgery
Single Enemy
125% / 140% / 160%
-15%
+5
3
Shocked
Afflicted (15% self)
Organ Failure
All Enemies
70% / 85% / 105%
+0%
+10
5
Shocked
N/A
Psionic Blast
Single Enemy
100% / 115% / 135%
+0%
+5
0
N/A
Confused (80% / 85% / 90%)
Transfusion
Single Enemy
15% / 30% / 50%
+0%
+7
6
Bleeding
Transfusion (self)
Physicist Class (Science)
Physicists can become Chaos Theorists. They are good at inflicting ground combat status effects,
but they can't exploit any. In space, they can protect or speed up an ally. If you are willing to dedicate one to the task, you can achieve tremendous speed on one ship by having an officer with Bend Spacetime III and one with Bend Spacetime II. If you aren't that fanatical, you can get similar effects with III + I or II + I. This is one of the ways to make Weapons Supercharge more useful.

Proficiency: Crew Panic
Weakness: Vulnerable

Space Combat
Warp Atomic Structure removes the Voraash's Drain effect and the Yabling's Parasitic Lash effect from the target. Ablative Field provides +35%, 42.5%, or 50% damage resistance for 3 rounds.
Dark Matter Extraction does 100%, 125%, or 150% healing to self for each of 4 rounds and the same amount of damage to the target. Quicken increases speed by 90%, 110%, or 150% for 1.33 rounds.
Name
Target
Damage
Threat
Cooldown
Exploits
Inflicts
Ablative Field
Single Ally
0%
+0
5
N/A
Ablative Field
Bend Spacetime
Single Ally
0%
+7
6
N/A
Quicken
Siphon Dark Matter
Single Enemy
25% / 35% / 45%
+5
6
N/A
Dark Matter Extraction (self, target), Crew Panic (95% target)
Warp Atomic Structure
Single Enemy
125% / 140% / 160%
+5
2
Hull Breach
Crew Panic (95%)

Ground Combat
Delayed Recovery does 120%, 150%, or 180% healing for each of 3 rounds. Both Delayed Recovery and Emergency Meds remove debuffs on the target and have three uses per battle.
Power
Target
Damage
Aim
Threat
Cooldown
Exploits
Inflicts
Delayed Recovery
Single Ally
0%
+0%
+7
4
N/A
Delayed Recovery
Drop Isotopes
All Enemies
90% / 105% / 125%
-20%
+10
4
N/A
Afflicted (70% target, 15% allies)
Emergency Meds
Single Ally
250% / 350% / 450%
+0%
+7
4
N/A
N/A
Hazard Zone
All Enemies
60% / 75% / 95%
+0%
+10
4
N/A
Blinded (60% / 65% / 75%), Exposed (60% / 70% / 75%)
Irradiate
Single Enemy
110% / 125% / 145%
-10%
+5
0
N/A
Afflicted (75%)
Mass Paranoia
All Enemies
50% / 65% / 85%
+20%
+10
4
N/A
Confused (70%)
Psionic Blast
Single Enemy
100% / 115% / 135%
+0%
+5
0
N/A
Confused (80% / 85% / 90%)
Prestige Subclasses
Chaos Theorist
Chaos Theorists get an aquamarine uniform and the most varied set of powers. Force Targeting lets you force an enemy to immediately use a power of your choice. This is most useful when you want to prevent them from performing a specific action. For instance, you can force the enemy to waste a healing power on a fully healthy enemy, or you can use a basic power instead of Regurgitate. Reflective Shield causes 50% of the damage taken by the ship to also be inflicted on the attacker. It lasts 4 rounds. It is useful when fighting bosses. Dimensional Inversion increases Revenge by 50. That results in the increased damage proportional to damage taken. This is useful for those who are using Weapons Supercharge and expect to be spending a lot of time in Critical Condition. Dark Matter Storm does 105% damage to all enemies for each of two rounds, and heals the user for the same 105% damage for two rounds. You do not get three times the healing. This power also has a warmup of 2 rounds and an additional half turn of recovery.
Name
Target
Damage
Threat
Cooldown
Exploits
Inflicts
Force Targeting
Single Enemy
0%
+10
7
N/A
N/A
Reflective Shield
Single Ally
0%
+8
6
N/A
Reflective Shield
Dimensional Inversion
Single Ally
0%
+0
5
N/A
Dimensional Inversion
Dark Matter Storm
All Enemies
45%
+12
6
N/A
Crew Panic (35% target), Dark Matter Extraction (target), Siphoning Dark Matter (self)

Commando
Commandos get a brown uniform and the only prestige power that can be upgraded. Guard Ally causes the ally to be Guarded for 3 rounds. This prevents the Guarded ship from taking damage. Combine with Dimensional Inversion to get high power from Critical Condition. The Focus Fire powers are more complicated than normal powers. The Rev Up power enables the other powers. The Rev Down power re-enables your normal powers after using Focus Fire. Focus Fire only has 1/3 of the recovery time, not the 1/2 it claims. For the base power, that means getting all 3 attacks off in one turn's amount of time. The upgrades have 5 or 6 attacks before you have to Rev Down. Since revving up and down costs one turn for each action, the base power isn't very useful unless you can finish off the enemy before needing to reload, or you use Weapons Supercharge after Rev Up but before Focus Fire. The upgraded versions can hold their own, but the last upgrade may not be worth the skill point unless you use this power a lot.
Name
Target
Damage
Threat
Cooldown
Exploits
Inflicts
Guard Ally
Ally Only
0%
+0
5
N/A
Gaurded
Rev Up
Single Enemy
0%
+5
0
N/A
N/A
Rev Down
Self
0%
+0
0
N/A
N/A
Focus Fire
Single Enemy
125%
+5
0
Engines Down
N/A

Counselor
Counselors get a purple uniform and the most straightforward set of powers. All four Auras have no warmup, no cooldown, no recovery, and +3 threat. (Which means you can get ridiculous threat if you can stand the animations. Or if you turn them off.) They last 3 rounds, or until you cast a different Aura, whichever comes sooner. Meditation Boost provides +20% Aim and +10 Evasion to your fleet. This is worth grabbing even if you don't get the others. Subtle Encouragement provides +25% resistance to the seven basic status effects. Microagressions decreases the enemy fleet's damage output by 15%. Psych Up increases your fleet's damage output by 15%.
Cheats (don't do this!)
Basic cheats:
First go into settings gameplay then dev mode then close that and press ` and please reevaluate your life if you do this man...

GenerateOfficer("officer name", GetFaction("terran"))
CreditResource('crew', 999999)
CreditResource('materials', 999999)
CreditResource('dark_matter', 999999)
CreditResource('fuel', 999999)
CreditResource('drones', 999999)

Achievements pt. 1
Knowledge is power
do the tutorial and you got it.


The Sacrificial Lamb
you have to- to... lose a green shirt! :(((( i still remember the artificially generated name of my first dead one it was... uhh.... UHH......


Acceptable Losses
Lose 10 green shirts in combat Makes sense.


Collateral Damage
Lose 25 green shirts ok ok you can do that pretty easy.


Valar Morghulis
Lose 50 green shirts? why?? do you devs just hate them or something? and if you do hate them why not figure something out?


Damnit, Jim. I'm a Doctor, Not An Undertaker!
Kill 100 Green shirts just execute them! Hey devs hey devs you hear that? its the sound of achievement hunters crying!


Blanket Fort Baron
Build a single base room #officeracademyftw!


City Planner
Build 3 rooms easy!


King of the Castle
Build 10 rooms ez gg ez ez xd


And Caesar Wept
Build 20 base rooms np np xd xp


Savvy
Research 5 techz EZ GG BOYZ


Erudite
Research_technolog- i mean research 10 tech pretty easy.


Technological giant
Research 20 technologies not TOO hard to get but you could miss it in a speed run or something but if you were doing that you probably already had this?


Chruul to be Kind
Destroy 10 chruul ships rekt xd xd


Goodbye, Chruul World
Destroy 25 Chuurl ships. yeah ya know?


Chruul and Unusual
Destroy 100 chruul ships.. HAHA TAKE THAT YOU STUPID NOT MY REAL ENEMY BEING CONTROLLED SUCKERS!!!!


Bandit Hunter
Destroy 10 Pirate ships wait a minute that didn't have a funny title...


Taking Back The Skies
Destroy 25 Pirate ships oh jeez i'm so tired man but i must *YAWN* go on


The Flying Dutchman
Destroy 100 Pirate ships. these guys aren't our enemy for like 2/3s of the game how did i kill so many?


Growth Industry
Recruit 10 officers thats pretty difficult but you'll do it!


Beam Us Up, Ensign
Have an officer reach level 2... PRETTY HARD AM I RIGHT xDDD


Go To Warp, Lieutenent
Have an officer reach Level 5 PRETTY HARD AM I- *snores*


Make it so, Number one
Have an officer reach level 10 not hard unless you play games for like 1 hour then quit werido.


All Hail Your Reptillian Overlord
Make an ally of the Yabblings, All you are base is belong to us killian.


Crocodile Hunter
Make a enemy of da yabblings... lets face it a destroyed damage useless battered old reminet of a federation could still squash even the strongest of enemy empires.


There Is No Spoon
Make an ally of the blah blah blah turns out the korzan are only minorly telepathic but are very empathetic pretty cool right?

Dissenter
Make a enemy of the Korzan well my dog doesn't like this one and he said that he would crush my skull when its still inside my head... does anyone know why?


Tech Support
Make an ally out of the Collective. man there is a lot of these aren't there these are like really hard to make because i gotta painstakingly just steal these photos and slowly upload them.


Cascade Failure
Make an enemy of the Collective turns out their ships are REALLY rare to see around well atleast in my experience.


Naturally Selected
Make an ally of the Xlar-Yanthu union suprisingly these guys have always been my closest ally always having 100 diplomancy with me...


Survival of the Fittest
Make an enemy of the Xlar-Yanthu...


HR Nighmare
Lose 10 officers in the line of duty... i think i lost like 3 officers TOTAL


Embrace the Suck
Make an ally of the Voraash. FINALLY SOMETHING I CAN HELP WITH! ok so when you encounter a Voraash fleet in federation space engage it but immediatly retreat and a dialog option will appear!


The Importance of Being Wormest
Make an enemy of the Voraash. who can't do this?


Frog John Silver
Make an alliance with the pirate Willa just attack one of the pirate clans and whatever


I'll Be Back
Make an alliance with the pirate Savak just attack one of the pirate clans and whatever


Last of the Xlar Lords
Make an alliance with the pirate Khut just attack one of the pirate clans and whatever


There Will Be No Peace
Don't Ally with any pirate captains


No Place Like Home
Defeat The Chruul At New Terra


Spare the Rod and Spoil the Chruul
Destroy the chruul spawn pit


Admirexecution
Kill the admirax >:)


One Star Ship
Have a ship Reach Rank one.


Two Star Ship
Have a ship Reach Rank two.


Three Star Ship
Have a ship Reach Rank three


Four Star Ship
Have a ship Reach Rank four What a legend


Tier 1 Ship
Build a Tier one ship... but you already have one...?
Mid Game (Spoiler is blacked out)*
Goals:

1: Establish further good relations with all factions
2: Build every single drone ever if you want to quit sending ships to all those colonies
3: Tier 4 and 5 ships
4: Recovering legendary officers to use with your fleet

Good relations
The only part to doing this is the quests they give you always do them eventually and always save their colony's/mines (you can get diplomacy and minerals) it is also suggested you say nicer things to people because they will like you better :)


DRONES DRONES DRONES!!!!
Build a lot of those :)

Tier 4/5 ships
Part of building/using these is leveling your officers with simple or important fights with chruurl next is getting them tasty minerals (it will be easier if you restore every building possible)


Legendary officers
With the inclusion of a part of the guide that already goes over these i will give extra tips:

1: Stick around the korzin they will have the quest that leads to suki
2: Search EVERYWHERE for xiao
3: Be careful sometimes these officers can die in simple missions meaning you lose one of the best people around for that.
Ship Overview*
Ship Tier
1
2
3
4
5
Minimum Officer Level
1
4
7
10
13
Strength Rating
10
17
30
49
74
Stats
  • Hull When this reaches 0, the ship goes into Critical Condition. When in Critical Condition, any damage whatsoever can destroy the ship. The chance of destruction increases with the amount of damage taken.
  • Damage This is the base that powers multiply off of. The actual damage range is visible when selecting a target during battle.
  • Aim This is the chance of hitting your target if the opponent has 0 evasion. Some powers have reduced values.
  • Evasion Each point of evasion decreases the opposing aim by 1.
  • Speed Higher values yield more turns in a given space of time.
  • Critical This is the chance that any given attack does twice as much damage as it otherwise would have.
Strength Rating
When an enemy fleet reaches a sector with more than one Terran fleet, it will engage the fleet with the higher total strength rating first. See table above.
Threat
Threat is used by enemies to pick their targets. Each ship starts battle with a certain amount of threat, see the table. That number is increased by most powers, but the increase is erased at the end of the battle. When an enemy ship selects a single target (as opposed to when it uses an AoE attack), it picks one at random (Ship A). It then compares the threat on Ship A, multiplied by a random number between 0.75 and 1.25, to the threat on each of the other two ships. If either of the other ships has a higher threat after that test, the enemy has an 80% chance of switching its target selection to the new ship. In practice, this means that tank ships will not receive all attacks, but will absorb most of them. A ship with extremely low threat will get about 1% of single-target attacks, but will still get all of the AoE attacks. Shuttles start with 50 threat.

Tier
Tactical
Science
Engineering
1
80
100
120
2
130
150
170
3
180
200
220
4
230
250
270
5
280
300
320

Elite Crew
When a ship acquires enough XP (higher tier ships need extra), you will get a notification indicating that a new Cadet, Crewman, Petty Officer, or Ensign has joined the ship. Elite Crew provide stat boosts to that ship only. They are lost when scrapping the ship.
Tactical Ship Powers
All tactical ships can use any of the tactical powers that you've unlocked. The tiers listed refer to the hanger that unlocks the power. Harass does not have the +5% Critical and -20% Aim that it did before. (If the game updates to include those, you will see a decrease in aim. That's when you'll know the crit boost is active.) Vulnerable is not removed by Teleport Explosives. Triple Shot has -15% Aim. If your tactical ship has increased Aim, the damage boost is totally worth it.
Power
Tier
Target
Damage
Threat
Warmup
Recovery
Cooldown
Exploits
Inflicts
Harass
1
Single Enemy
125%
+5
0
0
0
Sensors Offline
N/A
Bullseye
1
Single Enemy
125%
+5
0
0
0
Vulnerable
N/A
Crippling Shot
1
Single Enemy
100%
+5
0
0
2
N/A
Engines Down (95%)
Disabling Strike
1
Single Enemy
110%
+5
0
0
2
N/A
Weapons Disruption (95%)
Teleport Explosives
1
Single Enemy
25%
+5
0
0
0
Vulnerable
Sabotage (95%)
Triple Shot
1
All Enemies
85%
+10
2
0
5
Vulnerable
N/A
Targeting Support
2
All Allies
0%
+0
0
0
4
N/A
Targeting Support
Focused Beam
2
Single Enemy
100%
+5
0
0
3
Sensors Offline
Weapons Disruption (35%)
Strafing Run
3
All Enemies
75%
+10
2
0.5
4
N/A
Engines Down (95%)
Missile Swarm
3
All Enemies
75%
+10
2
0.5
7
N/A
Weapons Disruption (95%)
Munitions Backfire
4
Single Enemy
50%
+5
0
0
4
Sensors Offline
Weapons Disruption (95%), Munitions Backfire (95%)
Seeker Missilies
4
Single Enemy
90%
+5
0
0
4
N/A
Engines Down (95%), Pulse Mesh (95%)
Pulse Mesh
5
All Enemies
75%
+10
2
0
5
Sensors Offline
N/A
Countersnipe
5
Single Enemy
110%
+9
1
0
5
Vulnerable
Engines Down (95%)
Munitions Backfire deals 45% damage for each of 3 rounds.
Pulse Mesh deals 30% damage for each of 2 rounds.
Sabotage deals 38% damage for each of 4 rounds.
Targeting Support adds +25% damage output for 4 rounds.
Science Ship Powers
Cauterize Hull removes Hull Breach, the Voraash's Vampire effect, and the Yablings's Parasitic Lash effect.
Power
Tier
Target
Damage
Threat
Warmup
Recovery
Cooldown
Exploits
Inflicts
Portal Cannon
1
Single Enemy
125%
+5
0
0
0
Hull Breach
N/A
Incisor Beam
1
Single Enemy
125%
+5
0
0
0
Vulnerable
N/A
Upload Virus
1
All Enemies
40%
+10
2
0.5
5
N/A
Sensors Offline (75%)
Disruptor Beam
1
Single Enemy
110%
+5
0
0
2
N/A
Crew Panic (95%)
Cauterize Hull
1
Single Ally
600%
+7
0
0
0
N/A
N/A
Adaptive Armor
1
All Allies
150%
+12
0
0
0
N/A
Adaptive Armor
Protective Field
2
All Allies
0%
+5
0
0
5
N/A
Protective Field
Torture
2
Single Enemy
50%
+5
0
0
4
Weapons Disruption
Torture
Void Spatter
3
Single Enemy
50%
+5
0
0
4
N/A
Crew Panic (95%), Void Spatter (95%)
Systems Overload
3
Single Enemy
100%
+5
0
0
2
N/A
Sensors Offline (95%)
Warp Storm
4
All Enemies
85%
+10
2
0
4
Hull Breach
N/A
Psionic Storm
4
All Enemies
75%
+10
2
0.5
6
N/A
Crew Panic (95%)
Gravity Well
5
Single Enemy
150%
+5
1
0
5
Hull Breach
Sensors Offline (95%)
Overwhelm Core
5
Single Enemy
90%
+7
1
0
6
Weapons Disruption
Crew Panic (95%), Overwhelm Core (95%)
Adaptive Armor provides 75% healing for each of 3 rounds and +10% damage resistance.
Overwhelm Core deals 90% damage for each of 3 rounds.
Protective Field provides +30% damage resistance for 3 rounds.
Torture deals 150% damage for each of 2 rounds.
Void Spatter deals 90% damage for each of 3 rounds.
Engineering Ship Powers
Engineering heals remove all debuffs. Instant Repairs is only a good choice when you already have Repair Drones selected, or if you don't want to waste the Repair Drones.
Power
Tier
Target
Damage
Threat
Warmup
Recovery
Cooldown
Exploits
Inflicts
Flak Barrage
1
Single Enemy
125%
+9
0
0
0
Engines Down
N/A
Disintegrate Hull
1
Single Enemy
125%
+9
0
0
0
Crew Panic
N/A
Deconstruct
1
Single Enemy
50%
+9
0
0
2
N/A
Hull Breach (95%)
Disable Countermeasures
1
Single Enemy
90%
+9
0
0
2
N/A
Vulnerable (95%)
Shock Mine
1
Single Enemy
50%
+13
0
0
5
Crew Panic
Ship Disabled (95%)
Repair Drones
1
Single Ally
400%
+14
0
0
0
N/A
N/A
Release Mines
2
All Enemies
75%
+17
2
0
4
Engines Down
N/A
Brace
2
Self
0%
+20
0
0
4
N/A
Brace
Instant Repairs
3
Self
300%
+9
0
0
2
N/A
N/A
Eruption
3
All Enemies
85%
+30
2
0
4
Crew Panic
N/A
Acid Bombs
4
All Enemies
60%
+30
2
0.5
5
N/A
Hull Breach (95%)
Shield Disruptor
4
All Enemies
50%
+25
2
0.5
5
N/A
Vulnerable (95%)
Demolish
5
Single Enemy
100%
+11
1
0
5
Engines Down
Hull Breach (95%)
Engulf
5
Single Enemy
125%
+11
1
0
5
Crew Panic
Vulnerable (95%)
Brace adds +50% damage resistance, +100% threat for 3 rounds.
Ship Line Overview*
Each new hanger unlocks the next ship in each line. Higher tier ships have increased Hull, Damage, Threat, Strength Rating and build costs, but no other change. The Proportional Damage listed gives an easy means of comparison. The actual ranges are given below with the hull values.

Stats
Rogue
Marksman
Knight
Warder
Acolyte
Disciple
Aim
103
103
100
100
97
97
Evasion
6
0
3
-3
3
9
Speed
48
53
42
47
55
60
Proportional Damage
5
6
5
4
4
3
Critical
2.5%
5%
2.5%
4%
1%
0%
Resistances
Sensors Offline
+5%
-5%
-15%
-25%
+25%
+15%
Engines Down
-5%
+5%
-25%
-15%
+15%
+25%
Crew Panic
-25%
-15%
+25%
+15%
-5%
+5%
Hull Breach
-15%
-25%
+15%
+25%
+5%
-5%
Ship Disable
+0%
+0%
+0%
+0%
+0%
+0%
Vulnerable
+25%
+15%
-5%
+5%
-25%
-15%
Weapons Disruption
+15%
+25%
+5%
-5%
-15%
-25%
The Marksman Line
Marksmen are the offensive line of tactical ships.
Name
Hull
Damage
Crew
Dark Matter
Marksman
450
65-95
45
550
Archer
720
112-182
120
1300
Ranger
1153
214-328
220
2300
Hunter
1902
342-525
350
4000
Commando
3138
547-840
575
6750
The Rogue Line
Rogues are the defensive line of tactical ships.
Name
Hull
Damage
Crew
Dark Matter
Rogue
550
53-83
50
500
Ronin
897
90-154
125
1250
Assassin
1470
176-278
225
2250
Ninja
2426
281-445
375
3750
Matador
4003
450-711
625
6250

The Acolyte Line
Acolytes are the damage-oriented science ships.
Name
Hull
Damage
Crew
Dark Matter
Acolyte
700
38-68
40
600
Magus
1120
66-124
100
1500
Conjurer
1792
128-223
180
2700
Enchanter
2957
205-356
300
4500
Thaumaturge
4879
328-570
500
7500
The Disciple Line
Disciples are the support science ships.
Name
Hull
Damage
Crew
Dark Matter
Disciple
600
27-57
35
650
Sorceror
960
45-100
90
1600
Witch
1584
87-180
160
2900
Warlock
2614
139-287
250
5000
Wizard
4312
222-460
425
6750
The Knight Line
Knights are the slowest ships in the Terran fleet, but they have the evasion of an Acolyte and similar damage to a Rogue. If you decide not to include a Tactical ship in your main fleet, you want one of these.
Name
Hull
Damage
Crew
Dark Matter
Knight
740
51-81
60
400
Crusader
1184
88-146
150
1000
Paladin
1894
171-262
270
1800
Protector
3126
274-420
450
3000
Champion
5158
438-672
750
5000
The Warder Line
Warders offer decent speed and the strongest hull available. They are good for support and tank roles. Since they have better resistances to Hull Breach and Vulnerable than Knights, they are also good for officers with Death From Above, Ramming Speed, and/or Broadside Salvo.
Name
Hull
Damage
Crew
Dark Matter
Warder
840
39-69
65
350
Guardian
1361
66-124
160
900
Gallant
2210
131-224
290
1550
Exemplar
3646
210-358
500
2600
Paragon
6017
336-572
825
4400
Achievements pt. 2 (lots of spoilers)
Tier 2 Ship
Build a tier 2 ship.


Tier 3 Ship
Build a tier 3 ship.


Tier 4 Ship
Build a tier 4 ship.


Tier 5 Ship
Build a tier 5 ship.


(Spoilers ahead!)


My Other Ship is a Pegasus
Killed the Chruul Chimera.


Laying Waste
Killed the Chruul Desolator.


Delivering the Crushing Blow
Killed the Chruul Crusher.


Ma-Ma-Ma-Monster Kill!
Killed the Chruul Behemoth.


Terminal Killocity
Killed the Chruul Marauder.


Chruuling the Herd
Killed the Mothership.


You Had One Job.
During the tutorial you will have the option of well uhh ya know


Bebt Inheritance
Why on earth are we liable for that loan i mean seriously? we are the only contact? we don't represent the federation anymore not to mention you can't bill a different planet for one planets loan!

O'Briens Conservation Society
Successfully Cloned a irish space person? wait how can irish names still exist by the time we reach the stars our entire civilazation will have melded destroying and chance of this name existing or the writers were watching that one family guy episode or whatever.


Help! Help! We're Being Repressed!
Rescue 5 colonies from a Chuurl fleet. lol u guyz hav shutlz right? to go 2 ur homz? y no use dem for give us money?


All in a Day's Work
Rescue 15 colonies from a Chruul fleet. Hey shouldn't we put in place some kind of defense system that like damages the enemy fleet while they bombard?


Savior of the Stars
Save 30 colonies from those dirty reds! Hey can't we set up a natural convoy with like a normal ship? not have to build a drone that can be destroyed and magically reapears.


Restored Balance
Successfully beat the game on Cadet difficulty.


Boldly Went
Successfully beat the game on Lieutenant difficulty.


Knows Where Their Towel Is
Successfully beat the game on Commander difficulty. COMMANDER WE ARE UNDER HEAVY FIRE CALL IN A AIR STRIKE
you mean a space strike right? >:(


Galaxy Guardian
Successfully beat the game on Captain difficulty.


Champion of New Terra
Successfully beat the game on Admiral difficulty. oh god i'm finally done jeez man...


Hero of the Stars
Sucessfully beat the game on Grand Admiral difficulty. Yep now you have to do this if you want 100% achiements
Late Game (Spoiler free)*
Goals:
1: Have as many high level fleets tier 5 as you can muster
2: Use the foundry to increase strength of halcyon 6
3: Level every officer up as high as you can and get a engineering officer for extreme repairs.

Tier 5 fleets
It is best to have 3 because when you get to the last boss battle all the people with 100 diplomacy will give you a officer to use with a ship like i usually say minerals need to be gotten in high quantaties

Halcyon six fortifications
So it turns out the foundry was actually useful ;) and that means you just need to build drones (A LOT) and do everything you can to make it stronger

Leveling and repair bay droning
Leveling officers up is easy just fight bad guys and use levels to increase starting levels
but one sad thing you will need to do is make a officer only for repairing halcyon 6 and nothing else

The Final Battle
The motherships sends mutiple fleets to the artifacts but if you play your cards right you can get there faster with the help of a artifact that used to belong to your station you will move faster.

When you get there your officer is not gonna be fast enough to finish finding it so you will fight without that officer and you HAVE to because they will send anotherone and it will get there.

(If you don't want to fight without one officer, send a single-ship fleet with the officer who will do the task. The three-ship fieet will cover, as of a recent update.)

With the help of those tier 5 fleets and alien fleet you can destroy all incoming fleets and get the artifacts then it will be a fight with the mothership.

Don't stay and fight the whole battle retreat when it is the right time. If you don't retreat, bring some of the alien consumables to buff your stats and a bunch of Omega Drones to keep you alive however your cauterize hull is going to be drained pretty quick

Q&A (Minor spoilers)*
Q: What officer should i pick on starter?

A: Almost always engineering for starters unless it is a harder difficulty such as captain or above choose science because he heals people very greatly as his epic


Q: Bucky rogers can't leave halcyon?

A: He can pilot a shuttle and use that to get around but... don't get in fights with it


Q: Shuttle's purpose?

A: Well for the most part nothing they can only do pitiful amounts of damage and survive little to none themselves,
but... but you can use them for officer transport doing something on a planet and being helped by a fleet.
They can also be used to very easily rebuild and upgrade colonies mineral plants and fuel plants not to mention carrying minerals back to Halcyon quickly.
Tier 1 or 2 ships are also good for the same tasks, but sometimes they aren't ideal. See "When is scrapping ships a good idea?" below.

Spoilers ahead:

Q: How do i ally with the Voraash?

A: Quite simple, if you didn't see the answer in the achievements section i can tell you. When the voraash attack one of your facilities you must simply retreat before firing a single shot then go back to them, dialogue will appear
(it is also a easy way to not fight the crazy OP weapons and resistances they have).


Q: When is scrapping ships a good idea?

A: When you need more crew. Old ships are good for your secondary fleets and all the tasks that shuttles are good at (barring Bucky transport), but they have a sizable amount of crew. If you still need the ships for non-combat purposes, build shuttles as replacements. (You will always get enough resources from the scrap job.)
Secrets and cool stuff
Xlar Sub-species
Norch, Kotoro, Sloggoth, GOR, Trag, Tegida, Kagga

Tegida, and Sloggoth Xlar still exist and are active but it is fairly possible that all of these species are still living in some place

Space event secrets:

Cadets Long lost relative:
This is a bambozle by the chruurl- i mean chruul but you can learn something cool aprently this strange thing can happen:

"Using the Korzan psychic device, your science team is able to isolate the psychic signal that was reaching out to the distressed cadet: an ancient artifact originating from what must have been the same space-faring race that built Halcyon 6 itself!"

Yabbling chruurl- chrrul:
"Your fleet has encountered a fleet of Yabbling-spliced 'Lizard' Chruul who seem to have adopted some of their parent race's characteristics. In their own primitive way, they seem to want to sell you a Chruul organ and inflated prices."

Pretty strange stuff this means that the chrrul can integrate other species so good they can escape the grips of the hive mind controlling them!

Bucky Rogers:
"Bucky Rogers pre-allergic-reaction-to-learning-serum backstory is, in reality, terribly fascinating. He waits patiently for the day that someone might ask him about it. However, because of his green uniform, nobody does." This guy is just a officer like cadet thats it
66 Comments
MongooseCalledFred  [author] 9 Dec, 2023 @ 8:53pm 
There's a tech for a Tier 5 hangar, should be immediately after the Tier 4 hangar, which won't be available until you reach Act II.
yangsunny 6 Dec, 2023 @ 11:32am 
stupid question, I just finished my first playthrough on lieutenant difficulty. But I didnt have the option to build tier 5 ships, is this only available on higher difficulties or did I miss something? Certain technology or something?
CiaphasCain 18 Oct, 2019 @ 11:13pm 
Okay so this guide talks about everything there is, but how about some advice on which classes and ships to build? Also which skills and optimal reroll results. Finally good fleet combinations and combos? Thanks btw.
Garwain 4 Oct, 2019 @ 1:26pm 
The guide states about the warder line:
"Since they have better resistances to Hull Breach and Vulnerable than Knights, they are also good for officers with Death From Above, Ramming Speed, and/or Broadside Salvo."

Either I am dumb and don't understand resistances in this game or that is an error. The crusader (Knight Line Tier 2) has +50% Hull breach and -25% vulnerable. The Guardian (Warder Line Tier 2) has +15% Hull breach and -50% vulnerable.

I always assumed that positive resistances were higher resistances? so the knigh line has the better resistances for hull breach and vulnerable?
Marisa Fan  [author] 31 Aug, 2019 @ 6:12am 
huh
Cuthawolf 29 Aug, 2019 @ 1:22am 
Might be a bug; but you can put Bucky Rogers on the Precursor ship. He never gets ship powers of his own, but that doesn't stop him from being able to use the ones the ship provides.
MongooseCalledFred  [author] 19 Jul, 2019 @ 6:14am 
It does appear like Counselor isn't as much part of that section. I'll try and find some time to pop one in.
music98god 19 Jul, 2019 @ 12:19am 
may be mute but you don't have a spreadsheet under Counselor like the other classes. It just bugged me because it makes Counselor seem like less of a choice.
PunkSteve 27 Jun, 2019 @ 11:25am 
Cool, thanks. :ss13ok::cybereye:
& it's Sale Time. :reexcited:
Marisa Fan  [author] 27 Jun, 2019 @ 10:12am 
Yeah, there are some i'm unsure if i have included them however.