Space Engineers

Space Engineers

Not enough ratings
How to Make and Convert DDS Icons for the GUI
By DranKof
Transparency doesn't work when just exporting DDS files from GIMP or Paint .Net. Though you can use PNG files, there might come a time when you need to use a DDS file. If you ever do need to use DDS files, this guide can show you how to do it.
   
Award
Favorite
Favorited
Unfavorite
Background (Optional Reading)
Formerly when you wanted to add icons to the Graphics User Interface (GUI) in Space Engineers (SE), you had to use the same DirectDraw Surface (DDS) file type that is normally used for surfaces on 3D models. The DDS file type has generally not been natively supported by most art programs and especially not in the exact format that SE requires.


Because of this, for a while, Keen included a converter that allowed for the conversion of various commonly used file types into DDS files. Yet as of SE v1.179.x, the converting exe files were no longer included in the SE SDK or regular SE game package. Apparently, some time before the end of this year (2019) with the current version being 1.193.x, they have started including the conversion files again so that somewhat obsoletes the purpose of this guide as knowing that you're even supposed to use them, where to get them, and what parameters to use with them were really the largest obstacles.

That's assuming you're using a DDS file at all. PNGs take that and throw it out the window.


Although Keen has now re-included the primary EXE file that you need to add transparency, what makes things super easy is that that SE now natively supports PNG files with transparency so you don't even have to convert your PNGs into DDS to begin with.


But a need still might arise in the future where you need to convert DDS files between different formats. Whether Keen decides to stop supporting PNG files (not impossible) to optimize the code or whether you're working on an entirely different DDS project, this guide should help you make DDS files and then remake them into another form of DDS files. Yay!

TL;DR
Use PNG files.
Gimp or Paint .Net?
Side Note: "Paint dot Net" gets incorrectly auto-formatted by Steam into a hyperlink: Paint.Net -- this cannot be avoided -- and as the domain "paint.net" is not actually affiliated with the makers of Paint.Net, I will call it "Paint .Net" as a workaround for this guide.

So which one should you use?

If you're using PNGs, you should keep on using whatever you're using and you may ignore this guide. If you need to work with DDS files for SE for any reason, before you begin you should decide which art program you want to use.

If you don't have either program and you just need to convert files, use Paint .Net. It's much more user friendly. If you're actually going to need to do a lot of image editing, it would probably be a better idea to learn GIMP.

Other Notes:
  • I last tested GIMP v2.10.6 , version 2.10.14 was the most recent when writing this article.
  • I last tested Paint .Net v4.2.5 , which was the most recent version when writing this article.
  • As of writing this (2019), the DDS plugins for both had not been changed AFAIK since 2017, so versions shouldn't really matter for those.

If using Paint .Net, continue to Part 1 - Method 1.
If using GIMP, SKIP TO PART 1 - METHOD 2.
Part 1 - Method 1 - Paint .Net
Paint .Net is a little easier to use than GIMP and feels like a much lighter program than GIMP. If all you're doing is converting files, I suggest just using this one.

1) Download and install Paint dot Net[www.getpaint.net].

2) Download and install the DDS plugin[github.com].

3) Draw and save your beautiful image as a DDS file.

4) When exporting the DDS file, use these settings:
  • BC3 (Linear, DXT5)
  • Error Metric: Uniform
  • Cube Map: False
  • Generate Mip Maps: True ... w/ Super Sampling works for me.

SKIP THE NEXT SECTION AND GO TO PART 2.
Part 1 - Method 2 - GIMP
If you're actually making your own custom images, you probably already are using GIMP.

1) Download and install GIMP[www.gimp.org].

2) Download and install the DDS plugin[code.google.com]

3) Draw your beautiful image.

4) When exporting the DDS file, use these settings:
  • Compression: BC3 / DXT5
  • Mipmaps: Generate Mipmaps

Continue to Part 2.
Part 2 - Make Transparency Work
For some reason, none of the DDS plugins above output a file that allows SE to automatically recognize the alpha (transparency) layer. That's probably why Keen (usually) includes the utility "texconv.exe" with their game.

5) Create a folder "texcon" with a full file path that has no spaces.
  • The name doesn't really matter as long as there are no spaces. I ran mine in the folder: "D:\Development\SE\texcon".
  • (Having spaces in any folder such as a parent folder "SE Modding", for instance, might make it not work. For some reason when I tested this program wouldn't work for me even when I used quotation marks.)

6) Create two more folders inside your "texcon" and name them "Textures" and "TexturesOut".
  • The names are up to you, but you'll have to change references to them in steps 9 and 10 below if you use anything else.

7) Copy "texconv.exe" into your "texcon" folder.

8) Add two plain text files to your "texcon" folder and rename them "convert.bat" and "analyze.bat".

9) Copy and paste this into "convert.bat":
texconv -f BC7_UNORM_SRGB -if LINEAR -sRGB -y -o TexturesOut -pmalpha Textures\*.dds ren TexturesOut\*.DDS *.dds pause
  • 9b) Rename folders "Textures" and "TexturesOut" if you used something else.

10) Copy and paste this into "analyze.bat":
texdiag info *.dds texdiag info Textures\*.dds texdiag info TexturesOut\*.dds pause
  • 10b) Rename folders "Textures" and "TexturesOut" if you used something else.

11) Place your DDS GUI images into folder "Textures".

12) Run "convert.bat".
  • It will display text telling you that it's working, if you see nothing at all (or an error message like, file not found), leave a comment!

13) Place DDS files in "TexturesOut" where they should go in your mod directory tree.
  • Example: "{your mod}\Textures\GUI\Icons"

You're finished.
Troubleshooting
Different problems have different solutions. These are the most obvious ones I can think of.

If the image is purple, discolored or missing entirely:

The "analyze.bat" file that I included in the process above should help you confirm that the files have been converted properly. If you didn't get it earlier, you can get the program texdiag.exe here[github.com].

When you run it, you should see this:
ore_cattierite.dds width = 128 height = 128 depth = 1 mipLevels = 8 arraySize = 1 format = BC7_UNORM_SRGB dimension = 2D alpha mode = Unknown images = 8 pixel size = 21 (KB)

Anything else probably won't display quite right in SE.
If you have different values, double-check your command or export method and try again.


Also, if you are not seeing anything:

Double check the file paths.


If you have errors reported on your custom mod:

Carefully read the error in detail and hopefully you'll know how to act accordingly.

Speaking of custom mods, below is one that you can compare with to see how I used this information.
Try it Yourself!
I mostly made this guide for myself because every 3-9 months, whenever I come back to my mod I forget how to do things, and the problem of the texture converter having gone missing almost made me give up on updating it entirely.

If you want to download a mod that uses custom textures to see how they are implemented, you can download (by hitting "subscribe") a mod I made called "Better Stone":
https://steamhost.cn/steamcommunity_com/sharedfiles/filedetails/?id=406244471
I am happy for you to modify and test it to your heart's content, you can even re-upload it if you like, just be sure to change the name!

(After you subscribe, Steam should download the mod, if it doesn't, make sure the game is closed, unsubscribe, and subscribe again. If it still doesn't, start up a game world with the mod enabled and SE will downloaded it if it hadn't already.)

Use 7-Zip[www.7-zip.org] to open the file: C:\Program Files (x86)\Steam\steamapps\workshop\content\244850\406244471\942833257750452932_legacy.bin
(The exact path may vary depending on where you installed Steam on your computer. -- The exact name of the .bin file might change with updates, but it should be the only file in that folder.)

Feel free to unpack, explore and learn how to make your own textures or new in-game items!
Special Thanks
Special thanks go out to the following people:

@NorcaSystems for letting me know that an update on Space Engineers moved the mod folder to a new directory in the Steam Program Files folder.
@Gopher for letting me know that PNGs were natively supported by SE now.
@playhard45 for letting me know that Paint .Net has a DDS plugin that works even better.
@Digi for letting me know that Microsoft's GitHub link became a horrible mess and that Keen was re-including the executables with recent updates.
@Snow~ Thanks for the heads-up:
There is a .dds mod for Photoshop CC that also allows you to do Part 1 yet a 3rd method:
https://www.nexusmods.com/skyrim/mods/76482/
If Photoshop CC is your thing (I haven't tested yet), this should work, too! Thanks for the info and I will try to keep track of this method, too.

In closing...

If you see anything else, let me know, I will try to update! (Sorry if it takes me something like 3 months to respond...*cough cough sorry great tip though Gopher cough*.)
If you think I skipped over anything that really needs more explanation, let me know about that, too.
Thank you very much for reading this guide.
27 Comments
g. 9 Dec, 2023 @ 11:28am 
This guide is great - thanks alot
Valiant Maverick 23 Aug, 2021 @ 10:17pm 
These days, GIMP and DDS don't mix.
Stollie 13 Apr, 2020 @ 6:29am 
The DDS plugin mentioned in this guide is old and only supports BC3 whereas SE uses BC7 for the most part these days.

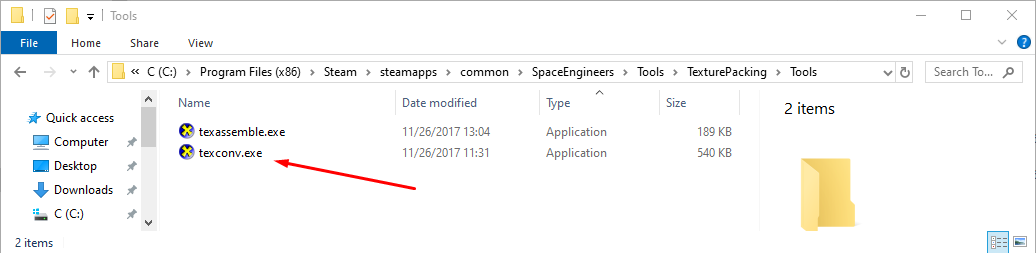
The DDS plugin/script made by Equinox uses texconv.exe in a python script to convert the files 'on the fly' for you behind the scenes.

Check Shaostouls guide on YouTube for how to set it up (https://www.youtube.com/watch?v=mE6mbsQff8k)

Lastly, join the offical keen Discord #modding-art channel for assistance etc. in regards to textures and modelling if you get need help/get stuck.
Stollie 13 Apr, 2020 @ 6:24am 
FYI's for anyone that lands here: -

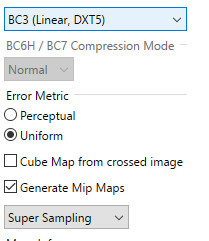
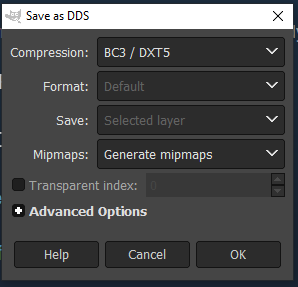
1.) BC3 is apparently not a lossless format so you actually lose quality when converting from BC7 to BC3. Convert to TIF or PNG instead for you editor (GIMP etc.) then back to BC7 for your in game texture or simply keep a copy of the texture in both formats.

2.) Paint.NET doesnt support alpha channels in the way SE uses them so is pointless to do texture work in.

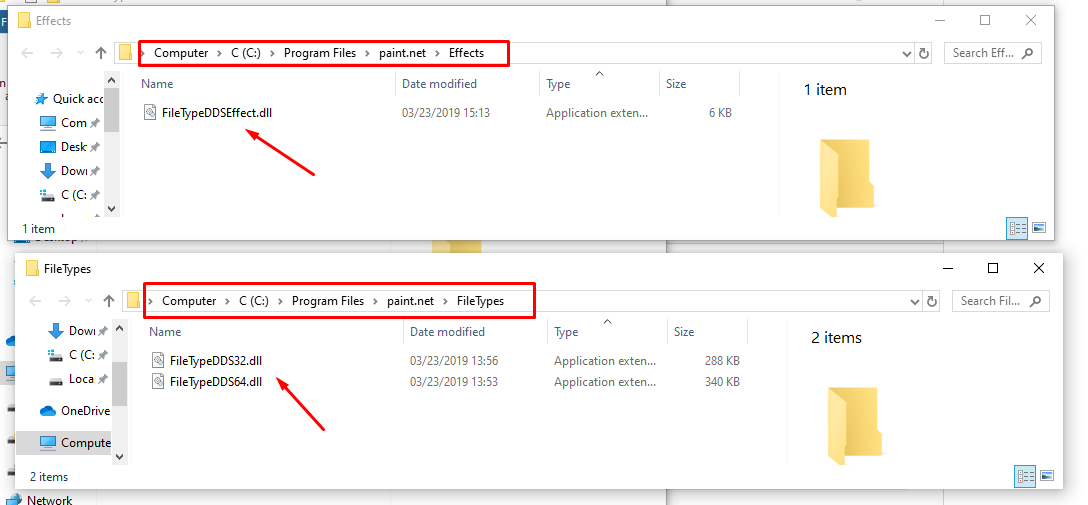
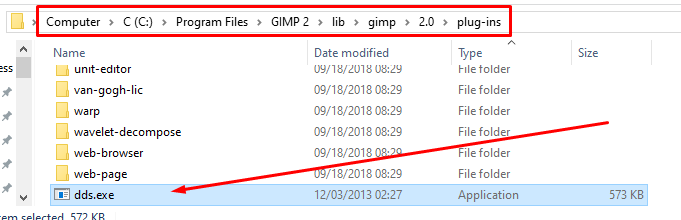
3.) The GIMP DDS plugin is basically a python script that runs DDS files through texconv.exe automatically for you - so if it doesn't work you can always do it manually.

4.) The nVidia plugin for Photoshop sucks, use the Intel Works one instead.

5.) CM and ADD files are BC7_UNORM_SRGB, however NG files should be BC7_UNORM due to how the mid way grey point is determined. See the KSWH official guide here on VRage restrictions for more info (https://steamhost.cn/steamcommunity_com/sharedfiles/filedetails/?id=787920125) .
Shoku 'Jetwash' Silverfall 19 Nov, 2019 @ 9:56am 
Thanks for the guide! I did find a working plugin for Photoshop CC. I can confirm it's working on PS 2020. It won't open the original game files, they all show up black so you'll need the DirectX tools to convert those, but I've been able to open the textures in a few mods I've browsed through. https://www.nexusmods.com/skyrim/mods/76482/
DranKof  [author] 2 Nov, 2019 @ 10:05pm 
@Digi I've now created a new Github repository for backing up the files mentioned in this guide as well as provide a link to the texdiag program, which had gone missing. Thanks for letting me know.
DranKof  [author] 2 Nov, 2019 @ 10:04pm 
@playhard45
Yes, it exports very well but, as far as I could tell, through testing all the combinations of settings that the Paint.Net plug-in has to offer, you still have to run it through the batch conversion process to get the alpha channel to go transparent in-game for GUI icons. Were you able to get GUI icons to go transparent without doing the batch files / texconv.exe process?
Digi 21 Oct, 2019 @ 6:31am 
texconv is included in the game, don't send people to githubs that don't have actual downloadable files anymore.
playhard45 24 Sep, 2019 @ 3:13pm 
Guys...there is an easy way.
Use Paint,net with the dds plugin.
It has FULL DDS(BC7) support and can convert to/from whatever format you want.
Just went looking for another way after seeing what it took to get the textures into Blender
I have yet to use a DDS in game but it does import them and i can export to DDS(BC7) with no issues.