Dead Secret

Dead Secret

60 ratings
Dead Secret Guide - Walkthrough, Endings, and Lore
By AttackOfTheDave
This is a full guide to Dead Secret, including a full walkthrough, puzzle solutions, all endings, collectible documents, and story analysis.
4
   
Award
Favorite
Favorited
Unfavorite
Overview
Who killed Harris Bullard?

In the summer of 1965, in a small house in the middle of nowhere, the brilliant Harris Bullard was found dead in his study. The police seem to think that he died of natural causes, but a young, ambitious reporter suspects foul play. The case is more complicated and dangerous than she suspects, though – can she get the real story and escape with her life?

In Dead Secret, you play Patricia Gable, the intrepid reporter who is researching the circumstances behind Bullard's death. This guide will walk you through your investigation, getting you all the lore you need to put the puzzle together. You will also learn how to reach all five of the endings and thus net those achievements.

I strongly recommend that you play on your own for the most part, only referring to this guide when you're stuck, but I'll include everything you need to know in the walkthrough and in the appendices. Because Dead Secret packs a lot of surprises, I will do my best to avoid any spoilers. In addition, I'll advise you to do some things that, while not necessary for completion, will give you a more satisfying experience. I will assume that you can figure out how to control Patricia - it's not very hard. I will also assume that you'll take the time to examine your surroundings and read all documents when you get them.
The Scene of the Crime
After the introduction, you'll find yourself in the Entry of Bullard's house. Believe it or not, you can get Ending C right away. This will remain an option throughout most of the game.

Turn around and try to leave. You won't succeed at first, but keep trying until you can.

Assuming you want to actually play the game, start off by checking out your inventory. Besides checking your Objectives and quitting to the Main Menu, you can also read your Collected Documents. You start out with a few: under Profiles you will find information on the people involved in the case. This data will update as you learn more about them. You will also find that you already have Miscellaneous 1/14: Coroner Report.

Back to the task at hand. Walk up to the small table in front of you. Check out the newspaper to get Newspaper Clipping 1/7: Reclusive Prof Found Dead in Home. Open the drawer on the left to get a Small Key. Turn to your left and go to the door covered with Japanese prayer slips. Since you have the key, you can head right into the Study.

Start by inspecting the couch. Lift the right cushion to find Research Doc 1/5: The Man Who Could See With His Skin. Head left to the bookshelves and open the left-hand cabinet underneath. Open the book inside to find a Circular Lens.

Head to the desk and pick up Note to Jo 1/3: Lens Note. Turn the knob on either side of the typewriter to unroll Research Doc 2/5: Ideomotor Effect. On the right side of the desk, open the top drawer to reveal another Circular Lens. On the left side, open the bottom drawer to get some Scissors, and the top drawer to get Blackmail Note 1/4: IT IS OVER. Then head over to the globe.

Puzzle: Open the globe.

Refer to the Lens Note. It says, “X marks the spot.” Look at the odd wall map and notice where the X is. To help you get your bearings, Asia and Australia are on the left, the Americas are in the middle, and Europe and Africa are on the right. Spin the globe until you can see the place where the X was: Japan. Push the secret button there to open the globe.

Grab the strange box to put it on the desk. Turn to head back to the Entry, but before you exit, look in the bookcase on your right to find Miscellaneous 2/14: The Snow Woman.

In the Entry, use the Scissors on the package on the table. Take the Old Book and go back into the Study.

Puzzle: Put the Old Book where it belongs.

On the top shelf of the bookcase where you found The Snow Woman, you'll find a row of books by Lafcadio Hearn with one missing. Put the Old Book in the empty spot.

Now that you have the Wooden Wedge, use it on the strange box that you found earlier.

Puzzle: Open the strange box.

Refer to the Lens Note again. At the end it says that the sequence is West, East, North. Look at the note beside the telephone to see what symbol corresponds with North. Examine the box to discover that the North symbol is on the left. Use that to orient yourself and push the buttons according to the sequence. Since North is on the left, you'll need to push down, up, and left to open the box.

Take the Mask and look around the room. Examine the painting to find Note to Jo 2/3: Note to Jo. Keep in mind that from now on, you can wear the mask to find additional clues wherever you go.

Time to head out. Before you exit the Study, though, you'll have to bone up on the case so far. The information is all in your documents, and you can answer the questions again if you get them wrong, but if you're in a hurry, here are the answers:

Harris Bullard's body was found by Bobby Sawyer.
Bullard was scared. He worried about losing his secret research.
Bullard was being blackmailed by Woodcutter.


Back in the Entry, enter the door to your left and head upstairs.
The Second Story
Go through the right door first into Bullard's Room, then head to the right past the fireplace. In the corner you'll find the Circular Dial. Turn around and look under the footstool to find a handprint. Click it to gain Musing 1/8: This is my Chance.

Walk over to the window – you can open it for some fresh air. Look on the floor beside the bed for Daily Log 1/9: Daily Log – Ideofocal Lenses. The safe is in the corner nearby, but you don't have the combination yet. Walk between the bed and the chair and look between the boxes against the wall to find Daily Log 2/9: Daily Log - The Apparatus. Look in the wardrobe to find Blackmail Note 2/4: I KNOW YOUR SECRET. Check out the torn photograph on the dresser.

Puzzle: Reassemble the photograph.

The puzzle is pretty simple. Refer to the screenshot to see what it should look like before placing the lower left corner.


The reassembled photo is Miscellaneous 3/14: JAMES LOWRY and HARRIS BULLARD, USS Essix, 1943.

Head out of Bullard's Room and cross the landing to Josie's Room. Check out the newspaper on the footstool to get Newspaper Clipping 2/7: Hero Says Helicopter May Win Viet Nam War. Use the Circular Dial on the chest in the corner.

Puzzle: Open the chest.

Turn the different rings so that they form a picture of a bird. If you're having trouble, refer to the screenshot to see what it should look like before turning the outermost ring.

In the chest you'll find a Small Knob and Jo's Diary 1/5: Jo's Diary – Nightmares. Next to the chest is a nightstand with a handprint on the side. This one is Musing 2/8: A Real Journalist. Look under the foot of the bed to find Jo's Diary 2/5: Jo's Diary – Finding Father. Open the door of the other nightstand to find “The Crystal Cave” Excerpt 1/5: The Crystal Cave – Chapter 3.

Now is the first time you can achieve Ending D. It's easy to get, so I'll just cover the way NOT to get it.

Exit Jo's Room and quickly go into Bullard's Room. Exit out of the window.
The Forest of Dreams
Wander through the snow. When you reach the lantern, experiment with which way to go and you'll find that it's not easy to navigate. Once you start making progress, though, always head toward the brightest light you can see in the distance. Go through the door and follow the corridor to the end.
The Ground Floor
Look around to get your bearings. Now is another opportunity to get Ending C, if you want to.

Face between the fence and the locked doors and run away. It won't let you do it immediately, but keep trying.

Still with us? Great. Climb back into the house through the window beside the woodpile. You'll find yourself in the Dining Room. On the table to your left you'll see a scale and Research Doc 3/5: Note about Bottle Weights. Approach the strange device and look on the floor by its base to find Daily Log 3/9: Daily Log – Josie. Check out the handprint in the rightmost chair for Musing 3/8: Nothing Scares Her. Right next to that chair are two chairs stacked on one another. On top you'll find Letter from Cynthia 1/4: November 15, 1960. Look between the boxes in the corner to find Miscellaneous 4/14: The Subconscious Mind.

Head through the open doorway into the Living Room. Walk to the fireplace and grab the Fireplace Poker and Fireplace Broom. Grab the paper from the back of the piano to get “The Crystal Cave” Excerpt 2/5: The Crystal Cave – Chapter 8. Examine the boxes on the table to find another handprint – Musing 4/8: Wichita. Head to the nearby window and turn around to find Daily Log 4/9: Daily Log – Mining Dreams leaning against that same box. Walk to the open box on the floor and look inside to find Daily Log 5/9: Daily Log – Cynthia. On top of a nearby box is Newspaper Clipping 3/7: National Recognition for Local College. On the floor nearby is a lot of sheet music, but more importantly, Miscellaneous 5/14: Work Order. Now that we've cleaned up all those pesky papers, there's still one more thing to do here.

Puzzle: Open the hidden box.

Tidy up the ashes in the fireplace with the Fireplace Broom, then put on your Mask. Make sure you look around the whole room! In addition to the symbols in the fireplace (star, circle, square), you'll find a hotspot on the floor next to the wall. Use the Fireplace Poker to pry up the loose floorboards there. To open the box, enter the correct combination. You saw it in the fireplace: star, circle, square.

Inside the box you'll find an Old Key, Miscellaneous 6/14: Letter from Graham – The Plan, and the safe combination. Go back to the Dining Room and head through the double doors into the Kitchen.

Go past the oven and the basement door and take a look at the cupboard on your left. Open the middle drawer to find Research Doc 4/5: Lens Patent. Open the freezer to find a Frozen Coffee Can. Walk around the table to the far corner and open the cabinet to find Blackmail Note 3/4: YOU HAVE FIVE DAY. Walk past the sink and look on the counter for Miscellaneous 7/14: Note to Bobby. Open one of the drawers under that to get Blackmail Note 4/4: HAND YOUR RESEARCH TO ME. Head over to the two doors. On the bench by the backdoor you'll find Letter from Cynthia 2/4: January 2, 1961. Take a look at the pantry. On the left side you'll find Empty Bottle 1/4. Before you head to the next room, there's a small mystery you can solve.

Puzzle: Find out what's inside the Frozen Coffee Can.

To open the Frozen Coffee Can, you'll need to thaw it out first. Head over to the sink and turn on the hot water tap. Use the Frozen Coffee Can on the sink and it will reveal its secrets. Take the blank page inside. There's more to this than meets the eye! Head over to the oven and turn the dial furthest to the left. Hold the blank page over the burner to reveal Miscellaneous 8/14: Bobby's Secret Message.

Go back to the pantry and go through the left door into the Bathroom. Turn left and check out the bathtub; inside you'll find “The Crystal Cave” Excerpt 3/5: The Crystal Cave – Chapter 14. Immediately to your right, on top of a cabinet, you'll find News Clipping 4/7: Cold Winter Increases Risk of Exposure. Open the door underneath to reveal Empty Bottle 2/4. Step over to the toilet and look underneath the toilet paper spindle to find Daily Log 6/9: Daily Log – Promises. Grab the Flashlight from the sink, then turn around to get Newspaper Clipping 5/7: The Week in Review. Open the doors beneath it for Musing 5/8: No Marks on the Body.

Exit through the other door with the help of the Old Key to find yourself back in the Study. Look above the bookshelf to the right to clarify what you already know, then head to the Entry. Use your Small Knob to open the middle drawer for Empty Bottle 3/4.

Head up to Bullard's Room to take a crack at the safe. Some things are different upstairs; did the painting on the landing always look like that? Was that thing always on the mantel? Next to it, you'll find Letter from Cynthia 3/4: March 26, 1958. Anyway, the safe is what's important.

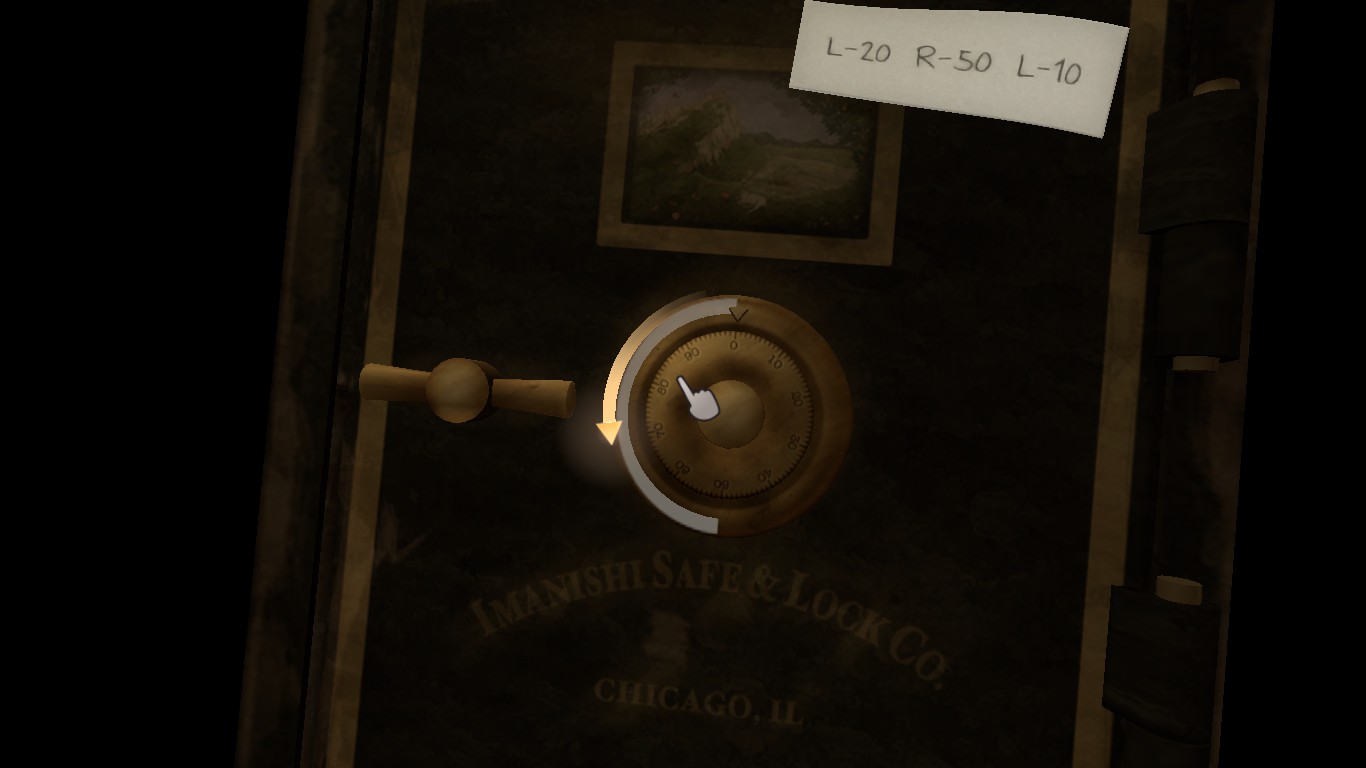
Puzzle: Open the safe.

The interface is kind of fiddly here, but you can do this. Just rotate the dial according to the code: left to 20, right to 50, and left again to 10. When your cursor is on the left side of the dial, clicking moves it to the left, and vice versa when it's on the right. Each click will move the dial by ten. From the starting position (zero) click on the left side twice, then the right side seven times, then the left side six times and the safe will open.


Let's explore our new-found treasure! On the right side of the safe you'll find Miscellaneous 9/14: Freezer Work Order and Note to Jo 3/3: Warning. On the floor of the left side of the safe you'll find Research Doc 5/5: Plans for Lunar Dream Apparatus. In the top compartment of the left side is Empty Bottle 4/4. Before we put all these bottles to work for us, though, let's check out Josie's Room again.

Open the wardrobe and inspect it to slide the false back out of the way. Head on in and work your way to the right to find a Secret Room. Examine the unusual eye drawing on the right wall. Look at the book on the nightstand to get Jo's Diary 3/5: Jo's Diary - Tracing Father. On the floor between the nightstand and the makeshift bed is the first Battery. One more to go! On the bed you'll find Jo's Diary 4/5: Jo's Diary – Happy Birthday.

Now that we've found everything up here, make your way all the way back down to the Bathroom. Use the bottles on the bathtub to scoop up some leeches (yuck!) then go back to the Dining Room.

Puzzle: Calibrate the device.

As you might have read in the documents you've gathered, the key to calibrating the device is placing the bottles according to their weight. Use the bottles on the scale to get started. Weigh different combinations of bottles to get a sense of which ones are heavier or lighter than others, then click the boxes above to show the correct sequence. If you don't want to go to the trouble, the order is C, E, A, D. Use the bottles on the device to calibrate it.

Once you correctly calibrate the device, you'll receive the Lunar Dream Apparatus Calibrator, but that's not all! Look at the base of the device to see that a door has opened up, revealing another Battery. Your Flashlight works again! Let's give it a test drive! Head into the Kitchen for starters.

Here's another opportunity to gain Ending D, and, again, it's very easy to do, so I'll instead hint at how to avoid it.

Head straight for the Basement!
Underground
You're going to need more light if you want to get anything accomplished! From the base of the staircase, circle around either the left or right side until you see a brick pillar with a switch on it, and flick that switch. Let's see what we can find.

Nearby, you'll see a simple chemistry lab. Examine the poster to get Miscellaneous 10/14: Chemical Flame Test. Underneath the nearby shelves you'll find a Record. To the right of the lab, you'll see a long wood-paneled wall with a Crank sticking out of it. Turn the Crank to see what it does, and take it with you. Unfortunately, you can't get into the Freezer without the key, so let's see what else the Basement has in store for us in the meantime.

From the locked door, turn around and examine the shelves to find Letter from Cynthia 4/4: September 14, 1964 and a bottle of Lemon Juice. Head past the stairs to the laundry machines. On top of the dryer is News Clipping 6/7: Spring Cleaning with Chemistry. Turn around and walk to the crates. On top of one of them is Daily Log 7/9: Daily Log – Resignation. Look on the shelves to your left to find a lot of unknown chemicals to clutter up your inventory. Walk toward the familiar-looking wood-paneled wall and look on the ground for a somewhat camouflaged Miscellaneous 11/14: Letter to Graham. Turn around to see a handprint on a crate lid: Musing 6/8: Better Make it Count.

Now: how are we supposed to get out of here?

Puzzle: Escape the Basement.

The other wooden wall could be a secret door like the first one. Look for a loose board in the same place that you saw the crank socket on the other one. Try the Crank. Unfortunately, it's too rusty to turn, and you don't have anything that can break up rust. You might, however, have the ingredients you need. Head back to the chemistry lab, but first take a moment to get the Matches that were in the can that toppled when you passed by. Refer to your documents to see what you need. Apparently Borax and lemon juice combine to make the appropriate compound, but do you have any Borax? Refer back to your documents to find a way to tell. You'll have to use the Bunsen burner to see the effects of your chemicals on the flame. Turn the valve beside the poster to provide gas to the burner, then light it with your Matches. Test your chemicals, one by one, until you find the correct one. Add the Borax and the Lemon Juice to the mortar to obtain Rust Remover. Use it on the crank socket.

Before you head into the Hidden Passage, you'll bone up on your notes again. Answer the questions correctly to proceed. Once again, I'll give you the answers below.

Cynthia Peckman wanted money.
Graham Wellington has a secret: he is Woodcutter.
Bullard was being blackmailed about somebody named James Lowry.


Head down the Hidden Passage. You'll pass through a tall, round chamber; look up to get your bearings. Continue on your way until you reach a ladder, then climb out of there.
Magnum Opus
Now that you're back above ground, you'll find yourself in the Workshop. Head to the control panel and look around. On top of it you'll find Daily Log 8/9: Daily Log – Woodcutter. Head to the other side of the huge pod. On the far side of the canisters is a blank page. We already know what to do with that, but it will have to wait. On the floor on the other side of the canisters is a Hacksaw Handle. Head back to the control panel, then turn right and climb the ladder. In the corner of the loft you'll find “The Crystal Cave” Excerpt 4/5: The Crystal Cave – Chapter 19. Head over to the birdcage on the table. Open the cage door to find Jo's Diary 5/5: Poem. Pull out the tray underneath the cage to grab the blade; congratulations on your new Working Hacksaw! Before you head back down, look at the chair on your right for Musing 7/8: What I Want.

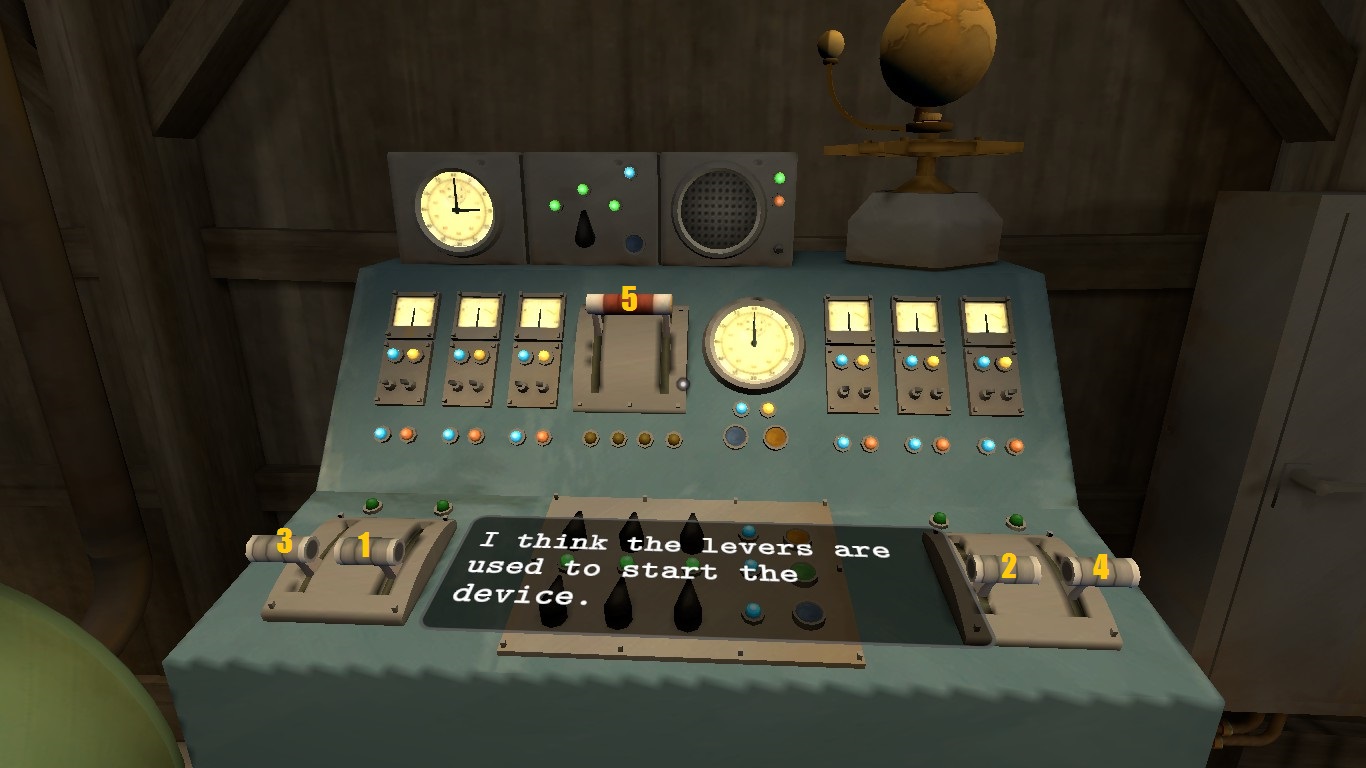
Go back to the control panel and cut the chain on the cabinet doors with your Working Hacksaw. Open the left door to find a power switch for you to flip. To calibrate the machine, place the Lunar Dream Apparatus Calibrator on the base on top of the control panel.

Puzzle: Activate the machine.

You need to use the different levers in a specific order. When you pull the wrong one, you'll hear a hissing sound and all the levers will return to their “off” position. When you pull the right one, you'll hear a low tone and will be able to pull the next lever in the sequence. If you don't feel like experimenting, here's the sequence: second gray lever, third gray lever, first gray lever, fourth gray lever, red lever.


Hey, the pod is lit up! Let's check it out! But first, we have another opportunity to avoid Ending D.

Yeah, our plans haven't changed. Hide in that pod.
Dream House
Head down the hallway and turn right. You'll pass a lot of doors, but you can't enter any of them. Keep going, though! When you've had enough, turn around and go back the way you came. Follow the hallway and head into the room. Grab the Weird Statue from the floor, then turn around and head back the way you came.
Blackout
Oh, goody, another dark room: the Secret Still. Luckily, there's a familiar switch on the wall next to you; give it a flip. Head to the right and get the Large Crank from on top of the boxes. Turn right and walk past the casks. On top of the barrel next to the ladder, you'll find Daily Log 9/9: Daily Log – A Way Out. Head to the right again, then approach the table in the middle of the room. Grab the Empty Moonshine Jug and Newspaper Clipping 7/7: Roosevelt Signs Cullen-Harrison Act. Turn around and search under the pallet next to the generator for Miscellaneous 12/14: Letter from Graham – Bullard's Identity.

Puzzle: Restore power to the room.

Head to the left corner to find the business end of the still. Put your Empty Moonshine Jug on the ground under the tap and fill it up. Pick up your Jug Full of Moonshine. Head back to the generator, then pour in the Jug Full of Moonshine, attach the Large Crank, and give it a spin.

Now you can exit the gate! Head down the passage and up the winding staircase.

Head back toward the house. Beside the well, you can get “The Crystal Cave” Excerpt 5/5: The Crystal Cave – Chapter 23. Remove the board from under the doorknob. Before you head back into the Kitchen, though, you'll take another moment to compose your thoughts. As always, answers are below.

The dead man in the underground room was Graham Wellington.
The truth about Harris Bullard is he is an imposter.
The man we know as Harris Bullard is really James Lowry.
Solving the Mystery
Now you're going to want to go through the Bathroom to the Study. If you like, you can play your Record on the record player in the corner for a little music. Head over to the map and put the Weird Statue on the base with its friend. Take the Padlock Key and Miscellaneous 13/14: Letter from Rosanna.

Now we can unlock the freezer. On your way through the Kitchen, though, use the blank paper as you did before to reveal Miscellaneous 14/14: Bobby's Secret Message 2. Head down to the Basement and unlock the Freezer with the Padlock Key.

Important note! This is your last chance to collect any documents that you may have missed! By now you should have:
4/4 Blackmail Notes
5/5 “The Crystal Cave” Excerpts
9/9 Daily Logs
5/5 Jo's Diary entries
3/4 Letters from Cynthia
7/8 Musings
7/7 Newspaper Clippings
3/3 Notes to Jo
5/5 Research Docs
14/14 Miscellaneous

If there is anything that you haven't gotten yet, now is the time to get it! If you're satisfied with your progress and are ready to pass the point of no return, proceed into the Freezer.

Look at the shelf on your right for Musing 8/8: Put it Together, then turn around and head out. You'll find yourself back in the Dream House, but this time it's fairly straightforward. Proceed down the tunnel until you reach a room with four portraits and four keys. It is time for you to make your choice: who killed Harris Bullard?

You can now achieve ending S, A, or B, depending on your actions. See below for details, or try to solve the mystery for yourself! Good luck!

To get Ending B, choose one of the wrong suspects. Take their key and open the door.

To get Ending A, choose the correct suspect: Josie Herrera. Take her key and open the door. Make your way through the inferno until you see her collapsed under burning wreckage. Ignore her and go through the last door to freedom.

To get Ending S, choose the correct suspect: Josie Herrera. Take her key and open the door. Make your way through the inferno until you see her collapsed under burning wreckage. Pull the debris off of her and help her out of the building.

Congratulations! You've solved the mystery of Harris Bullard! Enjoy the big time, ace reporter!
Achievements
There are five Steam achievements for Dead Secret, and you can get them by finding each of the five endings. That said...
Endings
S – Identify the right suspect, save the stalker's life, and escape the burning house. Patricia has the exclusive story, the murderer is convicted, and a unicorn grants her three wishes (not shown).
A – Identify the right suspect and escape the burning house. Patricia has the story of a lifetime, but the murderer will not face justice.
B – Identify the wrong suspect. Patricia is reported missing, presumed dead. She is never seen again.
C – Leave Bullard's house before solving the case. Patricia is safe, but is still stuck in her dead-end job.
D – Get caught by the stalker. Patricia gets killed.
Documents
Below is a checklist of all the documents in the game, in the order that the player is most likely to read them. Use this as a gauge of how close you are to completion!

Blackmail Notes
1 IT IS OVER (in top left desk drawer in Study)
2 I KNOW YOUR SECRET (in wardrobe in Bullard's room)
3 YOU HAVE FIVE DAY (in cabinet in Kitchen)
4 HAND YOUR RESEARCH TO ME (in drawer in Kitchen)

“The Crystal Cave” Excerpts
1 The Crystal Cave – Chapter 3 (in nightstand in Jo's Room)
2 The Crystal Cave – Chapter 8 (in back of piano in Living Room)
3 The Crystal Cave – Chapter 14 (in bathtub in Bathroom)
4 The Crystal Cave – Chapter 19 (on floor of loft in Workshop)
5 The Crystal Cave – Chapter 23 (next to well Outside)

Daily Logs
1 Daily Log – Ideofocal Lenses (on floor beside bed in Bullard's Room)
2 Daily Log – The Apparatus (between boxes in Bullard's Room)
3 Daily Log - Josie (on floor beside device in Dining Room)
4 Daily Log – Mining Dreams (beside box on table in Living Room)
5 Daily Log – Cynthia (in open box in Living Room)
6 Daily Log – Promises (beside toilet in Bathroom)
7 Daily Log – Resignation (on crate in Basement)
8 Daily Log – Woodcutter (on control panel in Workshop)
9 Daily Log – A Way Out (on barrel in Secret Still)

Jo's Diary
1 Jo's Diary – Nightmares (in chest in Jo's Room)
2 Jo's Diary – Finding Father (under bed in Jo's Room)
3 Jo's Diary – Tracing Father (on nightstand in Secret Room)
4 Jo's Diary – Happy Birthday (on bed in Secret Room)
5 Poem (in birdcage in Workshop)

Letters from Cynthia
1 November 15, 1960 (on stacked chairs in Dining Room)
2 January 2, 1961 (on bench by backdoor in Kitchen)
3 March 28, 1958 (on mantel in Bullard's Room)
4 September 14, 1964 (on shelf in Basement)

Musings
1 This is my Chance (under footstool in Bullard's Room)
2 A Real Journalist (on side of nightstand in Jo's Room)
3 Nothing Scares Her (on chair in Dining Room)
4 Wichita (on side of box on table in Living Room)
5 No Marks on the Body (in cabinet in Bathroom)
6 Better Make it Count (on crate lid in Basement)
7 What I Want (on chair in Workshop)
8 Put it Together (on shelf in Freezer)

Newspaper Clippings
1 Reclusive Prof Found Dead in Home (on table in Entry)
2 Hero Says Helicopter May Win Viet Nam War (on footstool in Josie's Room)
3 National Recognition for Local College (on box in Living Room)
4 Cold Winter Increases Risk of Exposure (on cabinet in Bathroom)
5 The Week in Review (on cabinet in Bathroom)
6 Spring Cleaning with Chemistry (on dryer in Basement)
7 Roosevelt Signs Cullen-Harrison Act (on table in Secret Still)

Notes to Jo
1 Lens Note (on desk in Study)
2 Note to Jo (behind painting in Study after wearing the Mask)
3 Warning (in safe in Bullard's Room)

Research Docs
1 The Man Who Could See With His Skin (under couch cushion in Study)
2 Ideomotor Effect (in typewriter in Study)
3 Note about Bottle Weights (on table in Dining Room)
4 Lens Patent (in cupboard in Kitchen)
5 Plans for Lunar Dream Apparatus (in safe in Bullard's Room)

Miscellaneous
1 Coroner Report (you start with this)
2 The Snow Woman (in bookcase in Study)
3 JAMES LOWRY and HARRIS BULLARD, USS Essix, 1943 (torn photo on dresser in Bullard's room)
4 The Subconscious Mind (between boxes on floor in Dining Room)
5 Work Order (on floor near sheet music in Living Room)
6 Letter from Graham – The Plan (in hidden box in Living Room)
7 Note to Bobby (on counter in Kitchen)
8 Bobby's Secret Message (blank page in Frozen Coffee Can from freezer in Kitchen)
9 Freezer Work Order (in safe in Bullard's Room)
10 Chemical Flame Test (above chemistry lab in Basement)
11 Letter to Graham (on floor in Basement)
12 Letter from Graham (under pallet in Secret Still)
13 Letter from Rosanna (inside statue base in Study)
14 Bobby's Secret Message 2 (blank page next to pod in Workshop)
The Whole Story, Explained
The story of Dead Secret is complicated and may be hard to follow. Like Patricia, you have to read the documents and put the pieces together in order to see the big picture. I've put together a summary of the story as I understand it. Some of the details (such as how the Lunar Dream Apparatus works) are based on my own theories, so take them with a grain of salt. Also, I hardly need to say it, but MASSIVE unmarked spoilers follow! Please, for your own sake, don't read this part until you've completed the game!

Our story begins in the 1940's, with two brilliant men from Chicago: Harris Bullard and James Lowry. Bullard was an academic with a focus on physics. Lowry used his intelligence in a different way: laundering money for the mob. Both entered the United States Navy, where they served aboard the USS Essix in the South Pacific. Over the course of their service, they became friends; Bullard even gave Lowry lessons in physics. On January 5th, 1944, Bullard filled in for Lowry on a mission. His submarine sank, with no survivors.

Lowry realized that since his name was on the crew manifest, he would be presumed dead, and Bullard considered alive. He saw the opportunity to cleanly break ties with the mobsters in Chicago, and took on Bullard's identity. In 1946, Lowry received an angry letter from Rosanna Turner, who had been in a relationship with Bullard before the war and had had a daughter with him. Seeing her as the last person who could serve as a witness that he wasn't really Bullard, Lowry snuck into her apartment and strangled her. Unbeknownst to him, her daughter Josephine was watching from the shadows. Around the same time as this incident, Lowry collected the insurance settlement from Bullard's family farm burning to the ground. It seems like a pretty safe bet that he lit that fire himself.

Free of connections and flush with ill-gotten gains, Lowry moved into an old hideout in Kansas with his new wife Cynthia Peckman and continues an academic career built on Bullard's legacy. He teaches at Oakley College and starts coming up with the theories behind what would eventually become the Lunar Dream Apparatus. In 1957, he writes his will, leaving everything to Cynthia, but their marriage dissolves the next year.

Meanwhile, Josephine Turner, who had been adopted by the Herrera family, began looking for her long-lost father. She tracked Lowry to Oakley College and enrolled, hoping for a sort of family reunion. She noticed, however, that there were some oddities about “Harris Bullard” that she couldn't quite explain.

Lowry continued his teaching and research, patenting the special lenses that formed a part of the Lunar Dream Apparatus project and “co-authoring” a paper with his rival, Dr. Graham Wellington in 1962. Wellington was very interested in the Lunar Dream Apparatus and schemed to steal it and make a profit off of it. After stumbling upon the connection between Lowry and Bullard, he began his campaign of blackmail as the Woodcutter.

Wellington's nonstop harassment drove Lowry to retire from Oakley College in 1964 and move his research into his home. He employed Josephine as a research assistant and Bobby Sawyer as a general errand boy. With Josephine's help, he completed the Lunar Dream Apparatus, and used her as a test subject. The device removed the barriers between her conscious and subconscious mind, allowing her to recognized her dreams of Bullard killing her mother as long-suppressed memories. Realizing that Bullard was not only not her father, but killed her mother, Josephine plotted to kill him. She locked him in the basement freezer until he died, then dragged his corpse into the study to thaw. Bobby Sawyer discovered the body and alerted the police, which got the attention of Patricia.

Here's where the player takes control.

While Patricia is investigating the mystery, Josephine returns to the scene of the crime, presumably to recover the research notes on the Lunar Dream Apparatus. Unbeknownst to her, Dr. Wellington had the same idea. Faced with two interlopers, Josephine donned a disguise and sought to kill them both and burn the farmhouse to the ground to destroy any evidence.

You didn't let her succeed, though, did you?
Epilogue
I hope you had as much fun playing Dead Secret as I did! I welcome constructive criticism on the guide!

PSA: Please do not kill anybody in real life.
18 Comments
Grintus 18 May, 2023 @ 5:56am 
Thank you very much for the guide and the summary! Was a good chance to see what I understood and what not. :D
dustyn.barlow 7 May, 2023 @ 4:07pm 
Spoiler on Killer Reveal and Ending


Awesome guide but I am having a bit of a problem. Not with the guide but with the story. Lowry serves in the military with a man who becomes his friend. His friend covers for him, but loses his life on the mission he was covering for. So in thanks for this Lowry, kills his friends wife, in front of his friends daughter, burns his friends house down and pockets the insurance money?!?!?!?!

What in the hell kind of character trait is that? Even the most vile people wouldn't do anything close to that to somebody they call a friend. Also Lowry isn't some sociopathic Hitman, he is a Money Launderer aka an Criminal Accountant, killing without remorse isn't a job prerequisite.

It kind of feels like the Dev needed Josie to want revenge, but not sure how to implement what exactly she wanted revenge for. It is just to over the top for me to take seriously..
erc 26 Feb, 2023 @ 6:38am 
Thanks for the well-written guide, came in handy in those moments of confusion. Nothing major, yet the counter for 'Letters from Cynthia' in the section 'Solving the Mystery' should be 4/4, instead of 3/4.
Revenger23 15 Jun, 2022 @ 7:13pm 
Really helpful Guide, thx :cupup:
SeltzerCaesar 13 May, 2021 @ 6:35pm 
Thanks for the explanation at the end. I missed a few documents and didn't really understand why the killer did what they did. :ss13ok:
Rush 22 Dec, 2020 @ 11:53am 
The story was a bit of a mess. Some key parts must have been in documents that I missed, and my selection at the end was largely a guess.
Patola [Linux] 18 Oct, 2020 @ 2:29pm 
Now the story makes much more sense! Thanks for filling in the gaps!
Drogean 22 Feb, 2020 @ 5:22pm 
fantastic guide thanks !
alphabetsoup 8 Nov, 2019 @ 12:26am 
Just wanna add: the final daily log (cakefoxy mentions below) is actually available from the beginning of the game. Chronologically, it's probably the first one you'll pick up.

Thanks for the guide!
cakefoxy 12 Jul, 2019 @ 12:01am 
if you're still interested in finding the last daily log, it seems to appear after you get back inside from the hidden still; it's in bullard's room, between the boxes next to his bed