Serious Sam Fusion 2017 (beta)

Serious Sam Fusion 2017 (beta)

28 ratings
Beginner's Guide to Setting up Weapon Models
By Soulmyr
Hopefully this guide will help you properly set up a weapon model as well as teach you some basic stuff about the Serious Editor
   
Award
Favorite
Favorited
Unfavorite
Intro
Hello, I’m Soulmyr, creator of critically acclaimed mods such as “Johnson [Resource]”, “BFE Ammo Packs [Resource]”, “Kleers with Glowing Eyes” and some weapons no one cares about. Today I’ll tell you some secrets of the trade when it comes to importing weapon models into Serious Sam, touching up textures and various effects, as well as some basic stuff about the Editor.

Important note: This guide was made to supplement noam's guide - Creating Custom Weapons. So read that one as well as this one. I recommend reading this one first, since you need a mesh to set up weapons and databases.
What you'll need
  • Blender and/or Autodesk 3D studio
  • DDS converter[www.ddsconverter.com] or a program able to convert .dds files into a readable format
  • This plugin[drive.google.com] for Serious Editor 2017*
  • An image editing software (Photoshop, GIMP, Paint.NET, whatever you prefer)
  • Basic English comprehension. I’m not making this guide in Russian

*Unpack the files in Steam/Steamapps/common/Serious Sam Fusion 2017/Bin/x64
Serious Editor Basics
The editor can be very scary and overwhelming for a newcomer, so let’s take it slow.
The Serious Editor 2017 is located in Tools, which you can find by hovering over your Library tab in Steam. Launch it

Now to start off, let’s open the mesh file for the BFE Double Barrel Shotgun. On the top bar, select File > Open > Document and navigate to SeriousSam3/Models/Weapons.DoubleShotgun/Meshes/ to open the file DoubleShotgun_FP.bmf.


Don’t be alarmed by all the new stuff that popped up, these are the areas you’ll be looking at for this guide. The main work area is where you’ll be doing all the configurations. Viewing options lets you determine what and how you see an object. Editor Options and Map options are a bit more complicated, we’ll get to those later. Navigation area has the different tabs you’ll be switching through and also the Explorer which is a fast way to browse the files. Right now we *need* to have Tools, Layer and Mesh. If for some reason you don’t have them, simply open View at the top, and click on the ones you’re missing.


Now, to the actual model mesh itself. Right now it’s set to smooth shaded, which is why there are no colors. To see how the weapon looks with color, change Smooth shaded to Shader and remove the Wires in the tab next to it by simply clicking on Wires. If you press Numpad 6 you’ll see how the weapon looks light with light, though in most cases it’s hard to tell in the mesh editor.

Here's some basic navigational stuff

  • Hold Ctrl to bring up the XYZ Navigation tool. This tool will allow you to move the selected object in a variety of ways, and even rotate it.
  • If you press Esc you will go into a sort of flying camera mode, which works like being in First Person. Using the mouse wheel you can adjust the speed at which you move the camera. You can also hold shift for a speed boost.
  • Hold Space + LMB to move the object across the X and Y axis
  • Hold Space + RMB to move the object across the Z and Y axis
  • Hold Space + LMB + RMB to rotate the object
  • Press Tab to rotate the object 90 degress. The way the object is rotated depends on how you’re viewing it. For example if you’re in Perspective (top left, next to Shader) it will rotate along the Y axis most of the time. If you’re in Front/Back it will rotate along the Z axis.


On the bottom you’ll the type of editor you’re currently in, Polygon/Vertex, Distance detail (as I like to call it) and on the right side you have VM, PM and LM. VM is used for weight maps which move things around in animation, and also blood decals, while PM is used for texture groups. I think this is enough for now, let’s move on to …
Finding your model
Through some light digging you find all sorts of places on the internet where good people (usually Russians) upload models for free. One such site is p3dm.ru. Facepunch is a site where all sorts of stuff gets uploaded but there is no search option so you’ll need to dig around more. There is also Gmod and Source Filmmaker. Alternatively, you can use programs such as Ninja Ripper to get models (especially from Unreal games like Killing Floor 2).

For the purpose of providing pictures I'll be making a Remington 870 MCS shotgun

Aside from a mesh, you’ll need to get a diffuse map (that’s the one with the colors) and a normal map (the blue one with the bumps). These can come in all sorts of formats, but often times it's usually .dds, which is where the dds converter comes in handy
Importing your model
After you find your model, it’s time import it. You’ll need to run it through Blender (if it’s .obj or .fbx) or Autodesk (if it’s .3ds) and export it as either a .obj or .fbx file (usually .obj works better).


Now create an empty mesh file (File > New > Mesh) and select Import mesh on the right and navigate to where you exported the model previously. If the model is white when you change the view to Shader, then everything is going fine.

Diffuse/Normal maps and Creating textures
If your textures came in a .dds format you'll need to convert them to something readable, like .tga (recommended) or .png. This is where the DDS converter comes. If your files are already in a readable format, then you’ve saved yourself about 30 seconds of work!

Now every single model needs two things - Diffuse map and Normal map. Diffuse map is basically the color of the weapon, while Normal map is basically the extra bumps and dents you get that aren’t part of the mesh.


To create our textures, select Texture -> Create texture and navigate to where you created your .tga or .png files. Make sure you set it to “Compressed opaque


While you can name the diffuse map whatever you want, you ABSOLUTELY must name your map something that ends with “_NM”. This is important because some normal maps need adjusting. When you create a normal map texture, you’ll have the option to flip X and Y, which is necessary in some cases where the weapon doesn’t reflect light as it should.


IMPORTANT: You need the aformentioned plug-in to properly create compressed textures, otherwise they will have an enormous filesize or will look ugly.
Texturing your model
Now on the bottom left, you’ll need to click on Layers, and click on Polygon maps. If your model has more than one layer map, a useful trick I’ve found is to set each map’s base color to something different, then rename the maps (on the bottom right, PM and S, click on the layer map and then “rename layer map”.


Now to place your diffuse texture click on the tab next to “base texture”, click browse and select the _CM map you made earlier. After that, click on the tab next to “base uvmap” and write “Texture”. Voila, your model should have colors now.


Repeat the same process for “normal map” and you should have your bumps.


Sometimes the X and Y values need to be flipped, because different games work differently I guess. It's hard to tell if the light is behaving correctly right now, it'll be more apparent when you set up your mesh in a model and use it in a level. Also specularity really brings it out more.
Specularity, Glossiness and Detail Normalmap
Specularity and Glossiness are kind of hard to explain because they do similar things – determine how light is reflected. Specularity is better for making a surface look metallic, while glossiness is better for making an object look plastic. Most of the times you need a little bit of both to make a weapon look good


There is no "correct" number, so you'll have to experiment with one or both of these to get the desired result. (However in my experience using a full 1 never works out, turns your model into chrome or plastic. Something between 0.5 and 0.7 is what I end up using most of the time)

Detail normalmaps are similar to normal maps, only on a smaller scale. They give surfaces a grainy detail. Not very important but it can make your model look nicer


Gloss Maps
Because different games use different engines and lighting and all that stuff, it's hard to get your model to look exactly like it did in the original. This is especially true for gloss maps.

Gloss maps (in some cases Specular maps) basically determine what parts of your model are shiny or glossy. They can make your model look more realistic by having the dirty and worn out parts less specular (shiny)

In the Serious Engine gloss maps have four values, corresponding to RGBA. According to Alen Lavadav himself, these are:
  • red - Multiplies the coating specularity.
  • green - Multiplies the coating color. This acts as a gray-scale texture for the coating layer.
  • blue - Masks the detail normal map. Where there is 0 in the blue channel, the detail is not effective.
  • alpha - Multiplies the base specularity.

This basically means gloss maps can be any color. For weapons however, you usually just need the opacity information for specularity. This next part requires Photoshop, or a program that has channels and mask functions.

The channels of a texture are black and white, so you can just use them as masks on a white layer to give you decent-looking gloss map for specularity
The red-and-blue grid is transparency

If you don't have a glossmap included in the weapon, you could try desaturating your diffuse map and fiddling around with brightness and contrast, though this will give you mixed results.

Sometimes a glossmap may contain colors, but these don't always work as intended. If that's the case, try to see if there's any useful infromation in the channels. For example this one has a lot of black parts in the blue channel*, so we can use that to make a mask.
*For Photoshop, you can open Channels from Windows > Channel.

You can use this channel to create a mask for a pure white layer, and make that your gloss mask.
The black parts become holes in the specularity, which in turns means less shiny parts.
Grouping and Smoothing
If you have only one polygon map and your model is made out of several different materials (plastic, metal, wood etc) then applying the same effects across the board can make your model look ugly or unnatural. Luckily, you can create polygon maps and apply different values to each group.

To create a polygon map, select the desired polygons by holding LMB and move the cursor over them. For an easier time, enable “Wire” on the top bar to see the polygons without color to distract you, and perhaps switch to Simple Shader. If you need to let go of LMB to rotate the model, simply press and hold Shift to save your current selection. One thing to note is that if you’re holding Shift and you press LMB over an already selected polygon, that same polygon will be removed from the selection.


Sometimes you’ll get lucky and the model will come with some polygons already grouped together. Double click on a model and the group will automatically highlight itself.

Now that we have different groups, we can also apply different levels of smoothing to them. Smoothing works differently on every model I’ve had, so there’s no “optimal” value. However, after a certain point, the smoothing starts to repeat itself, so there’s no point going above the 200 range.

Illumination
If you have a sci-fi looking weapon, or some tacticool attachment, you’ll probably want to make it glow. There two ways of doing this, but both require the use of the illumination option.

The first way is to create a new polygon map. You’ll probably need to give it a base color along with illumination values, so it’s not a white light emitting a colored glow. Usually a small value like 3-5V is enough to look good, but even 1 will make a surface stand out in the dark.


Lightmap works like a mask, if you’re familiar with image editing. Basically, it’s a black picture with grey/white parts and only the non-black parts are allowed to emit light. An example of this is my Enhanced Mordekai and Alternate Mordekai mod.


Which method you chose is up to you, the result is the same

Shader Modifiers
If you ever wanted to make a texture in a polygon move or make an illuminated polygon flash like a siren, then you'll need to add shader modifiers to your polygon map.

To create a shader modifier, open up your polygon map and create a new modifier in the "Shader modifiers" box located at the bottom of the polygon map.

If you want to make your illuminated polygon map flash, then you'll need to use the Gradient modifier. When you create your new shader modifier, select the "CGradientShaderModifier" option.

Once you created your gradient shader modifier, you will notice a few values under it. To make the gradient shader "connect" to the polygon map's base color shader, you'll need to add "base color" in the Destination value.

Next up is the gradient itself. This is where you can make the light flash. You can add/change the color by selecting the small rectangle inside the gradient box. You can also add more colors by clicking on different parts of the box. You can also move the mini rectangles around if you want to the color to change in a different spot.


For example, if you just want to make a basic flash, add one bright color at the left end of the gradient box. Then create another color in the middle and make the same bright color darker. After that, make another color at the right end of the box and make that color bright as the first one.

Now you will want to adjust how fast the gradient shader changes color. That's where the "Loop period" value comes in. The lower the value, the quicker the gradient shader changes color.

Now let's say you want to make your texture move. Then that's where the float graph shader modifier comes in. To create one, make a new shader modifier and select "CFloatGraphShaderModifier".

Now to make the texture move, you will need to add in either "base offset V" or "base offset U" in the Destination value. Next you will want to make a new graph. Create a new graph and select the "Step up" option and leave the stretch options alone.


And now the last step is to adjust how fast your texture moves. As I mentioned before, you will need to tweak the "Loop period" value for that.
Editing textures and Decals
If you’re the artsy type and want to edit a diffuse map, it’s useful to know what goes where. Simply press Numpad 8 and you’ll see the peeled version of your model. If you select a polygon on the left side, it will highlight that polygon on the right, giving you an idea of where the texture is being applied.


If you want to have a sticker-like thing on your object, you’ll need to make a texture with transparency. Use any image editing software (GIMP, Photoshop, Paint.NET etc) to create the desired image over the diffuse map, then export it as a png or tga file. Now click Texture > Create Texture, only this time select Compressed Translucent. If your file is transparent, you'll get a black-and-white background where the empty parts are.


Now we’ll need to make a new Shader. Simply press the yellow plus next to configuration to add a new shader. Don’t worry that the texture disappeared, that’s normal.


Now, add the transparent texture you made, type Texture bellow and scroll down a bit to where it says alpha test. Check the box and voila, you have a decal.


It's worth noting that a compressed translucent texture is 5MB regardless of content, if you're worried about filesize
Blood and Serious Damage
You want your weapon to have blood splatter, especially if it’s a close range weapon like a shotgun. Press Numpad+ to select all polygons, then on the bottom right, select VM and T, create new vertex map, name it Blood and chose whichever category works, usually Atlas is ok (However making UVs in SED is pretty inaccurate and bad, so I recommend doing this in Blender before weighting the mesh in SED). Now you should have both powerup and blood decals appear on your weapon.

To see how this looks, make a new Shader, find the blood texture in Content/SeriousSamHD/Textures/Effects/Blood/WeaponsBloodSplatter03, set base uvmap to Blood and make sure to set blend type to translucent. Make sure that new shader is on the bottom.

For the Serious Damage overlay, the texture is in SeriousSamHD/Textures/Generic/Effects/Lava_CM. IMPORTANT: Set the base uvmap to Texture, because it's hardcoded to that
Weight maps
Every animation is made of “bones” that move. A weapon has a main bone (usually called Body) and some child bones for things like the magazine and moving parts. You can open up the single shotgun first person model, go to Skeleton Editor on the bottom left and see what the bones are.


These bones correspond to weight maps. Basically you select a group of polygons, give them a weight map with the same name as a bone, and now every movement the bone makes is reflected on the part of the model with that weight map. To create a weightmap, select the desired polygons. You can select all of them for now by pressing Numpad+. On the bottom right, make sure VM and W are selected, then press action > create new vertex map, and enter the name of the bone you want to use (in this case, it's "Body")


Now the shotgun has another important bone - the pump (appropriately named "Pump"). Select the polygons that make up the pump, then repeat the process and enter a different name.

Putting your mesh on a model
It's time to make your first person model. Open up the weapon which you'll be using as a base (in my case it's the single shotgun), make sure you're Model Editor then click on Config on the bottom, Meshes > Shotgun and replace the current mesh with the one you made. If it's giving you an error about credentials, simply save and reopen your mesh.


Now chances are your weapon is HUGE, which is pretty normal. To resize it, first we'll need to get rid of the arms mesh. Simply click on the Arms tab bellow the Shotgun tab, press Arms.bmf and select none. Now that the arms are gone you can safely resize the weapon mesh. Go to Mesh Editor (double tap E), select all polygons (Numpad+), hold Ctrl and Shift and you'll get a sort of expanded XYZ tool. This will allow you to resize the weapon in various ways, but for now we'll simply hold LMB and move the mouse in a diagonal from the edge of the screen towards the center.


You can bring back the arms now, but DO NOT DESELECT THE WEAPON MESH. To bring the arms back, go back to model editor > config > meshes, click on (none) and select the Arms mesh located in SeriousSam3/Models/Weapons/Arms/Arms.bmf.

Now, while in the Model Editor, you should see a Tools tab on the bottom left. Click on it and you'll be able to preview all the avaliable animations. For now we'll use idle. If your weapon is still too big, or now too small, you can quickly hop back and forth between Mesh Editor (for adjustments) and Model Editor (to preview).

Materials
Materials are basically configurations. This is useful if you want to have multiple versions of your model with different skins, without saving the mesh several times.

If you look at the tabs next to your polygon maps you’ll see that it says (local). Click on it, chose Save As and pick a location.


Now you have a material. Let’s put another diffuse texture on this model and save it as a different material.


Now when you’ve made an .mdl file with your new mesh, go to Model Editor, click on Meshes, and you’ll see Modifier list. Click on the yellow plus, then the other yellow plus and the texture will disappear.


Now we select the material we created and it’s like we changed the whole texture.


Right now the material applies to the whole mesh, making certain parts look weird, but if you type in a polygon map (let’s say Body) in the Surface tab, then the material will only apply to the Body part.


Much better
Rendering Parameters
This is undoubtedly the worst part of making a weapon, and I dread it every time. Rendering paramaters determine where the weapon is placed on screen and how it's oriented. The problem is that you can't see your changes without going into a level, and you can't undo any changes, so it's a very slow and tedious proccess.

Basically you have Position values and Angle values.

X Position: Moves the weapon left and right
Y Position: Moves the weapon up and down
Z Position: Moves the weapon towards or away from the camera

X Rotation: Rotates the model to the left/right
Y Rotation: Rotates the weapons up/down
Z rotation: Rotates the weapon in a kind of clockwise movement, but this is rarely ever used.

Weapons and Ammo icons
This part is covered by noam's guide, but I'll just add two things to it

Some helpful tips: BFE weapon icons are pure white, whereas HD ones are slightly darker. Make your weapon icon 100% white and you have your BFE icon, reduce the opacity to 63% and you have your HD icon. Ammo icons for both games are darker, so use the 63% opacity there too.

Another thing to note is that the first four weapon categories of BFE are point to the right and the rest are point to the left. In HD, all the weapons are pointing to the left.

Adjusting Third Person & World Models
(This part is a little more advanced and I recommend you finish reading noam's guide first)

Right now every weapon has it's own "Tools" which determines how it's being held. There are different tools for HD and BFE, the main difference being that BFE weapons use only "Right Hand Tool" whereas HD weapons can use both "Left hand Tool" and "Right hand tool". You can see the tools in the weapon database file, right under Model

Basically, you'll want to pick a pose from the existing ones, see how that tool is named, then resave that tool elsewhere , WITH THE SAME NAME. It's very important that it has the same name.

So since I'm making a single shotgun, I'll need PlayerWeapon_SingleShotgun_R.ctl. I open the SingleShotgunWeapon.ep database file, scroll down to Right hand tool, left click on PlayerWeapon_SingleShotgun_R.ctl, chose Save As and pick a location.

Now, I open my own weapon's database file, and place the newly saved tool in the Right hand tool slot. Click the little plus next to Right hand tool to expand your options, and you'll see another "Model" tab (there are a lot of those, it's a bit easy to get confused). Put your world model in there (or any model that doesn't have a mesh but rather the weapon is a child) and resave it as "something_TP". This way you can move and resize the weapon model without altering the mess and affecting everything else.

Now let's put your weapon in the world. Open up any level (I like to use the JotN level Philae), and on the bottom left you'll see an EntityList tab. This is a list of all the things you can put in a level, like lights, monsters, items, scripts etc. For now we'll need GenericItem. Click on "Generic Item" and drag it into the level. Now while you have that GenericItem selected, on the bottom left you'll see an Entity Tab. Click on it, on the top you'll see item params, open that and navigate to where you've saved your weapon item dabase file. You should now be able to see how your weapon looks like in the world.

If you want to make adjustments, open the item you've put in the Model field of Item params (Right Click > Open in document) and make from the top row select Window > Tile Horizontally. Now you can adjust your model and immediately see how it looks like in the world (you may need to move the mouse from window to window to see the effect).

Adjusting the third person model is a bit trickier. First you'll want to enter a simulation, press Shift+T. Now pick up your weapon. Press Ctrl+~ and you'll enter a simulation view (to return to the regular view, press Ctrl+~ again. To exit the simulation, simply press Esc). Now, go back to the world file, open your item's weapon params, navigate down to tools, expand it, then open the third person model. You can now make adjustment to your weapon and see how they will look like in third person. Once you've made it to your liking, simply save the third person file and you're done!

(I will provide pictures for this segment soon, in the meantime I apologize for the dryness)
The End
And that about wraps up this guide. Probably wrote more in here than my 5 years of highschool literature classes, but hopefully someone will learn something, and maybe even make a sweet weapon one day.

I'd like to thank Kuber, Urban, nooms, Biomech, Mauritsio, Pan, Ryason, El Vanya and the 7smoke workshop for teaching me pretty much everything I know.

And Biomech again for writing the part about Shader Modifier, that was totally him

Let me know in the comments if there's anything I forgot to mention, or if something is still unclear.
30 Comments
BuhBuhich 16 May, 2023 @ 1:38pm 
I have a problem in weight maps, when I select the necessary polygons and create a weight map and make a bone, then in the animation editor when I twist the bone with a new weight map, it changes its size, although I just twisted it, what should I do with it? !
Favkuloda adekvatik 15 Jan, 2022 @ 1:23am 
Hey someone help, I don't understood how to make Gloss map and Gloss mask?
Chrysalis 23 Sep, 2019 @ 11:20am 
I apologize. But during the making a weapon on the guide during the animation stage, I ran into a problem that I can’t solve. The clip seems to be screwed into itself.
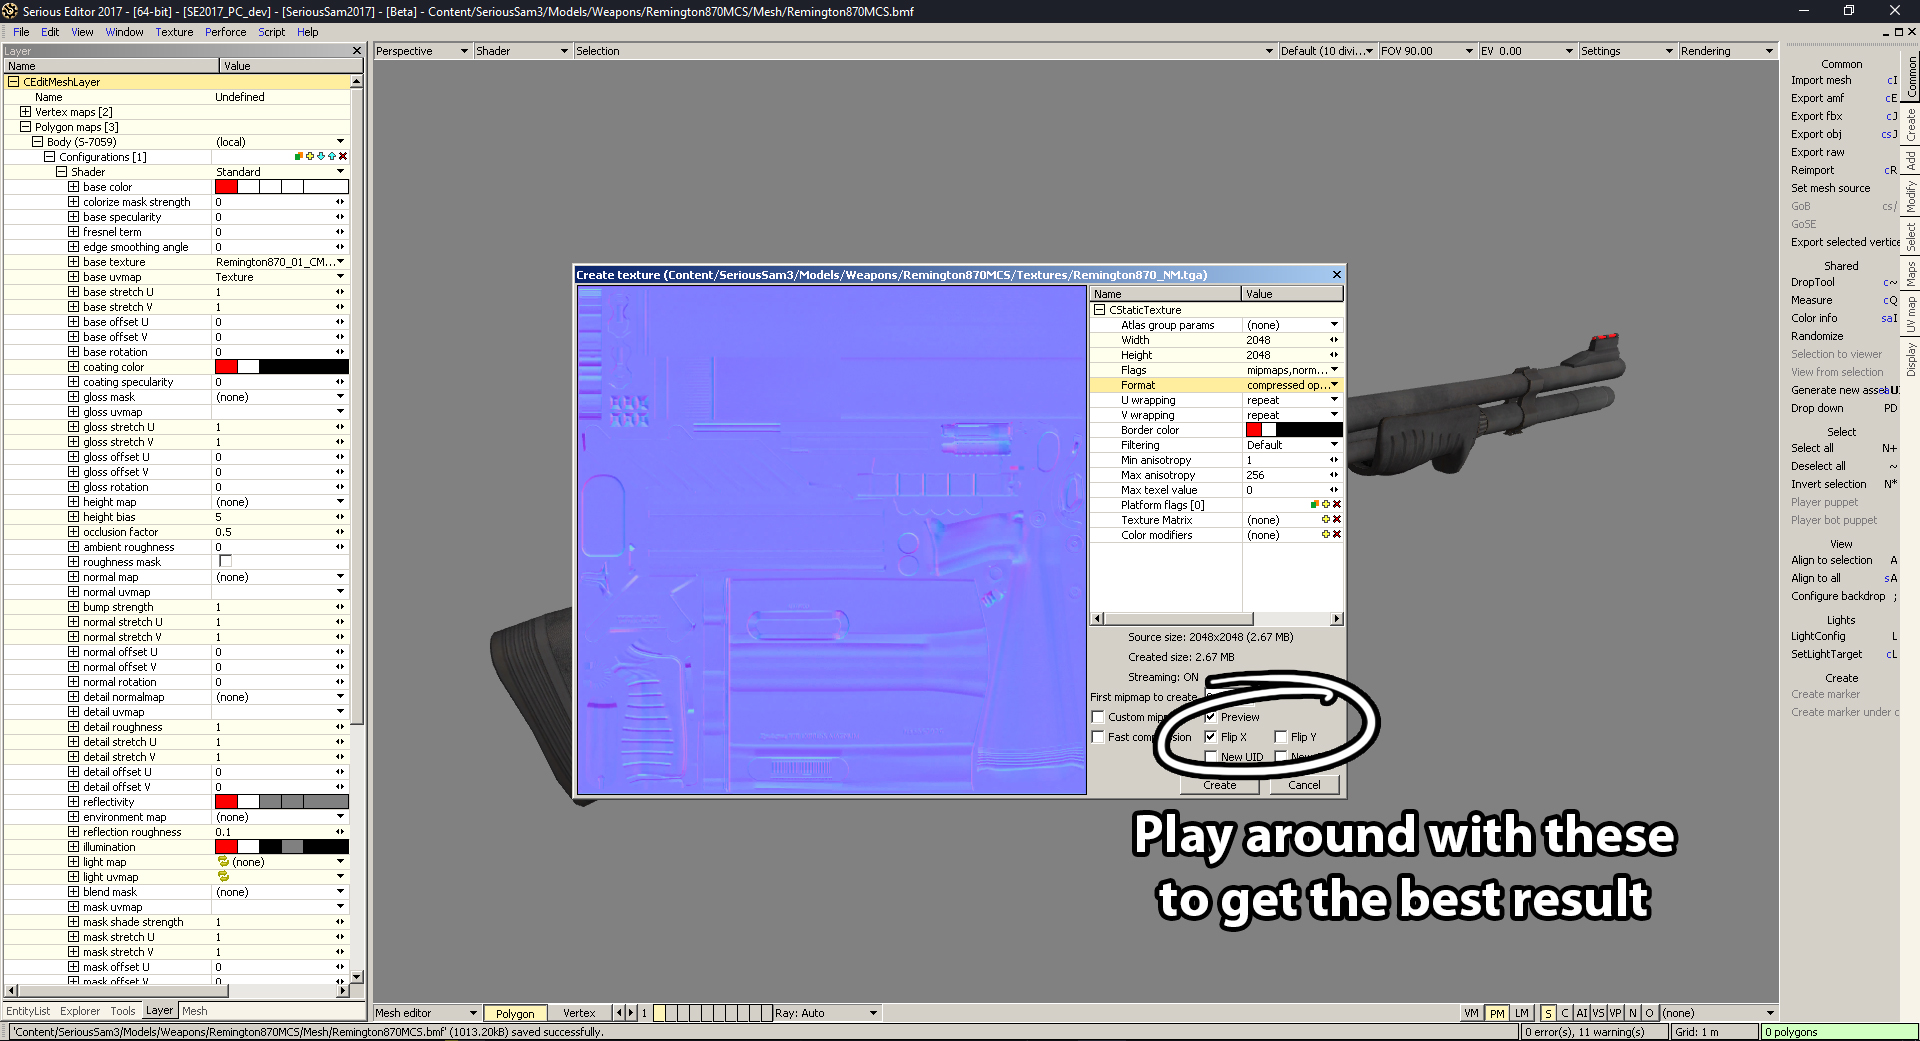
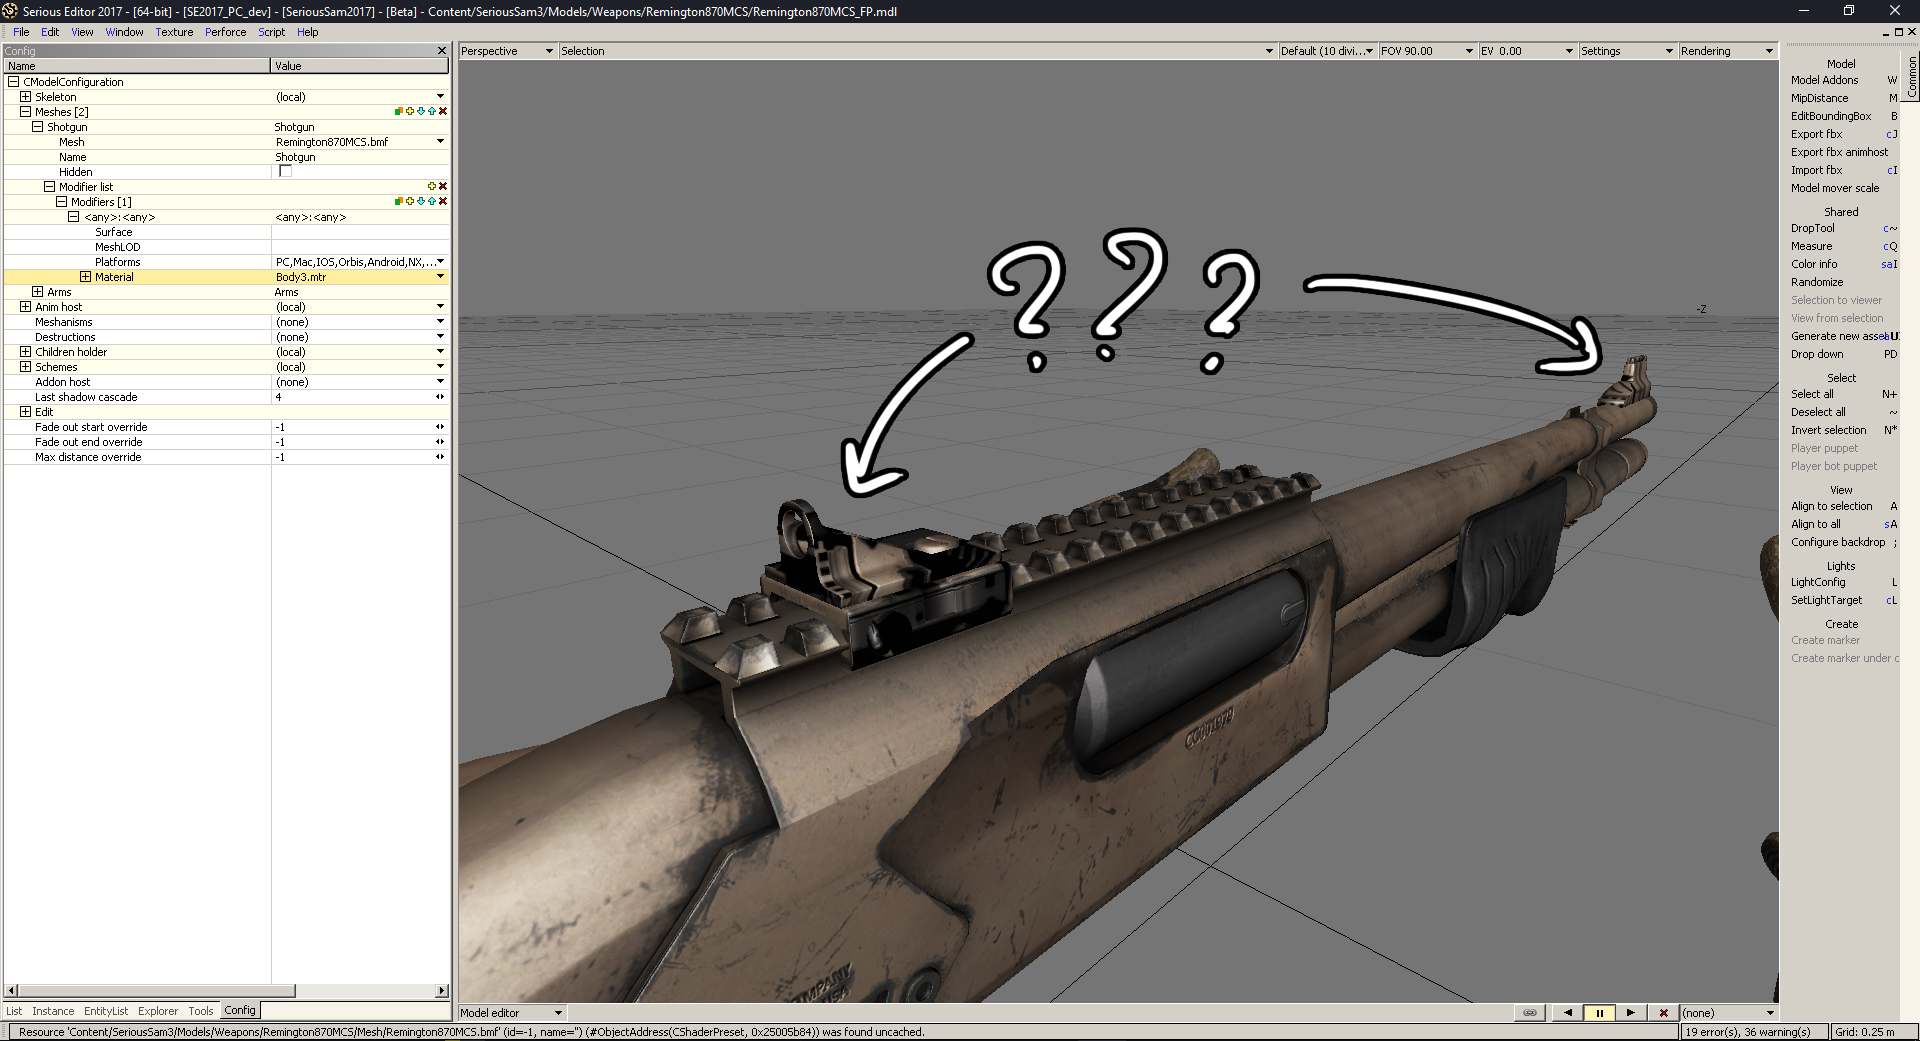
https://www.dropbox.com/s/xroy18zetqob02e/Bug.png?dl=0
Soulmyr  [author] 6 Feb, 2018 @ 4:48am 
I can't help you much with the ammo counter since I don't have VR (it's not a big issue, only like 10 people use VR) but icons are easy.

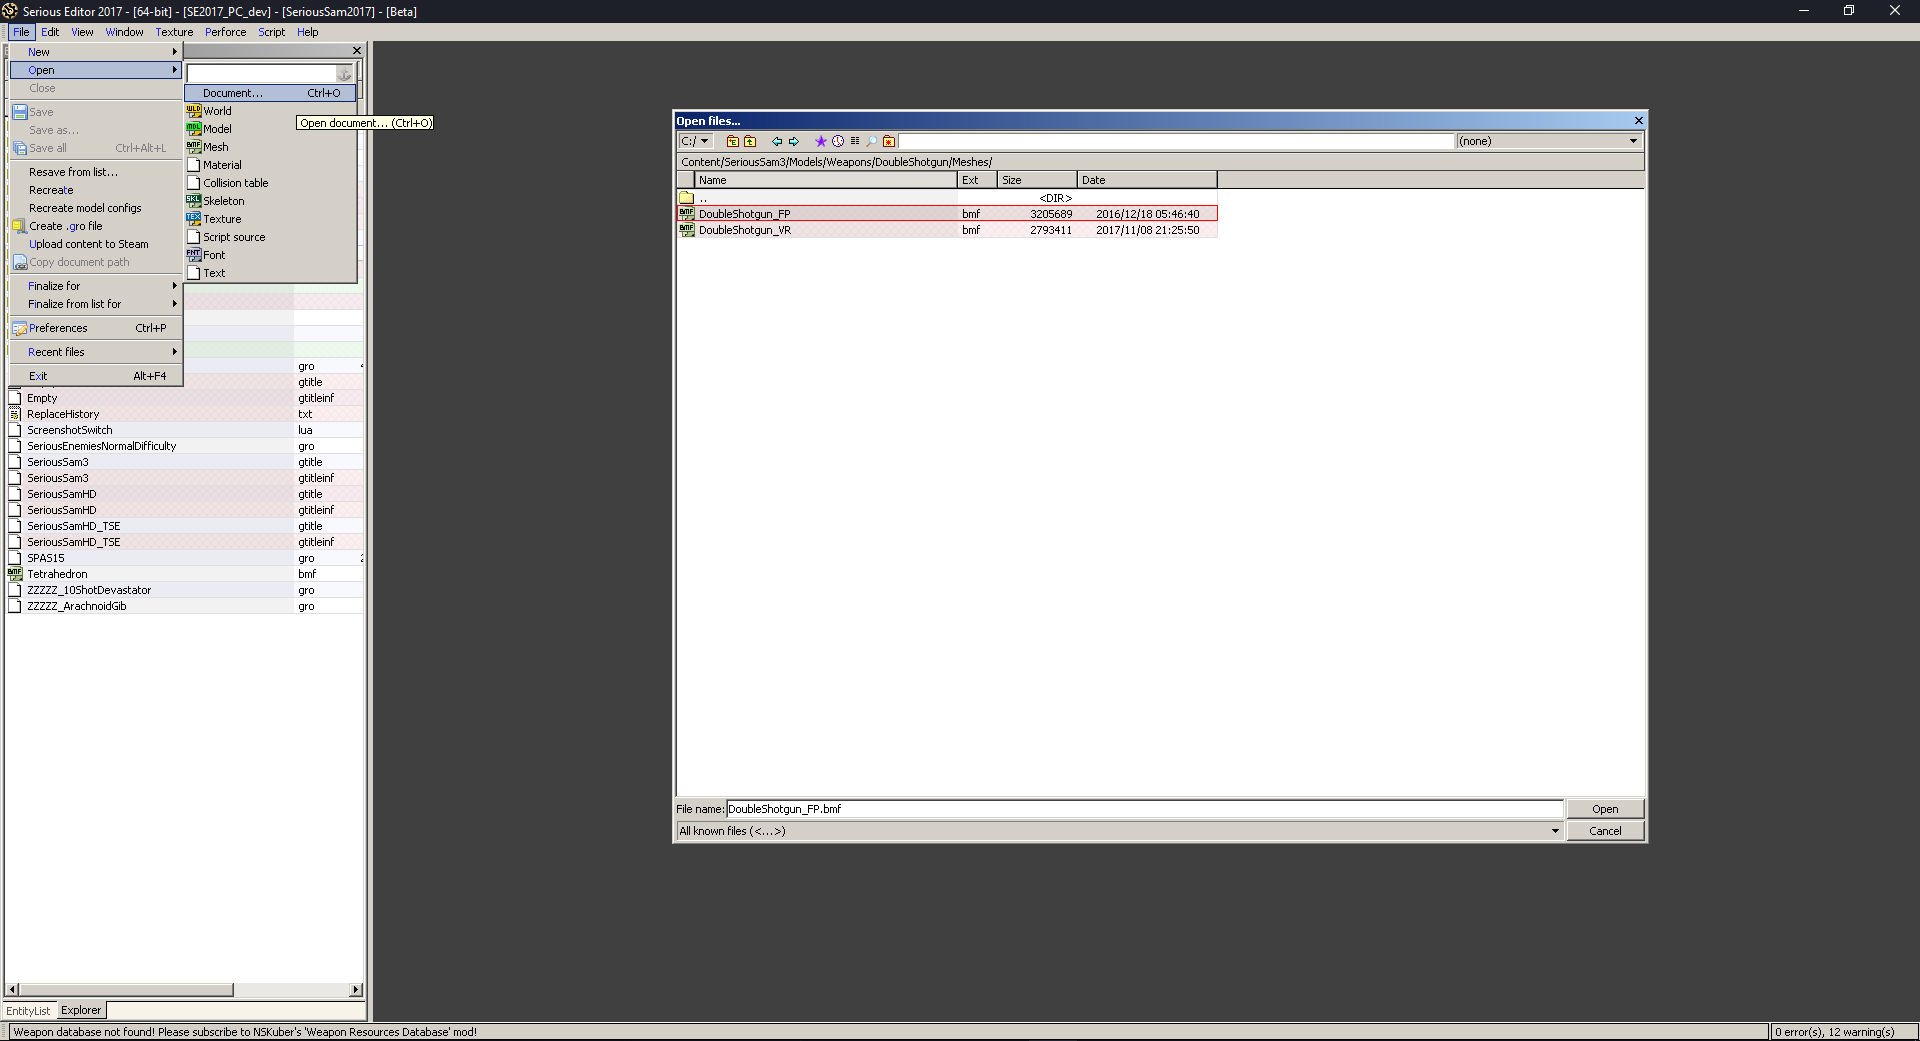
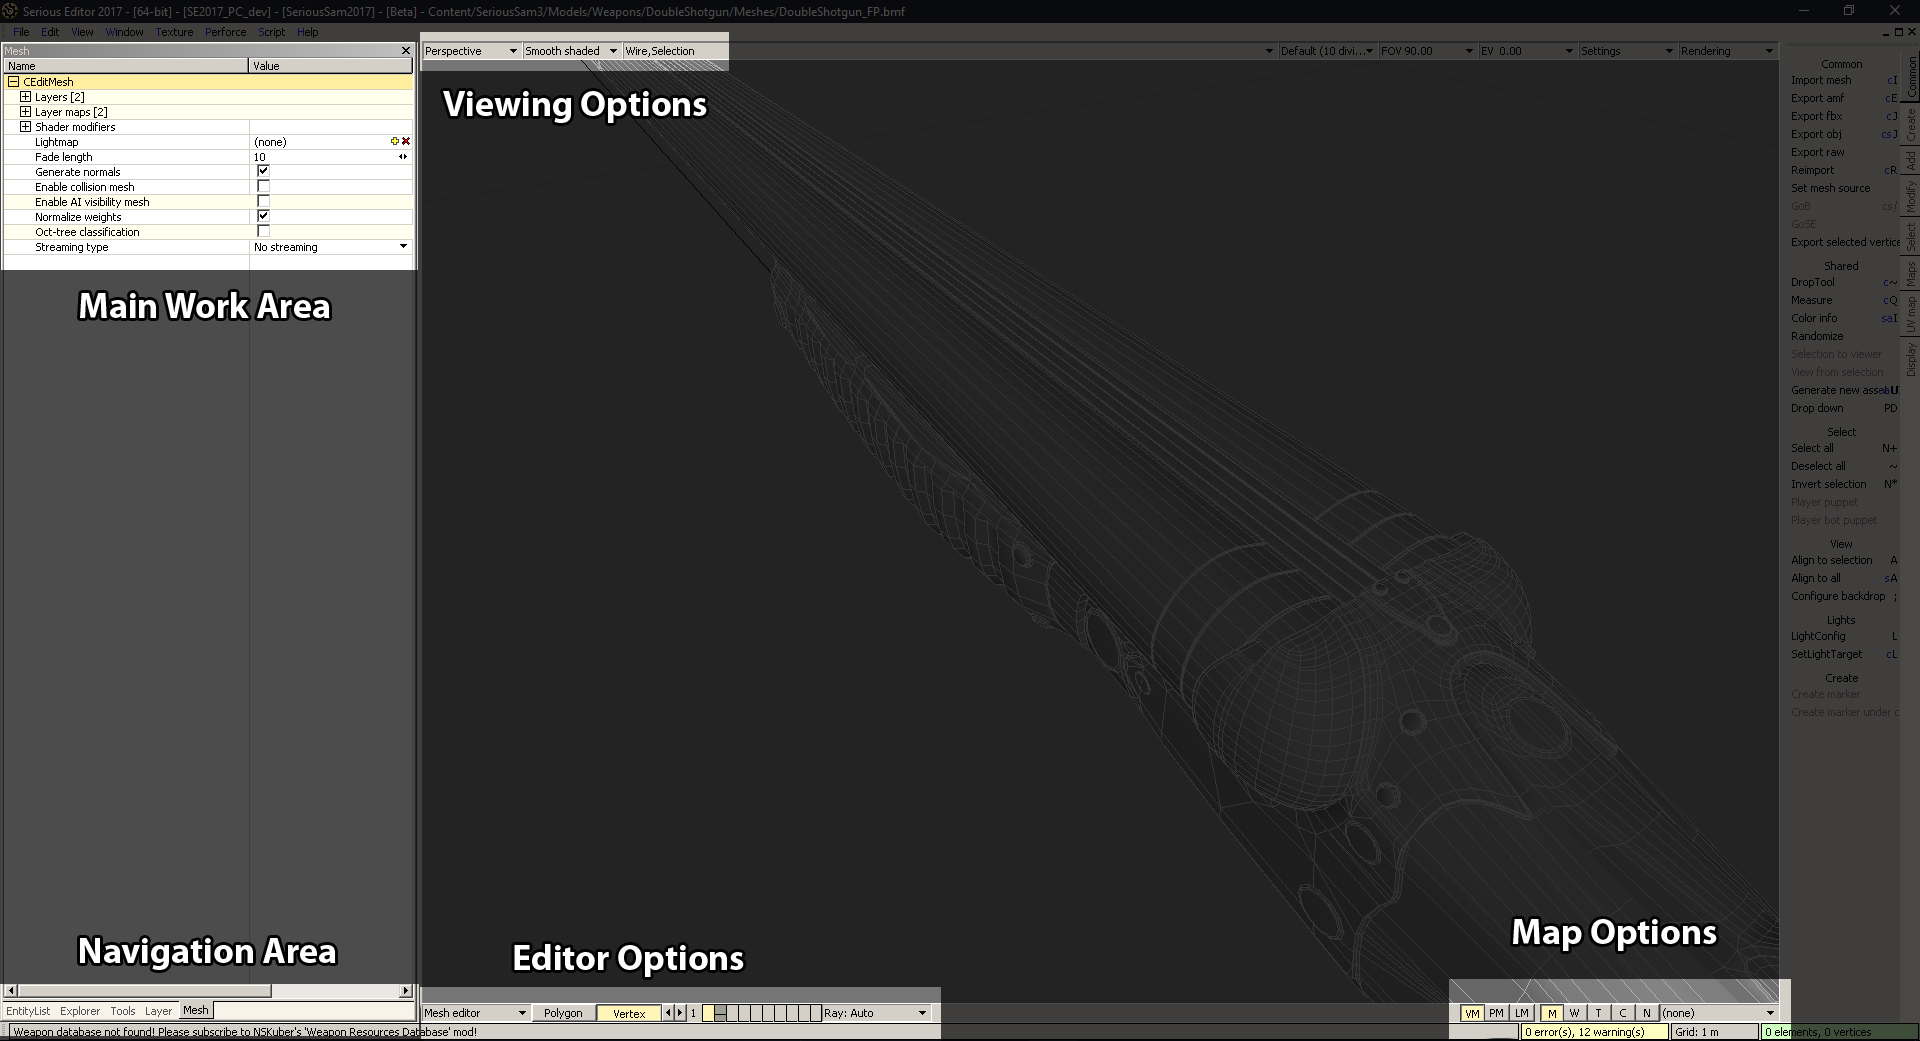
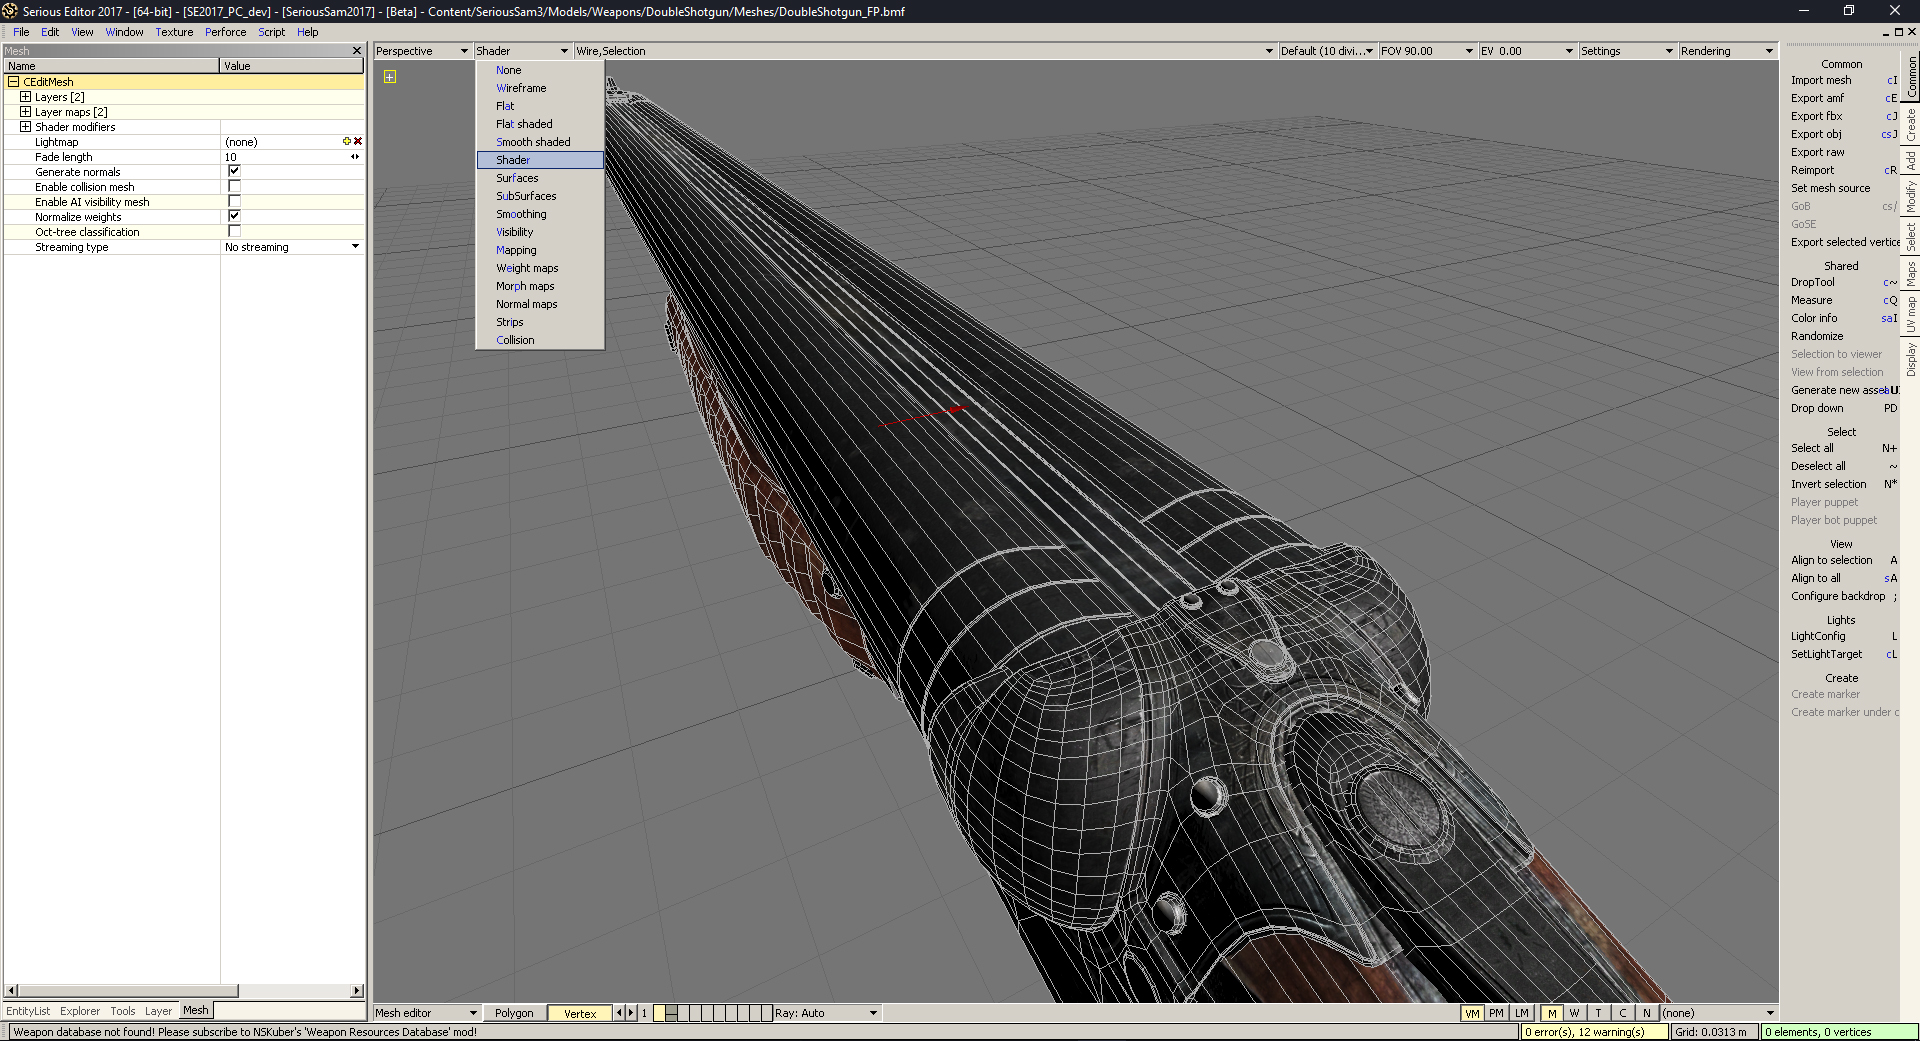
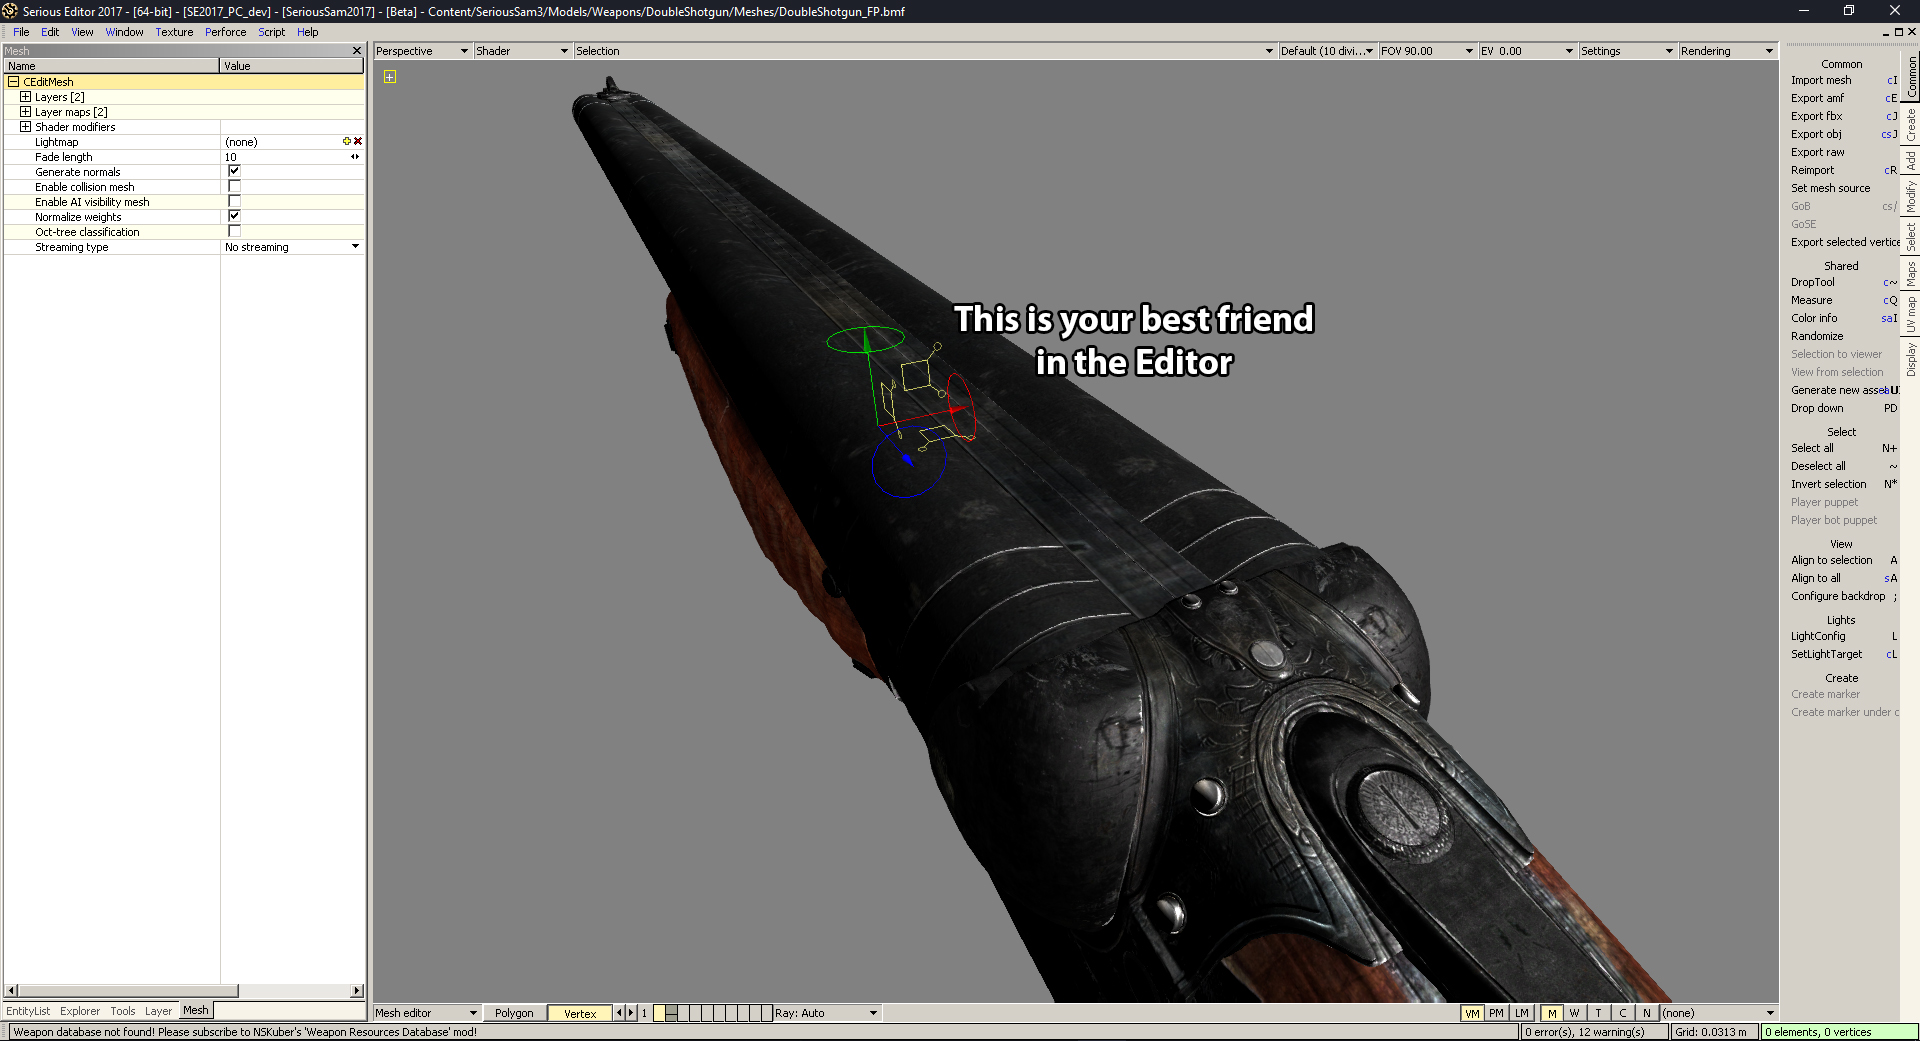
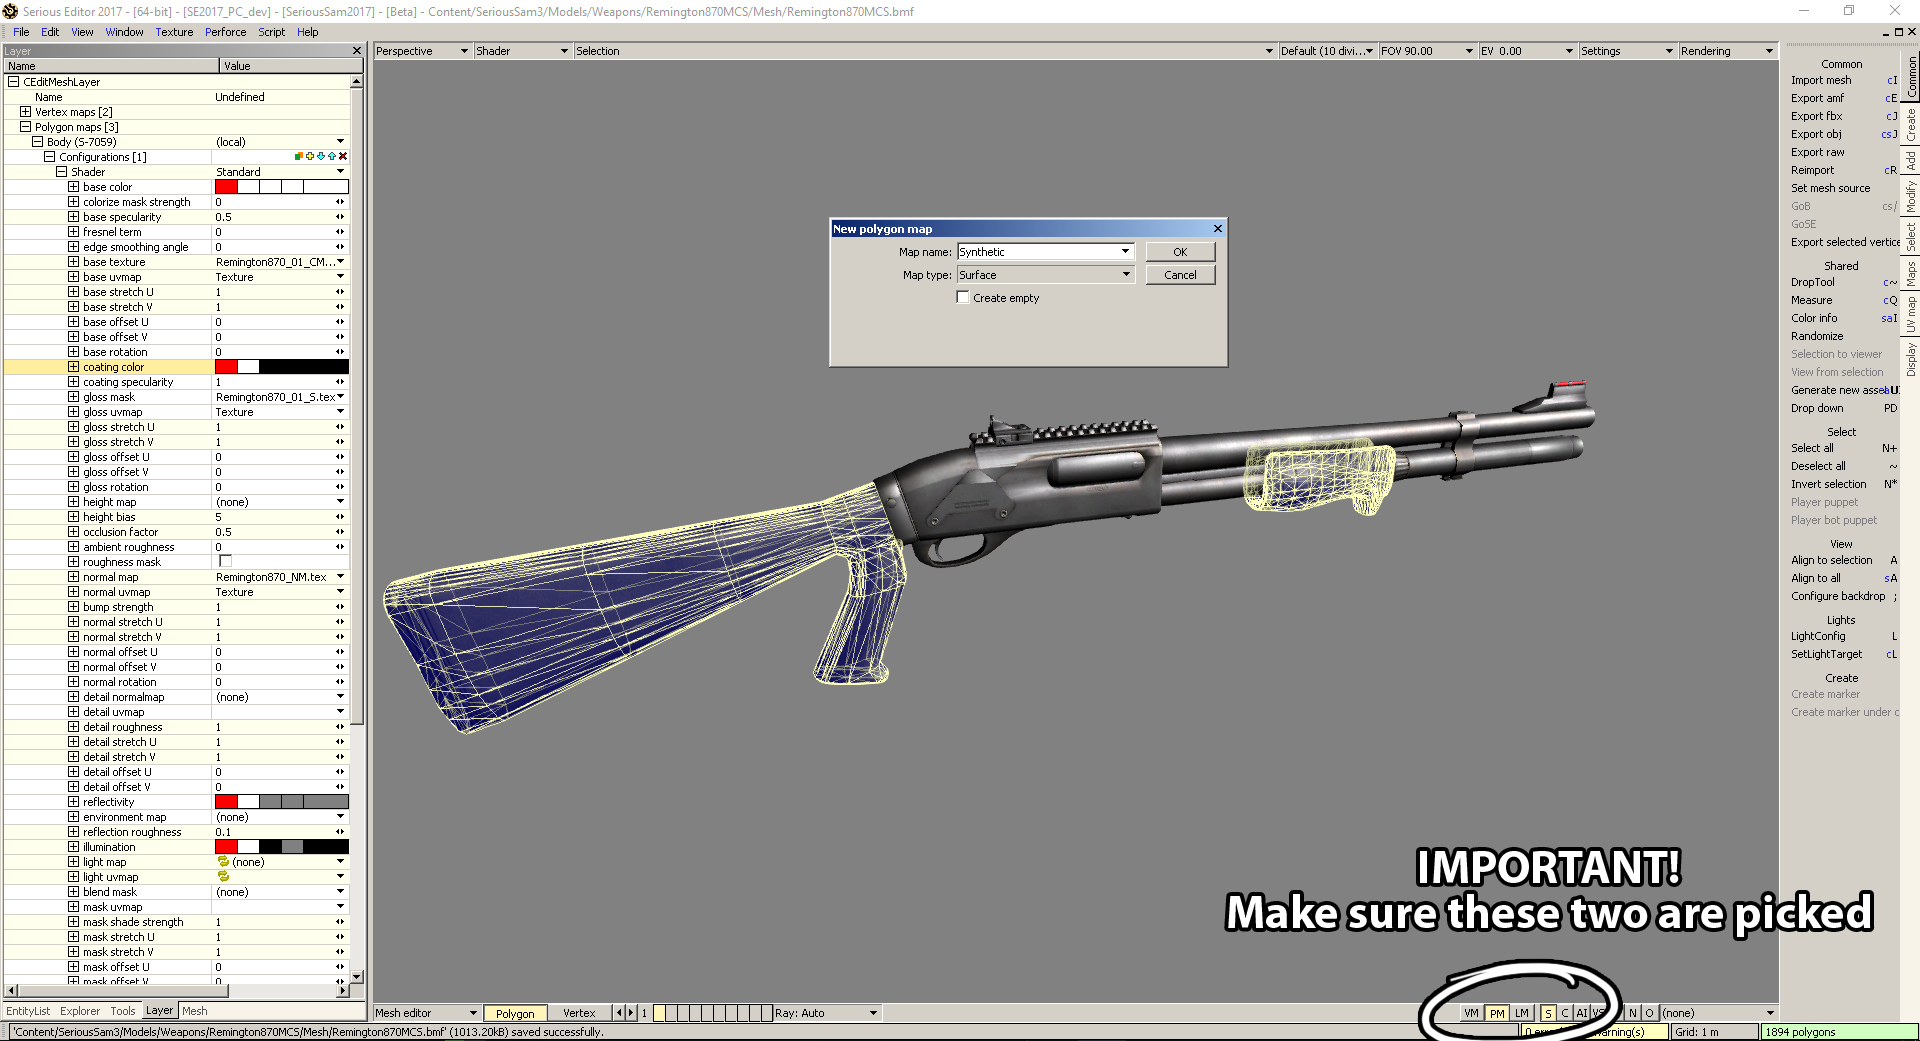
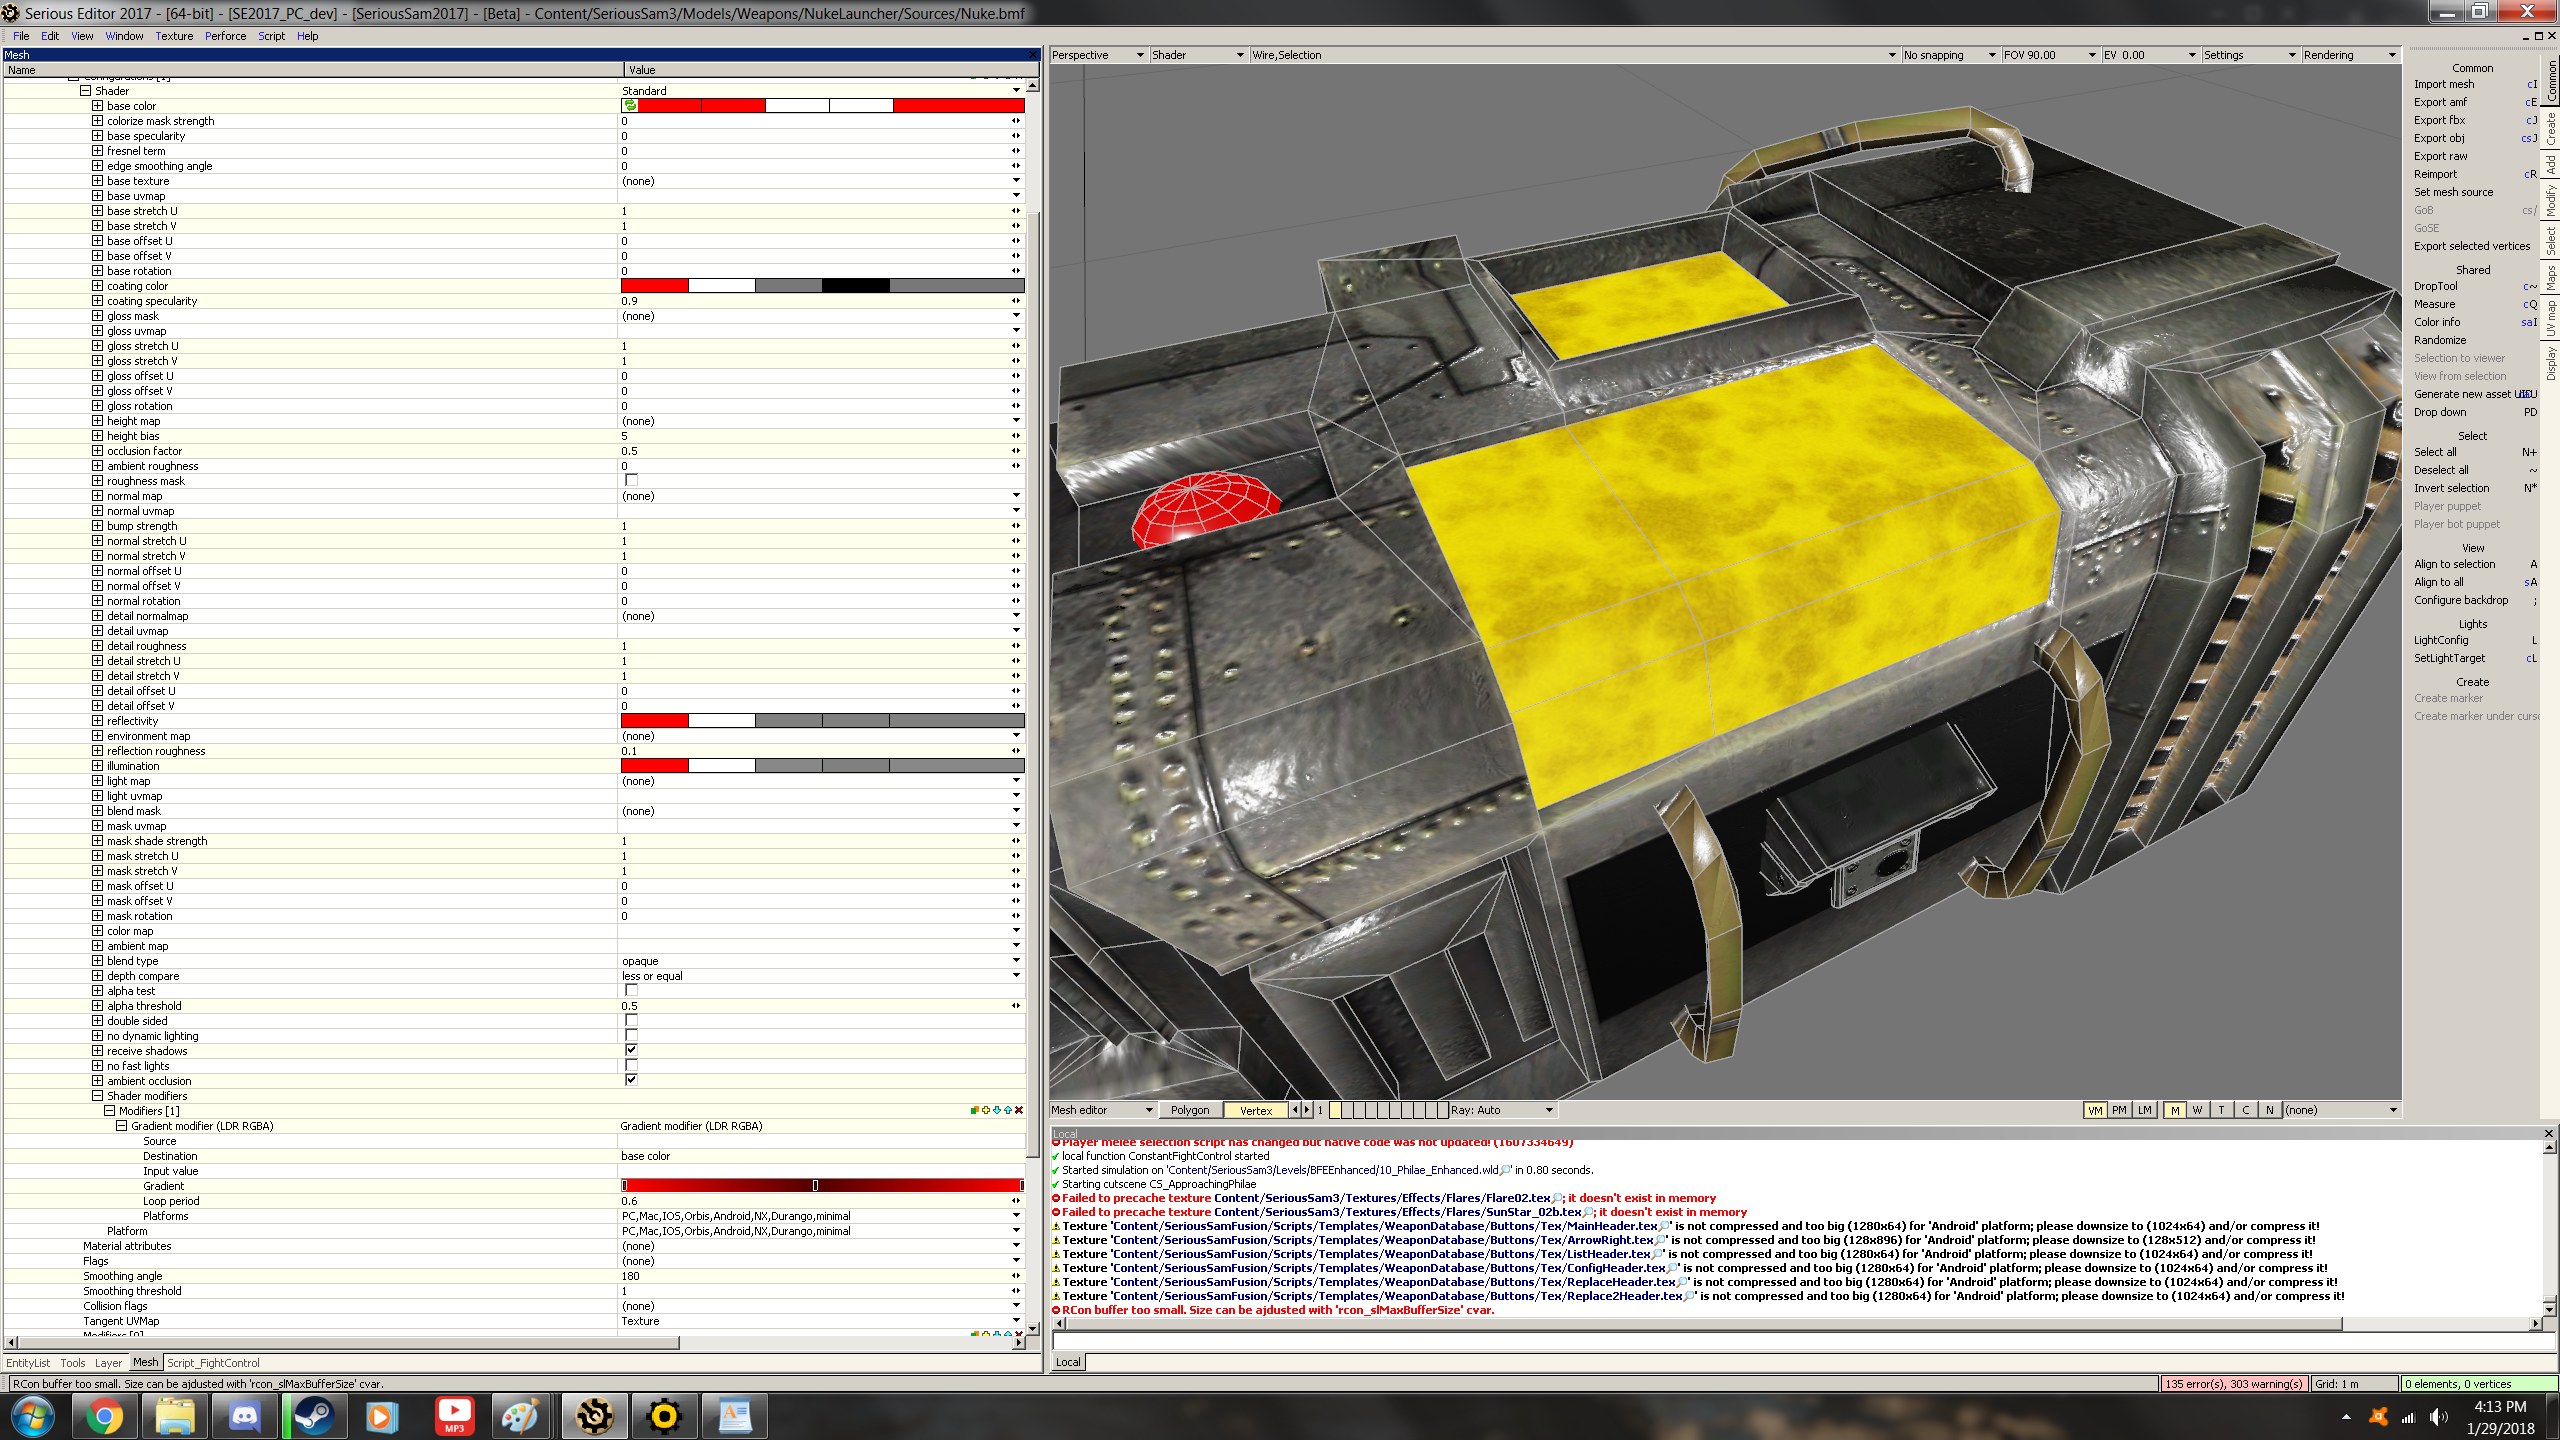
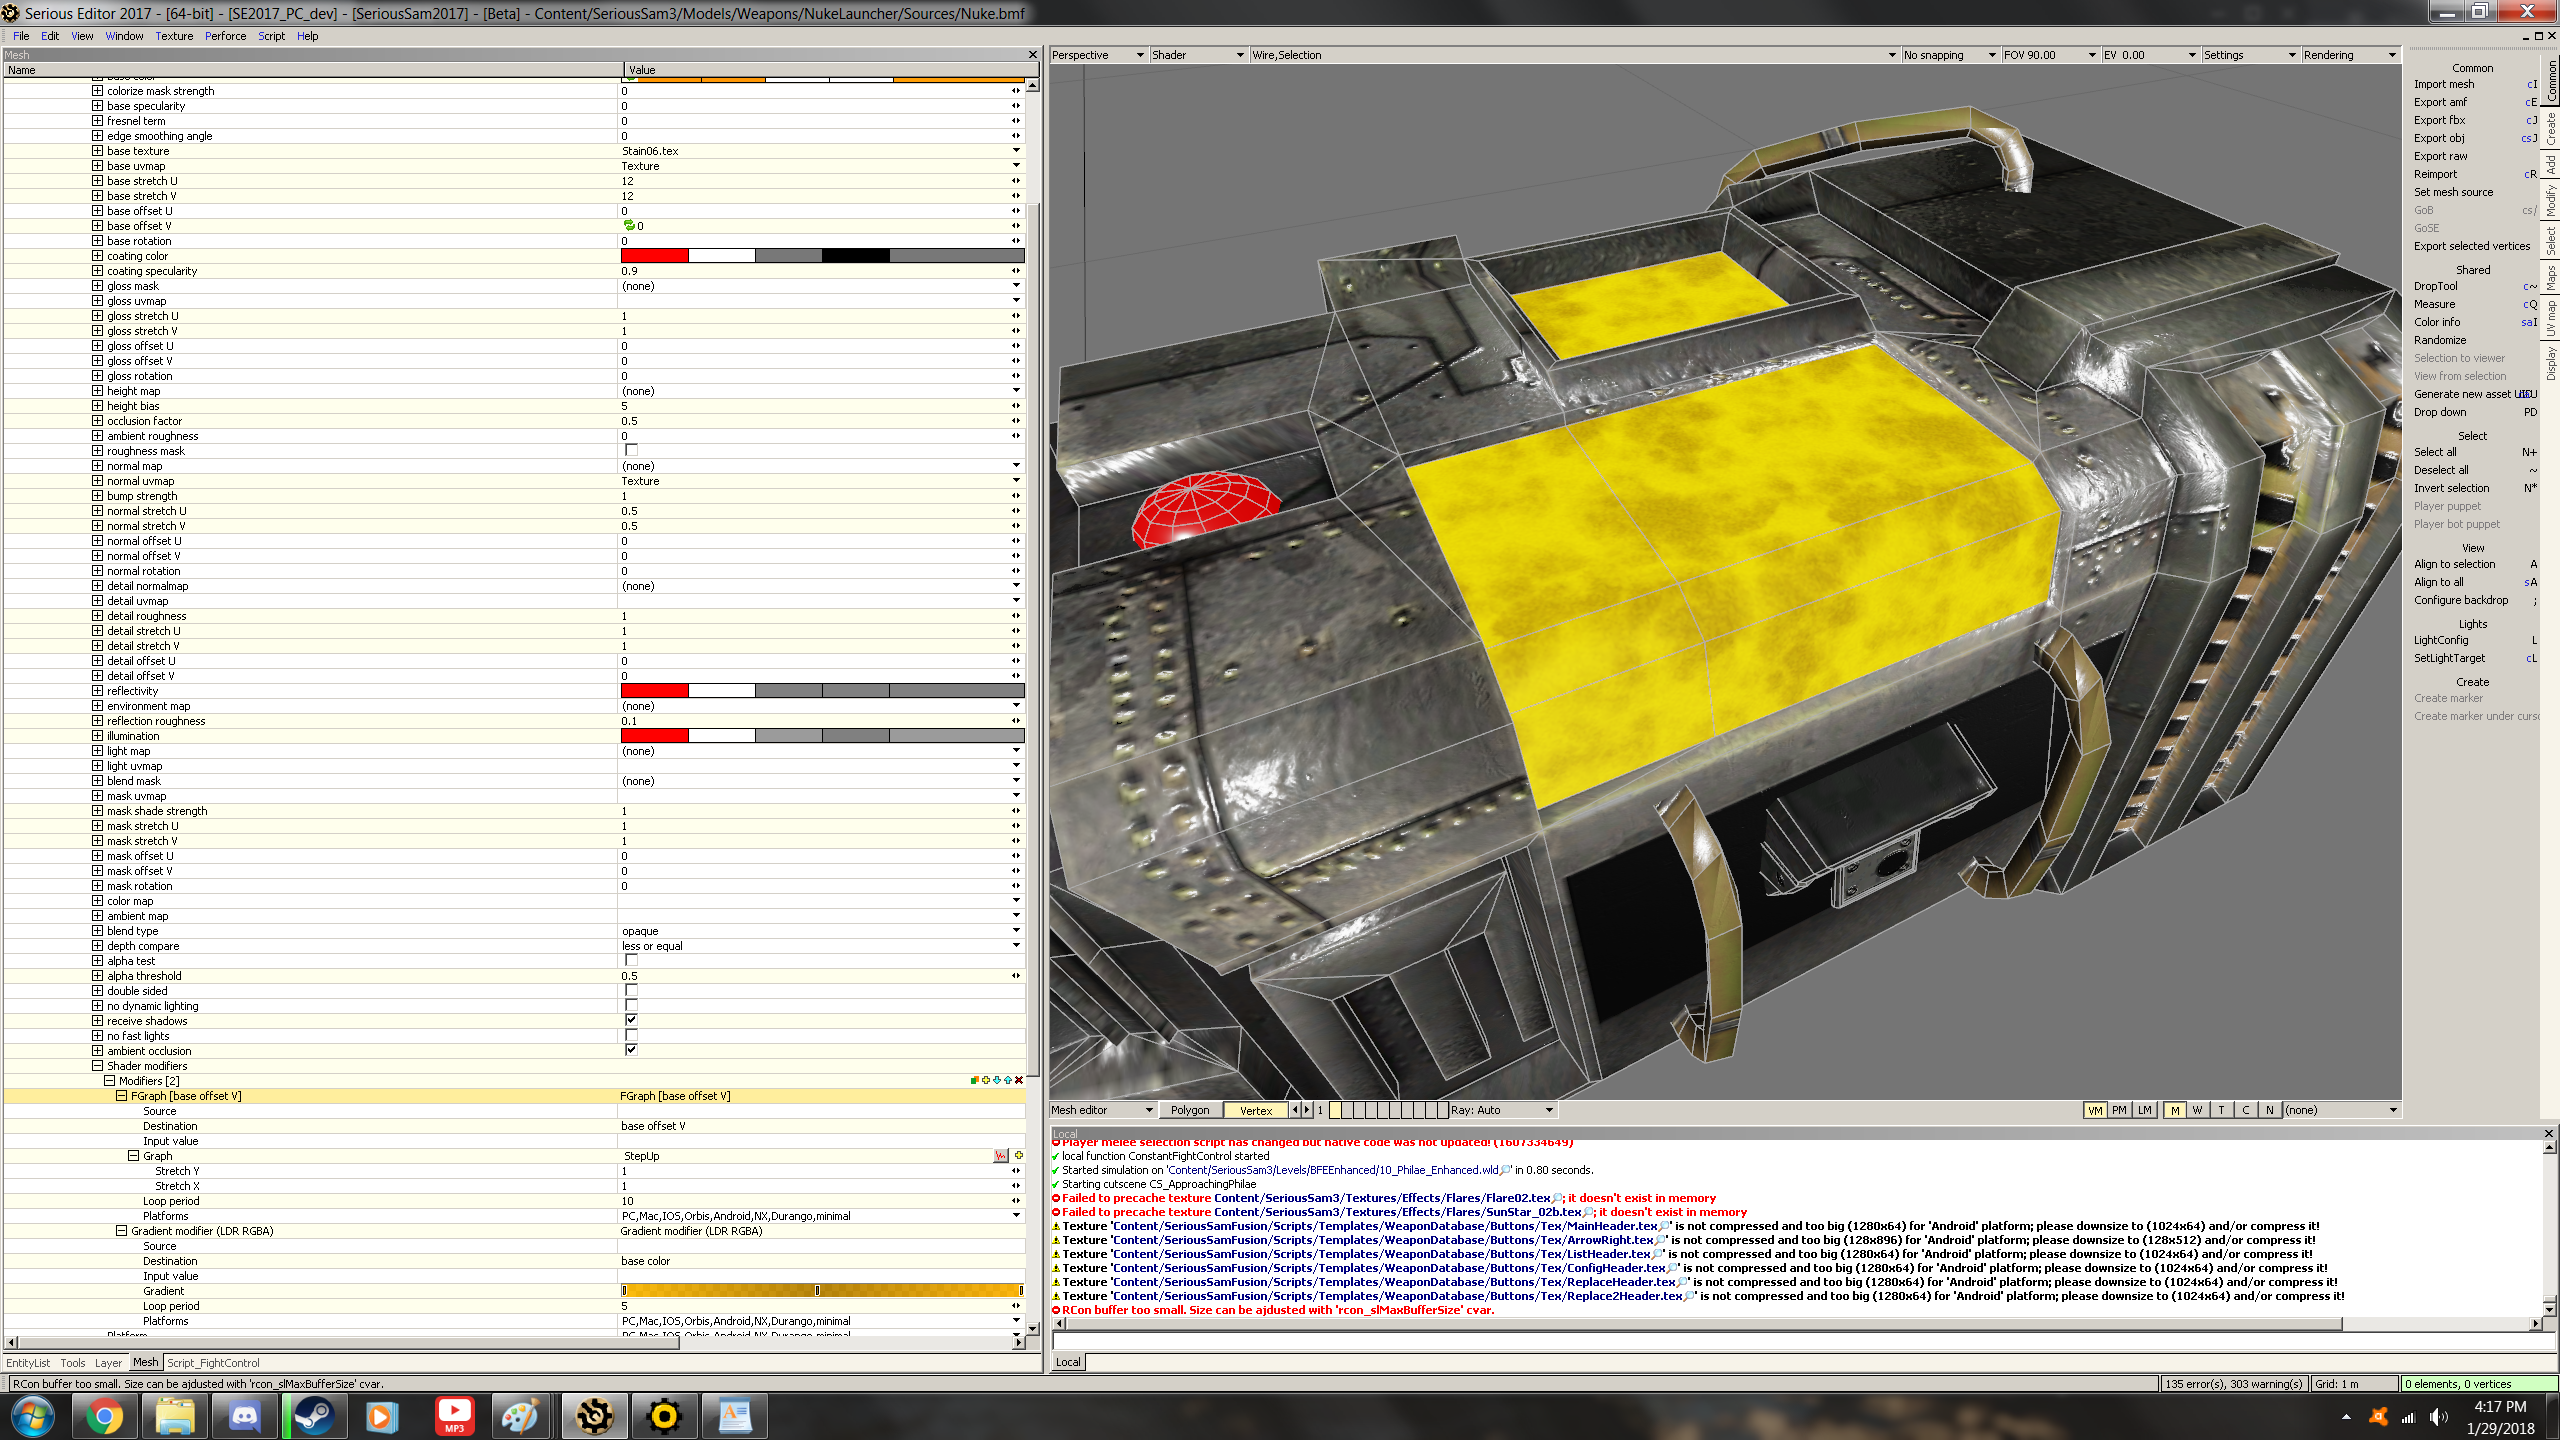
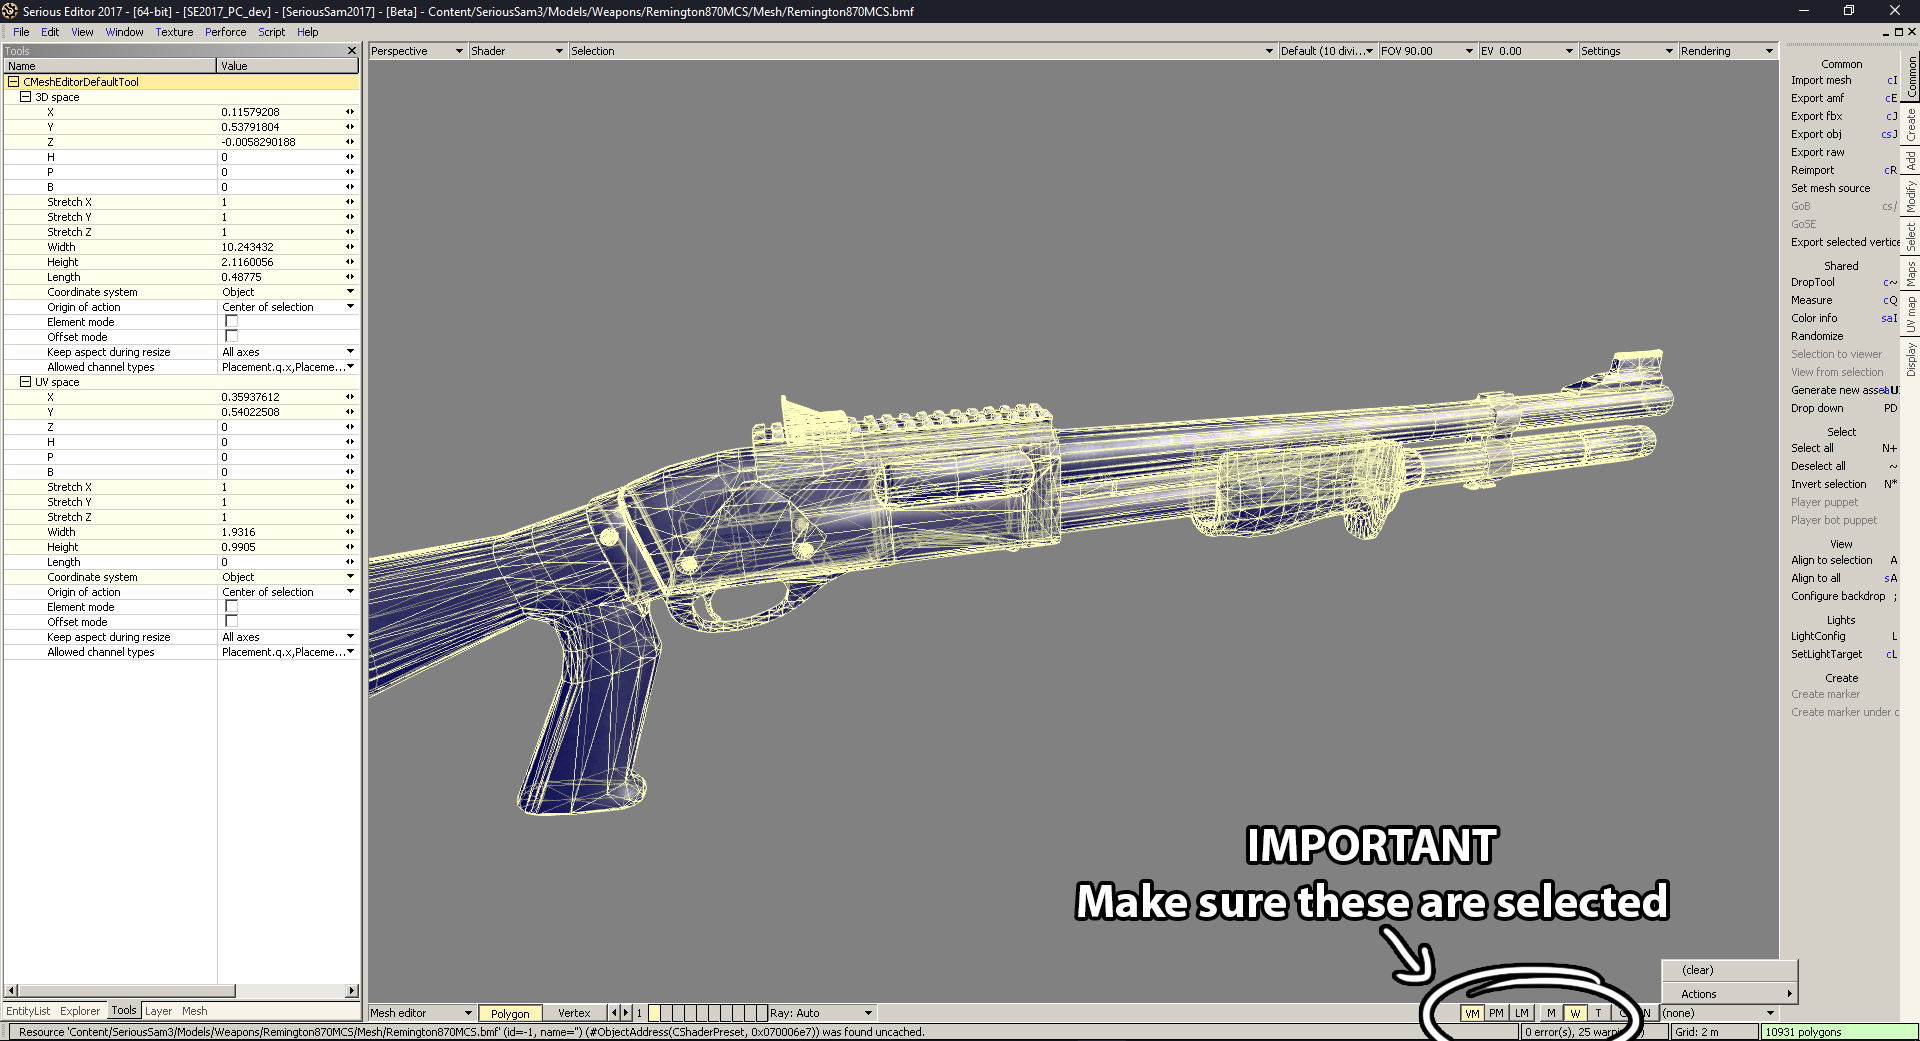
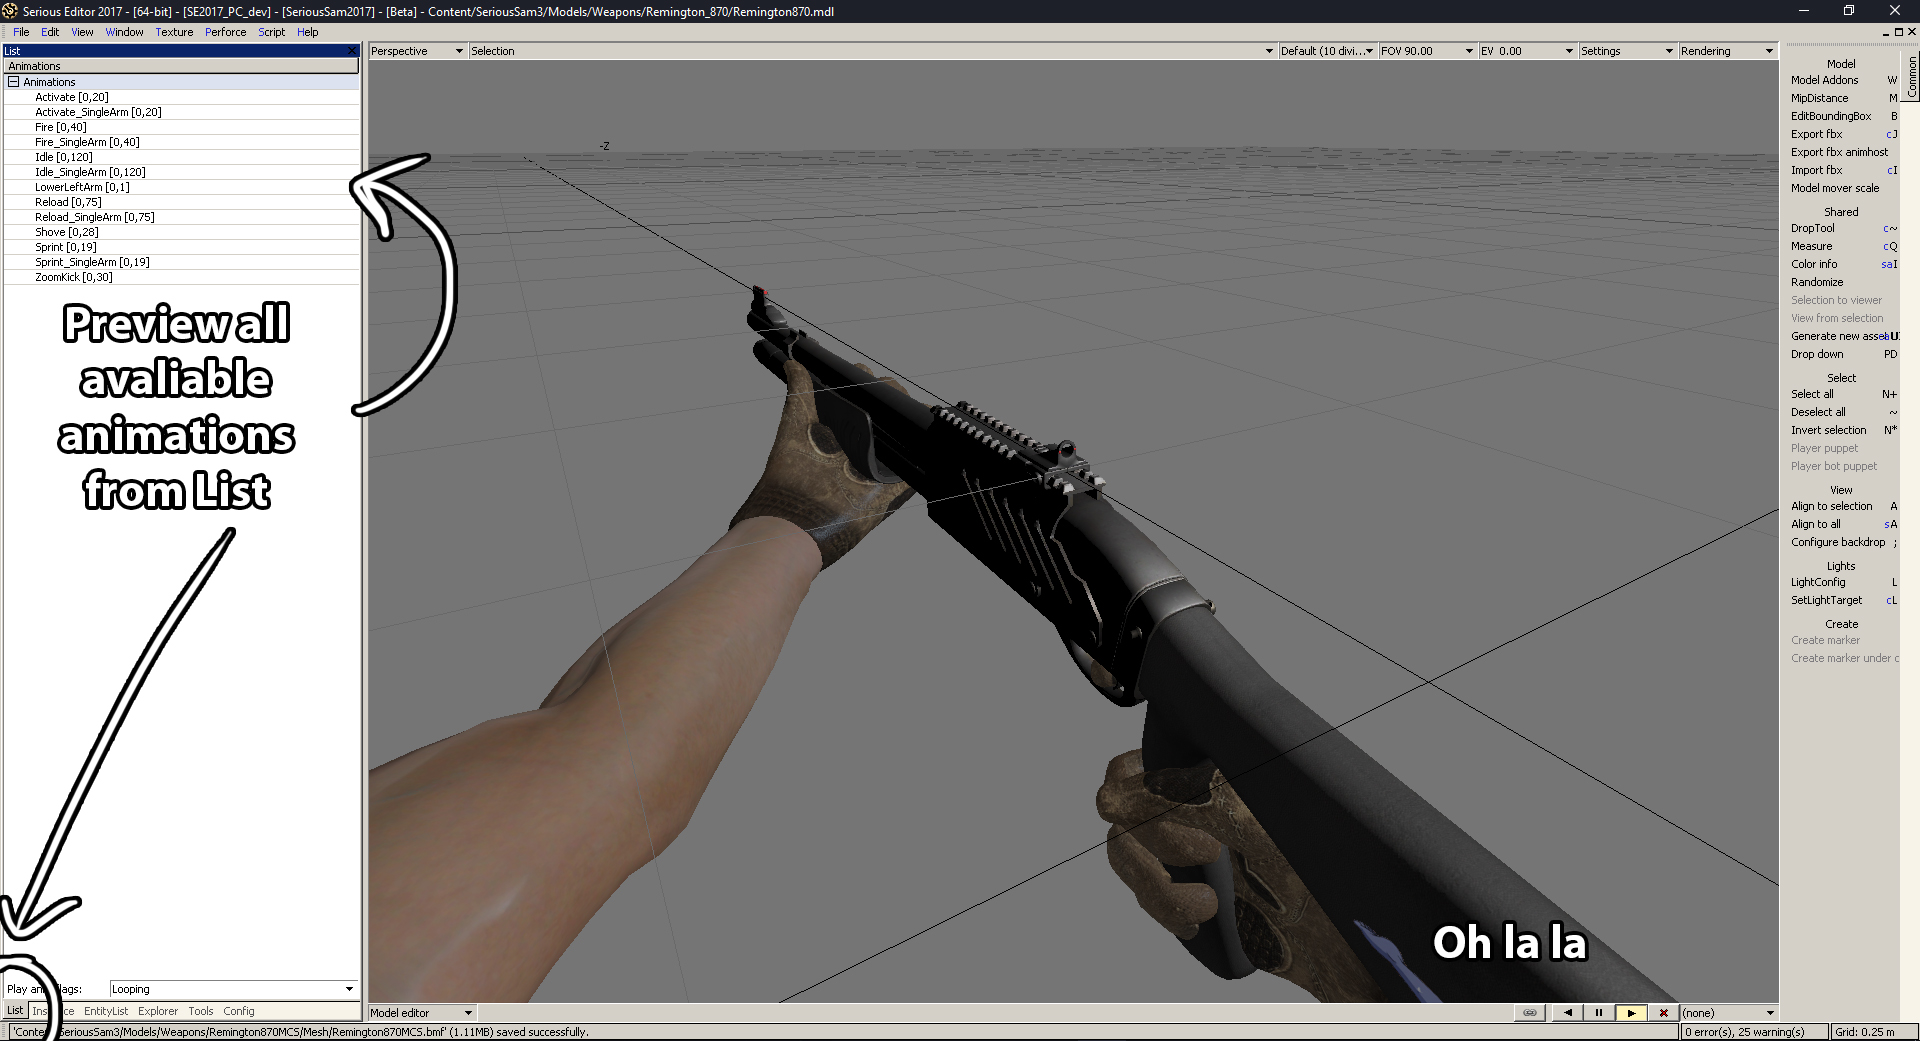
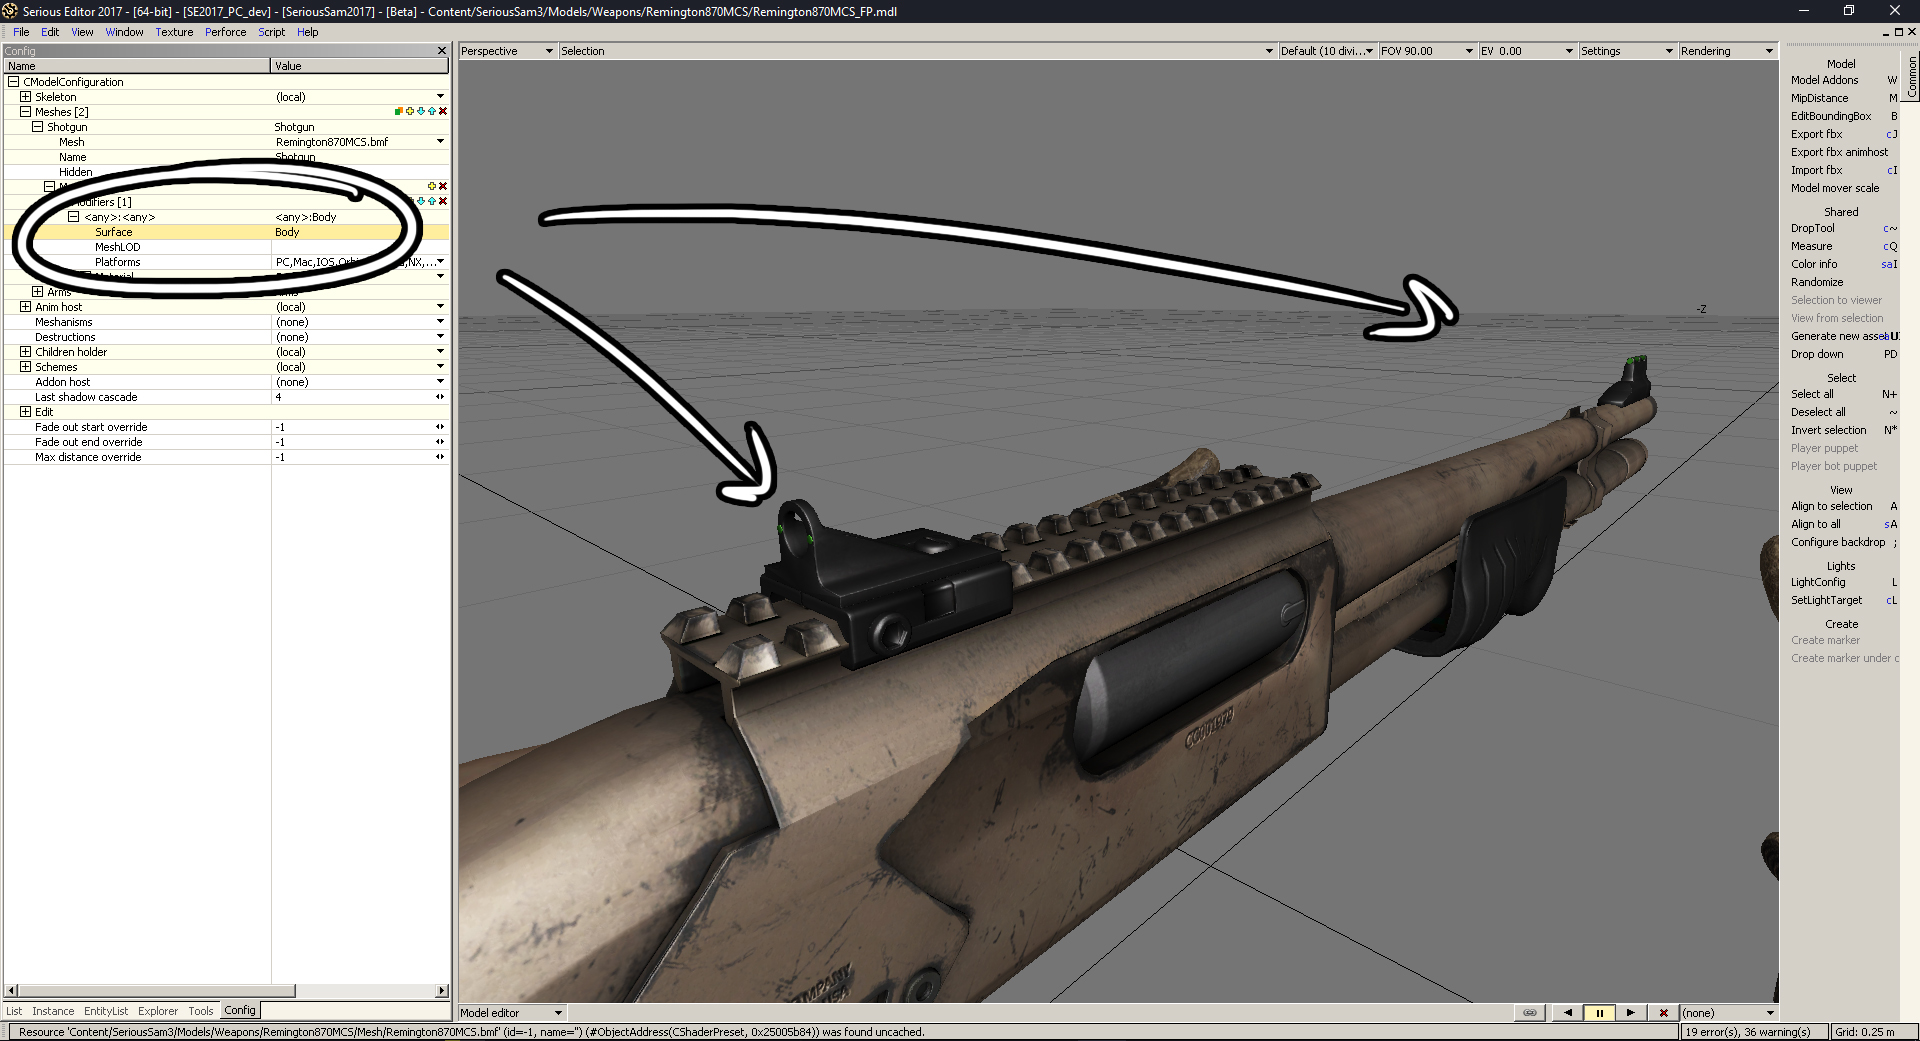
Open your weapon mesh, on the top right change "Perspective" to "Left" or "Right" (Read the "Weapons and Ammo icons" part to see where your weapons should be looking at"). Press Numpad 6 to get rid of the grid, then take a screenshot. You can set "Shader" to "Visibility" if you're not going to add any extra details to your weapon icon.

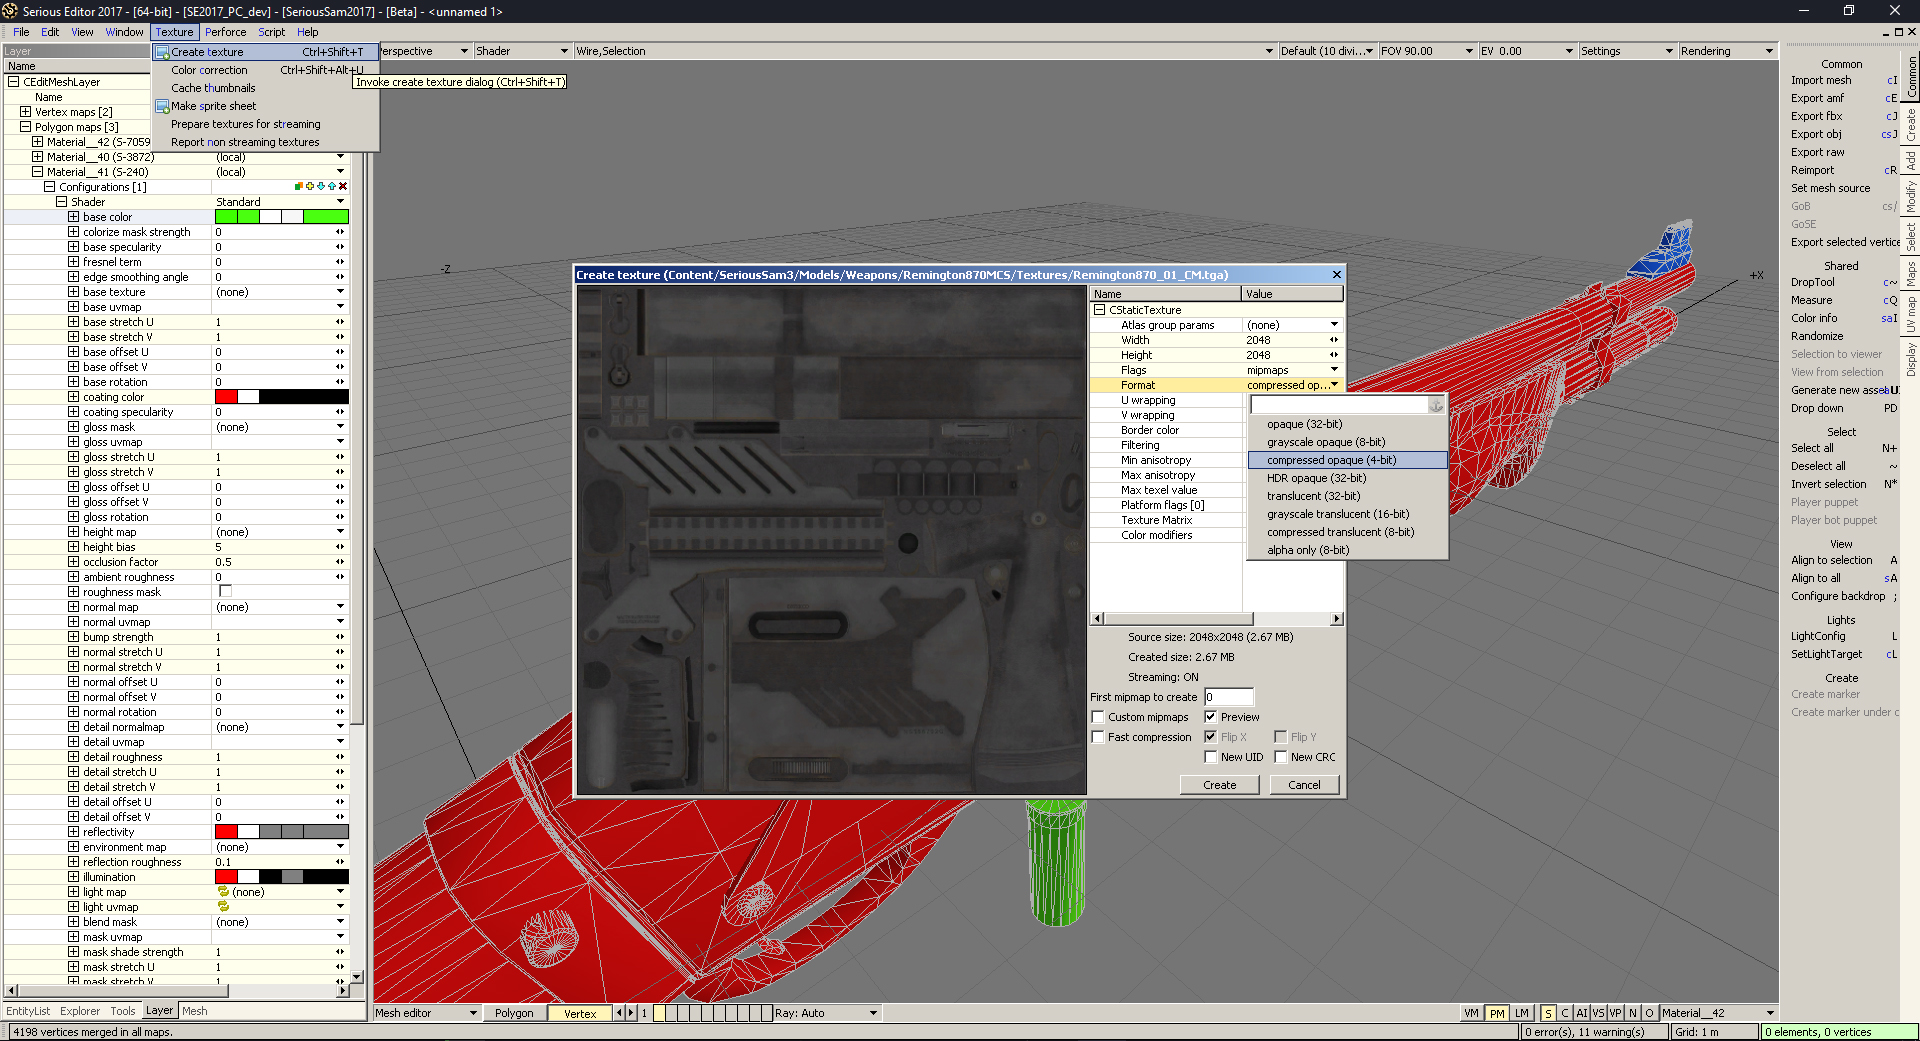
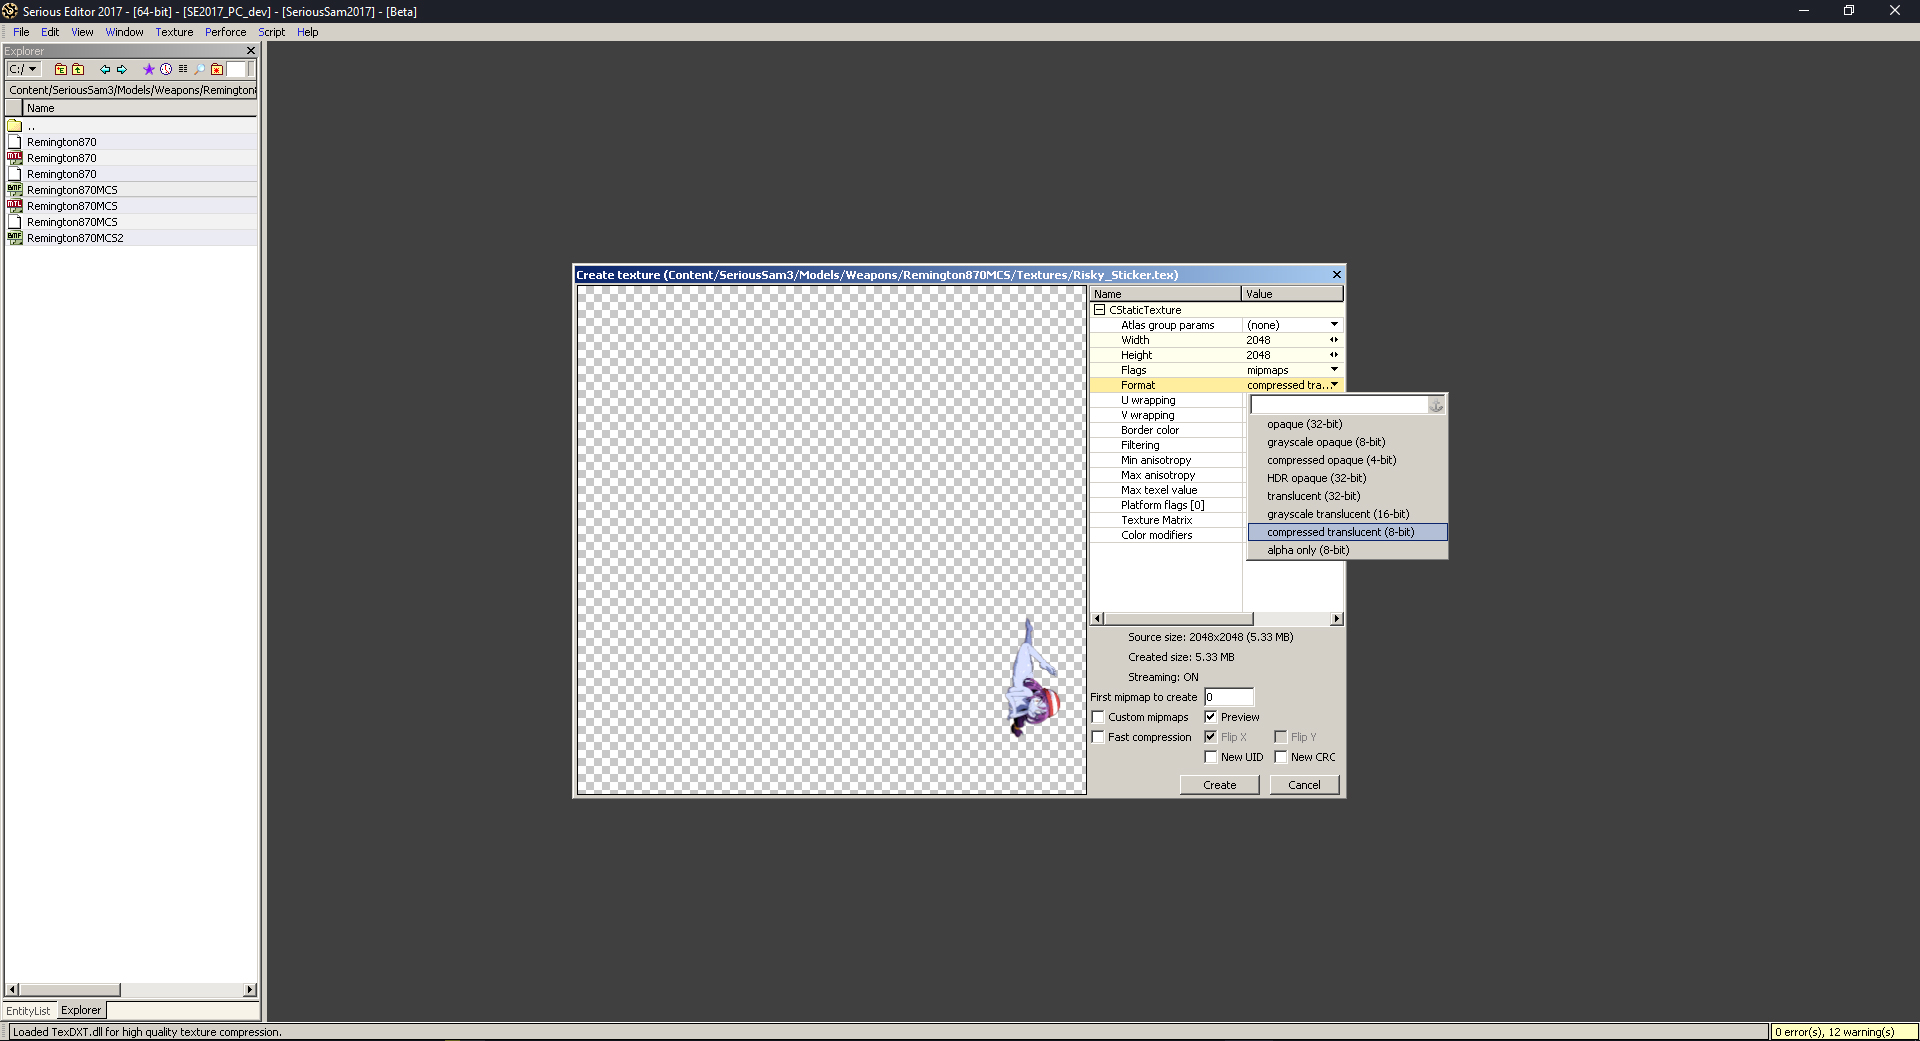
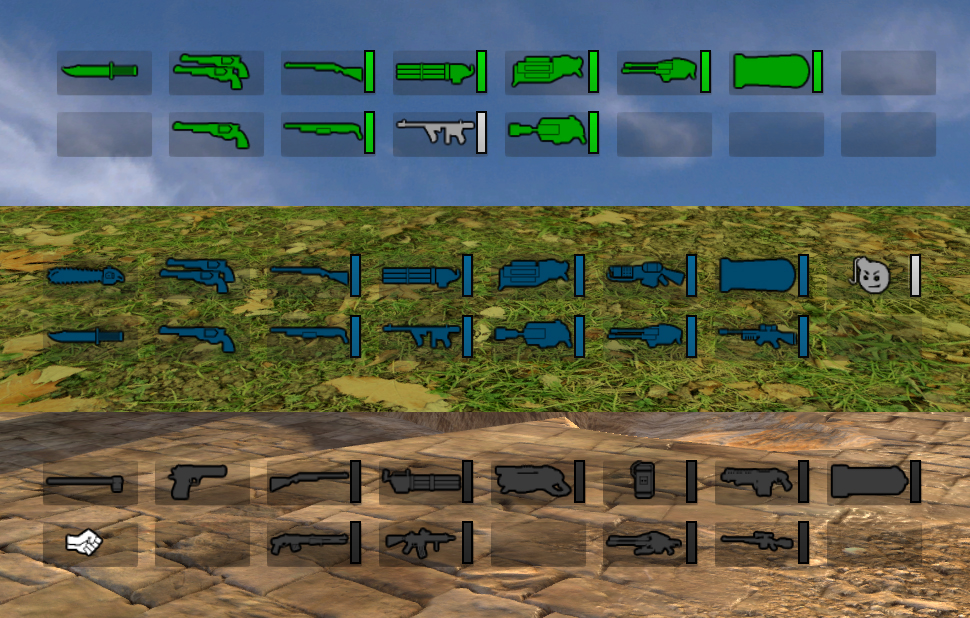
Paste the screenshot into your image editing software of choice. Remove the grey background with a magic wand tool, or by hand. Then copy/paste what you have a new 128x64 file. After you make adjustments, save that icon as .tga or .png, and create a texture
Derg Enjoyer 6 Feb, 2018 @ 4:38am 
Im trying to add the ammo counter to my weapon. Im also unsure on how to make the icons
Soulmyr  [author] 6 Feb, 2018 @ 4:32am 
What do you need?
Derg Enjoyer 6 Feb, 2018 @ 4:17am 
Sorry to bother you again but im confused about a couple of things from noam's guide. I tried asking for help there and haven't gotten a response. Would you be willing to give me a hand.
Derg Enjoyer 5 Feb, 2018 @ 12:01pm 
I think ive done everything from this guide correctly and im doing noams guide just now. I just want want to say thanks for all the help youve given me, im very grateful.
Soulmyr  [author] 5 Feb, 2018 @ 8:21am 
If the weapon doesn't move at all, then it doesn't have proper weightmaps.

I've never had a weapon moving only in one animation though
Derg Enjoyer 5 Feb, 2018 @ 8:06am 
When i change between animations in the list tab the weapon doesnt change position.