Guns of Icarus Online

Guns of Icarus Online

43 ratings
Letus's Lazy Lesson to Lobbing Lumberjack Lead
By Zu'ul, the Only
A quickly-made rundown of the Lumberjack Mortar
   
Award
Favorite
Favorited
Unfavorite
Preface
Welcome! You either clicked this because you are bored, are curious about the Lumberjack, or went “That’s a lot of ‘L’ alliteration.” Well, if you are here for the second choice that is what this guide is for!

Introduction
Well, I am Letus. Most likely you already mispronounced that name, but that is alright, because most likely you have also seen the Lumberjack, tried the Lumberjack, and wound up missing with the Lumberjack. We all start like that, so it is no problem. The Lumberjack is one of the hardest guns to use, but also one of the most rewarding!


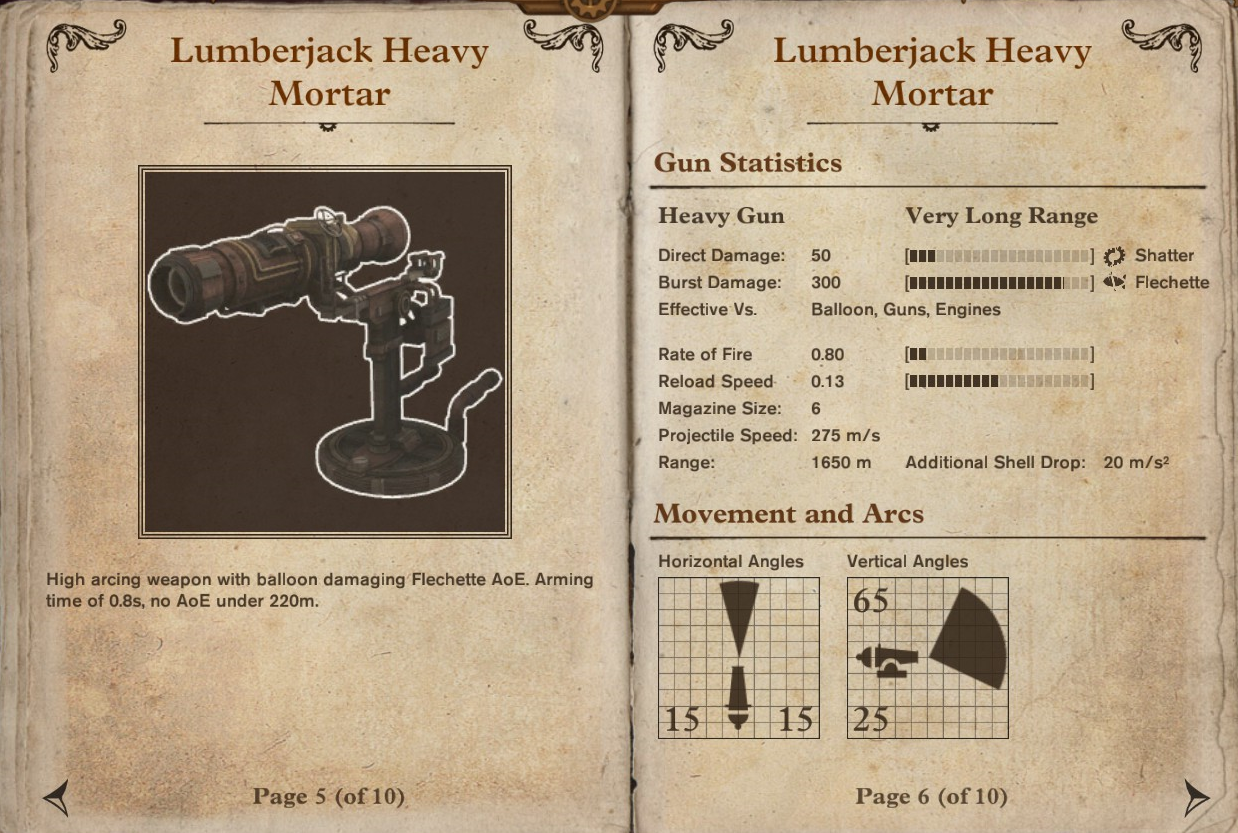
So what is the Lumberjack? Well, the Lumberjack is a heavy weapon of the mortar class. It does 50 shatter damage and 300 Flechette damage, and is also one of the longest ranged weapons in the game—with a recorded distance of 2,805 meters (555 meters farther than the Mercury Field Cannon’s Range,) and an insane Area of Effect; however, with great damage, comes great balance.

To understand what this gun is for, here is a quick rundown of its two damage types.
Shatter: 50
Balloon Damage: 10
Hull Damage: 5
Hull Armour Damage: 10
Components (Guns and Engines): 100

Flechette: 300
Balloon Damage: 540
Hull Damage: 60
Hull Armour Damage: 75
Components (Guns and Engines): 0

Put in mind that all balloons have 1200 health. That's a two hit balloon destruction there--3 if their engineers are on it.

The Lumberjack, like the Typhoon Heavy Flak, has an arming time, which is .8 seconds. That means that ships within a certain range—220 meters—will not take the full force of the Lumberjack, but only deal the meager 50 shatter damage while the Area of Effect does not happen. Not to fret! Each class has two shots they can use, and the Gunner can expand the full range of the Lumberjack with three different shots! I do not intend this guide to be a miracle “now you can hit everything with this” guide, or else the title would not include the word “lazy” in it.
Using the Gun--Gunner
There are three parts, two of which, gunning and piloting, are the main players of firing the Lumberjack. A bad pilot can make even the best gunner miss every shot, and a bad gunner can easily make the gun useless. The third part is an engineer, as you should always have one in your crew to keep you alive. One thing to know about the Lumberjack is how it rotates, and how far. This gun can point straight up, but it lacks in pointing down, trusting the arc of each ammo to compensate.

Gunning

Since this gun does flechette damage, which means it is a balloon killer. With its massive Area of Effect, you are going to be hitting most ship’s hulls with a balloon hit, and even if the balloon damage is down, all damage transfers straight to the hull armour, and then the hull! The trick is knowing which rounds to use for what distances!

Long Range:

Lesmok
This is going to be the round used for the longest distances. These are going to be the shots that will make the enemy team hate you, and your own team fear you. These shots, in the hands of a good crew, will be used often, but not always, as there is only one way to fight the Lumberjack: charge and take out the gun. This round has no bonus damage, but gives the bonus of less arc, more speed, and insane distance. The only cons is a smaller clip, you will have 4 rounds with this clip. Since this round has the fastest muzzle speed, that means it has the farthest arming distance with 374 meters.
Arming Distance: 374 meters
Clip Size: 4
Damage:
50 Shatter
300 AoE Flechette
Full Clip Damage:
200 Shatter
1,200 AoE Flechette

Regular Shot
Yes, this is a round, and yes, it can be used for long ranges, although the Lesmok Round will easily hit those long shots with less arc. There is nothing special about these rounds, but will be the only other round for an Engineer and a Pilot.
Arming distance: 220 meters.
Clip Size: 6
Damage:
50 Shatter
300 AoE Flechette
Full Clip Damage:
300 Shatter
1,800 AoE Flechette

Heavy Clip
Has the same muzzle velocity as vanilla, does not change damage, and reduces the jitter--which does not affect this gun much anyways. The -20% rate of fire makes it a little bit below Burst Round's.
Arming Distance: 220 Meters
Clip Size: 6
Damage:
50 Shatter
300 AoE Flechette
Full Clip Damage:
250 Shatter
1,500 AoE Flechette

Burst
This round has the same speed as a Regular Shot, which means it can go the same distance and be aimed the same as a regular shot. The special properties for this round is more rounds in your clip, and each shot adds 50% Area to the Lumberjack’s already wide Area of Effect, at the cost of no damage penalty! The cons are -15% firing rate. Even if you are using this for long range, you can easily mess up the enemy ship, and the firing rate? Think of it as a tool to help you lead between shots.
Arming Distance: 220m
Clip Size: 7
Damage:
50 Shatter
300 AoE Flechette
Full Clip Damage:
350 Shatter
2,100 AoE Flechette

Charged
This shot, just like Burst Rounds and Regular Shot, travels the same speed. This again means that they aim the same, meaning that if you can hit with a Regular Shot, you can hit with this shot. Charged shots do 30% more damage, at the cost of -25% firing rate, and -20% Clip. In layman terms, this shot’s rapid fire is the same as the burst, and the clip is the same as the Lesmok.
Arming Distance: 220m
Clip Size: 4
Damage:
65 Shatter
390 AoE Flechette
Full Clip Damage:
325 Shatter
1.950 AoE Flechette

Medium Range:
So, once Lesmok shows itself as a dud, it’s time to go to the next shot down!

Regular Shot, Burst Rounds, and Charged: Granted, you can use them for longer distances than the rest of these shots, but they also make decent mid-range shots!

Greased
This round makes all rounds 20% slower, which means they arm at a shorter distance; however, they make the gun shoot 60% faster, meaning you can dish out more lead at ships in fewer seconds! Unfortunately, they also do 20% less damage, meaning it’s going to take a little more shots to do full damage, and they slow the gun’s rotation. The FINAL plus side is that, just like the Burst Rounds, you get 7 shots to a clip.
Arming Distance: 176 meters.
Clip Size: 7
Damage:
40 Shatter
240 AoE Flechette
Full Clip Damage:
210 Shatter
1,680 Flechette AoE

Lochnagar
Yes, that +125% damage looks nice, and it is hilarious to see. The -90% gun rotation means your ship is going to be doing more aiming than you are, and the gun, once fired, will take 250 damage. Meaning, if you don't repair between reloading, your gun is going to rotate at the speed somewhere between stop and snail. The final drawback is the -50% AoE. This shot also has a -60% arming time making the arming distance drastically close!
Arming Distance: 88 Meters
Clip Size: 1
Damage:
112.5 Shatter
675 AoE Flechette Damage
Full Clip Damage:
It's one shot.....

Heatsink
This shot gives you the most rounds—a total of eight—gives your gun quick rotation, and decreases your round’s speed by 20%! The con being -17% damage. Arming distance: 176m. That is inside Flamethrower discance, meaning you can use this shot, and not get set on fire, or have no more fire damage stack up onto your gun.
Arming Distance: 176 meters
Clip Size: 8
Damge:
41.5 Shatter
249 AoE Flechette
Full Clip Damage:
332 Shatter
1,992 Flechette AoE


Close Range:
So, your mid-range shots are duds now! Time to use your last effort before your gun becomes something that disables—if you have pinpoint accuracy--but otherwise mostly useless.

Greased: These aren’t the best close-range shots since they both give a slowdown of 20%

Heatsink: Same range as greased, a bit more damage per clip, and your gun won't be on fire.

Incendiary
This round is the opposite of Lesmok. This round will give you the closest range possible with the Lumberjack without penalty of damage. It does have a chance to set fires, which is a bonus to unsuspecting ships not realizing they are too close. Its 30% speed reduction means that its arming distance is 154 meters.
Arming Distance: 154 Meters
Clip Size: 4
Damage:
50 Shatter
300 AoE Flechette
Full Clip Damage:
250 Shatter
1,500 Flechette
Setting things on fire is not calculated in this.

Lochnagar: The -60% arming time makes this round the shortest arming range. Your choice would be if you want DPS, or a glass cannon with a rate of fire of one round per 8 seconds--pending how fast you can repair or rebuild. Though, your foes WILL be surprised when this shot hits!

Fire your gun conservatively until you are certain you have your range. Once you have your range, you can fire two more shots and they will almost always hit. Even if your second shot kills the balloon, that third shot can hit just before that ship begins to really drop!

And here is a rather badly made vid to hopefully give you a visual (hopefully enough that if you pay attention, you can catch a bit of aiming.)

Gunner--Stamina
Stamina can be useful as well, mostly to get those ships that are barely in your left and right arc. Here are the Stamina Changes
Reload: 6 Seconds
Rotation Yaw (Left - Right) Speed: 32.5 degrees/second
Yaw Angles: 18º Left / 18º Right
Rotation Pitch (Up - Down) Speed: 19.5 degrees/second
Pitch Angles: 91º Up / 35º Down

Video of comparisons will go here!
Using the Gun--Pilot
Piloting

This gun is a projectile, which means everything you do to the ship transfers into the shop. You move left, it shoots left, you move right, it shoots right. You move up, it shoots up, and if you move down, it moves down. Even moving forward and backwards will affect this gun’s arc. So the worst thing you can do for piloting a ship with a Lumberjack is floundering around! The second worst thing you can do is getting as close as possible. The Lumberjack is a long-range support ship. If anything, you should be away from the fray, supporting the other ships, or they should be defending you while the ships come.

The best way to learn how the Lumberjack works on your ship, is to gun a Lumberjack, just to get the feel of how the projectiles are. Remember how the gun can aim, too. The Lumberjack can aim up more--even able to shoot your own balloon--than it does down. Use that to your advantage when it comes to evasion.

Your job as Pilot, is to watch the damage indicators to look for duds, and get your distance back.


Tools to keep in mind:

Kerosine: Being a long range ship, you're going to want to position and stick in one spot; however, that is not always the cause as allies and enemies will move around. Sometimes they will charge at you meaning you'll have to pull some evasives. Kerosine is a great way to get out of a dodge and relocate. Keep in mind that you cannot turn well with Kerosine on.

Phoenix Claw: Because the skill of a pilot with a Lumberjack is to keep the gun on target, you're going to have to turn quite a bit. The extra turning speed this tool will give you is great to keep in arc, but keep in mind that if your gunner is ready to shoot, your motions can make that shot go from a hit to flying all the way to Sweden. However, that extra speed of a turn can be given a hard break with Kerosine, as Kerosine reduces Angular Drag by 300%. A Phoenix Claw into Kerosine is a great combo to use for both aiming, and some dodging--as you can turn and go straight into reverse.

Chute Vent: Most likely, if your crew is good, the target will be going down. The Lumberjack doesn't need much of this tool to stay in arch, as a normal decent would keep it aligned, and the gunner can just go down a shot to lob as well. However, since the three ships that use this gun have balloons on the top, Chute Vent is a safe means to dodge. Recommended more on a Goldfish.

Hydrogen: This is just another useful tool for evasion...but that's just about it. Instead of dropping down like the Chute Vent, you'll pop up.

Moonshine: Goes faster then kerosine, but must be used responsibly as a constant burn will kill your engines.


Keep in mind that sometimes, charging at someone charging at you is the better way to dodge. People know the Lumberjack fails at close range, they might not expect you to be closing the gap. Just remember that this will put you at an extreme disadvantage, and eventually, people will learn your patterns, so mix it up!

To put into context, when a Hwatcha Fish charged my Lumberfish, I went forward. Just before his reload ended, I did a Chute vent to take all the hwatcha to the balloon, kerosined to pass under him, did a Phoenix claw to turn my gun back at him, kerosined to brake the eradic turn and continue full reverse while my gunner was able to go back to hating on the balloon.
The Ships
There are Three Ships that can use this gun: Goldfish, Galleon, and Spire. Each ship has a different advantage and disadvantage, such as multiple gun synergy and mobility. Here is a lazy rundown of each ship.

Galleon:

Advantage: Heavy Fire Power + most health (1400)
Disadvantage: Your speed ranges from a beached whale to a floating platform.

We all know the Galleon is a beast and has the must permahull--1400 to be exact, but the beauty of this ship is that it can do what the other two ships can't: Pair a Lumberjack with another heavy weapon. Because Two guns are pointing the same direction, it's not too hard to keep those two in arc, and the visuals to aim with as a pilot is to your left....Personally, I use the balloon component. Because you have two sides, you can easily customize this ship to be a long range sniper, to a short range brawler / disabler, and changing settings is easy as turning. Keep in mind that Guns 2, 4, and 5 are on port (left), thus giving you three guns with firepower, where as 1 and 3 are on starboard (right), and six is the back.

Positions:
Gunners get the front guns, 1 and 2, Gungineer gets the rear two.

Combinations:
Note...I'm making these names on the top of my head...most of the time I just list out what the guns are in chat to be more simple...

Balloon Killer
2 Lumberjack; 4 Lumberjack; 5 Hades

Because you hate balloons. You can either pummel out one ship's balloon and ensure it never gets up again, while the Hades takes out the hull for the painful grind to the ground, or...if you are positioned well, you can have two lumberjacks take out two ship's balloons.

Long Range Punch
2 Lumberjack; 4 Typhon Heavy Flak; 5 Hades / Mercury Field Cannon

I would suggest using the Hades over the Merc on this build...it shoots the same as a Lumberjack basically, but that is besides the point. What is worse than having no balloon while taking fire from a Hades ensuring the ground is going to hurt as you slowly watch that hull armor disappear showing your juicy permahull? A Heavy Flak Cannon to make you cringe as you take heavy damage, ensuring mutual doom, and--in some cases--no hope, pending on shot used (but that will be another guide!)

Long-Mid Range Disabler
2 Lumberjack; 4 Manticore Hwatcha; 5 Hades / Mercury Field Cannon / Artemis / Chaingun

This is a more shorter range build than a long range, as the spread of the Manticore is not worth it at a long range, unless of course you're planning on using heavy clip in it. This build is pretty tactical, and can be a one-gunner build--that is the gunner is the guy shooting all the guns when everything goes bad. Such as taking out the balloon with a greased lumberjack, to disabling them with the burst hwatcha, then running back to the lumberjack to re-kill the balloon...then running back. Where as the Merc or Artemis can also help with disabling--if they are in arc. The Gatling Gun / Hades keeps hull armour down to let the explosive power of the Manticore obliterate ships.

Tools to keep in Mind:

Kerosine / Moonshine: Because the Galleon is a floating beached whale, you will need to reposition and fast.

Phoenix Claw: Too keep the stationary platform's guns in arc. Very handy when needed to switch to your short range as well.

-------------

Goldfish

Advantage: Lower profile than the other two ships. More manueverable than the two.
Disadvantage: No Gun Synergy with the Lumberjack

Many may think only one gun isn't good, but as a support ship, the Lumberfish is a decent one to have on your side. It can pull in, move out, and turn. With it's low profile--that is the ability to stay low to the ground--a feature the Galleon and Spire cannot have--this ship can hide behind cover for it's hull and gun, and continue to dish out balloon hating justice.

The real advantage is maneuverability. Kerosine + Phoenix Claw is a great way to get out of trouble, the trick is how. Generally, if someone is charging at me, I go under, floor the kerosine, turn around with the claw, and full reverse--which if done well, will keep the lumberjack in Incindiary or Greased range.

Combinations:

Only thing I'd put on a Lumberfish would be a mine launcher...but the intention is to never need to use such a gun.

Tools to keep in Mind:

Kerosine / Moonshine: as stated above really.

Phoenix Claw: Got to keep that gun straight.

Chute Vent: Very helpful when it comes to dodging. See a Hwatcha? Drop down and let all those shots futily hit your balloon as your front gun is priority.


-----

Spire

Advantages: Glass Cannon--ever had four guns shoot at you all at once? Decent Manueverability.
Disadvantages: Glass Cannon (950), EVERYONE IS SHOOTING AT YOU

Oh the Spire...just..this ship. There is so much you can do with this ship. From dishing out everything, to having the ability to even cover multiple ranges. Just don't expect to live long without true team synergy. I love gunning in the Spire, but if I see an enemy Spire, I want that thing dead before it kills me.

Combinations:

So many of them, so I narrowed it down to two with the Lumberjack....

Magmortar
1 Lumberjack; 2 Hades; 3 Light Flak; 4 Mine Launcher.

Okay so I like Pokemon. Here, we see a Spire that will not only eat out your balloon, but your hull armour, leaving that light flak cannon to do the rest of the work of killing ships. The Mine Launcher is there to keep people from recklessly charginging into your Spire, leaving you an ability to escape.

Disabler Snipe

1 Lumberjack; 2 Artemis / Mercury Field Cannon / Hades; 3 Artemis; 4 Artemis / Mine Launcher
or
1 Lumberjack; 2 Artemis; 3 Mine Launcher; 4 Artemis

Why shoot out the balloon when you can shoot out the guns as well? The use of the Mercury Field Cannon not only eats hull for the artemis to do decent permahull damage, but can also be used to shoot out guns and engines, where as the Hades has the best arc to synergize with the artemis. The fourth slot being an artemis is for those sweet moments when the Pilot gets in position to shoot as well.

The second version is to again counter the close range brawlers trying to rush at you. Since the gunner has shots to make the mine launcher deploy at a short range anyways.

Tools to Keep in Mind

Kerosine / Moonshine: Your main defense is backing up....

Phoenix Claw: Got to keep those guns firing!

Hydrogen: You're flying a giant pogo stick. The advantage of using hydrogen instead of chute vent is that you won't crash into the ground if you try use altitude to change, the disadvantage is you're still exposing hull. You're almost better off to get some mines out and back away. Whatever your tactic, both require paying attention and reflexes. Too soon, the enemy can stick with you, too late, you'll be hit.

Tar Barrel: ...well just in case...
Using the Gun--Engineer
Well, other than tapping the gun to keep it optimal, you can do one more thing for the gunner: spot! This is only recommended if you are safe, however, and is a rather simple job. You pull out a spyglass, zoom onto the shot, and call out where the shots are landing! If the shot is short, call short, if the shot is far, call far, if the shot is left, call left, and if the shot is right, call right. You do not need to call the hit, since it is rather obvious, but frankly…doing so might make you feel cool.

Another Engineer job can buff the Gun as well. Always pre-buff the gun if you are going to do so. If you buff the gun while the gunner is getting his range in, you are basically giving shots that will not hit anything a useless damage boost. Get the buffing bar to one hit away from gun buffing, and once you see the ranging shot hit, then you buff! If the gunner is accurate, and hopefully has the ammo, he can fire at least two more shots with the bonus 20% damage!

Remember, make sure your captain wants a buffingeer (that is an engineer with a buff tool.)
Knowing When Shots Are Duds
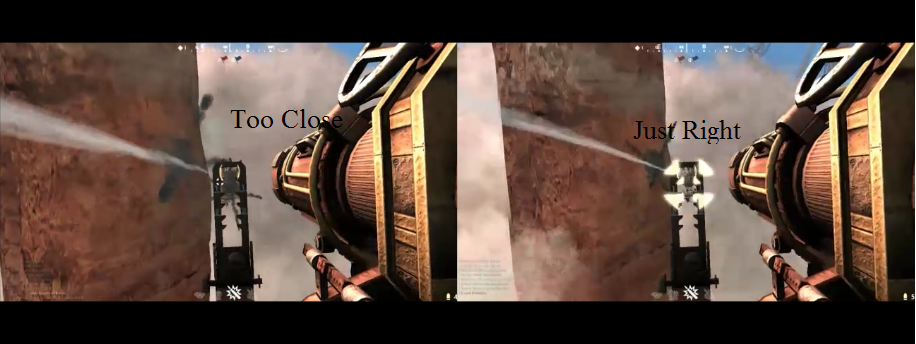
Overtime you will notice the damage indicators being the only tool to tell you if you are too close. For gunners, you will see two large hit indicators. If you fire your gun, and you see one tiny indicator, that means you are too close and you need to change rounds. With this arming time, it is better to change the rounds mid-clip, then fire the whole clip, as by the time you finally change clips, the enemy ship may be too close for that one.


Pilots have a little harder indicator to follow. What you are looking for are two indicators, roughly the same size. If you only see one indicator, then it is time to back off, but make sure to tell your gunner to use the midrange shots as he may be reloading to that particular shot.

Targetting
Aiming takes practice. Aiming with a Lumberjack deals with your ship, the enemy ship, and your round, and if things do not match up, then you will miss. Misses happens, you just have to recalculate and communicate.

Most of your shots will be dealing between the red line at the top, and the 1.5 line. Lesmok’s longest distance is at 1.75—or so that was the longest shot I got so far. The long range burst shots you will be aiming for will be around 2.5, while Incendiary is the same (although if you're aiming that high, you are far away enough to go the next round up--exception being incendiary.) Make it easy for yourself.


Make sure to choose your targets! If you are shooting at a squid that is running away, then do not bother with him, there is at least one more ship you can focus on! You are a support gun, so you need to support instead of shooting randomly.

See a Hwatcha fish focusing on a friend? Go for him! Knock his balloon out! Keep knocking it out! Hope your friend is smart enough to get their engines up and escape!

See a Galleon (or any ship) charging at you? Go for them! They’re a threat to your ship! Hopefully you can get a cry to your team to save you!

See another Lumberjack? GO FOR HIM. Always assume the enemy Lumberjack is as good as you. Even if that gunner is a bot, it is still a huge threat as they are insanely accurate with the Lumberjack.

See all three? Well...your captain will tell you which one he deems a bigger threat--hopefully--and go for them; otherwise, know the backup guns.
Final Tips
Always communicate with your ship and team.

A spotted ship is still a target.

The Map is a good tool, but it also likes to lie--or so they say.

A miss that winds up hitting is still a hit (works easier if the ship is on the ground.)

Don't be afraid of the shaking...your gun is still where you fired last.

Judge speed. Ships coming at you fast are actually coming faster at you than you think. They will be on top of you before you know it.

Practice makes perfect! I have spent hours in the Sandbox, and I still consider myself a bad gunner at this gun! Granted, those who have seen me, or been unfortunate to see me, may not think so.

The faster you get in that gun and load Lesmok, the faster you get the first shot. You can easily get into Lesmok, and take out an enemy's balloon--if not, scare them to death at the least--before they even begin to move. (Granted, helps if you can see them.)

Remember this gun is a mortar. That means it lobs. So if you are far enough, and one of your team’s ships is in between you and your target, you can still hit your target. (You can practice this by spawning a target in front of the visible target.)


Think of Angry Bird sounds when firing this gun. This really does not help you shoot better, but it is just fun to do.

Practice again.

Watch how others pilot or even shoot!

Learning to Lumberjack also helps with learning to use the Heavy Flak cannon. While the Lumberjack is fun, the Heavy Flack is concentrated death (although it does not shoot as far.)

And have fun!

17 Comments
Zu'ul, the Only  [author] 4 Dec, 2015 @ 12:48pm 
Edit: How old is this guide? I just realized I didn't give ideas for the three ships that use this gun! --and a slightly more depth piloting guide. (I intend to make/add a better video/gif.)
Zu'ul, the Only  [author] 1 Mar, 2015 @ 11:37pm 
Edit: fixed numbers, removing some images that are broken, and (hopefully) replaced them.
Zu'ul, the Only  [author] 21 Jan, 2015 @ 11:41am 
Forgot about this, updated some numbers that needed to be updated.
Hypoxaemia 16 Feb, 2014 @ 8:51am 
You have no idea how much this helped me back then. I literally went from not being to hit anything with the lumberjack, to consistently hitting with the lumberjack after reading this guide. Thanks :)
Valdus 12 Dec, 2013 @ 7:45pm 
Nice guide, really helped
Zu'ul, the Only  [author] 9 Nov, 2013 @ 11:34pm 
Fixed numbers for the apparent numbers of heatsink for 1.3.3 update.
Zu'ul, the Only  [author] 19 Sep, 2013 @ 11:36pm 
Changed numbers in lesmok for 1.3.2 update.
Zu'ul, the Only  [author] 31 Jul, 2013 @ 1:41am 
Fixed wrong clipsize numbers in Heavy Clip for the 1.3 update.

Added single shot damage and full clip total's damage to each shot.


...heatsink looks promising with that...shame I like seeing everything catch fire with Incendiary though....
Zu'ul, the Only  [author] 24 Jul, 2013 @ 1:47am 
Changed numbers in lochnagar, and updated the gunner video for the 1.3 update.

:fire::gunner::fire:
Sgtorange 2 Jul, 2013 @ 1:48pm 
nice break down of the rounds for different distances, appreciated :)