BattleCON: Online

BattleCON: Online

Not enough ratings
How to Seven ~ Much Ado About ∅
By Vi
An intermediate guide to a character who specializes in counters, negations, punishes, sarcastic cheering, and otherwise acting the part of a mastermind.
   
Award
Favorite
Favorited
Unfavorite
Introduction


This is the face of someone who just had fighting games explained to her, but didn't understand a lot of it, so she's going to do what she wants and the others can deal with it. Seven wants to play the game - she's not Marmelee - but the way she goes about it is skew to how the other characters fight.

Because of that, it's not easy to make a succinct or beginner-friendly guide to Seven. She's not a succinct or beginner-friendly character, with lots of text on all of her cards doing weird stuff. I'll do my best to present everything in an approachable fashion, and I've bolded the key bits for readers on the go, but there's a lot to take in if you want to be effective.

The obligatory disclaimer is still true - this guide is a reference, not a how-to. You will not ascend to become a pro-tier Seven by reading this guide. What this guide aims to do is give you some general direction on what to do when you actually play BattleCON and some food for thought on how to improve after you actually play BattleCON.
Character Overview
Let's start with what Seven can do well:
  • Play very defensively and maintain a life lead
  • Counterattack opponents with the help of moderate Stun Guard
  • Use a variety of Start of Beat movements to disrupt opponents' attacks
  • Use a variety of unusual special effects to disrupt opponents' attacks
  • Clash low-Priority attack pairs
  • Blatantly bait opponents into playing Dodge
  • Punish opponents for playing Dodge

All of that sounds good, right? But here's what Seven doesn't do so easily:
  • Reliably have high Power
  • Reliably have high Priority
  • Reliably attack at ranges 5 and 6
  • Use her best moves when she's low on Life

The summary of this is that, given a mediocre kit on the fundamentals, Seven seeks to beat her opponents at their own games. That tends to lead to complications, because the other characters are designed to be good at what they're good at.

This leads to a few things you have to be willing to accept before going further with this character:
  • Seven usually has a fair matchup against her opponents. Her character concept on its own is not generally going to win games at character select, but there aren't many characters who can overwhelm her, either. As a result, you will have to hustle in every single game to score wins.
  • Seven will always be a mid-tier character. Top-tier characters don't have many fair matchups... for their opponents. Then again, someone who has a fair matchup against top-tier characters is worthwhile in their own right.
  • Because Seven is reliant on playing to her opponent, she has a learning curve in every matchup and cannot stick to one grand strategy. That's why a simple beginner's guide isn't really feasible.
What Success Looks Like
Seven is arguably best at making both players' Life go down by about the same amount. She's good at stalling games out by circulating Dodge (to null a beat), Absorption (to lose a beat by a little bit), and some trade (to win a beat by a little bit). However, given how slow she is and how little Soak she has, she finds herself at a serious disadvantage when she has low Life, regardless of how much Life her opponent has. As a result, Seven's prime directive is to keep her Life comfortably above her opponent's, whether this is to render it impossible for the opponent to catch up while she stalls the game out or whether this is to drop her foe with one fewer hit than they need to drop her.

Getting that Life lead is the artistic part of playing Seven. You can do this purely via straightforward brawling, but with unconditional damage output that tops out at 5 before Heated Strike comes online, you're not likely to win a tank-and-spank damage race. Instead, you should focus on the ways you can win beats outright, without letting your opponent get a significant hit in. All you need is one good beat, and you can coast for a while with sheer damage control. With that in mind, you can use cards like Dodge, Absorption, Remote, and Sympathetic to control your positioning and choose when and where you launch your turnabout move. Time isn't on your side in an even game, but you can afford to be patient about when you pull a decisive Reserved, Remote, Excited, Terrified, or Burst. Learn to recognize when your opponent's best moves can be completely shut down, and exploit your advantage by deciding whether their respect for your tricks will be rewarded or punished.

One of the areas that Seven specializes in - and one way to get that Life lead - is in countering Dodge. Her Reserved Style from the center of the board is the most obvious way to do this, but she can also trap her opponent with Friendly or score free Life on Absorption. Clashing Dodge is also an option, although Seven has some difficulty reaching Priority 4 and above on demand. Don't sweat this part of the strategy too much, as all is certainly not lost if your opponent gets away with Dodging - you can set up on your opponent with Heated/Absorption/Heated+Absorption followed by a brawling move or a counterattack.

There are a few strategic pitfalls to look out for as Seven...
  • You shouldn't stress about upgrading Styles unless there's one you want ASAP. Cold is your default "punching bag" Style since Heated is so good, but other than that, in general getting hit is a -bad- thing (remember that bit about getting and keeping your Life lead?) and getting your Styles upgraded is more of a consolation prize than a goal.
  • You can trap yourself into a beat where you have no safe moves if you play Dodge and Absorption consecutively. It's not necessarily a problem, but since you're locking yourself out of both of your heavy defensive options, you should make sure you have a plan for the beat afterward before you commit to being vulnerable.
  • You need to make sure that you know what the cap on your opponent's damage output is. Since Seven is a counterattacker, if your opponent can barely deal enough damage to drop you to zero health, you should assume that they will (to such a degree that you should consider punishing the move they use to do it if you can). On the other hand, if your opponent has a variety of ways to cut you down but none of them are risk-free, you have nothing to gain by playing conservatively - feel free to do something surprising before you get cornered.

On the subject of matchups, as mentioned previously the ability to mitigate your opponent's ability to do what they do best isn't going to win games on its own, so few characters are going to be disappointed to see Seven as their next opponent. One exception is St. Mikhail, who will have to think hard about when to play his precious few supermoves against someone who can wait him out. However, Seven struggles against characters who get passive bonuses or can otherwise unconditionally threaten her. Kallistar, Anath, and to a somewhat lesser degree Cesar can use Soak to blunt Seven's attempts to trade while wielding the ability to hit her from virtually anywhere with high-powered attacks. Many other characters, especially those with dominant threats, can accomplish a similar effect by deliberately holding off on their big attacks in hopes of baiting both Dodge and Absorption out of Seven's hand. Hikaru can mind-game Seven hard by keeping Geomantic in hand until beat 3, for instance.
Unique Ability: Empath


This is Seven's character concept. In most matchups you shouldn't actively try to upgrade every Style, as that will probably distract you from your win condition. While Cold is always something you want to upgrade, and sometimes there is another upgraded Style you want to get ASAP, most of the time you should play the best Style in your hand regardless of upgrade status.
Unique Base: Absorption


Here's the card everyone pays attention to when they think of Seven! This is the card you play when you want to lose this beat by at most 2 Life. In case you skimmed it the first time, I'll repeat for emphasis: This is the card you play when you want to lose this beat.

Now that I have your attention, here's why you'd want to do that:
  • Damage mitigation - You only lose the beat by 2. If you've developed a Life lead, making it literally impossible for your opponent to bring the game back is an incredible advantage.
  • As a mixup - Give your opponent the joy of knowing that any time they could play their big payout, you can tell them it barely works.
  • To clash slow attacks - Between Styles with low Priority and a base with 0 Priority, you can clash at 1, 0 and -1 more easily than most other characters. This will help you compete with characters who can usually play slow attacks safely, such as Cadenza and Eligor.
  • As a Dodge substitute - You already have one card that nulls whatever your opponent plays (Dodge); having something close to a second one means that you're only "unprotected" for one beat out of each three if you're going full turtle. (It also means that if you don't know what to play or you don't know what your opponent is going to play, you can throw this out like Dodge. But don't make a habit of that.)
  • To set up a combo - Having +2 Power on the next beat will even out the damage you take on the Absorption beat, and if you pair it with a relatively fast attack you stand a decent chance of breaking your opponent's Stun Guard and scoring a major hit with no counterattack.
  • To bait Dodge next beat - On the other hand, if your opponent has a reason to respect your Power buff and isn't in a strong position after your Absorption beat, expect them to do something dodgy and call them on it.
  • To punish Dodge - If you play Absorption and don't get hit, you get 2 Life back. It's unusual for any character to win beats where their opponent plays Dodge. While this can be a game-winning move, keep in mind that your opponent will use their Dodge to reposition to wherever is most advantageous to them.

As a warning, you need to look out for characters that can punish Absorption. Any Ignore Stun Guard (ISG) effect or text that declares "the opponent is stunned" will stop you from regaining the 2 Life, meaning you lose the beat by a much-less-palatable 4. In addition, due to the game's weasel words, life loss effects do not count as damage and can cause you to lose more than 4 Life this beat. The unholy nexus of these two effects is Shekhtur's Brand; if she manages to win a beat by 8 at the same time your cool defensive move hits the discard pile, the best-case scenario is that you have a strong chance of losing.

Another warning is that Absorption won't help you when you're below 5 Life. Even though you regain 2 Life after activating, you need to have 4 to lose when you get hit. You can still use it to regain Life, but only if your opponent is foolish enough to let you get away with it.
Cold Style


This is a standard heavy Style with bad confirm. The upshot is that it comes with 3 Stun Guard, which allows you to use Drive and Burst with considerably less fear considering the Priority penalty. You'll probably still pair this with Shot or Absorption purely to minimize confirm and stun guard issues, though.

The two major upsides to playing this card are that it can upgrade into something much better, and that Undaunted - which has exactly the same stats as Cold but a better effect - may be put to better use in a worse situation later. Since Heated is strictly better than Cold, it's totally worth your while to try to get this upgraded whenever you can.

I'd like to say that there is some mind-blowing turbometa for what you can do with giving opponents -1 Priority next beat, like getting a better clash chain or using Grasp or even Drive without fear of being clashed out of it. It is occasionally helpful against characters with unexceptional Priority, and tossing an extra modifier onto your opponent goes a long way toward making their calculations more difficult, but it's really more something your opponent should worry about than you.
Heated Style


Look at how outstanding this card is. I'd say you couldn't ask for anything better, but it WOULD be nice if it had -2 Priority instead...

You have range, you have Guard, you have more Power than anywhere else in your regular cards, and you drop a crazy debuff on your opponent if they hit you. You can pair this with any base except Dodge, and it'll do great. Whether you're brawling or playing Absorption to make the next beat safe for attacks with low Stun Guard, this card is super-profitable almost every time you play it.

One note about the debuffing effect - it's the opposite of what you get out of Absorption; opponents will have heavily-gimped damage output and thus a difficult time breaking your Stun Guard. (You can consider it a way of winning a Heated beat by another 2.) This makes it very likely that your opponent will cut their losses by playing Dodge next beat if they can.
Detached Style


A little range and Stun Guard is all it takes to turn a blank card into a moderately acceptable one. This is one of Seven's few Styles that gives her a relatively brisk 0 Priority modifier, and combined with its range it gives her a less-than-terrible chance of going first with decent confirm. Even if you aren't planning on contesting Priority, the Stun Guard plus a Guard ante will make most Bases viable under most conditions, so this is a solid choice for a generic Style in most cases.

With that said, depending on your opponent, the ability to negate On Hit and On Damage triggers (and get rewarded for it) may be worth keeping in reserve until you expect to need it. Mikhail's Hallowed, Cadenza's Grapnel, Hikaru's Focused/Palm Strike, Karin's Howling/Feral/Claw, Luc's Memento/Fusion, and especially Magdelina's Blessing are good examples of cards that will leave your opponent quite disappointed if their added effects don't work. Then again, ignoring On Hit/Damage only really matters if you get hit, which means that you'll lose Detached after that beat, so don't take it too seriously. You get another good Style after Detached anyway.
Sympathetic Style


This Style does so many things for you that it's worth listing them individually.
  • Slow Start of Beat movement - Your opponent's options with minimum range are unsafe while this card is in your hand. Note that this doesn't matter much if those options also have Before Activating movement, as with Drive or Anath's Havoc.
  • Start of Beat Close - This is one of Seven's best ways to move closer to her opponent, where her spotty range modifiers will be less of an issue in later beats.
  • Enormous range - Drive, Shot, Burst, and Dodge all stretch across the entire board, and Strike has the same range as Shot.
  • Soak - Seven always has an eye on her Life total, and the ability to passively mitigate damage is much-appreciated. This combined with its confirm makes it a natural follow-up to a Heated beat, and against characters with low damage output you can drag the fight out quite a while by cycling this card.
  • Very, very slow - You are unlikely to be clashed out of whichever Base you choose, although it still happens occasionally when opponents Burst away.

The downsides to this Style are its lack of Power and Stun Guard. You can mitigate both of these by playing Strike, but if you really need the range or Strike is out of reach you should probably ante Guard. Still, this card is more or less a guaranteed hit and an excellent repositioning tool, so don't be afraid to play it.

As with all of Seven's Styles with good confirm, you should think twice before playing Shot with it - that range is better put to use with other cards.
Undaunted Style


As mentioned previously, the only differences between this card and Cold Style is in what they upgrade to and the text on the card. This one's text may as well read "if you are the Reactive Player and you were hit by any reasonable amount of damage, you move wherever you want and hit the opponent". This arguably makes it the best counterattack Seven has, as you can use it at any time from the beginning of the game, can deal a small boatload of damage, and move yourself to melee range where you belong.

These effects are difficult to overstate. Undaunted Strike + Power ante is a consistent 6 damage (with 8 Stun Guard!) that can be used to set up a life lead early on, or can be used to finish off an opponent late in the game before Seven has to face down first-one-to-hit-wins scenarios that she performs poorly in. Alternatively, if your opening play with Remote didn't go as gloriously as you envisioned, you can burn this to get back into a competitive position on the board.

The downside is that most of the time you only get to use this Style once unless your opponent trips over their own mindgames.
Terrified Style


There's a lot going on with this card, so to summarize it:
  • After you ante Power, if you go second, you win this beat by whatever the Power on your Base is (usually 3).
  • If it works as planned, both players' Life will go down. Seven doesn't like it when her Life goes down, and cautious opponents won't use an attack you can turn around to win with on the counter.
  • You take all of the damage you plan to counter. When Seven holds her arms out and dares her opponent to bring it on, she should be careful that her opponent cannot actually deal enough damage to drop her Life to 0.
  • Most of your opponent's fancy tricks to stop this - Grasps, autostuns, and the like - won't work. People tend to forget this!
  • Your opponent's standard tricks to stop this - namely clashing and Dodging - WILL work. Clashing in particular will tend to go poorly for you.
  • Terrified Shot comes at an accessible Priority (1) and if you set up full-board Shots your opponent will totally expect it.
In other words, Terrified is not a super-move that wins games. It IS, however, a way to continue winning games you're already winning or establish a turnabout at even Life. It's also a nice way to apply pressure on your opponent while you hold it in your hand; while Terrified Shot is easy to counter if you know it's coming, the counterplays to it (aside from simply blowing Seven away) tend to come with strong penalties for being wrong (Dodging on the wrong beat, or playing Burst when they'd rather not). Mix it up.

The biggest selling point of Terrified is that it's Seven's only means of fighting back against overwhelmingly powerful opponents, such as Kallistar+Elemental Form and Anath+True Devastation. When your opponent deals 7 or more damage on every beat with such high Priority that they have no chance of clashing you, Terrified and a healthy Life lead can be your safest means of scoring the finishing blow.

One of the other weaknesses of Terrified is that its utter lack of range and movement make Shot the safest Base to pair with it by far. A bold player may want to try mixing Terrified with Burst, Strike, or even Drive. As with many of Seven's turnabouts, this has the potential to fail terribly, but if you think you can counter your opponent's Terrified Shot counter, or you have Shot down and think you know exactly how your opponent will disrespect Terrified, the options exist. A concrete example of where these would come into play would be when Seven is standing on Khadath's Gate Trap. If Khadath has Evacuation Snare available, he can play it to nullify an otherwise guaranteed Terrified Shot, so you have to consider more mobile options.
Remote Style


It turns every Base into a Burst. It's a 0~1-ranged Style where Seven happens to be two spaces back. It's a long-range mortar when Seven is close to the corner. This one's weird. Sadly, it's also not as practical as one would hope.

There are two problems with this Style. First, Seven doesn't usually want to be too far away from her opponent. This is her escape/surprise Style, but it's also her only really-long-range Style until Sympathetic comes online. As a result, you'll frequently find yourself in situations where you can't even upgrade Remote Absorption without throwing yourself out of position against characters with better ranged options than you. Second, its unusual confirm and huge blind spot make it REALLY BAD if it gets clashed, as opponents will almost always be able to get out of the way and usually punish you once they know you're locked into Remote.

It does, however, have some niche uses. Characters whose ability to hit Seven relies on them being adjacent to her (Hikaru, Luc, Sarafina) may have a difficult time chasing her down despite their tricks, and the ability to move so far at Start of Beat can mess with positioning games in general (for instance, slipping out from between Karin and Jager during Full Moon). Remote Drive is a versatile 4~6 range attack that allows you to recover some of the ground you lose with your Retreat, while Remote Burst lets you evacuate so far even an opponent's standard Shot can't catch you. Remote Grasp is a risky but viable opening play against characters who don't favor 5-range openers. One pair I would NOT recommend - early on, at least - is Remote Shot. It does hit every space outside your minimum range, but then you have no means of attacking at range for the next few beats. Another pair I would warn against is Remote Dodge, which can move from corner to corner if it works and will probably ruin your game if it fails.

How often you play this card depends on the matchup, but it's up to you to decide whether you'd rather have this or its upgraded version - and when you're okay with the risk of playing this card if it's not clear it will help you. If you play this when your opponent plays a big advance/Drive, you will have regrets.
Friendly Style


Given that Seven has lackluster raw stats on many of her other cards, +1 Power/Priority is quite welcome. Don't get too excited, though - other characters with 1/1 Styles (Hikaru and Magdelina for instance) stack other bonuses onto them, whereas Seven generally can't, so this Style isn't the easy beat-winner you may expect. With that said, against characters with relatively ordinary Priority you're still going to get good results out of Drive, Grasp, and Strike. This is one of the few Seven styles that doesn't have some form of Stun Guard, so if you get outsped you probably lose the beat if you didn't play Strike.

What makes this Style interesting is its text - a clause forbidding the opponent to Retreat and a Start of Beat Advance. The first of these is only situationally useful; most of the time characters tend to Close or Advance. However, when characters intentionally Retreat - with Burst, for instance - they're relying on that movement to work, and denying it usually leaves them wide open to getting crushed.

The magic starts when your opponent is at space 2 or 6, and you are adjacent to them on either side. First, if you are at space 1 or 7, you can perform a corner cross with Friendly Burst - you can Advance to the other side of them and then immediately Retreat two spaces away. In effect, you are getting the effect of a Burst even though you're in the corner, avoiding any stationary 1~2 range attack your opponent may employ.

What's unique to Friendly is what happens if you're at space 3 or 5 in this scenario. Here, you have a fast Start Advance into the corner, and then you forbid your opponent from moving ANYWHERE unless and until you move again. This reverse corner cross is another punish for Dodge that most people forget about. What's nice about it is that even if your opponent sees it coming, unless they have some fast overwhelming attack or shenanigan handy the best they can do is clash Friendly Strike or try to trade, which gives you options for a mixup.

It uncontestably closes positioning gaps and destroys Burst, it's situationally heavy pressure Dodge can't fix, and it's one of your fastest moves combined with a Power buff. While you may want to save it for when it's an ideal punishment, that last bit can make it worthwhile to play on its own.
Reserved Style


There is exactly one thing about this card that isn't distilled garbage. It has a mandatory Retreat (which can make even Dodge bad) even though Seven wants to limit and control how often she puts distance between her and her opponent. It stops opponents from moving adjacent to you, but it has no range. It has no Power or Guard as well as bad Priority, making it so the only thing that can save you is its "opponents can't move adjacent" clause - and you don't even get a payout from it. Every single character in the game has access to Shot and Burst and therefore isn't hard-stopped by being unable to move adjacent to you. And, even when this Style is useful, if it gets hit you don't get it back.

So now that all of that has been established, let's talk about why you want this. The most obvious use for this is that it prevents opponents from Dodging past you. When that happens, Reserved Shot is basically free damage. At closer range Reserved Drive can fulfill the same function.

Another niche use for this is to play Reserved Grasp when your opponent is adjacent to you. Against somewhat slow attacks that don't have particularly good range, you can Push your opponent away from you and then back up to range 4. Alternatively, you can use it to Pull someone out of the corner and then take the corner yourself. Reserved Burst is also occasionally viable, as it has a bit more protection against enemy advances than usual.

But the most important use of this is to frustrate opponents who rely on movement for hit confirm. Hikaru, Luc, and Sarafina once again come to mind, but even characters who have somewhat marginal range like Shekhtur may be given pause. As long as you're holding onto Reserved, they can't safely chase you down.

Really, that pressure is what makes Reserved a viable Style. Whether you play it or not, the ability to perfectly punish Dodges and 1-range attacks will always leave your opponent paranoid as they choose their moves. Just don't play it outside the context of trying to punish something unless you're intentionally trying to ditch this Style for its upgrade.

Side note: Direct movements (e.g. Khadath's Teleport) can go around the spaces that Reserved cordons off, since they never enter those spaces.
Excited Style


In a reversal of its original form, there is exactly one thing about this card that IS distilled garbage, and it's that -1 Power. Three of the most beautiful words in BattleCON are "Ignore Stun Guard", and it even comes with some extra Priority and Range that would make this a useful Style on its own. With that said, the -1 Power ensures that what you're getting is not a payout, but a disruption. Excited Grasp is ISG at priority 6, but if you ante Power and don't get foiled by Start movement you're winning the beat by 2. Make no mistake, you ARE winning the beat, but not by much.

You can pair this with several other bases, but Burst and Absorption are kind of a waste and Strike isn't much better. If nothing else, you can get a 4 Priority Dodge, which can help you mix up against characters who are faster than you (and thus wouldn't care about the ISG).

Against characters with average Priority, Excited is one more option your opponent will constantly have to think about as you deploy it at your leisure. If you go first and your hit confirm is good enough, you simply win the beat unless they have Stun Immunity or a bunch of Soak. If you think your opponent will try to outspeed you, Seven has several alternative Styles that can punish people who use moves because they're fast (Terrified, for instance). Of course, if your opponent is slower than average, you should basically spam this card every rotation.

A lot of people discount this Style because it doesn't have the Dodge-punishing power of Reserved. While there are definitely matchups where Reserved is better (Luc), in general this Style is good enough on its own that I wouldn't lose too many brain cells over the threat of getting Reserved hit.
Switch "Style"


Switch is largely a way to maneuver out of being card-locked. In some situations Seven can reach a point where her available cards are rubbish at 3- and 4-range, and Switch Absorption is one way to stall until your discards cycle without giving up a Style you may find valuable soon. In addition, Switch Dodge is ever-popular, and once Detached and Remote upgrade Switch will be the only Priority 0 Style you have for the mixup.

A corner case where Switch may come into play on offense is when you need to contest a relatively slow priority without access to or desire for Excited/Remote/Detached/Friendly - for instance, if you expect a slow ISG. Even then, though, you're probably better off using Cold/Heated, eating the hit, and debuffing your opponent.
Finisher: Reciprocate


Let me spin this card a different way than what's written:
  • You hit the entire board for 4.
  • If you take at most 5 damage before your move comes around and you're not out of Life, you return that damage as well, but you still win the beat by 4.
Even more so than with Terrified, the problem with Reciprocate is that it asks you to take damage while your health is low enough for you to use the Finisher to start with. Your opponent doesn't have to worry about getting counterattacked if they can wipe the floor with you outright. This leads to two ways of thinking about this card:
  • You spend the game stockpiling Force for when you reach 6-8 Life. Then you spend the next few beats threatening Reciprocate, possibly with a Guard ante, and pull a big counterattack.
  • You use Reciprocate as an easy 4 damage plus Power ante on a beat when your opponent can't Dodge it or hurt you very much.
While there are some matchups where you're unlikely to get a beat when your opponent will leave you alone, economically speaking you'll probably get more than 4 damage out of using Power and Guard antes throughout the game... and you may still be able to Reciprocate anyway. So it's better to think about this as a full-board attack that incidentally counterattacks.
Finisher: With Feeling


I'm sure you can come up with some scenario where having Soak 4 on one beat will win you the game. Whether you can expect that scenario to occur more often than one where you'd rather have the 4 damage from Reciprocate - often enough that you would choose this Finisher at the start of the game, divorced from context - is a more difficult question. As it is, the ability to get a null beat at best and access to a couple of Styles you may not have had the chance to upgrade is blatantly inferior to your other Finisher.

There is one huge exception to this advice, and it's the Sarafina matchup. Not only does Sarafina have the sort of low Power that Soak 4 can help with, but her Implosion and Silver Styles destroy Reciprocate simply by being played.

I have heard that this card may get changed at some point, at which time I'll revise this.
Standard Openers
Seven has a lot of options for beat 1. None of them, aside from Cold/Undaunted Shot against characters with bad first beats, are the sorts of things opponents will actively try to play around, so there isn't much need to worry about getting outguessed. Rather, you should be the one outguessing your opponent.
  • Cold Shot (1~4/4/1/5) - Standard turret opener. Not adventurous, but that's the worst thing you can say about an attack that hits the whole board for 5 (after ante) on beat 1 with a ton of Stun Guard protecting it.
  • Cold Absorption (NA/NA/-1/6) - I don't recommend opening with Absorption in general, as it allows your opponent to set up while you take free damage. However, against characters who tend to use their best moves on beat 1 like Hikaru or Cadenza, it's worth considering. As a bonus, this move clashes Cadenza's Clockwork Shot, breaking the bot's best attack pair in half and giving you an opportunity to use the Taunt feature.

  • Detached Drive (Before: Advance 1-2, 1~2/3/4/2, After: Move 0-1) - A full-board Drive. If you feel a need to keep close to your opponent from beat 1 onward - especially if you anticipate a Burst or Dodge - this will do the job, but it's a mediocre option overall.
  • Detached Strike (1~2/4/3/7, After: Move 0-1) - Generally inferior to Cold Shot, but has the benefit of ignoring and countering any On Hit shenanigans.
  • Detached Dodge (Dodge at 3) - Standard beat 1 Dodge mixup. Getting Force off of your opponent's move at the same time is a sweet bonus.
  • Detached Burst (Start: Retreat 1-2, 2~4/3/1/2, After: Move 0-1) - Seven's original Styles don't Burst very well, but at least this one hits at range 4. It's a losing move against Shots but at least you can move closer to where you were afterward if you don't get stunned.

  • Undaunted Strike (Before: Countermove, 1/5/2/8) - A buffed Strike with huge confirm begging for a Power ante. Your opponent will regret hitting this.
  • Undaunted Shot (Before: Countermove, 1~4/4/1/5) - As with Strike, but more foolproof and a bit harder to clash.
  • Undaunted Dodge (Dodge at 2) - Standard beat 1 Dodge mixup. If it gets clashed, you're still probably going to have a good beat.

  • Remote Grasp (Start: Retreat 2, 3~4/2/5/0) - A cheeky, risky play to score an easy 2 damage while avoiding any opener that can't hit range 5 or outspeed Priority 5. The downside is that this immediately corners you and puts you at a range where your options are limited, and if your opponent rushes forward you may lose the beat by a considerable amount.

  • Reserved Shot (Personal space, 1~4/3/1/2, After: Retreat 1-2) - Some characters (Marmelee, Luc, Magdelina, Sarafina, sometimes Kallistar) like to play Dodge beat 1 to set up or escalate. Some characters need to be taught a lesson about that.
Afterword
So there you go. It's a huge wall of text, but a lot of the difficulty of learning Seven is remembering what she's capable of as you create and exploit opportunities to punish opponents while avoiding the worst of their strengths. Remember, though - there's only so much you can learn from a guide like this. As you keep playing, you'll come to understand what works and what doesn't through repeated pattern recognition.

All the best, and don't let the decision timers get you down!
6 Comments
ApatheticWrath 11 Jan, 2022 @ 5:53am 
How did you get this art?
Sentorian 24 Sep, 2018 @ 2:54pm 
Also worth noting - it's alluded to, but not stated explicitly, but friend;y's anti-retreat works on "move to any space" abilities like ruk's reload or kadath's teleport - they can't move anywhere behind them from your point of view.

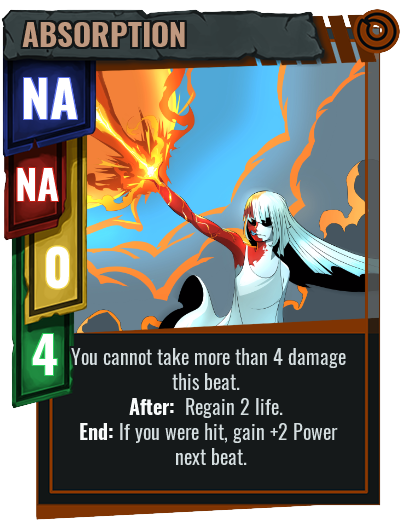
I also kinda disagree with the whole bit about Seven not wanting to be at range. I think that if you have a life lead and the opposing character is not a ranger, it can be a viable strategy to mainly stay at range. Lots of fighters become pretty predictable when you are at distance, making it easier to stall out and null beats against them, a common seven win strategy. In particular I find this a good strategy against Magdelina - you tend to get a life lead, and Mags players tend to be okay trading whiffs or letting you plink at them from range and stalling to higher levels, only to realize that it's too late and they can't break through the standard stall rotation of dodge - absorption - terrified shot.
Sentorian 24 Sep, 2018 @ 2:54pm 
I want to throw my hat in the ring for undaunted burst as a potential starting pair, against low powered folks. It's mostly a niche pair against karin, but it has surprising hit confirm because of the situational advance, trades well against non-plus damage drives and shots, which can't be said for most bursts.

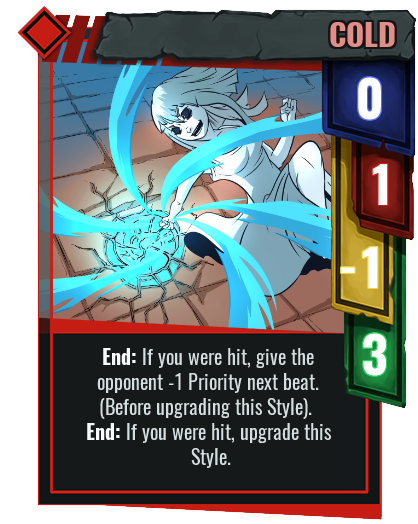
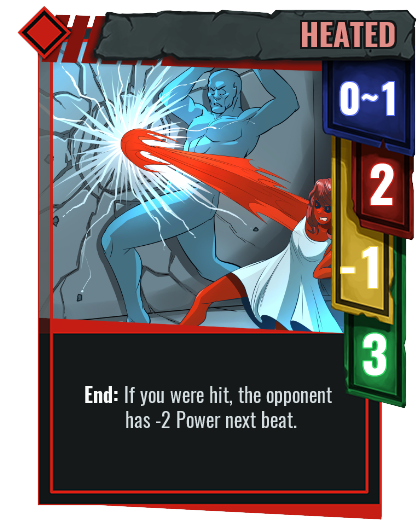
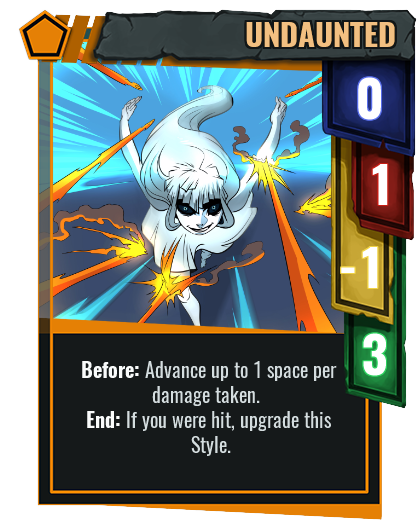
Speaking of undaunted, I find that you often have a choice between trying to get cold and undaunted upgraded early, as they have the same stats - In my opinion in most matchups it's worth it to go for undaunted first - you lose hit confirm, but terrified is a very strong tool and while heated is certainly better than cold, they perform roughly the same function. This doesn't hold true against say Eligor who is regularly as slow or slower than you, at which point terrified is honestly a downgrade and it's better to go for cold.
TakeMyLunch 7 Sep, 2018 @ 6:20am 
love the joke at the start.
Alison 5 Sep, 2018 @ 8:55pm 
Great guide.
mnmkami 30 Aug, 2018 @ 8:13pm 
Freaking amazing. 10/10.