
351 ratings

MvM Demoman: The Unrivaled Champion (Secondaries Updated 6/2/2014)
By Upsilon
Unchallenged; unrivaled. MvM is truly impossible on some maps/difficulties if your Demo isn't ready. With this guide, you will be. Glove up now with the unrivaled champion!
Favorite
Favorited
Unfavorite


Created by

Category: Achievements, Classes, Co-op, Game Modes, Gameplay Basics, Loot, Multiplayer, Secrets, Walkthroughs, Weapons
Languages: English
Class: Demoman
Posted
Updated
25 May, 2014 @ 7:45pm
24 Jun, 2018 @ 5:00am
| 21,278 | Unique Visitors |
| 260 | Current Favorites |
Guide Index

Overview
Important Notice
Intro
Other guides
Overview
The Champs Primaries
The Champ's Secondaries (Updated)
The Champ's Melee
Champ's Upgrade Build
Champ's Basics: Positioning
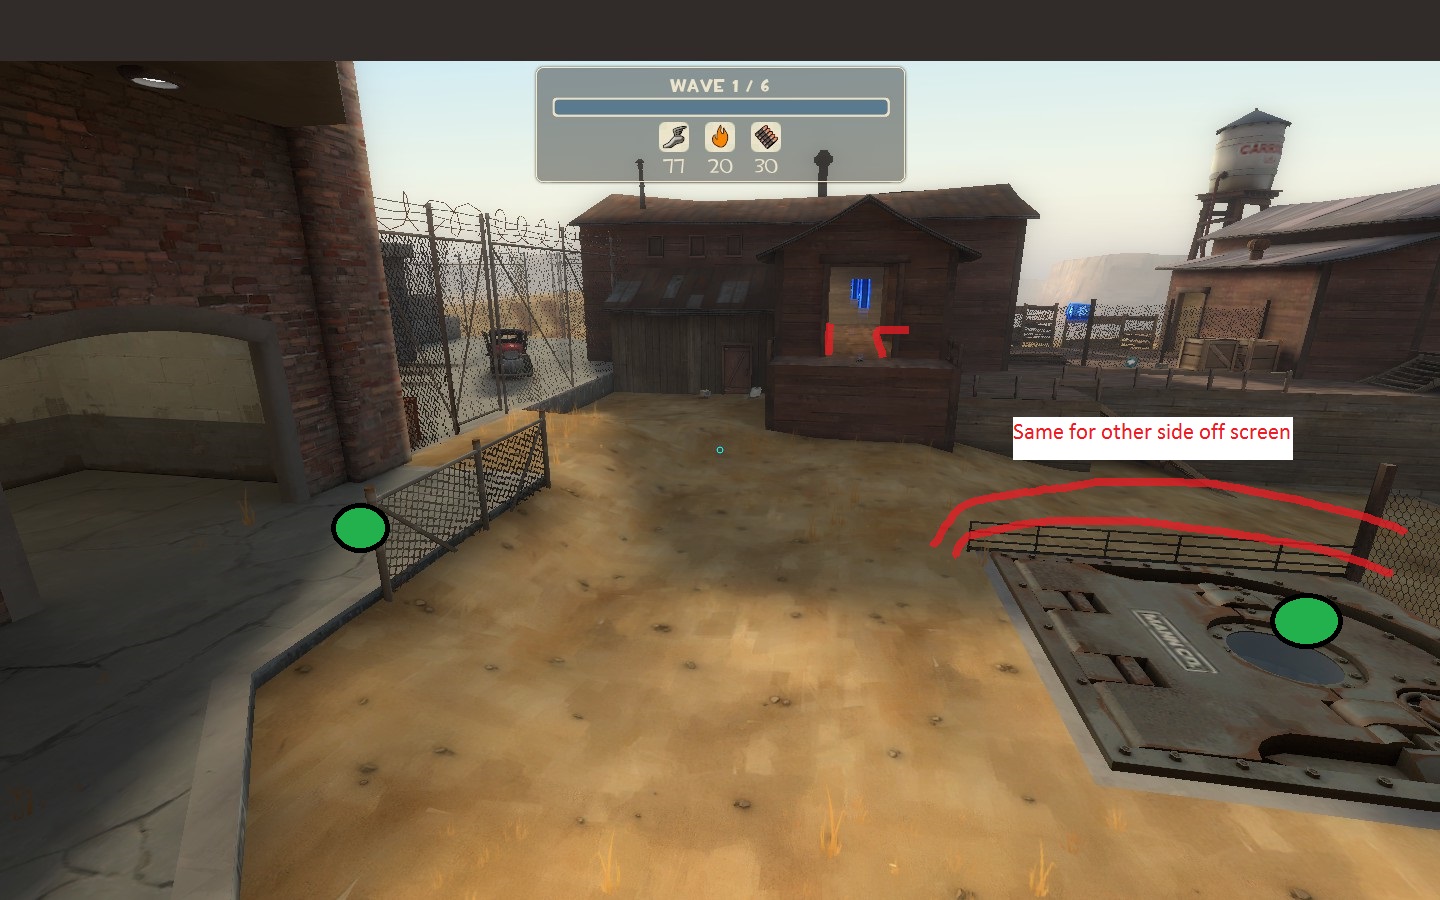
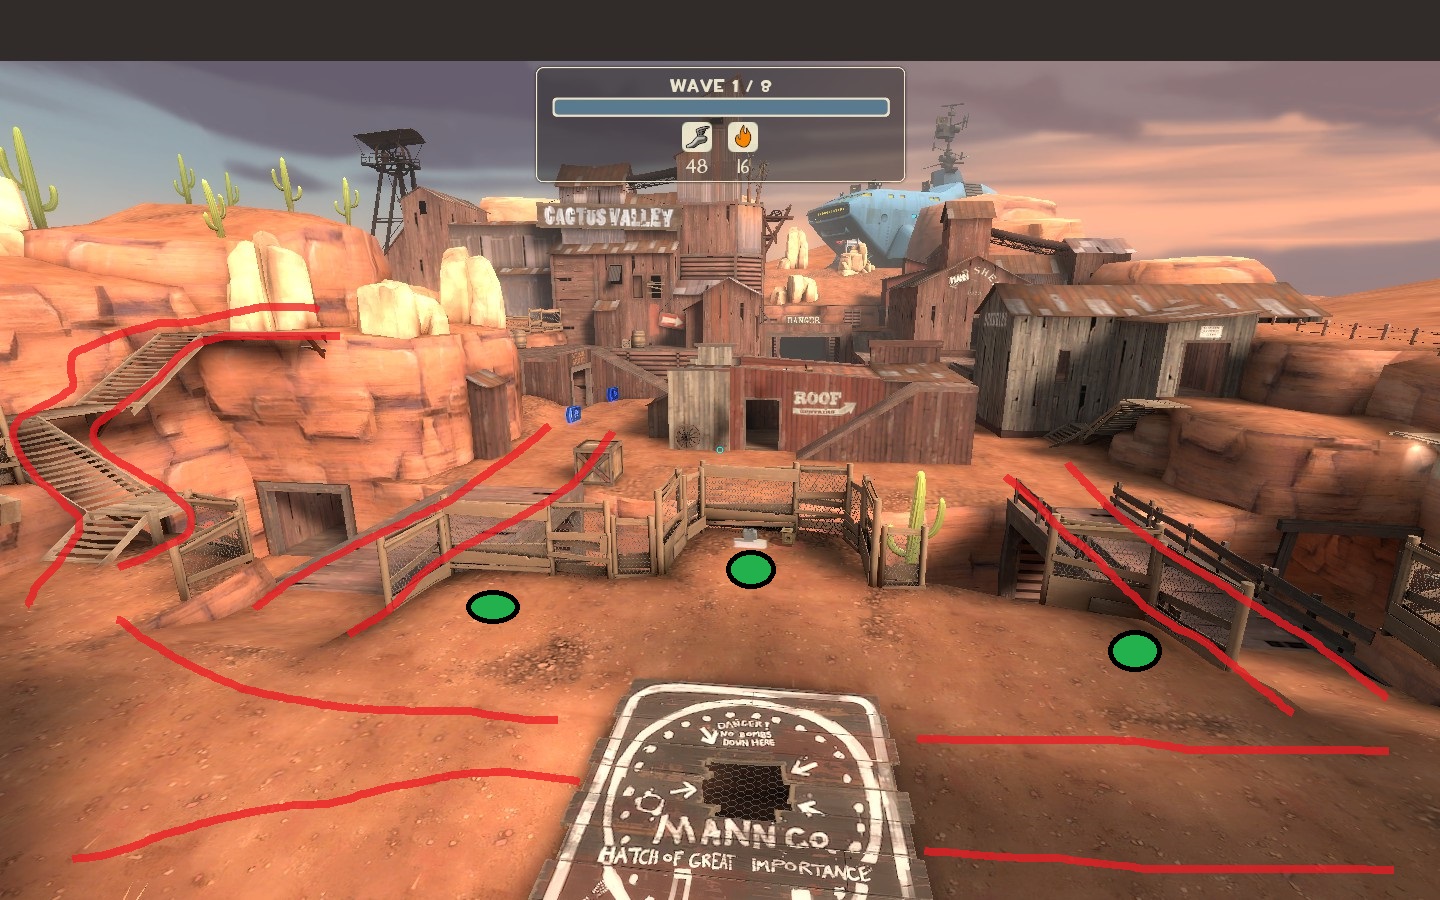
Positioning: Big Rock
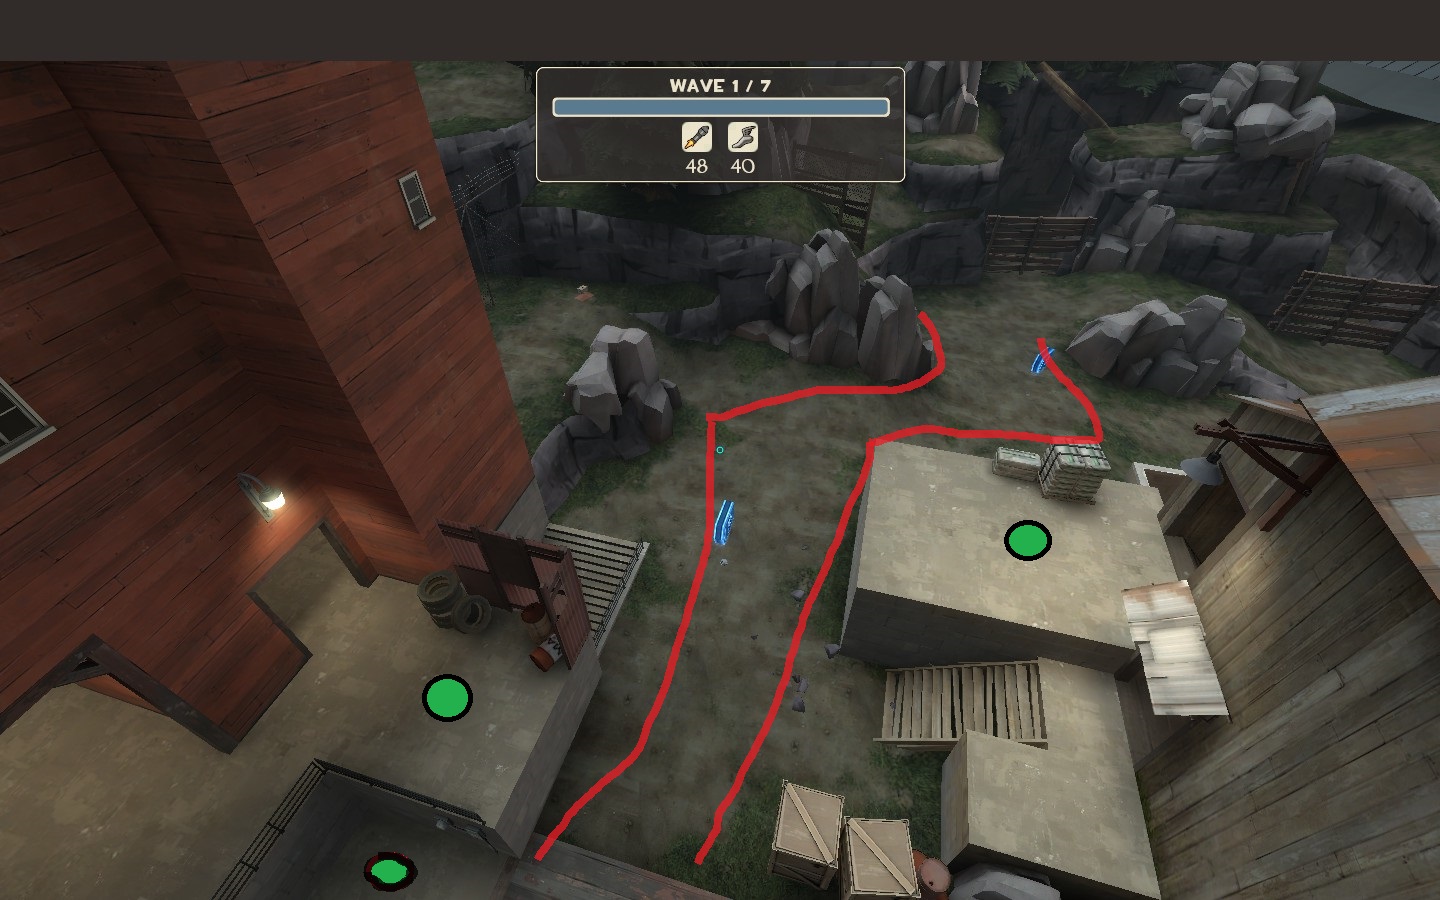
Positioning: Coal Town
Positioning: Decoy
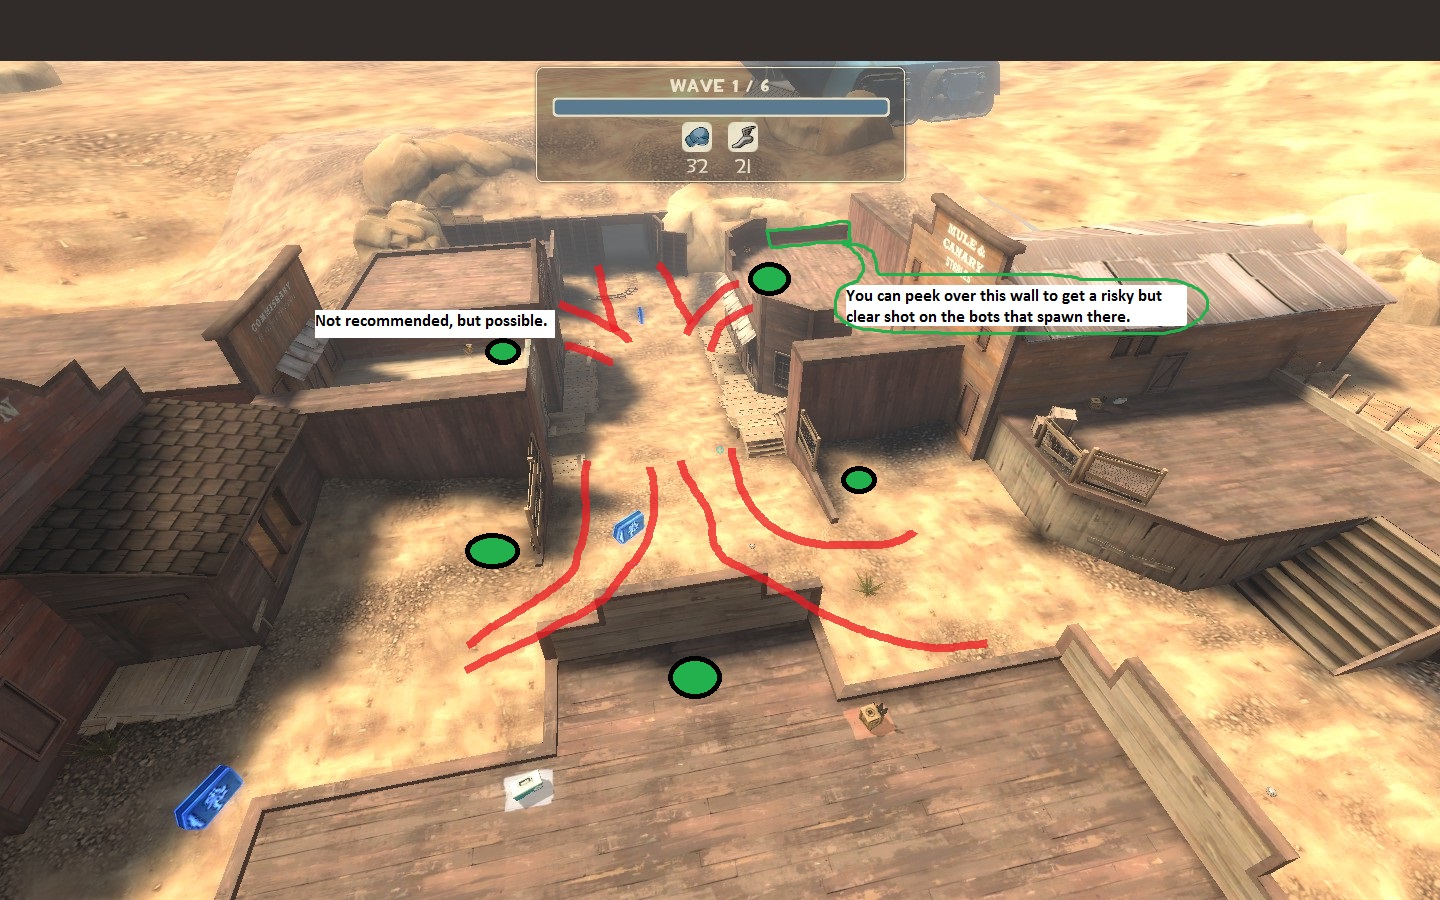
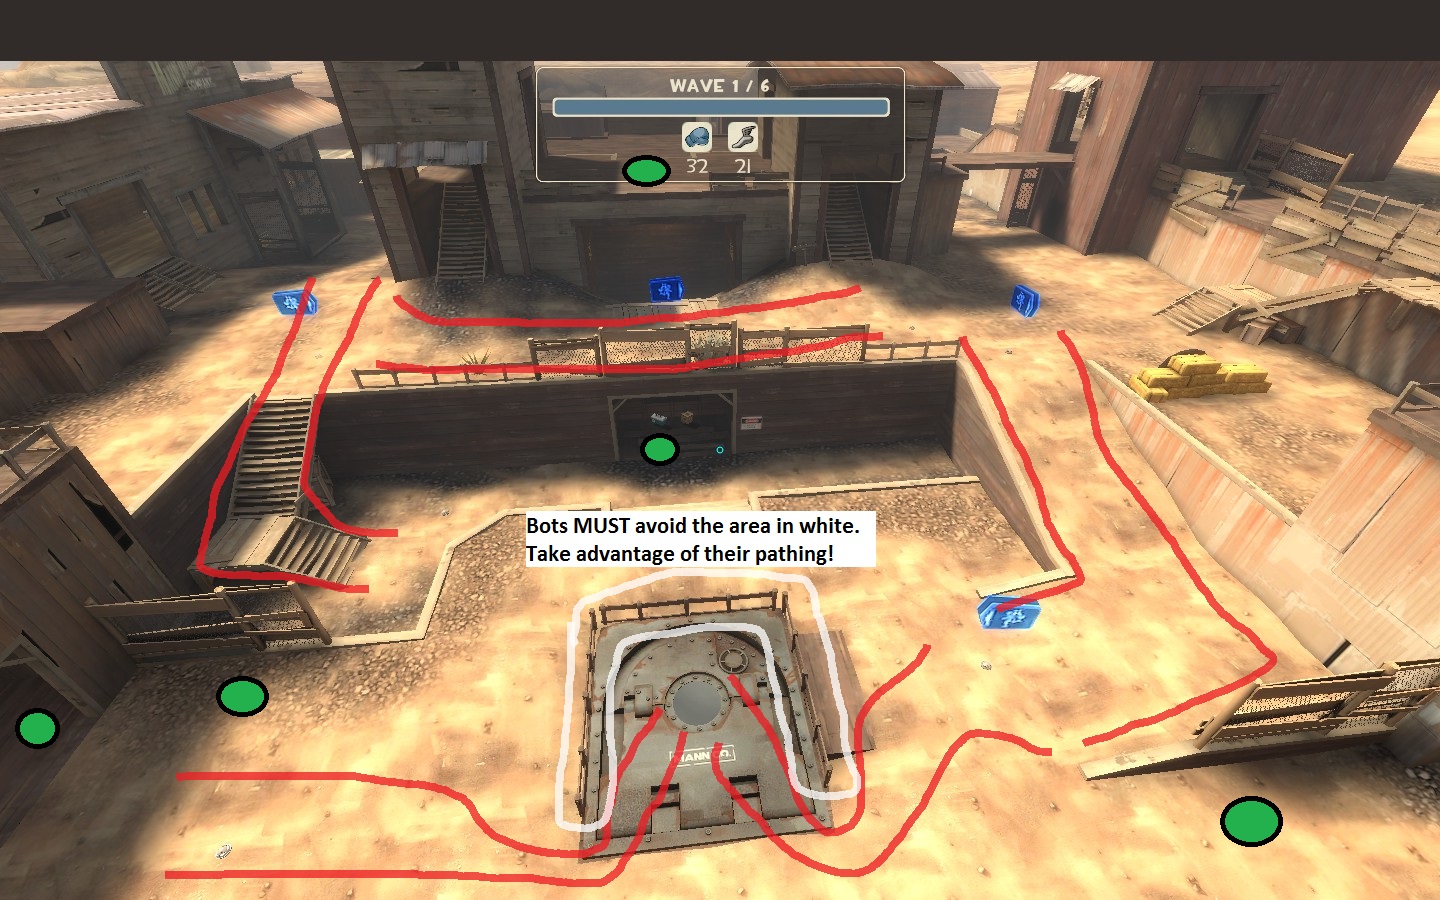
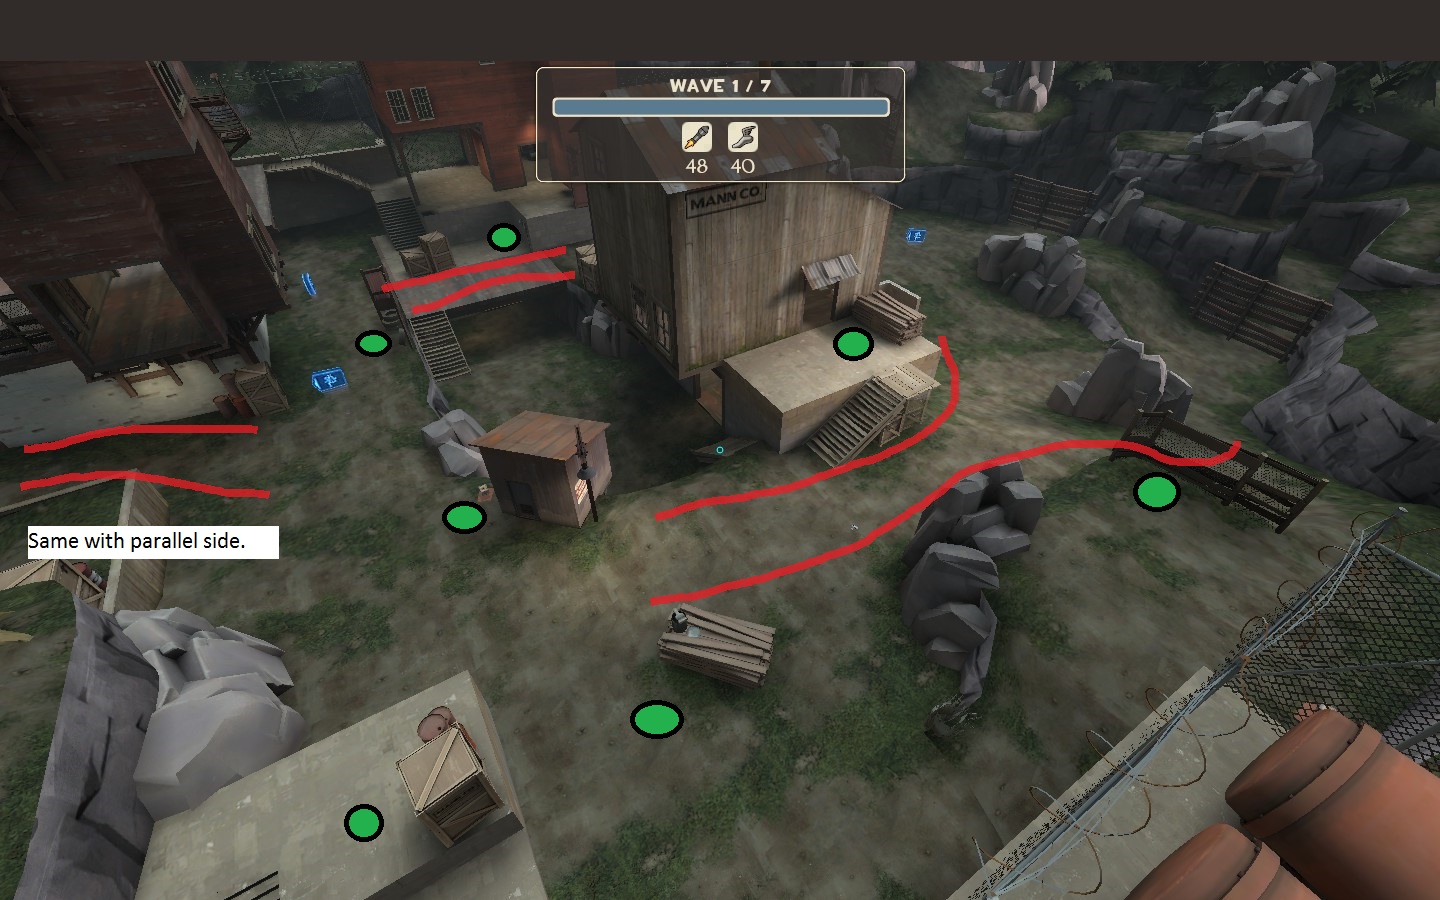
Positioning: Mannworks
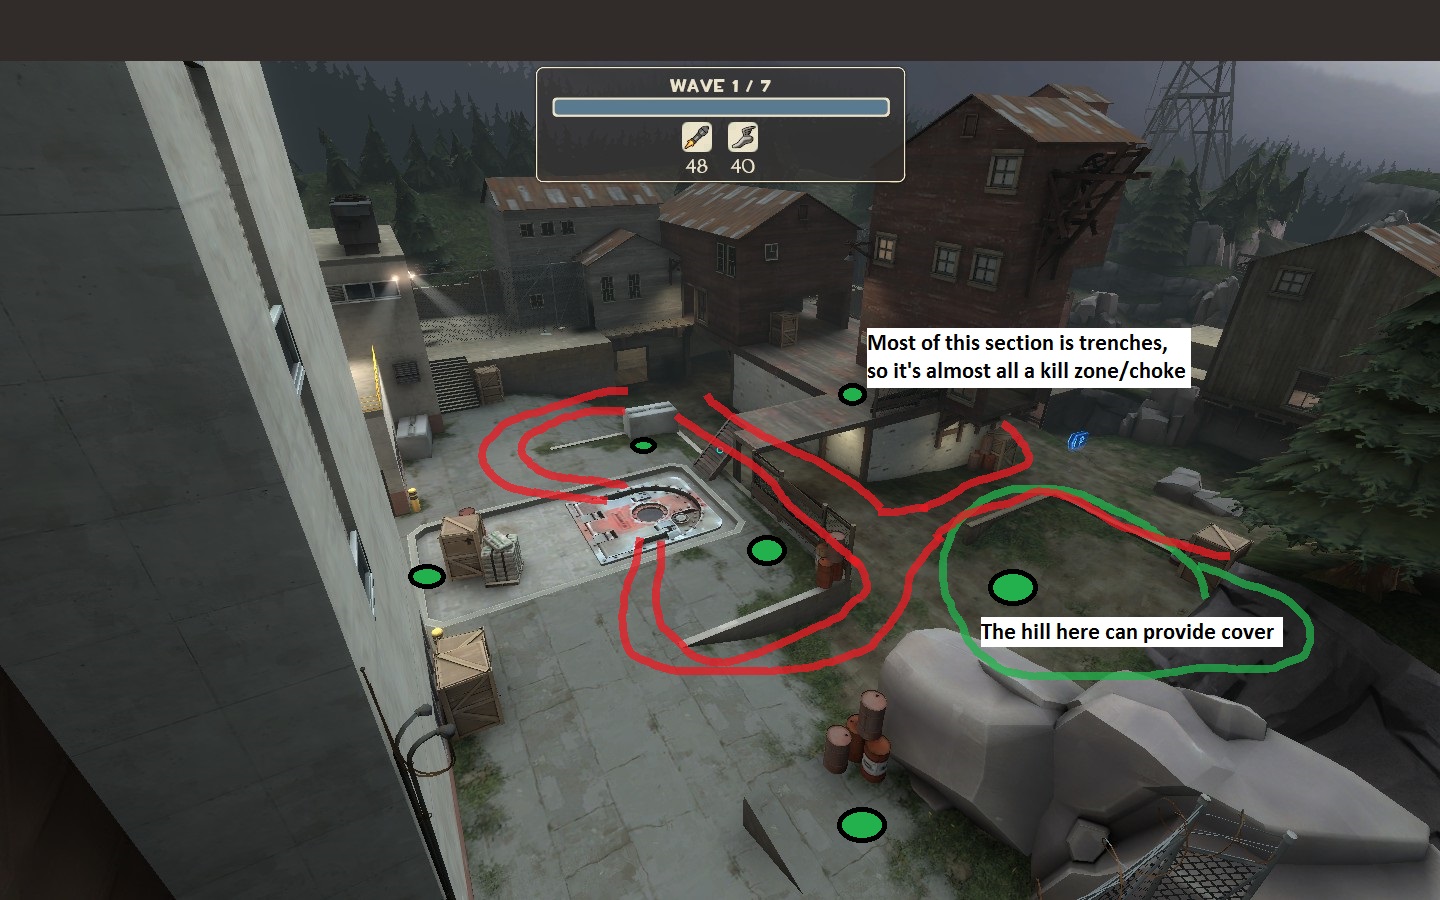
Positioning: Rottenburg
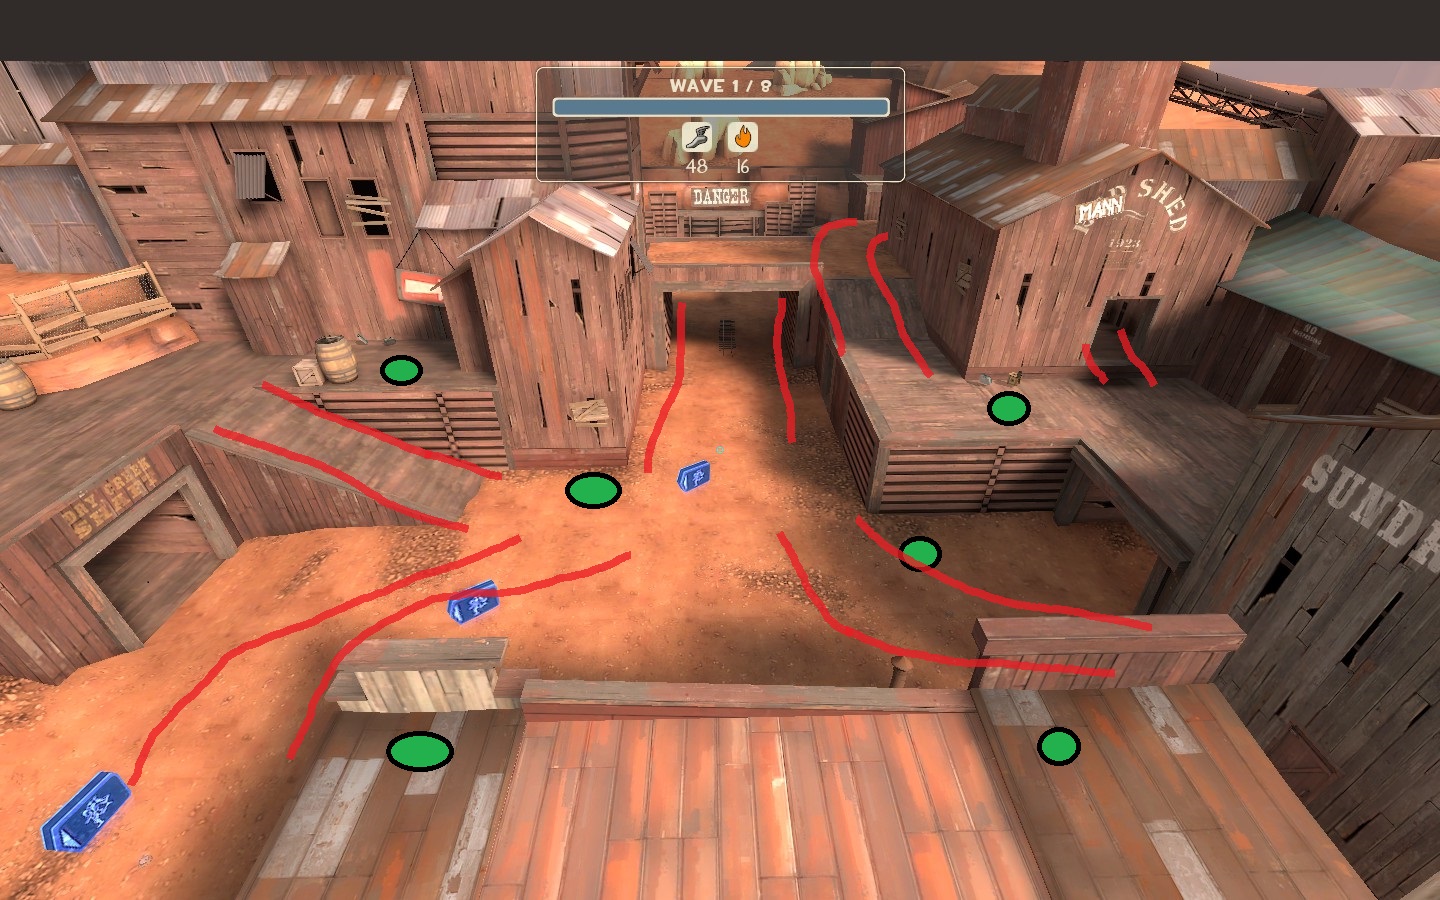
Positioning: Mannhattan
Champs Basics: Miscellaneous Tips
Champ's Basics: Your HVTs and How to Kill Them
In the Ring: Bomb Placement
In the Ring: Crowd Thinning
In the Ring: Tanks
In the Ring: Spies and Snipers
The Champ has entered the ring!
UGH! I FORGOT THIS ONE!
Comments
Important Notice
I think it's just about official that I am discontinuing updating/writing guides for MvM. MvM Solly most likely won't see the light of day. Thanks again to everyone who viewed and I hope the guides helped you. They were great practice for me and I had a lot of fun, but now, I'm moving on. I hope the information will still be relevant at the time you are reading, and good luck on those Aussies or whatever is the next big thing on TF2 at the moment.
- Upsilon Force
- Upsilon Force
Intro
Upsilon is BACK and after a superfluous haitius I bring you the guide you've all been waiting for!
The Demoman is a powerhouse of devastating damage. So overwhelmingly powerful, HE CAN ALMOST SOLO A MAP. The Champ can thin out large crowds, he can plant traps on the bomb point itself to clutch a victory, stop Medic bots before they can charge and plow through your team, or stack up his bombs to wipe out the biggest, toughest bots IN ONE EXPLOSION!
Demo makes or breaks any team. If he's good, that alone might be enough to win. (In some cases, I've had awful teams and a great Demo and he carried ALL of us! I myself have nearly won games with a bad team as Demoman!) Besides a few exceptions, if your Demo isn't good, YOU WON'T WIN. A good Demoman is VITAL; CRUCIAL to victory. In fact, I'm expecting this guide to turn around more bad games than any other guide I've written yet COMBINED!
If you think I have brought the Champ glory, please rate, comment, and/or favorite the guide and please tell your friends about it! (I've noticed in my other guides, I have 6,000+ views but only 50ish ratings. Don't you think that's a bit silly? Just click the Thumbs Up button at the top of the guide! By the way, if you must critique I'm open to it, but please do so politely and as a side note, I do not accept random friend requests; but you can join my Fan Club!)
Other guides
https://steamhost.cn/steamcommunity_com/sharedfiles/filedetails/?id=148119190
https://steamhost.cn/steamcommunity_com/sharedfiles/filedetails/?id=150296100
https://steamhost.cn/steamcommunity_com/sharedfiles/filedetails/?id=152068821
https://steamhost.cn/steamcommunity_com/sharedfiles/filedetails/?id=152626791
https://steamhost.cn/steamcommunity_com/sharedfiles/filedetails/?id=156320959
(I won't include Pyro because the guide is outdated.)
Overview
The Demo in MvM is almost identical to Spy. His job is to thin out crowds and - above all - hunt down the enemy Medics. Whether it be giants or waves of normal Medic bots, Medics are debatebly the single most dangerous opponent you will face in MvM. Your team is counting on you as Demo to neutralize their "uber-rush" threat. If you don't, might as well roll out the red carpet straight to your bomb hatch because there is almost nothing you can do about it now.
This might be a shocker, but on most maps the Demo is all-around more effective than the Spy. His biggest edge over Spy is he can damage tanks considerably better.
(In my humble opinion, if upgrading sappers as Spy would reduce its cooldown, they would pull out more even and purchasing all those ammo upgrades just to use it more often is a hassle).
Demo is, without a doubt, THE most powerful and effective class in MvM. I know this one was long overdue, but I now present the most requested guide ever: MvM Demo! Let's get to it.
The Champs Primaries
After some expirimenting, I'm shocked at how deadly the Loch 'n Load is. (Click the white text to go to the wiki for more information!) The bomb flies faster than the stock Pipe Bomb launcher and does 20% more damage. Once you upgrade its damage, you can fire this into a crowd of Scout bots and kill almost EVERY one of them! Also, against tanks, this is a weapon to be feared. Maybe 2nd only to the Beggar's Bazooka.
Stock Pipe-Bomb/Grenade Launcher is not optimal, but don't panic! It's not absolutely necessary to use your primary in MvM. You might not EVER switch away from your secondary Sticky Bomb launcher(s). If you're all set up and just waiting on bots, you can switch to this and shoot it faaaar away for some free damage.
The Loose Cannon behaves almost identically to stock pipebomb launcher with the only exceptions that you can control its detonation in the air by priming the shot, and it can knock-back targets. Since it's so much like the stock launcher, you can put it in the same category.
I've seen someone recommend Boot Legger/Ali BaBa's Wee Booties because of the max health bonus. Some suggest it's better because it gives you more health and, therefore, more survivability. I would disagree. You lose any potential of your grenade launchers for a lowly 25hp. No thanks, I say.
Bear in mind you will almost NEVER use your primary, but if you do, take stock or Loch 'n Load.
The Champ's Secondaries (Updated)
Like the Spy's knife or the Heavy's minigun, this is the most important choice you make in MvM. I would say that Stock Stickybomb Launcher would be the best all around. It will take some upgrades, but the firing speed can eventually even out with the next launcher on our list.
The other stickybomb launcher is Scottish Resistance. If you compare the stats, Scottish Resistance can lay up to 14 bombs at once, has a fast firing speed, and each bomb can be detonated separately, allowing for multiple bomb-group placement. The reason I don't recommend it is the delay before you can detonate them. It might not seem like much, but it gets annoying and the Stock launcher can detonate almost immediately after firing; allowing for M1,M2,M1,M2 spam (which is nice when there are few robots remaining). It might not seem like much, but that delay does cost precious seconds. The only real advantage of it over Stock is the 14 bomb cap. With a crit canteen, thats 14 CRIT BOMBS ON ONE SPOT! However, in conclusion, the stock wins by a narrow margine; .8 seconds, to be exact.
(Update: With the new damage ramp re-work, the debate on these 2 secondaries got even more heated. Now, you'll just have to see for yourself which works better for you.)
If you take anything else for secondary, you deserve to be kicked.
[EDIT] A message to all my viewers: I have received some harsh feedback on saying what I said in this section and I have many things to say.
Firstly, this guide is aimed at newer players. Demoknights might be viable, but these are an advanced tactic, and not recommended for new players.
Guides are generally not intended to highly skilled/veteran players unless explicitly stated otherwise. If you are one of these players, why are you looking at a beginner's guide in the first place, and why are you bashing on it? These staunch statements against Demoknights are intended at a new player. Try this context: You just started MvM and I highly recommend you go Demoknight. I would get overwhelming negative feedback for leading them to their deaths and causing many disasterous games. "GG UPSILON U SEND 10,000 DEMONUBS INTO MY GAM AN WE LOOSED UR GIDE SUX"
If you do get very good at Demoman, yes - by all means - break the meta, have fun, do whatever the hell you want. I'm simply stating the safest, common denominator on how to get loot in MvM without screwing up everything, getting kicked like crazy, and generally just lead them down the path of least resistance.
I called Demoman the champ and the best class and called him necessary because the intro was written about a year ago and the guide remained 5% done. I wrote this back when a good Demo WAS crucial to victory and in a sense, still is. Once again, try this context: You go Demo and are assigned "medic killer and wave thinner". If you aren't ready to be the assigned medic killer (as Demo, Sniper, or Spy ect) on the harder difficulties, you won't win. That was also written during Mecha Engie which IMHO was way harder than 2 Cities.
I also DID mention that grenade launchers were lethal. I said I was "shocked at how lethal they were." This implies a lot of potential that I just didn't mention. Yes: more advanced players can solely use their primary and win games, but again I wanted to keep this simple for newer players.
I will NEVER claim to be the best or even SOME OF the best MvM players out here. I'm just some average guy who caught on to how it all worked and I love writing, so I thought I'd make a guide. I do not believe I'm some pro or super famous. I'm pseudo-famous at best, but my writing DOES have credibility as well as an entitlement to my opinion. I'm also not here to argue with anyone. I will discuss things, but I will not feed your addiction to drama and attention.
I'm very disappointed that I got so much hate for this. Shout-outs to the people who were more polite about it, but for the others, this behavior was unnecessary and uncalled for. There is absolutely no reason to give the insults and patronization that I got from writing this. Shame on you.
In conclusion: I hope this guide was a big help to anyone who read it. I'd like to thank the people who supported me, and I hope that the more rude players come around. 10k views was a great run. See you all next time!
The Champ's Melee
This is highly debateable mostly due to the fact that you should have your secondary out about 90% of the game. I find stock bottle to be the best because there's no penalty to having it. If you're out of ammo for the stickybomb launcher, you should be running for more and shooting grenades from your primary. Above all, you shouldn't ever be meleeing unless you're like me, wanting to smash your bottle over a Spy bot's face.
Just like that, the melee weapon walkthrough is over! Best section ever!
Just like that, the melee weapon walkthrough is over! Best section ever!
Champ's Upgrade Build
 The amount of money you start with will vary from map to map. First thing you should ALWAYS click is 1 reload speed for your Stickybomb Launcher. One point in reload speed, one point in firing speed, then 1 +25hp per kill. From here, rush maxing reload speed, followed by maxing firing speed. (With Scottish Resistance, it only takes 1 upgrade to max firing speed). I've never found the need to max hp per kill but you better get at least 1!
Take note that increasing damage done per bomb IS A LUXURY and should NOT be prioritized at all. It's very expensive and unnecessary.
Next is defenses. Again, depending on the map you either need to max crit resistance or start getting some blast resistance. Another observation of mine is I haven't need much need to get bullet resistance. The one that I really have trouble with is explosions, so I tend to ignore bullet resistance entirely. With bullets, at least you can hide from them, but explosions will creep around cover and hit you anyway. If you have money to spare, you can put it into Stickybomb Launcher damage. Or....
You can skip getting resistances or damage on your secondary, and put money into the DEADLY Loch 'n Load! Start again with reload speed. Max it, then go back and forth between clip size and damage. With a crit buff, YOU CAN DO OVER 500 DAMAGE PER SHOT! Alas, this would be a "glass cannon" build; all damage, no defense, but it's fun as heck! You might even give that enemy Sniper something to be feared!
Now that we know what to take, let's hit the gym and start trainning!
I know folks of my generation are tired of hearing this, but if you haven't....
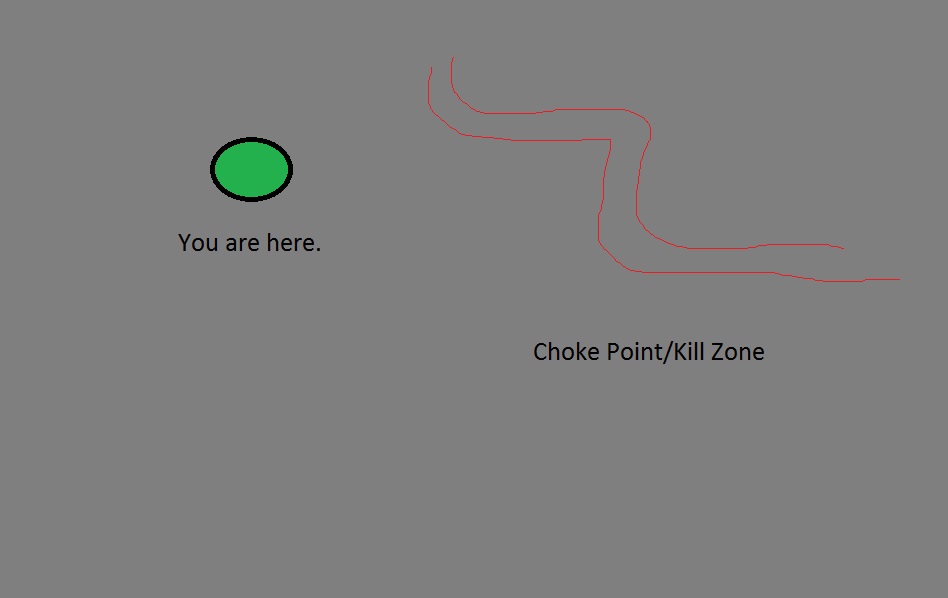
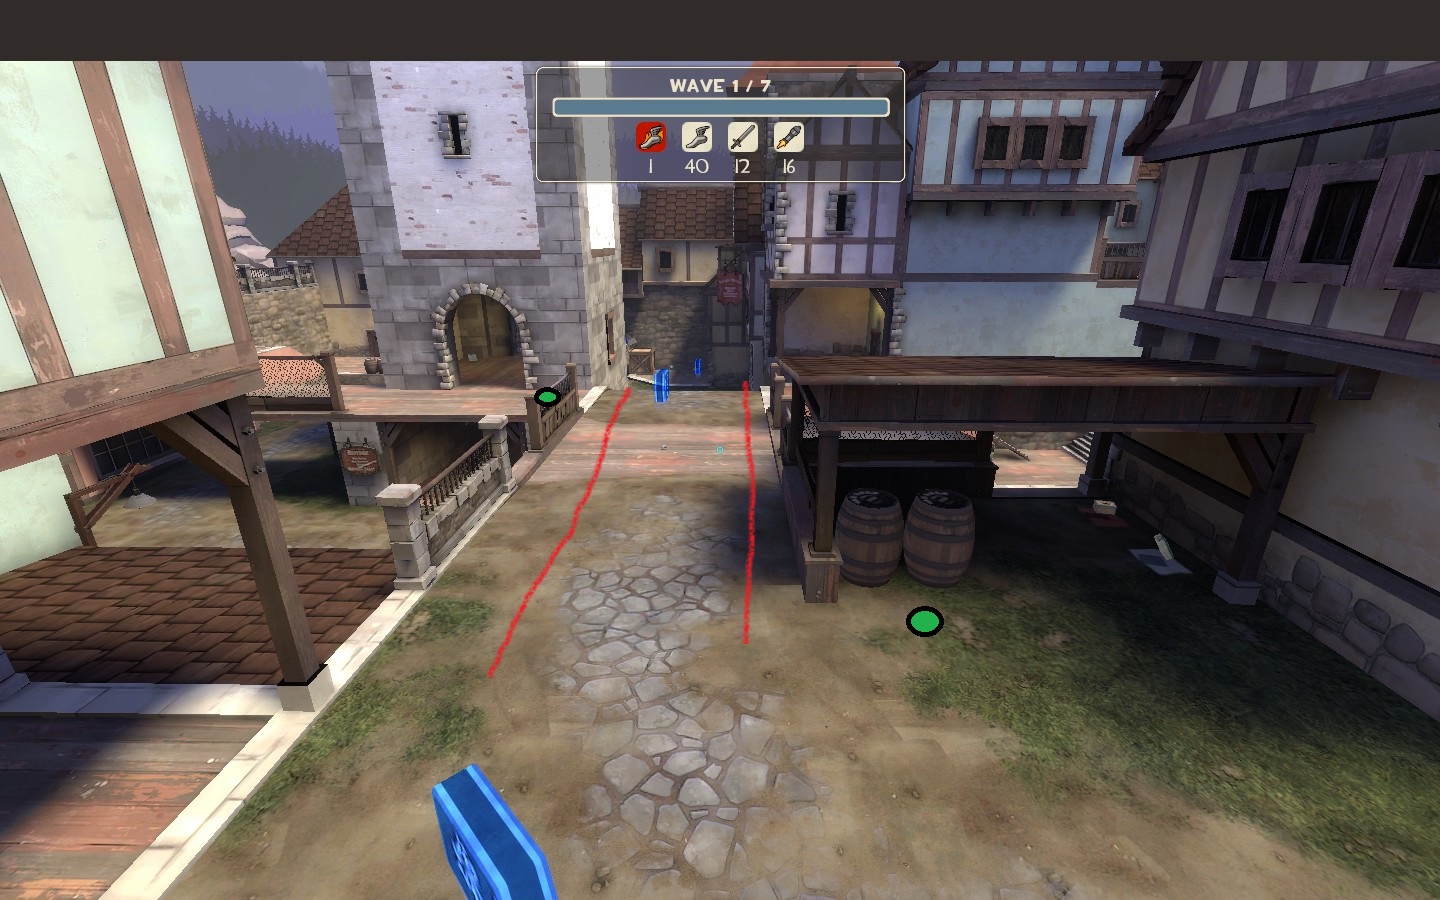
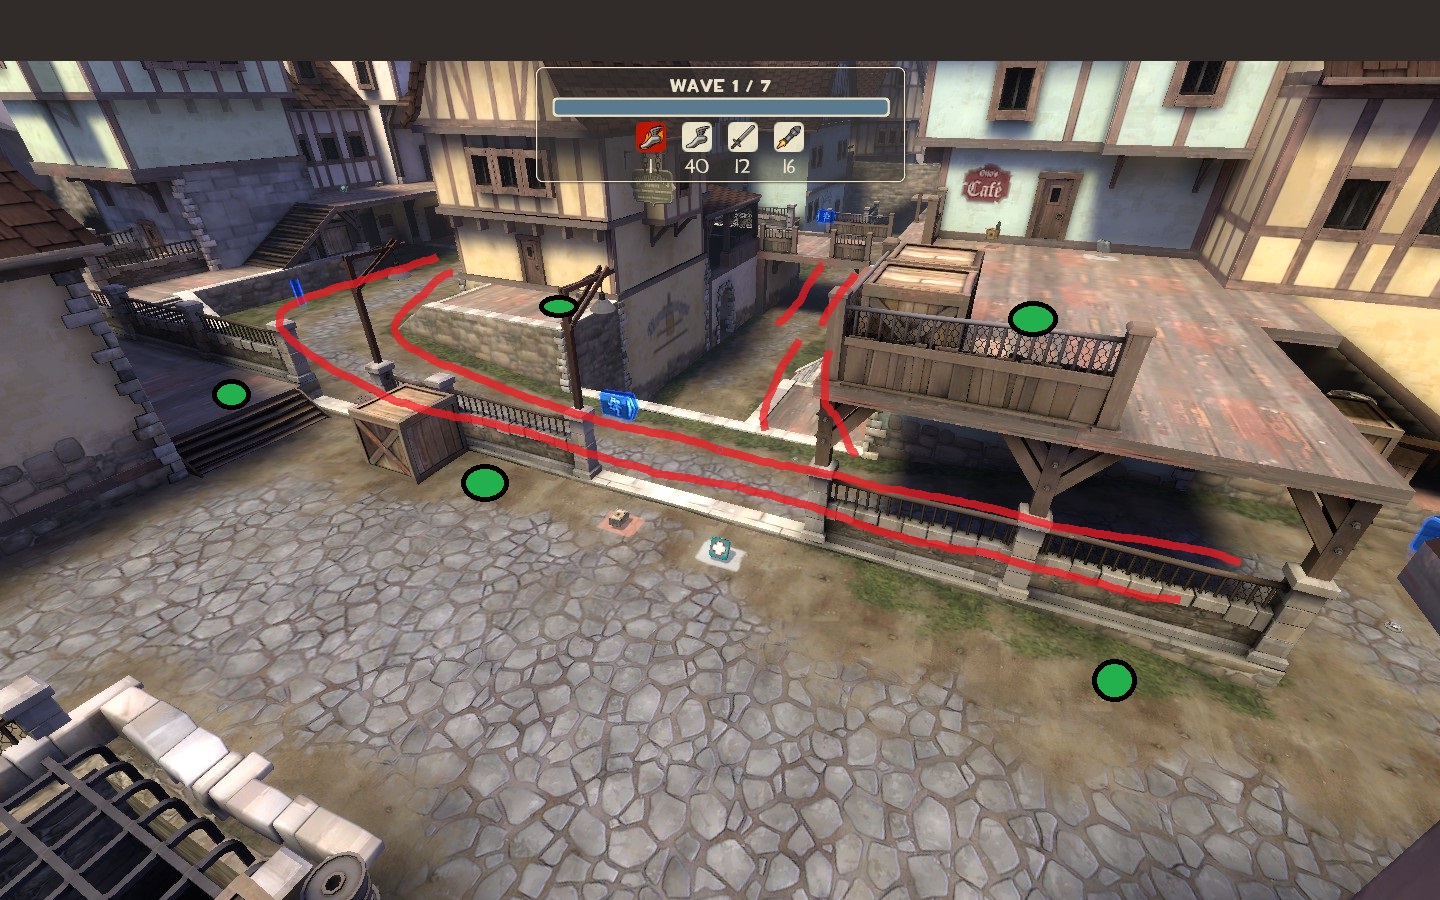
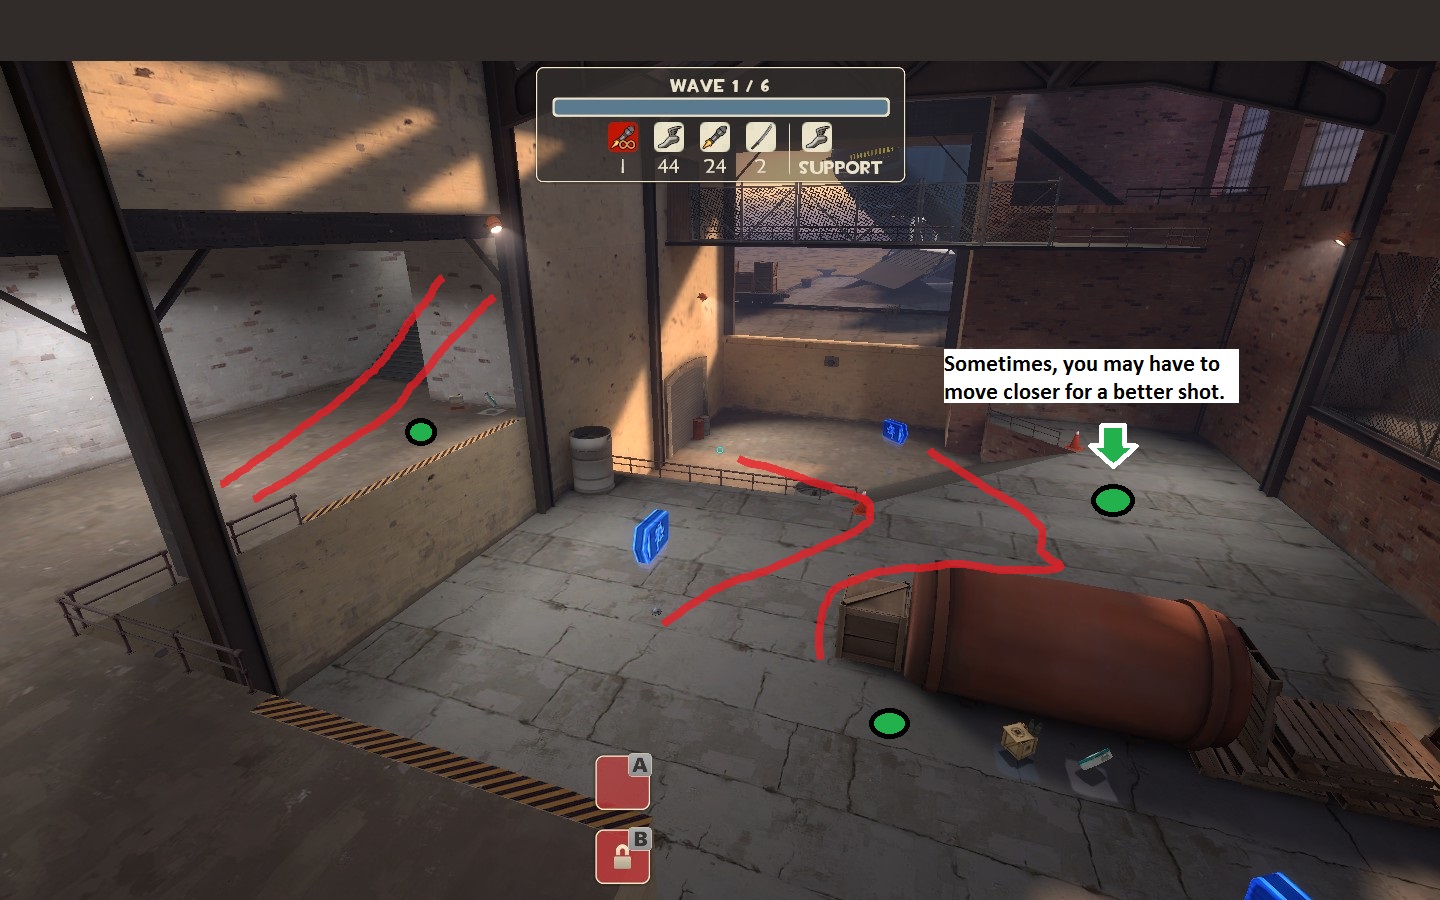
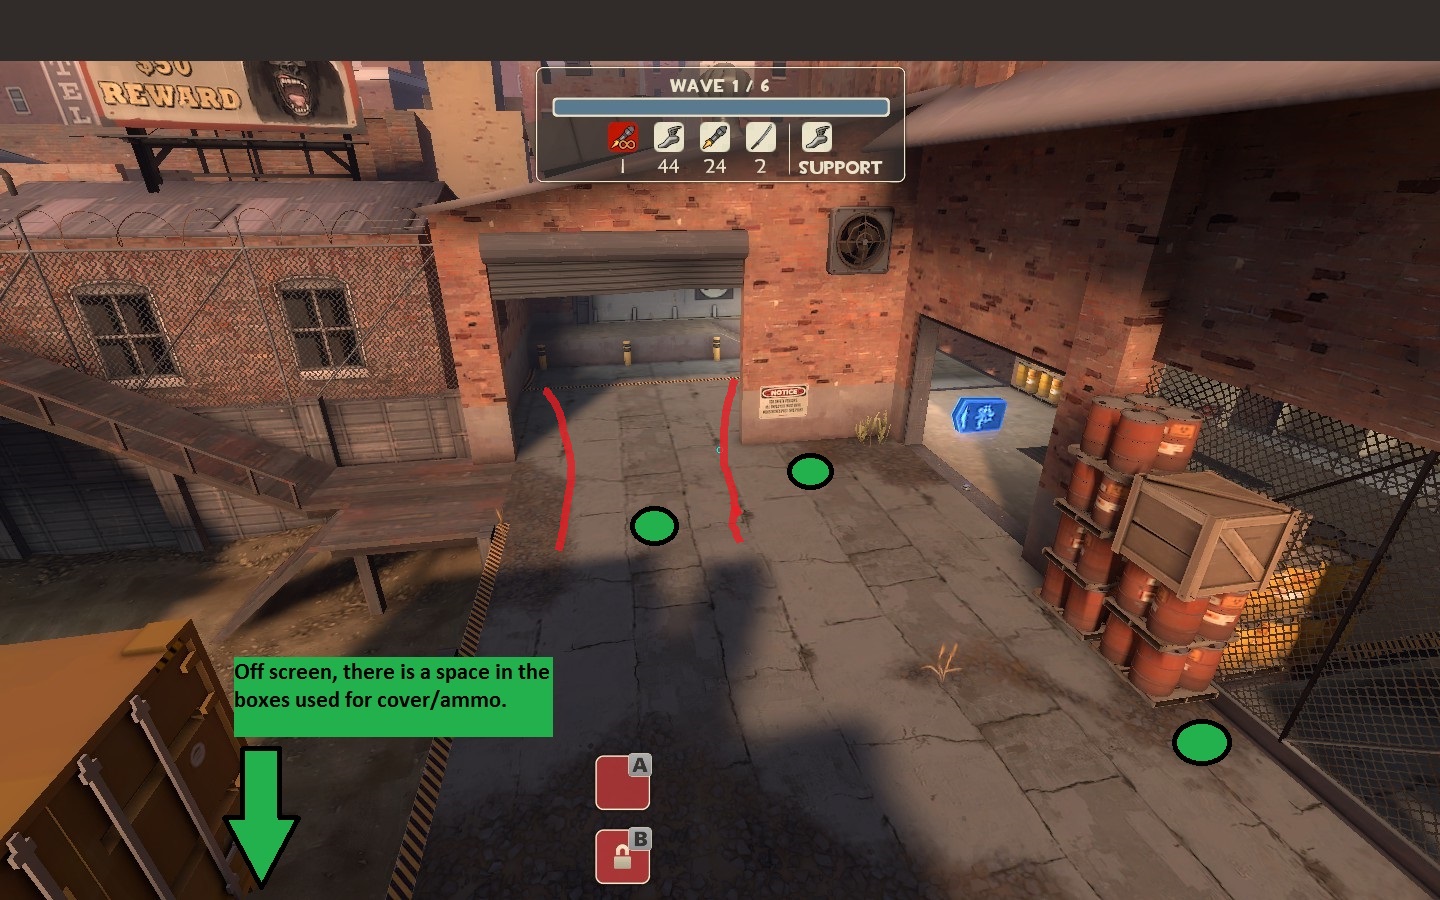
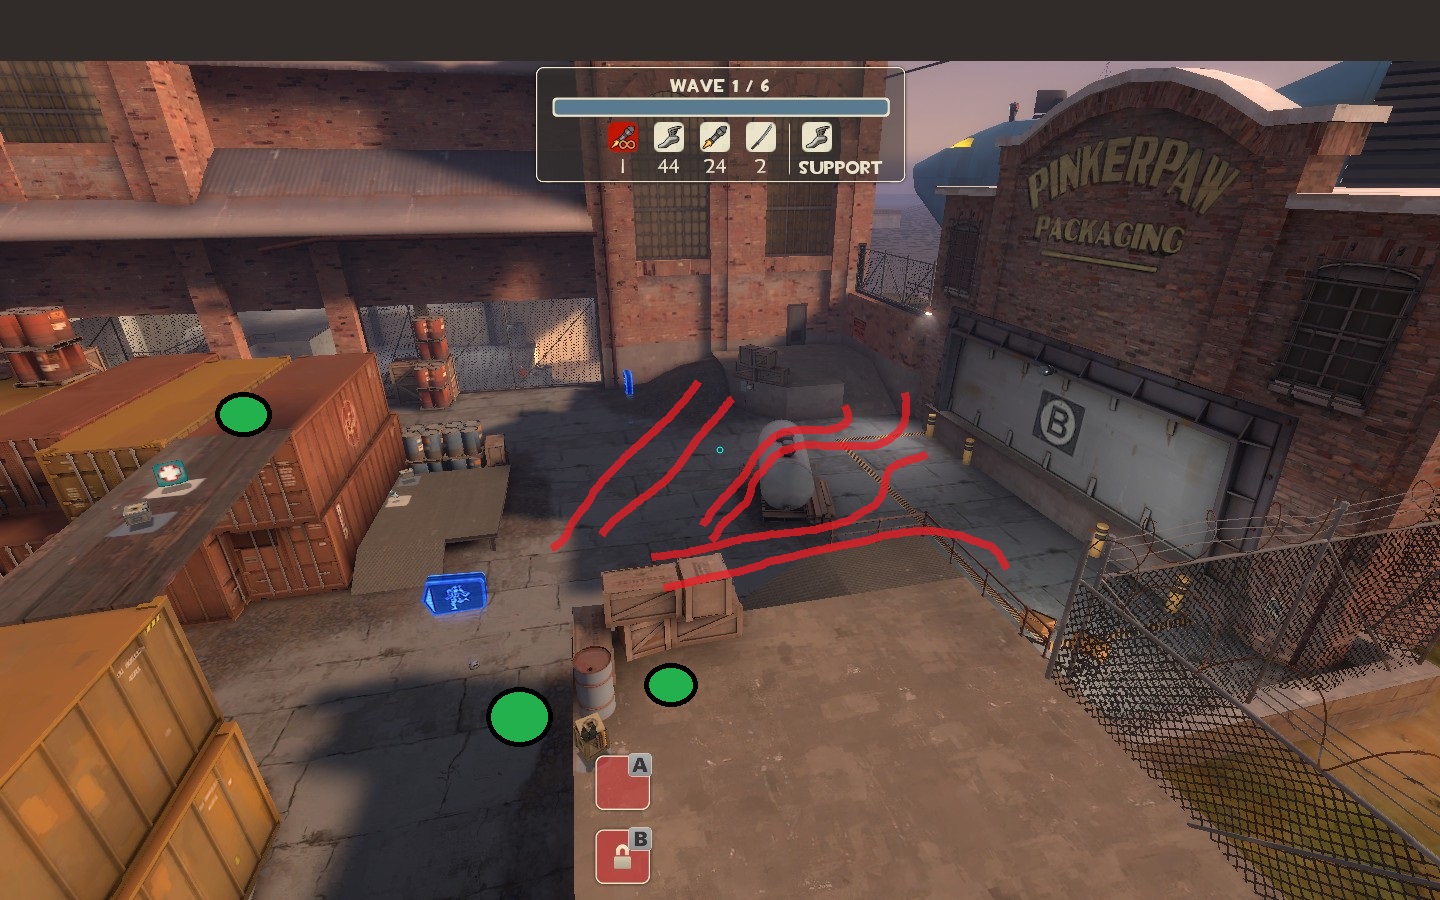
Champ's Basics: Positioning
Positioning goes a long way into measuring anyone's effectiveness in MvM. The champ needs to be close enough to plant his bombs on the choke point currently being used by the players, while still nearby cover, health, and ammo. As you can see, the places you camp out are a small niche; a very small selection. Sometimes you will be near the Engie's dispenser, sometimes not. Here are some screenshots to give you visual of each one. (Click the images to zoom in.)
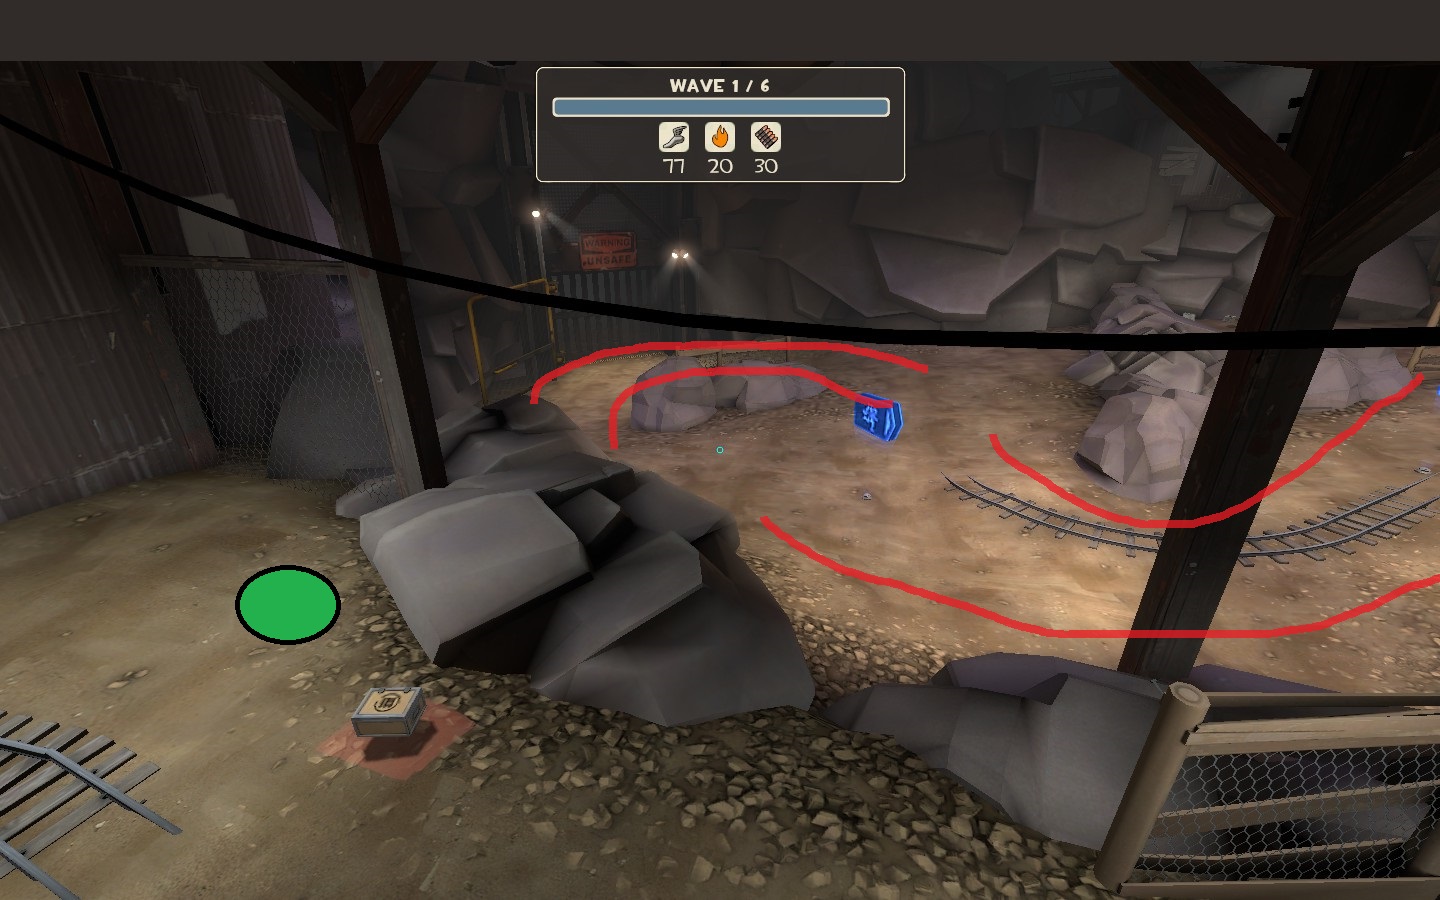
Positioning: Big Rock
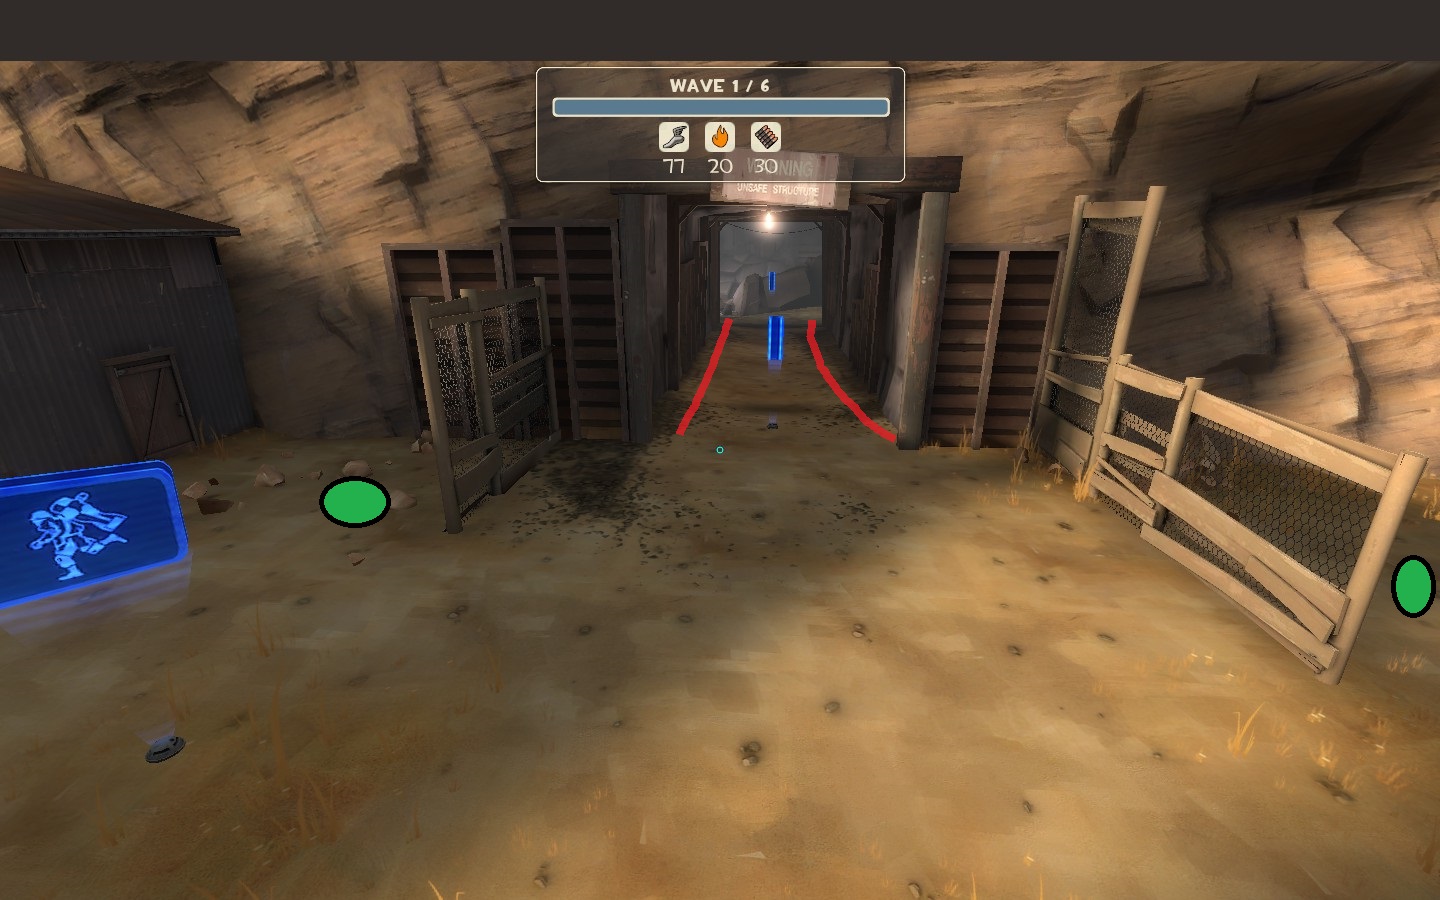
Positioning: Coal Town
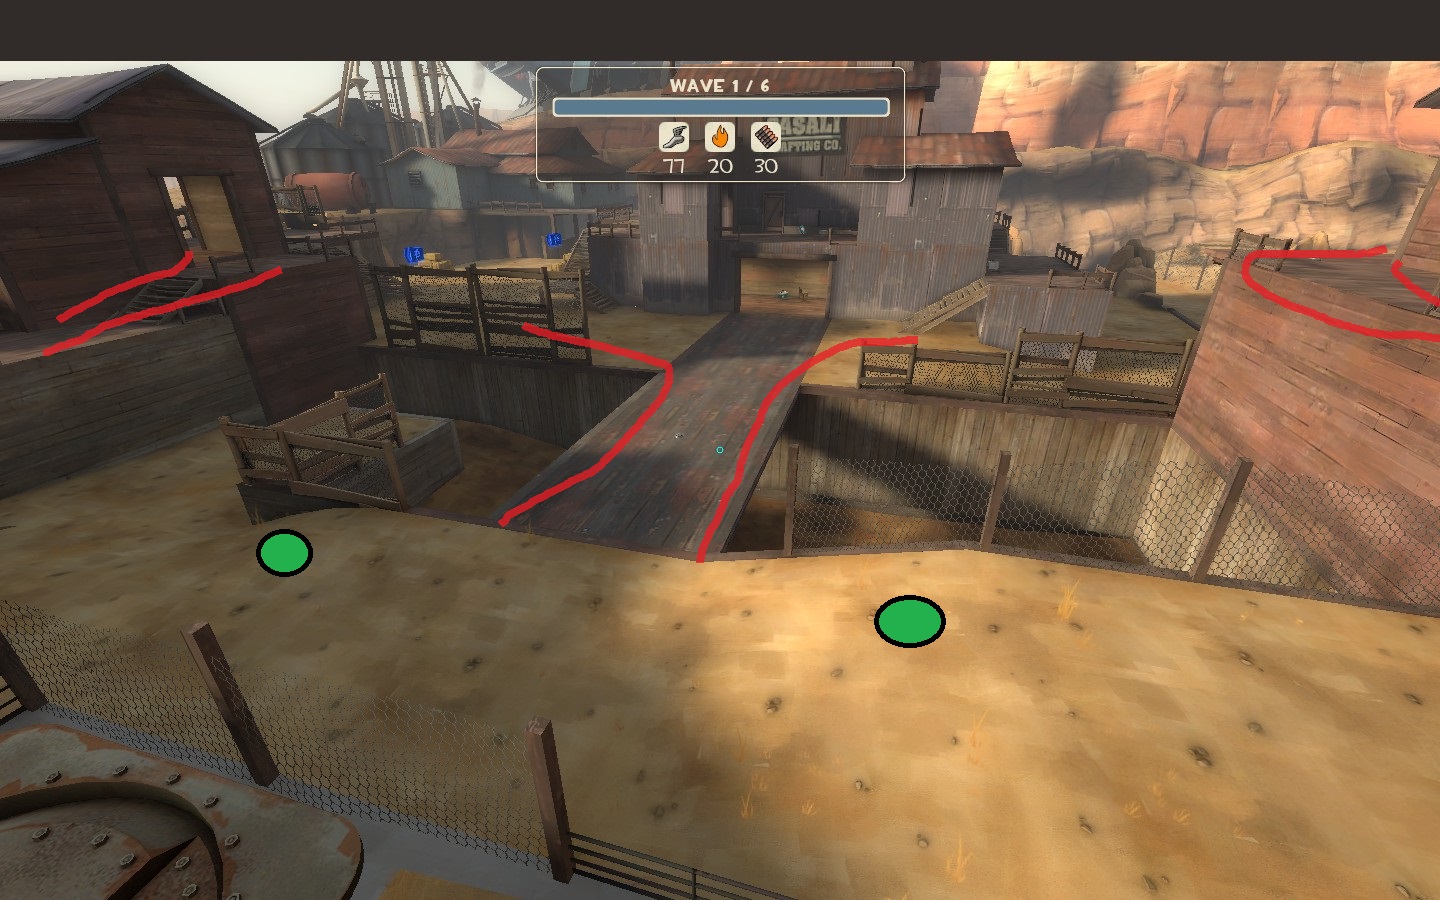
Positioning: Decoy
Positioning: Mannworks
Positioning: Rottenburg

Positioning: Mannhattan
Now remember: these aren't ALL the spots, and they aren't ALL the perfect spot. This should just give you an idea of how to start playing as - and how to think as - the Champ.
We're upgraded, we're in the right places. Now, we learn how to rain the pain!
Champs Basics: Miscellaneous Tips
Before you enter the ring, there's a few odd things we've got to cover first. For one, click on Advanced Options and check "Automatically reload weapons". This feature will save you many precious seconds by auto-reloading your weapons whenever you aren't firing them.
Every class benefits from this greatly except for Ambassador Spies who have a bad habit of ramming their gun between their eyes while trying to aim.

Next up, you indisputably MUST learn at least the basics of rocket jumping/stickybomb jumping. The mobility from these skills will get you in position faster, help you escape trouble, get an easier shot, save teammates, EVERYTHING! Look up tutorials on how to do it even if it's just the basics. You cannot pass up learning this skill. Just remember: if the Demo wants to sticky jump, HE HAS TO BLOW ALL HIS BOMBS IF USING STOCK LAUNCHER, so just be fully aware of where they are, how many are down, if any are down at all, or if jumping is more important. If it's the Scottish Resistance, there will be a long delay, but you can set off bombs if they are under your feet.
The best way I've found to learn is selecting "Create Server", choosing the map, use ` to open the console and type sv_cheats 1, then hurtme -200. This will give you a big over heal and let you practice jumping more conveniently. THIS SKILL IS A MUST!
TL;DR enable auto reload, learn to stickybomb jump.
Every class benefits from this greatly except for Ambassador Spies who have a bad habit of ramming their gun between their eyes while trying to aim.
Next up, you indisputably MUST learn at least the basics of rocket jumping/stickybomb jumping. The mobility from these skills will get you in position faster, help you escape trouble, get an easier shot, save teammates, EVERYTHING! Look up tutorials on how to do it even if it's just the basics. You cannot pass up learning this skill. Just remember: if the Demo wants to sticky jump, HE HAS TO BLOW ALL HIS BOMBS IF USING STOCK LAUNCHER, so just be fully aware of where they are, how many are down, if any are down at all, or if jumping is more important. If it's the Scottish Resistance, there will be a long delay, but you can set off bombs if they are under your feet.
The best way I've found to learn is selecting "Create Server", choosing the map, use ` to open the console and type sv_cheats 1, then hurtme -200. This will give you a big over heal and let you practice jumping more conveniently. THIS SKILL IS A MUST!
TL;DR enable auto reload, learn to stickybomb jump.
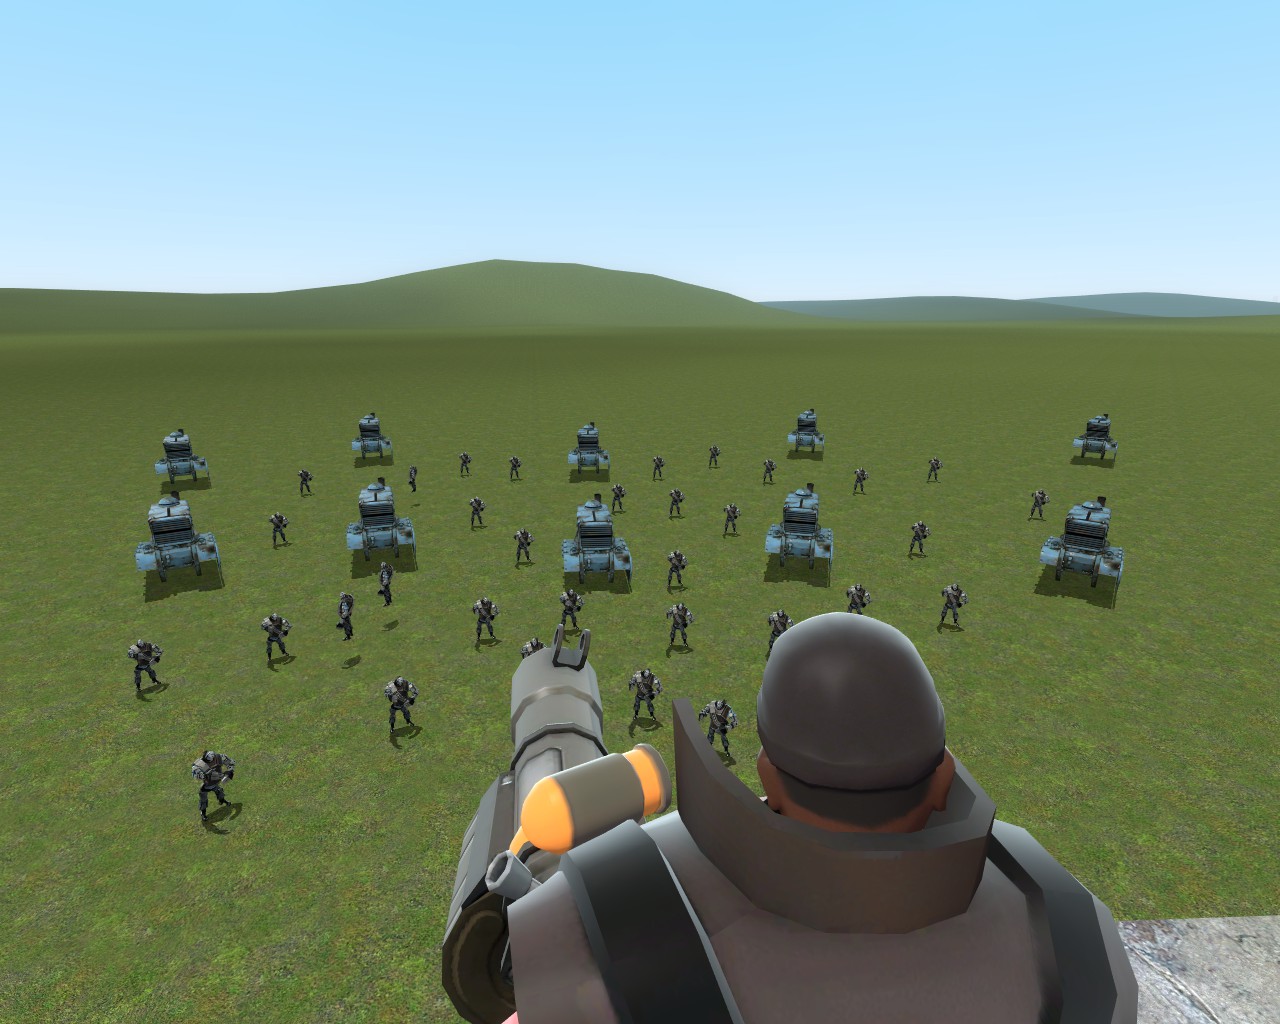
Champ's Basics: Your HVTs and How to Kill Them
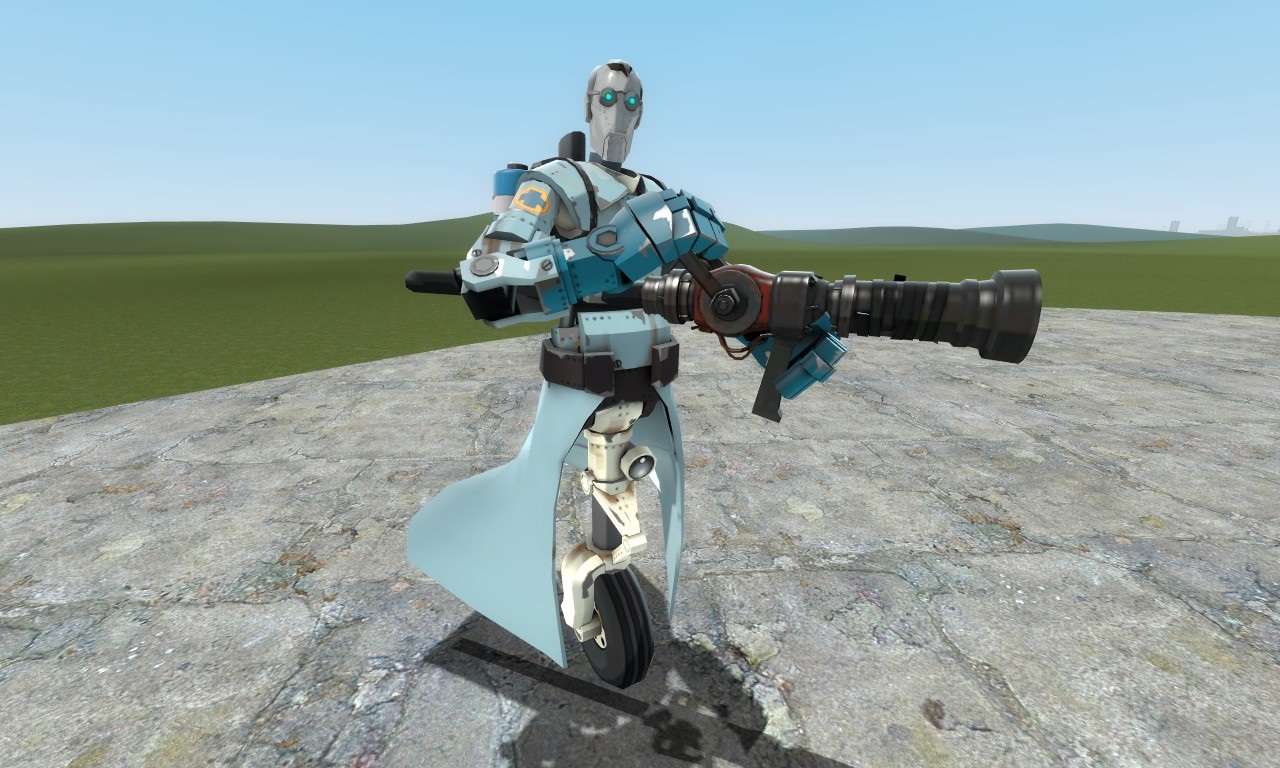 (Yes, I couldn't find a picture of it the way I wanted, so I made a ragdoll pose in G-Mod.)
 Your nemisis and your prey, the Medic bot will be your Game-Over-Apparatus if not handled correctly. Generally, 2 stickybombs at they're feet would be enough to wipe them out. I always use 3 to be safe. There are rare times when the bot will juuuuust survive and BAM UBER PEW PEW YOU'RE ALL DEAD RACE TO BOMB HATCH BOOM U LOSE AHAHAHAHHAAH.
http://www.youtube.com/watch?v=BfYZIrMvQrY (Just for fun: if any of you have a youtube account, try to make a comment that says something like "UPSILONS GUIDE!" on this video, then rate it up and reply to it. See if we can't get the highest rated comment xD lol)
First, when the Medics show up, YOU NEED TO BE THE FIRST ONE TO ENGAGE! You have to be aggressive, maybe even going past the front line to be the first one to fight. Your team CANNOT fight the giant unless you have the Medics down, so you need to learn (through experience) how to be cautiously-aggressive on Medic spawns. Give yourself a clear shot, but don't get dropped, either!
Here's the way you aim. Medic bots always follow their heal target. The easiest way to hit them is to aim your shots at the feet of their heal target or slightly ahead (assuming you are using stock stickybomb launcher). Which brings me to the next step.
ALWAYS WATCH THE A.I.'s PATH! For most classes, this isn't a big deal at all. As Demo, it is absolutely vital that you keep track of where the robots walk. I'm not just talking the holo-flags at the start either. I mean where do their feet/unicycles touch the ground. After all, you are putting bombs at their feet and can't afford to miss. Bunches of small bots such as Scouts and Solly's ect will tend to spread out pretty wide, but giants always follow a very thin path....and your target will be right behind them.
It's a cold fact that sometimes, the Engi bots just get through and plant a troublesome sentry. Some people like to think that the Spy is the anti-Engi, but they're wrong. The TRUE anti-Engi is the Demochamp! Either get an angle on his sentry from cover, or quickly step out to place a stickybomb at its base then immediately hide again. 3 SIMULTANEOUS bombs should reduce it to scrap ( if you don't set them off at the same time, the sentry will survive and the Engi will repair it). Be sure to tell your team that his sentry is down so that your more assassin-oriented teammates can drop the Engi bot itself. 3-4 bombs should also do-in its teleporter exit, and Engi bots are down for the count!
In the Ring: Bomb Placement
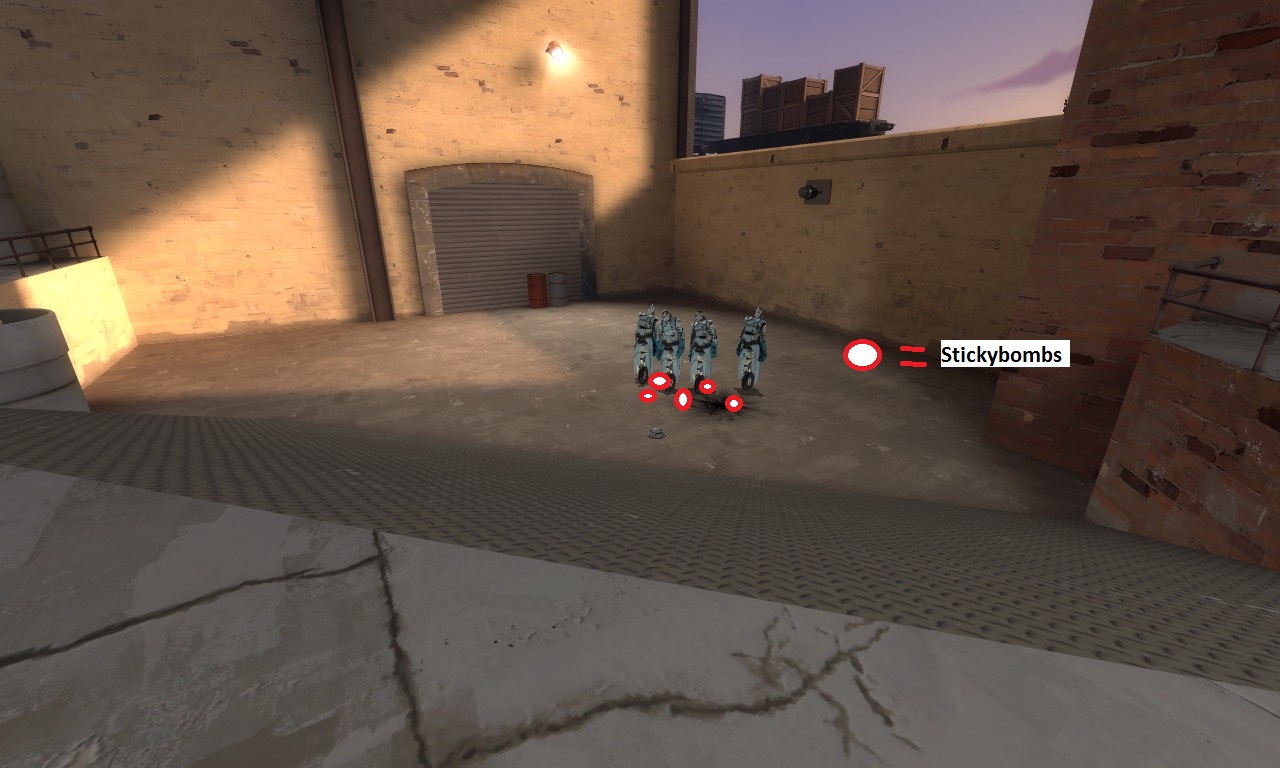
Looking at that pic now, maybe those bombs are placed a little too tightly. If they were slightly more spread, it'd still kill the group. So, with bomb placement like the pic or slighty more spread, this should be the way that you take out a group of Medic bots following a giant.
When faced with a giant Medic bot, this is where that path-watching will pay off the most. Either wait until your teammates have the other giant's aggro or try to fire from cover. Use your crit canteen and shoot as many bombs in one place as you can without dying (remember the maximum: 8 for stock launcher, 14 for Scottish Resistance). When he steps on them, KABOOM! Only use your crit canteen for the Medic. Your team should be able to clean up the other giant without you critting again.
In the Ring: Crowd Thinning
Most newer Demo's reach a "player's block" of sorts after they detonate their first set of bombs. They then panic and get overwhelmed. It's ok: DON'T panic.
WHAT DID WE JUST SAY ABOUT PANICKING?
Look, the goal here is NOT TO KILL EVERY ROBOT OURSELVES. That's why we have 5 other teammates. It works like this: you set up about 4-5 (8 if possible) bombs for the next group. When they show up, you blow the bomb set. Now, ignore the survivors (depending on map/position), hide from their retaliation, and set up for the next group. With a buff banner Solly, a brass beast Heavy stuck to a dispenser, an Engi's T3 sentry, a Medic healing everyone and giving the heavy crits AND shielding everyone with projectile-immune utility, I think you're gonna be fine.
In the Ring: Tanks
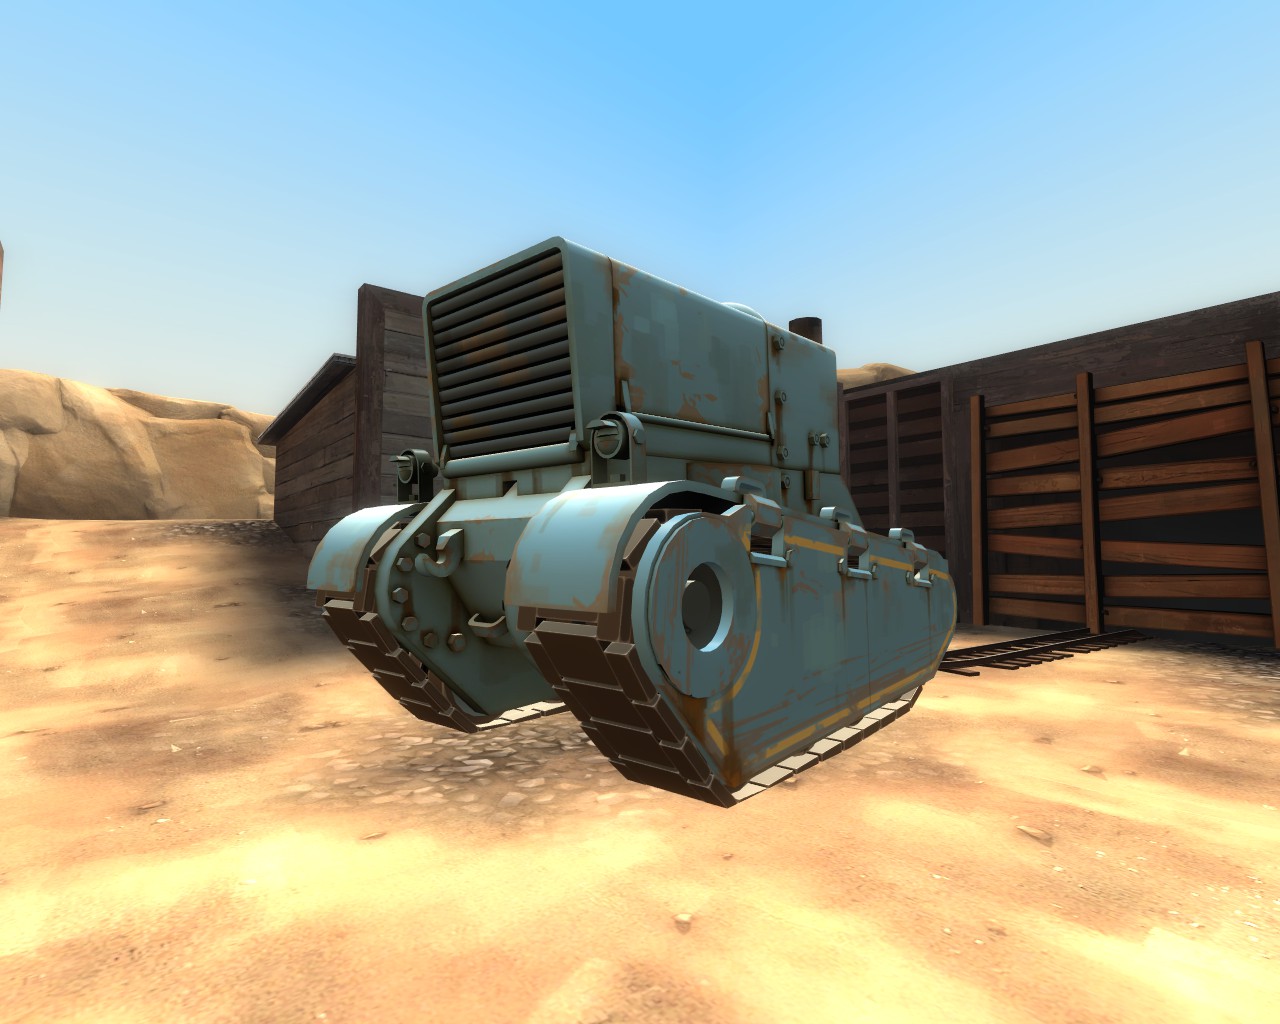 The infamous tanks. Here's where Demochamp gets an Edge over Spy in MvM. This isn't complicated, but worth mentioning. The strat is to lead the tank by about 5-6ft, use a crit canteen (if available), plant all 8 of your bombs, then blow them when the tank's front part touches them. If it's a final mission and tanks are the only plausible threat, you can instead use your refund your upgrades and max out the damage of your primary and use only it. If crits aren't available, try to stay close to your Soldier who will undoubtely have is Buff Banner activated.
In the Ring: Spies and Snipers
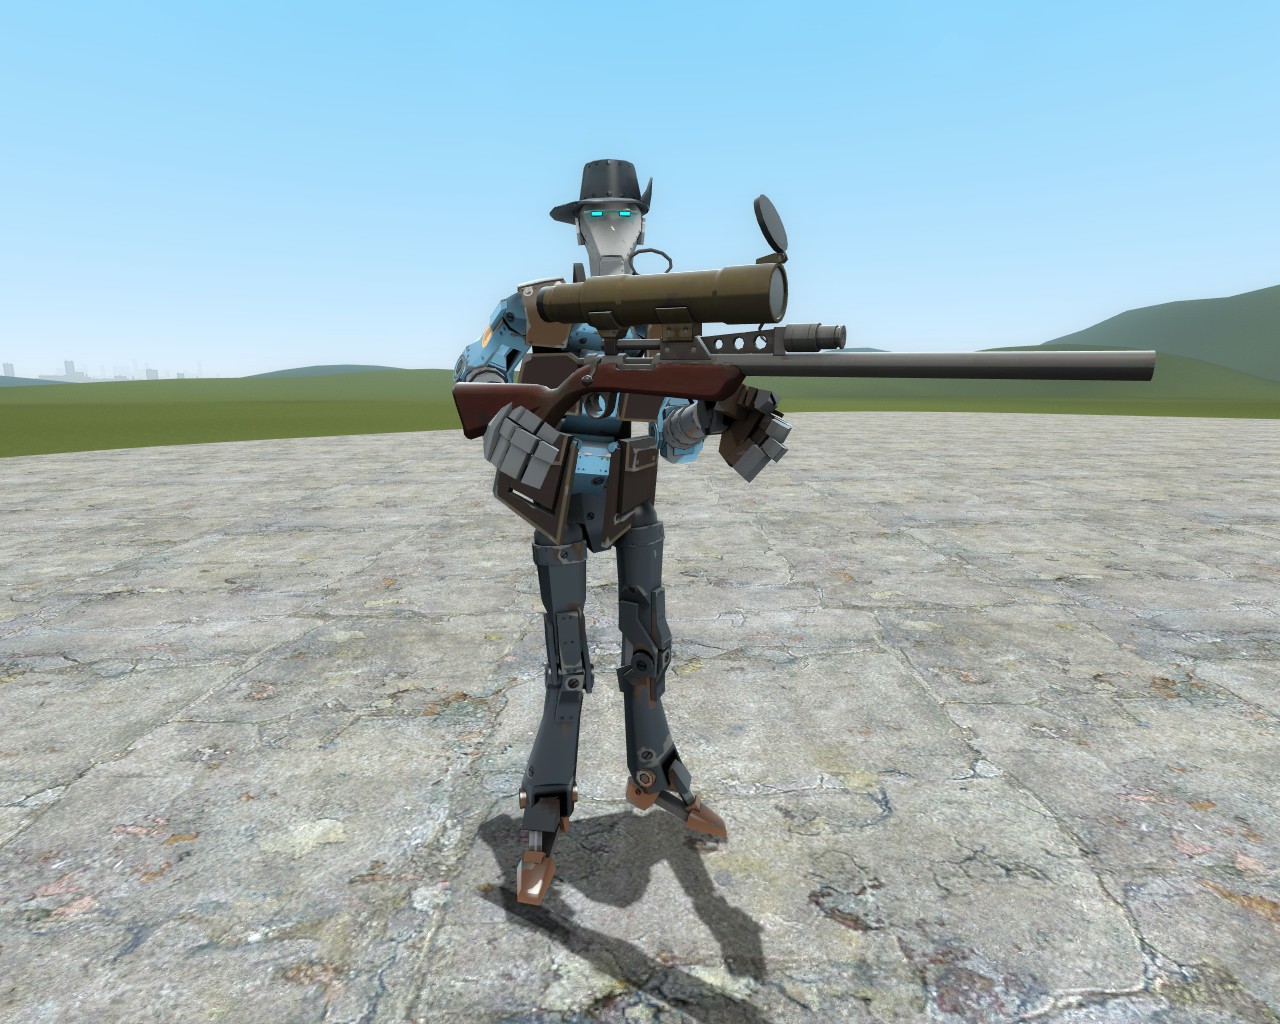 These pests are Sniper bots. As Demochamp, our range is very limited and generally can't fight them directly. Your best bet is to hide from their LOS (line of sight) and let your teammates deal with them. When scoped in and preparing to fire, they leave a long, blue tracer-like laser from their muzzle to their current target. Use the blue laser as a warning and take cover! Of course, if they ARE in range, they won't see a bomb at their feet while looking through that narrow scope. If caught out in the open, I personally juke them. As long as you run the opposite way for no longer than about .5/half a second, they will never fully lock on and won't fire. Think like this: you're in the open, a Sniper laser appears! Look at the Sniper so you can side-strafe-juke to avoid damage. You hold D for .5s then A for .5, rinse and repeat. If cover is to your right, simply hold A for a little less, and D for a little longer, vice versa, ect. After some live practice, you'll see what I'm saying and it will click; promise.
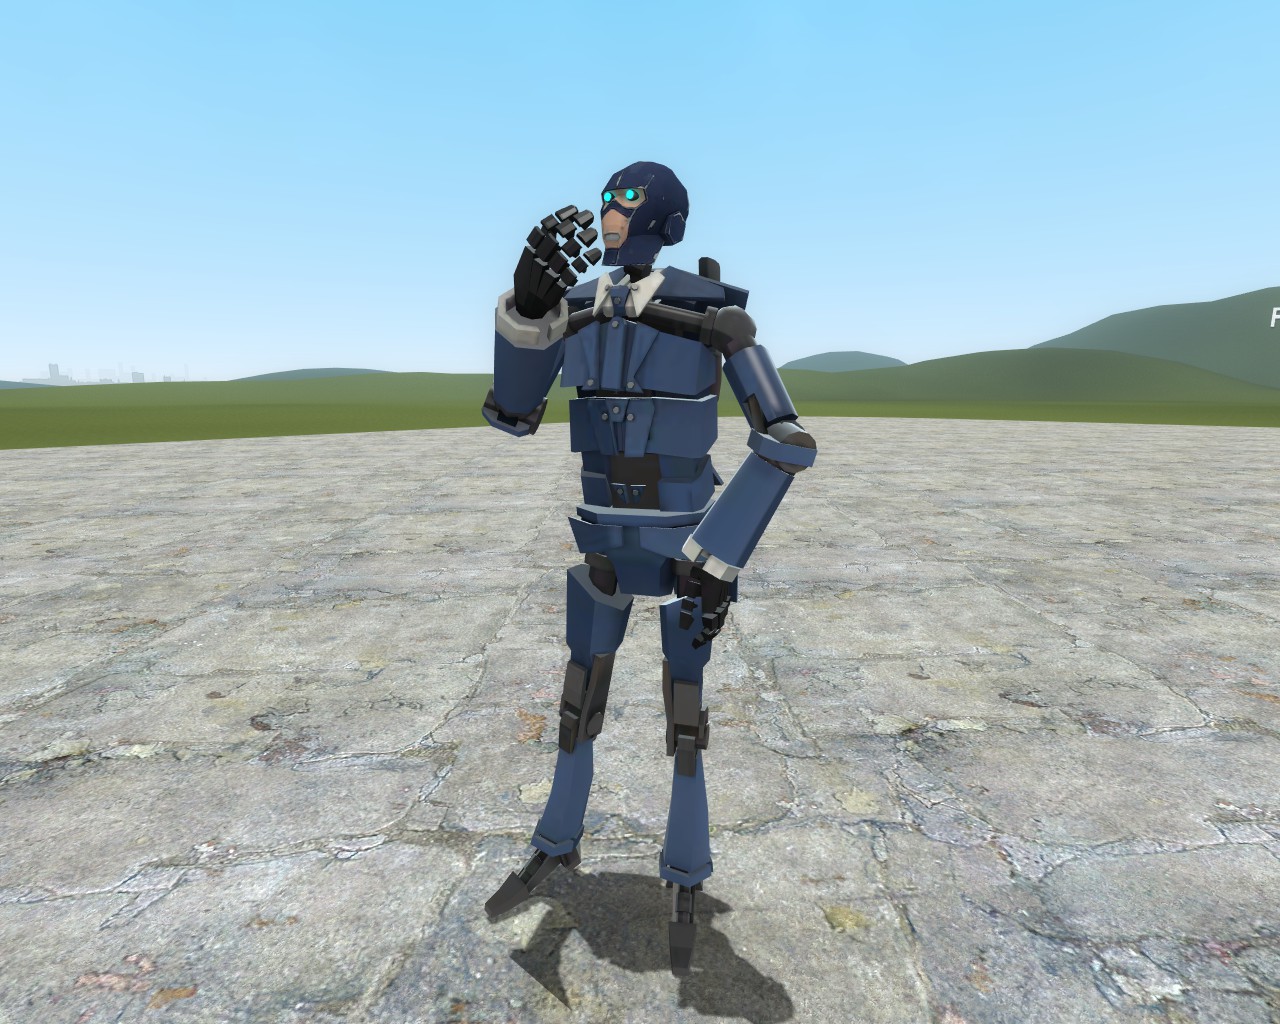 .....and this is the Spy bot. Very, very little threat to a sober Demo....wait there are none...ehem, anyway, as long as you heed the warning from the Administrator "ALERT! THERE ARE SPIES COMING!", they won't even scratch you.
Once you get the warning, run right to the Engineer's sentry gun. Sentires attract Spies like a moth to flame. If your Engineer takes the warning, he should be right next to the sentry as well. Place a few bombs around the gun, IMMEDIATELY get a full 360 degree coverage afterward to make sure you won't get stabbed, and wait for a teammate to suspiciously approach it. If they put a little box that makes the sentry look down and start buzzing with electricity, KABOOM! If possible, try to find a corner that you can put your back to. Spies come in small numbers so unless you have a group of Medics to drop, help the Engi be rid of these vermin then back to your usual routine.
Another cheap trick is to run INTO the Spy. Yeah, I'm serious! Spy bots are programmed to auto-melee you if you're in range and they're facing you. The stab will do very little damage, and the Spy will break his disguise, which will cause the sentry to MELT him. Just run right at him and say "KISS ME".
http://www.youtube.com/watch?v=qy0ak7Js4d0
If done right, you will hardly notice a Spy was ever there save for the piles of burnt scrap metal everywhere.
The Champ has entered the ring!
That about does it! Stick to cover, watch for Medics, focus those giants, learn to bomb jump, hit those tanks hard, and no one will beat you.
UGH! I FORGOT THIS ONE!
One last tip: if a Medic manages to ubercharge, DON'T GIVE UP! You have one last chance to make a play! While ubercharged, MEDICS CAN STILL BE BOUNCED! By setting 2-3 bombs in one place and blowing them, you can still push them very hard; maybe even away from their heal target to break their uber!
108 Comments
<
>

I love your guide!

Small thing. Update the Loch n' Load stat since it got nerfed 6 ft under

Cheers Mate!

Really helpful,thanks

Really late to the comments here, but working with a spy's sapper to get some heads with the eyelander early on is really effective in my opinion.


