Sorcerer King: Rivals

Sorcerer King: Rivals

Not enough ratings
A Somewhat Brief Treatise on Sovereigns
By F50
   
Award
Favorite
Favorited
Unfavorite
Introduction
I was looking for this information on the web one day and didn't really find it. So here it is for all to see. This guide goes over the various differences between each of the sovereigns except unique units, though some mentions will be made as they are relevant to the skill trees. This turns out to be a somewhat significant omission, but I can't be arsed. If someone wants to pull the stats and abilities for all of those and post them here or otherwise send them to me, I'll include them.

Other than unique units, sovereigns differentiate each other in the following ways:

  • Starting Bonuses. Each sovereign has flavor questions that result in a small bonus. Some sovereigns also start with extra resources. The Wizard starts with extra mana, the Commander starts with extra army slots, and the Priestess starts with a unique resource.
  • Starting Spells. Each sovereign starts with different combat spells, and in the case of the Priestess, additional strategic spells.
  • Features of Special Terrain Sovereigns. Both the Dwarven King (ruler of the Frostlanders) and the Archlich have special terrain that is spread by their outposts and cities. In the case of outposts, these two sovereigns open up city placement on this terrain, an effect normally reserved for the 80 mana Geomancy spell available to the Wizard and Guardian. This makes city expansion much easier for these two sovereigns. Additionally they do not require a turn from a city to construct Shards.
  • Skill Tree. Each sovereign has a unique skill tree that can have all kinds of different effects.

Each sovereign also is flavored to start with a special ability, which is just an extra unique spell (strategic or combat) except in the case of the Dwarven King. This can be selected prior to game start, and any sovereign can select any of these. Similarly, each sovereign is also flavored to start with a particular unit group, including a hero, and certain spellbooks, which change the liklihood of certain spells appearing and can be enchanted into items. These can also be selected before game start.

In the case of both special abilities and unit groups, but especially special abilities, there are significantly stronger (Hypnosis) and weaker options (Chant of Vitality).
The Soverign Skill Tree
The sovereign skill tree is one of the main ways in which the sovereigns differentiate from each other, and definitely the most complicated. Behold, here the skill trees in all their glory:


Now a bunch of this is inscrutable without the tooltips, but I'll get to that. There are some things that can be immediately noticed just from a cursory comparison of the trees. Of particular note are Leadership I/II and Enchanted Forge. Every soverign has enchanted forge except for the Tinker who gets it for free. Every soverign also has Leadership I/II except for the Dwarven King, which has "Defending the Realm" (+1 army size per city). The archlich and priestess' versions are flavored "Shambling Hordes" and "Legions of the Damned" for the archlich and "Warrior's Zeal " and "Holy War" for the Priestess.

These are particularly important skills, because Enchanted Forge provides the basis for a lot of endgame and hero equipment, while Leadership limits the easiest way to get more powerful armies. The Archlich is disadvantaged in terms of enchanting, but advantaged because of its unusually early Leadership II. Enchanted forge is in a less convenient location for the Priestess, Wizard, and Archlich than the rest of the cast. The Guardian is extremely disadvantaged in the early game with respect to army size, being unable to get Leadership I until at least the 5th level up.

All sovereigns start with 5 army slots except for the Commander who gets eight. Except for the Dwarven King, the others can gain the following number of extra slots with Leadership I/II:

Archlich: 3*/5* (8 additional, total 13)
Wizard: 3/4 (7 additional, total 12)
Commander: 2**/3* (5 additional, total 13)
Tyrant: 3*/4 (7 additional, total 12)
Guardian: 2/3 (5 additional, total 10)
Priestess: 2/2 (4 additional, total 9)
Tinker: 1/1/1/2 (5 additional, total 10)

* Also grants logistics slots
** Also grants +1 moves to all units

That Tinker tree hurts, man, having to spend four level ups on a measly five slots, if one even choses that path. Other common skills include forging, which grants a few extra recipes, clairvoyance which grants extra sovereign spells per battle, and Tower of Mastery, which unlocks a building that can end the game.

Before I discuss the individual skill trees, have a quick look at the sovereign's starting spells, since at least a couple sovereigns really focus around them.
Starting Spells
Each sovereign starts with a particular list of spells that contribute to their identity. All sovereigns start with Boost Shard, Bountiful Harvest, Enchanted Hammers, Enchanted Supplies, and Spell of Ascendency. Sovereigns starting on a random map seem to get Lower Land and Raise land in addition to this.

* Probably a unique spell that is unresearchable.

Dwarven King
  • Ice Blast (6 mana, single target 8 damage + 3 per shard + 3 initiative debuff)
  • Obstruction (2 mana, makes single tile impassable)
Ice blast is one of the nicer single-target spells, but expensive especially early on. Obstruction may need multiple casts to be effective, but can help make small armies much stronger than they initially appear. The Dwarven King's default hero is ranged.

Archlich
  • Decay (6 mana, single target 3 damage + 1 per shard DOT for 6 turns)
  • Doom Gaze (2 mana, all enemy units are paritally blinded for 3 turns, unless they resist)
Doom Gaze is an awesome way to make the Archlich's strong early armies even stronger.

Wizard
  • Flame Dart (5 mana, 10 damage + 2 per shard)
  • Ice Blast (6 mana, single target 8 damage + 3 per shard + 3 initiative debuff)
  • Lightning Bolt (8 mana, single target 12 damage + 1 per shard + disables abilities for 2 turns)
While Ice Blast is one of the nicer single-target spells, these are actually kinda meh because of their relatively high cost and the fact they are all easy for the other sovereigns to research. Thankfully, the Wizard has no problem acquiring enough mana to pay these mana costs. The larger implication of the Wizard having these three spells to start is probably that they don't clog up research options.

Commander
  • Battle Cry* (30 mana, all units get to act immediately)
  • Converge* (5 mana, All friendly melee units move to the target unit, target defense is decreased 75% for 1 turn)
Not only does the Commander get large armies, convenient enchantment, and good special units, but both of these are really amazing spells that scale with army strength. The trick is conserving mana enough to use them.

Tyrant
  • Cauterize* (4 mana, 6 SK ascension points, All friendly heal 14 + 3 per shard)
  • Doomray* (5 mana, 1 SK ascension point, 3x3 Aoe 12 damage + 4 per shard)
Doomray has a three turn cooldown, and is so good it is one of the spells that matters for. 1 SK ascension point is a very cheap cost. Since the Tyrant is probably looking to close the game out early anyways, you are highly unlikely to let the Sorcerer King ascend with only two castings or so per strategic turn -- meaning you are more than happy to be spending those ascension points rather than extra mana for this wonderfuly undercosted spell.

Cauterize requires only slightly more restraint, and is an amazing tool to have when needed.

Guardian
  • Awkward Movement (2 mana, 3x3 rough terrain)
  • Obstruction (2 mana, makes single tile impassable)
  • Soothing Melody* (25 mana, all friendly units heal 2hp per turn this battle)
  • Tame* (30 mana, take control of targeted Beast)
This is kinda hard for me to judge. Tame is expensive, since you could be summoning units for that later on. Soothing Melody is probably next to useless (although you could heal an entire army to full if you have a spare enemy wolf on the field). Awkward Movement and Obstruction seem great for archer-heavy armies.

Priestess
Combat Spells
  • Holy Vindication* (14 mana, 2 damage per allied unit to all enemies)
  • Into the Light* (0 mana, single target 3 damage + 1 per shard, if the target dies gain 3 mana +1 per shard)
  • Restore (0 mana, single target 5 heal + 2 per shard)
  • Refresh (5 mana, target acts immediate and refreshes all cooldowns)
Strategic Spells
  • Destiny's Judgement* (0 mana, divine favor, 75 damage to target unit)
  • Heavenly Ward* (1 mana, divine favor, target unit will retreat to the nearest city if they lose a battle)
Unique spells is where the Priestess really shines.

Divine Favor is a special resource for the Priestess, and as far as I know the only way to get more is to spend sov level ups on them. Use sparingly, but do use. Since Divine Favor can't be used in combat there are limited situations where it is particularly effective, so don't worry overmuch about running out unless you are rushing for Destiny's Sentinel and need 5-6 of them. It is probably best not to cast Heavenly Ward on hero units.

Starting out with two zero-cost soverign spells are awesome. In particular "Into the light" is incredible, and abuseable. Refresh will never get old. Restore doesn't have a cooldown so you can always use up the casting limit (which will be considerable, because the default hero is a mage) keeping your units in top condition.

Tinker
  • Summon Vorpal Blade* (4 mana, summons unit)
  • Summon Vorpal Spear* (4 mana, summons unit)
  • Summon Vorpal Longbow* (4 mana, summons unit)
The tinker spells each cost 4 mana and create a weak summon. Early game they are probably better to have than Ice Blast, especially Vorpal Spear, and being summons they can tank some damage meant for your hero or troops. Even if the item dies, it remains in your inventory as a powerful weapon.
The Dwarven King Skill Tree

  • Arctic Speed (1): When walking through Arctic Territory, friendly units move at 2x speed.
  • Chilling Victory (2): When a battle is won, the surrounding tiles are converted to Arctic. [Note: this also means settleable, for you]
  • Frozen Tracks (3): Unlocked a Storm Call where all enemy units are frozen on the strategic map for 15 turns. [note: 0 mana-cost spell with 99 turn cooldown, probably the most useful Storm Call in the game, which isn't saying much.]
  • Dwarven Bluff (4): When outnumbered in a battle in Arctic Territory, friendly units get +2 Attack and Defense for every enemy unit over the size of your army.
  • Wild Allies (5): When fighting in Arctic Territory, you start each battle with a pack of Wild Wolves on your side.
  • Cold Blooded (6): When fighting in Arctic Territory, allied units start the battle at full health.
  • Glacial Advance (4): When fighting in Artic Territory, enemies start the battle slowed.
  • Stunted Growth (5): Unlocked a Storm Call where spawned Sorcerer King units start with a 50% level penalty and cannot gain experience for 25 turns.
  • Earthbreaker (6): [presumably "unlocks"] A Storm Call that rips open the earth. Target enemy unit of any level is swallowed into a chasm.
  • Shards of Clairvoyance (4): Sovereign can cast an additional spell in battle for every owned shard. [Most sovereigns get +3 or so castings over 3 separate levels, this is amazing by comparison. Skeletons here we come]
  • Stoneguard (5): [presumably "unlocks"] A Storm Call that raises a barrier of mountains around the target shard, helping to shield it from attacks. [50 turn cooldown, protects one shard unless you have an outpost or other monster-passable but indestructable object in an adjacent tile. 0 mana, like all Storm Calls. Next to useless.]
  • Freezing of the World (6): [presumably "unlocks"] A Storm Call that converts a "large" section of the map to Arctic terrain. [Large here meaning a radius of 3...on a 20 turn cooldown. 0 mana, like all Storm Calls. Next to useless.]
  • Icebound Allies (6): Become instant allies with the minor race you're most friendly with.
  • Dwarven Magi (1): Cities can build the Dwarven Tower building which unlocks the Dwarven Magi unit. [Dwarven Magi have a weak-ish AoE attack, a weak-ish heal abillity, and Arcane Arrow. Relatively similar to the Battlemage unit]
  • Harpooners (2): Cities can train Harpooner units, spider riders that have both melee and ranged attacks. [Unfortunately, the harpooners trained thusly are meh single units, not the awesome unit groups that defend your cities. Without any equipment, a Harpooner is about as good as a Wolf group. With equipment...just make Wolf groups.]
  • Mining Knowledge (1): Get +1 sovereign skill point for every tapped resource.
  • War Depots (2): Buildings that convert a city's production into Logistics.
  • Recruit Hero (3): Recruits an additional hero.
  • Catapults (3): Unlocks Catapult Foundary, a building which allows a city to construct Catapult units. Catapults are an AoE ranged unit that have friendly fire. [Terribly low initative, the foundary is about as expensive as Wolf Pens]
  • Mana Wells (4): Building that gives +1 mana per turn. [~50% more expensive than a Catapult Foundary or Dwarven Tower. A tad expensive for the effect.]
  • Enchanted Artillery (5): Unlocks the 'Enchanted Artillery' city enchantment, which boosts the strength of ZOC attacks on incoming enemies.
  • Yeti Dungeons (6): A place to hold captured Yeti then twist them into bestial warriors. [Yeti dungeons are an expensive building, more than twice as much as the Catapult Foundary, and Yeti themselves are twice as expensive as a Wolf group. A Yeti is a single unit, which means that its damage is medicore at best, but it turns out Yeti are actually quite naturally tanky, with 60+ hitpoints and lots of natural armor.]
  • Resource Hunter (2): Reveal all resources on the map.
  • Defending the Realm (3): Every city adds +1 to army slots.
  • Enchanted Forge (3): Player can enchant items.

So firstly a note about Defending the Realm. Because all Arctic non-forest is settleable to you, you can settle basically wherever you want, even more so than the Archlich thanks to Chilling Victory. This means that the only thing limiting your expansion is Threat. And when I played, that threat capped at 2 for some reason, allowing me to eventually settle 10 additional cities. Even if that isn't the case for you, however, you could just settle the additional cities during the last turn of the game to bring the largest army possible to the Sorcerer King's doorstep. The Dwarven King is therefore the sovereign with the highest cap on army size of all the sovereigns. Additionally, War Depots contribute extra logistics slots, so spam those units.

Now, unfortunately a lot of the skill tree requires actually researching and playing to really understand what it does, even with tooltips. How good are dwarven magi? How efficient are Mana Wells? How does storm call work? For this reason my list is more annotated than usual.

And the verdict? The Yeti tree is bad and the Harpooner tree is mediocre. Chilling Victory is nice because you can use it to open up some areas to outpost/settle that would otherwise be closed to you. The Enchanted Forge/Defending the Realm tree is awesome, as is Shards of Clairvoyance.

Stoneguard/Freezing the world doesn't do enough to be useful. Glacial Advance could be useful to take down Lieutenants with a little setup. Dwarven Bluff not only requires you to be in Arctic Territory, but also requires you to be outnumbered, which thanks to Defending the Realm you will likely never be. Wild Allies seems pretty neat, but you probably won't get a ton of use out of it, and it is in a mostly-dead tree.

So after wading through the cruft the stand out skills are: Shards of Clairvoyance and Chilling Victory on the one hand (with an honourable mention to Glacial Advance), and Defending the Realm and Enchanted Forge on the other. Arctic Speed/Chilling Victory may be good enough to get before Defending the Realm, but getting Defending the Realm early is probably more efficient. While War Depots is cool in case you really need the extra logistics, for the most part you will be making enough cities to do without and proceed straight to Shards of Clairvoyance (taking Enchanted forge at your leisure).

After that, it opens up a lot. War Depots in case you need/want to spam, spam, spam more cities and units, Glacial Advance for defense and shenanigans. If you're still looking for more: Mana Wells, Wild Allies, and Earthbreaker are all two skills away. And all this time your units of choice are Wild Wolves and whatever quest or ally units you can scrounge up.
The Archlich Skill Tree

  • Lands of Magic (1): The spell 'Reanimation' can now be cast in Blue Fissure terrain, which completely heals an army and refreshes their moves.
  • Recruit Hero (2): Recruits an additional hero.
  • Novice Clairvoyant (2): Sovereign can cast an additional spell in battle.
  • From the Depths (3): Unlocks 'From the Depths', a low-cost teleportation spell that brings an army to Blue Fissure terrain.
  • Expert Clairvoyant (4): Sovereign can cast two additional spells in battle.
  • Cold Hands (5): Unlocks 'Death Grip', a spell that stops enemies in Blue Fissure terrain in their tracks.
  • Master Clairvoyant (6): Sovereign can cast three additional spells in battle.
  • The Haunting (5): When fighting in Blue Fissure terrain, enemies have a chance of starting the battle afraid .
  • The Reaping (6): Unlocks 'The Reaping', a spell which halves the hitpoints of any enemy army passing through Blue Fissure terrain.
  • Skeletal Defenders (6): When fighting in Blue Fissure terrain, you start the battle by placing a group of Skeletal Defenders who's might is based on the number of claimed shards.
  • The 11th Hour (6): When the Sorcerer King's asension points are above 350, all spells will be half their normal costs.
  • Death Rising (1): Bone Fragments get dropped in battle, a resource that can be used to build undead armies.
  • Bonecraft (2) : Unlocks several recipies for items that use Bone Fragments.
  • Undead Forge (3): Unlocks several recipies for armor and weapons that use Bone Fragments.
  • Enchanted Forge (4): Unlocks the enchantment option when crafting.
  • Boneyards (4): Unlocks the 'boneyards' improvment, which produces +1 bone fragment per turn.
  • The Weaver (2): Unlocks 'Spider Altar' building which allows the training of Weaver units. Weavers are ranged spider units with ~33hp and a reasonable attack.
  • Greater Weaver (3): +5 level bonus to Weaver units.
  • The Hellhound (3): Unlocks 'Altar of the Beast' which which allows the training of Hellhound units.
  • Greater Hounds (4): +5 level bonus to Hellhound units.
  • The Undying Lord (3): Unlocks 'Altar of the Undying' which which allows the training of Undying Lord units. Undying Lords are mounted knights.
  • Greater Lords (4): +5 level bonus to Undying Lord units.
  • The Corpse Wyrm (4): Unlocks 'Altar of the Wyrm' which which allows the training of Corpse Worm units.
  • Greater Wyrm (5): +5 level bonus to Corpse Wyrm units.
  • Altar of Might (1): Unlocks 'Altar of Might' which raises the level of trained units by 2.
  • Shambling Hordes (1): +3 army slots, +5 Logistics.
  • Legions of the Damned (2): +5 army slots, +10 Logistics.

Who cares about Enchanted Forge, we have skeletal dragon units! Or we can fight really well in Blue Fissure terrrain and cast lots of spells. I choose the former, mostly because fighting in the sovereign terrain is often not very useful. Because Shambling Hordes and Legions of the Damned are available early, there is a lot of room to go down the special unit tree or crafting tree. Again, it is worth noting that the Archlich is tied for 13 max army slots with the Commander.

In fact, it is somewhat useful to to compare the Archlich with the Commander overall. Getting those army slots is easier and faster for the Archlich, and it also comes with lots of bonus Logistics slots! Which you will need, by the way, since you can't get as many logistics slots from buildings as the Athican sovereigns or the Dwarf King. Not getting convenient enchanted forge potentially hurts, however, as one won't be able to upgrade those special units as much as the Commander until much later. However, the special units are different than Knights (and take more effort to get), and I'm not sure how the difference plays out in practice.

My proposal is that Death Rising is the first skill and Shamling Hordes the second, as the first is the main way to get the resources you need to produce both your basic and special units. After that is the question of whether to go for Enchanted Forge and Altar of Might or Undying Lord/Corpse Wyrm. Going for Hell Hound and Enchanted Forge both might be the worst of both worlds, since the four levels for Enchanted Forge and the two levels for Legeions of the Damned don't leave you a lot of room for further upgrades, and Hell Hounds are merely servicable (better used as a half-measure before the Corpse Wyrm and a support unit thereafter).

As nice as Skeletal Defenders is, the other options in the Lands of Magic tree are just too substandard to be worth considering. Similarly, Boneyards really doesn't give enough bone fragments to change much, so as leave that one alone unless you're really starving for bones if you go the Enchanted Forge route.

Speaking of unique units, the Weaver is very much like the Dwarf King's Harpooner (and has the same issues with being mediocre as a single unit), the Hell Hounds are similar to the Dwarf King's Wild Wolves (but they have the same howl ability that the shadow-warg does) and are generally slightly worse than other sovereign's Rider unit, the Undying Lords are like a Rider but with twice the health, and the Corpse Wyrms are big and beefy single units armed with both a line attack and deadly bite (a double damage attack) that hits for 100+ damage on a 5 turn cooldown or so. Each of these requires a relatively similar number of bone fragments (24, 25, and 35 respectively) compared to the basic units, with the Undying Lords and the Corpse Wyrm generally giving you more bang for your fragment.
The Wizard Skill Tree

  • Mentor I (1): Units gain experience +15% faster.
  • Recruit Hero (2): Solicit a hero to fight in your army.
  • Leader I (3): +3 army slots.
  • Marching Orders I (4): All armies get +1 moves.
  • Leader II (5): +4 army slots.
  • Trainer (6): All friendly units gain a level.
  • Mentor II (5): Units gain experience +40% faster.
  • Marching Orderes II (6): All armies get +2 moves.
  • Resource Harvesting (1): Tapped resources will spawn chests filled with crafting materials.
  • Scholarship I (1): +25% Lore production bonus
  • Geomancy (2): Unlocks the 'Restore Land' spell which creates a city location on barren or grassland tiles
  • Forging (2): Unlocks several new armor, scroll, potion, and accessory recipes.
  • Shard Sense (3): All shards revealed on the map.
  • Enchanted Forge (3): Unlocks the enchantment option when crafting.
  • Scholarship II (4): +50% Lore production bonus, unlocks Magician Academy building which which allows the training of the Battle Mage unit.
  • Diplomatic (5): +1 favor with every rival.
  • Clairvoyance I (1): Sovereign can cast an additional spell in batlte and recieves 20 mana
  • White Mage (2): +50% healing potency
  • Arcane Profiency (2): -10% spell costs
  • Storm Mage (3): +50% lightning damage
  • Clairvoyance II (3): Sovereign can cast two additional spells in batlte and recieves 40 mana
  • Ice Mage (4): +50% ice damage
  • Divine Channeler (4): Every shard provides +1 mana per turn.
  • Fire Mage (5): +50% fire damage
  • Clairvoyance III (5): Sovereign can cast two additional spells in batlte and recieves 60 mana
  • Ultimate Wizardry (6): Current spell is instantly learned and the sovereign can research an unknown spell of legendary might.
  • Tower of Mastery (6): Unlocks a special wonder where, if built, will unite the power of all shards and bring an end to the Sorcerer King's dominion. Choosing this ability will also draw his immediate and complete wrath, so be prepared.

The wizard has very balanced trees, gaining a hero and extra moves on the leadership path (which gets a respectable 12 army size), while getting extra mana and more powerful magic on the Clairvoyance path. Enchanted Forge is in a somewhat awkward separate tree that while sorta okay doesn't have anything really amazing in it (unless you absolutely need geomancy due to a complete lack of city locations).

Divine Channeler is only four levels in. My theory is that Divine Chaneneler is amazing with Clairvoyance on the way, and also so is Leader(ship) I with Mentor I and Recruit Hero on the way. So why not build both, all that's left is to decide on an order. Going Leader(ship) I first is nice, because that gives time for Mentor I and Recruit Hero to work their passive magic, but getting more mana is truly desirable. Either way, Enchanted Forge more or less gets left behind. My next choices would be Clairvoyance III, Ultimate Wizardry, Enchanted Forge, and Resource Harvesting more or less in that order.

However, going for Ultimate Wizardry and an elemental affinity (Ice or possibly Fire, preferably) first and not bothering with Leader(ship) I should be a very valid option -- although the small army size in that case is very restrictive.

Finally, starting with Geomancy, and then progressing to Leader(ship) II followed by Enchanted Forge and perhaps Mentor II is also an option. This may seem like reducing the Wizard to an inferior Commander except with Geomancy, but Geomancy can actually be that good in some circumstances, especially when paired with the Wizard's starting mana pool. The Dwarf King and Archlich are better at that sort of thing due to their outposts having a free Geomancy-like effect, but the Wizard is the most efficient Attican sovereign at that style of play (the Guardian doesn't get as much army size from Leadership II, takes longer to get it, and doesn't have the bonus starting mana).
The Commander Skill Tree

  • Leadership I (1): +2 army slots, all units get +1 moves.
  • Knights (2): Unlocks the Knight unit in all your cities.
  • Recruit Hero (3): Recruits an additional hero.
  • Warhorses (4): Mounted units get +1 moves and +3 attack for the first round of combat.
  • Leadership II (5): +3 army slots, +2 logistics
  • Rush (6): All units gain the Rush ability, allowing them to move twice in combat.
  • Enchanted Forge (2): Unlocks the enchantment option when crafting.
  • Training Yards (3): Unlocks the Training Yard building that boosts the experience of units stationed in a city.
  • Guild Master I (4): Unlocks the Soldier's Guild and Guardsman's Guild, which improve the attack and defense of units trained in a city.
  • Guild Master II (5): Unlocks the Healer's Guild which increases the max health of units trained in a city by +6
  • Mine Work (6): Metal mines under your control produce 75% more metal.
  • Guild Master III (7): Unlkocks the Assassin's Guild which increases the dodge and initiative of trained units. Also unlocks the 'Crystaline Order' wonder which gives +1 crystal and +2 Logistics for every owned shard.
  • Tower of Mastery (7): Unlocks a special wonder where, if built, will unite the power of all shards and bring an end to the Sorcerer King's dominion. Choosing this ability will also draw his immediate and complete wrath, so be prepared.
  • Warfare (1): +5 Logistics
  • Mobilization (2): All cities get a free Barracks.
  • Backfire (3): Whenever one of your units dodges, it gets a counterattack.
  • Berserk (4): Units can go berserk [when, is this an ability?] gaining the Maul ability but going under AI control
  • Rage (5): All units get +10 initiative
  • Forging (3): Unlocks several new armor, scroll, potion, and accessory recipes.
  • Battle tactics (4): Unlocks Enrage and Indistriminate Wrath .
  • Deadly Strikes (5): All units get +3 to their critical strike chance [no idea what this means percentage-wise].
  • Battle Master (6): All your units move before the first enemy can move.
  • Clairvoyance I (1): Sovereign can cast an additional spell in battle.
  • Reveal Champions (2): Reveal the location of champions on the map.
  • Ancient Wisdom (2): Each claimed shard gives all units a +10% experience gaining bonus.
  • Clairvoyance II (3): Sovereign can cast an additional spell in battle.
  • Call To Arms (4): Unlocks 0-cost spells 'Warrior's Call' which gives the entire army +2 attack per unit killed, and 'Defender's Call' which gives target unit a protective aura of +2 defense per adjacent unit.
  • Clairvoyance III (5): Sovereign can cast an additional spell in battle.
  • Greater Wisdom (6): Each claimed shard gives all units a +25% experience gaining bonus.

Okay, so the Commander has some pretty deep trees with Battle Master, Greater Wisdom, and Guild Master III. However, bailing out early is greatly encouraged with Enchanged Forge, Ancient Wisdom, Knights, and Mobilization all being frontloaded awesomeness. So much so, that regardless, you probably want to seriously consider getting all of Leadership I, Enchanted Forge, and Knights in the first 8 levels.

Going the Battle Master tree saves you many turns of dealing with logistics allowing you to pour out units. I think the Battle Master route is probably better than the Rage route, though it depends in part how good Battle Tactics actually is (it might be better to just grab forging and go the Rage route if both it and Deadly Strikes are not very useful). If going either route, you'll probably want Mobilization before going back for Knights.

The Leadership II tree is also attractive, giving you very large armies, a hero, and extra damage for your knights.

Ancient/Greater Wisdom is very likely amazing, and Clairvoyance is never terrible, so that tree sounds initially promising, but is likely a fairly bad tree by comparison. Call To Arms seems pretty meh, so it might be taken only as a dip for Ancient Wisdom, earlier the better, but after Knights.

The Guild Master tree seems way, way too slow to be of much use, but could be gotten after whenever you get Enchanted Forge for an additional small increase in unit strength.

So my hot take is the following two orders:

  • Warfare > Mobilization > Leadership I > Knights > Recruit Hero > Forging > Warhorses > Leadership II > Enchanted Forge (Forging and/or Enchanted Forge can be gotten before Recruit Hero to start equipping knights earlier at the expense of hero levels)
  • Leadership I > Knights > Clairvoyance I > Ancient Wisdom > Recruit Hero > Enchanted Forge > Warhorses > Leadership II (Recruit Hero can be gotten before Clairvoyance I for extra hero levels at the expense of knight levels)

Or just go for Leadership II first before going whatever suits your fancy.
The Tyrant Skill Tree

  • Malevolence(1): Unlocks the 'Drain Shard' spell, which destroys any shard in your territory, draining 300 mana from in instantly and giving the Sorcerer King 50 ascension points.
  • Siphon (2): Every time the Socerer King gains ascension points, the Tyrant gains 30 mana.
  • Divine Chaos (3): Spells from the Chaos and Wrath spellbooks cost 50% less to cast.
  • Scorched Earth (4): Unlocks the 'Scorched Earth' spell which brings down massive damage on a [strategic, I think] target and changes the tile to burning lands.
  • Dark World (5): Your forces scout out several additional cities, dungeons, tombs, and temples.
  • Tower of Mastery (6): Unlocks a special wonder where, if built, will unite the power of all shards and bring an end to the Sorcerer King's dominion. Choosing this ability will also draw his immediate and complete wrath, so be prepared.
  • Slaves (2): Unlocks the 'Slave Pits' building, which which allows the training of the Thug unit that costs population instead of logistics.
  • Soul Sacrifice (3): Trained units can be sacrificed giving +1 spell to cast for that battle.
  • Dark Forge (4): Provides several 'dark hero' recipes, which are weapons, scrolls or accessories.
  • Retribution (5): Cities get +25% production for every 200 Socerer King ascension points.
  • Betrayal (6): Reduces threat level to 0. Unlocks three buildings that allow Warg Riders, Trogs, and Fallen Apprentices to be trained, respectively.
  • Militarization (1): Unlocks Officer's Barracks and Urxen Hovels, which which allow the training of Spearmen and Urxen units respectively.
  • Forging (2): Unlocks several new armor, scroll, potion, and accessory recipes.
  • Motivation (3): All units gain +1 movement, and an additional +1 for ever 100 Sorcerer King ascension points
  • Recruit Hero (3): Recruits an additional hero.
  • Leadership I (4): +3 army slots, +5 Logistics.
  • Indoctrinate (5): +1 favor from all Rivals.
  • Leadership 2 (5): +4 army slots.
  • Replenish Armies (6): Unlocks 'Replenish Armies' which completes all unit production in all cities.
  • Clairvoyance I (1): Sovereign can cast an additional spell in battle.
  • The Enemy (2): Reveals the position of the Sorcerer King.
  • Enchanted Forge (2): Unlocks the enchantment option when crafting.
  • Clairvoyance II (3): Sovereign can cast an additional spell in battle.
  • Wrath of God (4): Unlocks 'Falling Star', a strategic spell which deals 18 damage +3 per shard to all armies within 1 tile of the target point.
  • Clairvoyance III (5): Sovereign can cast an additional spell in battle.
  • Demonic Reinforcements (6): Unlocks the [supremely useless?] 'Armageddon' spell which unleashes demonic units on the map that are outside your control.

The Tyrant has a lot of really neat mechanics in the skill tree, all of which you WANT RIGHT NOW. Between Siphon, Betrayal, Leadership II/Replenish Armies, and Divine Chaos + Clairvoyance...what do you choose?

Siphon is amazing in a unit-focused strategy (actually it is just generally amazing). Unfortunately, this skill seems to be bugged for me and doesn't work. However, due to the ease of creating units with the bonus mana this gives you as written, it would mean that Leadership I and II are super important aftewards. Then, replenish armies gets you more units. You could follow it up with Enchanted Forge, then maybe Divine Chaos since it is right there.

Alternately, you can do a settle-focused strategy, churning out new cities (you could also take the 3 extra unit groups that come with a threat from the starting bonuses), then quickly reseting threat with Betrayal . This puts you behind on being able to get to Leadership I and requires a lot of sovereign skill points, however, since eleven levels would be required before getting leadership II, and Enchanted Forge has still not been attained.

A spell focused order, going Divine Chaos > Clairvoyance I/II > Leadership II last also sounds like a really fun build, however it might not be the most effective. But boy, oh boy, Divine Chaos is a 50% spell discout. 50%!. And getting that together wtih Clairvoyance I only costs four levels. That seems really, really good.

As with the Commander, going straight leadership II is a valid option, and the skill after that is even actually really useful: Replenish Armies.
The Guardian Skill Tree

  • Enchanted Forge (3): Unlocks the enchantment option when crafting.
  • City Guardian(1): Unlocks an improvement that gives a city two sniper defenders.
  • Master Defender (2): Unlocks an improvement that gives a city a more powerful ZOC attack.
  • Bastion (3): Unlocks 'Bastion' which which allows the training of Sniper units.
  • Invulnerable Cities (4): Unlocks 'Dragon's Roost' which gives a city a golden dragon defender.
  • Forging (5): Unlocks several new armor, scroll, potion, and accessory recipes.
  • Recruit Hero (3): Recruits an additional hero.
  • Leadership I (2): +2 army slots
  • Leadership II (3): +3 army slots
  • Nature's vision (1): Outposts gain +2 ZOC and attack range
  • Resource Harvesting (2): Tapped resources will spawn chests of crafting loot.
  • Root of Evil (3): Reveals Sorcerer King's fortress on the map.
  • Revive Land (2): Cleanses target shadow tile and makes it settleable
  • Nature's Cloak (3): When fighting in friendly territory, friendly units are given an aura of +20% resistance to Fire, Cold, and Frost.
  • Disease (4): When fighting in friendly territory, enemies are poisoned, losing 1 hitpoint per turn for the entire duration of combat, unless they resist.
  • Tremor (5): When fighting in your territory, unless they resist, enemies are immobilized for 1 turn, their dodge is reduced, and they suffer slight damage.
  • Tornado (6): When fighting in friendly territory, all enemy special abilities are disabled for two turns.
  • Shard Guardian (1): All shards are revealed on the map.
  • Trail Blazer (2): Unlocks the 'Place Road' spell.
  • Clairvoyance I (2): Sovereign can cast an additional spell in battle.
  • Geomancy (3): Unlocks the 'Restore Land' spell which makes any grassland or barren tile settleable.
  • Shard Healer (4): Unlocks a spell that allows a player to heal shards.
  • Fertility (5): Unlocks a spell that places a Wild Grain tile on the map.
  • Volcanic Vengeance (6): Unlocks the Volcano spell.
  • Clairvoyance II (3): Sovereign can cast an additional spell in battle.
  • Clairvoyance III (4): Sovereign can cast an additional spell in battle.
  • Clairvoyance IV (5): Sovereign can cast an additional spell in battle.
  • Tower of Mastery (6): Unlocks a special wonder where, if built, will unite the power of all shards and bring an end to the Sorcerer King's dominion. Choosing this ability will also draw his immediate and complete wrath, so be prepared.

So the Guardian has lots of abilities that allow hunkering down for the full duration of the Sorcerer King's ascension available and cities can be greatly fortified. Moreover, both Enchanted Forge and Forging are on the way to Leadership II. However, the low army slots and lack of other ways to make an unusually strong army are limiting.

Strangely, this may not be a severe issue on low or high difficulty games due to combining ranged units with the Obstruction spell, having especially strong cities, cities not being limited by army slots, and being able to repair shards. Indeed, this seems to me, at least at my first glance like a good sovereign for openly defying the Sorcerer King from the start (which makes it a shame she doesn't have a +threat starting option like the Tyrant or Commander).

I don't know, but I'm going to run with this theme. And if I am going to run with this theme, I might intentionally leave Leadership II alone for a long time. Starting with Shard Guardian and Nature's vision, then decide whether you need Geomancy first to spam enough cities or whether you can progress directly to Invulnerable Cities, and then snatching Shard Healer, and perhaps Volcanic Vengeance. Since this is going to be a very long game anyways, this leaves us plenty of time to grab either Leadership II or Tower of Mastery thereafter -- or even grab Tornado to be extra prepared.
The Priestess Skill Tree

  • Divine Visions (1): The higher powers will come to you in visions to give you locations of special items.
  • Heroic Precision (2): Unlocks Heroic Precision which causes the target unit to never miss during battle
  • Sovereign's Prayer (3): +3 Destiny's Favor
  • Heaven's Might (4): +5 Destiny's Favor
  • Clairvoyance I (2): Sovereign can cast an additional spell in battle.
  • Recruit Hero (3): Recruits an additional hero.
  • Clairvoyance III (4): Sovereign can cast an additional spell in battle. [PS, where did Clairvoyance II go?]
  • Clairvoyance IV (5): Sovereign can cast an additional spell in battle.
  • Forging (1): Unlocks several new armor, scroll, potion, and accessory recipes.
  • Blessed Cities (2): Unlocks the Tower of Prayer wonder, which increases hope and reduces the Socerer King's ascension points.
  • Shard Temples I (3): Captured shards heal 1 health per turn.
  • Great Temples (4): Unlocks the Temple improvement which increases hope and decreases Thralls.
  • Shard Temples II (5): Captured shards heal 2 health per turn.
  • Tower of Mastery (6): Unlocks a special wonder where, if built, will unite the power of all shards and bring an end to the Sorcerer King's dominion. Choosing this ability will also draw his immediate and complete wrath, so be prepared.
  • Resource Harvesting (2): Tapped resources spawn chests of crafting materials.
  • Enchanted Forge (3): Unlocks the enchantment option when crafting.
  • Greater Piety (4): +3 Destiny's Favor
  • Inquisition (5): Unlocks a building which which allows the training of the Cleric unit.
  • Destiny's Sentinel (6): Allows the summoning of Destiny's Sentinel, costs 1 Destiny's Favor.
  • Holy Wrath (7): Unlocks 'Holy Wrath', a strategic enchantment which does AoE damage.
  • Warrior's Zeal (3): +2 army slots
  • Marching Hymn (4): All units get +1 moves.
  • Sword of Judgement (5): All units get +2 arcane attack.
  • Holy War (6): +2 army slots
  • Army of Light (7): All units get +5 [max, I'm pretty sure that's max] health.
  • Gilded Throne (7): +3 Destiny's Favor

So there isn't actually a lot here that is a must-acquire except Enchanted Forge and Warrior's Zeal. Much of the Priestess' identity is in her unique starting spells rather than her skill tree. Of what remains, the standouts to me are Destiny's Sentinel (the unique unit, with Enchanted Forge as a rerequisite), and Holy War (with Sword of Judgement as a very tasty prerequsite). I was actually never able to figure out how good Holy Wrath is actually, because I never figured out how to cast it.

As far as two units in the sovereign skill tree goes, Destiny's Sentinel is a 0-cost summonable unit (uses Destiny's Favor only) with a pretty darn sweet attack (if not hitpoints). The Cleric unit on the other hand seems very uninspiring when compared to the enchanter.

The priestess has shard-healing tools as well as more ways to decrease Sorcerer King ascension points, in order to draw the game out late. However, the healing tool is weak, and weak armies make some level of cooperation with the Socerer King essential. She has the smallest amount of army slots available (9) when upgraded, and she is able to acquire both of them within four levels. Moreover, her starting spells allow mana to be acquired quickly and especially weaker enemies can be exploited to avoid mana issues. This suggests a relatively quick game may be a better idea than trying to deliberately draw the game out, despite the tools available.

In fact, I suspect the Priestess has the best early strategy of all of the Sovereigns except the Tyrant on hard difficulty and below due to the strength of the Destiny's Sentinel unit, the immediate availability of an "all-enemies" target spell, and early army size upgrades. On insane difficulty the Destiny's Sentinel unit falls off due to the need for taking advantage of the additional strength of enchantments and crafted weaponry on groups of units and additionally on that difficulty the Priestess suffers from a greater need for armies sizes larger than 7.

For these reasons, while Shard Temples II is an option, it would seem a better strategy would be to start out out with Warrior's Zeal, and then acquire either Holy War or Destiny's Sentinel (and then progress the other afterwards).

By the way, the maximum total amount of Destiny's Favor available in a game appears to be 17.
The Tinker Skill Tree

  • Enchanted Maps (1): Unlocks 'Champions Map', 'Crystal Map', and 'Map of Nations'. +2 Birch Scrolls.
  • Loot Mining (1): Tapped resources will spawn chests of crafting materials.
  • Skilled Craftsmen (1): +1 Enchantment Slot (new total: 2)
  • Master Enchanter (2): Unlocks several high level enchantments from the wrath, summoning, enchantment, and chaos spellbooks.
  • Master Armorers (3): All common and uncommon armor recipes are unlocked [All the basic Plate, Chain, and Leather wear is included, but not Longstrider boots].
  • Civic Heroes (4): Unlock recipes for items that given bonuses to stationed cities. The Seed Sachel recipe gives +1 food, the Workman's Hammer recipe gives +1 produciton, and the Flawless Scope recipe gives +1 city ZOC.
  • Master Craftsmen (4): +1 Enchantment Slot (new total: 3)
  • Legendary Weapons (5): Unlock legendary weapons to be crafted.
  • Tower of Mastery (6): Unlocks a special wonder where, if built, will unite the power of all shards and bring an end to the Sorcerer King's dominion. Choosing this ability will also draw his immediate and complete wrath, so be prepared.
  • Legendary Jewelcraft (5): Unlock legendary accessories to be crafted.
  • Legendary Armor (6): Unlock legendary armor to be crafted.
  • Leadership I (2): +1 army slots
  • Recruit Hero (3): Recruits an additional hero.
  • Leadership II (4): +1 army slots
  • Leadership III (5): +1 army slots
  • Leadership IV (6): +2 army slots
  • Spoils of Victory I (2): More common loot from victorious battles.
  • Scroll Masters (3): Scrolls are retained after using spell scrolls in battle.
  • Forging (3): Unlocks several new armor, scroll, potion, and accessory recipes.
  • Archivist (4): +1 Lore whenever you find a 'goodie hut', +5 lore whenever you complete a quest.
  • Transmute I (5): Use mana to create common loot.
  • Transmute II (6): Use mana to create uncommon loot.
  • Transmute III (7): Use mana to create rare loot.
  • Spoils of Victory II(5): More uncommon loot from victorious battles.
  • Master Archivist (6): +2 and sovereign skill points whenever you find a 'goodie hut', +10 lore and sovereign skill points whenever you complete a quest.
  • Spoils of Victory III (7): More rare loot from victorious battles.
  • Thrifty Potioneers (1): You retain bottles after a unit drinks a potion
  • Clairvoyance Amulets (1): Unlocks the 'Clairvoyance amulet' recipe, giving the sovereign +1 spells in battle. +1 platinum chain, +1 radiant diamond.

This is a tough one. Leadership, Legendary Weapons, or Master Archivist/Scroll Masters? When should Loot Mining/Spoils of Victory I be obtained? The Tinker has a very rough start to the game, because while eventually an army size greater than the Preistess can be obtained, each army slot is sooo expensive, and the default hero group is initially pretty squishy (and the artic wolves suck at scouting/material collecting). On the other hand, the Tinker breezes through late game with fully outfitted triple-enchanted legendary-equipped riders.

Getting either Master Armorers or Forging is a big deal so you can save your wolf pelts for enchanting and make your basic defensive gear chainmail with the flawless iron from Loot Mining. While it is possible to go straight Leadership IV, that kinda means you're playing a much worse Commander just with double-enchantment slots, and it isn't really worth-it. Similarly, Legendary Armor is actually kinda bad, since they require Platinum and Radiant Diamonds that would be better spent on Weapons or Jewelery. This leaves us taking either Master Archivist/Spoils of Victory III, or Legendary Jewelcraft/Legendary Weapons first.

As it happens, double and/or triple enchanting is so powerful that anything beyond Leadership I isn't critically important. While relatively fast Leadership IV is probably a good idea, winning with a 5-7 unit army is also a cool sovereign-identity thing for the Tinkerer. Remember that trained groups of units get 3x the bonus from at least some enchantments such as Ogre Blood (+5 health) and wolf pelts (+1 damage), so multi-enchanting makes a big difference. Even single-enchanted ogre-blood gear can add an additional 165 hitpoints to trained unit group, and that's without a shield. Clairvoyance Amulets is a useful skill to get late-game when you realize you won't be able to finish another branch of the tree so that you can cast more of the spells you've spent all of that time researching for the final battle.

The reason why Thrifty Potioneers and Scroll Masters have largely been left out of my analysis is because potions are limited more by nectar than flasks, while Scroll Masters is largely obviated by the spell "Harvest Forest".

Therefore the following builds I propose are as follows:

  • Leadership I > Loot Mining > Legendary Jewelcraft > Legendary Weapons (optionally omit this if you don't have the weapon materials) > Leadership II
  • Spoils of Victory I > Loot Mining > Leadership I (optionally delayed) > Master Archivist > Leadership IV
  • Spoils of Victory I > Loot Mining > Leadership I (optionally delayed) > Master Archivist > (optionally Spoils of Victory III) > Master Craftsmen > Legendary Weapons/Jewelcraft

So my current answer to when Loot Mining should be obtained is fairly early in an effort to conserve wolf-pelts and supply my troops with useful chain gear, but there is likely no point in getting it before an iron/crystal deposit can be obtained. If you're going for Master Archivist, you also want time to let this generate excess chests in order to reap the dividends of that skill.

The advantage of the Master Archivist first build is extra sovereign skill points that allow you to get an extra couple sovereign levels (though since you get it as your 7th or 8th sovereign level, it should only be a couple extra unless you take the game even later), as well as so much extra Lore that there is little to no need to spend any shard focus on it, and more wolf-pelts and ogre blood, and other (mostly non-gem) materials to enchant and make potions with. You get some recipies (Longstride boots, Warrior's Spirit potion, IIRC) that the legendary-first build doesn't get, but you are short the chain headgear. The extra levels you get ought to be enough to be able to get either Leadership IV or Master Craftsmen + one more skill by the same time the Legendary-first build would get Leadership II -- but the Legendary-first build might end the game before getting that so the comparison is somewhat arbitrary.

The Legendary-first build gets the third enchantment slot early along with some better recipies (including the Legendary ones, obviously, but also chain headgear), but doesn't get the benefits above. Because I tend to favor shorter games I think I would favor this build.
Starting Bonuses
At the begining of the game, each sovereign recieves some bonus based on some flavor questions. Some results are better than others and some sovereigns get better bonuses. Most significantly to me, the Tinker is the only sovereign that can't get a turn 1 Pioneer unit (having neither a Pioneer start nor a Mana start) with any starting hero. Here's the list:

Mana should always result in 40 mana. Sovereign xp is 10 skill points, enough for the first level.

Dwarven King
  • Axeman (single unit, kinda bad)
  • 2x aptly named Arctic Wolf (26hp).
  • 1x Rickety Catapult (19hp, AoE ranged unit)
  • 3x Wolf Pelt, 4x Flawless Iron
  • Flawless Iron, Cedarwood Oil, Birch Scroll, Mana Berries, Clouded Amethyst
  • 1x Explorer (single unit)
  • Mana
  • +20 Lore
Archlich
  • Amulet of the Eagle (2 sight), Ring of the Tutor (+25% xp).
  • +10 Lore, Blizzard Scroll
  • Flawless Iron, Cedarwood Oil, Birch Scroll, Mana Berries, Clouded Amethyst
  • 2x Risen Warrior (single units, 44hp each)
  • 1x Weaver (strong ranged bastard)
  • Administrator
  • Crypt Keeper (can settle/outpost)
  • Logistician
Wizard
Always starts with 100 mana instead of 40.
  • Amulet of the Eagle (2 sight), Ring of the Tutor (+25% xp).
  • +10 Lore, Blizzard Scroll
  • Flawless Iron, Cedarwood Oil, Birch Scroll, Mana Berries, Clouded Amethyst
  • 1x Militia (single unit)
  • 1x Militia (single unit)
  • Administrator
  • Pioneer
  • Logistician
Commander
Always starts with 3 additional army slots.
  • Soldier group
  • Archer group
  • Soldier, Archer, and Pikeman groups. +1 Threat (note: unlike the tyrant, you don't have an abillity that lets you reset this threat later on)
  • 3x Wolf Pelt, 4x Flawless Iron
  • 3x Nectar, 3x Glass Flagon, Mana Berries
  • 3x Clouded Ruby, 2x Last Breath, 2x Birch Scroll
  • Administrator
  • Pioneer
  • 3x Reformed Bandit (single units, so not that strong, but you have the army slots for them, one of them can cast slow, and you can also send them to canvas the map for you)
Tyrant
  • Soldier group
  • Archer group
  • Soldier, Archer, and Pikeman groups. +1 Threat
  • Mana
  • Sovereign xp
  • 2x Champions Map, 2x Shard Map
  • 30 Lore, shard map
Guardian
  • Amulet of the Eagle (2 sight), Ring of the Tutor (+25% xp).
  • +20 Lore
  • Chain Coif (+4 defense), Razorfin Arrowheads (+3 attack), Cloak of Shadows (+10 dodge).
  • Mana
  • Lore
  • Extra Metal nearby
  • Extra Crystal Crags nearby
  • Extra (2?) horse pastures nearby
Priestess
Always starts with a special resource: 3 Destiny's Favor.
  • Mana
  • +20 Lore
  • Sovereign xp
  • 3x Healing Potion, Major Healing Potion, Minor Mana Potion (10 mana).
  • 2x Nectar, 2x Glass Flagon, Clouded Ruby, 2x Birch Scroll
  • Administrator
  • Pioneer
  • Logistician
Tinker
  • 3x Wolf Pelt, 4x Flawless Iron
  • 3x Nectar, 3x Glass Flagon, Mana Berries
  • 3x Clouded Ruby, 2x Last Breath, 2x Birch Scroll
  • Rouded Shield recipe, Chain Gauntlets recipe
  • Crimson Ring recipe, Amulet of the Eagle recipe
  • +1 sight ring (with recipe)
  • +25% xp ring (with recipe)
  • +5 dodge ring (with recipe)
2 Comments
Galdred 4 May, 2021 @ 6:20am 
I won with the Archlich in insane. I could not get the forge for the whole game (I could have purposedly delayed the ending, but there was no point), so you were spot on on your recommendations.
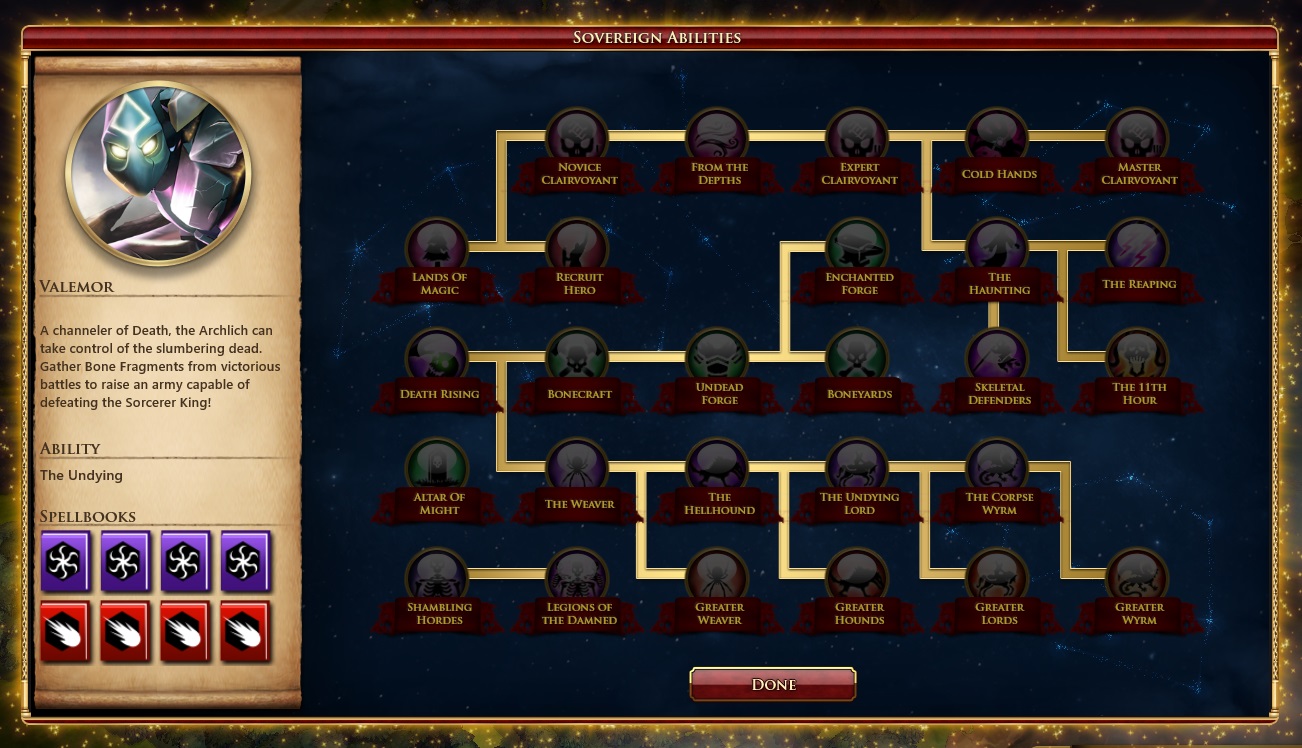
Skeleton archers and mercenary swordsmen don't require logistics (I haven't built every unit, so I don't know whether there are other that don't have an upkeep cost), which makes them great for garrisoning.
The Corpse wyrms hit really hard, with an AoE line attack and their 2*damage bite, but they are very slow on the strategic map (move 2). I ended up favoring the greater lords for their better mobility.
Galdred 29 Apr, 2021 @ 4:47am 
Thanks for the detailed information! I soloed most of the opposing groups on hard with a single dwarf hero with the tinkerer. It is true that legendary armor offers less bang for bucks than legendary other options, but it is still significant (+0.5 Def /level for the legendary helm. +18 defense for the armor), and I found the demon horns to be more restrictive than the radiant diamonds or the platinum ore (but I only bothered focus crafting and enchanting for my two main heroes, and equipped the other units with leftover).
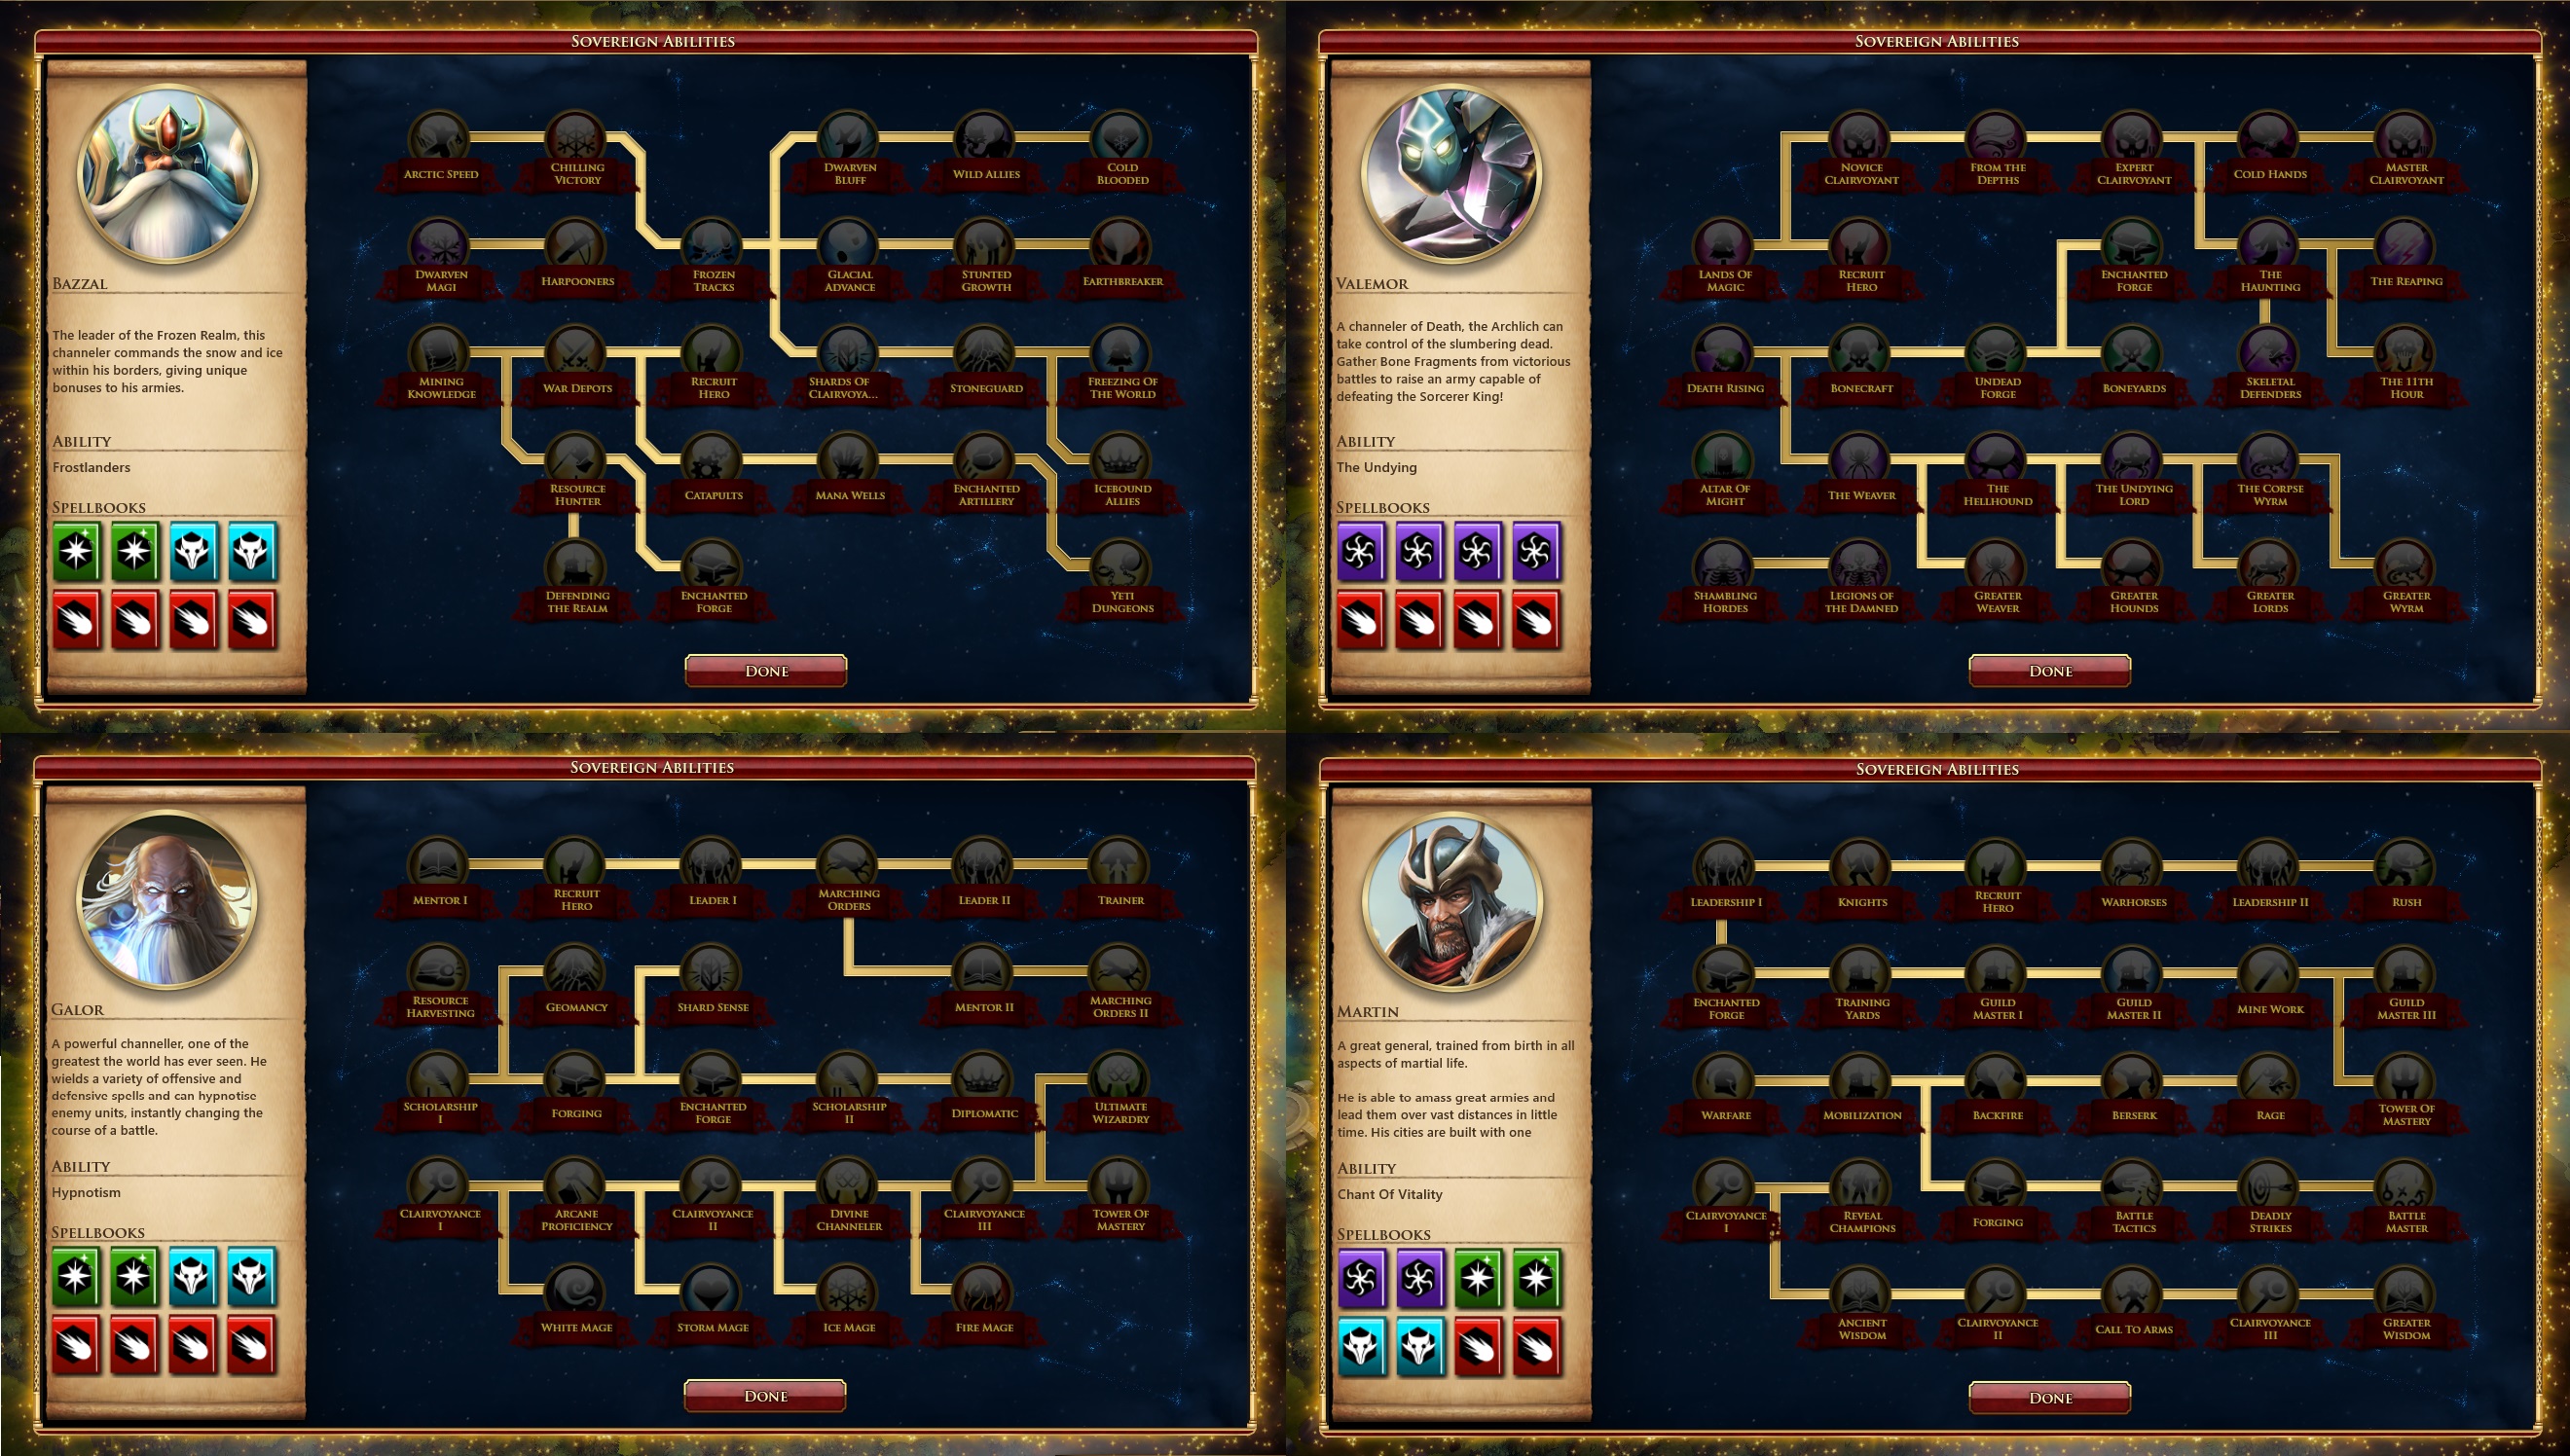
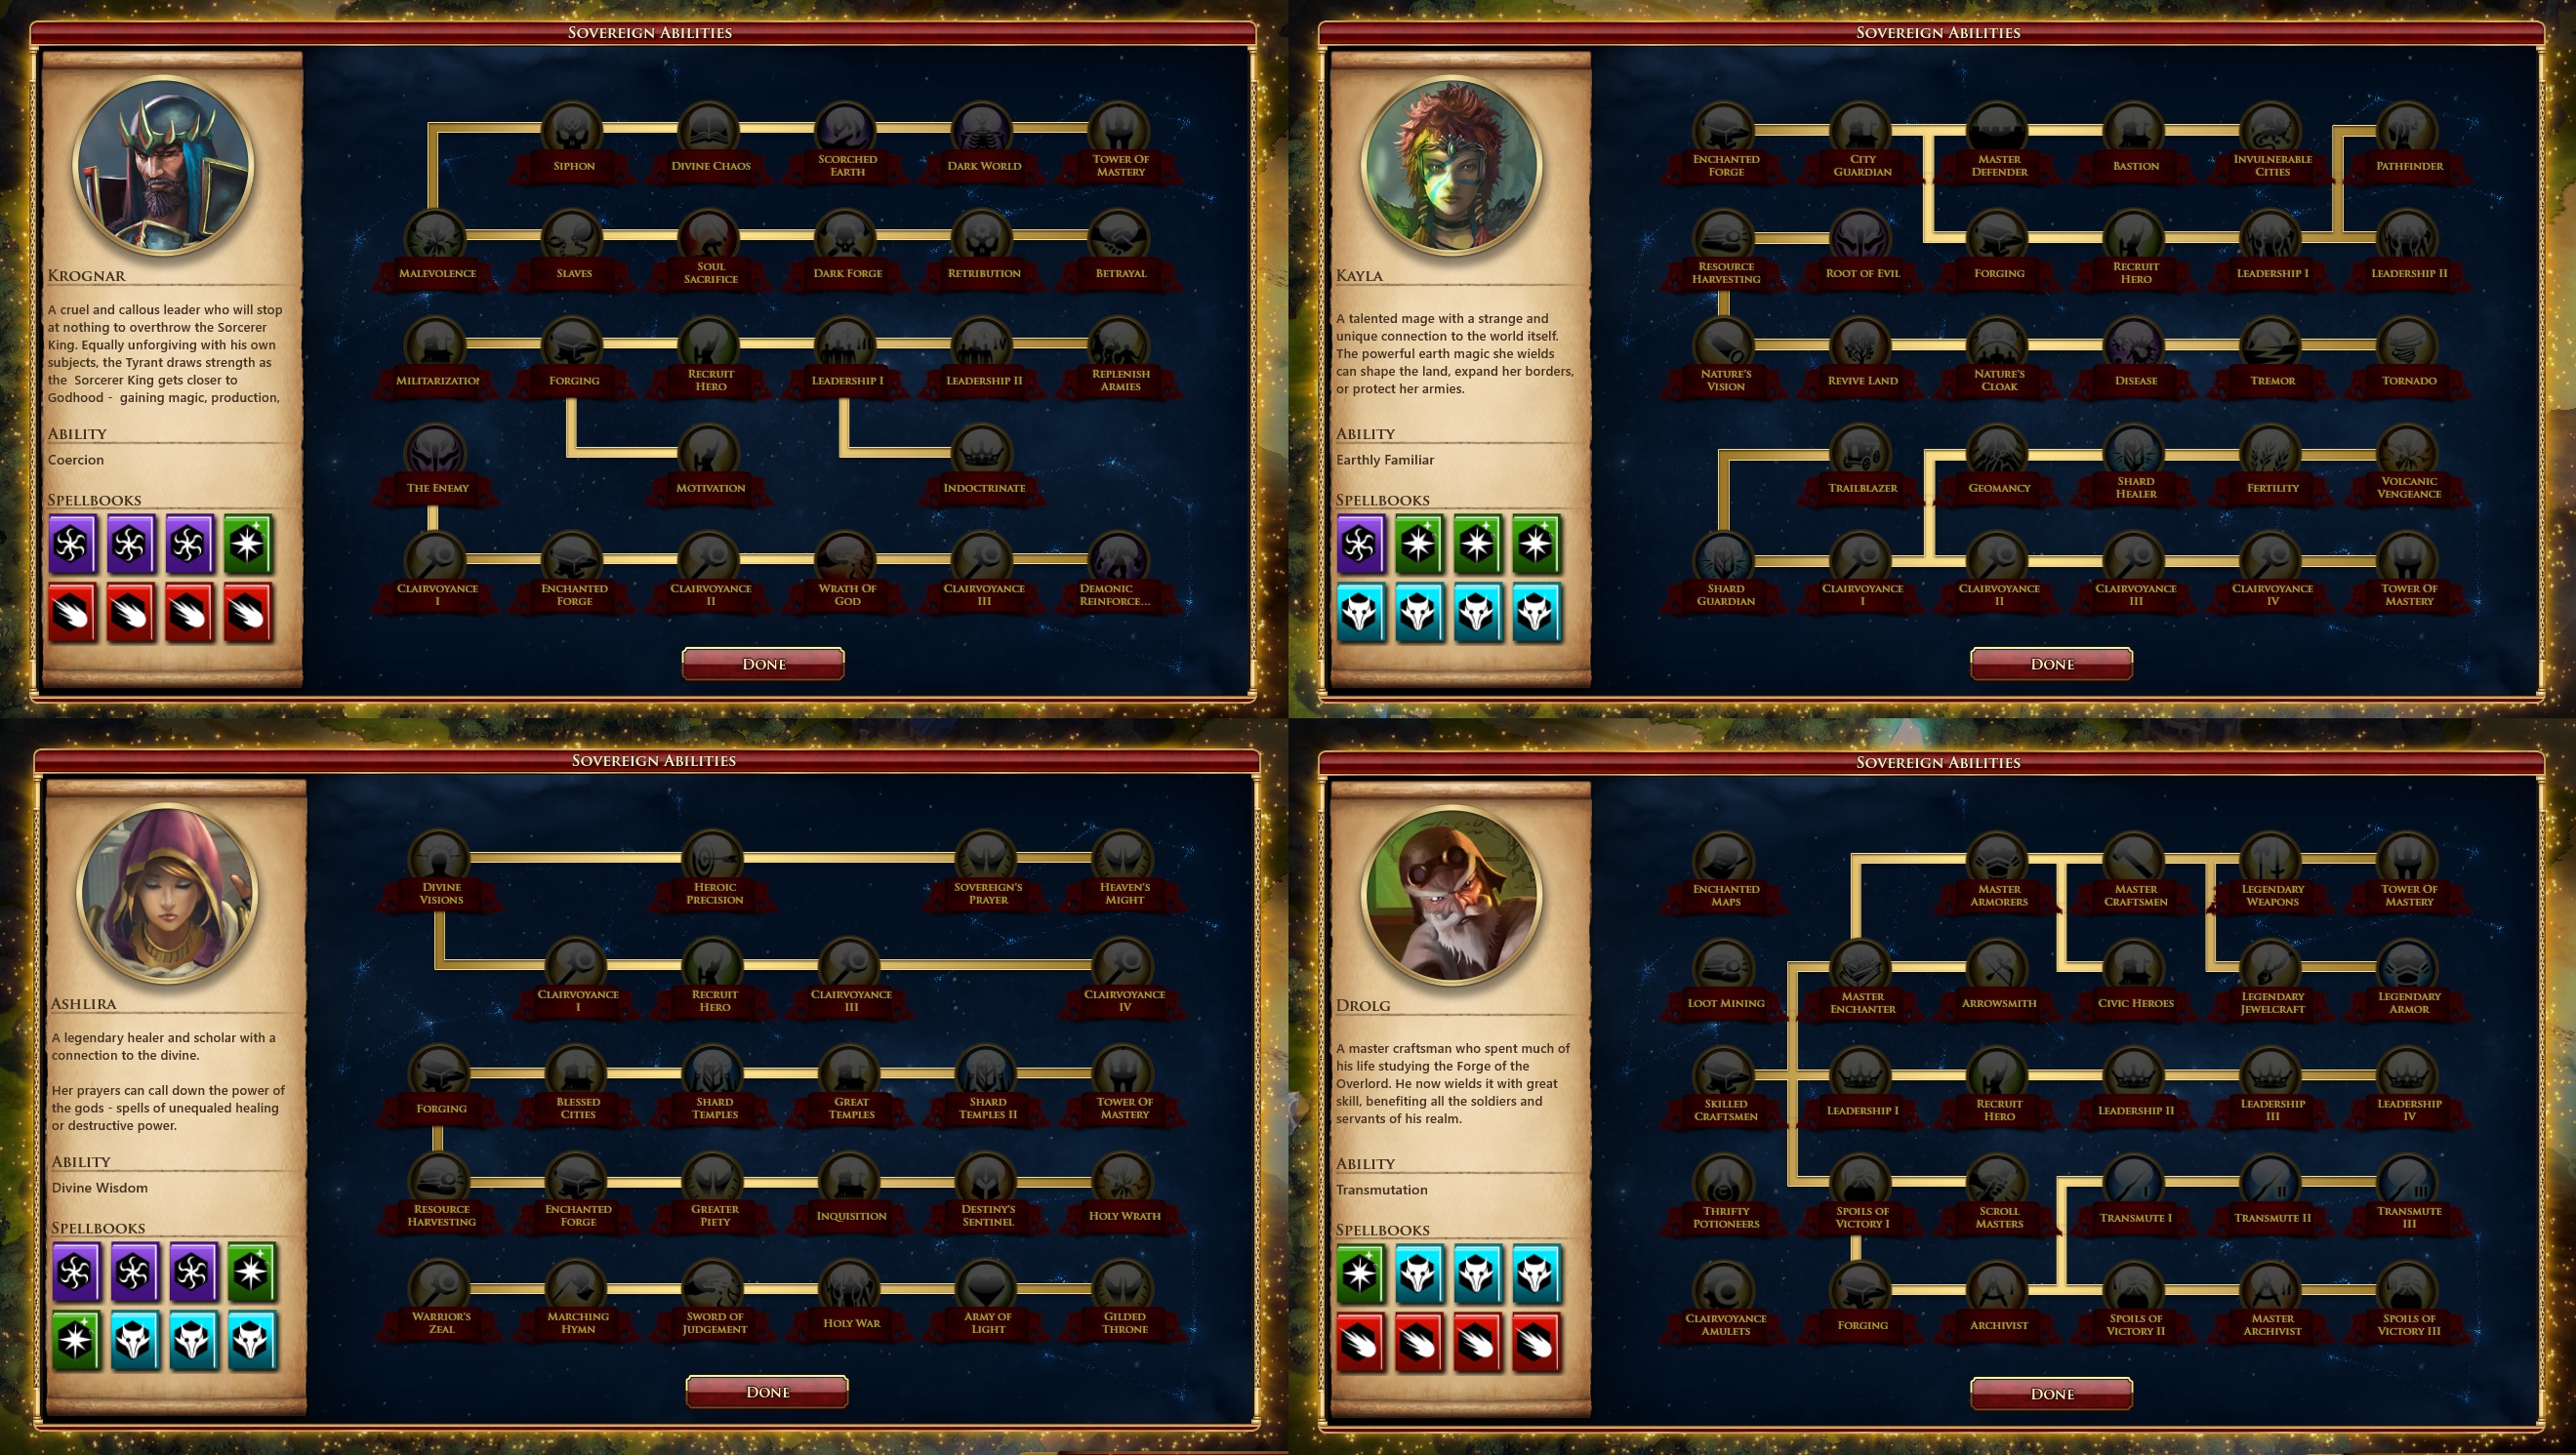
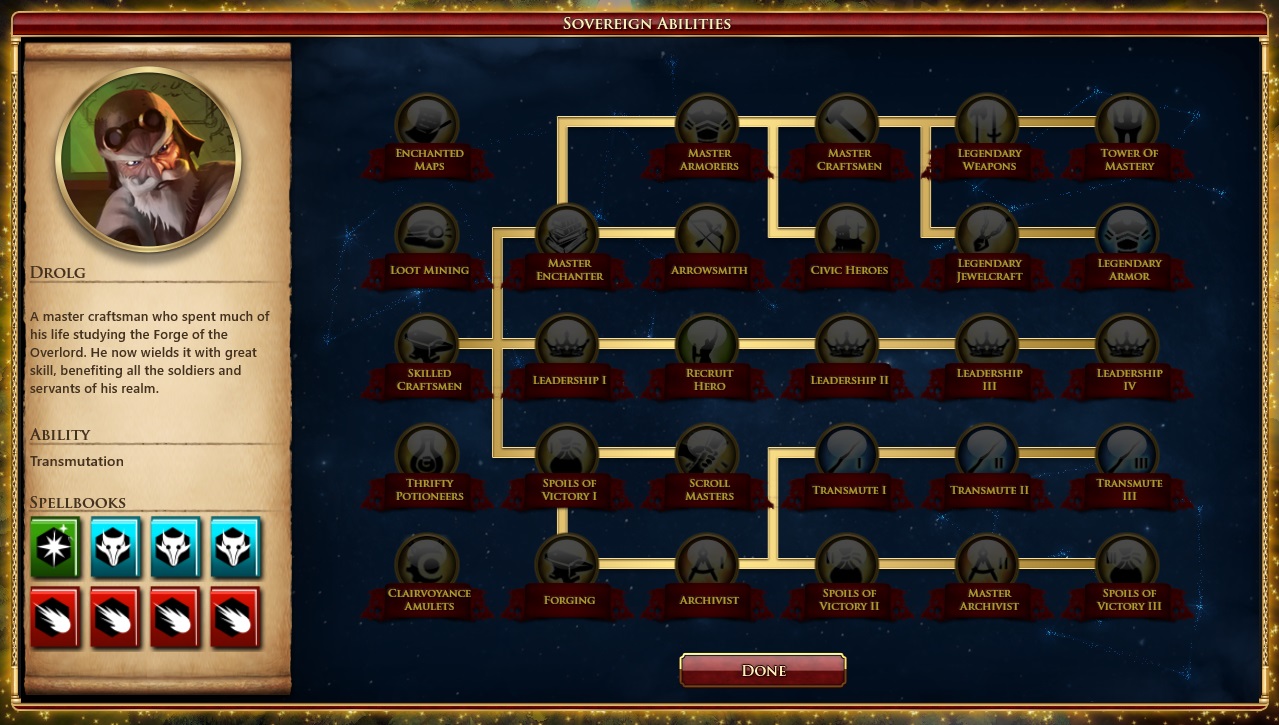
I decided to focus on the dwarf because Master enchanter provided me with a +3 mana/kill enchant. It is a huge deal, as it can make cloud walk pay for itself, and makes crafting a lot of the rings more manageable.
A large advantage of multi enchantment with a single "main" hero is that you can stack +movement enchant on him, which makes refreshing potions much more efficient.
For all of these reasons, I found legendary armor quite worthwile in the end.