Wargroove

Wargroove

122 ratings
Kitsune's Puzzle Hints and Solutions
By Kitsune
A guide to help solve the 25 puzzles from the game. I will give out hints first, followed by solution map and video of the solution. This should help you to obtain all 25 stars from the puzzle and acquire the "Puzzle Practitioner" achievement.
2
   
Award
Favorite
Favorited
Unfavorite
Overview
Hi,
War Groove have a puzzle mode where you need to win in one turn using the units available. It's both fun and frustrating at the same time. I strongly recommend trying out the puzzle first yourself before using this guide. I will first provide hints, and then a solution image to indicate where you should move your units and where to attack, and finally a video showcase the full solution.

For the solution image, green arrows means move here, red arrows means attack here, and blue arrows means use special ability here (e.g. groove, load/unload, hex, heal).

It is also worth noting that most of the puzzles have more than one solutions, I will post all the solutions I know, but there may be different ones.

Good luck!
1. Enmity
Take Sigrid to victory in a single turn!

Known solution: 1

Hints
  • Cavalry crits when attacking at an foe that is 6 space or greater
  • Swordsman crits when placed next to your own commander
  • Alchemist crits when placed on a terrain with 3 or more defense stars
  • Sigrid's groove allow you to eliminate a unit completely
Solution

Video walkthrough
2. Brute Force
Take Sigrid to victory in a single turn!

Known solution: 1

Hints
  • Go for the HQ and not the commander
  • Shield jump damages buildings
  • Use archer to kill the mage right below HQ
Solution

Video walkthrough
3. Get the Heck out of Dodge
Get the Cherrystone Villager to safety in the north-west in a single turn.

Known solutions: 1

Hints
  • Cavalry and Wagon need to move twice
  • There 2 units that you don't need to use in this map (but can help if you made mistakes)
Solution

Video walkthrough
4. Balance and Wisdom
Take Emeric to victory in a single turn!

Known solutions: 1

Hints
  • Crystal placement should make both mages crit on their target
  • Make way for both cavalry and doggo to finish off Greenfinger
Solution

Video walkthrough
5. Sun and Shadow
Take Sedge to victory in a single turn!

Known solutions: 2

Hints
  • Cavalry charge is required in both solutions
  • In solution 1, Sedge need to make way for a doggo
  • In solution 1, you kill the pike blocking the cavalry with 2 doggos
  • In solution 2, you need to move doggo to make way for Sedge
  • In solution 2, you kill the pike blocking the cavalry with the mage
  • In solution 2, you can have up to 2 units unused
Solution 1

Solution 2

Video walkthrough 1
Video walkthrough 2
6. Surrounded
Take Mercia to victory in a single turn!

Known solutions: 2

Hints
  • There's a lot of minor variance between both solutions, main difference is once uses groove, the other don't
  • In solution 1, use heal aura on mage, pike, and cavalry
  • In solution 2, groove is not used
  • In solution 2, some of your units suicide
Solution 1

Solution 2

Video walkthrough
Video walkthrough
7. Unhappy Valley
Take Ryota to victory in a single turn!

Known solutions: 1

Hints
  • Go for the HQ
  • I did not use Harpie
Solution

Video walkthrough
8. The Turning Tides
Take Mercia to victory in a single turn!

Known solutions: 3

Hints
  • In all 3 solutions, you need to make way for the cavalry on the bottom left
  • Solution 1 and 2 uses groove, and solution 3 does not
  • Solution 1 and 3 kills both unit beside Nuru, and solution 2 only kills the cavalry
  • For Solution 1, Heals golem, pike and doggo
  • For Solution 1, I did not use the top right swordsman
  • For Solution 2, Heal golem and doggo (not pike)
  • For Solution 2, there's a lot of sacrifices, the sacrifice was used on the commander
  • For Solution 2, top right swordsman and the bottom right doggo were not used
  • For Solution 3, there's also a lot of sacrifices, the sacrifice was used to kill the units beside Nuru
  • For Solution 3, top right swordsman was not used
Solution 1

Solution 2

Solution 3

Video walkthrough 1
Video walkthrough 2
Video walkthrough 3
9. A Matter of Life and Death
Take Valder to victory in a single turn!

So I don't think this puzzle was suppose to be like this, at least Valder shouldn't be that close to the HQ, I will post the trivial solution, and what I think is the "intended" solution, the "intended" solution does not require skeleton next to Valder.

Known solution: questionable

Hints
  • Go for the HQ in all solutions
  • There is a trivial solution which I don't think it's intended
  • Trivial solution only uses 4 units (including summon)
  • In non trivial solution, Wagon can be used to position pike crit
Trivial Solution

Non-Trivial Solution

Video walkthrough trivial
Video walkthrough non trivial
10. Age and Beauty
Take Sigrid to victory in a single turn!

Known solution: 1

Hints
  • I did not Sigrid's groove
  • All units are needed
  • Killed all Nuru's units.
Solution

Video walkthrough
11. Child Genius
Take Koji to victory in a single turn!

Known Solution: 2

Hints
  • In both solutions, you need the cavalry to hit the commander
  • In both solutions, you need to make way for one of the sparrow bomb
  • In solution 1, you damage Emeric with one of the sparrow bomb, but not in solution 2
  • In solution 1, I had 2 unused units (left most spear and bottom right doggo)
  • In solution 2, I had 3 unused units (2 spears on the left, and bottom right doggo)
Solution 1

Solution 2

Video walkthrough 1
Video walkthrough 2

12. The Winding Bridge
Get the Heavensong Villager to the other side of the bridge in a single turn

Known solution 1

Hints
  • I had 6 unused units
  • The only unit that can do significant damage on the golem is the warship on the right placed on the shore tile, think about how to free it
  • I used all water units on the right side of the bridge except the barge, and only warship on the left.
Solution

Video walkthrough
13. Desert Bones
Take Caesar to victory in a single turn!

Known solutions: 2

Hints
  • In both solutions, you need to make way for cavalry to breakdown the gate for trebuchet
  • In both solutions, the top portion of the map is played the same
  • In both solutions, I inspired cavalry, trebuchet, and pikeman
  • In solution 1, I freed golem with cavalry by killing doggo
  • In solution 2, I freed golem with archer and swordsman by killing mage
Solution 1

Solution 2

Video walkthrough 1
Video walkthrough 2
14. Nemeses
Take Mercia to victory in a single turn!

Known solutions: 2

Hints
  • In both solutions, use your groove on the knight and mage
  • In both solutions, the left portion of the map is played the same
  • In both solutions, I healed cavalry, archer, mage, and swordsman
  • In solution 1, I unlocked a path for the doggo
  • In solution 2, I unlocked a path for the mage
Solution 1

Solution 2

Video walkthrough 1
Video walkthrough 2
15. Storming the Keep
Known solutions: 2

Hints
  • Go for the HQ
  • In both solutions, I had to capture the dock
  • In both solutions, I needed a pike to hit the HQ
  • One solution is much more complex than the other
  • In solution 1, I ignored the top left corner
  • In solution 2, I airdropped a pikeman to setup pike crit
Solution 1

Solution 2

Video walkthrough 1
Video walkthrough 2
16. Beyond the walls
Take Tenri to victory in a single turn!

Known solutions: 2

Hints
  • Go for the HQ
  • One solution is much more complex than the other
  • In solution 1, I used Tenri to teleport away an enemy unit
  • In solution 1, I only attacked from top side and bottom side
  • In solution 1, I swarmed enemy HQ with doggos
  • In solution 2, I used Tenri to teleport a friendly unit
  • In solution 2, I attack from all 3 side
  • In solution 2, I did not have doggos by the HQ
Solution 1

Solution 2

Video walkthrough 1
Video walkthrough 2
17. A Bridge too far
Get the Felheim Villager to safety across the bridge in a single turn.

Known Solutions: 1 but with a lot of variances

Hints
  • In all variances, you kill the same units just with different units
  • In all variances, you kill the golem with Sigird groove
  • In all variances, you kill the pike with aquanauts
Solution 1

Solution 2

Video walkthrough 1
Video walkthrough 2
18. The Abominable Snow Woman
Take Ragna to victory in a single turn!

Solutions: 2 with lots of small variances

Hints
  • Position the shield smash so it hit a lot of units near Mercia
  • Honestly, there's a lot of units that can attack Mercia here, so just pick your poison
Solution 1

Solution 2

Video walkthrough 1
Video walkthrough 2
19. The Siege
Take Greenfinger to victory in a single turn!

Known solution: 1

Hints
  • Break down the northern gate with a western cavalery
  • Break down the western gate with a trebuchet
  • Break down the southern gate with a pikeman crit
  • I did not use Greenfinger groove
Solution

Video walkthrough
20. Friend or Foe
Take Emeric to victory in a single turn!

Known solutions: 1 with some variances

Hints
  • In both solutoins, make way for 2 mages to reach Tenri
  • There's multiple variances to break down the gate to free the path for the mage from the top
  • Crystal placement should cover the spot above and below Tenri
Solution 1 Variance 1

Solution 1 Vairance 2

Video walkthrough 1
Video walkthrough 2
21. Troubled Waters
Get the Floran Villager to the other side of the water in a single turn.

Known solution 1 (But have a lot of variances on how to do the final bit)

Hints
  • In all variances, I made the same path for the barge
  • I killed a golem, a merfolk, a warship, and a dragon for the barge path
  • Greenfinger's groove is not useful here
  • For variance 1, I used the land units to unblock the mage
  • For variance 2, I used water units to unblock the harpoon, and did not touch any units on the top right corner.
Solution 1 Variance 1

Solution 1 Vairance 2

Video walkthrough 1
Video walkthrough 2
22. A Bitter Struggle
Take Ryota to victory in a single turn!

Known solution: 1


Hints
  • Ryota dash with 11 moves, and ended to the right of Sedge
  • Set up Royta's dash with the enemy on the northern half of the map
  • Set up path to wagon drop a pikeman for a pikeman crit
  • Trebuchet should kill the doggo for mage to get to north side of Sedge
Solution

Video walkthrough
23. The Long Way Round
Deliver the Heavensong Villager to the safety of the walls in a single turn.

Known solution 1

Hints
  • Use the top wagon
  • Trebuchet + Cavalry seems like the best way, if not the only way, to defeat the golem
  • You want Tenri to be at max range from both the wagon and the destination when casting her groove (Tenri's groove is 6 tiles away from her when selecting target, and when selecting destination)
  • Doggos seems to be good at taking out the trebuchet
Solution 1

Video walkthrough
24. The Dead of Winter
Take Valder to victory in a single turn!

Known solutions: 2 with some variations (hex or hexless)

Hints
  • Valder is not used
  • In all solutions, I had to use top left cavalry, mage, and giant to kill Ryota, so think about how to make path for these 3 units.
  • If you are going with Hexless solution, Harpies are required
  • If you are going with Hexless solution, You have to break down the northern gate above the village
  • If you are going with Hex solution, it's up to you to open gate or not, and you can open either of the 2 northern gates.
Solution 1 (Hexless)

Solution 2 (Hex with left gate)

Solution 2 (Hex without gate)

Video walkthrough 1
Video walkthrough 2
Video walkthrough 3
25. A Chilling End
Take Sedge to victory in a single turn!

Known solutions: 1 with some small variances

Hints
  • Only had to use Sedge's groove on 3 units
  • Clear a path for you dragon to hit Ragna from the right
  • Clear a path to setup pike crit on Ragna (multiple ways to do this)
Solution 1

Video walkthrough
36 Comments
Mjollner 28 Mar @ 9:48am 
For anyone coming here and still looking for a complete answer for #25 you basically need to run Sedge clockwise around the map with Sadistic Rush - I made a full rundown here:

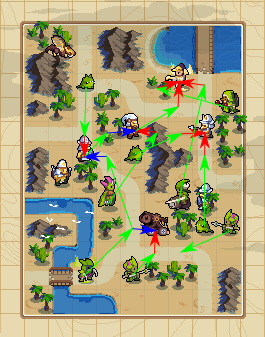
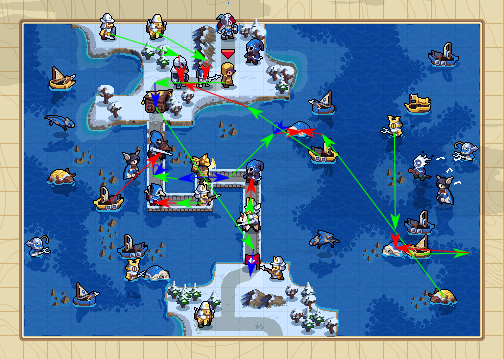
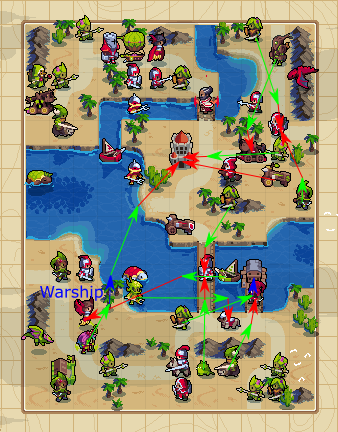
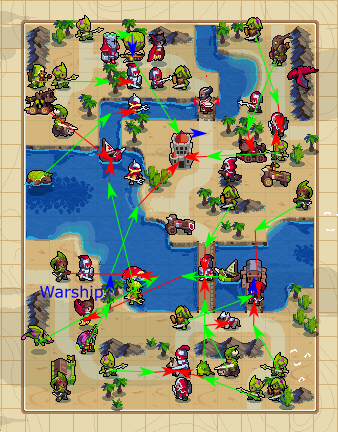
https://imgur.com/a/9iq2QFM
AnonymousShade 22 Dec, 2023 @ 1:41pm 
22 and 25 changed
Professorclockwork 29 Jul, 2023 @ 4:08pm 
Puzzle 22 got changed again. I didn't know what to make of the image you used in your last update.
calderino 27 Jan, 2022 @ 8:20pm 
Hey, I managed to do 17 without using Sigrid at all! So not all variances require Sigrid :P
Cactu 17 May, 2021 @ 5:20am 
here's the tiny mistakes I've found (in the spoiler pictures) :
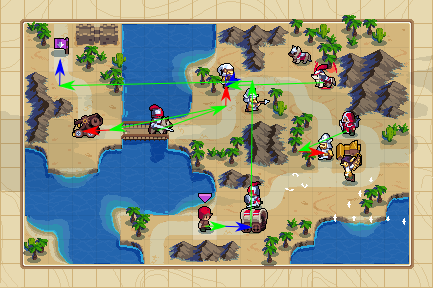
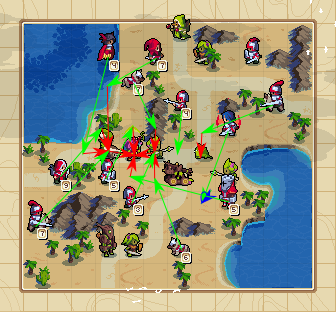
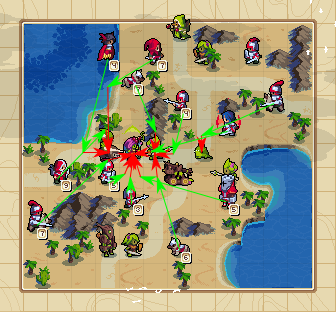
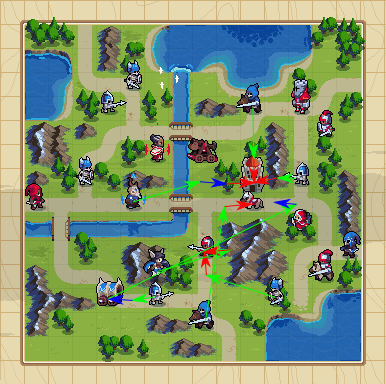
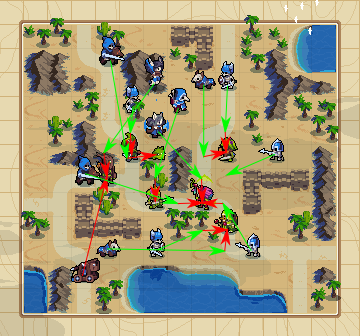
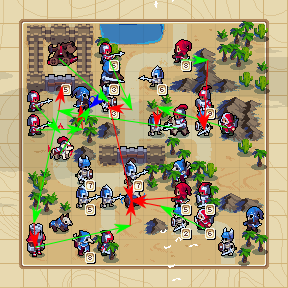
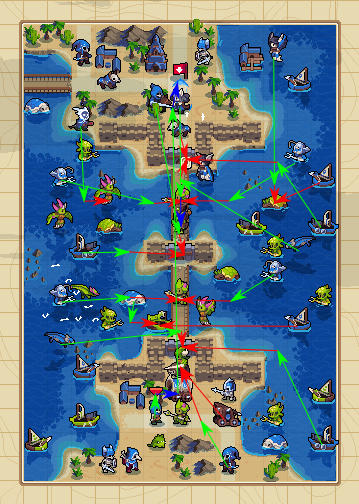
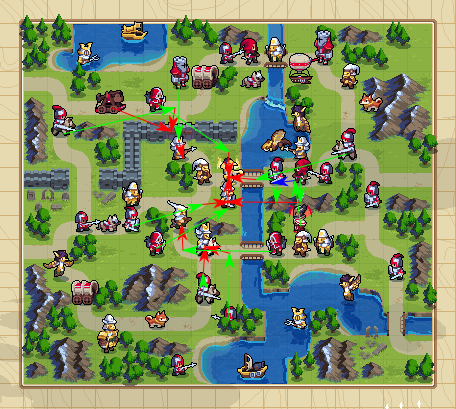
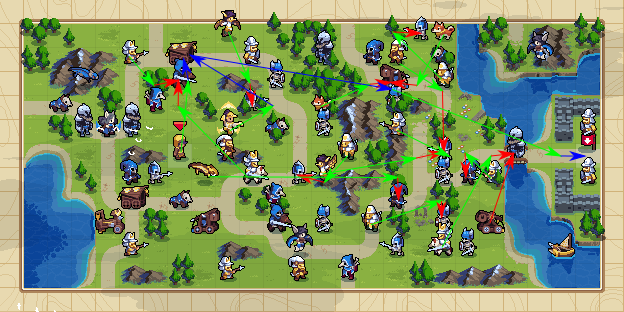
In the "Desert bones" (first spoiler image) : the cavalier is supposed to hit the doggo not the golem
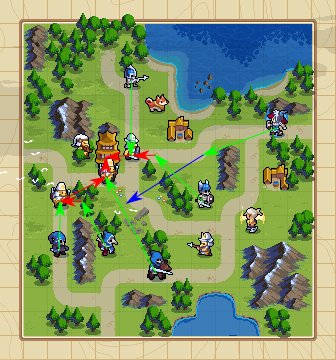
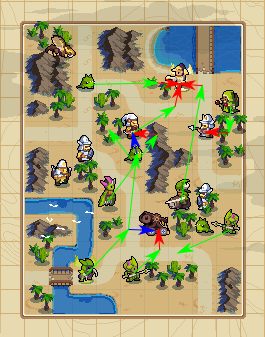
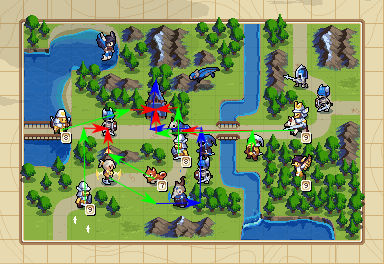
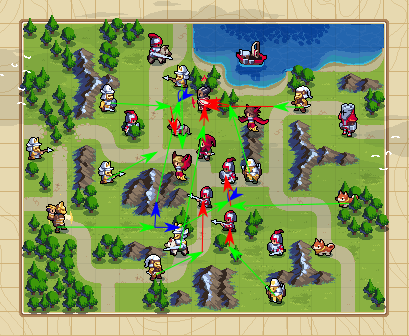
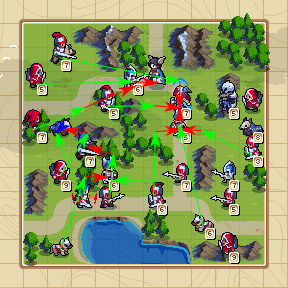
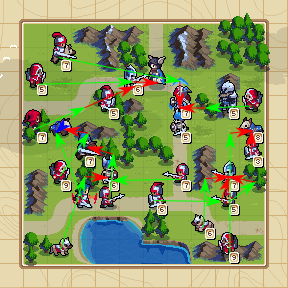
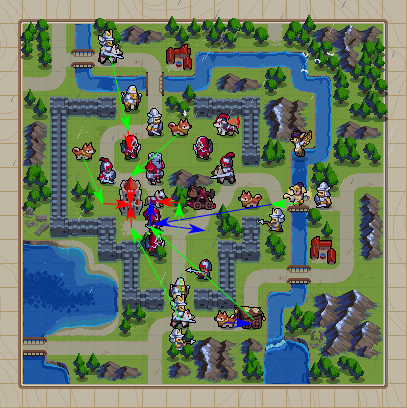
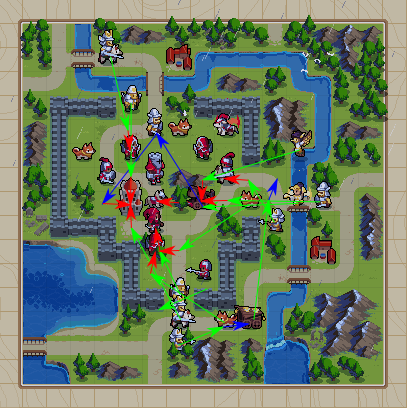
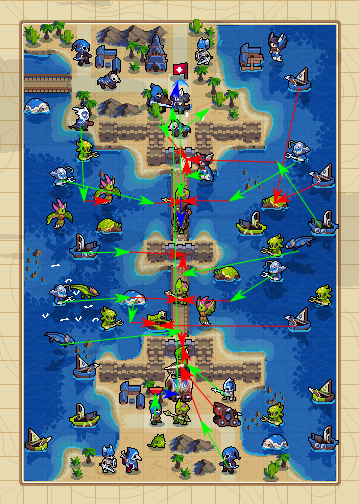
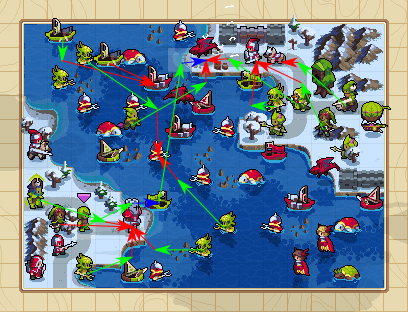
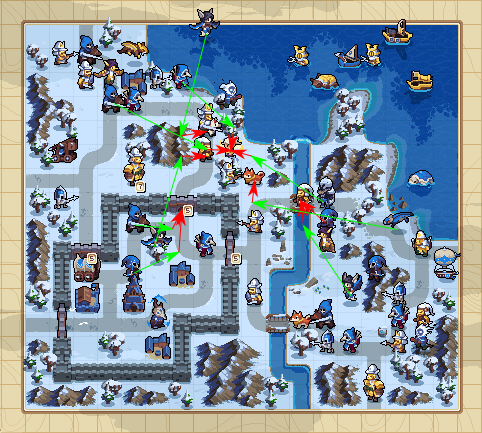
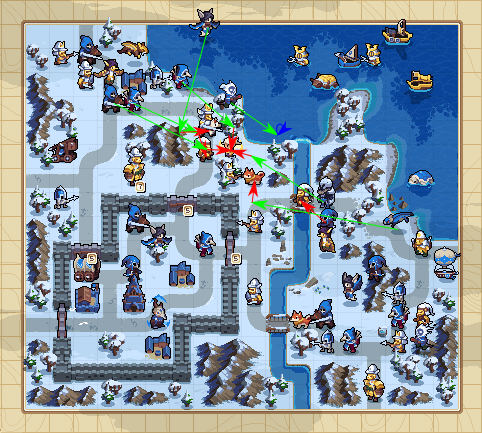
In "The long way round" : The archer (the one under Tenri) attack (red arrow) is missing in the image
Gaia's Minion 24 Apr, 2021 @ 7:23pm 
Alright so, here's a solution to 25. Sedge's path: https://feen.us/5l1b7hjp.jpg and at the end everything should look like this: https://feen.us/zf6p7p1k.jpg
Scout BlueWither 4 May, 2020 @ 10:30am 
Um, number 25 still isnt Working.
Synavix 23 Feb, 2020 @ 10:56am 
For anyone trying to do 22 after the update, this setup worked for me: https://i.imgur.com/mlfiO83.png

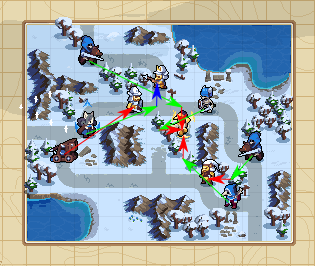
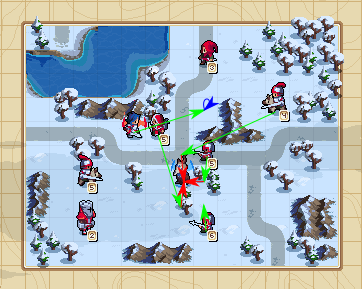
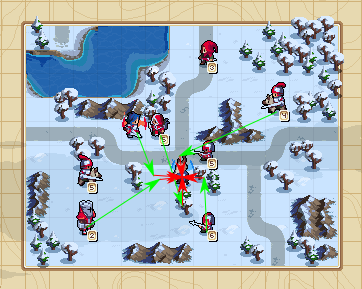
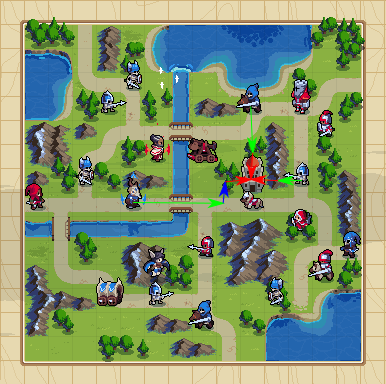
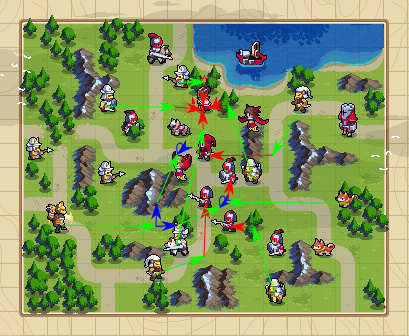
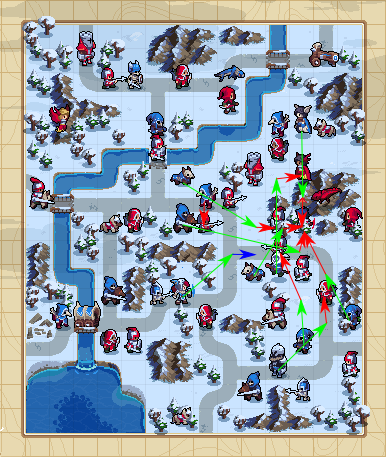
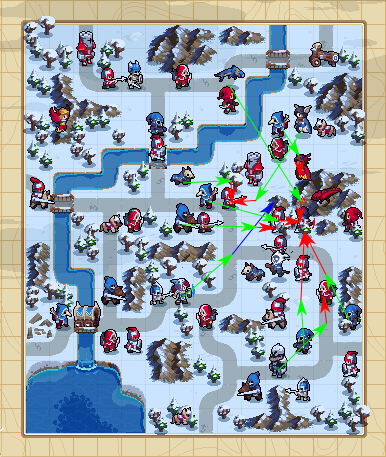
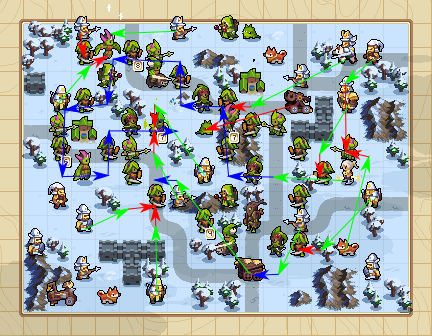
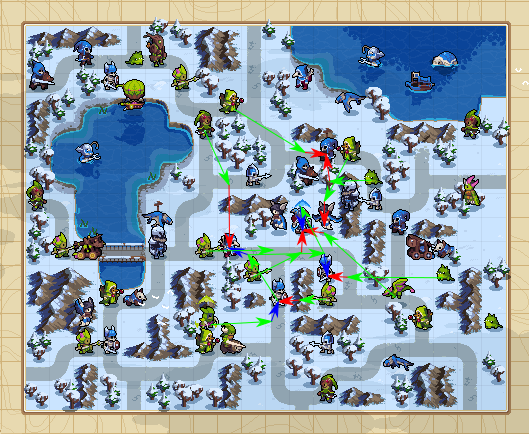
After that groove you should be able to finish him off with the same spear crit setup as before. (Move the bottom right spear into the transport, drop him off south of sedge, leaving the space for the unused spearman on the mountain to move in for a crit).

There are a few different ways to set up that groove (especially in the bottom left with the unused units) but what is important is the number of gaps you use to jump, since each one increases your damage on sedge at the end.
LegendaireNic 13 Feb, 2020 @ 7:45pm 
A bitter struggle is outdated. they removed some of the units and Sedge doesen't have 7hp at the start.
Sir Richi of Awesome 25 Jan, 2020 @ 11:44am 
Thank you for this guide (as well as the other two). Having the hints in addition to the solutions is so helpful. It lets me complete a level myself rather than just seeing how it is done.