Counter-Strike 2

Counter-Strike 2

Not enough ratings
SKIN CREATION - THE DEFINITIVE GUIDE
By pablo

   
Award
Favorite
Favorited
Unfavorite
Introduction: Software


Photoshop will be used to load a 3D Model and open the UV Map, so we can easily paint over the 3D model using my templates.
VTFEdit is required to import and export VTF (Valve Texture Format).
3D-Coat not needed but super useful, it allows you to paste a design right over the 3D model, letting you adjust it as you wish, so you just have to correct some pixels on the UV map.
Skin Templates are optional but provide a powerful help to get oriented in the UV map.
Blender not needed but useful to select the UV parts and identifying each one by selecting them.


  1. Open the model.obj file and set the dimensions as 2048x2048 (72dpi).
  2. Right click the 3D model and click on Materials, then locate the button .
  3. Now click on "Replace texture" and select the template I made.
  4. Once the texture is loaded, right-click the model again and head over Materials, now, click on the button but click on "Edit texture" this time.
  5. A new document with the UV should be open and it's where you're going to make your skin. Whatever you draw on the UV document, will be added to the 3D Model.


  1. Remove all the elements that come by default ("A" and then "Delete").
  2. Click on File > Import > Wavefront (.obj).
  3. Right click the model to select it, and press TAB to enter the edit mode.
  4. Click and drag this icon to the middle of the screen, that will allow you to have a view for both 3D and 2D UV map.
  5. Now, on the UV Map area, make sure the toolbar is exactly like this.
  6. Now go to the 3D area and press Shift+F to move in first person (WASD).
  7. Once you have the part you want to select, left click to lock the view and press C to select parts. (Mousewheel increases / decreases the size, wheel click deselects, left click selects and right click exit the selection mode.
  8. Everything you select in 2D will be marked on the 3D model and vice-versa. You can use this to have an idea of what you want to paint and what you don't.


  1. Open 3D-Coat and a window will pop up, click on Paint UV Mapped Mesh (Per-Pixel).
  2. Click on the folder icon and locate the weapon 3D model.
  3. Make sure everything is like this:

  4. Go Edit > External Editor Projection Scale > 300%.
  5. Go Edit and then check Project Through (that paints both sides of the weapon when you paint one).
  6. Go Edit > Preferences, and make sure everything is like this:

  7. Locate the "Toggle Perspective" icon:

  8. Now click on [Camera] and select "Right", this will set a side view of the weapon.
  9. Go Edit > Edit Projections in Ext. Editor. By clicking it, Photoshop will open allowing you to paint.
  10. Once you paint what you want in Photoshop, you press Ctrl+S to save the file.
  11. Go back to 3D-Coat and wait 5 seconds for the texture to load and your paint will be on the gun.


  1. Load the skin template using the method I explained in the Photoshop section.
  2. You will find four sections:
    • Cover: it's purely aesthetic, you should delete this layer before you start working.
    • Tiny Parts: this layer group includes tiny part the weapon has, such as nails, rivets, pins, etc
    • Parts: this layer group has the main weapon parts, such as grip, stock, barrel, etc
    • Texture: here is the default texture of the weapon, but slightly modified so you can use it with your design.

  3. Now that you know what the layers are, let's paint! Look for the weapon part you want to paint, and use the magic wand (W) to select that color, then paint over it.
  4. Once you painted everything you want, you must merge "Tiny parts" and "Parts" together (Select both layer groups and press Ctrl+E).
  5. You will have a layer with your design now, you must set the Blending Mode as "Multiply", if it doesn't mix well with the default skin, you can also try "Overlay".
  6. It's highly recommendable that you also modify the alpha channels, I will explain how later.
  7. Now that you have your skin ready let's save it as 32bit .TGA (Targa) file.


  1. Open VTFEdit and go File > Import, and then select the .TGA (Targa) texture we designed for the weapon.
  2. A window will pop, you must have it like in this image:
  3. Once you've done that, just go File > Save as... and save it as .VTF (Valve Texture Format).
Introduction: Design


You must think of something that fits and matches with the CS:GO look. For example, not so saturated colors, no references to other games...


Sometimes you will want to make an illustration and sometimes you'll want to have a pattern to work with. How to decide?
Is quite simple, you will want patterns on skins with not a good space to paint on, for example, R8 Revolver which is curvy and would make the illustration look weird.
On the other hand, illustrations look fine on weapons with a flat surface or big blank areas, like P90 or AWP. Keep in mind you can use both for a better result, combining an illustration with a gradient or pattern.


The color palette is one of the most important subjects, this will make your design look attractive on the first look. I have two websites that are super useful to find your perfect color palette.
  • ColorHunt[t.co]: This is a perfect choice if you are not inspired and you want something cool.
  • Adobe Color[t.co]: Here you can search for keywords to find a palette that fits your idea.

Once you have your palette you can move to the next step.


Depending on the design, you'll want to create a sketch, you can draw something in a piece of paper and then scan it to be able to illustrate it with the illustration software of your choosing.
Make sure you save it as .PNG so you can keep the transparent background. If you are going for patterns, you can get a 2D side render and paint over it, so you can play with shapes and different parts.


  • Im not good at illustrating, so I tend to focus on color palettes, the problem is that a flat color doesn't look good on a weapon, that's why you should use textures, they give depth to the skin and make it look better. You can use this website[t.co] to find a transparent texture, so you can paste it over your flat color, and set the blend mode as "Multiply".
  • Keep your workspace clean, try not to generate unnecessary layers, and if you do make sure you name them or group them into Layer Groups.
Introduction: Advanced Design


What is an Alpha Channel? According to Adobe:
Originally posted by Adobe Help And Questions:
Alpha channels store selections as grayscale images. You can add alpha channels to create and store masks, which let you manipulate or protect parts of an image.
In CS:GO, the alpha channel is used to determine the wear/float of the weapon.
The RGB (Red, Green, Blue) values go from R:0 G:0 B:0 (which is 100% black) to R:255 G:255 B:255 (which is 100% white).
To determine the wear effects, you are going to use values between 0 and 255.
In the image, you can see the grayscale values.
Value
Color
Effect
0
Black
Will remain visible even on Battle Scarred
128
Grey
Will be visible around Field-Tested, any lower float will scrath it
255
White
Wont be visible on the weapon, not even in Factory New, i reccomend not using white


What is a Normal Map? According to Polycount:
Originally posted by Polycount Wiki:
A normal map is an image that stores a direction at each pixel. These directions are called normals. The red, green, and blue channels of the image are used to control the direction of each pixel's normal.
A normal map is commonly used to fake high-resolution details on a low-resolution model. Each pixel of the map stores the surface slope of the original high-res mesh at that point. This creates the illusion of more surface detail or better curvature.
However, the silhouette of the model doesn't change.

Since it's almost impossible to create a normal map by hand, you can use multiple tools to achieve it. For favorite and easiest one, is with a Photoshop Filter.
In order to generate it (as long as you have Photoshop CC 201x), take your .TGA (Targa) texture and paste it on a new document, now you must go over Filter > 3D > Generate Normal Map.
This will trigger a pop window with 3 vertical selectors and a 3D view. You can change the 3D view to any shape from the dropdown list, I recommend a cube.
Now play with the vertical selectors on the right to increase or decrease the depth effect, once you click OK it will generate your normal map based on the texture.
Save it as .TGA (Targa), we will use it when we upload the skin. Here is a clear example of a normal map usage:
Step 1: The Texture


  1. Open the .OBJ file for the weapon you want with Photoshop, for this example i'll be using MAC-10.
  2. Make sure the canvas is 2048x2048 and 72dpi.
  3. Right click the model and click on the materials icon.
  4. Locate diffuse and click .
  5. When the dropdown pops, click on Replace Texture and select the template .PSD file.
  6. Right click the model again and do as before but instead of Replace Texture click on Edit Texture.
  7. From here just paint. When you are done simply combine "Parts" and "Tiny Parts" by selecting them and pressing CTRL+E.
  8. Now you should have one layer with your design and another layer with the original texture.
  9. Select the layer with your design and change the blending mode to "Multiply".
  10. Combine them and you will have your skin texture.
There's another method to do it using 3DCoat, here's a video doing it that way:


  1. Go to channels tab, next to layers one (if it isn't there go Window > Channels).
  2. Look for the last one and click on it, it should be a grayscale canvas.
  3. Now, depending on your skin design you will want to modify it according to the "Alpha Channels" article over "Software" section above.
  4. You can use "Levels Tool", "Curves Tool" or "Brightness and Contrast Tool", you can find all of them over "Image > Adjustments" tab.
  5. Once you are OK with it, click on the RGB channel (the one on the top) to go back to the skin texture.


  1. Make a copy of the current document by going to "Image > Duplicate"
  2. On the new document, go "Filter > 3D > Generate Normal Map", a new window will pop.

  3. Move the selectors as you want and once you are happy with the result click OK.
  4. Save that document as .TGA (Targa) file.
Step 2: File Management


  • Locate the .TGA (Targa) files you saved previously from Photoshop.
  • They should look something like this:

  • Open VTFEdit, and click "File > Import" and select the texture.
  • Leave everything on the popping window like this:

  • Once it's done processing, click on "File > Save as..." and save it as .VTF file.
  • Do the same with the normal map we saved as .TGA (Targa).
  • After doing this we should have two .VTF files, texture and a normal map.


  1. Move to your steam installation folder, in my case:
    SteamLibrary\steamapps\common\Counter-Strike Global Offensive\csgo\materials\models
  2. Inside that models folder, create a folder called "weapons".
  3. Inside the weapons folder, create another folder called "customization".
  4. Inside the customization folder, create another folder called "paints".
  5. Inside the paints folder, create another folder called "custom".
  6. Inside the custom folder, create another folder with the name of your skin. NO SPACES
  7. The final line should look like this:
    ...\csgo\materials\models\weapons\customization\paints\custom
  8. Place there the .VTF files of your weapon.
Step 3: In-Game Workbench


Open your console and type
workshop_workbench

(Click for full size)


Finish Style:
Pattern Selection:
  • Select the pattern you created and saved as .VTF. (More info)
Normal Map:
  • Toggle normal map usage ON / OFF, and select the normal map saved as .VTF
Colors:
Phong:
Size Scale:
  • Unless you want a random pattern, you should check this ON. (More info)
Parameters:
  • pattern_offset_x: defines the posible values the texture can be displaced on the X axis.
  • pattern_offset_y: defines the posible values the texture can be displaced on the Y axis.
  • pattern_rotate: defines the posible rotation in degrees.
  • wear_remap: defines the wear the weapon can be found when opening a crate.


Model:
  • Choose the weapon model
Addons:
  • StatTrack: adds the StatTrack counter to the gun.
  • Nametag: adds a nametag plate to the gun.
Randomize

Displacements:
  • Preview parameters such as texture offset and rotation.
Wear Preview

Viewport

Viewport Settings

Texture Preview


Save:
  • Save current workbench.
Save as:
  • Save current workbench as...
Load:
  • Load a saved workbench.
Submit:
  • Submit the current item to the Workshop.
Refresh:
  • Refresh the textures in case you made any change, this way you don't have to load them again.


  1. Click on the save button on the bottom right.
  2. Go to the same location you saved your .VTF files before:
    ...\csgo\materials\models\weapons\customization\paints\custom
  3. Save it there and give it a code name with no spaces.
  4. We will use this to test the skin in-game later.
Step 4: In-Game Testing


In order to test your skin in-game, you need to own the weapon you will test.
This means if you want to test, for example, a PP-Bizon skin, you must own a PP-Bizon, also it's highly recommendable that you use a Factory New one.

For this guide, I will use the MAC-10 weapon. So:
  1. Buy or own the cheapest Factory New skin for the weapon you chose.
  2. I found that the cheapest Factory New for MAC-10 is MAC-10 | Silver, from Bank Collection.

  3. Now that we bought the skin, we can move to the next step

  1. Go to your CSGO installation folder
    ...\Counter-Strike Global Offensive\csgo\scripts\items\
  2. Locate a file called "items_game.txt", and right click > Edit with Notepad++
  3. Once you have the text document opened, press "Ctrl+F"
  4. On the dialog box, type "item_sets" and press "Enter"
  5. This will bring you to the collection list, look for the one your weapon is in, for example, mine was Bank Collection.

  6. Under the collection name must show all the guns from that collection, for example, mine is "an_silver" (see the green selection) which is the code name for the skin.
  7. Press "Ctrl+F" again and type the code name for the skin, in my case "an_silver".
  8. From this, keep pressing "Enter" until you find a text area that has a similar structure like this:

  9. Now its time to replace the .txt file we exported from the Workbench before.
  10. Locate it over:
    ...\csgo\materials\models\weapons\customization\paints\custom\yourskiname
  11. Right click the .txt file and click on "Edit with Notepad++"
  12. You will have something like this:

  13. Copy everything without the } {
  14. Go to "items_game.txt" file and paste it replacing under the first three lines of code.

  15. Change "texture name.vtf" to "yourvtfname.vtf", and then remove the ".vtf" extension.
  16. Save it and let's move ahead for the next step.


  1. Go to your Steam library, locate CSGO and right click on it.
  2. Select "Properties" and click over "Set launch options".
  3. Add the following line to the popping window:
    -insecure
  4. Accept and open the game.
  5. This will avoid the game detect you have modified files and won't trigger VAC-BAN.

  1. Once you are in the game, check your inventory and look for the skin you just replaced, in my case, MAC-10 | Silver.
  2. You should be able to inspect it and it should show the texture you made for it.
  3. You can go now in an offline match with bots and take screenshots.
  4. Here's a helpful guide I made for it.
    https://steamhost.cn/steamcommunity_com/sharedfiles/filedetails/?id=1668303169

  1. When you're done taking all the screenshots, remove the "-insecure" tag we added before.
  2. Also right click CSGO in your Steam library and click "Properties > Local Files" and click on "Verify integrity of game files".
  3. This will make sure you don't have anything wrong in your files that can get you VAC banned.
    NOW YOU CAN SAFELY PLAY.
Step 5: Workshop Management


  1. Go into the workshop workbench again.
  2. Click "Load" and select the .txt file you saved time ago.
  3. The model should be loaded again in the workshop workbench.
  4. Click submit.

Workshop:
  • This file will be automaticly selected.
Source TGA:
  • The .TGA file you saved with the texture from Photoshop.
Source NORMAL:
  • The .TGA file you saved with the normal map from Photoshop.
Info:
  • Skip it, it's on the article below.
Texture VTF:
  • The .VTF texture you saved from VTFEdit before.
Normal VTF:
  • The .VTF normal map you saved from VTFEdit before.


First, I'd say try to keep names short with almost no articles or unnecessary words.
Take as a reference the skins already in-game, try to give it a catchy name.
You can use some generic words such as:
  • Canvas
  • Net
  • Mesh
  • Cammo
And then match them with any other word.
Usually names that start with a letter and then another one that starts with the same work fine. i.e
AUG | Akihabara Accept


The description can be used in three ways:
  • Promotion: such as adding workshop banners, social media banners, etc to promo yourself.
  • Commercial: you can include ads, referral banners or just donation buttons.
  • Showcase: it's possible to attach gifs to the description, one common use is a weapon float gif.

In order to embed images to the description, you will need this marking code:

For PNGs, JPGs or GIFs
[img]X.Y[/img]
For longer GIFs
[img]X.mp4[/img]
For PNGs, JPGs or GIFs that lead to a url when clicked
[url=Z][img]X.Y[/img][/url]

And follow these steps:
  1. Go here[imgur.com] and upload your image.
  2. Hover the image once uploaded and this should appear:

  3. Click on "Copy".
  4. Type one of the codes I posted above depending on your needs.
  5. Replace "X" with the URL you copied from Imgur.
  6. Replace "Y" with ".png", ".jpg" or ".gif" depending on the file you uploaded.
  7. Replace "Z" with the URL you want it to be redirected.
  8. Save the description and the image should be showing.
Templates:
Workshop GIF[wishes2.com]
Social Media Buttons[wishes2.com]
Social Media Button Template[wishes2.com]

Download[i.imgur.com]


Download[imgur.com]


Previews will require some photo editing, you will want to create a 1920x1080 pixels canvas and make your gun be clearly visible.
Photoshop Preview Templates[wishes2.com]
Final Thoughts: Support


⠀⠀⠀⠀⠀⠀⠀⠀⠀⠀⠀⠀⠀⠀⠀⠀⠀
Buy me a coffee!
Click here![t.co]


⠀⠀⠀⠀⠀⠀⠀⠀⠀⠀⠀⠀⠀⠀⠀⠀⠀
Donate by Steam Trading!
Click here!

https://steamhost.cn/steamcommunity_com/sharedfiles/filedetails/?id=1668303169
https://steamhost.cn/steamcommunity_com/sharedfiles/filedetails/?id=1591754326
6 Comments
midnight lupa ϟ 17 Aug, 2021 @ 5:46pm 
good
pablo  [author] 1 Jul, 2019 @ 11:20am 
@Divine Lotus

No is not :)

It's obvious that is a typo, thanks :etgpilot:
[UA/SK] Divine Lotus 1 Jul, 2019 @ 10:06am 
BTW I meant to say GIMP 2.8.0 I hope that wasn't confusing
[UA/SK] Divine Lotus 1 Jul, 2019 @ 7:02am 
Always welcome @Pablo. I hope it all helps
pablo  [author] 1 Jul, 2019 @ 6:07am 
@Divine Lotus

Many thanks for the share.
Highly appreciated!
:cozyspaceengineersc::etgpilot:
[UA/SK] Divine Lotus 1 Jul, 2019 @ 6:03am 
For anyone that use GIMP (pasting my info to relative guides):

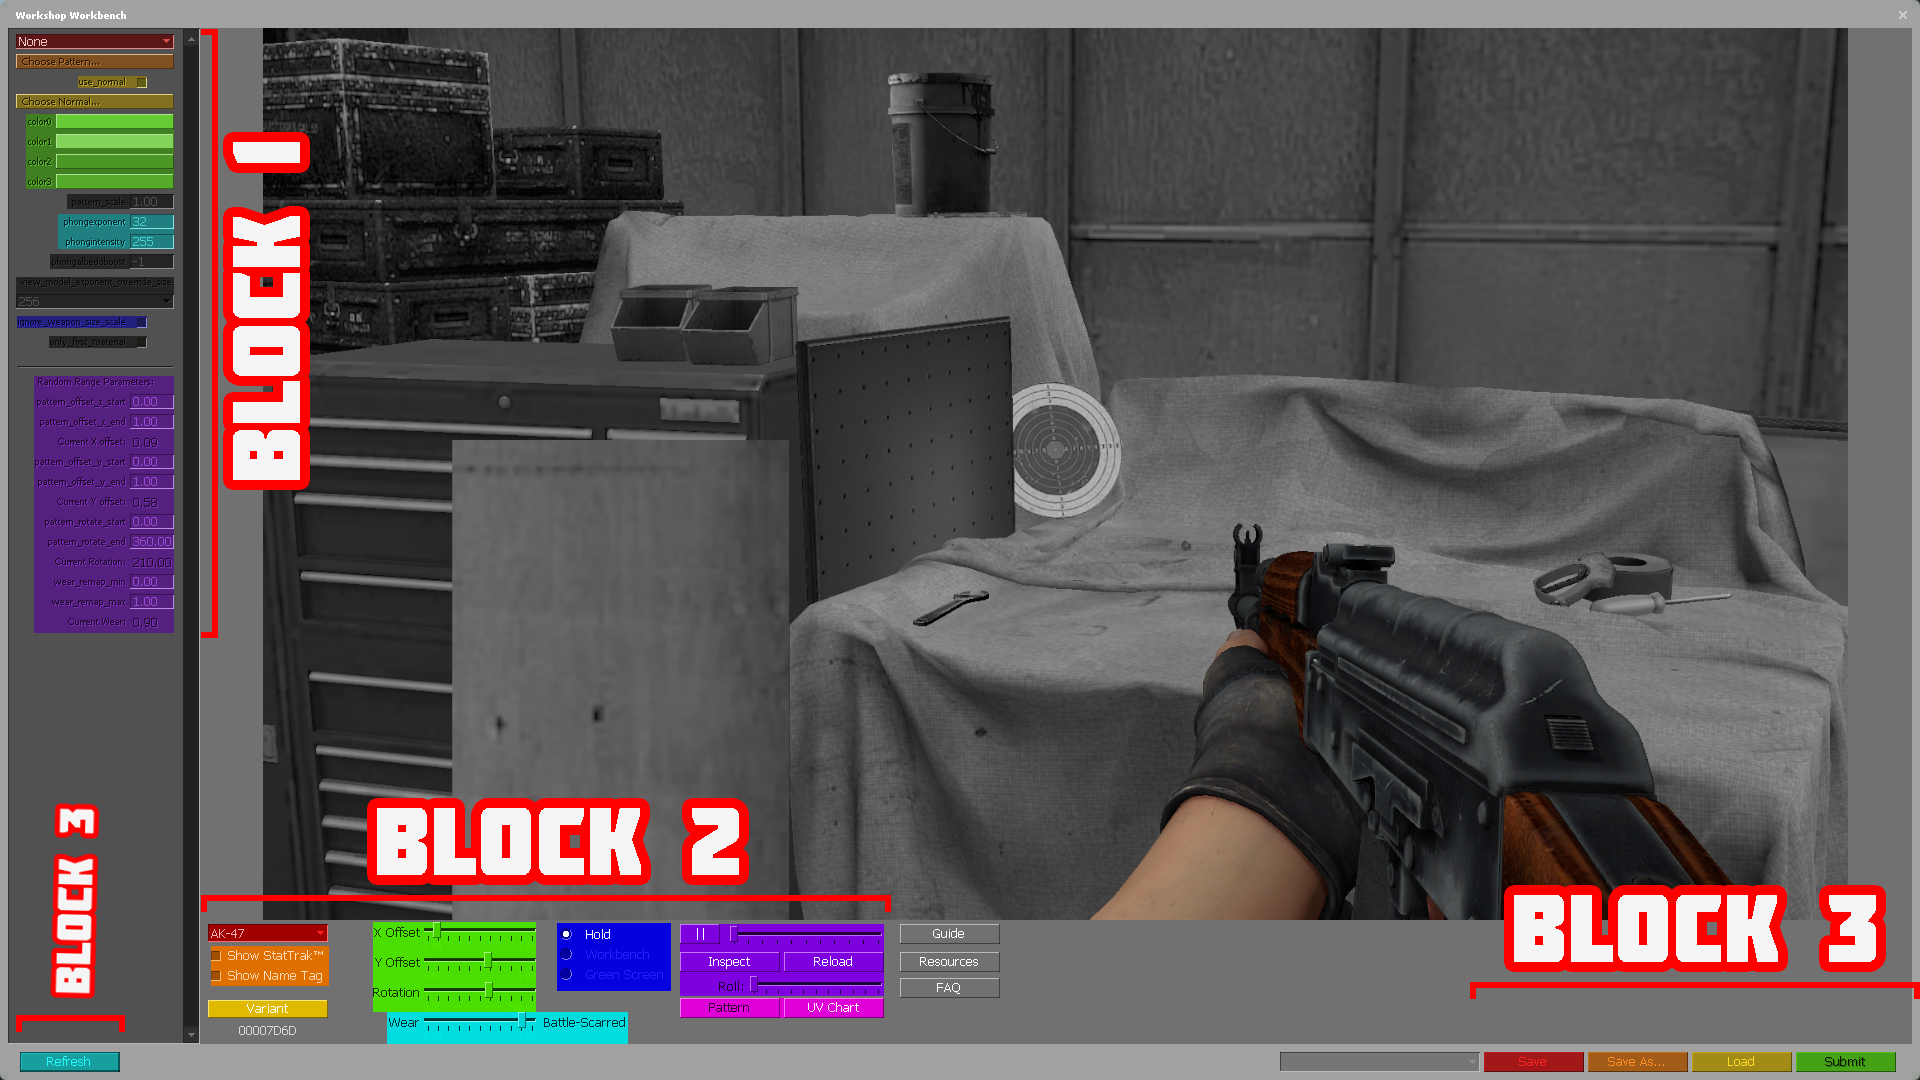
I recommend looking into the official Valve SDK Documentation for insight on how materials work in CSGO's Source engine, linked below:
GIMP alpha channel
https://developer.valvesoftware.com/wiki/GIMP

GIMP Alpha channel: https://m.youtube.com/watch?v=LQCziSTNJgQ
https://www.youtube.com/watch?v=A9aZdPqs17M

Using GIMP VTF plugin?
Be sure you're using GIMP 2.80

Not using it? Follow this: https://developer.valvesoftware.com/wiki/Creating_a_Material

I have a wiki that relates to the process of making skins / modding: https://steamhost.cn/steamcommunity_com/sharedfiles/filedetails/?id=1501754039&searchtext=Wiki

Always try to read the manuals in anything, because they often give you some insight

Use .tga or .tiff image types instead of .jpg or .PNG since they're lossless and supports alpha. More info in the Valve Source SDK Doc

3D = Use Blender with GIMP