Killing Floor 2

Killing Floor 2

74 ratings
Tamari's KF2 Survival Handbook - Advanced Movement
By Tamari
A look into the various tactics you can employ to improve the way you move around the Killing Floor.
   
Award
Favorite
Favorited
Unfavorite
Introduction
Topic:
Advanced Movement

Category:
Tactics

Prerequisite Guides:
https://steamhost.cn/steamcommunity_com/sharedfiles/filedetails/?id=1619420165
For player skill levels:
Advanced to Expert

View the entire Handbook here:
https://steamhost.cn/steamcommunity_com/sharedfiles/filedetails/?id=1633641281
Welcome to Tamari's KF2 Survival Handbook - a consolidated resource for tips, tricks, and tactics for Killing Floor 2 that aims to help you become a better player and learn a bit more about the game while you're at it.


This guide is focused on: Advanced Movement

Movement is a fundamental concept that has deep roots in FPS as a genre, with KF2 being no exception. The way you move around the battlefield can impact a variety of things, from your personal survivability to the welfare of your teammates.


What About Movement?
As I said above, the way you move around the Killing Floor can have a huge impact on your personal survivability and the welfare of your teammates. It can also increase your combat proficiency as well.

Efficient and precise movement generally boils down to pure mechanical skill, but there are tricks and tactics that anyone can utilize to improve their movement. Some of those tricks are:
  • Backwarding
  • Recoil Force Boosting
  • Damage Force Boosting
  • Cornerhugging
  • Looping
  • Circlestrafing

Each of these allow you to improve your movement in some way, with some being more defensive in nature, while others are for utility purposes.

Good movement skills are paramount to your success in ANY first person shooter. KF2 is no exception, where good positioning and movement are amongst the most important aspects of being a successful player.

Read on!


Tactic 1: Recoil Force Boosting
In KF2, most weapons have some degree of Recoil, however some actually apply Recoil Force to the player as well.

Recoil Force is a vector applied to players as a result of firing a weapon. Vectors "push" players by adding directional velocity to them. In the case of Recoil Force, this is always straight backward, opposite of the direction of firing.

There are several weapons in KF2 that apply a Recoil Force vector to you when you fire them. The two we are the most interested in are the:
  • Double-barreled Boomstick
  • Doomstick

As you might imagine, it is possible to use the force vector applied by these weapons to your advantage, by speeding you up or slowing you down. This is known as a Recoil Force Boost, and it is the single most awesome trick you can add to your arsenal.

Recoil Force Boosting has an enormity of applications, including:
  • Clearing gaps that you cannot normally jump across
  • Climbing onto ledges you cannot normally jump up onto
  • Moving faster around the map
  • Reducing fall damage
  • Evading attacks
  • Evading fast Zeds (eg. Fleshpounds, Scrakes, and Bosses)
  • Goomba Stomping / Crowdsurfing


How it works
For the purpose of this guide, I will be focusing on using the Double-barreled Boomstick, as it is cheaper, reloads faster, and weighs less. This allows more perks to make room in their loadouts to carry it.

Just keep in mind that everything I will explain from here on out can be done with the Doomstick as well.

With that said...
you do not have to be playing Support to make use of Recoil Force Boosting.
Any perk can do this as long as they are carrying one of the two weapons I mentioned above.

To perform a Recoil Force Boost (with the DB-Boomstick), simply aim downward, jump, and press the alternate attack button (in that exact order).

Note
You don't have to aim completely straight down. Aiming at shallow angles (relative to the "straight forward" direction) will send you farther laterally, while steeper angles will send you farther vertically. The diagram below illustrates this:


Figure 1 - Recoil Boost Angles

The red dotted arrow is the Direction of Recoil, or the direction of the recoil vector applied to you as a result of firing. Notice how it is always directly opposite of the Direction of Aim. This is pretty intuitive.

You won't always be sent in the direction of the recoil, specifically in the case where the recoil is in the opposite direction of your movement and you are moving fast. In this case, your forward momentum will not be completely cancelled out by the Recoil Force vector. Instead, you will be slowed down slightly.

This happens because vectors only ADD directional velocity, NOT set directional velocity.

This property of vectors ends up being pretty useful, as you will see later on.

The following must be true for a DB-Boomstick (or Doomstick) Recoil Force Boost to work:
  • You must be airborne
  • You must have at least two shells loaded

If you aren't airborne, it won't work. This is why you must jump before pressing the alternate attack button. The ideal situation is to press the alternate attack button as early as you possibly can, so that you can apply the Recoil Force while you still have most of your upward momentum. The longer you wait to fire, the shorter of a distance you will travel, since you begin to slow down near the peak of your jump. If you understood my earlier explanation of vectors, this should make sense.

This is kind of tricky to get the hang of at first, but with practice, you will get better over time.

You must also make sure your weapon has at least two shells loaded before you attempt this, or it won't work. In the case of the DB-Boomstick, this constitutes a full magazine.

Now for the applications.


Traversing Inaccessible Terrain
As I mentioned earlier, you can Recoil Force Boost to traverse gaps and reach ledges that you normally would not have access to. This allows you to take shortcuts, escape from Zeds, and increase your overall mobility.

Here is an example:
https://youtu.be/trnwyHPd-8s
There are many more spots in the game where you can do this, aside from the ones shown in the video. Get creative!

You can also use Recoil Force Boosting as an aid to Looping (which is shown in the video), a tactic I discussed in Section 1.1: AI Pathing. If you are unsure what Looping is, you can read all about it here:
https://steamhost.cn/steamcommunity_com/sharedfiles/filedetails/?id=1619420165
Evasion / Increasing Mobility
Boosting with the Double-barreled Boomstick can be used as a mobility-increasing and evasive tool as well. This is primarily useful for the following situations:
  • Getting to the trader quickly
  • Catching up to your team while Kiting
  • Escaping the killzone/radius of Zed/Boss attacks
  • Getting away from fast Zeds and Bosses

Here's how this looks in-game:
https://youtu.be/qYa_o18RHzU
Note that in the clip, I am using Tactical Reload to increase my reload speed.

By Reload Cancelling, you can move even faster. This is shown in the second part of the clip. If you aren't sure what Reload Cancelling is, I covered it extensively in Section 1.3: Universal Offensive Tactics. You can read all about it here:
https://steamhost.cn/steamcommunity_com/sharedfiles/filedetails/?id=1656947151
Reducing Fall Damage
As I explained earlier, Recoil Force can also be used to slow yourself down. This is done by aiming in the direction you are moving, so that the Recoil Force pushes against your forward momentum, thereby cancelling a portion of it. You can use this to reduce, and in some cases completely negate, fall damage.

Here's how this looks in practice:
https://youtu.be/g4FGMVyOzTA
Notice how in the last part of the clip, I reduced my fall damage taken from 24 to 1! Quite an improvement!

This works because fall damage is based solely on your falling velocity. By decreasing your downward speed, you can sometimes slow yourself down out of the fall damage speed range, preventing damage altogether.


Goomba Stomping / Crowdsurfing
Recoil Force Boosting can be used as an aid in Goomba Stomping / Crowdsurfing.

If you aren't sure what either of these are, refer to Section 1.2: Universal Defensive Tactics. You can find it here:
https://steamhost.cn/steamcommunity_com/sharedfiles/filedetails/?id=1632622273
Recoil Force Boosting allows you to launch yourself into the air and onto a Zed's head, even when there are no platforms or objects around, making it usable just about anywhere.

Here's how this looks in-game:
https://youtu.be/qiP3i0Gnuto
Repeatedly boosting onto the enemy's head allows you to completely shut down even the most powerful Zeds (and Bosses).


Disadvantages
The only disadvantage you need to know is that Recoil Force Boosting is very limited, since you can only perform it with specific weapons. Because of this, it can be hard to fit these weapons into your loadout. It is for this reason that I recommend the Double-barreled Boomstick over the Doomstick, since the latter weighs a whopping 10 kg.

Still, if you're playing Support or just happen to have some free space, it's worth it to pick up a Double-barreled Boomstick and use it to boost. Plus, it doubles as an efficient Zed killer!


Tactic 2: Damage Force Boosting
Most Zed and Boss attacks have a certain degree of Damage Force associated with them that is applied in addition to the damage they normally do. This is very much the same idea as Recoil Force, which I explained in the previous subsection. Like Recoil Force Boosting, Damage Force can also be used to your benefit in the form of Damage Force Boosting.

Damage Force Boosting allows you to convert some of your received damage into movement, mainly to give you some distance from dangerous Zeds/Bosses. This helps give you breathing room and offers you a good opportunity to reload, heal up, or flee. It allows you to escape the killzone of a Zed's attacks, which helps prevent you from receiving follow-up damage from subsequent attacks.

It is a defensive movement tactic at best, as it relies on you to take damage first. Thus, you should only use it when you know you are going to take damage and there is no other way to avoid the attack. For example, Damage Force Boosting could be used when you are out of ammunition as a last resort.

Berserkers and Survivalists receive the biggest benefit from this tactic, since they have both damage resistance attributes and perk skills that increase their proficiency in melee combat. SWAT (and Survivalist) also have Heavy Armor, which allow them to block damage more effectively. In the end though, any perk can perform this tactic, just not as effectively as those perks.


How it works
To perform a boost from applied damage, simply jump at the same moment you receive damage from a Zed.

This works because like Recoil Force, Damage Force is also a vector, meaning it adds directional velocity to the player. The direction of the vector depends on the type of attack used:
  • For melee-based attacks, this is usually the direction the Zed was facing when the attack landed.
  • For projectile-based attacks, such as the Husk's fireball or Patriarch's rocket launcher attack, this is usually away from the projectile itself. Furthermore, the angle of the vector applied depends on WHERE you were hit by the projectile. For example if a rocket landed at your feet, you would be sent upward, but if a rocket hit you in the torso, you would be sent backward.

Essentially, melee-based attacks send you away from the Zed and projectile-based attacks send you away from the projectile. Pretty intuitive if you think about it.

Like the direction, the magnitude (strength) of the force vector applied also depends on the attack. In general, attacks that deal more damage have a greater degree of Damage Force (not always though).

This means that Fleshpounds, Quarter Pounds, Scrakes, and Bosses have attacks with some of the highest Damage Force, since they are amongst the strongest enemies in the game. These are really the only Zeds you'll need to use this tactic on anyway.

For the purposes of this guide, we're going to be focusing specifically on utilizing Damage Force from melee-based attacks. Projectile-based attacks are typically avoidable and are not easily mitigated, making it not worthwhile to use them to boost. Still, you could boost off of a Husk or Patriarch rocket if you really wanted to I guess...

We're also going to be utilizing Knife Parrying, a defensive tactic I explained in-depth in Section 1.2: Universal Defensive Tactics. You can read about it here:
https://steamhost.cn/steamcommunity_com/sharedfiles/filedetails/?id=1632622273
Parrying allows you to perform this tactic while taking the minimum damage possible, which is important for staying alive.

Keep in mind that you could also use any other melee weapon to do this too. In fact stronger melee weapons, like the Bone Crusher, will actually reduce damage taken even more. In the end though, unless you're playing Berserker or Survivalist, you will likely only have your Knife available to use.

To perform a Damage Force Boost from a melee attack using Parrying, you'll want to turn to face the incoming Zed, jump, and Parry it's attack, all at the same time. If done right, you'll be sent flying away from the Zed.

Like with Recoil Force Boosting, you must already be airborne for the boost to work, which is why you must jump first. This takes a bit to get used to.

Here's how this looks in-game:
https://youtu.be/xBgBtGu6WeQ
As you can see, the boost is actually pretty decent. You can also see how the Fleshpound's stronger attacks (mainly his two-handed attacks) send me much further.

The main reason this is so helpful is that it allows you to escape the killzone of the Zed's attacks. After being launched, you will usually be far enough away from the Zed to avoid any other follow-up attacks, which in the case of a Large Zed or Boss, will likely kill you.

By remembering that vectors add to your velocity, you can enhance the boost even more by sprinting in the direction that you know you will be launched. The best way to do this is to sprint backward just before you jump, giving you a bit more initial speed.


Disadvantages
The primary disadvantage to performing a Damage Force Boost is that you must take damage, which isn't exactly optimal for staying alive. It is not easily repeated either, as you typically will be severely hurt after doing just one boost.

You also need to be mindful of your positioning. It is very easy to accidentally launch yourself off of a ledge or down a flight of stairs, causing additional fall damage. Only Damage Force Boost when you know the direction you will be launched won't end up putting you in more danger.

As I've said a few times, Damage Force Boosting is primarly meant to be an escape/defensive tool. Don't rely on it to help you get around the map the same way you can with Recoil Force Boosting. It is meant as an emergency maneuver at best.

It can save you from death and ultimately change the outcome of the game, which definitely makes it worth learning and practicing!


Tactic 3: Circlestrafing
Through precise movement, it is possible to exploit the AI of Fleshpounds and Quarter Pounds, by running in circles around them. This is known as Circlestrafing, and it is probably one of the most classic examples of AI manipulation in video games. Contrary to what you might think, it actually does work in KF2 (although to an extent).

When done correctly, Circlestrafing completely prevents a FP/QP from hitting you and can be used to buy yourself time. As a bonus, it also looks hilarious.

This lull can be used to heal, reload, or simply allow you or your teammates to shoot at the Fleshpound with relative ease. Circlestrafing is neither a Defensive nor Offensive tactic, but more of a Utility tactic, as it can be used in various situations effectively.

It can also be performed by any Perk, though it should be noted that faster-moving perks like the Gunslinger and Field Medic will have an easier time pulling it off.


Advantages
+ Allows you to completely avoid taking damage from FP/QPs when performed correctly
+ Allows you to buy time to complete critical actions such as reloading or healing
+ Doubles as an efficient form of crowd control, allowing safe takedowns
+ Can be great as a last resort or in an area where it would be impossible to outrun the FP/QP


How it works
Circlestrafing works against Fleshpounds/Quarter Pounds because of the way they attack and track their targets.

It turns out that typically when a FP attacks, it performs a lunge, throwing itself at the targeted player. By moving in a specific way, you can force this attack to miss most of the time, allowing you to begin Circlestrafing the Fleshpound (or just run past if that's all you want to do).

The strafing itself works because FP/QPs don't track their targets quickly enough. When performing the maneuver, they will constantly attempt to turn and face you so that they can attack, but will be unable to since you will have already moved out of their attack range.

So you can think of this maneuver as having two distinct parts:
  • Getting the FP/QP to miss
  • Circlestrafing the FP/QP

Getting them to first miss is important because you will be knocked back otherwise, and will likely take damage from follow-up attacks, which could potentially kill you.

The process of dodging the initial FP/QP attack is slightly different depending on whether it is enraged or not. Let's discuss each case separately:

Passive
When the Fleshpound/Quarter Pound is in it's Passive (or non-enraged) state, the best way to force it to miss is through Bash Cancelling. This is essentially using the Melee Bash (V) to cancel it's attack, giving you plenty of time to begin the strafing cycle.

If you are unsure what Bash Cancelling is, you can read about it in Section 1.2: Universal Defensive Tactics:
https://steamhost.cn/steamcommunity_com/sharedfiles/filedetails/?id=1632622273
Enraged
When the FP/QP is Enraged, things are slightly more difficult.
In this scenario, Bash Cancelling is not possible due to fact that Enraged Zeds have 75% resistance to ALL Afflictions.

If you aren't familiar with Afflictions, you can learn everything you've ever wanted to know about them in Section 3.1: Afflictions:
https://steamhost.cn/steamcommunity_com/sharedfiles/filedetails/?id=1650828185
Instead, you must resort to outright dodging the attack. The easiest FP/QP attack to dodge is the lunge attack, mentioned earlier. To dodge this, you want to pass by the FP/QP's front-left or front-right as close its body as possible (basically touching him). The other attacks are dodged in the exact same way, although with less of a chance of success.

Due to the angle and distance at which you are relative to the FP/QP when it tries to attack, it will need to make a very sharp turn (basically 90 degrees) in order to hit you. At this moment, if you simultaneously turn inward, toward the attack, you will cause the FP to miss completely. Essentially, you will barely "slip past". After this, you can begin the Circlestrafing cycle.

Here's how both of these scenarios look in-game:
https://www.youtube.com/watch?v=TbOxRNnAIk4

Note that after beginning the strafe cycle, it is important to stay as close to the FP/QP as possible, so that in the case that it attacks again, it will again miss, allowing you to continue the cycle. Staying closer also allows you to get around the FP quicker, as smaller circuits are a shorter distance overall.


Pitfalls
As I mentioned earlier, when a FP/QP is enraged, the easiest attack to dodge is the lunge. Though this tactic is performed the same way against the other attacks, it is less reliable. With some of the other attacks, the Fleshpound can swing earlier than expected, intercepting and hitting you before you can manage to dodge. When this happens, it is best to simply move away and try again, or just shoot the FP/QP.

If you do not pass close enough to the FP/QP, it is possible that its attack can swerve and still hit you, causing unnecessary damage.

This tactic is also much easier when playing a perk with increased Movement Speed, as you will be able to avoid the attacks easier. Slower perks are at a significant disadvantage. Regardless, it is still possible to perform this tactic as any perk.

And perhaps the most important disadvantage to this tactic is that it only works against these two Zeds. You will not be able to do this against any Boss (including King Fleshpound), and Scrakes track their targets too quickly/precisely for this tactic to be viable against them. For all other Zeds, it is better to just shoot them down rather than try to Circlestrafe them.

While this tactic sounds silly and cheesy, it can really save your life sometimes. It provides you a (somewhat) reliable way of mitigating/dodging damage against FPs/QPs, especially since Bash Cancelling is not always guaranteed to work against them due to their constant enraged state.

Try it!


Tactic 4: Backwarding
Backwarding refers to the navigation of a map's layout / terrain whilst backpedaling (holding the S key). At the core, moving backward is a pretty basic movement skill, but it is also extremely important as it serves as the basis for Kiting. It can be used just about anywhere to great effect really.

This might seem trivial, but I deem it important enough of a concept to include in the guide. I've seen many many games end because players neglect to deal with threats approaching them from behind.

By being proficient at backwarding, you can multi-task. For example, you can:
  • Deal with threats behind you
  • Block, Parry, or Melee Bash Zeds chasing after you (e.g. Fleshpounds, Scrakes, Bosses)
  • Heal teammates who are behind you

... all while simultaneously moving away from danger and properly navigating the map's terrain.

Essentially, it improves your situational awareness, or your ability to comprehend what's going on around you.

In KF2, good situational awareness is THE most important aspect of solid gameplay, bar none. It is MUCH more important than good aim.

This becomes a lot more important on higher difficulties, where you have less breathing room due to the increase in Zed count, movement speed, and aggression. Often times the primary objective becomes keeping the surroundings clear, rather than focusing on specific Zeds, so that you and your squad don't become overwhelmed or trapped. This is especially true while Kiting.

In order to do this successfully though, you need to be good at surveying all of your surroundings, not just what's in front of you.

In general, it's good to know how to move through the map without actually seeing where you're going, whether or not you're actually in danger. Through Backwarding, you can essentially "take your hand off the wheel", and leave navigation to muscle/cognitive memory while you focus on more pressing matters.


Practicing
I recommend practicing Backwarding during the Trader time.
After the wave ends, see if you can navigate to the Trader backwards, or try taking laps through a few rooms and see if you can move through them.

The idea is to do this while getting caught on objects and walls as little as possible. The less the better.

Here's what I mean:
https://youtu.be/WGIuPX4AlKU
It can be hard to get used to this at first, but it should come a little more naturally with practice. Still, you don't have to be 100% perfect at this (that'd be ideal of course). Even I make a few mistakes in the example video here and there.

And here's an example of using Backwarding to deal with chasing Zeds:
https://youtu.be/Ny9n3g8HdPw
Efficient movement like this can help you avoid taking damage while simultaneously keeping your surroundings clear.

Certain weapons and perk skills can aid you in situations like those shown in the example video. Some examples of these are:
  • The Freezethrower
  • The SWAT's Level 20 skill, Cripple
  • The Gunslinger's Level 20 skill, Skullcracker

These apply Snare (an Affliction) to Zeds, which reduces their movement speed. The Freezethrower also Freezes enemies in their tracks.

If you aren't sure what Snare or Freeze are, you can read all about them in Section 3.1: Afflictions.
You can find that here:
https://steamhost.cn/steamcommunity_com/sharedfiles/filedetails/?id=1650828185

Disadvantages
The most obvious drawback to Backwarding is that you can't see what's ahead of you (or in this case behind you).

However, this shouldn't really be a problem as long as you aren't turned around for too long.
Only turn around to deal with immediate threats (for example an enraged Fleshpound) and to heal
or cover teammates.

Even in your diligence, you will still sometimes get blindsided by the occasional "around-the-corner" spawn when you turn around to deal with threats behind you. Unfortunately, this really just comes down to bad luck.

The main idea here is to improve your situational awareness, and hopefully help you get better at being aware of not only what's in front of you, but also behind and to the side. This includes teammates AND Zeds. Proficiency with basic movement skills is paramount to your success in any FPS, especially Killing Floor 2.

It may seem odd to see so much emphasis put on this, but believe me, it is useful!


Tactics 5 & 6: Corner Kiting & Looping
Corner Kiting is a method used to force an attacking Zed to miss.
Looping involves trapping a Zed in a specific movement cycle to prevent it from reaching you.

These tactics are discussed in great detail in Section 1.1: AI Pathing.

They are two important movement skills that you can learn to keep yourself alive and out of harm's way. It always surprises me how many people have no idea about them. I highly recommend learning about and mastering them. It can really help, even if you are a veteran player!

Read all about them here!
https://steamhost.cn/steamcommunity_com/sharedfiles/filedetails/?id=1619420165


Tamari's KF2 Servers


Tamari's KF2 is a KF2 community of over 800 Members that I operate alongside Forrest Mark X that aims to bring a modded experience to KF2 that enhances the game through quality-of-life features and changes, new gamemodes, and a chill and close-knit environment. We're a multi-continental KF2 community supporting the NA and EU regions, and now also Southeast Asia / Australia as well!

Our objective is primarily to introduce people to the Controlled Difficulty mod, but we have something fun for players of basically all skill levels and preferences.
We don't like drama and try our best to maintain a stress-free environment that feels more like a small gaming family than a group of friends playing games together.

These are not your typical modded servers. The mods in use aim to enhance the vanilla experience as opposed to drastically changing it. As such, you can expect to find features that remedy some of the more clunky aspects of vanilla KF2 gameplay as well as features that allow players to customize their experience(s). We also have lots of customized content that builds on the original game, such as 25 additional Prestige Levels (with unique badges), 187 custom Server Achievements, and custom gamemodes like Arms Race, True Endless, and ZED Wars.

Come hang out with us!
All types of players are welcome!
http://discord.gg/tamari
Conclusion
Art by littletino
Instagram: @rikavalentine39[www.instagram.com]

Show her some love!


I hope this guide has helped you to learn a few new tricks to give you that edge out on the Killing Floor. If you have any questions, leave a comment below! I will be updating this from time to time as more things are discovered.

Please give this guide a thumbs up if you liked it so others can see it, and so I know to make more!


Be sure check out the rest of the Handbook, where you can learn a bunch of other odds and ends about KF2 to help you improve your gameplay:
https://steamhost.cn/steamcommunity_com/sharedfiles/filedetails/?id=1633641281

Thanks for reading!
- Tamari


17 Comments
Keetoxx 29 Dec, 2019 @ 4:44pm 
nice guide btw, keep up the good work i read all of your guides
Keetoxx 29 Dec, 2019 @ 4:39pm 
or 'Facehug' and 'Confuse' when you're circling them
Keetoxx 29 Dec, 2019 @ 4:34pm 
some examples of 'circlestrafing' in real matches:

https://docs.google.com/spreadsheets/d/1u-79nxjNDrIfJO4NREdh9h0gq_R6iwzDR_ysWqu-4YA/edit#gid=0

thought i'd like to call them jukes or dodges.
Tamari  [author] 30 Oct, 2019 @ 8:49pm 
10/30/19
- Added a new section for Circlestrafing.
417 9 Jul, 2019 @ 11:47am 
backwarding is shit. dunno if it's just my stupiddity, but i usually get grabbed by clotes the moment i start dealing with threats from behind (and die.)

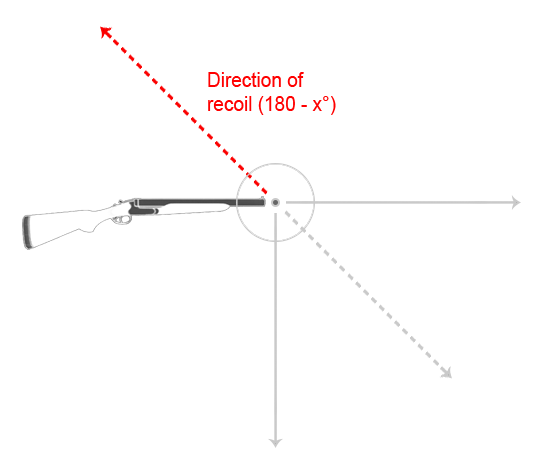
besides that, cornerhugging and recoil force boosting saved my life sometimes. thanks!
Tamari  [author] 17 Apr, 2019 @ 7:41pm 
Thanks @pinhead and @LazyholloW. Glad you guys found this helpful.

Unfortunately bad spawns are just bad luck, happens to the best of us. The simplest fix really would be to implement a "minimum radius" so that Zeds can't spawn if they're too close. Left 4 Dead 1/2 does this, and it works just fine.
LazyholloW 15 Apr, 2019 @ 11:44am 
Great guide, really. Too bad the TWI has made a genius decision to spawn zeds right in your f u c k i n g face after some retarded zerker mains was wining that game is too easy. So all that movement and situational awareness doesn't really help when stalkers and crawlers being spawn behind your back in attack mode. Sorry for my English. Well, I don't give a flying f u c k actually. Zed spawns are killing this game. :steamsalty::steamsalty::steamsalty::steamsalty::steamsalty::steamsalty:
hanamee 12 Apr, 2019 @ 3:00pm 
"In KF2, good situational awareness is THE most important aspect of solid gameplay, bar none. It is MUCH more important than good aim."

This should be a tip during the loading screens.

Nevertheless, it is disappointing to see that this isn't done more frequently in public games. It blows my mind seeing players quickly die to a crawler or something that could have been easily avoided had they been simply paying more attention.

Good guide, simple and gets straight to the point.
Coco 10 Apr, 2019 @ 10:54am 
You're welcome. You probably know that my guides might stay outdated forever, so watch out for Tamari, he's might do the content you were searching for while reading my guides. If he does Perk Guides, I'm pretty sure he'll do a great job, so keep an eye on what he does/will do :)
Phut 10 Apr, 2019 @ 7:53am 
Woah I never thought I would encountered Dodo in comments, your guide helped me alot even though it's outdated by now. Thank you!