EverQuest II

EverQuest II

30 ratings
EverQuest II Xbox Controller Support!
By †Captain†Alister†
Hello! & Welcome! To this guide of mine, for I'll be helping you
learn how to use this controller support for EverQuest 2!
So! No worries! For any questions you may have, this
guide will hopefully cover in-depth. Now get ready!
& Hold on tight! You'd better strap yourself in! Because
there's a lot to cover!

PS: If you do not know already about EverQuest's
Mini-Map than let me have the honor of telling you about it
and where to go to learn more: EQ2MAP[maps.eq2interface.com]

Xbox One Controller:

User Guide Profile:

steam://controllerconfig/201230/2010946125

update: I've tried to make this profile more readable
as of Feb/29/2020

Work in progress Profile: Sep/22/2024

This is my attempt to make a more console friendly feel for this profile.
Due keep in mind this is a WiP profile. It should work with the keybinds
in this user guide. And may have a few keys miss bound. My goal with
this one is to make a more relaxed profile, while putting less stress on your
hands when playing for long stints of time.

New keymaps, Layout and .xml files for this can now be found
in the "Step One: Where to Start" download link. (update: Nov/05/2024
Hotbar 1 has been replaced by hotbar 9 to prevent mishaps when crafting.
Hotbar 1 is used for crafting so I've fixed this to not happen. Mouse click when crafting.)
New User Guide for profile 2 is Planed. (But is "mostly" the same.) Button 4 is no longer
bound, and is now "jump." Use a place holder icon in the hotbar. Feel free to
download and load it up if you want to try the new profile 2 layout.
New Interface This is what I mean by add a place holder for button 4 on the hotbar.
Jump is now Button 4 and button 3 is now button 4.

Version 0.00.18
steam://controllerconfig/201230/3336183943

PlayStation 4 Controller:

This is a 2019 profile.
Everything in this profile seems to work just like my Xbox one.
This was a just copy'pasta of my Xbox profile. If you're wanting to
use a PlayStation 4 controller for this game use this link.

steam://controllerconfig/201230/1633602390

-->FAQ SECTION<--
2
2
   
Award
Favorite
Favorited
Unfavorite
Step One: Where to Start.
First off, you'll need these files:
  • These .xml & .ini files[drive.google.com]

    will setup the User Interface & set your Keybindings for
    you. This just takes care of most of the leg work for you.
    And one of the main reasons why it's taken me
    so long to make this guide haha.

  1. Step One:
    With the .xml file, you'll need to place it in this location:
    (Local Disk) \Steam\steamapps\common\EverQuest 2

    Or if you don't know where your game
    is installed you can find out via steam by:

    • Right clicking on the game in your
      Steam Library > Left Clicking on Properties > Local Files > Browse Local Files.

      This will take you to wherever you installed EverQuest 2 on your PC. If you
      installed the game using steam.


  2. To load this up in-game,
    type this in the game's chatbox:
    • /load_uisettings

  3. Look for this name:
    • XboxOneController

  4. Under this Server listing:
    • ControllerSupport
Step One pt²: The initial Steup
After all that is done you should have your GUI setup now.
It should look like this, give or take:

To show this feature in game press F10
to move the game's Interface around. You'll need to
know this for later steps. & We're just getting started lol.

By default the GUI looks like this:

  1. Now to import the Keybindings
      Once you have the .ini file you'll need to place it in here:
    • (Local Disk) \Steam\steamapps\common\EverQuest 2\Keyboards

  2. Once that is done you can load this file in-game by typing this
    command in the game's chat:
    • /load_keymaps my_Xbox_keymap.ini

And after that YOU'RE ALL DONE! At least for setting up the User Interface and getting all the Keybindings bound in-game!
Step Two: Setting Your Skills.
Next comes the hard part. I say that because this is where you the player comes into play.
This is the part where you set all your skills on these new Hotbars.
  1. To get started press F10 to interact with the GUI, next
    right click on Hotbar 8 and Left click on Hotbar Settings.
    To open hotbar 8's settings menu.

    Once you've clicked on the hotbar settings, make sure
    that this box is checked; "Show Icon Borders☑."
    This will help you see where your new keybindings are set, on the hotbars. Namely hotbar 8 for right now. At this point, you can right click on the other hotbars to see which ones are which, under the hotbar settings they each have.

    After you've gotten the hang of doing this, you can now set the rest of your skills. Don't worry I'll be going over this a little further in the guide with you.


    This is where things get more advanced. DevNotes: See, I've got a confession to make. I've only done this with the DeathKnight class. So! All the steps that follow from here on out will have to be by you starting a new character, or done by your understanding of how the class plays out.

    Mainly because from here we'll be using built-in game Macros for the main skills you see. For me, being a DeathKnight I can macro all my attack and magic spells on these two hotbars with the same key-press of 1. Kinda why you see that "Turbo1" key on the Right Trigger on the controller. That's because both Hotbar 8 and 10 (hotbar 10 marked in yellow) use the same key-press to activate both skill macros with one button. Hench the "Turbo" key.

    Here you'll see just what I mean by that. And I'll go over this more when I talk about the "Idle" Layer of the Controller Profile.


    To get your Macro window open in-game press the "O" key. NOT the Zero key.
    To open your skills window press "K." with both windows open you can drag and drop
    skills into your newly opened macro-skill-window. (Stay with me now lol.)
    With your macros open you can click on <click to edit> to set your skills in one macro.
    You can see in the images below what skills I've got set for my second "Magicka" Macro.


    That takes care of the Magic skills. Next comes the Melee skills. Now remember, this macro uses the same keybind as the Magicka one does. So I can use both skill macros at the same time. This lets me Attack, and Heal myself while putting DoTs (Damage over Time skills) on whatever I'm fighting.
Step Three: The Hard Part Is Almost Done!
So with this Macro Skill, you can see I've got significantly less skills here. As a level 68 DK. That's because this Macro is used to stun and knock down that which I'm fighting. DevNotes: Reason why making a new character during this part is so recommended. You can build your character and see where your skills can go on your hotbars/macros as you level up and progress through the game. To really see how this controller support can work for you. It's all very personal. Plus you can always go and modify something if something doesn't quite feel right.

And yes this did take me a while to figure out. Because with where you place your skills will determine what skill is being used in combat. So having to know when your macros will fire and how they will interact with one another is going to take time to understand, for your class and the way you play your class.

A good place to start for this process is looking at the cool down timers on your skills. And stacking them from the top, starting with the skills that have the longest cool down timer. And with each skill you add below that skill, making sure each skill's CD-Timer is getting quicker. So by the time your first skill is triggered again you've had plenty of time to dish out your other skills before you ⥁rotate⥁ back to your first skill. This is the basic formula for using macros. Or at least a good place to start.


Keep in mind again, both of these Melee & Magic Macros work together by pressing the [X] button on the controller or by holding [RT] the "Right Trigger." NOTE Pressing the [X] button will ONLY press the key ONCE. Where as holding [RT] will turbo fire this key. It will press "1" and press it again and again until you release the [RT].

And with all that in mind! You can now
rest easy. The hard part is finally done!
Next We'll go over what the rest of
the controller does and how you use it.

Below I'll give you a quick look at how these hotbars work before we get into the Steam Controller Images. The Xbox buttons that are inverted show these have to be HELD. The buttons that are not inverted you just have to tap. (Press once.) The Highlights in RED show the "Active" Layer being used. The BLUE highlights show the "Idle" Layer being used. In the Next part of the guide I'll explain this further.


Also, under no circumstances should you ever hold both [LT]+[RT] together at the same time while the Camera Lock is in use. This will cause your character to move forward. Only use [LT] and [RT] individually, independent of one another. And never at the same time. Unless! 😂 The camera lock is toggled off and you're trying to interact with NPC's, Items in your inventory, equipment ect... BUT! I'll go over that later as well.
"Idle" Controller Layer: Part One
Finally!! The easy parts of this guide! If you've made it this far I really must congratulate
you for staying with me. Those last parts can really take it out of me. So lets go!
The last half of this will go by much faster than the first half.

Here I'll talk about the Idle Layer of the controller profile. We touched on this a little bit in the last parts
of all this. But here I'll be able to tell you what they really do. And how to use them in game.


1.) [RT] Skill 1: "Turbo"
  • From the last parts of the guide we talked about this and what it does. Here I'll explain this. If you've imported the .ini file correctly. So as stated earlier Holding the Right Trigger will cause you to spam your first skill. For me it uses both my macros: Hotbar 8, button 4. & Hobar 10, button 1. Both use the same key-press, "1" in-game. Yes, this will work for crafting, although it's better left to pressing the [X] button on the controller to do that.

2). [RB] Camera Lock & Push to Talk:
  • The Right Bumper will act as both camera lock and push to talk, for when you join a voice channel in game. If you tap [RB] the camera will toggle and the mouse will center on the screen. (I use a 1600x900 screen resolution, it makes it easier to read text on screen for tv use.) If this camera toggle is not working go into: Options > Controls > Mouse Settings. MAKE SURE you have the "Advanced" button turned on while using the games Options window. You'll find a check box that will say Mouselook lock☑ make sure this check box is checked. Holding [RB] will activate the push to talk feature in-game. this should already be set to the "F" key. However if it's not working you can set it up by going to: Options > VoiceOptions > Voice Chat. And setting it's key to "F." While making sure nothing else is bound to it.

3.) Character Sheet/Inventory and Extra Button
  • For this one it may seem odd at first. However this button will open both your character sheet and your inventory at the same time. If you press this button twice (a "x2" double tap) you can use the "Extra Button." {hotbar 8, button 9. It's key press is shift+6} I've got this mapped as a Voiced Emote that tells everyone "I'm out of power." To do that just find the Emote in-game and set it to the ninth (9th) key on hotbar 8.

4.) The Face and Extra Buttons.
The face buttons are the [X,] [Y,] [B,] and [A] buttons on the controller.

  • Using Button [X.] Skill 1 & Extra Button 1

    So, as I've mentioned previously a few times by now this does one of two things on the "Idle" layer. A simple tap of this button will use your first skill. {hotbar 8, button 4, key-press, 1} The second feature is an "Extra" button, and to use this extra button all you have to do is hold the [X] button on the controller. {hotbar 5, button 11, key-press, shift+1.} for me I've got it set to Draw my weapons, and have my character say "here they come." In-game. For roll playing or immersing oneself into game-play as it were. To make this macro just use these commands | /target_self || /toggleautoattack || /incoming | all on one macro.

  • Using Button [Y.] Skill 2 & Extra Button 2

    The [Y] button will use your second skill. To use your second skill just tap the button. {hotbar 8, button 2, key-press 2.} To use the Extra button, just hold this button down. {hotbar 5, button 12, key-press shift+2} The extra button uses a macro that lets my character cheer.

  • Using Button [B.] Skill 3 & Extra Button 3/Home Recall
    The [B,] button. If you tap this button, it will let you use Skill 3. {hotbar 8, button 6, key-press 3} If you hold this button on the controller you will use the Extra button. {hotbar 6, button 1, key-press shift+3} It's a good Idea to set your Home recall skill here.

  • Using Button [A.] Skill 4. & Extra Button 4/Using your Mount
    The [A] button, if you tap it will use skill 4 on the hotbar. hotbar 8, button 8, key-press 4. For me I use this as a way to gather crafting items around the world. After all you can Tab Select crafting nodes in-game. So to do this open your Macros window again with the "O" key. And your skills window with the "K" key. Placing all your gathering skills in one macro. Such as Mining, Trapping, Fishing, Collecting, Foresting, and Gathering. To use the Extra button simply hold button [A.] I've got this set to use my Mount. {hotbar 6, button 2 key-press shift+4.}


5.) Using the Right Joystick. Camera and Mouse.
  • So, with the Right joystick, this will do one of a few things. Mainly it works as your camera when you have the Camera Lock on. By tapping [RB] on the controller. Acting as a toggle to switch from using your mouse and using your camera. Clicking [RJ] (the Right Joystick.) in will also make your character Crouch. Holding this for a few seconds will make your character toggle between walking and running.

6.) Using the D-Pad. Skills 5 through 8.
  • The Left D-pad will use your fifth skill. Hotbar 3, button 7, keybind 5.
  • The Up D-pad will use your sixth skill. Hotbar 3, button 5, keybind 6.
  • The Right D-pad will use your seventh skill. Hotbar 3, button 9, keybind 7.
  • The Down D-pad will use your eighth skill. Hotbar 3, button 11, keybind 8.

7.) Using the Left Joystick. Character Movement.
  • Moving the left joystick in any direction will make your character move.
    The joystick is bound to the W, A, S and D buttons.
    Clicking the left joystick in will make your character jump.

8.) The Select button.
  • Singe Press: Open World Map.
    When you press the button once, it will open the world map
    up for you. If this does not happen for you, your able to keybind this
    by opening the Options menu > Controls > Window Keys > Map Window.
    And mapping the button to the M key. If it's not already by default.

  • Double Tap: Extra Button.
    If you tap this twice (x2 double tap) this will press your extra button.
    Hotbar 8, button 7, keybind, shift+5

  • Hold: Community Window.
    Last but not least, if you hold this button you will open your
    Friends window. See who's all online and send group invites to form a party this way!
    This should be a default key in the game, but if it is not working as intended you can rebind
    this key by going here: Options menu > Controls > Window Keys > Community Window.
    And binding it's key to Y on the keyboard.

9.) Using the Left Bumper: Targeting & PoV Change
  • Target Next. Pressing the [LB] once will use the game's Tab targeting system. Use this
    to target your next enemy in a fight, or by targeting crafting nodes in the wild.

  • Holding [LB] Changing your Point of View.
    This will change your camera view from third person to first person. In combat you can see your weapons, arms and even your legs in this view! Try it out in a fight! If it's not working you can open the Options menu > Controls > View Options. Making sure the Advanced button is pressed. You can find 3 check boxes here for turning the First person combat camera on.

10.) Holding the Left Trigger. Switching to the "Active" Layer
  • Holding [LT] Will switch layers from Idle to Active.
Controller Layer: Part Two: The Active Layer.
In this section I'll be talking about the "Active" Layer of this profile. To use the Active layer
you must be holding the Left Trigger from the Idle layer to use the Active Layer. If you let this go
at any point the profile will forcibly switch back to the Idle layer.


11.) Using [RT] the Right Trigger.
  • Pressing the right trigger while using the Active layer will press the Left Mouse button in-game.
    Using this is really only Ideal for talking to NPCs, interacting with world objects, clicking on items in your inventory. And other things as such. While in combat there is no reason why you should ever press this. Due to it will make your character move forward if the camera lock is turned on.

12.) Using [RB] the Right Bumper: Camera Lock.
  • This will toggle between using your Mouse freely and turning the Camera Lock
    on or off. When you use this button the mouse will automatically Center on your screen.
    This makes it easy to get to all parts of the games interfaces, if you always know the mouse will return to the center of the screen.

13.) Using the Start Button.
  • This does one of two things. Pressing this will open the game's Main Menu. If you've imported the .ini file correctly. If this does not work you can find the option to do so under User Interfaces > Game Windows > "Escape opens Main Menu☑". Be sure to have the Advanced Button turned on.There will be a check box to turn this feature on in-game. Make sure it's checked

  • Holding the Start button at your Bank will cause all your bank bags to open at the same time.
    And yes, you will have to go back to your bank to fix the way your bags show up in-game after
    importing the .xml file. After all the .xml file moves your interface around.

14.) Using the Face buttons & Extra buttons.
  • Using button [X.] Skill 9 & Extra Button.
    Pressing this will use your 9th skill on hotbar 4, button 4. Holding this will use your Extra button. For me I've got it set to use one of my macros to change the player model. To do this open your Macros window and use this command: /soga_models on.

  • Using button [Y.] Skill 10 & Extra button.
    This one is kind of a big one. Pressing this will use your 10th skill, Horbar 4, button 2. Holding this is mainly for using a big skill, such as an ultimate skill. This is bound to Hatbar 7, button 2.

  • Using button [B.] Skill 11 & Extra button.
    Pressing this will use your 11th skill. Hotbar 4, button 6. I've got this set to toggle the Running skill on and off. This can be found in your Skills window by pressing K and looking for the ability "sprint."

  • Holding this will use your Extra button. This is to turn off the player model change via macro command: /soga_models off. This you'll have to set just like all the others. If you want to use this extra command like I do. All the Extra buttons you can set to skills, macros or commands of your choosing. This is just an example.

  • Using button [A.] Skill 12.
    Pressing this just uses your 12th skill. Hotbar 4, button 8. I've got this set to "Hail" NPCs in-game. This can be found in your skills window by pressing K and looking for the ability hail. Normally found on the first page.

15.) Using the Right joystick.
  • This is used as your camera movement while the Camera Lock is toggled on. When the Camera Lock is toggled off this will move your mouse. Clicking this joystick in will make your character sit and or swim down if held in water. (not really used because you can swim down by pointing the camera down.)

16.) Using the D-Pad
  • Left D-pad:
    Pressing this will open the Knowledge window. This is where you find all your skills. Holding this will open your Macros window.

  • Up D-pad:
    Pressing this will ether Zoom the camera in, or scroll up in text. If you hold this, it will open the game's Marketplace.

  • Right D-pad:
    Pressing this will use your Torch in-game. Making darker areas more visible to see. Holding this will open the games Calendar, this makes it easy to see when Events are starting.

  • Down D-pad:
    Pressing this will Zoom the camera out. Or scroll down through text. Holding this will cause the controller to change to the Hide GUI Layer. I'll be going over this feature in the last part of the guide.
17.) Left Joystick: Movement & Auto Run
  • Just like with the Idle layer the Left Joystick acts as your character's movement. However if you click this in you will start to Auto run in the game.

18.) The Select Button: Quest Log, Recipe Book & Guild info
  • Pressing the Select button will open your Quest Log. Holding this will open the Recipe Book. Tapping This Twice (x2 double tap) will open the Guild Window.

19.) [LB] Left bumper: Right Mouse & Preview Items
Pressing this will right click on anything that is being highlighted by the mouse. You're only going to be using this when the Camera Lock feature is turned off. Same with Holding this, if you hold this over a piece of equipment and press the Left Trigger you will Preview an Item.

20.) [LT] Left Trigger: Back to Idle Layer
And last be not least the Left Trigger. If you've been holding this down this will continue to use the Active Layer. Once you let the Trigger go the controller layer will go back to the Idle Layer.
Active G.U.I Layer: Part Three
In this section of the guide I'll be showing you how to use the Hide G.U.I layer of this profile. As mentioned before if you hold the Down D-pad while using the Active Layer this will cause the controller profile to change from the Active Layer to the Hide GUI Layer. Holding these buttons together will give you the option to, by pressing the correct buttons ether; hide the games graphical user interface, or toggle the game from Fullscreen to Windowed Mode.
  • To toggle the GUI just Tap the Start Button.
    To toggle from Fullscreen to Windowed Mode just Tap the Select Button.

    G.U.I Interaction.


    And that's it!! We finally made it through all of that! ↑ If you've got any questions or worries about how to use this, please don't be afraid to type them out in the comments below. I look forward to hearing from you all. And Thank you for taking the time to read all of that. I know it's a lot to take in. But I did have a lot of fun typing it all out for anyone else who wants to try the game at a new approach.
If you've enjoyed this please 👍Like ⭐Favorite and 🤳share this guide 😊
Below is a short video I put together, to show you can play the game with the controller profile I provide. I hope you enjoy!
It did take me a little over 30 hours to put this guide together. It would mean a lot to me, thank you ^.^
33 Comments
TheCr33pur 25 Jan @ 3:27am 
The game is much easier with KB+Mouse, just making it difficult using those controllers to move around and select the actions. But good luck, i hated it on PS4 and Xbox. Guess some games are okay with it and some arent.
†Captain†Alister†  [author] 10 Sep, 2024 @ 2:24pm 
You're most welcome, it's a passion of mine really. Oh! Also where it says, "name=Custom" you can actually change it to say something like "name=ControllerSupport" to make it easier to see in the Keyboard Layout drop-down list under the Options Menu. Hope it works out for you.
Crispin 10 Sep, 2024 @ 2:18pm 
You're really doing a lot to help me out, I really appreciate it :) I will check it out.
†Captain†Alister†  [author] 10 Sep, 2024 @ 1:29pm 
Possible fix:

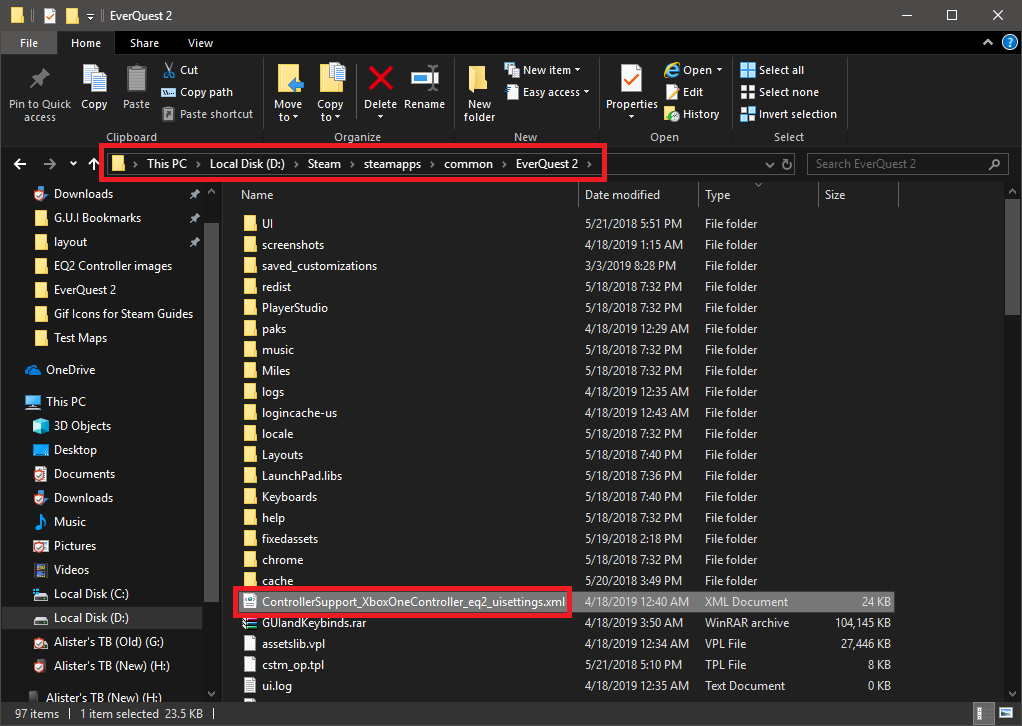
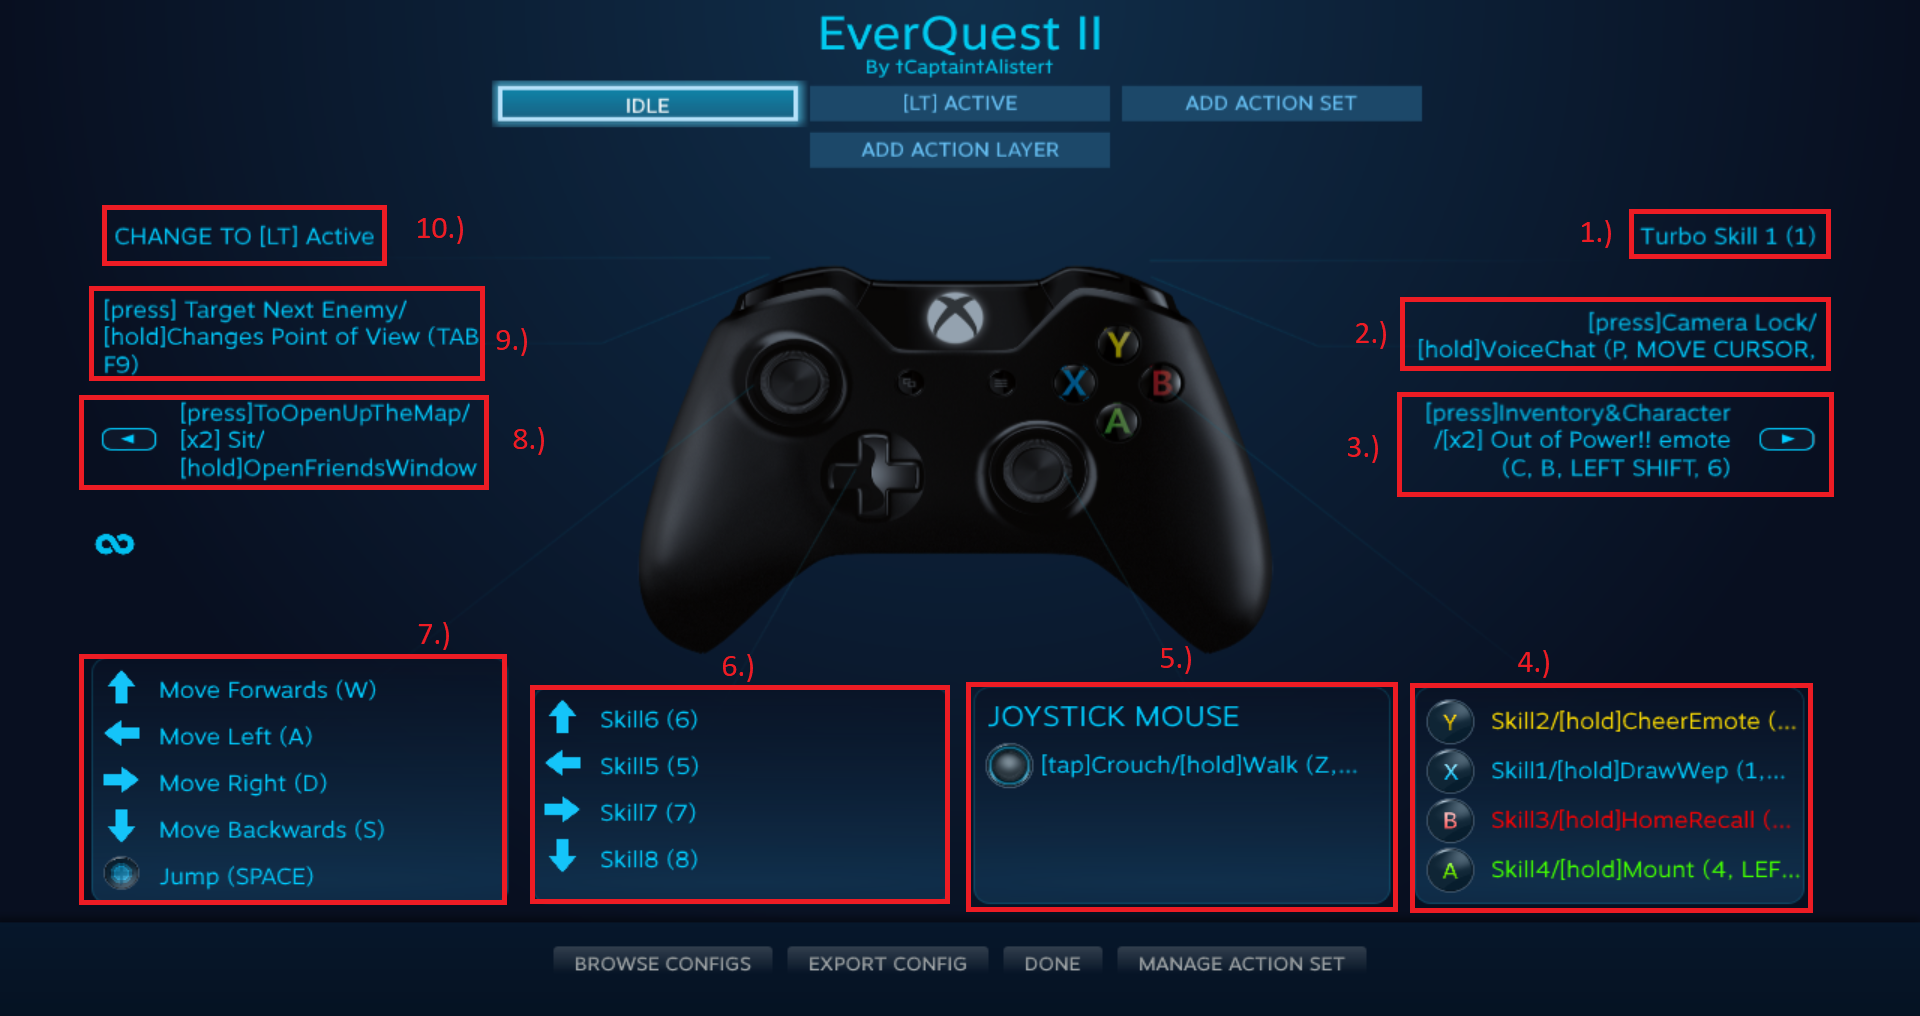
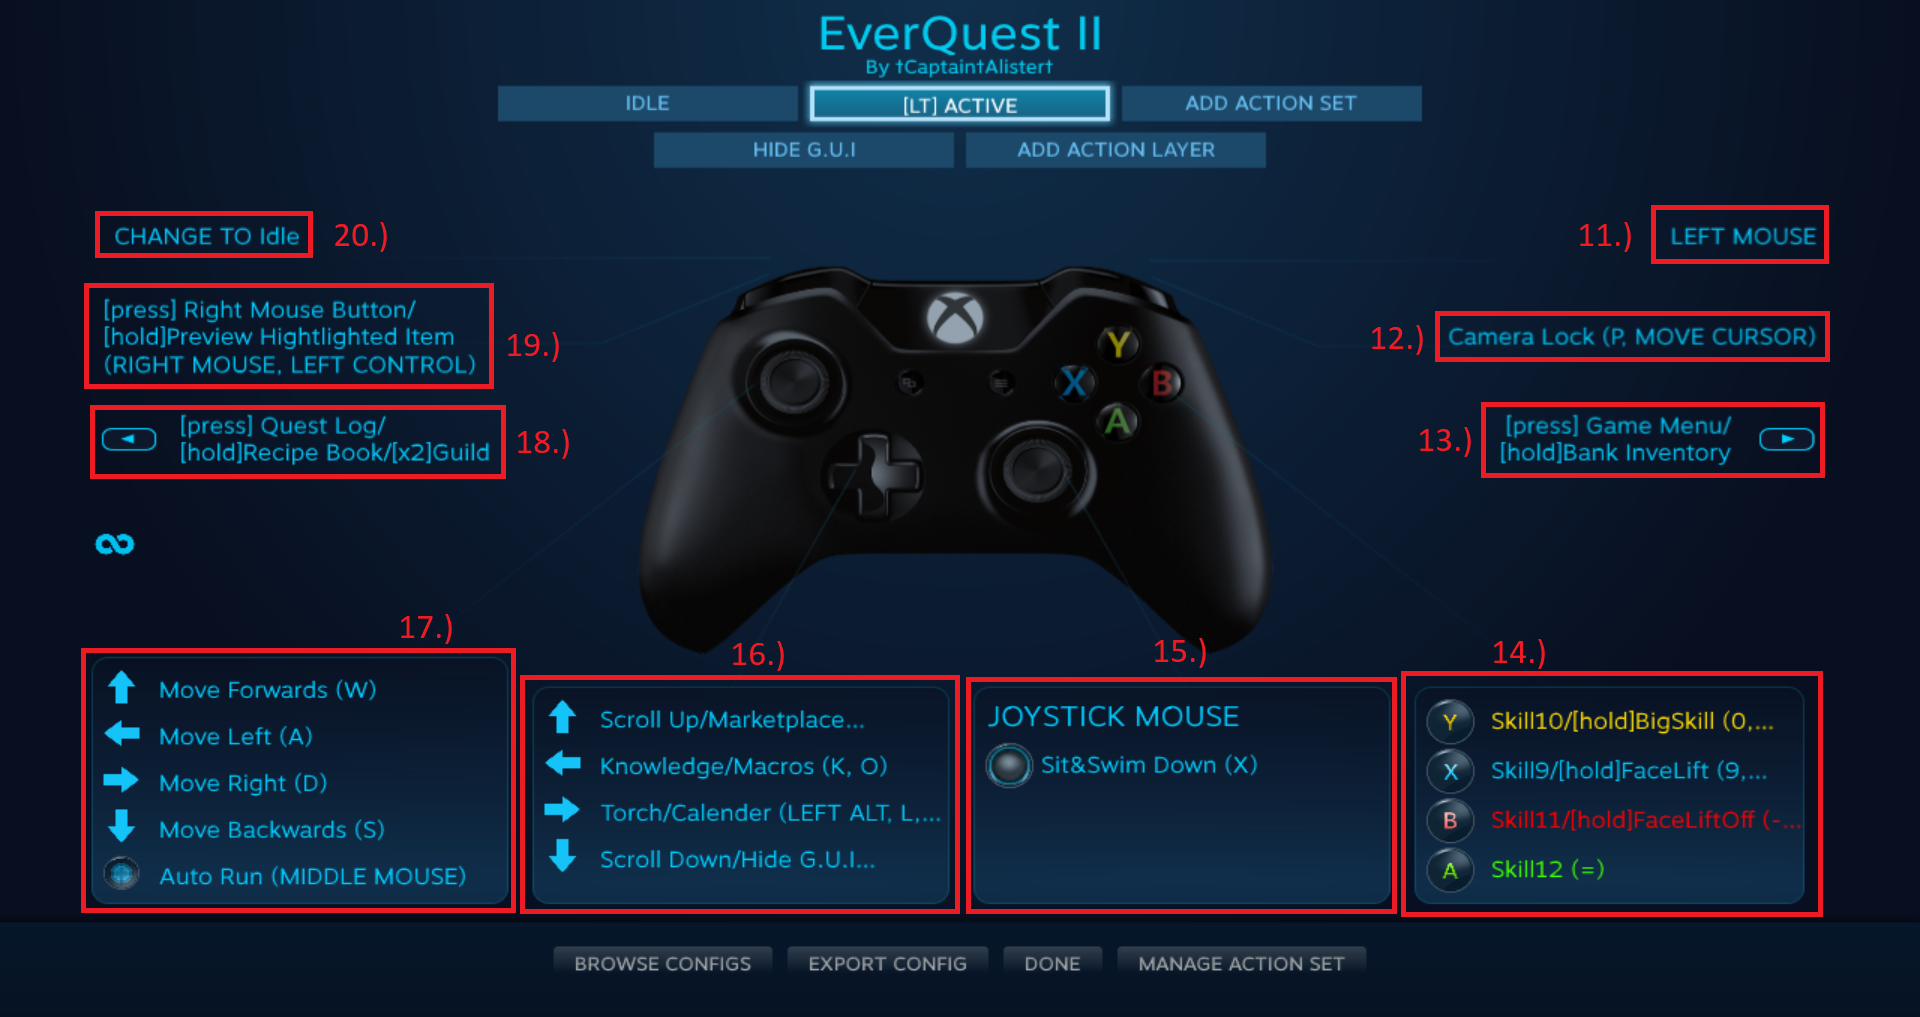
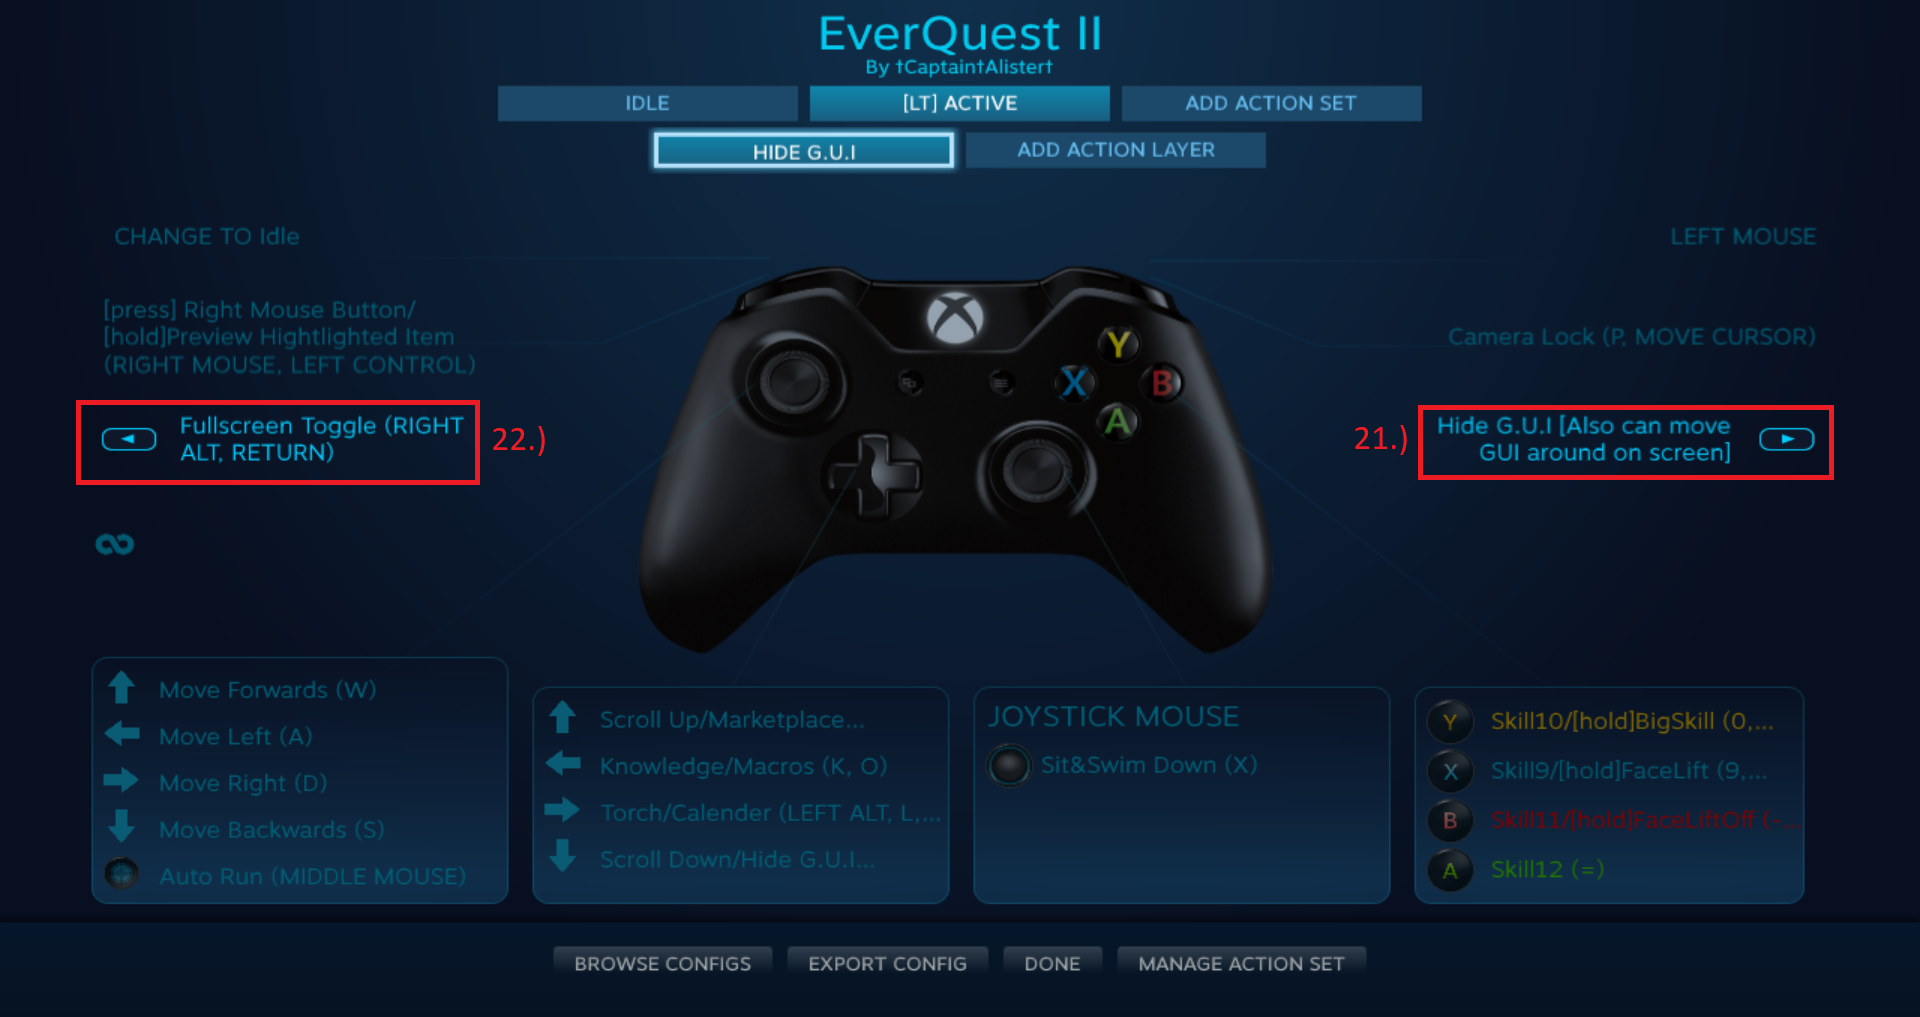
Navigate to your EverQuest 2 directory, find "Layouts" folder.
Backup: "EQ2-OtherMode.cfg" & Rename to: "EQ2-CustomMode.cfg."

Edit the new EQ2-CustomMode.cfg file to include:

name=Custom
options=
uisettings=
colors=
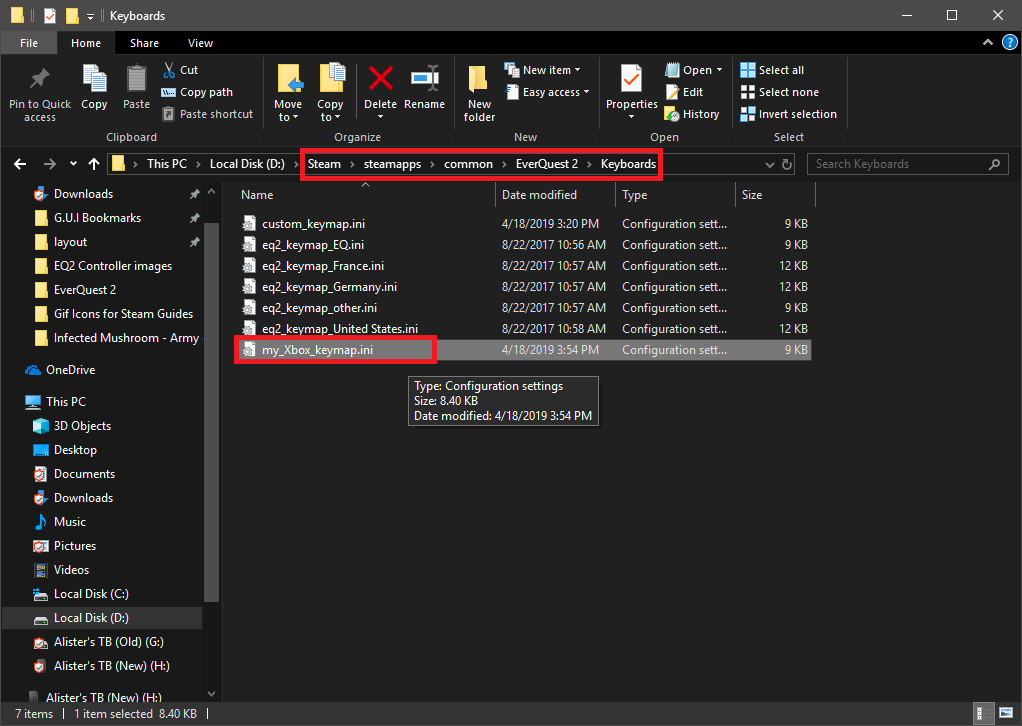
keymaps=my_Xbox_keymap.ini

In the main EverQuest 2 folder, edit "eq2_recent.ini" change this line:
"cl_configuration_file EQ2-OtherMode.cfg" to reflect this: "cl_configuration_file EQ2-CustomMode.cfg"

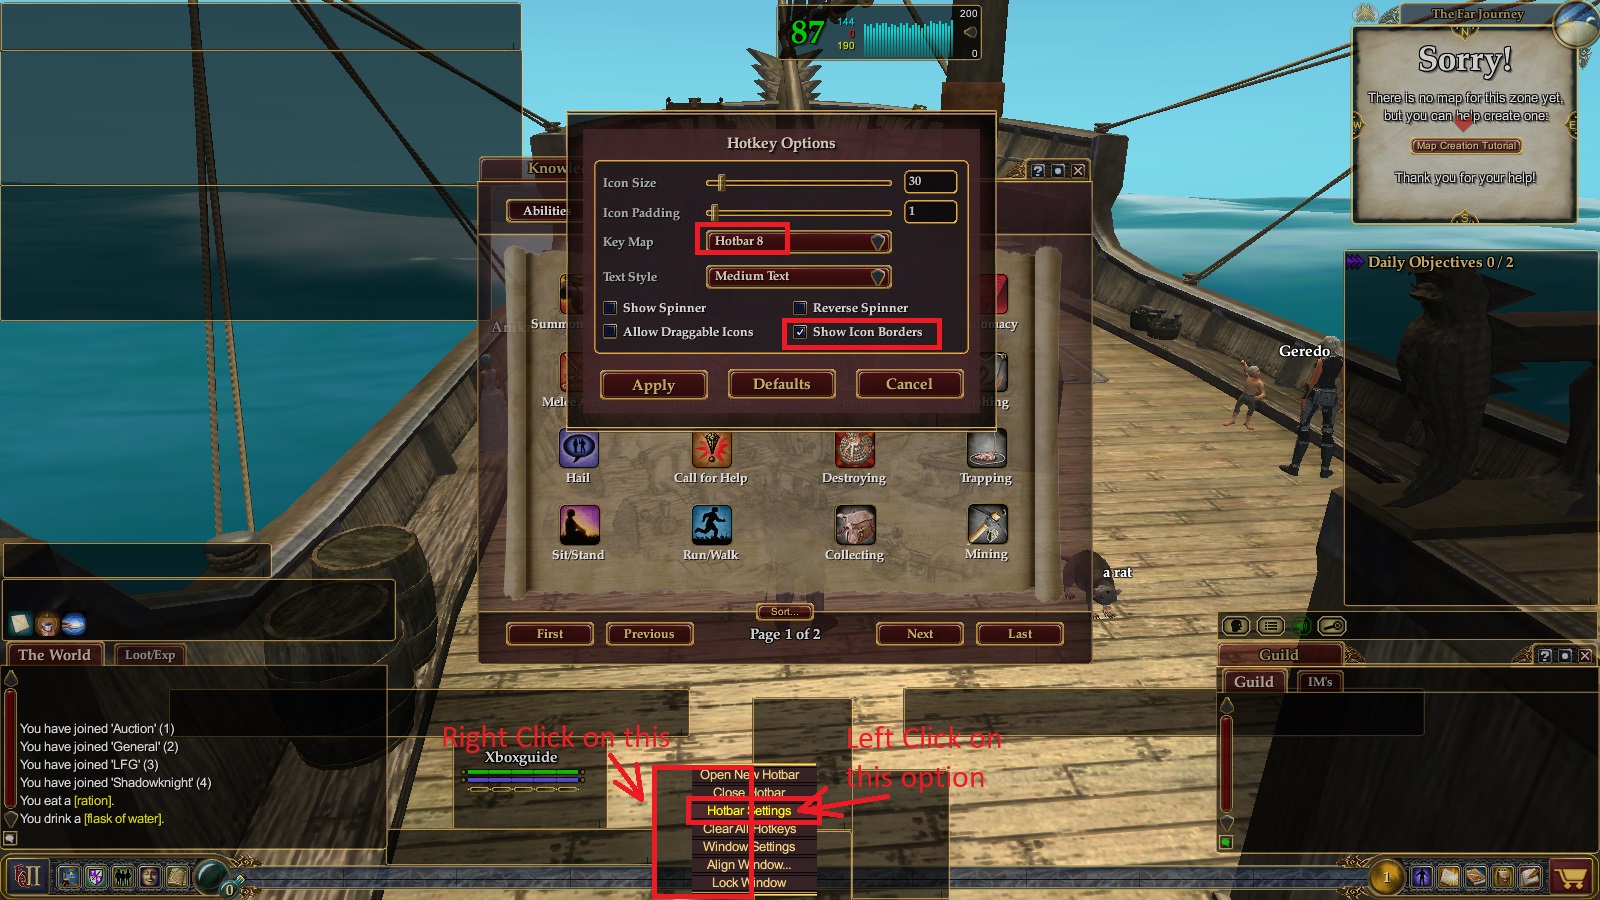
Login back in & Select “Custom” from the Keyboard Layout drop-down list in the Options menu.

And lets hope that works. I just tried this myself, when I logged in all the keybindings were still set so here's hoping.
†Captain†Alister†  [author] 10 Sep, 2024 @ 7:29am 
Ahhhh I see what you mean now. While playing the game it will seemingly change from the keybindings set and will switch back to the default keys. I was trying to figure out what you had meant. And I found out what you meant when playing yesterday. I'll try and find out what's causing that and see if I can't find out how to prevent that from taking place. :summer2021simulation:
†Captain†Alister†  [author] 9 Sep, 2024 @ 8:30am 
As far as hotbars go, they're not in order. Hotbar 8 is hotbar 1 in some regards. For buttons changing what hotbar is active, I didn't bind anything like that. With the GUI shown in the guide everything should be displayed on screen.

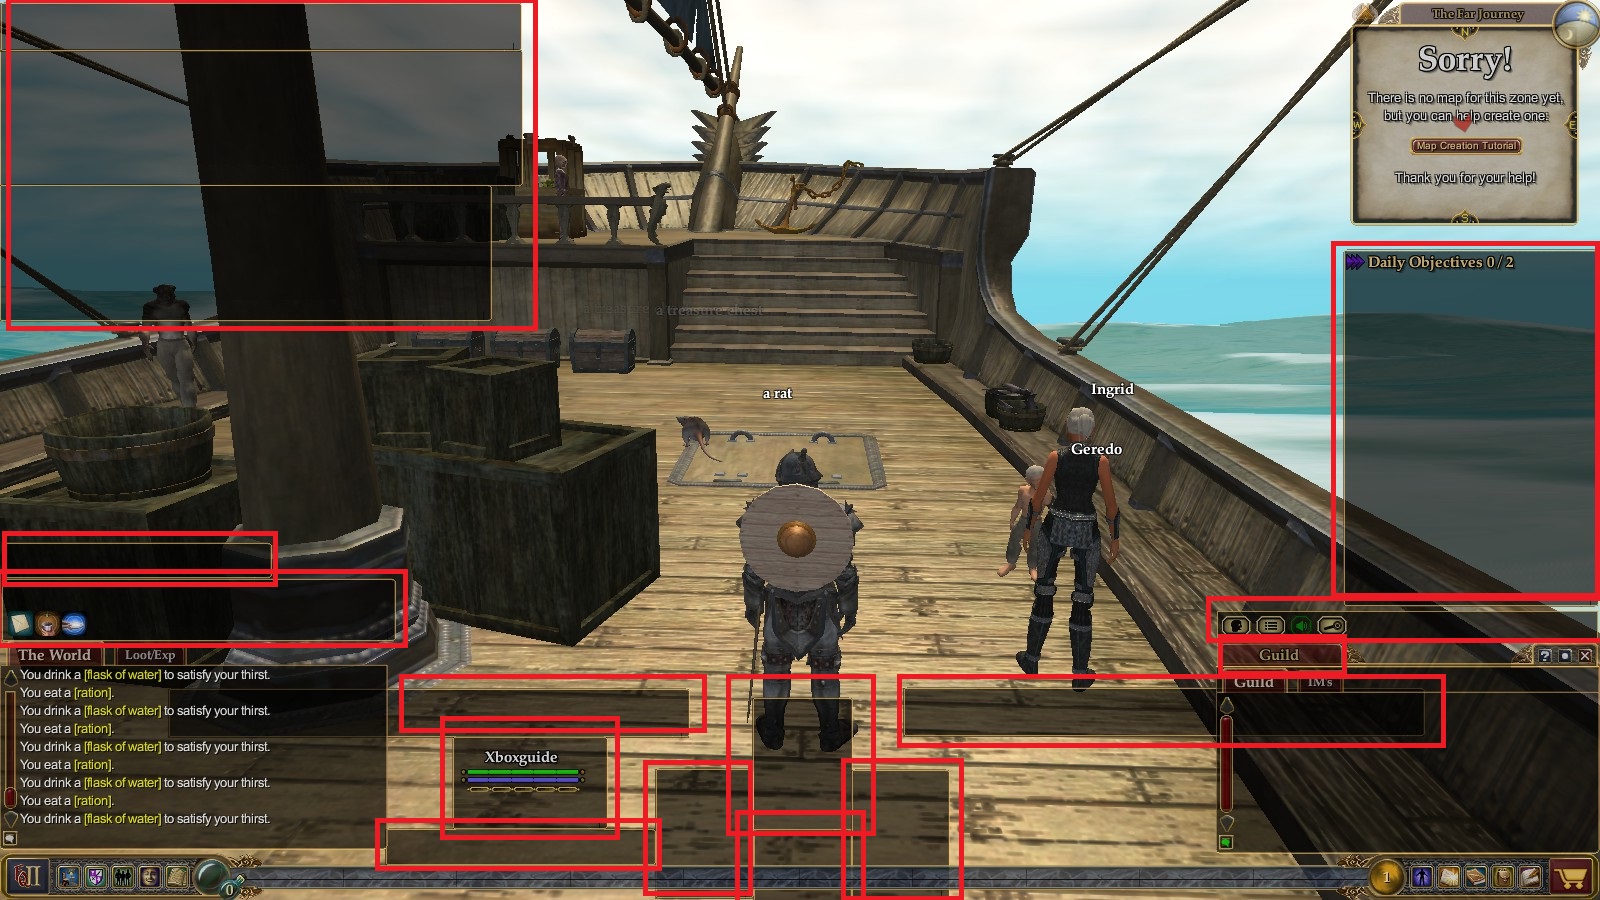
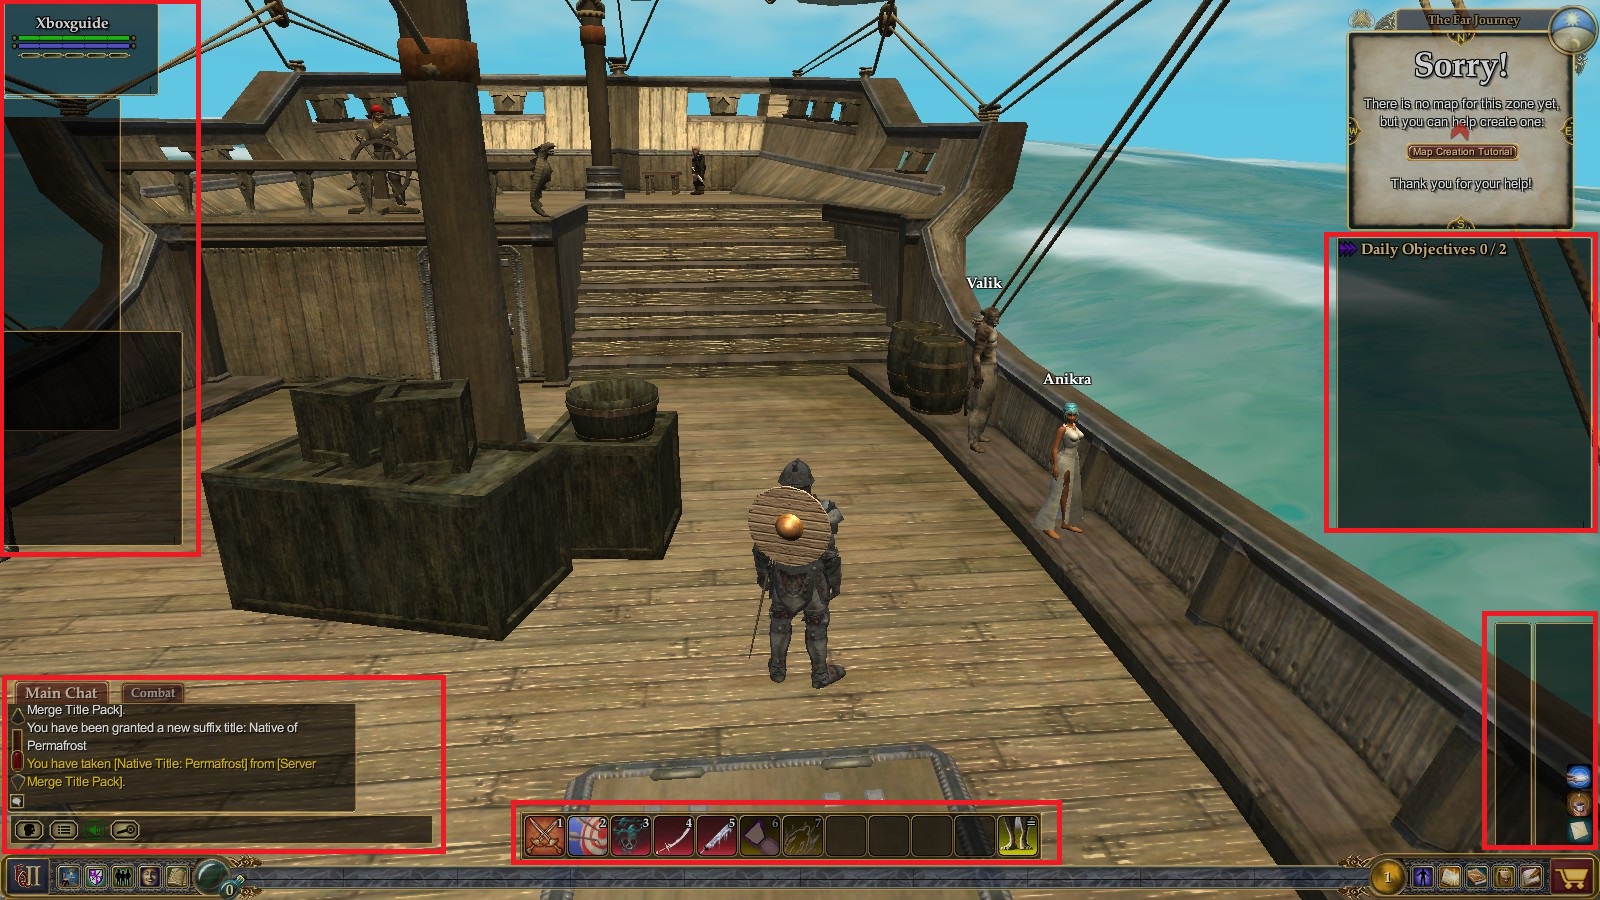
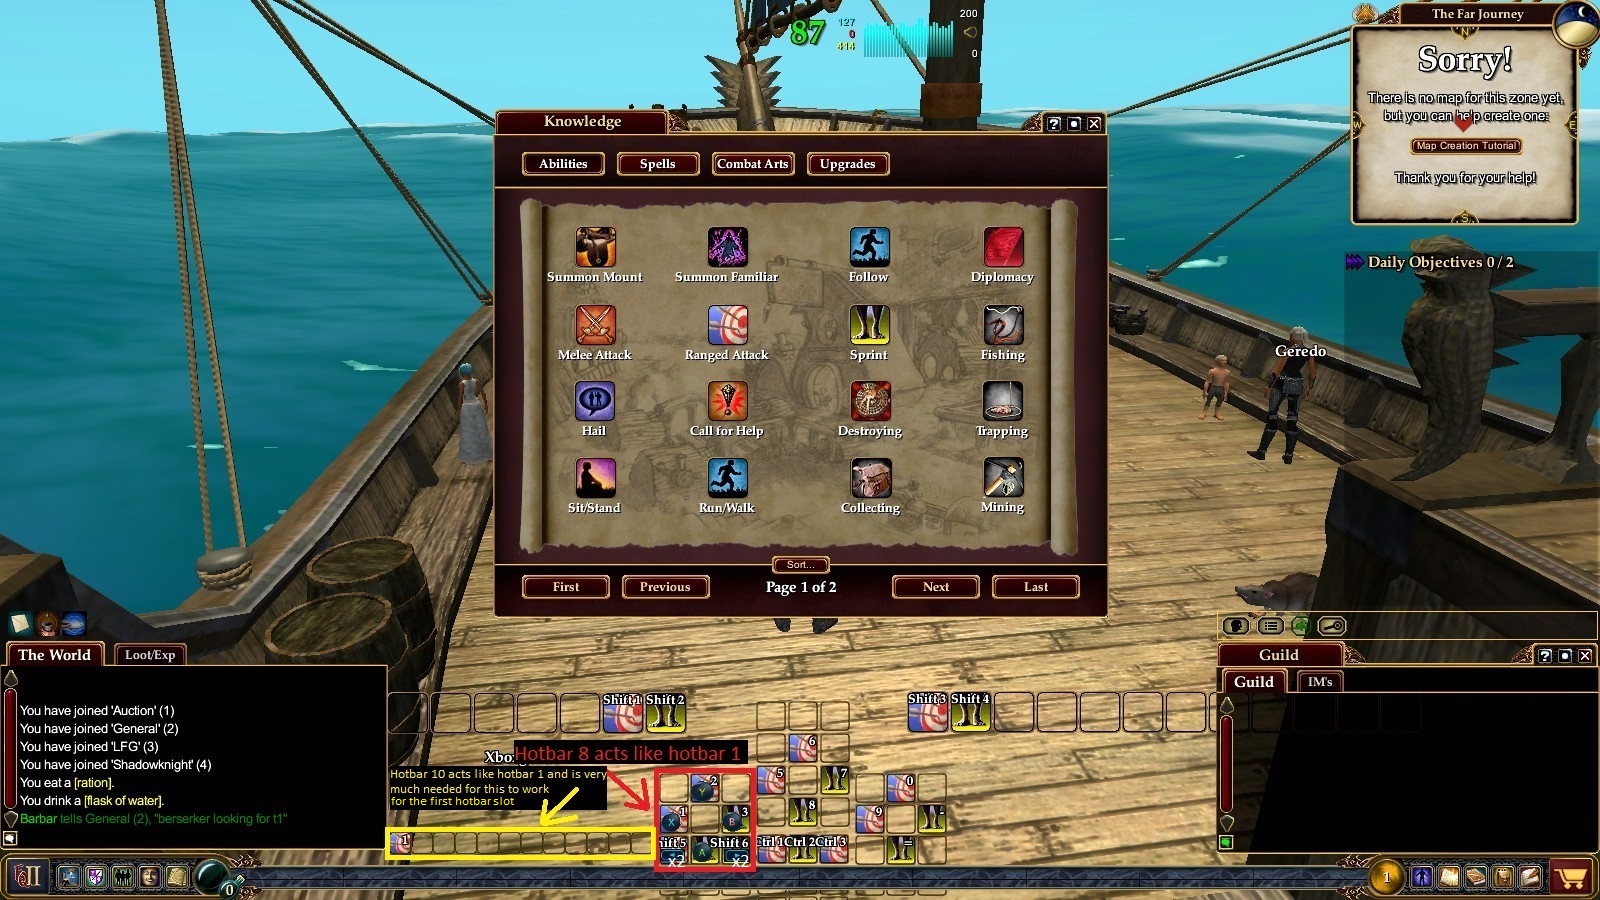
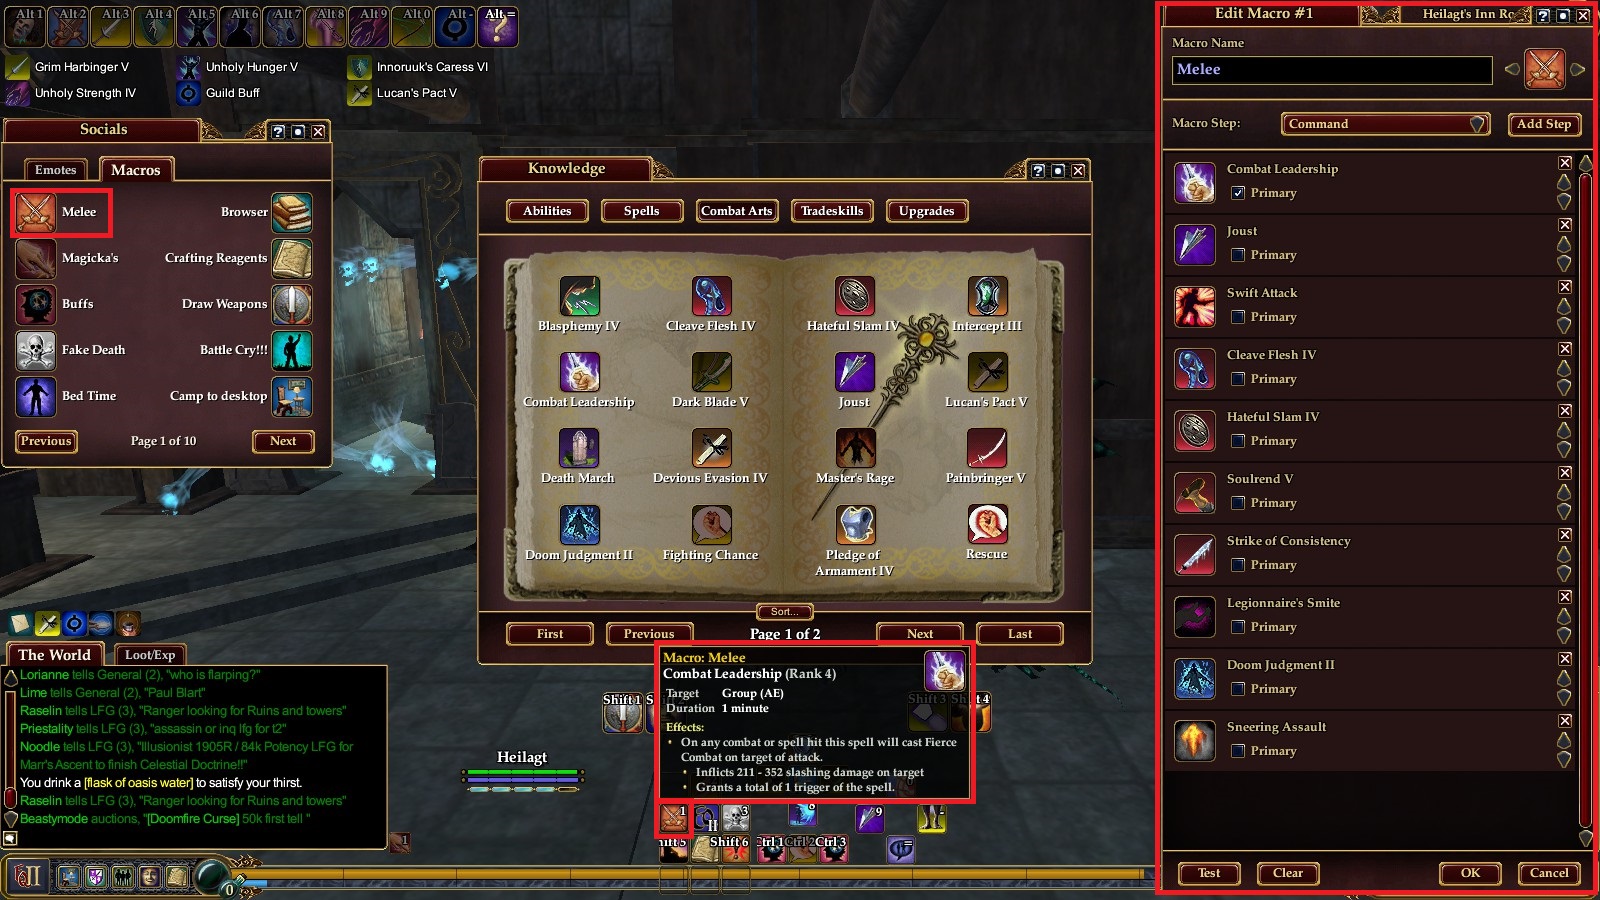
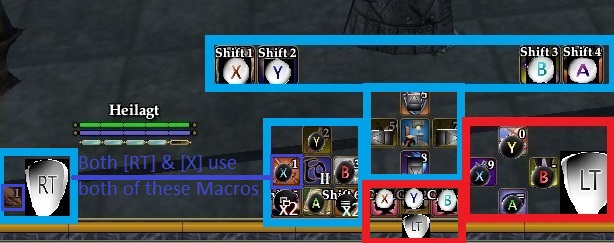
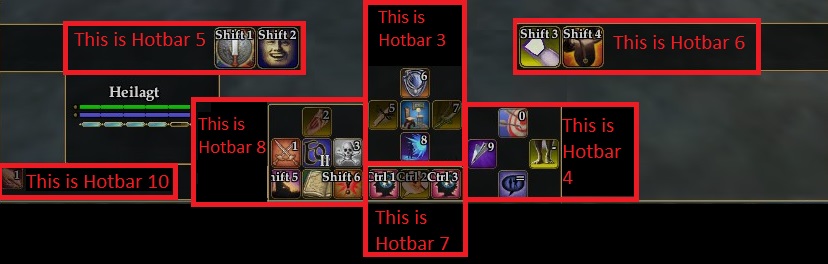
I'd say make sure the "advanced" button is selected in the options menu. That'll show all options. If there's a button combo that needs to be pressed that can change hotbars, I'd say remove those bindings in-game. IE "shift+1"

I'm glad you were able to get things working for the most part. Most of this is end-user based so I can only really do so much to help.

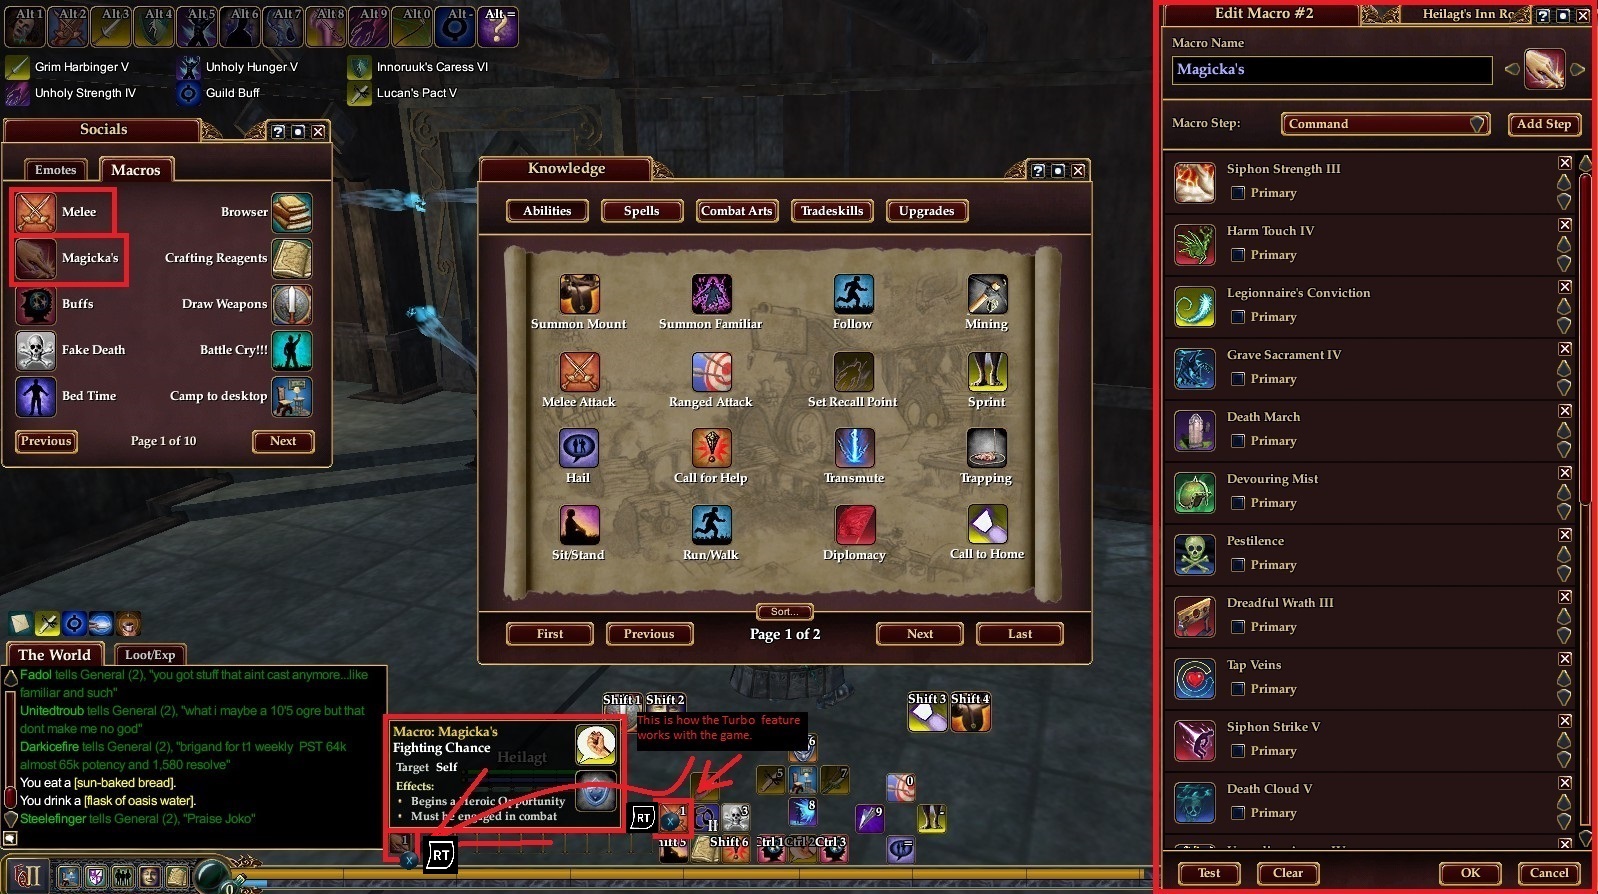
However, you can use this command-line in the game's chat to have the game auto setup the keybindings for you: /load_keymaps my_Xbox_keymap.ini
Crispin 8 Sep, 2024 @ 11:18am 
But some button keep changing my hotbar number, so suddenly my abilities doesn't work and I have to manually set the hotbars to the right number. Is that something you've exerienced?
Crispin 8 Sep, 2024 @ 10:57am 
I reinstalled eq2 and for some reason it works a lot better now. Maybe darqui interfered I dunno. Really clever setup and when I got action cam working it's pretty playable.
Crispin 8 Sep, 2024 @ 5:47am 
I'll start from scratch and see if I can just manually copy most of your settings in the steam controller settings.
Crispin 8 Sep, 2024 @ 5:38am 
Yeah I did. But something is not right, the setup for my controller in steam is not working correctly in game. Several buttons in game does nothing, when they should be firing off skill x and y.