Age of Wonders III

Age of Wonders III

102 ratings
A Quick Guide to Flanking
By Travis
Most of us here will admit that AoW3 is not a newbie-friendly game, often to its own detriment. Battles are especially non-intuitive, and can be a real turn-off for budding players. This guide will give a brief but informative look at the most prominent aspect of manual combat.
8
   
Award
Favorite
Favorited
Unfavorite
Brief Introduction
No silly advertising-type opener is needed here. Obviously if you got this far you need information. We all know a flanking attack does extra damage and determines how battles are fought, and ultimately, won.
Travis Demonstrates Flanking
First up though, we need a hero. Meet Travis. Travis says hi, sends his regards, and wishes you all the best.
Travis has kindly volunteered to fight a battle to show us how flanking works.
With Travis facing in the direction of the orange coloured arrow, the hexes are as follows:

- Purple: Most important – melee flanking attacks. The majority of one-shot-kills occur here.
- Red: ranged flanking attacks. With Travis facing up, any enemy unit firing at him in one of these hexes will trigger a flanking attack.
- Blue: melee non-flank attack. When a unit is in guard every adjacent hex will be in this category.
- Green: ranged non-flank attack. Again, when in guard mode, every non-adjacent hex will be in this category.

So what does it all mean?

- Flanking attacks deal extra damage and bypass shields. Therefore, to maximise damage output, one will invariably incline towards flanking. They are usually the best way to cut through defensive units (like pikemen, crusaders, human knights/elven swordsmen, etc).
- Flanking cannot happen to a unit in guard. All units can guard on their turn if they have not expended their movement in retaliation on their enemy’s turn (unless they have tireless).
- Statuses that affect BOTH moving and actions will render the unit permanently vulnerable to flanking (e.g. stunned, snared, frozen, etc.). Statuses that only affect movement (e.g. immobilised, slowed) OR only actions (e.g. dazed) will not make them vulnerable to flanking unless they cannot guard (e.g. if they were still able to attack).
- It is important to remember that a unit will turn to face whoever is attacking it. Also important is that a melee flanking attack will not meet a retaliation. If a unit attacks Travis from a purple hex (and Travis isn’t guarding), Travis will turn to face his attacker on the flanking attack and then the normal order proceeds. The attacker starts the normal attack sequence on the second attack and Travis is then able to retaliate. It follows then that a flanking attack is a free, better, unanswered attack.
- When Travis turns to face his assailant, his flanking tiles change. An attacker in front and one behind will guarantee flanking attacks. In this situation, Travis will (more often than not) need to rely on his allied units.
- Travis exercises no zone of control on the purple tiles. Enemies are free to move past him there without facing attacks of opportunity.
- Flanking attacks can be enhanced with the Backstab (usually just Rogue units/heroes, and a handful of items) and Charge (Cavalry, Global Assault (Warlord), and some animal/monster units) traits. If you have a cavalry unit flanking someone, it is often been to run three hexes (back and forth) and sacrifice an attack for less but better ones. This will also mean the enemy gets either only one retaliation or none.
- Lastly, beware of flying, floating, teleporting, or sprinting units. Typically these units are more squishy, but far better at evading damage and getting past your guard. The AI will flank you (especially with these units) wherever it can.

Well done! That’s the short version. Travis apologises for all the writing but wishes you well for your future journeys and battles. He would like to remind you that experience is really all there is to doing this game well, and getting to know the units. We all make mistakes, but the only real mistake is not learning from them.

P.S. you can rotate a unit by holding right-click and dragging in the direction you want it to face. This is mainly useful for spell caster units or units with special abilities like ‘Thunderstorm’.
Some Extra Stuff
Okay so where to then? Battle maps have obstacles and terrain that one must use to their advantage if they are to get anywhere. Travis has a few demonstrations. The first one involves some pathetic Halflings. None of them are particularly good at anything, but most importantly, they can’t fly, float, teleport or sprint. With that in mind, Travis has set up his position so that he and his cavalry are set between some rocks to tank melee damage, with an archer hero and support unit able to fire directly over without any penalties. The rocks on either side will make it harder for the Halflings to sneak around him (do note that the AI will attempt it anyway).

The next example is Travis clearing a gold mine (Travis plays at 200% spawn strength). Here there are three potential choke points, numbered accordingly. CP1 is three hexes longer than the other two, so will not be prominent. Here it is guarded by an irregular, who can hold himself in melee and do ranged damage when not engaged (more likely). He is guarding the archers behind him who will be able to shoot over the rock without LOS penalties as they are directly behind it.

CP2 is a little more interesting. This is where we can expect the bulk of the fighting. Travis has decided to leave a 1 hex gap between himself and the rock on his left. The Tigran chariot will now most likely make a beeline down this gap to engage the archers to stop their ranged attack; however Travis will get a free flanking hit on them as a result. Travis’s zone of control effectively stops them coming through there. The archers and priest are free to fire over the mine (the big hole in the middle) to either CP2 or 3 in this formation where needed. CP3 is guarded by a tanky knight whose existence will prevent the Tigrans from coming through there.

This example deals with spacing and open terrain. Not every map has obstacles in the right space to utilise. Here, Travis has set up his three strongest units in a line at the front with a 1 hex gap in between. To the right a rock prevents flanking, and to the left, another damage absorbing unit is placed just behind the front to prevent flanking as there is open space. It would be possible to move this unit further out, but that will reduce its effectiveness later on as it will be too far away to do anything. Lastly, the support/archer units are placed in the gaps 1 hex back from the front. This allows them to shoot through the gaps effectively, but also, they have an easy shift in position (denoted by the green arrows) should their targets try to hide behind the front units.

The orange arrows indicate where a determined attacker might try to rush for the archer or priest (and this would usually be good unless the unit is T4). In that instance, Travis and one of the other units would get an attack of opportunity (red arrows) which would significantly maim the intruder. The rushing unit would then be flanked by three units which is normally a death wish. The enemy cannot come around the sides without another two opportunity attacks from the knights, unless on the left flank it expends an extra tile. The latter option isn’t that ideal as the flanking unit will only get one attack on the priest which won’t be enough to deal enough damage to kill it. A combination of the two (front and left side) might kill the priest but the units will then be so exposed that Travis would be unable to lose from there.

It is important to remember that opportunity attacks won’t change the direction the opportunist is facing; Travis is completely able to cover both spaces. More often than not, a full single stack battle like this will only last three combat turns: 1) formation 2) crunch turn 3) running down. The second turn is where one formation tries to break the other that is in guard mode (usually). The effectiveness of that is determined by the unit choices and the formation they have chosen. Where they finish the second turn usually dictates the outcome of the battle, so it is really important one gets the formations as best they can.

This formation isn’t as effective against flying or incorporeal units as they will bypass the opportunity attacks and knock out the ranged units.

This next example is a little trickier. Flying and floating units can move over rocks and other obstacles, so they won’t be much help. Instead, Travis has turtled up around the priest, who will be the main dealer of damage. The archers in this case are less valuable as most of the enemy are incorporeal, so they have the sides. Travis’s main concern is the carrion bird who can bypass the shell altogether and hit the priest from behind, on the one hex Travis can’t defend. Everyone is packed tightly because incorporeal units ignore zones of control so don’t take attacks of opportunity. However, this formation is not good against dragons, eldritch horrors, or draconian flamers due to their area damage.

Endgame (and long game) battles get obviously trickier and varied and there is just too much to cover. Spells are a game changer too. These examples try to show how to minimise the risk of being flanked, but at the end of the day, the more you play, the more you learn, the more you develop your own style and get a sense of how to build your own armies. Hopefully this fills some of the beginner gap and is enough to get you going. And hopefully it was readable and understandable enough as well. As always, feel free to post your own thoughts and stuff in the comments; Travis will try to be as helpful as he can.

Happy Halfling Hunting! ;)

17 Comments
magnificent microwave casserole 18 Jan, 2024 @ 12:10pm 
Very cool This game is NOT newbi friendly, I can't win at all as anyone but Tigran after years it's sad :steamsad: i appreciate all these guides so much, helps confirm what exactly I should be prioritizing.
Travis  [author] 1 Feb, 2023 @ 11:47pm 
@elijafire

Good for you; you are however, in the minority. Besides, not everyone enjoys learning by being surprised, I daresay most look for the tools they need first and then working on applying them
elijafire 31 Jan, 2023 @ 5:59pm 
I disagree, AOW was very friendly to me when I was a newb. Half the fun was learning and being surprise attacked. The intricacies make the game fun.
Travis  [author] 17 Dec, 2022 @ 4:38pm 
@name be Nguyen

Sorry for the late reply - most people have moved on from this game (including me). I think your best bet is to watch gameplay videos on youtube, and learn as much as you can from there. Hope that helps
name be Nguyễn 3 Dec, 2022 @ 9:55am 
hey hey people how do you play this game ?
Oberdiver 13 Jul, 2022 @ 11:33am 
Travis is a great teacher, I hope he can soon take revenge on that pesky Halfling Necromancer whothat killed his parents.
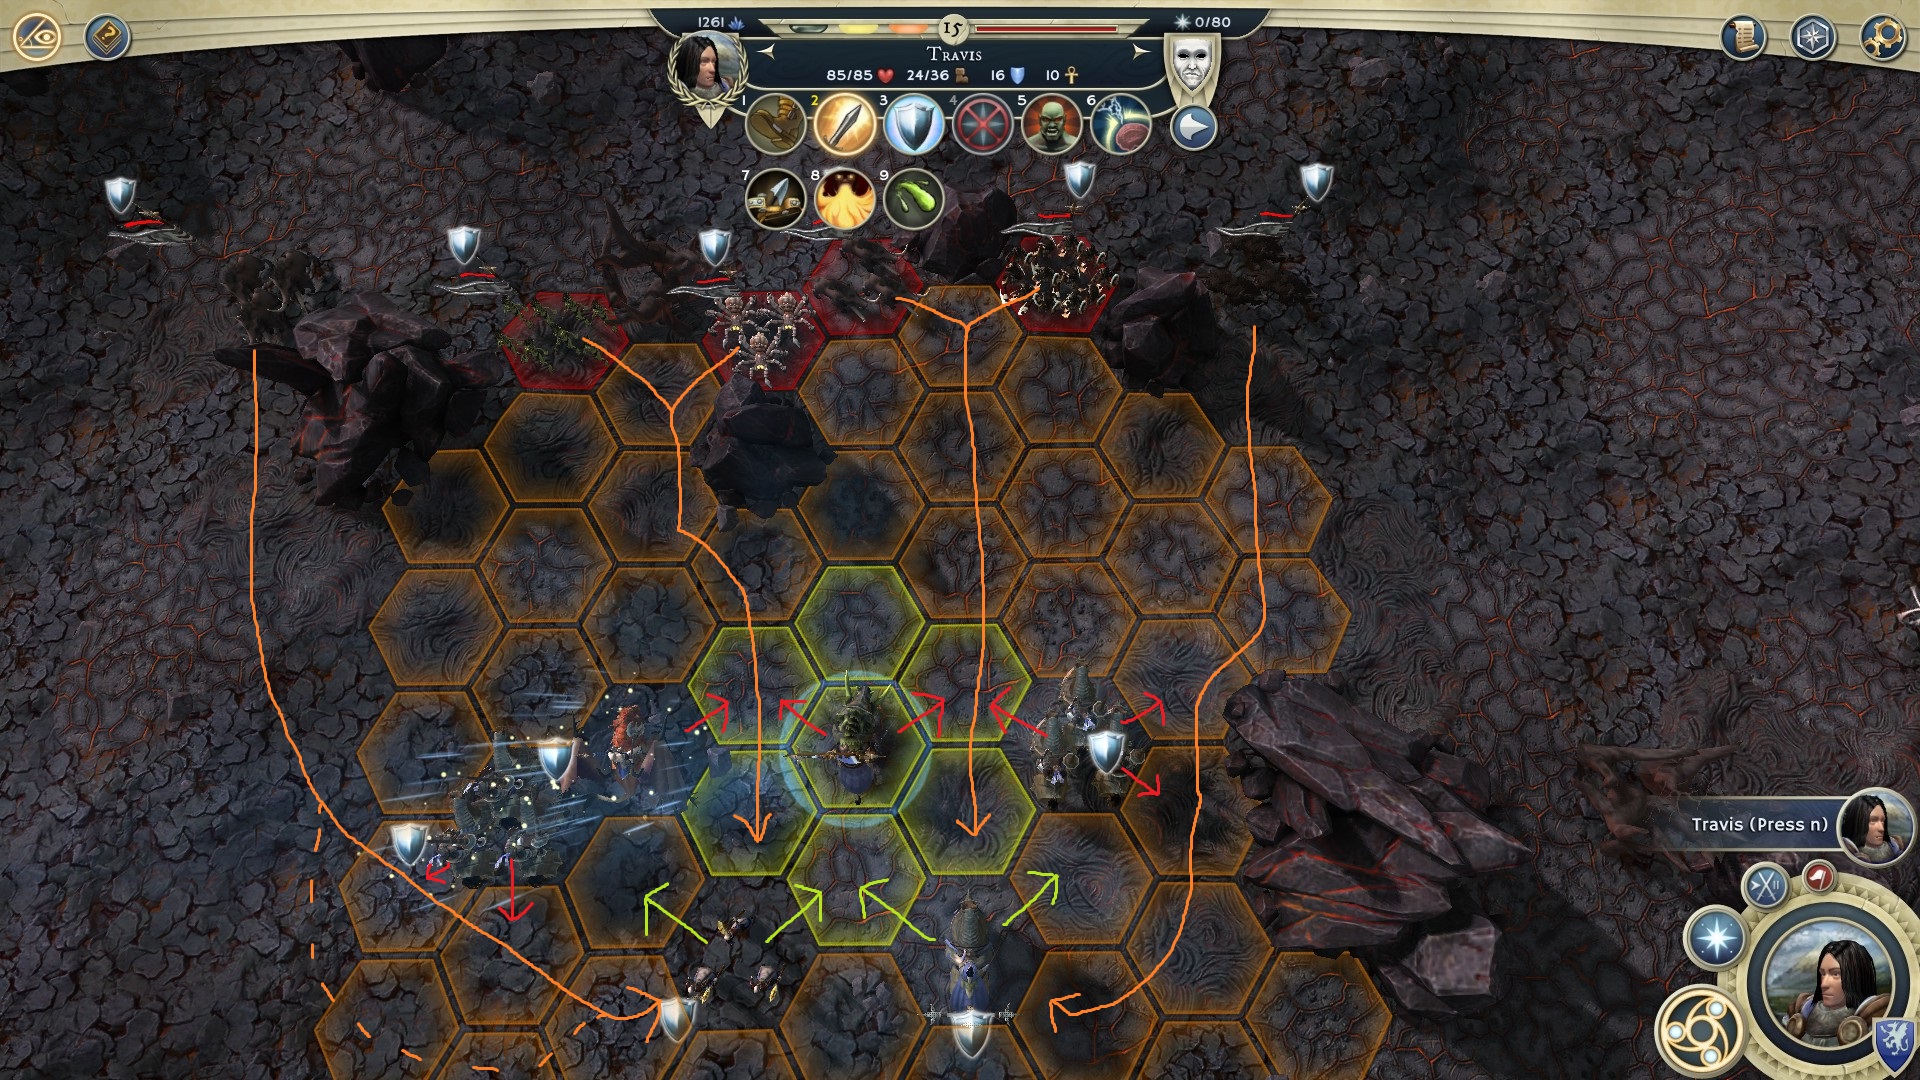
While I had a pretty good grasp of the mechanics before and knew that Flanking is important, I didn´t know JUST how important it is, and the importance of proper formations. This Guide explained many frustrating losses. Thank you!
Vape Mom 4 Jul, 2022 @ 6:12pm 
Warmest regards to Travis.
Travis  [author] 23 Jan, 2022 @ 1:31pm 
@Ktonian yes you're right. I forgot to put that in when I wrote this. Thank you, will update.
Ktonian 23 Jan, 2022 @ 5:36am 
I'll have to add that flanking (or status as said in this guide) permit to bypass 'shield' and other similar skills that give bonus to defense and/or resistance.
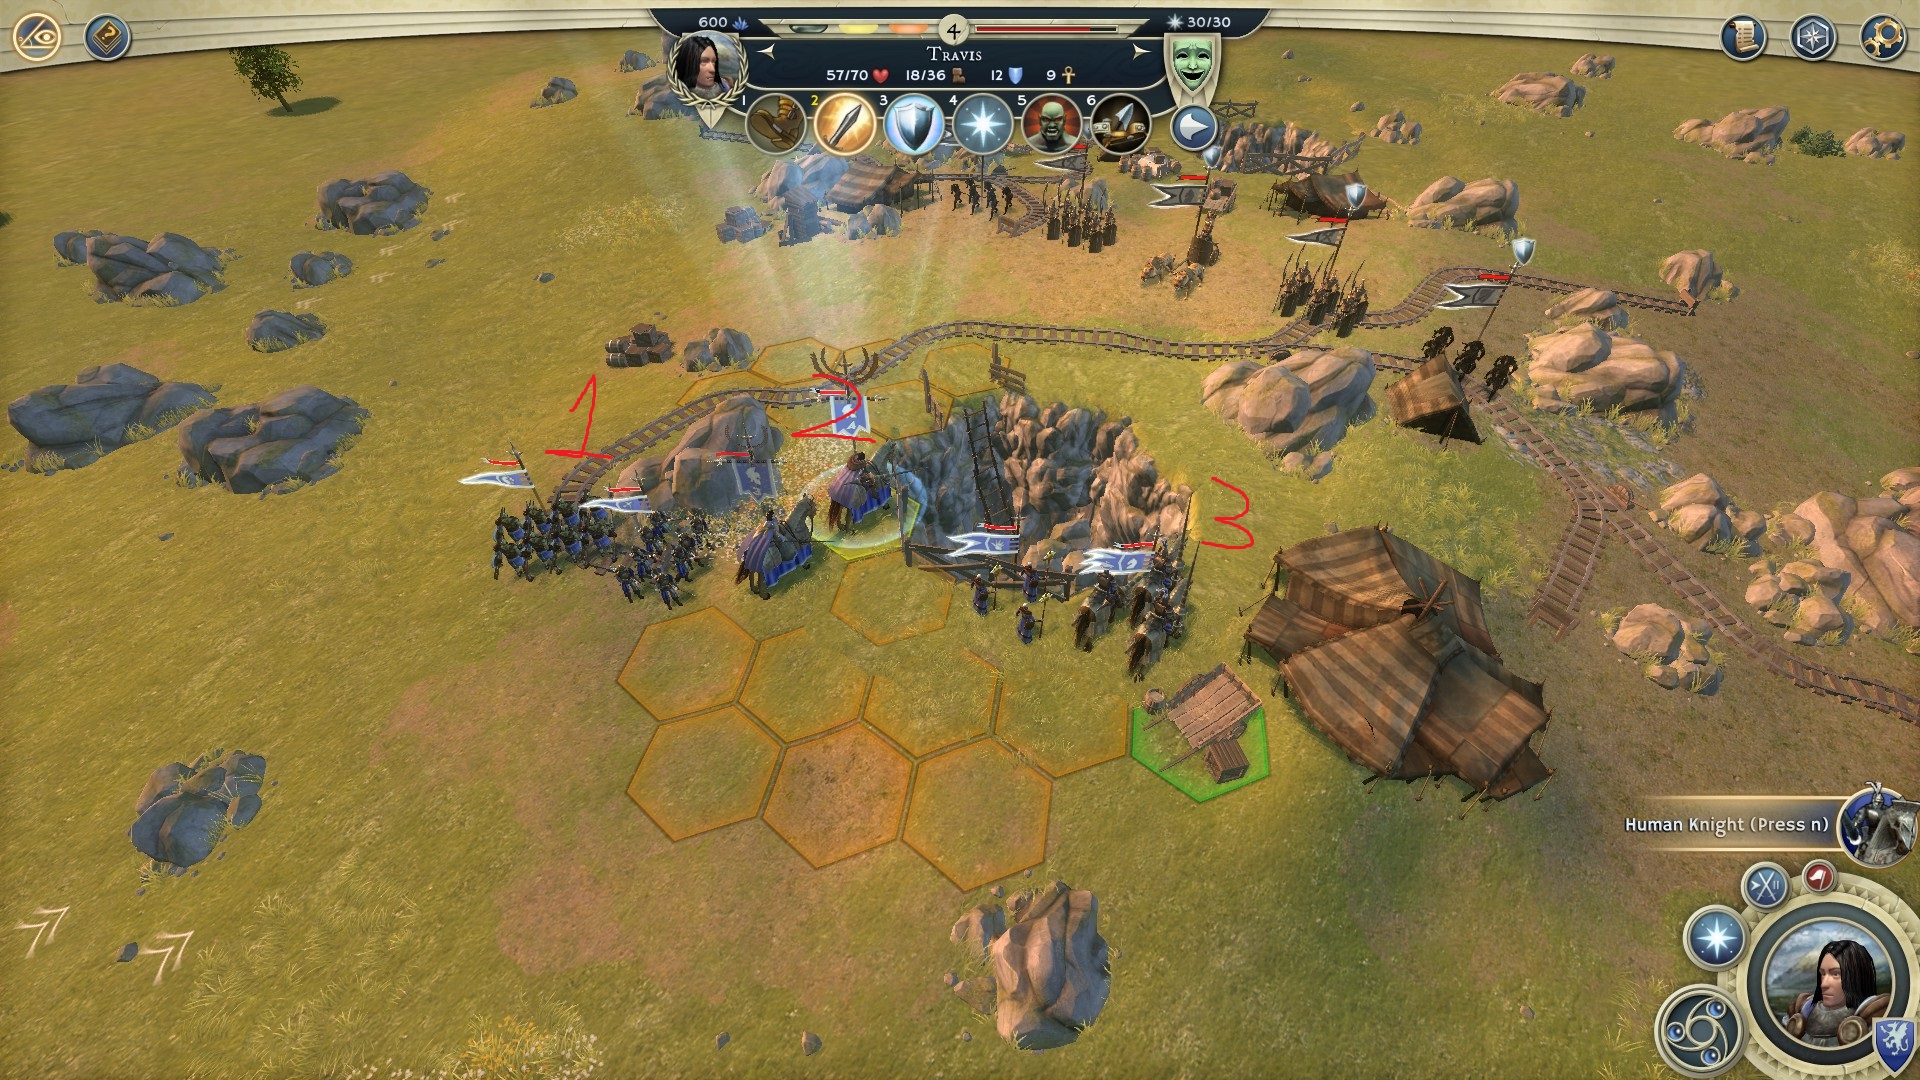
Some units are very dependent of those skill to be effective (high elve swordsmen, frostling raider…) or are simply really hard to kill when attacked frontally (human knight come into mind), thus flanking them permit to destroy those a lot more efficiently.
Travis  [author] 4 Aug, 2020 @ 9:34pm 
Of all the people I have spoken with, you are the first to have that opinion, congratulations. A lot of helpful information for the likes of mechanics are not very easily accessible/well presented, but with all things, yes you can follow your nose till the end. The other thing is, once you know how something works, it's often hard to imagine how you previously didn't.

In all, if this guide is helping people, better to just let it.