Kerbal Space Program

Kerbal Space Program

188 ratings
Tin Can Program Career Mode Guide
By Sistrum
This is a guide to success in Career Mode. This guide will show you an efficient path through the early days of Career mode. When starting Career Mode, your options are very limited, and this guide will show you how to make progress and avoid needless grinding.

Subscribe to the Tin Can Program to get all the craft you will need for this guide.

NEW: After the tutorial, try our complete Tin Can Program Campaign. This collection includes 25 additional craft of all shapes and sizes filling a variety of practical and impractical roles. Instructions are included, and the Campaign missions will return more than enough science to complete the entire Tech Tree. Good Luck!

February 16, 2023 - Video?!
v4.20 April 2022 - Final fixes in preparation for video production
v3 April 2021 - 'Pale Rider' upgrade, need new videos
v2 January 7, 2020 - Now with Video!
v1.3 October 7, 2019
v1.2 August 10, 2019
v1.1 August 3, 2019
v1.0 Complete July 21, 2019 - Special Thanks to Mike, Neil, and Buzz for taking the first step.

Illustrations by Books Bespoke (c) 2021
9
7
2
13
3
2
3
2
   
Award
Favorite
Favorited
Unfavorite
Thank you for choosing the Tin Can Program. This math-free guide is for Career Mode on the default ‘Normal’ difficulty settings. To get started, subscribe to the Collection. These spacecraft are tested and proven, so you can skip the design process entirely and proceed with exploring Kerbin and the Mün. Spacecraft design is not covered in this guide.

The Tin Can Program will launch your Career on a solid trajectory. The guide will get you through the early phase of Career Mode with no grinding. There are six Craft and eight Missions in the guide. Each comes with a video, instructions, and a simple checklist.

Before starting this guide, you should have at least played the basic tutorials. We are focused on telling you what to do, rather than how to do it. The instructions are simple, but more guidance is available in the videos.
Program Basics
Before you start a new career, make a few tweaks. In the Game Settings menu, on the General Settings page, enable 'Show Extended Burn Indicator' and set 'Default Throttle on Prelaunch' to 100%. Be sure ‘EVAs Auto-Rotate to Camera’ is enabled. These settings will ensure your experience is consistent with what is written here. If you’re still learning, keep reading for a few basic tips about the game.

Caps lock is crucial. This is a toggle that softens the steering inputs, making your controls more precise. You can use this toggle as needed. Press Z or X for full throttle or cut throttle, to avoid a delay. Be sure SAS is enabled at all times.

You also need to know when to switch the altimeter from Sea Level to Ground mode. The green setting (Ground) is needed on descent, when landing. This setting shows your real height above the terrain. At all other times, the blue setting (Sea Level) is more relevant. The altimeter setting is rarely mentioned in the instructions, because its usage is consistent in every mission.

Time warp can introduce errors, mainly during atmospheric flight, stage jettison, ‘chute deployment, or ground contact. Be sure you are in real-time before the situation becomes dynamic.

Finally, let’s talk about the navball. It might seem like the outside of a globe; you must reverse this perception. See the inside of a sphere — you are inside the Navball, and the reticule points to its inner surface. This way, you can see what the Navball really shows. The reticule is the tip of your craft; the navball illustrates your angle and attitude.

Finding marks on the navball is essential to following this guide. If you can read the Navball, you can complete this guide easily.

The Navball is usually marked with various navpoints. You don’t need to memorize them all, but be sure you can identify prograde and retrograde. Prograde shows where you are headed, and retrograde shows the opposite. Both of these Navpoints are marked with a yellow-green reticule.

Be sure you can recognize the special Maneuver navpoint. This is the dark blue reticule, and it is only shown when you have a Maneuver plotted on the Map. You also must know how to switch the Navball to different frames of reference. This is as simple as clicking on the velocity indicator, but it is absolutely crucial to your success. All three modes (Surface, Orbit, and Target) are used at various times during this guide.
Start Your Career Right
After you start your Career, look at your contracts in Mission Control. The starting four are the same in every new Career. The Agency offering these contracts — the World-Firsts Record-Keeping Society — offers a unique chain of contracts. Their contracts return a higher reward than any other agency, but they only offer any given contact one time, and only for world firsts. All contracts are random, but the WFRKS contracts are a bit less random — you can’t get a contract for a world first once it has been achieved, because it’s not a world first anymore. So, if you achieve a World First without a WFRKS contract in place, you miss out on a juicy contract reward.

These contracts are our focus. After the first four, they are random, so there is some luck involved. Even with bad luck, you will rarely be short of funds if you keep doing your WFRKS contracts. When you complete a contract that doesn’t require return to Kerbin, be sure to visit Mission Control for another contract immediately.

Okay, that’s it for introductions. To begin, accept the first two contracts: ‘Gather scientific data from Kerbin’ and ‘Launch our first vessel’. Now, put Tin Can 1 on the launchpad. Instead of launching, just run the Goo canister, collect a crew report, and send the pilot out for an EVA report. With that done, put the pilot back aboard and recover the craft to complete the first contract for free.
Tin Can 1 - First Flight

Flight Instructions
Put Tin Can 1 on the launchpad again. This is a vertical flight, but pitchover just a bit so that we don't come straight back down onto the 'pad.

While flying, observe the Goo canister and get a crew report. On descent, stage the parachute at 2km. After landing, get an EVA report before recovering the craft.

Fun Fact: Without the throttle limit, this rocket ascends beyond cruising altitude in less than a minute.

After Recovery
Back at the Space Center, activate the Fundraising Campaign at the Administration Building. Set it to the highest possible value. Get the ‘Escape the Atmosphere’ contract, then research Basic Rocketry, Engineering 101, and Survivability.
Tin Can 2 - High Toss
Note: included in Video 1 above

Flight Instructions
Tin Can 2 is a Science mission and another vertical-only flight. Again, no steering input is required. Before launch, examine the Science payload in the service bay. Open it manually — custom actions are not yet available.

Tin Can 2 has four altitude targets: In Flight, Upper Atmosphere, Space Near Kerbin, and Space High Over Kerbin. Inside the service bay, there are thermometers and barometers for each of these targets and three Goo Canisters.

Pin every infobox for each instrument, and the Command Pod’s infobox, too. Take a look at the video — it illustrates the idea better than words. We will un-pin each instrument and close its infobox as we proceed, to track our progress.

With the instruments prepared, we can launch. Jettison each booster immediately upon flameout. When the burn is done, start collecting observations:

Use a thermometer, a barometer, and a Goo Canister before we escape the atmosphere.

Above 70km, use another thermometer, barometer, and Goo Canister.

Wait until altitude exceeds 250km, then get a Crew report and use another thermometer, another barometer, and the last Goo Canister.

Wait to descend and deploy the ‘chute as soon as it is safe to do so. Once that’s done, use the final thermometer and barometer before landing.

We may experience a dramatic mountaintop landing. Be ready for an extreme slope. If the craft is rolling downhill, steer to counteract the roll so that the craft can be recovered. In this scenario, no EVA Report is possible — we don’t need it, anyway.

Fun Fact: Tin Can 2 usually renders the pilot unconscious when G-Forces are enabled.

After Recovery
Go to R&D and research four techs: General Rocketry, General Construction, Advanced Rocketry, and Stability. Go to Mission Control and accept the ‘Orbit Kerbin!’ contract.

Get another contract; we need the advance payment. Usually, there's a contract for the 'Mk16 Parachute', which is easy to complete. Any contract will do, though; we don't need to complete it, we only need the advance payment. There are more details in the video.

Next, upgrade VAB and the Launchpad — we will spend most of our remaining funds, but should have enough left to launch Tin Can 3.
Tin Can 3 - First Orbit

Flight Instructions
Launch Tin Can 3. Do not steer until altitude exceeds 25km.

At this time, the inner SRB will still be running, and steering power is limited. When the SRB burns out, jettison immediately and keep steering to horizontal - be careful not to oversteer.

Stay on the horizon until the upper stage burns out. Cut the throttle before jettison, so we don’t fire the orbit stage early.

Go to AP, remaining horizontal, and hit full throttle. Cut the throttle when PE exceeds 70km. We are now in a stable orbit. Steering the spacecraft drains the electric charge; be careful not to waste it because it cannot be recharged.

Leave Tin Can 3 in orbit and return to the Space Center. Go to Mission Control and accept the new WFRKS contract to return from orbit. Don't forget! These funds are crucial. Use the Tracking Station to resume flying Tin Can 3.

To deorbit, align retrograde and burn until PE is just below 30km. Jettison the orbit stage. Set the navball to surface mode and maintain retrograde attitude all the way down. Get a crew report from the upper atmosphere (above 18km). As usual, stage the parachute above 2km.

Fun Fact: The TC-3 “Yuri” orbit module’s battery is actually just a potato.

After Recovery
Take the next WFRKS contract (Mün flyby) and then upgrade Mission Control and the Tracking Station.

Use Tin Can Canoe to complete tourism contracts if funds are insufficient.
Tin Can 4 - Mün Mission

Flight Instructions
At launch, we fly vertically to 25km. At that altitude, pitch down to the horizon, and be ready to make roll corrections. Keep going with the pitchover through SRB jettison.

Hold steady on the horizon and reduce the throttle to just above zero. Stay level with the horizon until we reach orbit. Wait until there are about 10 seconds remaining until AP, then hit full throttle and stay horizontal. Cut the throttle when PE exceeds 70km.

Now that we are in orbit, we will use a maneuver node to set up a Mün flyby. To start, locate the Mün on the map. Place a node in our orbit, on the opposite side of Kerbin from the Mün. Add prograde velocity — one side of the plot should expand toward the Mün. Keep going until the plotted orbit goes a bit past the Mün’s orbit, then target the Mün.

Now, move the maneuver node to aim our plot toward where the Mün will be when we arrive. If the plot starts to fall short, add more velocity. For this flyby, we need a Mün PE below 60km — aim for about 30km to have a nice margin of error. Once the maneuver is set, be sure we are not going to escape Kerbin after the flyby. For more help adjusting the maneuver node, watch the video.

For the maneuver burn itself, use the burn indicator to know when to begin. Get aligned on the maneuver navpoint. Start the burn in flight view so we can jettison the empty upper stage immediately. After jettison, open the map. Stay aligned on the maneuver navpoint while burning — it may drift. With less than 100m/s left to burn, reduce the throttle to below one third. When the solid line appears (our real trajectory), reduce throttle gradually for better control.

Cut the throttle once the trajectory looks good, then delete the maneuver node, and make sure PE is below 60km — we can afford to make a few small correcting burns if needed. Monitor the remaining electric charge, which is mainly drained by steering.

Complications!
Proceed toward Mün. Press 8 to collect Science as soon as we enter its sphere of influence. Next, we need to check if our contract is completed yet. The flyby objective is completed upon arrival at Mün. If this is the only objective, our contract is done! Get a new one at the Space Center right away. Ideally, the new contract will be for Mün orbit, and we may proceed. Upgrade the Astronaut complex before you resume flying Tin Can 4.

If the flyby contract has additional objectives, complete those before proceeding with the guide. If returning to Kerbin, use a maneuver near your Münar PE to set that up: adjust the Kerbin PE down to about 30km. Before this burn, don't forget to collect the second round of Science: press 9 when below 60km. If the contract contains the 'gather science' objective, it will not complete until recovering the craft on Kerbin.

Once home, the Mün Orbit contract might not appear next, either; this is random. It's possible to get an Orbital Rendezvous contract next, right in the middle of our Mün Mission, which is annoying, but we will deal with it. Go ahead and take whatever the WFRKS hands out.

Wait until we get the Mün Orbit contract before proceeding with the rest of this mission! Launching Tin Can 4 twice can be monotonous, but will not be an obstacle to completing this guide. Be sure to upgrade the Astronaut complex before proceeding with the rest of the mission!

Orbiting Mün
Resume flying Tin Can 4, or repeat the above steps if necessary. Set up a maneuver node at your Mün PE. Add retrograde velocity until the flyby arc closes into an ellipse — that’s orbit. Keep adding velocity until PE and AP are both 30-60km. From this altitude, we can collect multiple EVA Reports.

With the maneuver ready, proceed to below 60km (before the maneuver) and press 9 to collect more Science. Be sure these second readings say “Space Near the Mün”. With that done, proceed to the maneuver node and execute the burn.

In Mün orbit, we need EVA reports from at least six different biomes. The Mün has numerous biomes, including one for each of the large craters. When we have the reports, use a maneuver node to return. Place it on the Mün’s prograde side, and add some prograde velocity to escape. Set our trajectory for a 25-30km PE at Kerbin. Watch the video to see more about how to spot different biomes on the map view and to see the escape maneuver.

After the maneuver burn, grab a few more reports on the way home. This is also a good time to make a quicksave. Before leaving Mün's influence, get an EVA report above 60km. Get another EVA report right after leaving — this one should read ‘Space High over Kerbin’. Get another EVA report below 250km, then prepare for reentry.

Just below 70km, send the pilot out for an Upper Atmosphere EVA report. Be quick! Don’t forget to immediately reactivate SAS and the retrograde hold when the pilot is back aboard.

As usual, deploy the parachute just above 2km. Once the ‘chute is fully inflated, the craft is stable. Get an ‘in flight’ EVA Report, then get back inside for landing. Unlike Crew Reports, the Command Pod can hold multiple EVA Reports — we should now have at least 11.

Fun Fact: There is no dark side of the moon, really. As a matter of fact, it's all dark.

After Recovery
Get a new WFRKS contract. The next one is usually Orbital Rendezvous at Kerbin, but we may also get a contract for Orbital Rendezvous at Mün, or even the Mün Landing. We should have enough science now to skip the Rendezvous mission and proceed directly to Tin Can Turkey. However, we must be able to perform Orbital Rendezvous before flying Tin Can Tuna.
Orbital Rendezvous/Crew Transfer

Flight Instructions
For the orbital rendezvous mission, think ahead! Tin Can 4’s reentry is not safe for a level 0 pilot. Tin Can 3 is our rendezvous target. Fly it to orbit first, then return to the Space Center. Remove the science instruments from Tin Can 4’s service bay. Follow the usual launch profile to orbit, then take a look at the map. Target Tin Can 3 to make some close encounter markers appear.

From where the two crafts’ orbits intersect, burn to prograde — slowly increase the throttle. One pair of encounter markers will realign as we burn. Control the throttle carefully, get them as close together as possible, then cut the throttle.

Now, look for the upcoming ascending or descending node. Check the angle at this node, and align to the corresponding navpoint: use normal to raise a negative angle, and use antinormal to reduce a positive angle. From near the node, burn carefully until the angle is zero. Stay close to the node — if it drifts away, cut the throttle and get closer to finish the burn.

Once the angle is at 0°, head to just after AP and make minor prograde or retrograde burns to adjust the encounter distance. Get the distance as low as possible, then approach the encounter itself. From about a minute away, turn on the retrograde hold in target mode. Hit full throttle when the time until close encounter is below 10 seconds. Control the throttle carefully and get velocity to zero. If we get close enough, the rendezvous contract objective will complete while we are slowing down. To get closer, align on the target navpoint. Burn to get closer, then retroburn again when close to stop.

For a crew transfer, get as close as possible. Put both pilots on EVA simultaneously. Fly each pilot to the other craft one at a time. With orbital rendezvous and crew transfer complete, it is time to deorbit these craft before their batteries die.

Be sure not to deorbit Tin Can 4 with a level 0 pilot aboard. Descend in the usual fashion with a 30km PE. Pop the ‘chute at 2km, as usual. Deorbit the other craft before we proceed.

Fun Fact: This isn’t zero gravity; this is free-falling with style.

After Recovery
The Mün landing contract will come soon. Other contracts may appear first, but they won’t be a problem. After accepting the Mün landing contract, research Heavy Rocketry, Flight Control, Basic Science, and Electrics. Upgrade R&D before launch.
Tin Can Turkey: Mün Landing

Flight Instructions
We’re going to use the same steps we used for Tin Can 4, with a few extra steps. For the SRBs, stay on a pure vertical trajectory. Start steering immediately after SRB jettison — pitch down to a 45° inclination and hold there. Watch as AP increases, and pitch down further when it approaches 60km. Hold steady at 15° until AP reaches 80km, then pitch to the horizon. Stay at full throttle until the lower stage burns out, reduce the throttle on the upper stage, just like Tin Can 4, then watch the time until AP.

Hit full throttle inside 10 seconds, and then cut the throttle once PE exceeds 70km. From this orbit, set up a close Mün flyby — aim between 10-20km. Use another maneuver to set up a retroburn at Mün PE, and burn for a very low orbit. Get both PE and AP down to 10-20km. When this second maneuver is done, we’re ready to land on the Mün. Go to the sunlit side of the Mün and engage the retrograde hold in surface mode. To find a good landing site, quicksave, then use trial and error — the video has some tips, too.

Carefully burn to zero velocity, then cut throttle. Descend until about 3km, or velocity exceeds 50-100m/s. Burn to manage descent speed, and get below 10m/s by 100m. Reduce velocity on final approach, and get below 5m/s before ground contact. This is hard to describe, so watch the video for more help.

Don’t forget to think about contracts: for a ‘Land on the Mün’ contract without a return objective, go get another contract right now. When a return objective appears, go ahead and plant a flag, even without the ‘Plant a flag’ objective, so the pilot will get a little extra XP.

With that in mind, press 8 to collect surface science, then go out on EVA and plant a flag. Use the jetpack to get up and down from the hatch. While outside, get a surface sample and an EVA Report. Get back aboard, and don’t forget to get another contract if needed. We want to have a ‘Return to Kerbin’ objective before we liftoff.

For this mission, fly straight up toward zenith to go home. Watch the map. When the return orbit at Kerbin appears, use a maneuver node to reduce its PE to about 30km.

In the video, you can see what to expect during liftoff and return. Once the return trajectory is set, the mission is almost done. Don’t jettison the orbit stage until near Kerbin. Engage the retrograde hold in surface mode before atmosphere contact, and open the ‘chute at 2km.

Fun Fact: The official mascot of the Tin Can Program is a Turkey named Franklin.

After Recovery
Research Propulsion Systems, Fuel Systems, Advanced Construction, Advanced Flight Control, Landing, and Miniaturization.
Get another WFRKS contract, even though we won’t complete it during this guide.
Keep following the WFRKS contracts to stay well-funded. Check for any relevant contracts before the next mission — we are landing on the Mün again.
If there’s no easy contract, don’t worry about it; it’s just a good opportunity, not a necessity.
Tin Can Tuna: Docking Training

Flight Instructions
Big Tuna is our docking trainer. This is another Mün landing, using an independent lander module. The lander must rendezvous and dock in Mün orbit before returning to Kerbin.

Fly the usual launch profile to orbit: pitchover at 20km, reduce throttle to get closer to AP, then burn full throttle for orbit when 10 seconds remain. Follow the same steps we used for Tin Can 4 and Tin Can Turkey. The flight to the Mün will be familar, too. Set up a maneuver node for a close flyby at 10-20km, burn the maneuver, then set up another one at Mün PE to make orbit. Before the second maneuver, practice docking.

Decouple the orbiter from the lander. While we drift away, turn the orbiter around and target the lander’s docking ring. Set ‘Control from Here’ on the orbiter’s docking ring. Wait until the debris drifts out of the way. Align the craft to the Target navpoint and activate RCS. Press H to approach to the Lander, but don’t go faster than 1m/s.

Using the translation controls (IJKL), adjust the prograde navpoint so that it is aligned with the target navpoint. Keep velocity below .5m/s on final approach, and turn off RCS for the last 1-2m. Once docked to the lander, transfer the pilot to it. Press 9 to shutdown the Orbiter engine, then set ‘Control from Here’ on the lander cockpit.

Now, proceed to burn the second maneuver. Set up a low Mün orbit with PE and AP at 10-20km. Press 4 to separate from the orbiter, so we can land. Go to the sunlit side of the Mün, then point the craft toward one of the navball's poles. In this attitude, decouple the orbiter from the lander and leave it behind in orbit. The radial attitude ensures we don't collide with the orbiter (or hit it with the engine plume) when we burn retrograde to initate landing. Start burning retrograde once separated. Of course, this should all be done over a suitable landing site.

Carefully burn to zero velocity, then cut throttle. Descend until about 3km, or velocity exceeds 100m/s. At 3km, jettison the upper stage even if it has fuel remaining. Then start a continuous burn to manage descent speed, and get below 10m/s by 100m. Reduce velocity on final approach, and get below 5m/s before ground contact.

On the Mün’s surface, press 8 to collect instrument science. Get an EVA Report and a surface sample, plant a flag, then get back in the lander when done. To return to Kerbin, we have to rendezvous and dock with the orbiter, so we can safely transfer back to Kerbin’s atmosphere. First, be sure to orbit in the right direction.

To prevent future heartache, quicksave now. Be sure to fly in the same direction as the orbiter. Watch the video for more detail. After launch, turn horizontal as soon as possible — once clear of any local terrain. Stay horizontal until AP reaches about 100km, then open the map. Find the spot (just ahead) where the two orbits intersect. Set up a maneuver at this intersection — use a radial burn to move our PE so that it touches the other orbit. The video shows this whole process.

Now, correct the ecliptic alignment. Target the Orbiter to make the ascending/descending nodes appear. Burn normal or antinormal at the upcoming node, so that it shows an angle of zero. Once the angle is zero, we can set up a rendezvous.

Use a maneuver node at PE to figure out whether to burn prograde or retrograde. Delete the node and burn freehand to monitor the encounter distance as it changes. Get as close as possible. For very fine control, use RCS — press N to back up a bit without turning around. We want an encounter below 1km — less than .5km is even better. Turn off RCS once the encounter is set up.

Approach the rendezvous. Engage the retrograde hold in target mode. Get within 10 seconds of the close encounter, then retroburn. Burn carefully until velocity is zero. To reduce the distance further, burn on the target navpoint again, then retroburn to stop. When the distance between the two craft is very small, line up on the target navpoint and switch over to the orbiter.

Target the lander, then align the orbiter on the target navpoint. Switch back to the lander and set ‘control from here’ on the docking ring, then realign on the target navpoint. Turn on RCS and approach slowly — slow down below 1m/s before contact.

Use RCS and the translation controls to keep the prograde navpoint right on top of the target navpoint. To realign with the target navpoint, deactivate RCS before steering. Just like the practice docking, keep velocity below .5m/s for the final approach, and shut off RCS within 2m. Once the lander is docked to the orbiter, we can prepare for departure.

Put the pilot back in the Command Pod. Press 9 to shutdown the lander engine, and press 0 (zero) to activate the orbiter engine. Set ‘Control from Here’ on the Command Pod. Use a maneuver node to escape from the Mün — set up a Kerbin return PE at 30km. Once this burn is complete, transfer all remaining fuel from the Lander to the Orbiter. Resource transfer mode is activated by Alt+Right Click — transfer fuel out of all the lander tanks until they are dry.

We will bring the lander back to Kerbin with us. Quicksave, then approach Kerbin as usual, with the retrograde hold engaged in surface mode, but don’t jettison the orbit stage. First, burn all remaining fuel at 60km. Jettison immediately upon flameout, then deploy the parachutes at 2km. Once the ‘chutes are staged, turn off the retrograde hold — the command pod flips over, and the lander hangs below. Deploy the landing legs, if appropriate.

Fun Fact: The 'Joel' and 'Mike' probe cores were adapted from janitorial robots.

After Recovery
After recovering the command pod and lander, the Tin Can Program tutorial is complete. You have graduated! To continue the Tin Can Program, subscribe to the Tin Can Program Expansion pack. These craft do not come with detailed guides, but each one has a mission profile and a checklist on its workshop page.

If you continue to follow your WFRKS Contract objectives, you will remain well-funded. There are several lucrative Minmus contracts headed your way before interplanetary objectives will appear. The Tin Can Program expansion pack includes a suite of low-tech craft for early Minmus missions, which will get you all the science you need to launch your first interplanetary mission.

Whatever your Career Mode goals are, we hope this tutorial helped you achieve them.
Afterword
Now that you have completed the Tutorial, try the full Campaign!

This guide contains unnecessary steps and inefficient design choices. These are not mistakes or oversights — some choices were made in service of a goal other than efficiency, and should not be misconstrued as mistakes. As the title implies, the Tin Can Program is not designed for maximum efficiency, nor is it intended to be particularly impressive. Instead, our goal has always been to maintain a wide margin of error with broad tolerances.

Your feedback, suggestions, corrections, comments, and questions are all welcome.

Thank you for reading — learning is heroic. The future is not fixed. Take your protein pills, and put your helmet on!

The Tin Can Program is a production of Books Bespoke [Phase Zero 2020-22]
Special Thanks to Matthew for playtesting and tolerating my abundant textual flow.

With much love for Lola, in particular, not to mention Valentina, Sally, Judith, Christa, Svetlana, Kathryn, Roger, Gus, Ed, Yuri, Mike, Neil, Buzz, and all the rest. How beautiful the Earth is... everything is going well. Поехали!

(Below, please find the instructions for flying Tin Can Canoe, a legacy inclusion which is no longer necessary to complete the tutorial. It also acts as a fail-safe, enabling you to generate additional funds if something goes wrong in the early days of your Career.)
Tin Can Canoe - Tourist Trap (Legacy)
Flight Instructions
Before liftoff, take note of the rocket’s reversed orientation. For this flight only, we will use the pitch up control instead of the usual pitch down. We are making the same turn to the East, but the opposite input is required, because the rocket is upside-down.

Fly on a vertical lift through the entire SRB burn, and jettison immediately on flameout. At 20km, pitchover directly to the horizon and hold there until the upper stage burns out. Again, be careful not to oversteer. Cut the throttle before upper stage jettison, then coast to AP and burn for orbit.

Monitor the remaining electric charge, which still cannot regenerate.

To deorbit, engage the retrograde hold. Retroburn carefully until PE is about 30km, then jettison the orbit stage.

On reentry, (somewhere around 20km) the reentry module will tumble out of control - this is normal. Watch the parachute staging icons. Deploy each set of ‘chutes immediately when safe.

After ‘chute deployment, turn off the retrograde hold. When the parachutes inflate, align Tin Can Canoe horizontally for landing.

Fun Fact: Tin Can Canoe is technically not a canoe, because one of the seats faces backwards.

After Recovery
Tourism contracts are no longer required to proceed. Tin Can Canoe is still included as a fail-safe in the event of a financial emergency, and because we are fond of its lo-fi antics.
Master Checklist (Tin Can 1-4)
Tin Can 1 Checklist
  • Accept first two contracts
  • Complete launchpad test (recover and return to launchpad)
  • Vertical flight only, no steering required
  • Crew report and Goo canister in flight
  • Deploy parachute at 2km during descent
  • Collect EVA report at landing site
Tin Can 2 Checklist
  • Career management at Space Center
    • Activate Fundraising Campaign
    • Get 'Escape the Atmosphere' contract
    • Research Basic Rocketry, Engineering 101, and Survivability
  • Pin infoboxes for science instruments (see video)
  • Vertical flight only, no steering required
  • Jettison each booster immediately at flameout
  • Collect science
  • Four target locations for this mission:
    • In flight
    • Upper atmosphere (above 18km)
    • Space near Kerbin (above 70km)
    • Space high over Kerbin (above 250km)
  • Thermometer and barometer in all four locations
  • Goo canister in upper atmosphere and space (both)
  • Crew report in space (high)
  • After reentry, deploy 'chute immediately when safe
Tin Can 3 Checklist
  • Career management at Space Center
    • Accept WFRKS contract and side contract
    • Upgrade VAB and Launchpad
    • Research Stability, General Rocketry, General Construction, and Advanced Rocketry
  • Vertical lift through outer boosters
  • Begin pitchover above 25km
  • After inner SRB jettison, steer to horizon and hold
  • Cut throttle at flameout, then jettison upper stage
  • Near AP, burn prograde at full throttle
  • Cut throttle when PE exceeds 70km
  • To deorbit, retroburn until PE is ~30km
  • Jettison orbit stage immediately
  • During reentry, maintain retrograde attitude
  • Get crew report above 18km (Upper Atmosphere)
  • Deploy 'chute at ~2km
Tin Can 4 Checklist
  • Upgrade facilities and assign an experienced pilot
  • Vertical lift until 25km - begin pitchover at this altitude
  • Limited steering power until upper SRB jettison
  • After upper SRB jettison, pitch to horizon and hold steady
  • At horizon, set low throttle
  • Do not cut throttle — get as close to zero as possible
  • Return to full throttle at 10 seconds before AP
  • Cut throttle when PE exceeds 70km
  • Set up maneuver node for Mün flyby below 60km
  • Execute maneuver burn — be sure Münar PE is below 60km
  • Press 8 immediately on arrival in Mün space
  • Accept new WFRKS Contract and upgrade Astronaut Complex (Space Center)
    • If Flyby Contract requires return to Kerbin, fly home and then return to Mün as above
  • Set up maneuver for retroburn to orbit at Mün PE — Set PE and AP at 30-60km
  • Press 9 near PE — be sure to get ‘Space Near Mün’
  • Execute second maneuver burn
  • In Münar orbit, collect at least 6 different EVA Reports
  • Use maneuver node for return to Kerbin PE at ~30km
  • Before departing Mün space, collect EVA report above 60km
  • At Kerbin, collect ‘Space’ EVA reports
    • One above 250km, and another below
  • Quickly collect EVA report just below 70km — get back inside ASAP!
  • Reactivate SAS and retrograde hold immediately
  • Deploy parachute at ~2km
  • With ‘chute inflated, collect EVA Report (In Flight)
Orbital Rendezvous Checklist
  • Fly Tin Can 3 to orbit and return to Space Center
  • In VAB, remove science instruments from Tin Can 4
    • Retain the service bay
  • Follow Tin Can 4 standard launch profile
  • When in orbit, target Tin Can 3
  • Burn prograde where both orbits intersect
  • Get close encounter markers as close as possible
  • Normalize orbit at ascending or descending node
  • Minor correcting burns near AP — get as close as possible
  • Before close encounter, activate retrograde hold in target mode
  • Initiate retroburn within 10 seconds of close encounter
  • Trim throttle and reduce target velocity to zero
  • To get closer, burn toward target navpoint then retroburn again
  • For crew transfer, put both pilots on EVA simultaneously
  • Deorbit to 30km PE with ‘chute at 2km as usual
  • After recovery, deorbit the other craft
Master Checklist (Turkey/Tuna)
Tin Can Turkey Checklist
  • Launch
    • Upgrade R&D
    • Research Heavy Rocketry, Flight Control, Basic Science, and Electrics
    • Check for easy Mün contracts (Plant a Flag, etc.)
    • Vertical SRB lift — pitchover immediately after jettison
    • Hold 45° inclination until AP reaches 60km
    • Hold 15° inclination until AP reaches 80km
    • Hold at horizon until lower stage flameout
    • Reduce upper stage throttle to just above zero
    • Return to full throttle at 10 seconds before AP
    • Cut throttle when PE exceeds 70km
  • Orbit
    • Set up maneuver node for low Mün flyby — 10-20km
    • Execute maneuver burn — be sure Münar PE is 10-20km
    • Set up maneuver at Mün PE for orbit, then burn
    • Set for low orbit with 10-20km AP and PE
  • Landing
    • Once in orbit, enable retrograde hold in surface mode
    • Quicksave, then use trial and error to find a good landing site
    • Land on the daylight portion of the Mün
    • To land, retroburn until velocity is close to zero
    • Activate landing legs after upper stage jettison
    • Cut throttle as close to zero velocity as possible
    • Descend until below 3km or faster than 100m/s
    • Burn continuously to manage velocity
    • By 1km, keep velocity below 50m/s
    • Make ground contact at 5m/s or below
    • Cut throttle instantly on ground contact
    • Collect Science
    • Press 8 once landed for instrument science
    • Get EVA report and surface sample
    • Plant a flag before returning to the craft
  • Return
    • Launch on pure vertical ascent until Mün escape
    • Burn to adjust Kerbin PE to 30km — use maneuver if needed
    • Enable retrograde hold in surface mode
    • Jettison orbit stage near Kerbin
    • Deploy ‘chute at ~2km
Tin Can Tuna Checklist
  • Launch
    • Research Propulsion Systems, Fuel Systems, Advanced Construction, Advanced Flight Control, Landing, and Miniaturization
    • Check for easy Mün contracts (Plant a Flag, etc.)
    • Assign a single pilot to the Command Pod
    • Vertical lift through SRB burn and after jettison
    • At 20km, pitchover to 45° until AP reaches 60km
    • Hold 15° inclination until AP reaches 80km
    • Maintain horizontal inclination until lower stage flameout
    • Reduce upper stage throttle to just above zero
    • Return to full throttle at 10 seconds before AP
    • Cut throttle when PE exceeds 70km
  • Orbit
    • Set up maneuver node for low Mün flyby — 10-20km
    • Execute maneuver burn — be sure Münar PE is 10-20km
    • Set up maneuver at Mün PE for orbit
    • Set for low orbit with 10-20km AP and PE
    • Practice docking before second maneuver burn
    • After docking, press 0 to shutdown orbiter engine
    • Transfer pilot to Lander and set ‘control from here’
    • Proceed with second maneuver (for Mün orbit)
  • Landing
    • When in orbit, press 4 to separate docking rings
    • Enable retrograde hold in surface mode
    • Quicksave, then use trial and error to find a good landing site
    • Land on the daylight portion of the Mün
    • To land, retroburn until velocity is close to zero
    • Activate landing legs after upper stage jettison
    • Cut throttle as close to zero velocity as possible
    • Descend until below 3km or faster than 100m/s
    • Jettison upper stage at 3km even if fuel remains
    • Burn continuously to manage velocity
    • By 1km, keep velocity below 50m/s
    • Make ground contact at 5m/s or below
    • Cut throttle instantly on ground contact
    • Collect Science
    • Press 8 once landed for instrument science
    • Get EVA Report and surface sample
    • Plant a flag before returning to the craft
  • Rendezvous
    • Find correct launch direction before return to orbit — same direction as orbiter
    • Hit full throttle and steer to horizon immediately when clear of terrain
    • Burn on horizon until AP reaches 100km
    • Set up radial maneuver where the two orbits intersect
    • Move your PE to touch the other orbit
    • Correct inclination at ascending/descending node
    • Once back at PE, burn to create close encounter
    • Get close encounter markers as close as possible
    • Before close encounter, activate retrograde hold in target mode
    • Initiate retroburn within 10 seconds of close encounter
    • Trim throttle and reduce target velocity to zero
    • To get closer, burn toward target navpoint then retroburn again
    • Stop within 100m for easy docking
    • Switch to orbiter, target lander, and set ‘control from here’ on docking ring
    • Press 6 to wake up autopilot, then align with target navpoint
    • Return to Lander, realign to target navpoint, and move in for docking
  • Return
    • After docking, press 9 and 0 to use orbiter engine only
    • Transfer pilot to Command Pod and set ‘control from here’
    • Use maneuver node to set up Kerbin return PE at 30km
    • After maneuver burn, refuel Orbiter from lander tanks and quicksave
    • Engage retrograde hold in surface mode when near Kerbin
    • At 60km, hit full throttle — jettison orbiter stage immediately when empty
    • Activate parachutes at 2km
    • Disengage retrograde hold when ‘chutes inflate
    • Activate landing legs if descending over land
Tin Can Canoe Checklist (Legacy)
  • Assign an experienced pilot
  • Vertical lift through SRBs
  • Pitch upper stage to horizon at 20km
  • After flameout, cut throttle and jettison upper stage
  • Near AP, burn prograde at full throttle
  • Cut throttle when PE exceeds 70km
  • When ready to deorbit, activate retrograde hold
    • Keep an eye on the electric charge
  • Carefully reduce PE to ~30km
  • Jettison orbit stage immediately
  • Deploy each ‘chute stage immediately when safe
  • Disengage retrograde hold for horizontal landing
20 Comments
Sistrum  [author] 22 hours ago 
Yeah, the random contract order can be annoying like that sometimes. The only thing to remember is that every time you trigger a world-first without a contract from WFRKS, you miss out on that contract reward, and the rewards are a little better, too

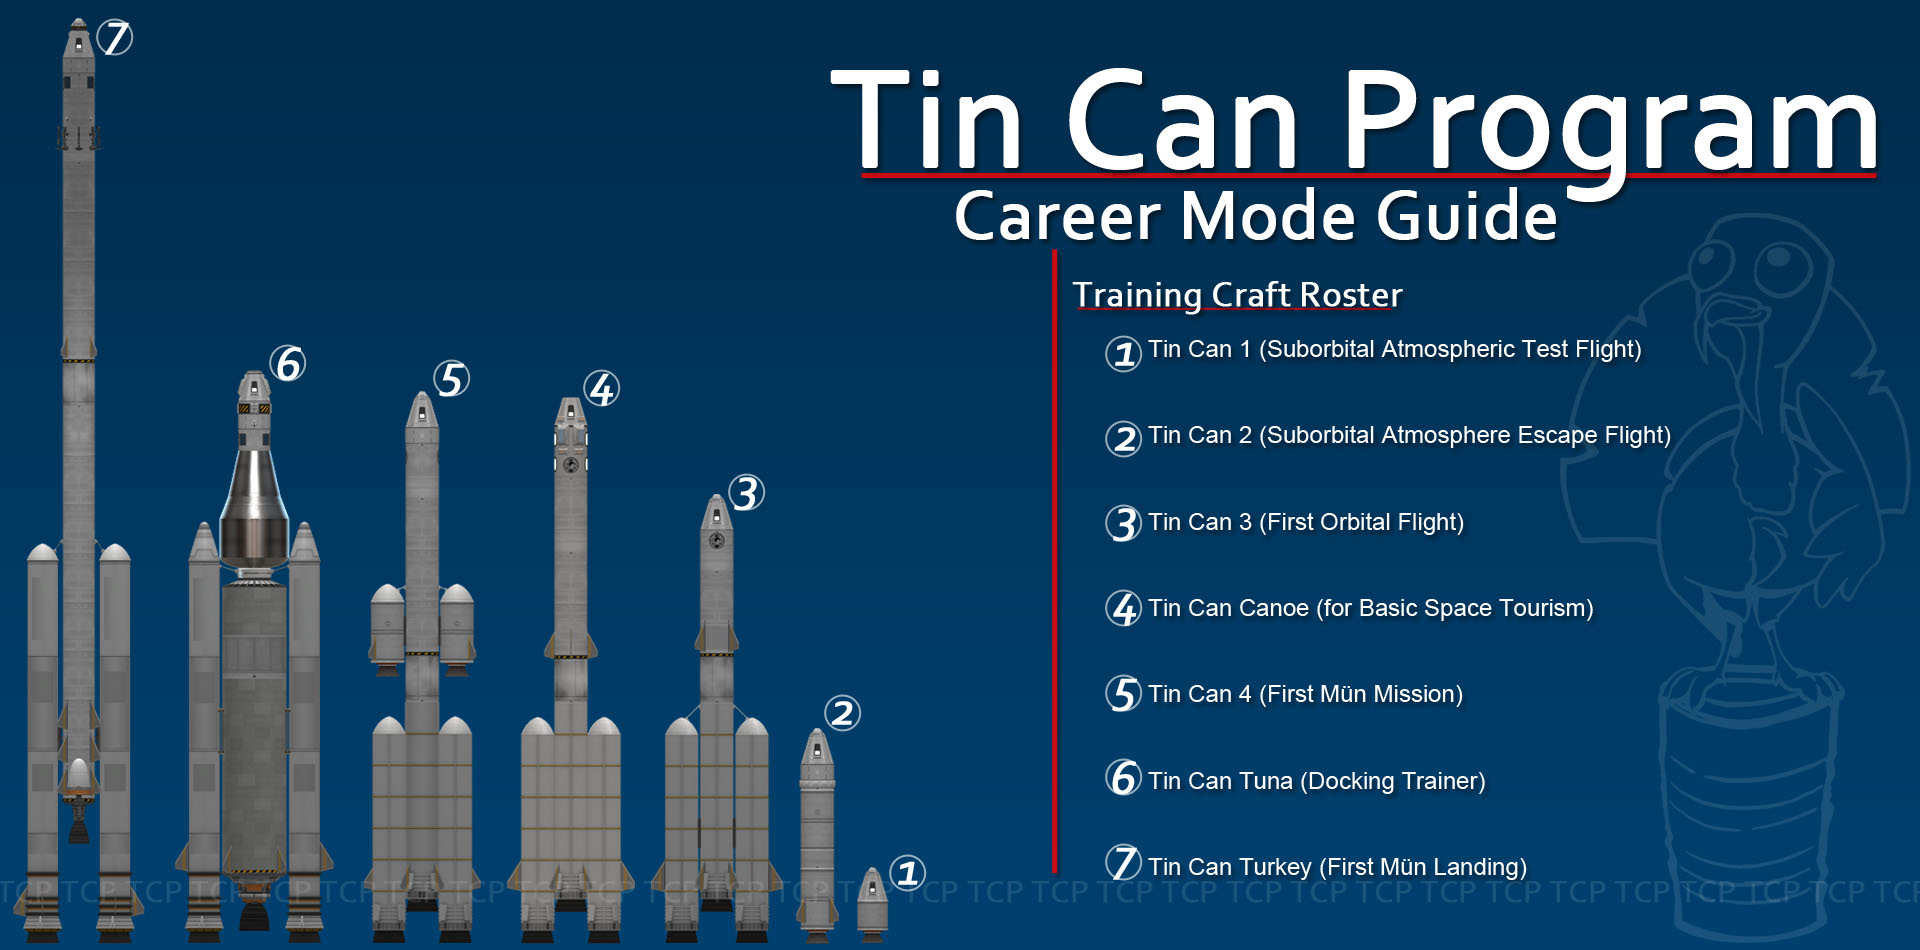
This guide is all about completing as many of those contracts from WFRKS as possible, but there are other ways to get funding, for sure :47_thumb_up:
NOReal525 24 Jul @ 3:23pm 
Nevermind! With a little bit of RNG manipulation, I could get a "Land on the Mun" contract from WFRKS, and from there I can handle it.
NOReal525 23 Jul @ 5:32pm 
Hey! It's that guy who asked about the non-DLC campaign. I am doing the tutorial campaign on Career mode, and I completed Tin Can 4. But I need to ask: Is it absolutely necessary to do Orbital Rendezvous/Crew Transfer, and Tin Can Tuna for this campaign? Or can I just research the stuff that is necessary for the Tin Can Tuna, and use a rocket similar to that to skip all that docking nonsense and head for Minmus? Docking is definitely a skill that I won't wanna learn for a good while, and I have more than enough research to unlock the Turkey. On top of that, I have a contract from Reaction Systems Ltd to plant a flag on the Mun, and it gives a nice ~170,000 Kerbucks if I do complete it. Thanks again!
Sistrum  [author] 20 Jul @ 12:39pm 
Very belated additional info:

I have corrected a minor error in the wording of the Tin Can 2 instructions; this was the likely cause of confusion about science output, as seen here in prior comments :KScared:
YourAnnoyingCousinFromPoland™ 27 Aug, 2023 @ 10:27pm 
Alright, thanks for the advice man, I'll try running through it again :)
Sistrum  [author] 24 Aug, 2023 @ 12:49pm 
You've probably missed something, yeah. Before Tin Can 3, you should collect science from:
- Your initial launchpad test before TC1
- TC1 flight science plus EVA Report at landing site -
- Numerous science instruments on TC2

Personally, the Crew Report is the thing I am most likely to forget.

If you're sure you got all the early stuff on the launchpad and during TC1, it seems likely that you missed a reading with one of the many instruments on TC2. It's a lot to keep track of in a single flight. :KScared:
YourAnnoyingCousinFromPoland™ 23 Aug, 2023 @ 2:10pm 
I'm not sure what I'm doing wrong, but I don't have enough science to get all four research nodes needed for Tin Can 3. Is there something I'm missing?
CyberSoul 26 Jul, 2023 @ 9:30pm 
Nevermind! I'm not really sure what happened, but I decided it was early enough to just scrap the whole save and start over, and it just worked out the second time.
CyberSoul 26 Jul, 2023 @ 9:04pm 
Hello! I just got to Tin Can 3. I had significantly less funds than you did, in the video you had about 17k and I was only at 2k, which is not nearly enough to launch the craft. I am sure I followed the guide to the letter, why might I be so short on funds?
WildDoktor 1 Mar, 2023 @ 7:50am 
Thanks for the explanation! What a great solution.