Golden Treasure: The Great Green

Golden Treasure: The Great Green

113 ratings
A Beginner's Guide to The Great Green
By Hybrid
Walkthrough and tips for beginners.
6
4
2
6
3
2
   
Award
Favorite
Favorited
Unfavorite
Introduction
The purpose of this guide is to provide a walkthrough and tips regarding the more challenging parts of Golden Treasure: The Great Green.

This guide is not intended to be 100% comprehensive, nor to tell you exactly what to do in step-by-step fashion. I could do it, but I don't care to spend time going so in-depth.

Instead, I will be going over what I believe to be the most important bits of information so that you can have a smoother experience and avoid pitfalls. The story is too good to miss because of misunderstanding gameplay mechanics.
Basic Tips: What should I know?
Whenever you're starting any new game, it can be difficult to know what's important and what's not. Often, you will have a multitude of options available, and it's not clear what to focus on. Let me help.

This is a Rogue-Lite. What does that mean? It means you have only one save-game file. You are allowed two freebie deaths per playthrough, but the third one is final and deletes your save. However, your Animal Masteries and Tarot Cards (achievements) are permanent. Animal Masteries and Tarot Cards provide permanent Elemental Mastery bonuses to all future playthroughs.

This is a game about Draak-Kin Life. Draak life is difficult and unforgiving. Draak are powerful and proud creatures, and that means other Draak can be your worst enemies. There are many risks and dangers inherent in exploring the land. Even wild animals like bears and lions can defeat a young Draak in battle.

To succeed, you need to think like a Draak-Kin, not like a fantasy hero. You are all alone in the wilderness. If you walk into danger, there is nobody else who will bail you out. If you are injured, it will be more difficult to fight and defend your territory. If something seems like it might be a risky idea, it probably is, especially for a young and inexperienced Draak. This is a game that is meant to be replayed. You cannot conquer everything you see on your very first play.

Animal Mastery is the single most important thing that makes the gameplay easier. These are the ways to gain animal mastery points:
  • During some dialogues, ask about the animal in question.
  • While stalking an animal, observe it.
  • While fighting an animal, use Brace (Earth ability).
  • Destroy the animal through sneak-attack, chase, or battle.
Every time you gain an animal mastery point, you will see a small icon of the animal fly to the gemstone near the bottom-left side of the screen. If you do not see this happen, it means that your action did not gain any animal mastery points. In fact, it may mean that the animal in question has been mastered! You can check this anytime within the Animal Mastery menu. Mastered animals are colored gold.

Elemental Masteries represent your Draak's abilities both physical and mental. Generally speaking, Fire and Earth are the most valuable because they most strongly enhance your combat prowess. Water is a secondary concern, and Air is a tertiary concern. I'm not saying that Water and Air are useless. But if all you do is boost Water and Air, you will have a cunning Draak who cannot withstand a fang-and-claw battle when its back is against the wall.

Shiny Things represent your Draak's cold, hard cash. Only Draak and two other characters care about Shiny Things. Your Elemental Masteries will be slightly boosted for hoarding many Shiny Things, but it is a mostly inconsequential bonus. The main use for Shiny Things is for trading with other Draak. If you have a lot of Shiny Things, go see if there's something you can buy. Information is more important than Shiny Things.

Artifacts are special and unique treasures found throughout the world. Most of them have a special use, but some are noteworthy only for their trade value. Generally speaking, most Artifacts do absolutely nothing by sitting in your hoard. If you have an option to use an Artifact within dialogue, this is almost always the best use for it. The game is not long enough that you need to "save" Artifacts for later. Use them now. If you don't want to use them, sell them to Darktooth.

Researching Artifacts yourself (when your Air Mastery has gained a few levels) is generally a waste of time. Darktooth's research service is a bargain. You should be spending your limited days on Animal Masteries, improving your Elemental skills, and testing yourself against the unknown.
Basic Tips: The Elements
The four Elemental masteries are indicators of your Draak's stats. As your masteries grow, your Draak becomes stronger and more able. Masteries are rated from 0 to 100, with every 10 points representing a mastery level.

Elemental Masteries impact many aspects of the game, but especially combat and dialogue options. Each mastery level will grant a new ability (some active, some passive) and help you to gain Treasure and other advantages.

Animal Mastery (learning everything there is to know about an animal) and Tarot Cards (achievements) provide permanent bonuses to Elements that persist through all playthroughs. Therefore, it is extremely important to seek Animal Mastery and Tarot Cards wherever possible. This is quite possibly the most important thing you can do when first starting.

Elemental masteries will also improve as you take actions associated with the elements, or fail at elemental checks (because you learn more from failure than from success). However, such improvements only persist through the current life.

Fire represents passion, aggression, raw strength, and the direct approach. Draak-Kin strong in Fire are physically powerful and can produce great flames from their breath weapons.
- Increases dialogue success involving brute force.
- Increases damage dealt in combat for many abilities.
- Mastery levels grant powerful combat attacks, and allow eating Shiny Things or one's self for energy.

Water represents mobility, transformation, stealth, and the indirect approach. Draak-Kin strong in Water can remain unseen in unlikely circumstances, and surprise targets with unconventional tricks.
- Increases dialogue success involving stealth and subterfuge.
- Increases likelihood to sneak closer without being noticed during hunting.

Earth represents durability, patience, stability, and serenity of mind. Draak-Kin strong in Earth can remain calm during stressful circumstances, and pause where many others would blindly charge forward.
- Increases dialogue success involving patience, calmness, and fortitude.
- Increases durability in combat.
- Many of the mastery levels increase armor and resilience.

Air represents swiftness of body and mind alike. Draak-Kin strong in Air can move with great speed, and can use their quick wits and eloquence to out-think and persuade others.
- Increases dialogue success involving speed, cleverness, or verbal persuasion.
- Increases chase speed in hunts.
- Increases odds to escape from combat.
- Good combat supplements like Thoughtspeed and Blink.
Basic Tips: Combat Abilities
A quick note

Most abilities have a basic effect and bonus effect. The bonus effect triggers when one of the following conditions is met:
  • You won the elemental clash outright. (Fire beats Air beats Water beats Fire)
  • The opponent used an Earth ability, and the elemental mastery of the attacker's ability is greater than the opponent's Earth mastery.
  • The opponent used the same element you did, and the elemental mastery of the attacker's ability is greater than the opponent's Earth mastery.
For example, let's say I use Power Strike and have 55 Fire mastery points. The opponent uses Bite and has 50 Earth mastery points. The bonus effect on my Power Strike will trigger because 55 is greater than 50.

It's possible for both combatants' bonus effects to trigger simultaneously.

Knowing this, it's generally a bad idea to use Bite, especially if your Earth mastery is lower than the opponent's attacking masteries. Many opponents have Bite (or "Standard Attack") in their attack patterns, making them vulnerable to bonus effects. And you may want to avoid using moves from an element if its mastery is lower than the opponent's Earth mastery.

Fire
  • Burning Breath - A weak attack, but your first Fire move and the only safe attack against Pricklebacks. Power Strike is almost always better. It is automatically replaced by Incinerate.

  • Power Strike - For being the second Fire ability, this is extremely powerful, and it scales nicely as your Fire mastery increases. Blow for blow, it's a solid ability that can outdamage everything except Venomous Bite and Charge.

  • Fireflash - Tiny damage, but if you win the elemental clash, this blinds the opponent on the next turn. Not a bad choice if you'll win the clash.

  • Intimidate - Debuffing Air doesn't do anything, except in one case. If you want to flee the battle, an opponent who badly outclasses you in Air can prevent your escape. In such (very rare) cases, use Intimidate and then flee.

  • Charge - This is a very good, but risky move. The damage is extreme, but if the bonus effect doesn't trigger, then you will severely debuff your Fire element and disable your Fire moves for three turns. Use this only if you know the opponent's next move is Air, or as a YOLO-style finisher.

  • Incinerate - I don't know that this is really better than Power Strike or Charge. Damage over time is fine, but more time is more opportunity for you to get hurt.

  • Rage - This is a free ability (no counter-attack). It's pretty good for most practical purposes, because very few opponents are going to spam Water attacks at you, and the animals that do are not terribly strong. Fun fact: If you use Rage and then your Fire is afterwards disabled (as from a failed Charge or opponent using Pacify), you can still use Bite.

  • True Song of Destruction - This is an instant kill against anything. So yeah, go for it.

Water
  • Flowing Strike - Your basic Water attack, but not a bad one. If your opponent is strong in Fire and uses a Fire ability, then the damage output is worthy. Go ahead and use it if you know your opponent is going to use a Fire attack.

  • Pacify - The problem with this skill is that the lower health states also apply debuffs. By using Pacify, you reduce the opponent's Fire for three turns. Okay, fine. By putting the opponent to Battered, Injured, or Crippled status, you also reduce the opponent's stats and get that much closer to ending the battle.

  • Venomous Bite - This is extremely strong for several reasons. Its damage output is armor-piercing and therefore very high. On top of that, it can debuff all elemental masteries, including Earth, which reduces the opponent's health and defense. It also loses the elemental clash to Air, which is generally less dangerous than losing to Fire or Water. You can win almost all battles with Venomous Bite until the foe is poisoned, then finish them with Power Strike.

  • Intuition - This is a free ability (no counter-attack). At the cost of a decent chunk of energy, you are informed of the Element of the opponent's next attack. This is just a question of whether you can afford the energy expenditure or not, but it can give you the edge you need against the toughest opponents.

Earth
  • Bite - A basic attack that does moderate damage only. It's relatively safe to use if your Earth mastery is higher than your opponent's masteries, but Power Strike is also a basic attack with much higher potential damage. Avoid using this if your Earth mastery is low.

  • Brace - A defend move that does no damage. Use this only for gaining Animal Mastery points. You should generally never use this against "bosses" or unique opponents. Many of them are flagged as "unpredictable", and as such do not follow the normal attack pattern rules.

  • Negate - This is a free ability (no counter-attack), so you can go ahead and throw it into a battle if you want. You could do something like Negate Air and then use Venomous Bite, or Negate Fire and then use Shock. The effect only lasts for three rounds, and Negate is single use per battle.

  • True Song of Healing - This instantly heals you to full health. So if you're Injured or Crippled, totally go for it.

Air
  • Swift Strike - The basic Air attack. I suppose you should use it if you know the opponent's next move is Water.

  • Roar - The damage is very low, and its bonus effect is to reduce the opponent's Water, which is not a useful thing to do. I'd rather use Swift Strike every time.

  • Mindscream - The damage is light, and the debuff (bonus effect) is mild. Turns out, you can't kill them with your brain.

  • Thoughtspeed - When you select Thoughtspeed, you then select another attack that is executed twice, immediately. However, you can only perform Brace for the following two rounds, so you are losing one attack to execute one a turn earlier. This is a risky, but powerful finisher. The ideal combination is Charge, but Venomous Bite or Power Strike aren't bad.

  • Hypnosis - On the turn after Hypnosis is used, the opponent will advance to the next instance of the element you chose within their pattern. The usefulness of this is marginal because Hypnosis itself is a complete waste of a turn. See the section called "Combat AI and Patterns" at the end of this guide for more details on how this skill works.

  • Shock - This is like Fireflash, but because it is much higher on the mastery ladder, it does more straight damage even without its stun effect. If the opponent is stunned, their next move will always be Brace. This is probably the best Air-Element attack if you know the opponent's next move is Water. If your Air mastery is higher than the opponent's Earth mastery, then you can stun-lock them by repeating Shock. Just watch that your energy doesn't run out.

  • Blink - When you select Blink, you then select another attack. The enemy's intended move is canceled, and they are instead forced to Brace. Apparently this is bugged such that Blink takes no energy to actually use. A reward for leveling up Air, and it only took 90 mastery points.

  • True Song of Dominion - Based on the XML files, this is supposed to inflict a status called "Drained". But there is no actual status with that name, so it does nothing.
Basic Tips: Attack Patterns
Take a look at the picture to the left. This is the Lesser Lumberer's attack pattern, read as "Fire, Air, Earth, Earth, Fire, Earth", which then repeats back to the first Fire.

Furthermore, these dots represent specific moves used in the same order every time. So it would be equally valid to call this pattern "Intimidate, Swift Strike, Standard Attack, Brace, Power Strike, Standard Attack", and the animal will use those moves in the same order every time.

Therefore, if the Lesser Lumberer's first move is one of Intimidate, Swift Strike, Brace, or Power Strike, then I can know its precise position within the pattern. If the first move is Standard Attack, then I have a 50/50 guess.

This does not apply perfectly to all animals. For example, the Plainsrunner entry shows 5 dots, but its pattern is actually 10 moves long.

Under normal circumstances, an animal will always stick to its pattern. At the start of battle, its position in the pattern is random.

Once you've gained partial mastery of an animal, you can reference this anytime in battle by clicking on the animal (to bring up its elemental mastery), and then clicking on one of those elements.

There are special rules concerning disabled Elements and Hypnosis. If you are curious, look for "Advanced: Combat AI and Patterns" at the end of this guide.

Special note: Some opponents (particularly No-Tails and unique foes) are flagged as "unpredictable" and do not follow a set pattern. You can Brace all day, but they will select a random attack every time.
Basic Tips: What does Reputation do?
As you travel about and perform certain actions, you may be informed that your reputation among Kin has increased, or you are getting known to be a fierce survivor, or you are getting a reputation for compassion and self-sacrifice.

These values do have some impact, but not quite as much as you might think. These are the total sum of effects that I know:

Reputation
  • There is a Clansinger encounter in Part 2 where you may boast of your high reputation.
  • Impacts favor with the elders during the ending sequence.
  • (New in Time of Creation) You may need sufficient Reputation if you want Bloom and Rift to appear during Part 3.

Fierce Survivor
As you accumulate Fierce Survivor points, MTB will grant the following boons:
  • In Part 2, you will receive a special token that increases Elemental Masteries and counts as a handful of Shiny Things.
  • In the transition to Part 3, you will see a vision of MTB and gain Elemental points.
  • In Part 3, MTB will invite you to participate in its combat trial, where you may earn loot and more Survivor points.
  • In Part 3, if you complete MTB's combat trial, MTB will give you a Darkspine if your Survivor points are sufficiently high. It's possible to reach enough points from the trial alone, but Survivor actions elsewhere give more leeway.
  • You may need sufficient Survivor points if you want Rift to appear during Part 3.
It also impacts favor with the elders during the ending sequence.


Compassion and Self-sacrifice
As you accumulate Compassion points, Allmother will grant the following boons:
  • In Part 2, you will receive a special token that increases Elemental Masteries.
  • In the transition to Part 3, you will see a vision of Allmother and gain Elemental points.
  • In Part 3, Allmother will invite you to the Part 3 labyrinth, where you may earn Elemental points and more Compassion points.
It also impacts favor with the elders during the ending sequence.
Power Gamers: Best possible start, NOW!
Okay, here goes. Scroll over the spoiler tags.

1. Start a new game (from Prologue, if you have the option).
2. Answer the first question by saying you like the quiet sleeping times.
3. Try to pick aggressive (Fire) or patient (Earth) answers, but it doesn't matter that much.
4. Once hatched, try to eat some dirt and dig downwards. It's wasted effort, but boosts Elements.
5. It doesn't really matter what you do at the Water pool.
6. At the cliff, try to fly.
7. At the Whiteblack, get it to divulge a secret.
8. At the dead Draak, sneak close.
9. Select the shimmering silver option to look inside its mouth. Vow to fight back.
10. It doesn't matter whether you do or skip the tutorial -- it's on rails.
11. At the starry nighttime scene, sing of Earth.
12. It doesn't really matter what you do with Darktooth.
13. Go hunt a small animal of your choice (Treetail, Longear, Darksweet, Prickleback, etc.) You need 20 animal mastery points. The first is a freebie on sight. Each observation is +1. Each Brace in combat is +1. Each kill is +1. Observe and chase-kill as close as you can to 20 for two hunt attempts, and then enter combat and Brace until you get 20. Flee if you get beaten up.
14. Now that you have been beaten up by a small furry animal, you need to take it easy. Go to the treasure site (it looks kind of like a pizza) and collect treasure.
15. Repeat Step 14.
16. Go visit Darktooth (shimmering purple dragon glyph). Ask him to identify the Crystal Fang. You can ask him more questions for Elemental points, but it's better to save your money so you can identify the Shakestick when you get it.
17. Now that you've healed a bit, go to a different hunting ground and do the same thing as before for mastering another animal. Observe and chase-kill as much as you can, and then enter combat and Brace until you reach 20.
18. Click on your sleeping nook and use the Crystal Fang. This boosts all your elements by 5 points, which is about a 20% increase from what you have now.


You are now pretty terrifying for having only spent 6 turns. Continue with the following rules:
- If you are in fine or pristine health, go to a hunting ground and develop mastery of new animals. This is the most important way of making yourself stronger during this and future lives.
- If you are battered or worse, then uncover some fog or stick to safe areas so you have a chance to heal. Your stats are lowered while battered or worse.
- Once you've gotten some masteries and are healed up, go to the cautionary areas.

Refer to the maps posted later in this guide to see where the "safe" and "cautionary" areas are.
Prologue: The Egg & First Days
This is a straightforward and linear process. Your choices here only have the impact of boosting your Elemental masteries.

There are two options here:

Try to focus on building Fire and Earth by being either aggressive or patient. If you try to be clever or insightful, then that will have a tendency to boost Water and Air, which is not the best thing to focus on.

After hatching, you are forced to follow a linear path for a couple days.

At the cliff, it's safe to try flying. You fall like a rock, of course, but you survive and get a Tarot Card for it.

In the encounter with the Whiteblack, your gains are limited. The best option are to get it to divulge a secret. Even if you fail the Water check, you'll gain Water points as a learning experience, which isn't terrible. If your Water mastery is very poor, you can try one of the other options to gain a minor Artifact, the Shinestone Bauble.

When seeing the slain Draak, it's okay to sneak forward, but you'll want to escape, not fight. Remember, you are a hatchling. The world is dangerous. If you got the Whiteblack to divulge a secret, you can sneak forward and find something hidden.

You will have a few additional dialogue options that grant elemental gains. Remember, Fire and Earth are best. Be either aggressive or patient, but not clever or insightful.

The next day, you will go meet with Darktooth. Darktooth is not dangerous, so all of your interactions are more chances to gain the Elemental mastery points you want. On a future playthrough, your Earth might be high enough to impress Darktooth with some specific options. Select to remain silent, and then say you Respect him.

When the tutorial ends, you are on your own and can explore the land as you wish. Animal Masteries are critical to your success. Make a point to visit hunting grounds and master all the small herbivores. It is far easier and more worthwhile to do this, than to run headlong into danger.

It is often faster to gain Animal Mastery points by entering combat and using Brace, rather than relying on distant observation. But some animals don't like to fight so much. So keep the following in mind:

-Furbeasts and Scalebeasts generally run away, or stand and fight when they see you, or when you mess up a sneak attack.
-Featherbeasts almost always fly away if they see you, but stand and fight if you mess up a sneak attack.
-Waterbound are not typically engaged in combat, and will swim away unless you sneak attack them.
Part 1: Map
Green box - Generally safe locations. There may be optional risk, but there is also a dialogue path to get a good outcome 100% of the time.

Orange box - Caution advised. There may be Element checks or combats here, with risk of death in battle or missing out on artifacts. Visit when hale and healthy, and look before you leap.

Red box - Danger! Some of these are outright bad, and others will make you lose time for no good reason. You should visit at some point so you can see the artwork and narrative, but it's a waste on an early playthrough.

Red boxes further explained:
  • Sheep icon: It's fine to visit for a brief look, but choosing to hunt here will reduce the amount of time you have left in Part 1.

  • Chicken icon: It's fine to visit for a brief look, but choosing to hunt here will reduce the amount of time you have left in Part 1.

  • Hut icon: There is a group of cats hanging out here. You can waste time doing chores for them in exchange for knowledge on lucid dreaming (which you get anyway at a modest Water Mastery level), or burn their hut down to even further reduce the amount of time you have left in Part 1. The cats are humorously arrogant, but it's a huge waste of time.

  • Multiple stick figure humans: There's nothing you can do here. Pretty much the only good choice is to walk away, which at least gives you some Earth points.

I did not draw a box around acceptable hunting grounds, Darktooth's icon, nor the fidget spinner in the upper-right. The fidget spinner is the exit to Part 2. Everything else is fine to visit at your own convenience.


If your sundial looks like this, you are out of time. Go to the fidget spinner icon in the upper-right, or you will lose your Shiny Things and Artifacts.
Part 1: Twist
When you enter the Spiritwood, you will be accosted by a Draak hatchling called Twist. Talk to it if you wish. Your only viable choices here are to pity its deformity (which provokes a Dance of Destruction), or challenge it to a riddle contest.

If it comes down to a fight, Twist is not super threatening. But it also doesn't come up with very difficult riddles. The possible answers are Fire, Water, Earth, and Air. Some alternative answers are also accepted, but these work just fine.

It seems to me, Twist would probably be smarter with a father figure in its life. Maybe someone very Wise, who shouldn't play favorites with its own children.
Part 2: Map
Green box - Generally safe. You might be able to pick pointless fights and get yourself killed over nothing, but there are dialogue paths with a 100% guarantee of a good result.

One caution regarding the hallucinogenic herb -- It is beneficial, and very entertaining to try once. Continuing to eat it will increase Elemental Masteries, but give you temporary and serious debuffs, and eating it five times in total will just kill you. It's more worthwhile to go collect Animal Masteries for 3 days than to eat the herb for 3 days.

Orange box - Caution advised. These are worthwhile to visit, but they may test your Elemental mastery or have combats of fair difficulty. Heal up before visiting, and use your head.

Red box - Danger! While these places are not entirely negative, they can easily get an inexperienced Draak hurt or killed.

Red boxes further explained:
  • Tiny Beings ("light bulbs") - These are friendly bees that want you to go kill a Lumberer (bear) in exchange for an Artifact that is only useful for selling to Darktooth. You can easily get killed for no good reason.

  • Weasel icon - You encounter an animal with rabies. Although there is an Air check to skip to the best possible result, you're unlikely to get it. The only choices are to walk away (which has a truly awful result for no gain), or fight it and risk getting infected. Draak aren't going to succumb to a silly thing like rabies, but you are still made ill and it's more trouble than it's worth.

  • Tailless icon - This is a No-Tail child lost and alone in the woods. It's completely safe to just leave (+Earth) or eat it (+Energy). If you want to play hero and save it, you will have to fight a Great Slideclaw (Lion), which will probably just kill you.

  • Spiky-looking angry thing - This is in connection with a sidequest to prevent an upcoming forest fire in Spiritwood. You should definitely, absolutely explore this sidequest, but it can very easily get you killed if you mishandle it.

    Spiky angry thing further explained:
    You have two options: fight it head-on, or go on an Essence Quest. The fight is extremely difficult at this stage. The Essence Quest requires that you have already met the Spiritwood Spirit at the glowy green tree icon.

    Because even the Essence Quest option can result in you being put to Crippled condition, here's an idea. Visit this place immediately after dealing with Whisper. After Whisper, there is no more mandatory combat in Part 2, and your Elements might be high enough to take a special option that preserves your health.
Part 2: Sidequests
Animal Masteries
Animal Masteries are still the most worthwhile use of time. However, you are no longer facing tiny furbeasts. Some larger animals can kill you very quickly. It's okay to take things a little more cautious, and it's okay to run away. Nothing is worth more than a Draak-Kin's life.

By the time of early Part 2, you should have 5 to 7 Animal Masteries complete. If you do not, then you are going to be weaker than the game is really expecting.

Deathbite Tailbeast and Tusksnort Hatchling are easy pickups in early Part 2. Even huge predators cannot force you into combat, so anything is safe to learn about via observation. Entering combat and using Brace is faster, but it can also get you killed.

While battered or worse, continue to uncover fog or visit safe zones.

Darktooth's Great Lesson
If you visit Darktooth, you will be able to spend 20 Shiny Things to embark on his Great Lesson. This is a major sidequest that takes several in-game days, but it is filled with interesting narrative and many Elemental boosts. It's ideal to do it as soon as possible, either before, or immediately after meeting Flare.

The Great Lesson has no combat and no elemental checks, so it is safe to enter while injured. However, it may test your (the player's) brain.

The Brightlings
There are two Brightling events along the southern edge of the map. Their icons look like No-Tails with a radiant aura. The Brightlings will not hurt you. If you interact with them peacefully, and solve the logic puzzle, you will be approached by an "Elf-Draak". What you do next is really, really important, but it's also really, really cheesy to hear it in a guide. Therefore, spoiler tags.

First, refuse the Elf-Draak's advances. It will drop its facade and inform you that this is a hologram being controlled by an extraterrestrial that wants to collect data. It's not going to hurt you.

So you can turn it down, which I'm sure makes you feel very good about yourself.

Or you can accept its offer of Shiny Things, which is pretty neat.

Or you can get -- HELLO -- 50% Animal Mastery progress on ALL ANIMALS.

Do I need to say more? Just note that whenever you start a New Life, any masteries less than 100% are reset to zero, so you can't just visit this event twice. It'll just bring you from 0% to 50% twice.


The Forest Fire
The fiery icon in the north region is a True Dream, a glimpse of a possible future. In order to prevent this bad future from happening, you must:
- Hang onto the dream and vow to take action. If you decide to forget the dream, you gain some Elemental points but cannot prevent the fire.
- Go to the angry spiky icon in the far south, and deal with the problem there.
- When you meet the deer, it's okay to try treating them as thralls, warriors, or equals, but you must eventually treat them as monarchs and beg them to protect the Spiritwood.
Part 2: Clansinger Pack
You are able to become Chief of the local Clansinger pack. This is of great benefit against Bloom, who is otherwise one of your most dangerous obstacles. To become their Chief, you must prove that you respect them and their virtues enough.

These are the events and possible "wolf reputation" changes:

At their den (Leftmost)
- Sneak attacking the guardian: -1
- Honorably defeating the guardian, and allowing it to escape: +1
- Eating the wolf pups: -3
- Sparing the wolf pups: +2
- Note: If you battle and then flee from the guardian, the wolves will not confront you at all.


At their feast (Middle)
- Telling them that their cooperation fosters weakness: -1
- Challenging to battle or song (Air or Reputation check), and winning: +2
- Challenging to battle or song (Air or Reputation check), and losing: -1
- Leaving out of Honor (Earth check), and they believe you: +1
- Leaving out of Honor (Earth check), but they don't believe you: -1
- Leaving out of disinterest, and your energy is >50%: +1
- Leaving out of disinterest, but your energy is <50%: -1


At the Dispersed (Rightmost)
- Ignoring it: +1
- Speaking with it, and leaving peacefully: +1
- Sneak-attacking it under false pretense: -1


After doing these three events, the wolves confront you. If your "wolf reputation" is at least "4", and your clansinger mastery is at least 50%, you can take the two special options that are shimmering with silver color. You must then defeat at least one Clansinger (optionally two) in a Dance of Destruction.
Part 2: The Rivals
After half of Part 2's time has elapsed, you will start to encounter three Draak rivals who want to conquer your territory. They are Flare, Bloom, and Whisper.

Watch the clock. The sundials below indicate the approximate time before each rival's arrival, but there is some variance. Don't go out and get yourself injured when these times approach.

All of the rival fights can be skipped by fulfilling certain conditions, but this can be challenging for early plays. More than likely, you will be forced to fight.

Flare
How to skip: If your Fire mastery is very high, you can scare Flare away with a show of strength. Or, if your Earth mastery is decent, you can challenge Flare to a riddle contest.

How to fight: When in combat, click on Flare. Do you see anything interesting about its masteries? It's good at Fire, but not so great at anything else. This is what we call a "glass cannon".

Watch Flare's body during each turn. Flare has three postures that telegraph its next move:
  • If Flare is standing tall with an open mouth, its next attack will be Fire. Counter with Water.
  • If Flare is leaning forward, its next attack will be Air. Counter with Fire.
  • If Flare is using its wings as a shield, its next attack will be Earth. Use any element where your mastery is stronger than Flare's Earth mastery so you get the bonus effect, with a preference for Power Strike or Flowing Strike (rather than Air).

Bloom
How to skip: You must become chief of the local Clansinger Clan. When Bloom arrives, select to call in your Clansingers, and challenge Bloom to song. Bloom's barnyard menagerie flees in shame.

Alternatively: With enough Air mastery, you can talk Bloom into fighting alone, making this battle much easier. The problem is having enough Air mastery without sacrificing something else.

How to fight: Worst case scenario is that you have to fight two of Bloom's animal companions before taking on Bloom itself. If you don't know the attack patterns for the goat, it may be best to try defeating it as fast as possible with Fire attacks. If your Fire is high enough, two Power Strikes can do the trick.

The Tusksnort is the toughest opponent here. You should have learned Tusksnort attack patterns because Tusksnort Hatchlings are very easy to hunt. This is also a fantastic time to use any Boom or Black Ball if you have them. Shakestick is somewhat lacking in power here.

If you can just make it to Bloom, you'll find it has a fatal disadvantage. The rooster on its head will announce the next attack that Bloom will do. All you need to do is match the rooster's words to the element, and then pick the countering element that will win the clash.

If you do end up dying here, you'll get to redo the day if you had a Sigil of Life to spend. Do a Fire or Earth lucid dream. Unfortunately, Bloodstone wears off before the actual battle. Bloom + Minions is not the toughest fight in the game, but it's the toughest fight for Part 2. Pull out the big guns.

Whisper
How to skip: If you allowed the Shriekers to live in your cave, you can call them here and open up a sneak-attack against Whisper. A good strike will (with enough Fire mastery) instantly defeat it. However, this is mutually exclusive with getting Boom from the Shriekers, which is useful for surviving the Bloom fights.

Or, if your Water Mastery is high enough to have unlocked Intuition, you can also use that for a sneak-attack. It's somewhat unlikely on an early play... unless you use the Living Labyrinth many times. You may want to.

Alternatively: Whisper does a huge amount of damage to you in dialogue if you don't have some of the alternative answers. There are two steps. First, you must first have Camouflage (Water Mastery passive skill) in order to hide yourself. This prevents a good deal of damage. You can prevent the rest by using a researched Lodestone, Alter Scent (Water level 7), or Negation (Earth level 8?!). Lodestone is the easiest. Alter Scent is attainable through use of the Living Labyrinth.

If you don't have Shriekers and haven't unlocked Camouflage, Whisper is pretty much going to kill you before the battle even starts. You get a lot of Water points from the Great Lesson, or from using the Living Labyrinth repeatedly. At least get Camouflage, or you are dead.

How to fight: Whisper makes the same mistake that Bloom does -- almost. Did you notice that this is one bizarre Draak? It has been using devious tricks to catch you off-guard, so are you surprised that Whisper announces attacks that it's not going to do? If Whisper announces its intention to burn you with Fire, it's actually going to do Air. Why? Because it wants you to use what you believe will counter, which is Water. You use Water; Whisper uses Air; you lose.

To win, use the Element that Whisper says it will use. If it says it will burn you with flame, then you should use a Fire attack. If it says it will be a destructive tornado, then you should use an Air attack.
Part 2: The Great Lesson
You can reach the Great Lesson by visiting Darktooth and giving him 20 Shiny Things. It involves two mazes, some puzzles, and some math questions. There is no combat. Although you can be injured by answering certain questions incorrectly, you cannot be killed by damage here (only by starvation).

Also be sure that your energy is high before entering. Even the fastest navigation will take a few in-game Suns.

The First Maze
Your goal is to find the seven cave paintings, and then find the OMs (cave salamanders).

Click here for a spoiler-iffic map.

Quickest solution:
1. Right
2. Back
3. Left
4. Left
5. Back
6. Straight
7. Right
8. Back
9. Straight
10. Left
11. Back
12. Right
13. Back
14. Back
15. Back
16. Right
17. Left
18. Left
19. Back
20. Right (looks like a pit)
21. Left
22. Back
23. Right


Then you must tell the story of the paintings in the correct order. Every time you make a mistake, you get zapped. This is the gist of it:
1. In the beginning, there was Earth and Sun, and also a little bit of Draak-Kin between.
2. Draak-Kin and dinosaur friends dominated Earth, uncontested. Happy times.
3. Aliens arrived and started giving everyone a bad time. Stupid aliens.
4. The Draak-Kin were all like, "Oh, hell no," and they fought the aliens.
5. The Draak-Kin mostly lost, and got put into mountains. Sadface!
6. There was harmony between furless bipeds of all heights.
7. All furless bipeds are now the same height, and also there are aminals and Draak-Kin again. Yes, I said "aminals". Deal with it.


The Four Schools
Next, you must find the four Schools within a looping maze. Sadly, I consider this so based on trial-and-error, I'm not even going to spoiler tag the maze solution. This is the fastest solution:

1. From your first screen, you can only go straight, so go straight.
2. Go right to enter the School of Knowledge. Bust out your math skills. You are on a timer for each question. (The answer to the square root question is always 51.)
3. Exit the classroom and go left. You are in a room with an infinity sign. This is where you return if you go the "wrong way", so it doesn't matter what order you do the next three Schools in. From the infinity sign...
  • Left, Right, Right: Shortcut back outside, if you are dying of hunger or something.
  • Left, Left, Right: School of Wealth. (Fastest solution is to threaten the instructor's life.)
  • Right, Right, Left: School of Emptiness.
  • Right, Left, Left: School of Faith. (Note that when you exit this classroom, it's Right, Left to reach the exit, or Right, Right to get back to the infinity sign.)
  • Right, Left, Right, Left: The maze's exit, only useful after you have been approved by all four School instructors. (Do you need to be told that all of these Schools are flawed as singular philosophies, and Draak-Kin have no business committing themselves to one forever?)
Part 2: Brightling Logic Puzzles
If you're having trouble understanding the Brightling logic puzzle, here is a spoiler-free screenshot with markup: https://i.imgur.com/yIJvJOd.jpg

Not all of the puzzles follow the exact "fill in the blank" format, but they are all asking for a logical move from the puzzle area to one of the three multiple-choice answers.

Fast solution:
- Left     
- Left       
- Right    
- Right     
- Left       
- Left       
- Right     
- Left       
- Middle 


Detailed solution:
- Left. The line(s) on the left are rotated 90 degrees to become the lines on the right.
- Left. This is difficult to explain, but here goes. Each individual shape (individual triangle, individual semicircle) is first vertically mirrored. Then the shapes are pushed closer together until they are fully intersecting. When you do this with the two triangles, it forms a diamond in the center and four miniature triangles in the corners. When you do this with semicircles, that's where the distinctive flat top and flat bottom come from. The two semicircles are still there, they're just overlapping so much that it's hard to tell.
- Right. The number of edges is being incremented each time (3, 4, 5, 6).
- Right. A diagonal, dotted line goes in that space.
- Left. A solid line along the bottom, and "gear" shape along the upper-right goes in that space.
- Left. They all have a solid horizontal line, so it's just a question of where the dotted vertical line goes. It goes down the center.
- Right. It's the only one that fits the implied lines feeding into the blank space.
- Left. It is rotated, but otherwise looks exactly like the shape.
- Middle. It is rotated, but otherwise looks exactly like the shape.
Part 3: Sidequests
There's a lot going on in this Part, but much of it is optional. Aside from keeping yourself from starving, you are not required to do anything else and can simply sleep until time runs out. So on an early playthrough, take things a little cautious and try to stay alive.

It's a challenge to accomplish every single goal unless you know exactly what you're doing. Do what you can. You can always come back later, when you're stronger. After all, don't you want to see the three endings? Or was that four endings?

The No-Tails
The No-Tails have expanded their holdings to the north while you were hibernating. They are beginning to encroach on your land, putting your hunting grounds at risk of becoming dangerously depleted. There is also much to explore about them to the north.

Since you have just awakened after a long sleep, the No-Tails have no idea that you even exist. But they know all about Draak-Kin, and aren't big fans. The more you reveal yourself and cause trouble for them, the more likely they are to come after you. Conflict may be unavoidable, but if you keep your head down, they might not ever know you exist.

Even so, you should definitely explore the areas of interest to the north. There is plenty to do and see, even if you might want to favor staying out of sight. Or if you have confidence in your strength, cause as much destruction as possible. That's also fun.

Conquering Tempest's Land
Tempest is a fairly honorable foe. Once you announce your challenge of its land, you will engage in combat right away. If you are able to win the combat, stick to your convictions, and you will annex a small portion of its land along with a new hunting ground far away from No-Tail interference. Remember to lucid dream Fire or Earth before going after Tempest, so you are stronger in battle.

Within Tempest's land is a very special person, the Artist.

The Artist is working on a very special project, but requires a Refining Stone, Bezoar, and Heavy Cube, or 150 Shiny Things to substitute for each missing item. If you can lend a hand, you will get a Treasure that even the Draak-Kin Elders would envy.

The Artist is also able to give you complete Animal Masteries (one animal at a time) for free if he likes you a lot, or in exchange for one Artifact if you are merely acquaintances. Animal Masteries are still one of the most worthwhile uses of your time.


Conquering Vantage's Land
Vantage is a very tricky Draak. It will not meet you at the border, but rather lures you underground. Be suspicious. Be careful. Keep your head on straight, and you will annex a small portion of its land along with a new hunting ground far away from No-Tail interference. Remember to lucid dream Fire or Earth before going after Vantage, so you are stronger in battle.

Within Vantage's land is a trading post with the Delvers. The Delvers will buy Artifacts from you in exchange for Shiny Things, and they are especially interested in the Shakestick, False Face, or Truffle.

Many-Times-Burned's Trial
If you are sufficiently powerful or have been demonstrating yourself to be a ruthless survivor, Many-Times-Burned will invite you to prove yourself in formal duels. The battles start easy and become steadily more difficult. The trial's final battle is against the most difficult opponent in the game, so you will generally need to be 9th level Fire/Earth, or have some help from a certain battle Artifact in order to win.

This is a fantastic time to lucid dream Earth, and then use the Bloodstone. Do it in that order so the Bloodstone doesn't wear off. If you don't have the Bloodstone, then lucid dream Earth and Fire.

If a battle looks to be going south, you might want to flee. As Never-Ever tells you, fleeing will cause you to lose 10 shiny things from your hoard. If you do not have 10 shinies to lose, then fleeing is not allowed.

If you should be defeated during this trial, MTB isn't a big fan of killing promising young Draak on a whim. You will be allowed to live and return to your lair, but you will be barred from re-entering its trial for the remainder of that playthrough.

Allmother's Trial
Allmother has a unique challenge for you: Experiencing life from an ant's point of view. You must procure food, water, and sweetkins (aphids) for the colony. Because ants tend to have somewhat dangerous lives, your inevitable ant-death will end the day and return you to your lair, but you can come back and pick up where you left off.

Because you are seeing through the eyes of an entirely different creature
, your Draak Elemental masteries are irrelevant during the trial. Therefore this is a worthwhile use of time on an early playthrough when your stats may be a bit weak.

Time of Creation
Newly added along with v1.55 in April 2021, the Time of Creation will begin a little over halfway through Part 3, marked by a special event. There are five possible mates for the Spiritkeeper, all with their own special requirements. None of them come directly to you; you must look at the map for glowing Draak sigils for creation (looks like two stick-figure dragons intertwined).

This is a purely optional endeavor, but it includes some nice dialogue, and some material benefits in terms of money and Elemental mastery boosts.
Part 3: Favor with the Elders
Going into the ending sequence, your favor with each Elder is calculated and categorized as either Low, Medium, or High favor.

The calculations are as follows:

MTB:
+ 1 per reputation point
+ 1 per survival point
+ 5 for completing MTB's trial this lifetime
+ 5 for owning the Darkspine
- 1 per compassion point
- 2 if you delayed the Moot

Darktooth:
+ 2 per reputation point
+ 10 for completing the Great Lesson this lifetime
- 2 if you delayed the Moot

Allmother:
+ 2 per compassion point
+ 0.5 per reputation point
+ 10 for completing Allmother's trial this lifetime
- 2 if you delayed the Moot

The result will fall into these ranges:
5 or less: Low favor
6-14: Medium favor
15 or greater: High favor

Each favor level will significantly change the dialogue after the point where Darktooth asks for your opinion. The following effects are the gameplay concerns:

MTB:
Low favor - Nothing worth noting.
Medium favor - Will threaten to kill you during the Wisdom path, plus MTB fully restores your health and energy during the Survival ending.
High favor - Same as Medium, plus MTB boosts your stats further (+50 Fire, +50 Earth) during the Survival ending.

Darktooth:
Low favor - Will demand tribute for you to take the Wisdom path.
Medium favor - Will demand tribute for you to take the Wisdom path.
High favor - Allows you into the Wisdom path for free, and will save your life if MTB threatens you.

Allmother:
Low favor - Bars you from taking the Compassion path.
Medium favor - Nothing worth noting.
High favor - Nothing worth noting.
Part 3: The Endings
At long last, you are presented with a choice to follow one of the paragons' plans, corresponding with Survival, Compassion, or Wisdom.

Each ending has some requirements in order to see them to a successful conclusion, but it's not so hard as long as you've been making an honest effort at following one of their philosophies.

MTB's Survival
This is the "default" as it has no special requirements as such and MTB will always welcome you to join. It does involve a mandatory, rather difficult combat. The combat can be skipped if you meet one of a few conditions.

Otherwise you'll have to handle it in claw-to-hand battle. Your Fire and Earth masteries should be in the neighborhood of 8th level. If you doubt your skills, lucid dream Fire or Earth (or both) in advance. Having high favor with MTB will also give you a huge stat buff here.

Steps / Requirements:
1. Choose MTB's path.
2. You are presented with a dialogue option. If you have one of the following: (Darkspine), (Antimatter), (Level 10 Fire mastery), the combat can be skipped.
3. Otherwise, you must participate in a mandatory combat against several No-Tail foes in a back-to-back endurance battle. If you die here, it's like dying in any other battle. Loss of Sigil of Life, restart day, etc.
(Note) As this is the final combat of the game, this is a fantastic time to use Elixir or Awakened Onyx Rod, both of which can be used during combat to fully heal you.

4. If you survived, enjoy the ending!

Allmother's Compassion
Allmother has two major hurdles to clear. If your Allmother favor is low, Allmother rejects you back to choosing Darktooth or MTB. The second hurdle can result in your instant death and loss of a Sigil of Life if you don't meet the requirement. It's not hard to meet the requirements, but you don't want to be halfhearted about this. (Get it? Halfhearted about Compassion? Huh? Huh?)

Steps / Requirements:
1. Choose Allmother's path.
2. If your favor with Allmother is low, Allmother is just like, "No. Go away."
3. Otherwise, MTB is outraged and orders you executed. You die. Oops.
4. Wait, your soul is okay. Alright, so you need one of the following: (12 Compassion Points), (20 No-Tail knowledge points), (99 Water mastery points).

5. If some fragment of you is still alive after that, enjoy the ending!

Darktooth's Wisdom
If you have high favor with Darktooth, you can pick this and relax, because you just won. If your favor is not so high, you'll have to offer tribute to Darktooth and deal with anyone who is very keen on you staying.

Steps / Requirements:
1. Choose Darktooth's path.
2. You must have one of the following: (400 Shiny Things), (Awakened Silver Rod), (Elixir), (High Darktooth Favor). Otherwise he will deny you from proceeding, and you are left with the choice to follow Allmother or MTB.
3. If your MTB Favor is low, MTB is glad to see you leave. Skip to 5.
4. If your MTB Favor is high, MTB will be angered and move to kill you...
4a. If you achieved one of: (Gave Awakened Silver Rod to Darktooth) or (High Darktooth Favor) then Darktooth will save your life.
4b. Second chance -- You can mollify/survive MTB's wrath with one of: (Elixir), (Darkspine), (Living Labyrinth), (Level 10 Earth Mastery), (99 Health).

5. Enjoy the ending!

Secret Ending
Say, weren't those three endings a bit bittersweet?

Maybe there's something else?

Maybe if you go ask the Spiritwood Spirit (in Part 3) if there are any alternatives, you might get an interesting answer.

Oooh, mysterious...
Advanced: Combat AI and Patterns
Take another look at the picture to the left. The basics were covered in a previous section, but there are two things that can throw a wrench into the works.

First, moves can be disabled. Negate can disable your choice of Fire, Water, or Air for three turns. Pacify can disable the opponent's Fire moves for three turns. Charge can disable the charger's Fire moves for three turns.

Second, you can use Hypnosis. Hypnosis will prioritize skipping to the next occurrence of that element within the pattern if the opponent knows an enabled move of that element. Otherwise it will substitute Standard Attack if that Element is unknown or disabled.

This is the full battle AI logic, per my research:

1. Turn begins.

2. Opponent readies a move with the following logic:
2a. If Player used Hypnosis last turn on an element with at least one known move, jump to next valid instance of that element within the normal pattern. Proceed to 3.
2b. Else if Player used Hypnosis last turn on an element with no known moves, proceed normally with pattern, but substitute Standard Attack (Earth) this time only. Proceed to 3.
2c. Else if Player used Hypnosis last turn on an element that is currently disabled, proceed normally with pattern, but substitute Standard Attack (Earth) this time only. Proceed to 3.
2d. Else (if Hypnosis is not a factor) rotate to next move in cycle and ask, "Is this move's Element enabled?"
--> If the move is not enabled, repeat 2d until an enabled Element is found.
--> If yes, proceed to 3.

Opponent's move is now "primed", and is waiting for the Player's action.

3. Player selects any number of "free" moves (Negate, Rage, Intuition, etc.).
3a. If Negate is used on the Element the opponent is about to use, the opponent will substitute Standard Attack (Earth) this time only.

4. Player selects a move that provokes a counterattack.

5. Player's move and opponent's move are now executed simultaneously. Turn concludes.
23 Comments
Drakomis 27 Feb @ 1:34pm 
Thank you for your guide! It's a huge help through this game!
Hybrid  [author] 28 Nov, 2022 @ 1:55pm 
I have run some tests and concede half a point.

It does appear that buffing above 100 points is effective. I found that, at 100 fire mastery, a Power Strike does 25 damage to a doe, whereas 100 fire mastery + fire lucid dream it does 29. There is no randomization to the damage. I am surprised by this, but I also think it's a bit academic in most cases. Once you're at these numbers, you can already pass all skill checks and defeat any enemy easily.

However, I would not call this level 11 mastery because the mastery levels and temporary buffs are not the same thing. Each mastery milestone gives a skill upgrade, whereas points from buffs do not. Since 100 is sufficient to pass all skill checks, anything past that is mostly combat damage boosts, and it looks like every point of buffed Earth provides a little damage mitigation (but only base Earth increases max health).
Chris37599 28 Nov, 2022 @ 12:46pm 
Fair point... I have most of the tarots and a significant portion of animal masteries, so my stats were quite a lot higher than someone doing their very first playthrough. <_<

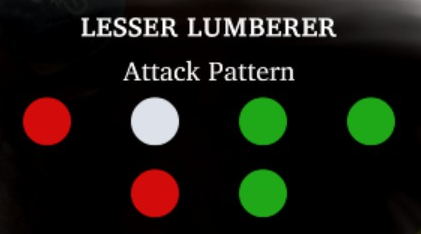
As for the mastery indicator -- I found that, even if you have a buff active, it does not turn blue unless you've actually 'reached' a new mastery level with that buff -- ex: being at 5/10 mastery for a given level along with a +1 buff does not turn the mastery indicator blue, but being at 9/10 mastery along with a +1 buff increases the mastery indicator's level and turns it blue.

In the level '11' mastery scenario, I did not have the blue glow over my level 10 fire mastery when I had the shinestone's buff and an additional buff from having a very large amount of shiny things, but it did turn blue after I got an additional large fire mastery buff from one of the dances of creation. (But since there doesn't appear to be a level 11 mastery icon, it still appeared as a level 10 icon, just blue.)
Hybrid  [author] 28 Nov, 2022 @ 11:24am 
While true, I didn't think the stat caps (level 5 for chapter 1, level 8 for chapter 2) were relevant for a beginner's guide because you're generally not reaching those until getting some animal masteries and tarots.

There is a hard cap at 100 mastery points; the blue mastery indicator indicates the element is being temporarily buffed, but it turns blue regardless of whether the buff is actually doing anything. Of course, you can be at 100 points naturally, and buffed + debuffed at the same time.
Chris37599 28 Nov, 2022 @ 11:15am 
Something of note: You cannot exceed level 5 elemental masteries as a Hatchling.

Attempting to do so will just result in getting no mastery experience when performing any events that give such. Ex: Singing a hymn to all four elements while having level 5 fire and water, and level 4 earth and air will only result in you getting earth and air mastery.

Also, it is possible to gain Level '11' masteries through buffs (as indicated by a blue level 10 mastery indicator), but I don't know if this provides any tangible benefit.
Hybrid  [author] 12 Jul, 2022 @ 5:52pm 
You're totally right. I just trusted the description of it and never suspected otherwise.
Yvilinn 12 Jul, 2022 @ 5:28pm 
I just mindlessly spammed fireflash throughout the game. I'm pretty sure the bonus effect of blinding your enemy triggers all the time, not just when you counter an air attack. I beat the great slideclaw to save the child in act two, I beat Whisper even though I started the fight at red health. After a while I stopped looking at attack patterns because fireflash would perma blind anything.
Harrow41 20 Nov, 2021 @ 5:17pm 
Hey, no idea if you are still updating this guide, but I got to Whisper for the first time with no Shiekers, Camoflauge, or any way to avoid the damage. I got into the fight and used the Boom which did enough damage to close out the fight before I died. I have no idea where the Great Lesson is or the Living Labrynth.
Hybrid  [author] 12 Aug, 2021 @ 6:49pm 
Have enough Earth mastery to pass the stat check, or get the Obstinate Stone from the friendly water spirit by answering its three riddles correctly .
Surrost 12 Aug, 2021 @ 6:46pm 
I tried going down there multiple ways but I just get sliced. Is there another path or maybe something I'm missing?