Agarest: Generations of War

Agarest: Generations of War

239 ratings
Walkthrough (First Generation)
By Frenzy85
Basically information from the wiki that I stole so it would be more convenient to use with Steam.

Agarest wiki can be found here: http://agarest.wikia.com/wiki/Agarest_Wiki

Disclaimer: I didn't write most of the information below. I wrote a very small portion of it, and did some edits while I was playing through the game. The information below is from the Agarest wiki. Most of what I did was making it presentable in the Steam guides format. I meant to have this for personal use, because I find using the Steam browser a pain and Steam guides help with quick navigation. If enough people complain about it, I will remove it from public view and make it private. If you think I should do this, leave a comment. If more than a dozen people ask for it, it'll happen, I promise.

Also, this does take quite some time to make, and is not just plain copy and paste! If you don't believe me, give it a shot... *shrugs*
I'll even tell you some tips to speed up the process if you ask. It still takes a while.
There are a few edits here and there, that people have been unable to do in the wiki because the pages are locked.
3
   
Award
Favorite
Favorited
Unfavorite
Notes
  • The information below (everything, just slightly edited...) is from the Agarest Wiki[agarest.wikia.com]
  • I'm making this because I hate using Steam Browser to browse stuff. It's extremely inconvenient, in my humble opinion. Steam guides can be quite convenient for navigation...

  • If you want to go for a perfect run, and are not sure what choices to make, I marked the choices(#) that will get you a "perfect run". You'll get True End and all scenes, except heroine endings, since they're mutually exclusive. You pick your own heroine! Canon choices are those on the top left of the pictures on the bottom right of the screen during scenes.
  • You may notice that the paths that aren't part of the "perfect run" has missing info. This is probably because people who filled in the information in the wiki mostly went for the perfect run. You don't miss any scenes, iirc, so there's no reason not to. Some scenes happen in different locations, such as the choice where you help either Fyuria/Luana.
  • I lied when I said you get all scenes... It's impossible to get all scenes in one playthrough, unless you re-load at some points. There are times when you have to choose between the heroines, and the scenes for each is mutually exclusive.
  • With that said, I suggest you go one run through on Easy/Normal, picking whatever you want and not going for True End. Then go to NG+ for the True End on Hard.

  • Note that encounters in blue/orange locations are approximate and are not 100% certain.

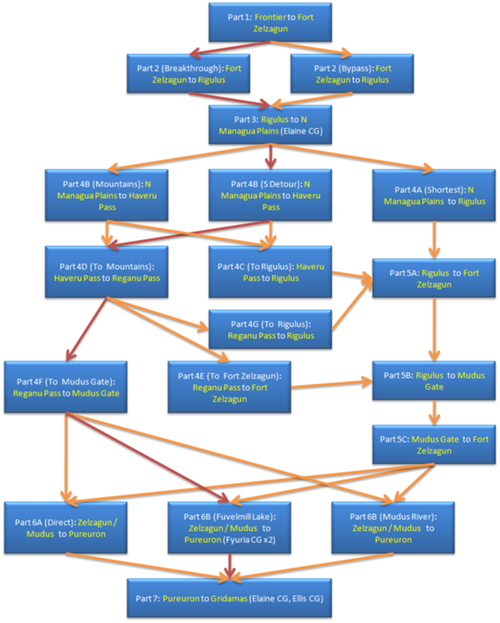
  • Don't let the flowchart fool you... The flowchart for the this generation is the most complicated one, and Part 1 is longer than all the others. Some sections that split converge after a few points!
Tips and stuff
Generation Specific
  • Useful items to convert early:
    • Long Sword/Hammer: ATK +100 <- cheap... and carries over when you upgrade gear tier
    • Headhunting Scythe: MAG +130 <- these are much more difficult, costs a lot of TP & EP
    • Accessories: <stat> +15 <- I'm sure you can figure out which accessory converts to what

    • There are a bunch of useful stuff to convert, but these are the most basic and easiest to farm. They are also available quite early, especially Long Sword and Hammer.

      Generally, the material for a weapon is gotten from converting a weaker weapon of the same type. For example, to get the Grip, a material for Guns, you convert the Handgun.

  • Useful combos to know:
    • Quadruple Attack: Double Edge + Double Edge
    • Broken Hit: Double Edge + Power Hit
      Quad Attack is stronger than Broken Hit if you haven't reached "Break". Quad Attack is about 2x more effective at Breaking an enemy as well. However, Broken Hit does more damage and more hits if you Break an enemy, because Quad Attack has no Break Art. However, you'll probably be using Broken Hit a lot more, because of how many Power slots you have this generation.

    • Vanish Trick: Rush + Trick Hit
      Highest hit count move for this generation. Use it to farm TP. The only one who can deal damage with this is Fyuria, because you need Trick Hit. This is unless you're using the Halper Scythe, in which case Zerva can contribute a Trick Hit as well.
      You can still use Trick Hits from Vira-Lorr/Ellie if they have spare AP, so you can get combos and accrue TP.

    • Holy Mist: Dark Mist + Ascension
      AoE skill. You don't have many choices for AoE's early on... not recommended if you want to go for Overkills for the items. Of course, unless you're using DLC and can simply wreck everything with one skill!

    • Sonic Blast: Sonic Wave + Blast
      You'll want Sonic Wave/Blast on your melee characters for the attack range they give you... and Sonic Blast will make it so they're not dead skills that you'll never use. It's basically Broken Hit, but it costs more AP and has a bit more damage and range. This is particularly useful if the enemy is in a corner or your mages happen to be standing beside it...
      It Breaks just as well as Broken Hit... ie. it Breaks worse than Quad Attack
      Quad Attack is still your go-to combo starter!

      These are literally all the combos I used in this generation. There are a few others you can execute, but these are what I personally used and found useful with my team composition.


  • If you think DLC is not for true gamers, but still like powerlevelling, you can do so with a bit of effort. This is most effective in Gen 1... Doing it in later Gen's have the same effect, but you won't be as overpowered as getting it in Gen 1!

    When you're in a dungeon, you don't use turns unless there's an event. Abuse this to grind. Progress through the story a bit, and then return to the first dungeon and auto-battle. Just use something to hold down the move button, so you can passively farm. Try to be strong enough that you take forever to level up, since your passive farming stops when you level up, unless you're there to allocate the points.

    The aim of this is not levels, or money... It's titles... There are titles for winning X amount of battles and defeating X amount of enemies. This is what you're aiming for. Of course, you can do this in a harder dungeon for levels, too!

    Some of the more useful stuff you can get from just farming for a long time:
    TP, since the shop never gets updated and all that, TP is the currency that you can actually get a significant amount of even in Gen 1. You can farm it easier with better skills, but it's still not too bad even in Gen 1, all things considered.

    Defeat 2k, 2.4k and 3k enemies. You get armor for reaching these goals. You can get Byakko's Bracelet at the 3k mark.
    Win 400 Battles. This gets you Stardust, a skill that has a ton of range. Very useful!
    Win 600 Battles. Suzaku Ring, a good ring that you won't replace until much later.

    Be warned, though, the AI for auto-battle is absolutely horrible. Unless you're battling enemies that are much weaker than you, you will die! To decrease the chance of this, give Ellis Heal and nothing else, and only do this in weaker dungeons.

  • Be wary of going too far light - this may prevent or make it much harder to get one character joining you in the second generation.

  • You can buy Vessel of Life for 25TP for some quick Gold. Don't do this if you don't need the Gold, there's no easy way to farm TP early on (or ever, really... but TP loses much of its uses very late in the game).

General

  • Monsters are often incredibly strong compared to your plot-related characters. They not only start out with 6 skil slots, but they have all their EX moves and monster weapons are often stronger than regular weapons. Some also have really good Willpowers!

    The only downside is their slow growth rates, meaning you either have to replace them regularly or they are not that good.

    I don't personally use them, since I can finish the game with the characters I get without having to grind(on Hard, too). There are a lot of battles in between events, after all...

  • You can jump in dungeons.

  • Playing the game on Easy/Normal will deny you access to a major part of the Post-game Dungeon. Play on Hard if you want to do only one playthrough. If you plan on doing multiple runs, I suggest you do not use your PP until your final playthough, as used PP does not get refunded.

  • Captured Monsters carry over multiple runs! You can safely use your PP on them without worrying about wasting PP, but only if you stay in the same difficulty or go to an easier difficulty.

  • Your Main Character and the three Heroines will be removed from your party at the end of each generation. You can bring them back after getting a certain item about halfway into the next generation. They do, however, cost a lot of money.

  • Enhance your equipment. It makes a huge difference. Some of them actually give you more AP when enhanced.

  • Convert equipment. You do this by enhancing a piece of equipment to max, and then trying to enhance it again. Most of them give you alchemy materials, but some of them give useful Actives.

  • Learn to chain your attacks. You gain more TP, which is valuable currency, by having longer combos. The amount of TP you get after the fight is your [max combo/4].

  • Learn to overkill. You get useful items by doing this. Especially against bosses... utilize EX moves!

  • Learn to steal and capture. Not so important early on, but get used to it as it helps a ton. Especially capturing... you'll definitely be doing capturing for end-game and post-game stuff.
Party Members
  • Leonhardt - Main Character
  • Fyuria - Heroine
  • Luana - Heroine
  • Elaine - Heroine
  • Ellis
  • Borgnine
  • Vira-Lorr
  • Zerva
  • Winfield

Name
Character Type
Leonhardt
Fighter
Fyuria*
BattleMage (Mage)
Luana
BattleMage (Fighter)
Elaine
Fighter
Ellis
Mage
Borgnine
Fighter
Vira-Lorr
Mage
Zerva
Mage
Winfield
Fighter

Fighter = ATK based
Mage = MAG based
BattleMage = Can go either way, but usually better at one role

Information based on their 3rd EX skills, and stat growth rate.

*Fyuria isn't a good Mage early on because you lack Magic attacks and it's harder to get MAG boosts. Her first EX skill, which is the only one you have access to early is based off her ATK. If you build her leaning towards MAG, she will be quite weak early.


Leonhardt, Ellis, Borgnine, Zerva, Vira-Lorr and Winfield makes for a very balanced and overall awesome team. They also have a 6-man combo that deals one of the, if not the, best single-target hit in the game, Absolute End. This is performed by using all of their 3rd EX skills in succession.

Leonhardt is one of the few characters that have Energy, and together with Force Field, makes positioning very easy and efficient.

Ellis has the longest range among every character in the game once she hits 25. She can more or less cover most fields. Her Willpower, Blessing, also gives you 25% more EXP/EP.

Borgnine + Ellis EX combo is among the earliest you can get. Borgnine also has insanely good stat ratings, S for both STR and VIT. Also, as a knuckle user, he's good for racking up combos without losing damage potential in your party, since he has good stats.

Winfield is one of the few EX Steal characters, and he's one of the few gun characters. Guns have a range of 4, and hits everything in a line. EX Steal gives you really good items at many points in the game.

Vira-Lorr simply has good stats. She could be better, but being able to use A-End is more than worth it. If only her EX2 was better, she wouldn't have any drawbacks.

Zerva, like Vira-Lorr is good, but not really great. His EX2 and EX3 can't be used vs. Gurgs. He's a scythe user... I used him for utility.
Flowchart


Note
  • It's not as complicated as it seems. A lot of the later sections are really short, and converge after a few World Map battles.
  • There seems to be a small mistake here. 4F actually connects to 5C, not directly to Part 6. I mention this again in the appropriate section.
  • Also, 5B doesn't connect to 5C. It connects directly to Part 6.
Part 1
Invasion Frontier
  • Event: Leonhardt joins
  • Fight: Frontier Soldier x 4
  • Fight: Musaka x 1, Gridamas Soldier x 2
    • Overkilling: Musaka (Sonic Blade) or (Sonic Wave)
  • Fight: Dark Knight x 1
  • Event: CG 101 unlocked
  • Fight: ???? x 1
    • The battle will be forced to end on the third turn
  • Event: CG 102 unlocked
  • Event: Ellis and Borgnine join
World Map
  • Frontier Road, West: Thief x 3
Hidden Path (Cliff Path)
  • Fight: Rock x 1
  • Event: Story related
World Map
  • Frontier Road, East: Thief x 3
Town: Dodone
  • Items: Silver Ore x 4, Fragment of Life x 3, 50 EP, 20 PP, 2000G
  • Facilities: Item Shop, Blacksmith (Enhancing), Adventurer's Guild (Titles) and First Aid Tent now available
World Map
  • South Murks Road, West: Thief x 3
  • South Murks Road, East: Thief x 3
Quest: Slumber Forest
  • Enemies: Thief, Hornet, Hell Dog, Imp, Skeleton, Lesser Bat
  • Treasure: Grass, Silver Bullion, Fragment of Life, Bone Guard, Thunder
World Map
  • Hamas Animal Trail: Hornet x 2, Hell Dog x 1
Alfheim (Elfville)
  • Event: Vira-Lorr joins
  • Event: CG 103 unlocked
World Map
  • North Murks Road, East: Hornet x 2, Hell Dog x 1
  • North Murks Road, Central: Hornet x 3, Hell Dog x 1
  • North Murks Road, West: Hornet x 2, Hell Dog x 2
Mimas
  • Fight: Gridamas Soldier x 4
  • Fight: Gridamas Captain x 1, Gridamas Soldier x 3
  • Event: Fyuria joins
  • Facilities: Blacksmith (Crafting) now available
World Map
  • North Nohutlu, South: Goblin x 1, Hell Dog x 2
  • North Nohutlu, North: Hornet x 3, Hell Dog x 2
Puteaux (Pyuto)
  • Event: Story related
  • Facilities: Horoscope is now available
World Map
  • South Nohutlu, North: Goblin x 2, Hell Dog x 3
  • South Nohutlu, South: Goblin x 2, Hell Dog x 3
Zelzagun Fortress (Fort Zelzagun)
  • Fight: Gridamas Captain x 1, Gridamas Soldier x 4
  • Fight: ???? x 1, Zerva x 1
    • Stolen: ???? (Shotgun), Zerva (Bone Scythe, Shadow Attack)
    • EX Stolen: ???? (Ring of Speed), Zerva (Divine Branch)
    • Overkilling: ???? (Unicorn Horn), Zerva (INT Up)
Killing ???? will end the battle that turn.
Killing Zerva will lead to Fyuria DOWN. (# don't kill Zerva for Perfect Run)
  • Field: Force Field obtained
  • Event: Zerva joins
  • Route Choice:
    • Break Through: Gauge moves towards DARK. Fyuria DOWN. Move to First Generation, Part 2 - Break Through. (#)
    • Bypass: Gauge moves towards LIGHT. Fyuria UP. Move to First Generation, Part 2 - Bypass.
Dungeon 1: Slumber Forest
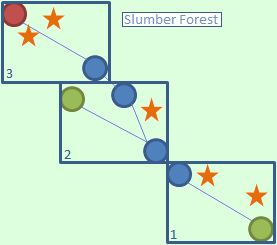
  • Green = exit, Blue = screens connected, Star = treasure

  • 1: Go forward (upper left) but to the right you'll notice a chest containing GRASS. Then go forward and to the right there is a chest containing SILVER BULLION.

  • 2: Going forward leads you to the exit, while going right and up leads you to your second chest containing FRAGMENT OF LIFE, now go up (the exit is to your left but you've got another screen to check before exiting)

  • 3: Go forward, it's a dead end, but you can nail treasure chests 3 & 4 containing BONE GUARD and the skill THUNDER. Now go back to the second screen. (Note: Chest 3 & 4 can only be found after you exit the map once)
    • I couldn't get to these chests on the PC version, for some reason. I might've just been being dumb, though...

  • 2: Go all the way left to find the exit of this forest.
Part 2 - Break Through
World Map
  • Elralmolt Trail, North: Goblin x 3, Imp x 1 (or Goblin x 2, Hell Dog x 3)
  • Elralmolt Trail, South: Goblin x 3, Hell Dog x 2 (or Goblin x 2, Hell Dog x 3)
Dunan Garrison
  • Fight: Gridamas Soldier x 5
  • Fight: Gridamas Captain x 1, Gridamas Soldier x 5
  • Fight: Gridamas Captain x 2, Gridamas Soldier x 4
World Map
  • Sem Coast Road, East: Skeleton x 2, Imp x 3 (or Skeleton x 2, Goblin x 3)
  • Sem Coast Road, West: Skeleton x 2, Goblin x 3 (or Goblin x 3, Imp x 3)
Kushina Valley
  • Fight: Lesser Bat x 1, Skeleton x 2, Imp x 3
  • Event: Luana joins
World Map
  • Husn Sea Route, SE: Skeleton x 2, Imp x 3
  • Husn Sea Route, NW: Skeleton x 2, Imp x 2
Town: Rigulus
  • Event Choice:
    • Accept: Gauge moves strongly towards LIGHT. Fyuria DOWN, Luana UP
    • Get it in writing: Gauge moves towards LIGHT. Fyuria UP, Luana UP (#)
    • Provide aid first: Gauge moves towards DARK. Fyuria UP, Luana DOWN

  • Move to First Generation, Part 3.
Part 2 - Bypass
World Map
  • Puteaux Forest, South (South Pyuto Forest): Goblin x 3, Hell Dog x 2
  • Puteaux Forest, Central (Central Pyuto Forest): Imp x 1, Goblin x 2
  • Puteaux Forest, North (North Pyuto Forest): Imp x 2, Goblin x 2
Alcina Wharf (Arukina Ferry)
  • Event: Story related
World Map
  • Celades Waters I (Selades Waters 1): Skeleton x 1, Imp x 3
  • Celades Waters II (Selades Waters 2): Imp x 3, Goblin x 3
  • Celades Waters III (Selades Waters 3): Skeleton x 2, Goblin x 3
  • Celades Waters IV (Selades Waters 4): Imp x 3, Goblin x 3
Ridinia Island
  • Event: Storyline related
World Map
  • Luminil Bay (Luminir Bay): Skeleton x 2, Imp x 3
Rigulus
  • Event: Gauge moves towards LIGHT. Fyuria DOWN
  • Move to First Generation, Part 3
Part 3
Town: Rigulus
  • Requirement: Before turn 45
  • Event: Fyuria wants a doll, so Leo is buying it
  • Gauge moves towards LIGHT, Fyuria UP
Town: Rigulus
  • Requirement: not Dark
  • Event: Luana shows her room to Leo
  • Gauge moves strongly towards LIGHT, Luana UP
World Map
  • Rymt Haim Trail, East (Eastern Rymt Haim Trail): Lesser Bat x 2, Skeleton x 2.
  • Rymt Haim Trail, West (Western Rymt Haim Trail): Imp x 3, Skeleton x 2
Chalcis (Calkis)
  • Requirement: Have Luana
  • Event: Luana asks which one of the girls is the most beautiful for Leo
  • Event Choice:
    • I Can't Answer: Gauge moves towards DARK. Fyuria UP, Luana UP (#)
    • I Don't Know: Gauge moves strongly towards DARK. Fyuria DOWN, Luana DOWN
    • Ellis: Gauge moves strongly towards LIGHT. Fyuria DOWN, Luana DOWN
Chalcis (Calkis)
  • Requirement: Before turn 40, Luana affection level 3 or higher
  • Event: Luana tries on some clothes
  • CG 76 unlocked
World Map
  • Sohbrook Bypath, East (East Sobulook Bypath): Lesser Bat x 2, Skeleton x 2, Imp x 3
  • Sohbrook Bypath, Central (Central Sobulook Bypath): Lesser Bat x 2, Skeleton x 2, Imp x 3
  • Sohbrook Bypath, West (West Sobulook Bypath): Lesser Bat x 2, Skeleton x 2, Imp x 3
Cave of Origin
  • Event: Storyline related
Quest: Cave of Origin
  • Enemies: Lesser Bat, Skeleton, Big Crab, Fairy, Lycanthrope, Mandrake, Mage
  • Treasure: Recovery Grass, Staff of Healing, Holy Symbol, Alluvial Gold, Essential Arts V, Intelligence Ring
  • Fight: Jumbo ♥♥♥♥ [Steam censored the word... The enemy is a giant chicken] x 1
    • Stolen: Darkness Element, Platinum Ore
    • Overkilling: Divine Branch
World Map
  • Rome Valley, North Pass (North Rome Valley): Lycanthrope x 1, Big Crab x 2, Fairy x 2
Rome Valley
  • Event: Winfield joins
  • Item: Vital Field gained
  • Fight: Dark Knight x 1
    • Stolen: Divine Branch, STR Up
    • EX Stolen: VIT Up, Moon Fragment
    • Overkilling: Max HP Up
    Winfield must be used.
    The battle will be forced to end on the fourth turn.
    The battle will also be forced to end if you deplete more than half of his HP.
    If you really really want to kill him in NG... You're going to have to do an obscene amount of farming. You probably need at least EX3. I had Leonhardt at 2.4k atk, Fyuria/Borgnine/Winfield at around 1.6k atk, Zerva at 1k mag, Vira-Lorr at 1.5k mag with Magic Up+ x2 and Magic Up. I only managed to get him down to half HP(about 6.6k damage dealt), so you'll need about 2x my stats, I suppose?. Those were the best gear I could feasibly get without grinding for days on end, and I was at a really high level, with all stats poured into STR/INT and all PP used up (all lvl 26 except for Winfield).

    This fight appears to be 'gimmicked'. His stats aren't really spectacular, with DEF and RST at a little above 200. In fact, you'll face several enemies stronger than him in terms of pure stats, apart from his HP. A Flame Dog, an enemy in Gen 2, has higher DEF/RST than the Dark Knight. In one save file, I had everyone at roughly 1k ATK/MAG and Ladius at 1.4k ATK. I was able to deal more than 20k in one combo, without using any EX moves. Granted, I was able to perform a few Break Arts, but the difference in damage dealt is huge, so I suspect his stats do not properly reflect his actual strength.
World Map
  • Rome Valley, South Pass (South Rome Valley): Lycanthrope x 2, Fairy x 2, Big Crab x 2
Managua Plains, North (Northern Managua Plain)
  • Route Choice:
    • Shortest Route: Gauge moves strongly towards DARK. Fyuria UP, Luana DOWN Move to First Generation, Part 4A - Shortest Route.
    • Kaystros Mountains: Gauge moves strongly towards LIGHT. Fyuria UP, Luana UP Move to First Generation, Part 4B - Detour. (#)
    • Southern Detour: Gauge moves towards LIGHT. Fyuria DOWN, Luana UP Move to First Generation, Part 4B - Detour.
      • Choosing this route will miss the 'To Mudus Gate' option when you reach Reganu Pass as you will miss meeting with Elaine.
Dungeon 2: Cave of Origin

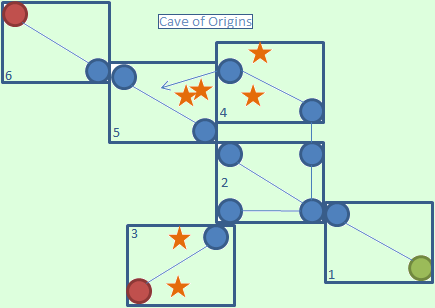
  • Green = exit, Blue = screens connected, Star = treasure

  • 1: Nothing to do except going forward.

  • 2: A 4-way path. Go left first.

  • 3: A straightforward dead-end lets you nail treasure chests 1 & 2 containing RECOVERY GRASS and STAFF OF HEALING, now go back to the second screen.

  • 2: Now you go right, not up.

  • 4: Go forward until the screen presents two paths. First, before going up, check a left to find a chest containing HOLY SYMBOL, then go up a little and choose to go right into a dead end in order to get a chest containing ALLUVIAL GOLD, now go left to the next screen.

  • 5: This place can be reached by going up in the second screen but by doing so you wouldn't have reached this platform with two chests containing ESSENTIAL ARTS V and INTELLIGENCE RING. Now jump down the platform and proceed forward to battle the boss and end this dungeon.
Part 4A - Shortest Route
World Map
  • Indignant Hill
Managua Plains, Central
  • Event: Story related
World Map
  • Lamour's Hidden Path
Managua Plains, East
  • Event Choice:
    • Help Luana: Gauge moves towards LIGHT. Fyuria DOWN, Luana UP.
      Move onto Event Choice:
      • Answer honestly: Gauge moves towards LIGHT. Fyuria DOWN, Luana UP
      • There's no such thing: Gauge moves towards LIGHT. Fyuria DOWN, Luana UP
      • Don't know: Gauge moves towards DARK. Fyuria UP

    • Help Fyuria: Gauge moves towards DARK. Fyuria UP, Luana DOWN
      Move onto Event Choice:
      • Age: Gauge moves towards DARK. Fyuria UP, Luana DOWN
      • Childhood: Gauge moves towards LIGHT. Fyuria UP, Luana DOWN
      • Zerva: Gauge moves towards LIGHT. Fyuria UP
World Map
  • Rigulus Bypath
  • Move to First Generation, Part 5A - Assault on Fort Zelzagun.
Part 4B - Detour
Notes
The Mountain route and the Southern Detour route are almost exactly the same beyond the number of encounters you get after the first event. They are combined in the wiki, and as this "guide" is almost 100% copied off the wiki, save a few minor edits, it will also be combined into one section.

World Map
  • Indignant Hill: Lycanthrope x 2, Big Crab x 2, Fairy x 2
Managua Plains, Central (Central Managua Plains)
  • Event: Storyline related
World Map
  • If Mountains:

    Kerrigan Road, West (West Kerrigan Road): Lycanthrope x 2, Big Crab x 2, Fairy x 3
    Kerrigan Road, East (East Kerrigan Road): Lycanthrope x 2, Big Crab x 2, Fairy x 2

  • If South Detour:

    Zeen Road, North (North Zean Road): ???
    Zeen Road, South (South Zean Road): ???
    Visikust Bypass: ???
Harvel Pass
  • Route Choice:
    • Head to Rigulus: Gauge moves towards LIGHT. Fyuria UP, Luana UP. Move to First Generation, Part 4C - To Rigulus.
      • This option will be automatically chosen if you took the lake detour to get to Rigulus earlier.
    • Head along Mountains(#): Gauge moves towards DARK. Fyuria UP, Luana DOWN. Move to First Generation, Part 4D - To Mountains.
Harvel Pass
  • Event Requirement: Have Luana.
  • Event Choice:
    • Help Luana: Gauge moves towards LIGHT. Fyuria DOWN, Luana UP.
      Move onto Event Choice:
      • Answer honestly: Gauge moves towards LIGHT. Fyuria DOWN, Luana UP
      • There's no such thing: Gauge moves towards LIGHT. Fyuria DOWN, Luana UP
      • Don't know: Gauge moves towards DARK. Fyuria UP

    • Help Fyuria(#): Gauge moves towards DARK. Fyuria UP, Luana DOWN
      Move onto Event Choice:
      • Age: Gauge moves towards DARK. Fyuria UP, Luana DOWN
      • Childhood: Gauge moves towards LIGHT. Fyuria UP, Luana DOWN
      • Zerva(#): Gauge moves towards LIGHT. Fyuria UP
Part 4C - To Rigulus
World Map
  • Bensulum Alley, South (South Bensram Path): Big Crab x2, Lycanthrope x2, Fairy x2
  • Bensulum Alley, North (North Bensram Path): Big Crab x2, Lycanthrope x2, Fairy x2
  • Rigulus Bypath (Rigulus Crossroads): Big Crab x2, Lycanthrope x2, Fairy x2
  • Move to First Generation, Part 5A - Assault on Fort Zelzagun.
Part 4D - To Mountains
World Map
  • Dedan Pass Road: Lycanthrope x 3, Fairy x 3 (or Lycanthrope x 3, Mandrake x 2)
Reganu Pass
  • Event: Elaine joins (if Kaystros Mountains route was selected earlier).
  • Route Choice:
    • To Fort Zelzagun: Gauge moves towards DARK. Fyuria UP, Luana DOWN. Move to First Generation, Part 4E - To Fort Zelzagun.

    • To Mudus Gate(#): Gauge moves towards LIGHT. Fyuria DOWN. Move to First Generation, Part 4F - To Mudus Gate.
      • Only selectable if Elaine joins.
      • Elaine starts at a higher affection rate by picking this option.

    • To Rigulus: Gauge moves towards LIGHT. Fyuria UP, Luana UP. Move to First Generation, Part 4G - To Rigulus.
Part 4E - To Fort Zelzagun
World Map
  • Hellid Road: ???

  • Move to First Generation, Part 5B - Fort Zelzagun to Mudus Gate.
Part 4F - To Mudus Gate
World Map
  • Kaystros Trail, North: Lycanthrope x 3, Fairy x 3
Quest: Kayastros Mountains
  • Enemies: Lycanthrope, Mandrake, Mage, Slime, Mummy, Lizard Man, Specter
  • Treasure: Shell Bracelet, Vanish Strike, Stone of Life, Capture, LUK Up, Moonring Blade, Mauler Blade
World Map
  • Kaystros Trail, South: Mandrake x 2, Slime x 2, Mage x 2
  • Prospect Ridge (Overlook Pass): Mandrake x 2, Slime x 1, Mage x 2
Town: Foothill Town
  • Event Choice:
    • Allow(#): Gauge moves towards LIGHT. Fyuria DOWN, Luana UP, Elaine UP
    • Assess: Gauge moves towards LIGHT. Fyuria UP, Luana UP, Elaine DOWN
    • Disallow: Gauge moves towards DARK. Fyuria UP, Luana DOWN, Elaine DOWN
World Map
  • Mimurae Lulakan (Mim Lerullakun): Mage x 2, Slime x 2
Trosia Highland
  • Event: Gauge moves towards DARK. Elaine UP
World Map
  • Culvert, West (West Kalbert): Mage x 2, Mummy x 2
  • Culvert, East (East Kalbert): Mage x 2, Slime x 3
Mudus Gate
  • Fight: Kasibal, Goblin x 3, Orc x 2
    • Overkilling: Kasibal (Flame Spear)

  • Move to First Generation, Part 5C - Fort Zelzagun Surprise Attack.
    As I have noted in the Flowchart section, there's a mistake there. 4F connects to 5C before 6.
Part 4G - To Rigulus
World Map
  • Hellid Road: ???
  • South Bensram Path: ???
  • North Bensram Path: ???
  • Lamor Hill: ???
  • Rigulus Crossroads: ???

  • Move to First Generation, Part 5A - Assault on Fort Zelzagun.
Dungeon 3: Kaystros Mountains

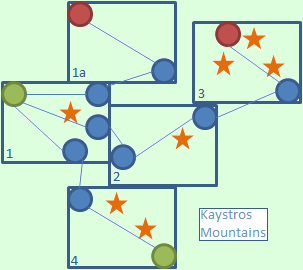
  • Green = exit, Blue = screens connected, Star = treasure

  • 1: Don't take the wooden bridge lying in front of you, go all the way right to find a chest containing SHELL BRACELET. DO NOT go up to the next screen, it's a dead end and it has no treasure chests. Instead, return to the entrance and this time take the wooden bridge. You'll end in a vast area, and to your right another wooden bridge. Take it to the next screen.

  • 2: Go all the way up and when you reach the top, check to the right: there's a chest beneath you. Unless you don't mind a fight, ignore it for now; you'll have to come back this way again soon. Continue to the top right to reach the third screen.
    • Warning: Screen 3 has enemies up to level 17, iirc. If you're not using DLC gear, or have been grinding a lot, it may be a good idea to skip this until later.

  • 3: You'll end in a long and sinuous dead end, with 3 treasure chests. The first one you'll see contains LUK UP, then by proceeding to the summit, you'll find two other chests containing MOONRING BLADE and MAULER BLADE. Now head back the way you came.

  • 2: Instead of retracing your steps, fall down to the chest and pick up a CAPTURE. Continue down, making your way back to the first screen.

  • 1: Go all the way down to the next screen.

  • 4: Another one that is long and sinuous, and leads you to the exit, don't forget to take the two chests on your right containing the skill VANISH STRIKE and STONE OF LIFE.
Part 5A - Assault on Fort Zelzagun
Town: Rigulus
  • Event. Luana joins if not already present
Harvel Pass
  • Event Requirement: If missed earlier.
  • Event Choice:
    • Help Luana: Gauge moves towards LIGHT. Fyuria DOWN, Luana UP.
      Move onto Event Choice:
      • Answer honestly: Gauge moves towards LIGHT. Fyuria DOWN, Luana UP
      • There's no such thing: Gauge moves towards LIGHT. Fyuria DOWN, Luana UP
      • Don't know: Gauge moves towards DARK. Fyuria UP

    • Help Fyuria: Gauge moves towards DARK. Fyuria UP, Luana DOWN
      Move onto Event Choice:
      • Age: Gauge moves towards DARK. Fyuria UP, Luana DOWN
      • Childhood: Gauge moves towards LIGHT. Fyuria UP, Luana DOWN
      • Zerva: Gauge moves towards LIGHT. Fyuria UP

World Map (Optional)
  • Husn Sea Route, NW: Skeleton x 2, Imp x 2
  • Husn Sea Route, SE: Skeleton x 2, Imp x 3
  • Sem Coast Road, West: Skeleton x 2, Goblin x 3
  • Sem Coast Road, East: Skeleton x 2, Imp x 3
  • Zelzagun Fortress, Backroad (Fort Zelzagan Pass): Mage x 2, Slime x 2

  • Move to First Generation, Part 5B - Fort Zelzagun to Mudus Gate
Part 5B - Fort Zelzagun to Mudus Gate
Zelzagun Fortress (Fort Zelzagun)
  • Fight: Braham, Largen, Gridamas Soldier x 4
    • Stolen: Braham (Element of Light, Silver Bullion), Largen (Element of Light, Crush Sword)
    • EX Stolen: Braham (Unicorn Horn), Largen (Divine Branch)
    • Overkilling: Braham (Shell Bracelet), Largen (Hawk Eye)
    The battle ends when Braham is defeated.

  • Event: Elaine joins if not already recruited.
World Map
  • Itogi Plains, NE (Northeast Itogy Plain): Mage x 2, Slime x 2, Mummy x 2
  • Itogi Plains, Central (Central Itogy Plain: Mage x 2, Slime x 2, Mummy x 2
  • Itogi Plains, SW (Southwest Itogy Plain): Mage x 2, Slime x 2, Mummy x 2
Mudus Gate
  • Fight: Gridamas Soldier x 4, Gridamas Captain x 2
  • Fight: Braham, Kasibal, Gridamas Soldiers x 2, Gridamas Captain x 2
    • Stolen: Braham (Silver Bullion), Kasibal (Harpoon, Flame Guard)
    • EX Stolen: Braham (Moon Fragment), Kasibal (Divine Branch, Unicorn Horn)
    • Overkilling: Braham (Earthseal Sword), Kasibal (Flame Spear)

  • Route Choice:
    • Direct: Gauge moves towards DARK. Fyuria UP, Luana DOWN, Elaine DOWN. Move to First Generation, Part 6A - Direct Route.
        This choice is automatically selected after a certain number of turns (definitely happens at turn 76).
    • Mudus River: Gauge moves towards LIGHT. Fyuria DOWN, Luana UP, Elaine UP. Move to First Generation, Part 6B - Mudus River.
    • Fuvelmill Lake: Gauge moves towards DARK. Fyuria DOWN, Luana UP, Elaine DOWN. Move to First Generation, Part 6C - Fuvelmill Lake.
Part 5C - Fort Zelzagun Surprise Attack
World Map
  • Itogi Plains, SW (Southwest Itogy Plain): Mage x 2, Slime x 2, Mummy x 2
  • Itogi Plains, Central (Central Itogy Plain): Mage x 2, Slime x 2, Mummy x 2
  • Itogi Plains, NE (Northeast Itogy Plain): Mage x 2, Slime x 2, Mummy x 2
Fort Zelzagun
  • Fight: Braham, Largen, Gridamas Captain x 2, Gridamas Soldier x 2
    • Stolen: Braham (Element of Light, Silver Bullion), Largen (Crush Sword, Element of Light)
    • EX Stolen: Braham (Sol Breaker), Largen (Flame Spear)
    • Overkilling: Braham (Shell Bracelet), Largen (Hawk Eye)

  • Route Choice:
    • Direct Route: Gauge moves towards DARK. Fyuria UP, Luana DOWN, Elaine DOWN. Move to First Generation, Part 6A - Direct Route.
    • Mudus River: Gauge moves towards LIGHT. Fyuria DOWN, Luana UP, Elaine UP. Move to First Generation, Part 6B - Mudus River.
    • Fuvelmill Lake(#): Gauge moves towards DARK. Fyuria DOWN, Luana UP, Elaine DOWN. Move to First Generation, Part 6C - Fuvelmill Lake.
Part 6A - Direct Route
World Map
  • Zasadeel Pass, North: 2x Lizard man, 2x Mummy
  • Zasadeel Pass, Central: 1x Lizard man, 1x Specter
  • Zasadeel Pass, South: 2x Lizard man, 1x Specter
Migratory Path
  • Event: Story related
World Map
  • Vovobackt Pass, North: 2x Fire spirit, 2x Lizard Man, 2x Specter
  • Vovobackt Pass, South: ???
Pleuron Fortress
  • Fight: Orc x 2, Goblin x 4
  • Fight: Garvel x 1, Orc x 2, Goblin x 3
  • Fight: Braham x 1, Garvel x 1, Orc x 3

  • Move to First Generation, Part 7 - Conclusion.
Part 6B - Mudus River
World Map

Depending on the route you took, you may need to fight two extra battles to unlock a path.
  • Culvert, East (East Culvert):
  • Culvert, West (West Culvert):
Trosia Highland
  • Event Choice:
    • Find Luana: No gauge change. Fyuria DOWN, Luana UP, Elaine DOWN
    • Find Fyuria: No gauge change. Fyuria UP, Luana DOWN, Elaine DOW
    • Find Elaine: No gauge change. Fyuria DOWN, Luana DOWN, Elaine UP

  • Item: Esoteric Book I gained
World Map
  • Trosia Highland, North
  • Trosia Highland, Central
  • Trosia Highland, South
[/b]
[/list]
Mudus River, Downstream
  • You do not choose which heroine you talk to here - it is dependent on their affection.


  • Fyuria Event Choice:
    • Look for star: Gauge moves towards LIGHT. Fyuria UP
    • Nod: Gauge moves towards DARK. Fyuria UP
    • Hope?: Gauge moves towards DARK. Fyuria UP

  • Luana Event Choice:
    • Go: Gauge moves towards LIGHT. Luana UP
    • Wait: Gauge moves towards LIGHT. Luana UP
    • Hesitate: Gauge moves towards DARK. Luana UP

  • Elaine Event Choice:
    • Childhood: Gauge moves towards DARK. Elaine UP
    • I do not know: Gauge moves towards DARK. Elaine UP
    • The others: Gauge moves towards LIGHT. Elaine UP
World Map
  • Rodill Trail, North
  • Rodill Trail, South
[/b]
[/list]
Kanatrious Hill
  • Event: Storyline related
World Map
  • L'arcgi Road, West
  • Norligu Bridge
  • L'arcgi Road, East
[/b]
[/list]
Pleuron Fortress (Pureuon Fortress)
  • Fight: Braham x 1, Garvel x 1, Orc x 3

  • Move to First Generation, Part 7 - Conclusion.
Part 6C - Fuvelmill Lake
World Map
  • Nevoric Mountain, North: 2x Lizard Man, 2x Mummy, 2x Specter
  • Nevoric Mountain, Central: 2x Lizard Man, 2x Mummy, 1x Specter
  • Nevoric Mountain, South: 1x Lizard Man, 2x Mummy, 1x Specter
Garana Wildland
  • Event Choice:
    • Find Luana: No gauge change. Fyuria DOWN, Luana UP, Elaine DOWN
    • Find Fyuria(#): No gauge change. Fyuria UP, Luana DOWN, Elaine DOWN
    • Find Elaine: No gauge change. Fyuria DOWN, Luana DOWN, Elaine UP

      Your choice affects a future event

  • Item: Esoteric Book I gained
World Map
  • South Garana Wildland: 2x Lizard Man, 3x Mummy, 1x Specter
  • Zuan Moor (Dyuan Moor): 2x Lizard Man, 3x Mummy, 2x Specter
Fuvelmill Lake, North Coast
  • Dependent on your choice during the Garana Wildland event.

  • Fyuria Event Choice:
    • Look for star(#): Gauge moves towards LIGHT. Fyuria UP
    • Nod: Gauge moves towards DARK. Fyuria UP
    • Hope?: Gauge moves towards DARK. Fyuria UP

  • Luana Event Choice:
    • Go: Gauge moves towards LIGHT. Luana UP
    • Wait: Gauge moves towards LIGHT. Luana UP
    • Hesitate: Gauge moves towards DARK. Luana UP

  • Elaine Event Choice:
    • Childhood: Gauge moves towards DARK. Elaine UP
    • I do not know: Gauge moves towards DARK. Elaine UP
    • The others: Gauge moves towards LIGHT. Elaine UP
World Map
  • Fuvelmill Lake Course I: 2x Water Spirit, 3x Specter
  • Fuvelmill Lake Course II: 2x Fire Spirit, 2x Specter
Fuvelmill Lake
  • Requirement: Before turn 85, Fyuria affection level 5, Luana affection level 4
  • Event: CG 73 and CG 74 unlocked
World Map
  • Fuvelmill Lake Course III: 2x Fire Spirit, 2x Lizard Man, 2x Specter
  • Fuvelmill Lake Course IV: 2x Fire Spirit, 2x Water Spirit, 2x Specter
  • Fuvelmill Lake Course V: 2x Fire Spirit, 2x Water Spirit, 2x Specter
Fuvelmill Lake, South Coast
  • Event: Storyline related
World Map
  • Fuvelmill Lake Road, South: 2x Fire Spirit, 2x Water Spirit
  • Fuvelmill Lake Road, Central: 2x Water Spirit, 3x Orc
  • Fuvelmill Lake Road, North: 2x Water Spirit, 3x Orc
Pleuron Fortress (Pureuon Fortress)
  • Fight: Braham x 1, Garvel x 1, Orc x 3
    • Stolen: Braham (Darkness Element, Silver Bullion), Garvel (Darkness Element, Silver Bullion)
    • EX Stolen: Braham (Windseal Sword, Thunderseal Sword), Garvel (Wind Guard, Thunder Guard)
    • Overkilling: Braham (Charm of Force), Garvel (Feather Ring)

  • Move to First Generation, Part 7 - Conclusion.
Part 7 - Conclusion
World Map
  • Noriless Main Path, North: 3x Fire Spirit, 2x Orc
  • Noriless Main Path, South: 3x Water Spirit, 3x Orc
Grimoire Way, North (Northern Gurimoa Way)
  • Requirement: Before turn 90, All Heroines affection level 4 or higher
  • Event Choice:
    • Go with Winfield(#): Gauge moves towards DARK. Fyuria DOWN, Luana UP, Elaine DOWN
    • Stop them: Gauge moves towards LIGHT. Fyuria UP, Luana UP, Elaine UP
  • Event: CG 68 unlocked if option 1 is chosen
  • Item: Secret Album 1 obtained if option 1 is chosen

    This is the Hot Springs scene.
World Map
  • Dordt Bach's House (Dolt Bucks's House): 2x Familiar, 2x Orc
  • Loratul Hills (Loreytool Hills): 2x Werecat, 2x Familiar
Grimoire Way, South
  • Event Choice: Nine questions [check next section]

  • Perfect run choices: 1,1,1,2,1,2,1,2,1
    Fyuria's questions: 1,2,1
    Luana's questions: 1,1,2
    Elaine's questions: 1,2,1
World Map
  • Gridymate Road, NE: 2x Familiar, 2x Werecat, 2x Orc
  • Gridymate Road, Central: 1x Familiar, 1x Hobgoblin, 2x Orc
  • Gridymate Road, SW: 2x Familiar, 1x Hobgoblin, 2x Werecat
Gridamas Capital
  • Event Choice:
    • Accept: Gauge moves towards LIGHT. Fyuria UP, Luana DOWN, Elaine UP
    • Refuse(#): Gauge moves strongly towards LIGHT. Fyuria DOWN, Luana UP, Elaine DOWN
    • Fight 1-on-1: Gauge moves strongly towards DARK. Fyuria UP, Luana DOWN, Elaine UP

  • Fight: 1x Melchior, 1x Hertzfeldt, 2x Gridamas Captain, 2x Gridamas Soldier
    • Stolen: Hertzfeldt (Stone of Life, Darkness Element), Melchior (Stone of Life, Silver Bullion)
    • EX Stolen: Hertzfeldt (Glaive, Damascus Spear), Melchior (Wind Guard, Chozurimaru)
    • Overkilling: Hertzfeldt (Sharp Sense), Melchior (Samson Ring)
World Map
  • If the Kaystros Mountains are not available, then a number of random battles will need to be fought to reach it:
    • Culvert, East (East Kalbert): Mage x 2, Slime x 3
    • Culvert, West (West Kalbert): Mage x 2, Mummy x 2
    • Mimurae Lulakan (Mim Lerullakun): Mage x 2, Slime x 2
    • Prospect Ridge (Overlook Pass): Mandrake x 2, Slime x 1, Mage x 2
    • Kaystros Trail, South: Mandrake x 2, Slime x 2, Mage x 2
Kaystros Mountains
  • You don't have to go through the dungeon.
  • Fight: Dark Knight x 1
    • Stolen: Darkness Element, Divine Branch
    • EX Stolen: Thunder Guard, Zanbato
    • Overkilling: Max HP Up+
Foothill Town
  • Requirement: Before turn 100, not Dark, Elaine affection level 5
      This may not appear if Elaine joined at Zelzagun Fortress
  • Event: CG 75 unlocked
Chalcis
  • Requirement: Before turn 100, Light, All Heroines affection level 5
  • Event: CG 77 unlocked
Dodone
  • Event: Young Man unlocks The Holy Island of Erin

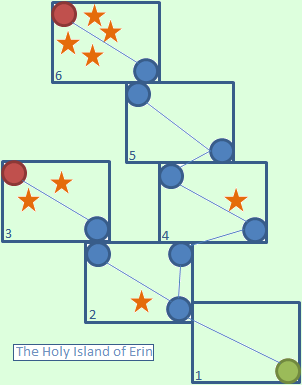
    The Holy Island of Erin is an optional dungeon.
Lucrellia
  • End of First Generation.

    Congratulations for completing the first generation!
    Check below for information about heroines and heirs!
Dungeon 4: The Holy Island of Erin

  • Green = exit, Blue = screens connected, Star = treasure

  • 1: Straightforward path. No treasures or path splits worth mentioning. Continue onto the second screen.

  • 2: Head straight as you enter and you will immediately approach a treasure containing HEADHUNTING SCYTHE. Continue across the bridge and you will see a zone; this will take you into the third screen.

  • 3: This area is a small straight-forward path with a dead end. At the dead end are two treasures containing MOONRING BLADE and CRUSH SWORD. Retrace your steps back to the second screen.

  • 2: Head to the right of your screen from where you are and follow the cliff edge but don't drop down. You'll soon come upon the zone for the fourth area above your character.

  • 4: Head down this straight-forward path. Not too far in you'll see a treasure to the right behind a tree so be careful not to miss it. Inside you'll find ADAKA. Continue on to the fifth screen.

  • 5: Straightforward path inside a cave like zone. No treasures or path splits worth mentioning. Continue onto the sixth screen.

  • 6: This is the final area of the dungeon. It is a small area with a dead end. At the dead end, you will find four treasures containing MYSTIC, DEMONIC SCYTHE, ASSAULT CANNON, SHIELD SWORD. That's all for this dungeon.
Event: Nine Questions
  • Fyuria Question 1
    Answer
    Alignment
    Fyuria
    Luana
    Elaine
    I do not hate them (#)
    Light
    +
    -
    -
    I can scarcely stand them
    Dark
    -
    +
    +

  • Luana Question 1
    Answer
    Alignment
    Fyuria
    Luana
    Elaine
    I see nothing wrong with them (#)
    Light
    -
    +
    -
    I have little interest in them
    Dark
    +
    -
    +

  • Elaine Question 1
    Answer
    Alignment
    Fyuria
    Luana
    Elaine
    Anyone can learn to cook(#)
    Dark
    +
    -
    +
    Love is all that matters
    Light
    -
    +
    -

  • Fyuria Question 2
    Answer
    Alignment
    Fyuria
    Luana
    Elaine
    If you desire it, then it is yours
    Dark
    -
    +
    -
    I want that one to be special(#)
    Light
    +
    -
    +

  • Luana Question 2
    Answer
    Alignment
    Fyuria
    Luana
    Elaine
    I like all children(#)
    Light
    -
    +
    +
    Ellis is special
    Dark
    +
    -
    -

  • Elaine Question 2
    Answer
    Alignment
    Fyuria
    Luana
    Elaine
    My heart will always stay true
    Light
    +
    -
    -
    I have yet to give my heart to anyone(#)
    Dark
    -
    +
    +

  • Fyuria Question 3
    Answer
    Alignment
    Fyuria
    Luana
    Elaine
    Species has nothing to do with it(#)
    Light
    +
    -
    -
    So long as they love one another
    Dark
    -
    +
    +

  • Luana Question 3
    Answer
    Alignment
    Fyuria
    Luana
    Elaine
    I think she would make it more fun
    Light
    -
    +
    -
    Does such woman even exist?(#)
    Dark
    +
    -
    +

  • Elaine Question 3
    Answer
    Alignment
    Fyuria
    Luana
    Elaine
    I cannot return(#)
    Dark
    +
    -
    +
    Yes, we must help them rebuild
    Light
    -
    +
    -

    NOTE: The + and - are not equal. Some of them affect the heroines more than others. I have had a heroine get 1+ and 1- and it resulted in loss in affection.
Choosing a Heroine
At the end of the first generation, you'll (most likely) get a choice of heroines to bear Leonhardt's child. You can pick among the heroines if their affection level is 4 or above.

Affection level can be checked by their faces on the bottom right of the screen during scenes. Level 4 is when they have a big smile. Level 5 is when they blush.

If all your heroines are at affection level 3 or below, you will automatically pick the heroine on the upper left of the circle. [ie. Fyuria, Valeria, Lavinia, Hildegard]

It's important to have your preferred heroine at max affection. Why? Your main character will have better stats, that's why! When your chosen heroine is at max affection, your next main character will be stronger compared to if your heroine's affection is at level 4.
*they will also have different weapons

In order to get the highest damage output team of Heroes, your bride choice should be Fyuria -> Yayoi -> Faina -> Silvi.
If you use a team of the 5 heroes + a certain character, you'll be doing Leaderboard worthy damage, if only the Leaderboards weren't so broken... :\

So, how exactly does the mother affect your main characters?
  • Stats
    Generally, the main attribute of your MC is dependent on his lineage and their mothers affect this the most. There's no hard formula for this, by 5th gen, there are a lot of combinations!
  • Weapon
    Same as stats, it depends on their cumulative lineage, and is mostly affected by their mother. There's no hard formula for this, by 5th gen, there are a lot of combinations!
  • Appearance
    Your main characters will look slightly different depending on who their mother is
  • Willpowers
    They learn different Willpowers based on their mothers
  • Extended Area
    Also depends solely on their mothers.
  • Skill slots
    The first 4 skill slots are based on the mothers. You get 2 more skill slots if you use the item "Proof of Valor" at level 50. One of them is based on their mothers, the other is based on their grandmothers. Only exception is 2nd gen, for obvious reasons. One of his extra skill slots is always Fire.


If you want to check out what descendants you will end up with, you can check out this awesome guide[www.gamefaqs.com] by ACasser!

There's also an online tool to help you with this, based on the guide above. Click here![www.soifon.net]
Credits, Links, all that good stuff
Credit to all wiki contributors, since I nicked the information off of them, with a small bit of editing.
The only ones I know of are Erellisae, Byuusan, Wathman(all the images) and Smurgledwerf(True End path). There are most definitely others, though!

Compile Heart & Red Entertainment, for creating the game

Idea Factory, Aksys Games and Ghostlight for publishing the game

Ghostlight again, for porting the game to PC

and you, for reading up to the credits!


Links
29 Comments
Faded 5 Feb, 2022 @ 6:37pm 
thanks :cozyspaceengineersc::ale::steamthumbsup::silverdollar:
Java Worker 1 20 Dec, 2016 @ 12:00pm 
Gonna play this game through only using the main characters and Plum, so 1 new character each generation except for the 3rd.
Frenzy85  [author] 12 Oct, 2014 @ 3:30am 
@#Raven
The wiki says you need to exit and re-enter for it to show up.

For some reaosn, I wasn't able to get it even after re-entering... though I may have just completely been blanking out and didn't see the chest right in front of me or something.
Raven 11 Oct, 2014 @ 3:26pm 
The 3rd area in slumbering forest at begining with bone guard and thunder skill chests is either a random spawn or appears on your 2nd run through the zone as it apeared for me 2nd time through
Gryphonheart 11 Aug, 2014 @ 9:50am 
@Frenzy85

Thanks again for your explanation. :) I'll follow your advice and keep a team with Leo and other 1st gen characters. I'm gonna read that guide of yours too!
Frenzy85  [author] 11 Aug, 2014 @ 7:17am 
@akj
It was nothing. I played the game quite a few times, so there was virtually no extra work as I confirmed stuff as I played. The only thing that took up time was editing it so it looks nice... or at least I think it looks good enough. Dx

The only part that I can really take credit for is the "tips" part... but it's only a small part of the whole thing.
Frenzy85  [author] 11 Aug, 2014 @ 7:14am 
However, also note that there are other methods that require little to no grinding. Well, any team follow the same concept, but there are other team compositions that does it with much more ease.

The 5 Main + 1 has highest atk, but the XL monster + Ellis team has the easiest setup to accomplish in the fight itself. In fact, the 5 MC + 1 is easy to mess up. The only drawback is that without high atk output, you won't be able to get the Overkill weapons.

An Ellis team with XL monster is pretty viable, although a bit harder than with an XL. However, you can create a fairly high output team (second best, I think) with Ellis + Borgnine + Leo + Winfield + Vira-Lorr + Zerva. This team has the best balance in terms of attack + ease of use, imo. I suggest using this and ignoring the 4 descendants if it's your first run.
Frenzy85  [author] 11 Aug, 2014 @ 7:08am 
Well, there are 81 combinations available (1296 if you count unmaxed affection)... but really, if you want to make a nice team of 5 main characters, the elimination process goes by really quick.

Fyuria -> Yayoi -> Faina -> Silvi. This gives a good team for end-game. You can add in a certain character that you get in Gen 5 and make a full team. Their attack output is the highest in the game when you combine their EX3. This means you require minimal grinding to be able to beat those super tanky bosses.

I believe I also made a guide for that. It's pretty short, so you may want to give it a read once you reach that point.
akj 8 Aug, 2014 @ 9:48pm 
Thanks a bunch for compiling these guides! :D: I'm sure it was a lot of effort going through all the information out there. I've just finished my first run using all your guides, and it's definitely better suited to steam's overlay than the wiki is.
Gryphonheart 8 Aug, 2014 @ 3:57pm 
Hahaha, yeah. I picked her too the first time I played this game! I haven't completed it tho xD
Thanks a lot for the info, i never thought picking a wife would be so complex lol. I didn't consider the Willpowers and skill slots until now, by reading your replies. :) It's good I saved the game right before completeng first gen, so I could fix stuff like this.

If you dont mind other questions: which wives would be the best for a run that doesnt require a lot of grinding? I like to enjoy the game's pace as it is and tbh I'm kinda lazy to do so (probably because battle system is kinda overwhelming for me atm, sicne I havent grasped much of it). Also, how would you succesfully build a character? Regarding stats :( I place almost everything at Vitality for the sake of defense and scaling, but idk If it was the right thing to do, neglecting other options.

Thanks a lot for the answers, really, they are REALLY helpful. You are a lifesaver xD