Fernbus Simulator

Fernbus Simulator

Not enough ratings
(EXPERIMENTAL) How to setup Multi-Display
By TML Studios
This guide will explain to how you can setup Fernbus Simulator to run on multiple displays.
   
Award
Favorite
Favorited
Unfavorite
Multi-Display in action
Here you can see the Multi-Display feature in action:


Many thanks to WallStark for allowing us to link his video here.
Important instructions
This experimental feature is available since Fernbus Simulator version 1.22.27780 and is available for public testing to gather feedback. We cannot guarantee that this feature works for every PC system and it is not easy to set up at the moment.

  • You have to set the Screen Mode to Fullscreen Borderless in the Graphics Settings/Display.
  • All monitors must have the same resolution.
  • It is recommended to arrange the views from left to right.
  • It is an advantage if all monitors are the same size.
  • The Multi-Display Feature is very performance demanding and is not recommended for a low-end PC.
  • Some changes may require you to restart the game in order for the change to take effect.

Should you have any questions regarding this feature you can contact our support at https://www.tml-studios.de/forum/support/
Where can I find the .cfg file?
C:\Users\*username*\AppData\Local\Fernbus\Settings\MultiDisplay

Please note that the file path may vary from system to system. Insert your username, which you're using on your PC, at the directory position of *username*
Setting the monitor resolution
  1. Under the above file paths you should find two .cfg files, which you can use with the help of a text editor, such as. Notepad ++, open and edit.
  2. Under the point "configName": "2 Views 1920 x 1080", you can specify a name for your configuration, under this name you will find it in the game.
  3. "windowPosX": 0, specifies the X position of your desktop window on monitor 1, see graphic.
  4. "windowPosY": 0, indicates the Y position of your desktop window on monitor 1, see graphic.
  5. Depending on the order of your monitor, the X position of Monitor 1 may vary according to your resolution.
  6. "windowWidth": 3840, specifies the width of your two monitor resolution taken together, so here, for example. 1920 + 1920 = 3840th
  7. "windowHeight": 1080, indicates the respective height of both monitor resolutions, in our example 1080.

Positioning the UI (User Interface)
  1. uIPosX: 0, indicates the X position at which the UI begins
  2. "uIPosY": 0, indicates the X position at which the UI begins
  3. "uIWidth": 1920, indicates the resolution width of the UI
  4. "uIHeight": 1080, indicates the resolution level of the UI
  5. Under "viewportId": "View 1" you will find the following points:
    • "posX": 0, beginning of the X position of the ViewportID
    • "posY": 0, beginning of the Y position of the ViewportID
    • "width": 1920, resolution of ViewportID
    • "height": 1080, resolution height of the ViewportID

Angle and FOV (Field Of View)
If you have set up your monitors in angles to each other, you should measure the appropriate angle, eg. With a Geodreieck, and enter this angle value in the entry of the appropriate monitor under the following point:
  1. We assume the Montor 2 stands at an angle of 75 ° to Monitor 1.
  2. In the section "viewportId": "View 2 you will find the entry" relativeRotation ":
  3. Here you can find the point "yaw": 60,
  4. Should your angle eg. 75 °, you have to edit the value here "yaw": according to "yaw": 75,
  5. Please note that the FOV value (Field Of View / field of view) must be identical to the angle value
  6. The FOV value can also be found in the "viewportId" section: "View 2 contains the entry" relativeRotation ":, under" fOV ": 60
  7. If the angle of Monitor 2 is 75 °, you have to edit the entry "fOV": 60 to "fOV": 75.

Save the .cfg file and test it in-game
Save the .cfg file and start the game whose .cfg file you edited.

In the main menu under Settings / Graphic you will now find the corresponding entry of the configuration that you have just edited.

Good ride!
Complete graphic for explanation
15 Comments
8[&] 16 Dec, 2024 @ 11:19am 
You should make a fixed version of cfg file let us download.
Nicolas19200 4 Apr, 2024 @ 2:23pm 
After 4 years still in the beta phase and it doesn't work it gives me a black screen if I launch it with AMD eyefinity like all my other games it's too zoom seriously made a complete and correct tutorial with the parameters for 3 screens and not for 2 or correctly develop this functionality without needing to go through the config files which are no longer even in .cfg format but in .mdconfig
FIA2008 7 Jul, 2023 @ 4:17am 
I don't have the MultiDisplay directory. The game crashes when I try to apply the multi monitor in the game settings.
Stefanuoskj 24 May, 2021 @ 3:36pm 
Is it possible that you did 3 IDENTICAL simulators and none of the three with 3 monitor support ????
Stefanuoskj 24 May, 2021 @ 3:35pm 
it takes a video guide. 7680x1440 resolution does not work. written guidance is not easy for everyone. do a guide on how to edit the .cfg file even for those who have three 32 "monitors
Volkan Topcu 5 Mar, 2020 @ 12:49pm 
Is not Support 2k? 7680x1440 ?
Javier C.A. 27 Jan, 2020 @ 12:01pm 
Will this functionality be available for Tourist Bus Simulator?
TML Studios  [author] 30 Sep, 2019 @ 12:53am 
@Osiris-Sensei
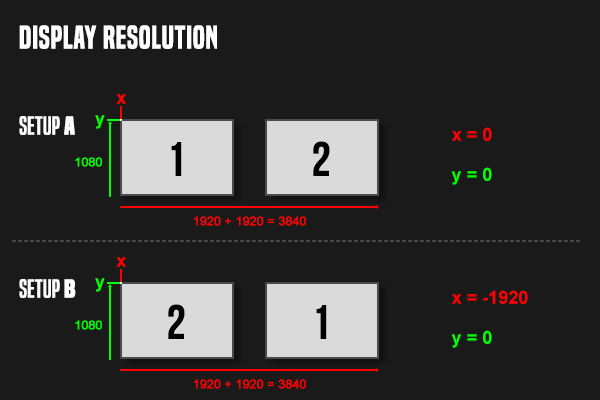
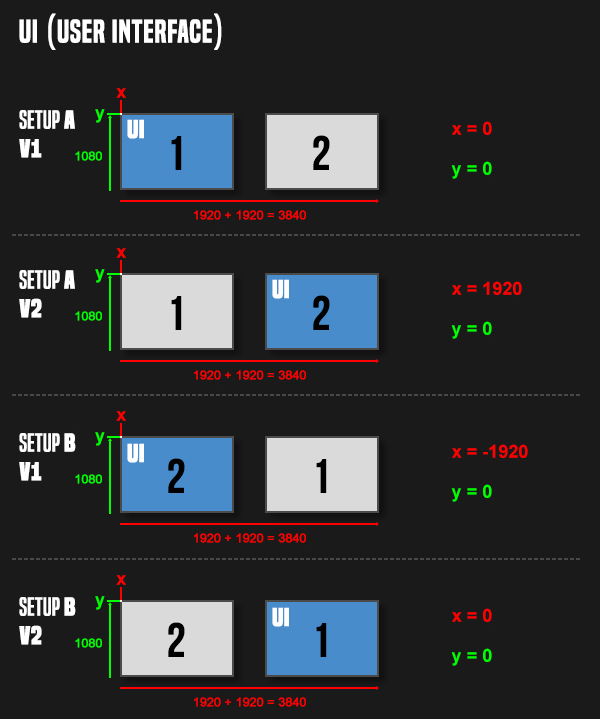
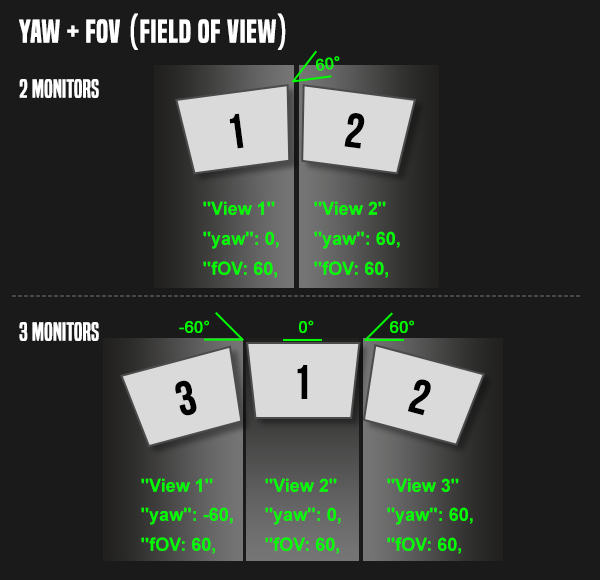
The multi-display BETA feature doesn't work in regular "Fullscreen". You need to activate "Borderless Fullscreen". Please, read the guide carefully.

Should you still have trouble with this BETA feature you can contact our colleagues in the support centre at https://www.tml-studios.de/forum/support/

Our support centre does not require any registration and you can send your ticket right away.


Kind regards
TML-Studios
Sam LeDivin 26 Sep, 2019 @ 8:30am 
this beta has messed up my pc, i loaded the game, click on multi display, but when i pressed fullscreen, it went all black, i uninstalled the game, re-installed it but its still the same thing and im pissed... WTF
TML Studios  [author] 26 Sep, 2019 @ 12:40am 
@eta32
Please note, that this feature is in BETA testing in order to gather feedback to improve it. If this feature would be flawless, there wouldn't be a BETA test. But thanks a lot for your constructive feedback, we will try to improve this feature during its BETA testing phase.