Agarest: Generations of War

Agarest: Generations of War

58 ratings
Walkthrough (Fifth Generation)
By Frenzy85
Basically information from the wiki that I stole so it would be more convenient to use with Steam.

Agarest wiki can be found here: http://agarest.wikia.com/wiki/Agarest_Wiki

Disclaimer: I didn't write most of the information below. I wrote a very small portion of it, and did some edits while I was playing through the game. The information below is from the Agarest wiki. Most of what I did was making it presentable in the Steam guides format. I meant to have this for personal use, because I find using the Steam browser a pain and Steam guides help with quick navigation. If enough people complain about it, I will remove it from public view and make it private. If you think I should do this, leave a comment. If more than a dozen people ask for it, it'll happen, I promise.

Also, this does take quite some time to make, and is not just plain copy and paste! If you don't believe me, give it a shot... *shrugs*
I'll even tell you some tips to speed up the process if you ask. It still takes a while.
There are a few edits here and there, that people have been unable to do in the wiki because the pages are locked.
   
Award
Favorite
Favorited
Unfavorite
Notes
  • The information below (everything, just slightly edited...) is from the Agarest Wiki[agarest.wikia.com]
  • I'm making this because I hate using Steam Browser to browse stuff. It's extremely inconvenient, in my humble opinion. Steam guides can be quite convenient for navigation...

  • If you want to go for a perfect run, and are not sure what choices to make, I marked the choices(#) that will get you a "perfect run". You'll get True End and all scenes, except heroine endings, since they're mutually exclusive. You pick your own heroine! Canon choices are those on the top left of the pictures on the bottom right of the screen during scenes.
  • You may notice that the paths that aren't part of the "perfect run" has missing info. This is probably because people who filled in the information in the wiki mostly went for the perfect run. You don't miss any scenes, iirc, so there's no reason not to. Some scenes happen in different locations, such as the choice where you help either Fyuria/Luana.
  • I lied when I said you get all scenes... It's impossible to get all scenes in one playthrough, unless you re-load at some points. There are times when you have to choose between the heroines, and the scenes for each is mutually exclusive.
  • With that said, I suggest you go one run through on Easy/Normal, picking whatever you want and not going for True End. Then go to NG+ for the True End on Hard.

  • Note that encounters in blue/orange locations are approximate and are not 100% certain.
Tips and stuff
  • Alignment and timing changes many things in this generation.
    • Being either too far light or dark can prevent events from spawning, possibly causing you to miss recruiting new characters.
    • Keep an eye on your turn count, taking too long to reach certain events can cause the gauge to shift from a Light Bonus to a Dark Bonus (or vice versa).
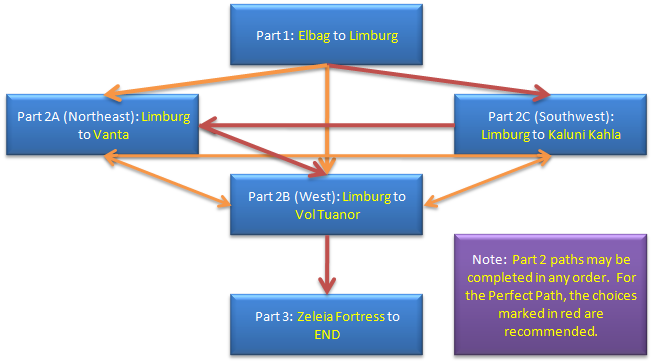
  • Part 2A, 2B and 2C must all be completed, but you can do them in any order. This will affect some scenes, battles and party members you obtain in this generation.
  • This is a good time for you to start grinding titles. The difficulty really goes up in this gen, so the extra PP from title rewards, and EXP/EP from the process of getting them, are very welcome.

    I do so believe many of the stronger crafting manuals are received as title rewards. I'm have this gap in my crafting list, and I'm quite sure I looted every chest in the game.
  • Grinding titles is also a good time to level up your old Main Characters. You don't want to level them up in post-game, because they level up too quickly and learn weaker Willpowers. You want to use PoV before they hit 52! This is true only for the 5 MCs.
Powering Up: Actives
  • At this point, you shouldn't even bother with anything less than ATK +750, given how readily available Halper Scythes are. MAG+ is a bit harder, so you may want to make do with MAG +460 or +500 for the most part.
    • Halper Scythe -> ATK +750
      Easiest to farm, and you will have the EP to make several of these. Make as many as you can. Only make lesser ones if you run out of TP. I would rather save my EP, though.
    • Shadow Blaster -> MAG +300
      Weak. Annoyingly so... but it's the best you can get that I find is still convenient to farm up. I ended up using a bunch of these, and a few of the stronger ones. I didn't go out of my way to get the stronger ones, because I couldn't be bothered.
    • Force Frame -> Magic Up
      Haven't done any testing. I had some of these, and I had a few empty slots, so I plugged them in. The active itself can be enhanced as well, though by how much they improve is not known to me.
    • Soul Sucker -> MAG +400
      Dyshana comes with this equipped, and you get one from a title if you get Dyshana. It's semi-convenient to farm if you want more, I guess... It's a rare drop from Ice Knights.

      Highly not recommended... might as well farm +900's instead of these.
    • Saint Hand -> MAG +460
      Too much trouble to make, in my opinion. You will probably have enough materials to create several, but you'll need to do a chain of crafting and converting. They also cost a lot... Unlike the Shadow Blaster, the component weapons aren't available in stores.
    • Hidden Stalk -> MAG +500, Sorcery Gun -> MAG +750
      These require a gun that you can neither buy nor craft. You need a rare drop(or EX Steal) from a mob. Don't bother unless you have spare Hidden Seekers. Though, to be honest, the rest of the materials aren't exactly easy to come by either, same as Saint Hand.
    • Caduceus -> MAG +750
      Yadah yadah... hard to farm...

  • You will have access to ATK +999 and MAG +900(and +999 in DLC dungeon), but not only are they hard to farm, but they also cost an obscene amount of EP to convert into. They will become easier to farm in post-game, although still a pain and the cost doesn't decrease at all.
    • Rafflesia -> Stardust Claw -> MAG +900 [332k EP]
      • Ogre + Silver Dragon = Rafflesia
    • Griffin -> Large Mithril Claw -> ATK +999 [354k EP]
      • Rafflesia + Medusa = Griffin
    • Crystal Dragon -> Stardust Fang -> MAG +999 [354k EP]
      • Silver Dragon + Ring Dragon = Gold Dragon
      • Silver Dragon + Gold Dragon = Crystal Dragon

        Note: Gold Dragon can be found, but not captured, so you'll have to use combination to get it.
        Note: Some monster combinations have multiple results. Just cancel and keep trying, it'll take a few tries at most.

      Capture Locations
      • Silver Dragon: Vinceburg Sea III
      • Ogre: Diyon Moor; Soraida Passage
      • Medusa: Diyon Moor; Soraida Passage
      • Ring Dragon: Deep Forest Naruvia, 6th screen
True End
Requirements
  • Have gauge be at NEUTRAL for the Summerill boss fight, which is the final battle of this generation. In order to get his, at the start of the 5th generation, you need to be low-NEUTRAL - there are a lot of enforced LIGHT boosting events that you only want to push you back to NEUTRAL and not into LIGHT.

  • When taking over bases in the 5th generation, go in the order Southwest (path towards Lingen) -> North (path towards Centan) -> Northwest (short path to Vol Tuanor)
    That is, Part 2C -> Part 2A -> Part 2B.

  • Do not get a dark alignment on any of the previous forts mentioned above.

  • Ensure all 5th generation characters join you. (check party members section)

  • Have under 500 turns on the counter. Note that you may go over 100 turns in any single generation as long as your total is under 500.

After getting the True End
  • All marionettes will be revived once the true end has been activated. No refunds.

  • The Gods can be killed in any order, except for storyline Chaos. Storyline Chaos's point in the boundary field will appear after you have defeated the other 5 gods.

    Killing storyline Chaos will get you the ending sequence, and take you to the credits. You may begin a new game plus right after, but if you're playing on hard difficulty, you can choose to continue where you left off to take care of unfinished business.

    Note: The Boundary Field can be tackled before or after finishing the True End.

  • If you've already defeated Holy Dragon in hard before defeating storyline Chaos, you'll have to do so again in the post-game in order to open up the hard-mode-only routes.
    i.e. In order to unlock the Hard Mode only routes, the Holy Dragon has to be defeated twice.
New Party Members
Name
Character Type
Rex*
Variable
Dyshana
Mage
Beatrice
BattleMage (Fighter)
Murmina
Fighter

*Rex is your hero for this generation. There are no "heroines" like in previous generations. You potentially have a free choice from everyone in your party!

All characters except previous MC + Heroines will be available unless otherwise stated.
Vashtor is not available in the beginning, and it is possible to lose him forever until NG+.

Obtaining characters
  • Dyshana: Conversation event on Marena Highway. Must be NEUTRAL.
  • Beatrice: Joins in a conversation event at Limberg.
  • Murmina: Joins on the southwest route to Karunikara. There is a turn limit, currently confirmed available up to Turn 22. It might be higher.
  • Vashtor: Go to Dandalugan Fort before Turn 70. Do not KO the boss, and after 7 turns, the battle ends automatically.
Flowchart
Part 1
Town: Elblag (El Bulong)
  • Event: Story related
  • Event: Rex joins
World Map
  • Raywen Moor: Flame Knight x2, Ice Knight x2, Gorgon x2
Malena Way
  • Requirement: Not too far light or dark
  • Event: Dyshana joins
  • Item: Esoteric Book XXII and Hell's Banquet obtained
World Map
  • Warrabool Plain: Flame Knight x2, Ice Knight x2, Gorgon x2
Town: Limburg
  • Event: Story related
World Map
  • Vancres Hills: Flame Knight x2, Ice Knight x2, Gorgon x3
Zeleia Fortress
  • Fight: Husward x1, Garvel x2, Orc Mage x3
Town: Limburg
  • Event: Story related
Town: Elblag (El Bulong)
  • Event: CG 113 unlocked
  • Event: Beatrice joins
  • Item: Esoteric Book XXIII and Full Rein Force obtained
Town: Limburg
  • Event: Story related
Three seperate paths become available
    All three must be completed but they can be done in any order
  • Move to Fifth Generation, Part 2C|Southwest Path (#)
  • Move to Fifth Generation, Part 2A|Northeast Path
  • Move to Fifth Generation, Part 2B|West Path
Part 2A - Northeast Path
World Map
  • Seryale Plain: Great Sorcerer x2-3, Living Dead x2-3
  • Guardian Road, South: Demon Whip x2-3, Living Dead x2
Guardian Road
  • Requirement: Murmina
  • Event: CG 114 unlocked
  • Event Choice:
    • Stop her from seeking revenge: Gauge moves strongly towards LIGHT
    • Ask what else she would like to do: Gauge moves towards LIGHT
    • Promise to help her(#): Gauge moves towards DARK
World Map
  • Guardian Road, North: Great Sorcerer x2, Living Dead x2, Troll x1
Lyonesse Fortress (Leonois Fortress)
  • Fight: Goblin King x4, Orc Lord x2
  • Fight: Garvel x2, Orc Lord x4
  • Fight: Husward x1, Goblin King x2, Orc Lord x2
    • Stolen: Husward (Orichalcum, Orichalcum Ore, Recovery Grass)
    • EX Stolen: Husward (Vessel of Life, Orichalcum)
    • Overkill: Husward (Magic Stone Piece)
  • Event: Gauge moves towards LIGHT (#)
    • Note: This changes to DARK after Turn 45.
World Map
  • Shussburg Wooden Pass (Syusburg Wooden Pass): Demon Whip x2, Living Dead x2, Troll x1
Town: Centan (Saint End)
  • Event: Story related
World Map
  • Norace Plain: Goblin King x3, Mist Dragon x1, Orc Lord x2
  • Buleuz Way: Goblin King x2, Mist Dragon x1, Orc Lord x2
Vatna (Vatona)
  • Fight: Garvel x2, Husward x2, Mist Dragon x1
  • Fight: Gurg x2
    • Stolen: Gurg [Physical] (VIT Up, Orichalcum), Gurg [Magical] (INT Up, Orichalcum)
    • Ex Stolen: Gurg [Physical] (Tyr's Fang, Marfile Seed), Gurg [Magical] (Mist Wand, Marfile Seed)
    • Overkilling: Gurg [Physical] (Kaiser Sword), Gurg [Magical] (Material Sword)

    End of Northeast Path
Next Section
  • Move to Fifth Generation, Part 2B|West Path (#)
  • Move to Fifth Generation, Part 2C|Southwest Path
  • Move to Fifth Generation, Part 3
Part 2B - West Path
World Map
  • Keledevol Way: Goblin King x3, Mist Dragon x1, Orc Lord x2
  • Dyan's Small Deserts: Goblin King x2, Mist Dragon x1, Orc Lord x2
Vol Tuanor
  • If you have taken 55 turns or less(#):
    • Fight: Husward x1, Garvel x2, Goblin King x3, Orc Lord x2
    • Fight: Gurg, Lindwor x2
      • Stolen: Gurg (Orichalcum, LUK Up), Lindwor (Orichalcum, Max HP Up)
      • EX Stolen: Gurg (Resist Frame, Marfile Seed), Lindwor (Marfile Seed, Clairvoyance)
      • Overkilling: Gurg (VIT Up+), Lindwor (INT Up+)
    • Event: Gauge moves towards LIGHT

  • If you took longer than 55 turns:
    • Fight: Lindwor, Garvel x2, Goblin King x2, Orc Lord x2,
      • EX Stolen: Lindwor (Beast Sense, Marfile Seed)
      • Overkill: Lindwor (LUK Up+) Garvel (Hermes Ring)
    • Fight: Gurg x2
      • EX Stolen: Gurg (Flamberge, Marfile Seed), Gurg (Ray Blade, Marfile Seed)
      • Overkill: Gurg (Sea Fire), Gurg (Cursed Eye)
    • Event: Gauge moves towards DARK
Next Section
  • Move to Fifth Generation, Part 2A|Northeast Path
  • Move to Fifth Generation, Part 2C|Southeast Path
  • Move to Fifth Generation, Part 3
Part 2C - Southwest Path
World Map
  • Gabov River Road: Living Dead x2, Great Sorcerer x3
Brace One's Guidepost
  • Requirement: Before turn 10, Neutral
  • Event: Plum struggles with the water
World Map
  • Hooknarl Road: Demon Whip x3, Great Sorcerer x3
  • Lilycia's Windmill Road: Demon Whip x2, Great Sorcerer x2
Kuturgur
  • Fight: Bull Orc x2, Goblin King x2, Orc Mage x2
  • Fight: Goblin King x2, Orc Lord x2, Orc Mage x2
  • Fight: Garvel x2, Goblin King x2, Orc Lord x2
World Map
  • Larzart Pass: Demon Whip x2, Living Dead x3
  • Blugran Sea Route: Demon Whip x2, Living Dead x3
Nefestrice Coast
  • Requirement: Before turn 35, Neutral
  • Event: Qua jokes about eating Fer
World Map
  • Deyon Alley: Great Sorcerer x2, Living Dead x2, Troll x1
Dalnia Way
  • Event Choice:
    • Where is your accent from?(#): Gauge moves towards DARK
    • How is Nastassja?: Gauge moves strongly towards LIGHT
    • How were the other continents?: Gauge moves slightly towards LIGHT
World Map
  • Knownlin Hill: Demon Whip x1, Living Dead x2, Troll x1
Eljudnir Fortress
  • Fight: Garvel x2, Goblin King x3, Orc Lord x2
  • Fight: Husward x1, Goblin King x5
  • Event: Gauge moves towards LIGHT
    • Note: This changes to DARK after turn 25
World Map
  • Tarkdy's Path: Demon Whip x1, Living Dead x2, Troll x1
Town: Lingen
  • Event: Story related
World Map
  • Redest Pass: Demon Whip x2, Great Sorcerer x2, Troll x1
  • Sazart Valley Way: Great Sorcerer x2, Living Dead x2, Troll x1
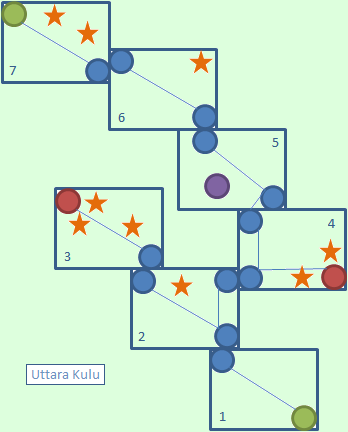
Quest: Uttara Kulu
  • Enemies: Dark Spirit, Demon Whip, Devil, Great Sorcerer, King Werewolf, Light Spirit, Master Skeleton, Nekomata, Troll
  • Treasure: Shiny Fang, Forbidden Tome IV, Clairvoyance, INT UP+, Resist Frame, Vessel of Life, Crimson Edge, O-Knuckles, Secret Arts XVII
  • Fight: King Werewolf x2, Master Skeleton x2, Nekomata x2
  • Event: Murmina joins
    • Note: It is possible to not be able to get Murmina but condition is currently unknown. (Possibly taking longer than 25 turns to get to the first fortress will cause this. It is assumed Murmina does not win that battle alone since the party was not there soon enough to assist her [on or around turn 30]).
    • Currently confirmed available up to Turn 22.
  • Item: Esoteric Book XXIV and All Reduced obtained
World Map
  • Acktul Cliff: Goblin King x3, Mist Dragon x1, Orc Lord x2
Kaluni Kahla
  • Fight: Goblin King x3, Orc Lord x3
  • Fight: Garvel x2, Goblin King x3, Orc Lord x3
  • Fight: Gurg, Lindwor
    • Stolen: Gurg (Orichalcum, Vessel of Life), Lindwor (Orichalcum, Recovery Herb)
    • Ex Stolen: Gurg (Resist Frame, Marfile Seed), Lindwor (Clairvoyance, Marfile Seed)
    • Overkilling: Gurg (STR Up+), Lindwor (AGI Up+)
  • Event: Gauge moves towards LIGHT
    • Note: This changes to DARK if Murmina was not recruited
Next Section
  • Move to Fifth Generation, Part 2A|Northeast Path (#)
  • Move to Fifth Generation, Part 2B|West Path
  • Move to Fifth Generation, Part 3
Dungeon 1: Uttara Kulu


  • 1: This dungeon consists of mountain type areas. This first screen is a straightforward path with no treasures, continue on to the second screen.

  • 2: Make your way to the top left of this area until you come to two bridges. Take the bridge on the left and immediately take a right after you cross it. You will find a treasure containing SHINY FANG at the end of this path. Return to where you turned from and head to the top left of the screen for the next area.

  • 3: Straightforward area. Follow the path all the way to the top left and you will come across three treasures containing FORBIDDEN TOME IV, INT UP+ and CLAIRVOYANCE . Retrace your steps back to the second screen.

  • 2: Head straight over the bridge and then take the second bridge to the right of the screen. Follow this path to the fourth area.

  • 4: Head to the right and and drop down a couple step to find a treasure containing VESSEL OF LIFE . You'll also spot a second treasure containing RESIST FRAME in this area. Climb up the steps to the top left of the screen and continue on until you reach the next area. Be warned, a battle will ensue.

  • 5: When first entering this screen, you may receive a cutscene along with a battle. After the battle Murmina will join your party. After the scene, you will see some steps to your character's front right that you can climb. Follow this path to the next area.

  • 6: Follow the path while climbing some steps. When the path looks like it splits, head to the top right of the screen. You will come to a treasure containing CRIMSON EDGE. Go back to the split and head left this time to the next area.

  • 7: You'll notice a treasure on a cliff above you, but you can't quite grab it yet. Follow the path all the way until you reach the top left of the screen. A treasure containing O-KNUCKLES will be sitting on a step. Now jump up on the step to your right and follow it (stay on this upper cliff) all the way back to the bottom right. You'll have to drop down to a cliff below you at one point. After this point you'll finally reach the chest, inside you will find SECRET ARTS XVII. You can now exit the dungeon via the top left zone in this area.
Part 3i
Zeleia Fortress
  • Event: Story related
Limburg
  • Requirement: Before turn 75
  • Event Choice:
    • Vira-Lorr(#): Gauge moves towards DARK
    • Sharona: Gauge moves towards DARK
    • Ellis: Gauge moves towards LIGHT
  • Event: CG 118 unlocked
  • Item: Magic Stone Piece x2, Damascus x2, Meteoric Iron x2, 50PP obtained
World Map
    From Kaluni Kahla:
    • Jyumi's Steep Road: Golden Bat x3, Titan x1
    • Old Linatoria's Sculpture Site: Death Crab x2, Golden Bat x2
    Alternatively from Kuturgur(but this skips Monofis Canyon, needed for a later event):
    • Zercla Bypath, SE: Golden Bat x2, Titan x1
    • Zercla Bypath, NW: Death Crab x2, Titan x1
Ladoga
  • Fight: 2x Gurg
    • Stolen: Gurg (AGI Up, Orichalcum), Gurg (LUK Up, Orichalcum)
    • EX Stolen: Gurg (Hidden Blaster, Marfile Seed), Gurg (Split Sword, Marfile Seed)
    • Overkilling: Gurg (Sea Fire), Gurg (Cursed Eye)
  • Note: There are 2 Gurgs in this fight, one is magical and the another is physical. It is recommended that You kill the magical one first because his magic is very powerful and always aims for your back row party. You need not worry about physical gurg much since his EX3 can only hit 3 square away from him.
World Map
  • Lazar Desert Oasis: Death Crab x2, Golden Bat x2, Titan x1

    These locations are optional:
  • Kudin Wildland: Death Crab x2, Golden Bat x2, Titan x1
  • Erichard Dune: Death Crab x3, Golden Bat x2, Titan x1
Lazar Desert
  • Fight: Ring Dragon
    • Stolen: Ring Dragon (Thunder Stone, VIT Up)
    • EX Stolen: Ring Dragon (Snow Wolf's Fang, Ring of Inability)
    • Overkilling: Ring Dragon (Angel Halo)
World Map
    From Lazar Desert:
    • Lazar Desert, West: Death Crab x2, Diabolos x1, Titan x1
    Or from Ladoga:
    • Zarabool Bypath, South: Death Crab x2, Diabolos x1
    • Zarabool Bypath, North: Death Crab x2, Golden Bat x2, Titan x1
    Or from Vatna:
    • Kelistbud Wildland: Diabols x1, Golden Bat x2, Titan x1
    • Evant Wildland: Diabolos x1, Golden Bat x2, Titan x1
Izabella Garrison
  • Event: Story related
World Map
  • Discorazono Pass: Titan x1, Diabolos x1, Golden Bat x2
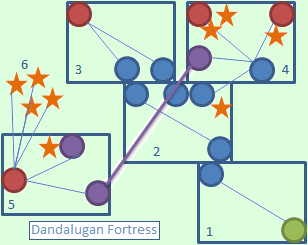
Quest: Dandalugan Fortress
  • Note: You cannot exit this dungeon after entering. And it will also disappear once completed. If you follow the map guide and not veer off too much then you can get all the treasures. Or you can go straight to the Vashtor battle (or the alternate battles if you get here late).

  • Enemies: Garvel, Goblin King, Goblin Mage, Hobgoblin, Orc Lord, Orc Mage
  • Treasure: Nightmare, Hermes Ring, O-Bangle, Aura Ring, Tree of Life, Triple Feather, VIT Up+, Extra Heal, Three Stars

  • Before Turn 70(#):
    • Fight: Vashtor
      • Stolen: Vashtor (Quickrain, Angel Wing)
      • Ex Stolen: Vashtor (Angel Halo, Misty Guard)
      • Overkilling: Vashtor (Crescent Moon)
      • Event(#): Vashtor rejoins if not KO'd by the end of Turn 7

  • After Turn 70:
    • Fight: Gurg x1, Husward x1, Goblin King x3, Orc Lord x3

  • If Alignment is Dark or You take too long to get to one of the earlier Forts:
    • Fight: Garvel x1, Husward x1, Goblin King x3, Orc Lord x3
    • Overkilling: Garvel (Aura Ring), Husward (Generation Crystal)

  • Note: You will be unable to have Vashtor rejoin if you did not fight him here.
  • Item: Esoteric Book XXVII and Overdrive obtained
Izabella Garrison
  • Event: Story related
Lingen
  • Requirement: Before turn 100, Neutral, Vashtor
  • Event: Ellis talks to Rex about Leonhardt and the others
  • Item: Mist Wand, Ray Blade, 50PP obtained
Monofis Canyon
  • Requirement: Beatrice and Murmina
  • Event: Beatrice and Murmina talk
  • Item: Esoteric Book XXVI, Force Frame, Resist Frame, Generation Crystal, 50PP obtained
World Map
    From Monofis Canyon:
    • Saffon Bypath: Bloody Beast x2, Rune Master x2
    • Corleitz Alley: Bloody Beast x2, Diabolos x1
    Or from Eljudnir Fortress:
    • Helulu Valley Wildland: Bloody Beast x2, Diabolos x2
    • Falmouth Hills, South: Bloody Beast x2, Rune Master x2
Falmouth Hills
  • Fight: Evil Dragon
    • Stolen: Evil Dragon (Magatama Crystal, VIT Up)
    • EX Stolen: Evil Dragon (Beast Sense, Three Stars)
    • Overkilling: Evil Dragon (True Emblem)
World Map
  • Falmouth Hills, North: Diabolos x1-2, Rune Master x3
  • Tilladed Animal Trial: Diabolos x1-2, Rune Master x3
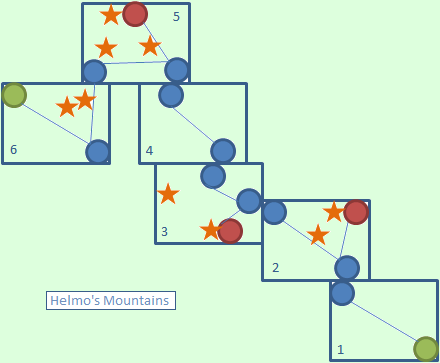
Quest: Helmos Mountains
  • Enemies: Bloody Beast, Diabolos, Lesser Demon, Magic Warrior, Medusa, Rune Master
  • Treasure: Stardust, Misty Guard, LUK Up+, Accessories 3-I, Refresh Herb
  • Treasure: Ring of Inability, Skull Staff, Sanctuary, Sarnga
Dungeon 2: Dandalugan Fortress


  • 1: Got some nice new scenery and areas for this dungeon. This first screen is a straightforward path. Just run on ahead and enter the castle.

  • 2: Another straightforward path, continue on to the third screen.

  • 3: Once again, another straightforward path. Head down the narrow path up the stairs, and start heading back to the bottom right of the screen while staying on the second floor. The zone leads back to the second screen.

  • 2: Head around the corner and you'll spot a door on your left. Continue for a bit and just ahead you'll find a treasure containing NIGHTMARE. Head through the door to the fourth screen.

  • 4: Start running straight and you'll enter a large open area. Continue going straight to reach some steps with two treasures awaiting at the top. You'll find O-BANGLE and HERMES RING inside them. Head back down the stairs and go to your right to find another set of stairs with another treasure containing an AURA RING . Enter the large open area again and this time head to the bottom left of the screen to find a path to the fifth screen.

  • 5: Follow the path past the broken staircase until you come to some blocks that you can jump on. Jump up the blocks and stick to the left hand side of the screen to the top left to enter the sixth screen.

  • 6: This screen is a small storage room of four treasures. Inside the treasures you'll find TRIPLE FEATHER, VIT UP+, EXTRA HEAL and TREE OF LIFE. Head back to the fifth screen.

  • 5: Head down the path in front of you and to the right of Rex you'll notice the blocks you jumped up earlier but they seem broken. Run past them and you'll spot another set that are in perfect condition. Jump up the blocks and head left to find a treasure containing THREE STARS and the zone to the next area. Be warned, a cutscene will start and you will enter a boss fight.
Dungeon 3: Helmos Mountains


  • 1: This dungeon will consist of mountain type areas that you have seen in previous dungeons. This first screen is straightforward and consists of no treasures. Make your way to the top left of the area to enter the second screen.

  • 2: Follow the path ahead of you, you'll have to jump up many steps. Half way through this area, you'll spot a treasure chest which contains STARDUST. To the right of this treasure are some more steps you can jump up. At the top of the steps is another treasure containing MISTY GUARD. Go back down these steps to where the first treasure was and head left to continue on the path to the third screen.

  • 3: Follow the path and you will shortly come to a bridge. After cross it, run to the bottom right of the screen to find a chest containing LUK UP+. Go back to the bridge you crossed and you'll see a second bridge to the left. Cross this bridge and right in-front of you will a chest containing ACCESSORIES 3-I. From this treasure run to the top right of the screen to find the fourth area.

  • 4: Straightforward path with no treasures. Head in the direction of the top left of your screen and you'll eventually come to the fifth screen.

  • 5: Hop up the steps above your character and you'll immediately spot another set up cliffs you can jump up. At the top of this set you'll find a chest containing a REFRESH HERB. Stay on this level of the mountain and head to the top left of the screen. You'll find another set of cliffs to jump up. At the top to your left will be another treasure containing RING OF INABILITY. From this chest, head straight down to drop off the cliff. You'll land on a small area containing yet another chest which contains a SKULL STAFF . Drop off this cliff and head down and you'll spot the zone to the sixth screen below you.

  • 6: You've seen this next area before. Above you are two treasures, but you have to go all the way around the area to reach them. Make your way to the very top left of this area. You'll see the zone to leave this area (this exits the dungeon) and to the right of it will be a small step you can jump up. Jump up this step and start making your way to the bottom right of the area. At some point the cliff you're on will end, drop down off this cliff and run to your right. You'll be on the cliff with the two treasures. Inside you'll find SANCTUARY and SARNGA. Head back to the top left of this area to exit the dungeon.
Part 3ii
World Map
  • Helmos Pass: Lesser Demon x2, Medusa x3
Guisado Gaza
  • Fight: Goblin King x3, Husward x2, Orc Lord x2

  • Re-enter for next event:
  • Requirement: Before turn 100, Neutral
  • Event: Reverie jokes about marrying Rex
World Map
    These locations are optional:
  • Ratlaris Plain: Magic Warrior x1, Medusa x2
  • Etvitz Peak Road: Lesser Demon x2, Magic Warrior x1
  • Gian's Bird Path: Lesser Demon x2, Magic Warrior x1
Dandalugan Fortress
  • Event: Story related
  • Note: The DLC dungeon Deep Forest Naruvia is now available through an event at Centan (Saint End).
Guisado Gaza (Visado Gaza)
  • Requirement: Beatrice and Murmina, Neutral
  • Event: Beatrice cleans Murmina's wings
  • Event: CG 90 and CG 91 unlocked

  • Re-enter for next event:
  • Requirements: Have all characters, Neutral, Seen all previous hotspring events
  • Event: Hot spring
  • Event: CG 72 unlocked
  • Item: Secret Album 5 obtained
World Map
  • Larohenga Desert, Roaming Sand (the wander sands) : Lizard Lord x2, Medusa x2
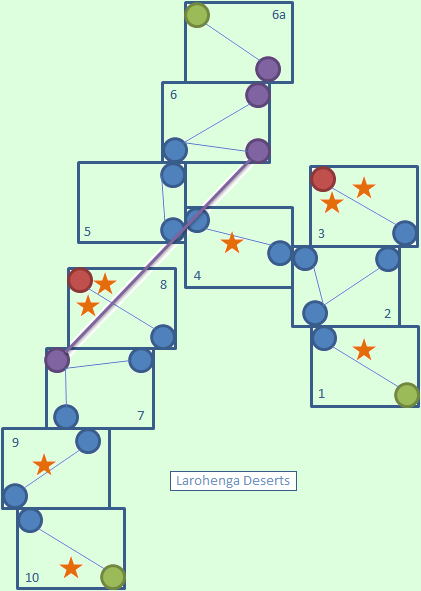
Quest: Larohenga Deserts
  • Enemies: Dark Mage, Lesser Demon, Lizard Lord, Magic Warrior, Wraith, Dragon Zombie
  • Treasure: INT Up+, Accessories 3-II, AGI Up+, Acessories 3-III, Cruel Frame, Ginna's Scythe, True Emblem, Dragoon Lance
World Map
  • Humoi Sand Road: 2 of (Medusa x2-3, Wraith x2-3, Lizard Lord x2-3) or Dragon Zombie x1-2, Dark Mage x2
Lenn Cape
  • Requirement: Before turn 125, Neutral
  • Event: Sharona cools off
  • Event: CG 94 and CG 95 unlocked
World Map
  • Diyon Moor: Dragon Zombie x1, Ogre x1, Medusa x3
Settlement
  • Event: Story related
World Map
    From Settlement:
    • Soraida Passage: Dragon Zombie x1, Ogre x1 or Dragon Zombie x1, Medusa x3
    Or from Lingen:
    • Vinceburg Sea III: Greater Devil x1, Silver Dragon x1
    • Vinceburg Sea II: Silver Dragon x1, Wraith x3
    • Vinceburg Sea I: Greater Devil x1, Silver Dragon x1
    • Bevonarl Bay, South: Silver Dragon x1, Wraith x3
    • Bevonarl Bay, North: Greater Devil x1, Wraith x3
Burnes
  • Requirement: Neutral
  • Event: Beatrice takes a bath and is invited to the bathhouse
  • Event: CG 92 unlocked

  • Re-enter for the next event:
  • Requirement: Must meet all true ending requirements
  • Event: Dyshana has a nightmare
  • Event: CG 93 unlocked

  • Re-enter for the next event:
  • Event: Story related
World Map
  • Nor Nokas, East: Greater Devil x2, Silver Dragon x1
  • Nor Nokas, West: Dragon Zombie x2, Greater Devil x2, Silver Dragon x1
Cam Ranh Terra (Kamuran terra)
  • Requirements: Seen each girl's respective events
  • Event: Reverie, Qua and Plum talk about their friendships
  • Item: Three Stars, Clairvoyance, Beast Sense, 2x Lapis Noster, 50PP obtained

  • Re-enter for next event:
  • Event: Story related
World Map
  • Jean Lisman's Rough Road: Silver Dragon x2, Rakshasa x2, Dragon Zombie x1
Valley of the Dead (Dead man's valley)
    If you're planning on replaying just the ending to see the different ending events for each girl, Save a new file here. Once you begin this event you will be locked into the choice you make.
  • Requirement: Seen each girl's respective events, Not Dark Alignment
  • Event: Rex talks to someone by the fire
  • Note: the person you choose is the one who Rex marries
World Map
  • Zaristmain Pass: Greater Devil x2, Dragon Zombie x1, Silver Dragon x2, Dark Knight x2, Arc Knight x2
  • Kaivot Trail: Greater Devil x2, Dark Knight x1, Arc Knight x2, Silver Dragon x2
Barzakh, City of the Dead (The Balzaf city of dead)
    First fight is always the same. Second fight can vary.
  • Fight: Gurg x4
    • Stolen: Gurg (Recovery Herb, Vessel of Life)
    • EX Stolen: Gurg (Three Stars, VIT Up)(STR Up, Force Frame)(AGI Up, Resist Frame)(INT Up, Resist Frame)
    • Overkilling: Gurg (Aerial Knife, Blacksmir, Skull Staff, Silent Cross)

  • If you did not fight Vashtor at Dandalugan Fortress:
    • Fight: Vashtor, Lindwor x2
      • Steal: Vashtor (Marfile Seed) Lindwor (Vessel of Life, Cure Grass)
      • EX Stolen: Vashtor (Dragvindel, LUK Up+) Lindwor (Marfile Seed)
      • Overkilling: Vashtor (Black Frame)

  • If you have Vashtor and are not Dark Aligned:
    • Fight: Summerill, Gurg x2
      • Steal: Summerill (Clairvoyance, Holy Lance), Gurg (Recovery Herb, Vessel of Life)
      • Ex Stolen: Summerill (Black Frame, Cruel Frame), Gurg (Marfile Seed, Dark Finger)(Saint Hand, Marfile Seed)
      • Overkilling: Summerill (Ring of Prometheus), Gurg (True Emblem, Misty Guard)

  • If you are Dark Aligned:
    • Fight: Chaos Dyshana
      • Steal: Finbrain, Death-Scythe
      • EX Stolen: Rusty Ring, Rusty Bracelet
      • Overkilling: Rusty Sword

  • Item (True End only): Leo's Sword, E.O.M., Esoteric Book XXVIII
  • End of Fifth Generation
Dungeon 4: Larohenga Desert


  • 1: This dungeon has desert type areas. You first experienced some of the areas if you have entered Tresor Island, the Fourth Generation DLC dungeon. This first area is a straightforward path. On the way to the top left of the screen, you'll come across a treasure on your right. Inside you'll find INT UP+. Continue on down the path to reach the second screen.

  • 2: This area consists of four zones and is somewhat of a puzzle similar to the Frozen Woods dungeon in the second generation. First make your way to the top right of the area and enter into the third screen.

  • 3: This area is a straightforward path with a dead end. At the end is two treasures. Inside them you'll find ACCESSORIES 3-II and AGI UP+. Retrace your steps to the second screen.

  • 2: This time make your way to the top left of the screen and enter the zone.

  • 4: Head to the top left and you'll spot a treasure containing ACCESSORIES 3-III. Continue left to the fifth screen.

  • 5: Nothing of interest here. Just head to the top right of the screen to exit to the sixth screen.

  • 6: Here, you can first take a slight detour to find the North Exit, which is needed to get one of Sharona's CG's. Make your way to the top right of the screen to go to the north exit screen. Else go to the bottom right and skip to the seventh screen portion of this guide.

  • 6a: This is just a straight forward path, make your way to the top left of the screen and exit the dungeon. Now you can re-enter the duneon, and make your way to the bottom right of the screen to end up back at the sixth screen.

  • 6: Now go to the bottom right to enter the seventh screen.

  • 7: First, go up to the top right to enter eighth screen.

  • 8: Make your way to the top left to find 2 treasure chests, containing GINNA'S SCYTHE and CRUEL FRAME. Head back down to the bottom right to return to the seventh screen.

  • 7: Now head to the bottom left of the screen to enter the ninth screen.

  • 9: In the center of this screen you'll find a chest containing a TRUE EMBLEM. From here run to the bottom left of the screen to find the zone to the tenth screen.

  • 10: This is the exit screen for the southern exit. Head to the bottom right, where you'll find a DRAGOON LANCE. After grabbing the treasure, continue to the bottom right to exit the dungeon.
True End boss battles
These can be fought in any order, with the exception of Chaos.

Lucrellia
  • Fight: Mercury
    • Steal: Aegis, Heaven's End
    • EX Stolen: Vasaltis, Earendil
    • Overkilling: Lost Regnum
Graccea
  • Fight: Mobius
    • Steal: Demon Frame, Chaos Frame
    • EX Stolen: Dynamis's End, Nothung
    • Overkilling: Mobius Link
Fendias
  • Fight: Deeth
    • Steal: Black Frame, Black Bustier
    • EX Stolen: G.O.H., Princess Bustier
    • Overkilling: S.O.D.
Enhambre
  • Fight: Nemesis
    • Steal: Dark Bracelet, Bracelet of Light
    • EX Stolen: Princess's Tiara, Calinou's Hammer
    • Overkilling: Nemesis
Aegisthus
  • Fight: Mayastia
    • Steal: Dragon Frame, Extra Frame
    • EX Stolen: Augenblick, Imperial Guard
    • Overkilling: Sons of the Sun
World Map
  • Teitobucks Pass: Arc Knight x2, Dark Knight x2
  • Ziyanm Passage: Arc Knight x2, Rakshasa x2
  • Javiden Plank Road: Arc Knight x2, Rakshasa x2
  • Muon Moor: Arc Knight x2, Rakshasa x2
Boundary Plane - Sealed One
  • Fight: Chaos
    • Steal: Rune Blade, Rapid Sword
    • EX Stolen: Eyes of Death, Armageddon
    • Overkilling: Infinity
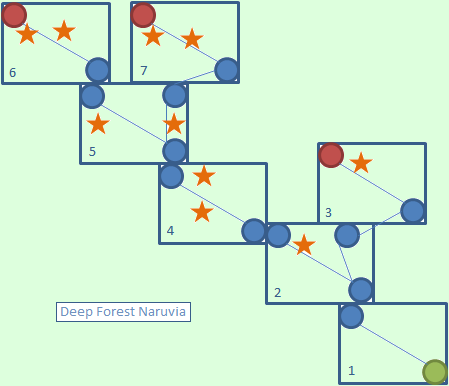
Dungeon 5: Deep Forest Naruvia


  • 1: As you would have guessed, this dungeon consists of forest type areas from earlier dungeons in the game. This first area is a straightforward path with no treasures. Head to the top left of the area to reach the second screen.

  • 2: Make your way to the top left of this area. You'll will come upon a treasure resting right next to a zone. Inside this chest you will find a BLACK FRAME. Do not enter the zone next to the treasure just yet, head to the right of the zone and you will find another zone not far off. Enter this one to reach the third screen.

  • 3: This area is pretty small and is a dead end with one treasure. Inside the treasure you will find SANSENTOU. Retrace your steps back to the second screen.

  • 2: Go through the zone you passed before. Head to the bottom left of the screen from where you are and you'll see it shortly on your left.

  • 4: A straightforward path. As you cross the first bridge, you'll see a treasure containing CRUEL FRAME on the small island. Continue on your way through the path. As you cross the last bridge you'll see another treasure containing BYAKKO'S BRACELET directly in-front of you. From here make your way to the left of the tree and you'll spot the zone to the fifth screen.

  • 5: Exact same area as the second screen. Head to the top left of the area, cross the bridge and you'll spot a treasure next to a tree. Inside the treasure you'll find DEADLY BLOW . Go through the zone to the left of the treasure to the sixth screen.

  • 6: This area is a dead end with a couple treasures. Inside the treasures are HALPER SCYTHE and ARTEMIS. Retrace your steps back to the fifth screen.

  • 5: From the zone, head directly right from where you are. You'll end up dropping off a cliff to into a small canyon. You'll also see a treasure on your right side sitting on a cliff. Inside you'll find BLOOD RED. Head to the top left of the screen from the treasure and you'll spot the zone to the seventh screen.

  • 7: Follow the path and you'll see small ponds to the top right of your screen. Sitting next to the ponds is a treasure containing GENBU'S GAUNTLET . Continue on the path to find the last treasure of this dungeon which contains REPPU. That's all for this dungeon.

If you've been struggling with battles in this generation, this will be a nice boost to your party's strength. Be warned, however, that the enemies you will find won't be easy. Most of the enemies are around level 90 - 110, with one of them being lvl 125 in the last screen.

If you want to know whether it's worth it, this is what you can get out of it:
  • Halper Scythe
  • Black Frame - armor
  • Sansentou - spear
  • Cruel Frame - armor
  • Byakko's Bracelet - armor
  • Blood Red - dagger, rare drop from Medusa
  • Artemis - multi element rod
  • Genbu's Gauntlet
  • Renbu - breaker

Everything on this list, aside from Halper Scythe and Blood Red was better than anything I could get my hands on at this point. I was able to get everything the moment I unlocked it, but I didn't encounter the lvl 125. Battles were tough with my party levels at the high 80's to low 90's.
Credits, Links, all that good stuff
Credit to all wiki contributors, since I nicked the information off of them, with a small bit of editing.
The only ones I know of are Erellisae, Byuusan, Wathman(all the images) and Smurgledwerf(True End path). There are most definitely others, though!

Compile Heart & Red Entertainment, for creating the game

Idea Factory, Aksys Games and Ghostlight for publishing the game

Ghostlight again, for porting the game to PC

and you, for reading up to the credits!


Links
5 Comments
Bartelmy 21 Feb, 2022 @ 6:17am 
If you don't have Vashtor and are not dark-aligned, you fight the four gurgs, then Vashtor and the two dragon things, then Summerill with two Gurgs.
Frenzy85  [author] 27 Jan, 2022 @ 5:56am 
It's a time skip after every generation, which is why most of the recurring characters are long-lived races except for Winfield, who is immortal due to the bracelet he has.

There's a small period of time where the hero of each generation gets to spend time with their love interest and have a child. After which, they do the sealing thing, and the party moves on to the next continent, where the next gen's hero grows up.
generalpickleful 26 Jan, 2022 @ 4:57pm 
Also dumb question here but is there a 10 to 20 year time skip between each generation if so who was the parents for the main characters cause didn't there dad/mother/or chosen waifs all kinda go and disapper to block out darkness or what ever so how did that go was it like boom pregnant then 9 months later they became the seal or something im having a hard time understanding what happined
Frenzy85  [author] 25 Jan, 2022 @ 10:13pm 
I think so...
But if you have a save from Gen 4, you can mess around with the 9 question answers to get to Neutral at the start of Gen 5.
generalpickleful 24 Jan, 2022 @ 3:56pm 
so is it true im locked out of haveing true end and Dyshana if im not neutral at the end of gen 4? if so does that mean i gotta do it all over again?
to get the true ending? cause if so im kinda fucked