RimWorld

RimWorld

87 ratings
[1.0] Create a Hair Mod - Chicken run tutorial
By Chicken Plucker
So, you wanna make a hair mod? Let's have it.

   
Award
Favorite
Favorited
Unfavorite
Step 1: Install the software you need

What you need:
  • Notepad++ - To code your mod in .xml
  • Image editing software such as Photoshop or GIMP 2 - To draw your hair with
  • RimWorld - To test and upload to RimWorld workshop with

Links provided:
Step 2: Draw your hair
NOTE: This tutorial is NOT a drawing tutorial, I will not put too much emphasis on how to draw a hairstyle since I believe in you that you can do it by yourself!

I will be using a mouse to draw since a graphics tablet is not a necessity.

  • Get the vanilla's male or female average normal head. (Available in the Google Drive link)


    - You have to open RimWorld's original head files since this will be accurate to the resolution your hair needs to be, otherwise you may run into texture issues because you saved your hair the wrong size

    - You will pick normal because RimWorld automatically scales the hair based on the normal style, if you draw over the narrow head style it will look squashed on normal

    - You only need 3 views (south, east and north) for hairstyles. This is the same for hats.

  • Draw your hair

    - Make sure your hair is white color and your shading is black or other shades of black since the game will automatically color your hair

    - For this example I use "Tanya" from Red Alert 2 (Only RTS OGs will know the struggles), I find different views of her hairstyle, draw and shade accordingly.


    - When you are finished, make sure you save as .png file for transparency.

    - Make sure you name the hair like this: (YourName)_south (YourName)_east (YourName)_north (YourName)_west, the case is sensitive and you may run into missing texture errors if you name them wrong.

    - Make sure if you are doing the "west" side of your hair or headgear, you still do it with a head facing the east since it is RimWorld that automatically flips it in-game. If you flip the head yourself, you will run into issues.

    - You don't need a "west" side since the game can use the east side of the head as well, this is only if you want extra detail.


When you are finished and you've done things correctly as listed, you will have a folder looking like this.

I repeat: This tutorial is NOT a drawing tutorial, I will not put too much emphasis on how to draw a hairstyle since I believe in you that you can do it by yourself.

I drew the Tanya hair by mouse only and so can you!

Time to code. Chicken-six going dark.
Step the 3rd. Coding your hair
Right, you may have never touched .xml before so you are here to learn from the masta of disasta (cause I keep breaking my mods, rip) .

I will keep it short and sweet.

  • Structure of a RimWorld mod folder

    - Every mod folder has to look like this.
    + About folder that has the "About.xml" for descriptions and preview image, along with the unique Steam Workshop ID.
    + Defs folder which has the .xml coding that makes your hairstyles work in-game
    + Textures folder where you place your hairstyles or other stuff

  • This is how the folder should be placed under your RimWorld mod folder:

    This is where you place the manual install mods, or mods you are creating for you to upload them or modify them. Your mods sit next to the Core folder of RimWorld.

    NOTE: DO NOT Touch the Core folder since it is RimWorld itself, if you delete anything here or modify files here you may need to reinstall RimWorld

  • 1. Make sure you place your textures in the correct directory of your mod under the Textures folder

    Place your hair under where your hairstyles should go, don't just drop it in the texture folder itself or you will have troubles when making a bigger mod later with clutter.

  • 2. Go to Defs folder and open your hairstyle coding

    - After you've installed Notepad++ you should associate .xml files with the Notepad++ software. If you don't know how to associate the file, you simply right click and you click "Choose default program"

    - Open the .xml sample file with Notepad++

    +<defName>(YourDefname)</defName> is important, make sure you don't change or delete this once you release your mod or else you will break gamesaves of your mod users

    Give your hairstyle a unique name that no other modder would possibly choose, or else you may run into mod conflicts with each other.

    Just make your defName easy to remember, use underscores and proper capitalization. This is the name the game will use to find it, keep your naming consistent and tidy.

    Note: You cannot end defnames with a number i.e. "HairDef_TanyaRA2" always end it with a letter.

    + <label>(YourLabel)</label> is the name players will see the hairstyle as in-game, this is what you can change anytime without problems of breaking saves.

    + <hairGender>Female</hairGender> Is for the gender of your hair, you can write "Male" or "Any" for both in the middle. Case sensitive.


    + <texPath>Things/Pawn/Humanlike/Hair/Tanya</texPath> Another important one, you simply write the location of your hair under the "Textures" folder, you don't need to write Textures as part of the directory since it automatically goes there. You include the folder within your "Textures" folder that has your hairstyle filename, and finally the hairstyle itself.

    You do not write any of the directions i.e. Tanya_south, you instead just write "Tanya" since it will automatically select the directions.

    Note: It is important that you don't give the same texture directory for a new hairstyle, or else you will have the exact same hair for a new defname unintentionally.

    I.E. <texPath>Things/Pawn/Humanlike/Hair/Mohawk</texPath> and <texPath>Things/Pawn/Humanlike/Hair/Mohawk</texPath>, an exact duplicate including the filename.

    + <hairTags>
    <li>Urban</li>
    <li>Rural</li>
    <li>Tribal</li>
    </hairTags>

    Hairtag is what pawns these will spawn with (By that I mean faction pawns or race pawns). If you don't want the hair to spawn for vanilla pawns at all, what you do is delete the tags or reserve your unused filler one and end up with something like this:

    <hairTags>
    </hairTags>

    Or

    <hairTags>
    <li>IPutMyOwnHairtagAsFillerThatsNotUsed</li>
    </hairTags>

    If you wish to just not include tribals for example it will look like this:

    <hairTags>
    <li>Urban</li>
    <li>Rural</li>
    </hairTags>

    Factions can use hairtags, you can have your custom one i.e.

    <hairTags>
    <li>Sample_EpicFaction</li>
    <li>Urban</li>
    <li>Rural</li>
    </hairTags>

    'Tags' Do not need defnames made for them, you can create tags anytime and hook them to where they need to be, in this case you can put it in a modded faction you're making.

  • Adding more hairstyles

    You copy paste the hairstyle above starting from "<HairDef" and finishing with "</HairDef>"

    You make your changes to this new hairstyle, making sure there are no mistakes with the directory or spelling errors and that should be finished. You do not touch anything else outside of the HairDefs or you may break the .xml mod.

When you are finished making changes, "Save".

When you're happy with your hairstyles, it is time to make a snappy preview.
Step 4: About.xml and Preview

  • Preview

    So you have drawn your beautiful hair, you've coded your mod and now it's time to make your own preview.


    This is the Sample preview I made showcasing Tanya in her Red Alert 2 environment. You can make your own and I bet it will be better than what I have now.

    We are going to save it under the name "preview" and it will be a ".png"

    so it will appear as "preview.png" in your About folder.

  • About


    You're a pro hacker now, you've coded your hair. I don't have to walk you through changing the description or other things in your About.xml.

    Do your finishing touches and get ready to see the final product in-game
Step 5: Test and Upload your mod
  • Test the mod in your Mod Settings by enabling it
    - I use 'Prepare Carefully' and 'Camera +' for mod testing since they are very helpful in viewing your work up close.

  • See if things are lookin' good in-game
    - Spoiler Alert: yours will because you're breathtaking.

  • Upload your mod in Steam Workshop!
    - When you're done and confident with your hair and you're no longer tangled up (hehe get it? cause Tangled was a movie about hair) then just make it prettier by uploading more previews in your Steam Workshop mod page!


You're done.
Troubleshooting (Possible problems and errors)
(You can skip this slide)

Troubleshooting:
Possible issues:


  • Purple boxes (Missing Textures)
    - Make sure you named the folder directory or your textures correctly, each direction and each lowercase/uppercase letter. This happens when the game can't find a texture.

  • _west facing the wrong way
    - Don't flip your west image, the game will do this for you. If you flip it, the game will preview it the wrong way.

  • _north and _south facing the wrong way
    - Swap the tnorth and south direction by renaming them in your mod folder

  • Errors regarding defName rules
    - Make sure you don't end your defName with a number or full stops and other characters such as !"£$%^&*()

  • "&" Character issues
    - Anywhere you use "&" or other certain characters in .xml you will run into issues, please use this instead in the code to make the symbol you want to appear:

    Ampersand use -----> &amp;
    greater-than use -----> &gt;
    less-than use -----> &lt;
    apostrophe use -----> &apos;
    quote use -----> &quot;

  • Broken saves after update
    - Don't rename a defName when people start using your mod, or else when a save is loaded it may break when it can't find the old existing defName. It's similar to loading a gamesave after deleting a mod that was a part of the playthrough.

  • Trailing whitespace
    - Make sure you don't leave a space at the end of your descriptions. Just delete the space wherever this is mentioned

  • Duplicate defName found in mod
    - When you create a new item/hairstyle in the game and forget to rename the defName, this may show up due to duplicates. Either delete the duplicate or rename it properly.

  • Broken/full of error .xml file
    - Could be due to deleting an important part of the .xml or adding something that shouldn't be there such as accidentally leaving a character anywhere outside your definitions, or maybe deleting something important like the "</Defs>" tag at the very bottom of your mod.

    Watch out for accidentally duplicating or deleting those. But lookout for what may be giving the issue in your console log in case it mentions which .xml

  • Hair texture phasing out from top and bottom in-game
    - You are using the wrong resolution for the hair, make sure you use the template and avoid going over the edges of the texture's square

  • Supported version in about.xml is outdated
    Just make sure it's formatted like this:

    <supportedVersions><li>1.0</li></supportedVersions>

  • Your hairstyle/item is being overwritten or is missing after enabling 'x' mod
    One of you may have used the same defName, avoid this problem by having a very unique defName or else you will get overwritten by another mod that has an object with the same defName.

  • I am sad and alone and I feel like I am getting nowhere, I am lost.
    - This tutorial cannot help you.

    What can help you is answering the call, Jesus Christ calling you by your name so you can be healed and made new. Not only yourself, but you and all your loved ones.

    "Him that cometh to me I will in no wise cast out. -- John 6:37 KJV"
Finish

Amazing, mission complete!

That right there is why you're the best Boss.

The one and only!


See you next time space chicken, I hope you don't run into problems. If you do, there's the troubleshooting page and other means of getting through the issues.
25 Comments
Chicken Plucker  [author] 20 Apr, 2024 @ 1:32am 
@violue - I refer you to this more up to date one in terms of coding, but the principles are the same:

https://steamhost.cn/steamcommunity_com/sharedfiles/filedetails/?id=2860925280

All the best with your mod, the linked tutorial should work for 1.5

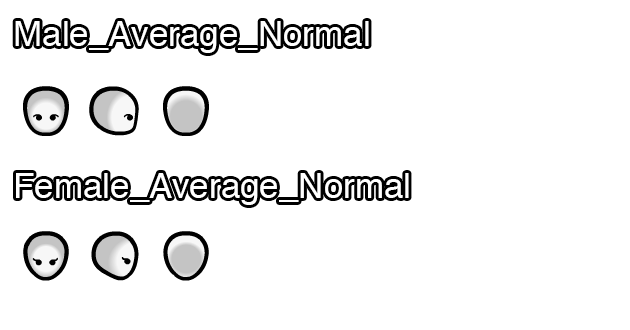
@Misty Step - Hey there, I’m so sorry for the 3 year late reply. It’s been a heck of a three years, but I’ll answer your question. I suggest to always use the normal heads or retextures of normal heads in high resolution just so it’s vanilla friendly. Some head mods change the shape too much imo.
violue 19 Apr, 2024 @ 11:50pm 
Do you know if your tutorial will work for 1.5? I really don't know enough about modding/coding to gauge that for myself but I've had an urge to make my own hair mod lately.
Huayra-tata 23 Oct, 2021 @ 11:38pm 
If I want to use the head from the facial animation WIP mod, does it matter if it has the same size of head? Should I still use the original head or should I copy one out from the mod folder and draw the hair off that?
Lord Varriack 3 Sep, 2021 @ 3:33pm 
okay I will check that out thanks
Chicken Plucker  [author] 3 Sep, 2021 @ 3:11pm 
@Lord Varriack - Make sure you're using the hair tags in coding correctly. The hairtags are what allows them to spawn for factions, which uses certain hairtags i.e. "Tribal", "Urban", "Rural" etc.

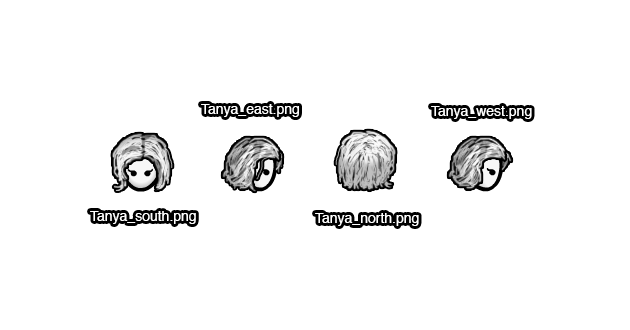
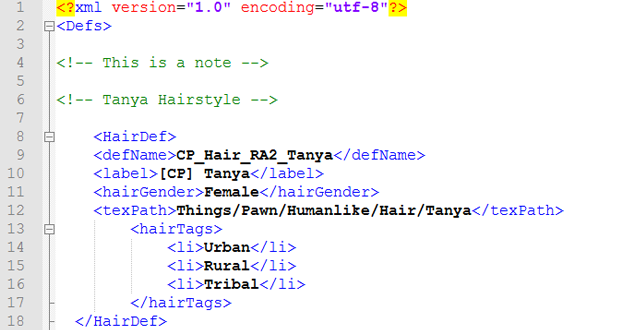
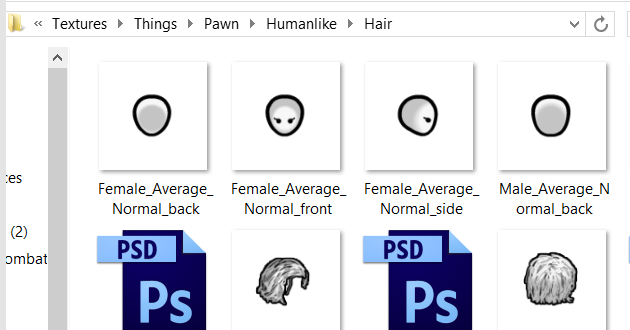
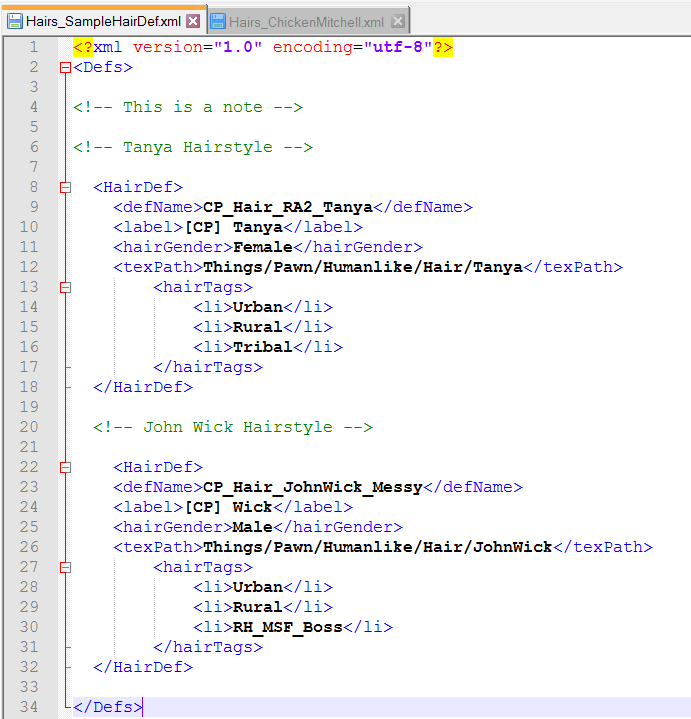
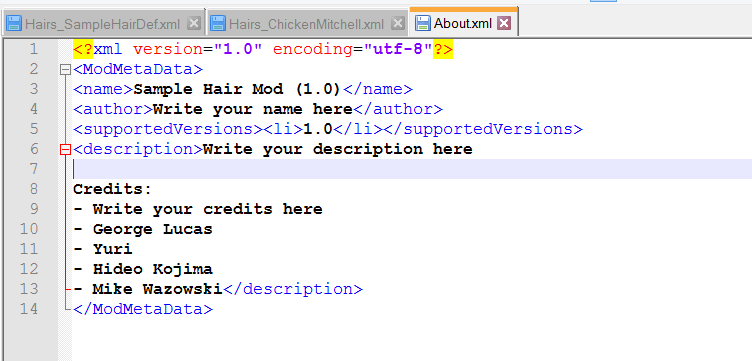
The new coding for 1.3 hairstyles added different hairtags so make sure you're up to date on those by going through vanilla files
Lord Varriack 3 Sep, 2021 @ 3:08pm 
Hey man you still around? I seem to be having an issue with the hairs textures not showing up in game but they are listed as options
TempleOS 19 Jul, 2021 @ 3:24pm 
Guide is invalid as it uses notepad++
Chicken Plucker  [author] 22 Oct, 2020 @ 10:16am 
@test - Rural and Urban are what outlanders use, some of the "Urban" tagged hairs are also tagged for Tribal since they're supposed to be punkish
test 20 Aug, 2020 @ 1:48am 
what do tags mean? I assume tribal is for tribal factions, what are rural and urban?
Chicken Plucker  [author] 11 May, 2020 @ 4:58pm 
@OutboundLegend - Hello, very sorry for the late reply!

I recommend you download off-steam versions of hair mods with more than one hair and compare it to your coding along with the base file's coding so you can see what you may have done wrong and what seems different. I am positive that when you progress to comparing what may have went wrong with your code and a working mod, you will learn much faster than trying to figure out the issue on your own. Hope that helps!

@KyoKunSP - Cheers!