Monster Hunter: World

Monster Hunter: World

855 ratings
MHW: Iceborne [DLC] - All Grimalkyne Photos | Lynian Researcher Requests | Outstanding Observer Achievement
By Brachragon
Guide on how to obtain all 3-paw photos for the Lynian Researcher, as well as examples on how they could look.

Out of all available photos, you need to turn in any 20 of your choice for the achievement to unlock.
3
14
2
2
2
   
Award
Favorite
Favorited
Unfavorite
Basics
Iceborne introduced a pretty cool new feature to MH:World - the camera.
You first get it by the good lookin' fella' to the right of this text. He'll give it to you for free, pretty early on in the story of the DLC. He's sitting close to the council table and will stay there.

While the game throws a tutorial on screen upon talking to him for the first time, there are a few things, which it won't tell you.

First: How to identify the spots, where the pictures can actually be taken?
If you visit an area in expedition mode and open your map, you might find this icon somewhere on the map:


This is the identifier for the majority of the photos.
For the remaining photos, which aren't identified by this, you'll find instructions just above the respective entry in the chapters below.

Now, this may seem obvious, but before you can do any of these photos, you'll have to befriend all 6 of the tribes.
In order to do that, refer to the following steam guide:
https://steamhost.cn/steamcommunity_com/sharedfiles/filedetails/?id=1475736970
Or take a look at this video by youtuber GaijinHunter:


Once that's done, you can charge right into it.
Go onto an expedition and take a few shots of any of the tribes.
If your photo is suitable for any of the requests, it'll show a marker right after you shot the picture. You'll recognize it.

That marker doesn't tell you, how many of the 3 requirements were met, however!
But there's a really easy way to check that real quick.
While still on an expedition, pull out your camera and the HUD will display the button in the upper right corner, which you need to press, to open your album.
Do so and select a picture with the orange marker. You now have the option to compare the picture to the request it's intended for.
For example:


As you can see, I shot two pictures for the same request, but the left one only fulfilled 2 of the conditions, while the right one fullfilled all 3.
This is shown by the fulfilled conditions being written / highlighted in orange.
Make sure to check every picture you take against the request and do so on the spot, so that you can immediately make a better one, if needed.

Beware:
If you're back in Seliana and you want to give the researcher your photo, make sure you have the correct request selected, when pressing the button to turn in the photo!

Otherwise he'll describe your photo as worthless and ask you to go out to take it again.
Don't be fooled by the old man!

If you exclusively care about the achievement, then 1-paw photos suffice.

Video Guide
If you'd rather watch a video guide for this, even if it's missing some of the crucial information collected further below, refer to this video by youtuber Gaming with Abyss:


1 - 4 | Ancient Forest
------------------------------------------------------------------------------------------------------
1 | A Keen Sense of Smell
This one's easy - you just have to go to the tribe's lair. You find it by fast traveling to the camp in area 17 and then by just turning back., to the opposite direction of the path you'd take to go to the Rath's nest.


2 | Keeping Up the Pace
For this one, go to Area 6, where Pukei-Pukei's nest is located, and just take the northwest path. Check the northern border and you'll find the ramp illustrated on the right. From there, you should find the grimalkyne.


3 | The Leaf Boat
Either visit the lair or use the tailraider signal to call a local grimalkyne to your side. If you've done so, go to Area 6 and take the southwestern water router.


4 | Grimalkyn Under a Chilly, Wet Roof
Now, this one is difficult.
I only had them spawn in Area 6, up the ramp I've shown prior to picture 2, but you might also get them in area 4.

Once you found them, there are several different scenarios, which can play out.
You want the one, in which there are a male and a female from the beginning. Soon after, a second dude will walk up and snitch the girl away. This will trigger the remaining one to look down in sadness. There's now a chance for a second female, with a blossom in her hair!, to come out of the bushes and pair up with him a few seconds later.

If you stumble across a situation, which does not end up like the picture just below, fast travel back to the closest camp and walk back to the scene. It'll reset with a chance to get the right one, this time.


5 - 7 | Wildspire Waste
------------------------------------------------------------------------------------------------------
5 | Itchy Ears
Fast travel to the northern camp near Diablos' nest and you should already see the 3 green dots on the screen.
Go there and wait for the grimalkyne to scratch it's ear.


6 | The Grimalkyne's Out of the Bag
Just after the last pic, go back to the camp and wait for your own palico to take something out of it's equipment. Once your palico comes back out, you'll see the grimalkyne looking like:


7 | Day Training
Go to the spot highlighted on your map by the marker illustrated in the basics, and wait until the end of the fight, when they lock their weapons.


8 - 10 | Coral Highlands
------------------------------------------------------------------------------------------------------
8 | Hello There!
Just go to this tribe's lair.


9 | Taming the Wildlife
Go to the location highlighted on your map.


10 | The Sound of Success
Now, don't be fooled by this one!
There's a good chance for them to be locked in an animation cycle, in which one of them constantly falls over, at the end of their 'concert'. This is an endless loop.
If you get it, fast travel back to the closest camp and walk up to them again! Repeat, until you get the scenario, in which they successfully finish their concert and are then happy about it.


11 - 14 | Rotten Vale
------------------------------------------------------------------------------------------------------
11 | Air Pollution
Recruite one of the local grimalkyne by entering their lair, or by using the tailraider signal.
With one of them by your side, walk into any of the polluted areas in the lower layer of the Rotten Vale.


12 | Polished to a Sheen
Just walk into their lair and look for this fella.


13 | A Big Catch
Now, this one may take quite some time to spawn!
First, it's marked by the icon on the right, rather than the usual one I gave you in the basics above.
Second, you explicitly need the Plunderer tribe for this one!
The grey one with orange features. Check the pictures above and beneath.
Sadly, it is completely up to the RNG which tribe spawns, and it cannot be manipulated. You have to travel to any of the other maps / cities and come back, to reshuffle the event.
Once you got the Plunderers, just mount a monster. (You might want to use the Insect Glaive for this.)


14 | Eat or be Eaten
This one's located in their lair again.
He can fish up 2 different fishes. After several Goldenfry, the event illustrated beneath will play out.
Make sure to shoot your photo while the water goes crazy! Because the fish that's about the reach the surface will draw the poor lil' fella with him into the depths.
(I haven't tested it, but if you fail to get a good photo, you should be able to reset the event by fast traveling to the nearest camp and going down to the lair again.)


15 - 17 | Elder's Recess
------------------------------------------------------------------------------------------------------
15 | Let's Dance!
Just go to the Gajalaka's lair.


16 | Big Bang Attack
Recruit a Gajalaka by going to their lair, or by using the tailraider signal. Now approach a big monster and your new companion will start throwing this explosives.


17 | Flight of the Gajalaka
The location for this one is indicated on your map.


18 - 20 | Hoarfrost Reach
------------------------------------------------------------------------------------------------------
18 | Popo Pecking Order
The location for this will be shown on your map, with the icon I illustrated in the basics at the top of this guide.


19 | Ready, Aim, Fire!
This one will be illustrated on your map with the icon on the right.

Go there, wait for a big monster to cross the area and lure the monster to the Boaboa by throwing a rock into it's face or just by attacking regularly.


20 | Skinny Dipping
You need to be careful for this one!
Stay as far away from the Boaboa as possible! You'll have to make use of the zoom function this time. The Boaboa will immediately flee if you approch it, even if you wear the Ghillie Mantle!

If you don't know how to get to their lair - hit one of the Wingdrakes in Area 2 with a slinger ammo or your Clutch Claw while it hasn't yet engaged in combat, then spam your 'ride' button, which you also use for your tailraider.


-----------------------------------
Only 20 photos in total are required for the achievement. The ones below are optional, but they kind of fit with the theme of the guide. So I wanted to include them anyway, whilst I decided to ignore the remaining requests.
21, 23, 25 | Seliana
------------------------------------------------------------------------------------------------------
21 | Bath Connoisseurs


23 | Say "Sneeze!"

And as a little bonus:


25 | Gathering Hub Courier
54 Comments
Ragnax 22 Jul @ 7:31am 
The tutorial is great, congratulations on your work! :steamthumbsup:
Unlike other comments I didn't use another source, this one was more than enough.
You don't need to take all the photos in the album (maybe 20) and you don't need 3 “stars”, I did the easiest ones until I unlocked the achievement. :espresso:
Yanguir 12 Mar @ 9:18pm 
It doesn't have to be 3 stars
Pedsouji 30 Dec, 2024 @ 5:23pm 
A grand total of 20 requests are needed to get the 'Outstanding Observer' achievement.

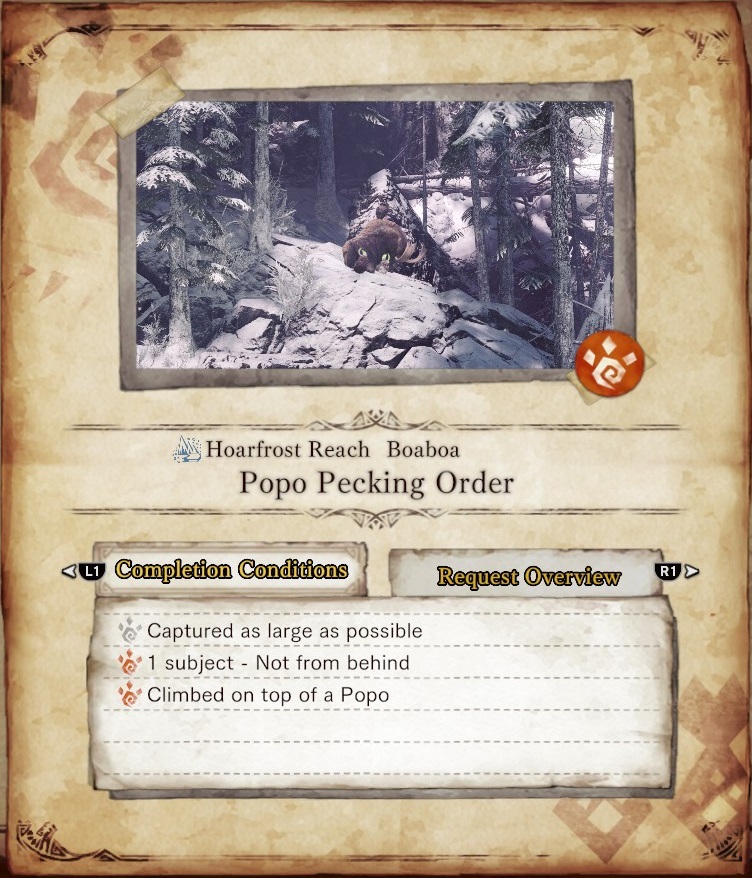
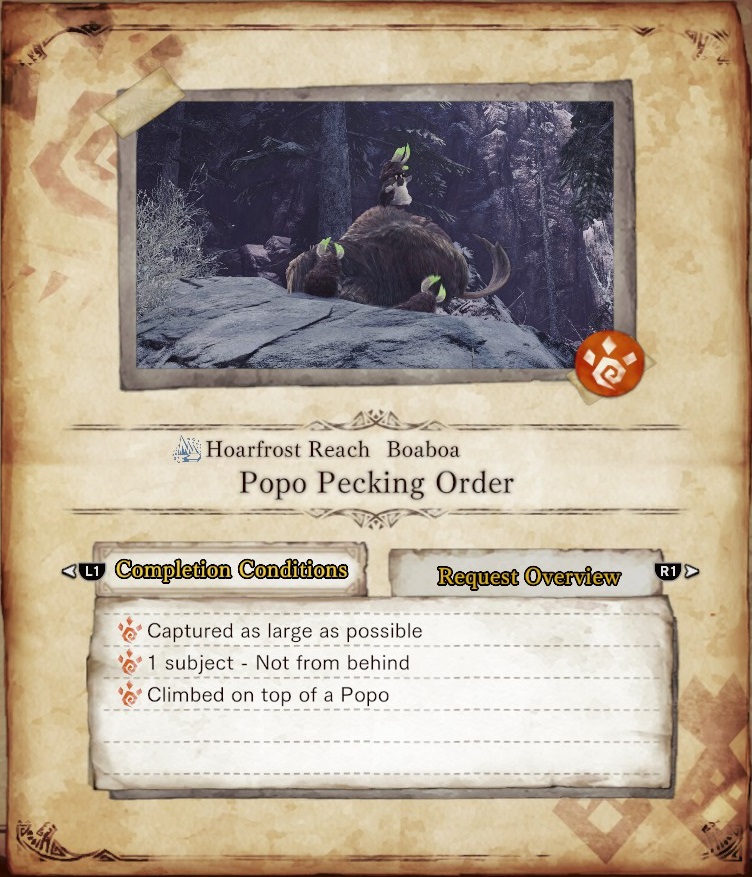
Important: To save time, do the easiest tasks on 21-30 (21, 23, 25, 27, 29, 30), then the easy ones on 1-20 (1, 2, 3, 5, 6, 7 (Daytime), 8, 9 (Daytime), 11, 12, 15, 16, 18, 19)
16 is like the hardest on this list (like 3 out of 10 hardest but it's still easy to do)
luijix 15 Sep, 2024 @ 4:56am 
Update after fledgling observer was bugged:
i made a new character and played up to iceborne to do the first request and weirdly now the achievement is unlocked but steam says i unlocked it months ago...must have been a weird steam issue, but doing this again worked (only took me 20 hours to play through world :tcry: )
luijix 26 Aug, 2024 @ 4:24pm 
Doing a single one of these should already give me the 'fledgling observer' achievement right?
i have done 7 or so and still don't have it....is this bugged? i was gonna 100% world before wilds comes out but if this is bugged i might as well not bother...
Brachragon  [author] 18 Jan, 2024 @ 10:18am 
@Rich Homie Beta
Which other resources did you use?
There's already a video linked at the top, I can easily add other recommendations as well.
Willoughby 18 Jan, 2024 @ 7:21am 
While I appreciate the gesture and effort put in, unfortunately, this guide left me using other resources to find information to supplement the lack of detail in multiple instances. Since the author doesn't plan on updating it (it's an old game, I don't blame them), I would suggest using another resource from the beginning.
Joe Batard 20 May, 2023 @ 11:51am 
Hello , for the achievement we need the 3 paws ? i have some "perfect photo " who count for only 2 paws and i can't get the last one ( the boat for the n*3 )
Meridian 15 Apr, 2023 @ 12:02am 
I also got the achievement before doing 21/23/25. I don't think you have to do those, it might be like the other comment said (20 turned in?)
Nexures 10 Feb, 2023 @ 7:18am 
not to mention there are 30 and not 25 quests. but they probably added that stupid stuff later