Barony
Not enough ratings
Official Scripting Guide for the Barony Editor
By WALL OF JUSTICE
Starting with version v3.3.3, the Barony map Editor supports a subset of gameplay scripts for custom map design!

To make use of this, Barony Script text is entered into the "Text Source" sprite within the editor, and is triggered by map events such as switches, pressure plates, entities disappearing or existing.

An accompanying Workshop Map has also been created for this guide to play and learn about scripting - skip to the Script Tutorial/Example Map sections to follow along there.
   
Award
Favorite
Favorited
Unfavorite
Scripting Introduction
Starting with version v3.3.3, the Barony map Editor supports a subset of gameplay scripts for custom map design!

To make use of this, Barony Script text is entered into the "Text Source" sprite within the editor, and is triggered by map events such as switches, pressure plates, entities disappearing or existing.

An accompanying Workshop Map has also been created for this guide to play and learn about scripting - skip to the Script Tutorial/Example Map sections to follow along there.https://steamhost.cn/steamcommunity_com/sharedfiles/filedetails/?id=2025195984

The Workshop Map also has in-world explanations suited to a blind playthrough if you'd just like to experience some of the new features, rather than read about the scripting language!

Barony Script will continually be updated to include more functions as needed by our development or requested by our community mapmakers. Our team is currently using this to implement an in-world Tutorial to cover gameplay basics.

===============================================================

What does it look like?


Scripts are defined by the use of the 'tag' @script at the start of a Text Source. Normally a Text Source sprite relays messages to players, but using @script instead instructs the game to process Barony Script 'tags' which are keywords starting with @ and separated by spaces.

In the example above, the script does the following:
  • 'Attaches' to a monster located directly ontop of the Text Source
  • Sets the status effect 5 (Invisible) to the attached monster for a duration 0 (infinite)
  • Triggers the script immediately as soon as the map loads, without requirement for power

===============================================================

Script Formatting Notes
  • Make sure the script starts with a @script tag
  • Make sure each @tag keyword is surrounded by spaces
  • Some @tag keywords require a value, e.g '@tag=123' which needs the '=' equals sign next to the keyword without spaces
  • Tags can be separated by as many spaces as needed to help make it readable
  • If the keyword or values need to overflow into the next line, select the next line and continue typing - only add a space once the keyword or value pair is completed
  • Order of tags usually does not matter, however they are read and executed in sequence
  • If your script does require 2 events to happen in a certain order, create 2 Text Source sprites and add a Message Delay of 1 game tick on the second script
Attached vs. Non-Attached Scripts
Tag Types
Script tags have 2 variants:
  • Non-entity tags such as "@power=X,Y" that do not reference specific entities on a level. "@power=X,Y" provides power to the map tile coordinates at X,Y.
  • Entity tags that operate on entities such as players, monsters or items on a level. Such tags may have a default operation such as "@killenemies=X,Y" which kills all enemies on a tile X,Y. Most entity tags can also be "attached" to group of entities and can be used with "@attached.killenemies=X,Y" to kill only monsters attached to the current script.

===============================================================

Attaching Scripts to Entities
Scripts can be "attached" to entities in order to modify only those specific entities, or to trigger if an event happens to an entity. First place the "@attachto=XXX" tag in a script to specify what type of entity to attach to.

By default, a script will only attach to entities located ontop of the Text Source script sprite. To attach to multiple entities within a map with 1 script, use a Map Range with @attachrange=. See the "Script Value Types" section for more information about Map Range formats.

Note "@attachto=XXX" will only attach entities ONCE when the map first loads. If you want to attach to entities multiple times, or to attach to certain groups of moving entities inside a room, use "@reattachto=XXX" in the same format. (See script reference for @reattachto= for more details)

Examples are:
  • @script @attachto=monsters @attachrange=all
    • Attaches to ALL non-player controlled NPCs, both enemies and allies.
  • @script @attachto=players @attachrange=3,4
    • Attaches to player entities located on map tile 3,4.
  • @script @attachto=items @attachrange=5-10, 15-20
    • Attaches to items in the world within a rectangular Map Range from X:5,Y:15 to X:10,Y:20.
  • @script @attachto=skeleton @attachrange=all
    • Attaches to ALL skeleton NPCs in the world
    • All monster types can be attached to with this method, substitute "skeleton" with "succubus", "dummybot", "gnome" etc.
Other attach entity types (Not yet available):
  • @script @attachto=gold
  • @script @attachto=breakable (if a collider is using one of the preset "breakable" damage types)
  • @script @attachto=collider (only if a collider can take damage - for your own custom colliders, otherwise also includes "breakables" as above)
  • @script @attachto=bell
Script Value Types
Many scripts require a value to be appended after the keyword with an '=' sign between the keyword and value. An example is "@power=10-20, 3-4". The type of value required for each keyword is shown in the detailed Script Keyword Reference section.

Value Types:
  • Map Range
    • Map ranges specify a specific tile or group of tiles in the current map to operate on. The @power= keyword uses a Map Range for what tiles to power - examples below will use this keyword. Ensure the correct punctuation order of commas (,) and hyphens (-) are used.
    • A single tile can be specified with a single "@power=X,Y". @power=3,4 will power the tile at X:3 Y:4.
    • A rectangular range of tiles can be specified with "@power=X1-X2,Y1-Y2". @power=10-20, 3-4 will power the tiles with an X value from 10 to 20, and a Y value from 3 to 4.
    • A simple global map-wide range can be specified with "@power=all". This dynamically applies the keyword from map X:1 Y:1 to the map height and width. (@power is not an idea place to use '=all', but a keyword like "@unfreezemonsters=all" is a better suited use to unfreeze every monster on the map.)
  • Single Value
    • Single values use only 1 number after the equals sign. Examples are:
      • "@nextlevel=2" triggering a level change 2 levels ahead - equivalent to a /jumplevel 2 console command.
      • "@pro0=50" which sets the Tinkering skill for all players to 50.
  • Multiple Value
    • Multiple values are separate by a semicolon (;). Examples are:
      • "@attached.seteffect=5;10" which sets the status effect 5 (invisibility) for a duration of 10 seconds on all players.

How to Trigger/Power Scripts
As scripts are part of the Text Source sprite within the editor, normally they can be manually fired using a pressure plate, lever, or other power system within the editor like the rest of the Barony Editor contraptions. However, there are a few other ways to get scripts to activate using the "@triggerif=" keyword.

When a "@triggerif=" condition is met, the script is POWERED, but not neccessarily immediately run. If a "Message Delay" is set within the Text Source sprite, the sprite needs to be powered for the duration specified in order for the script to run. This can be used to sequence sound effects, player messages, and other powerable events within the world.

  • @triggerif=always
    • Immediately powers the script upon map load.

  • @triggerif=attached#exists
    • Requires attached entities given by "@attachto=" to exist in the world to power the script.

  • @triggerif=attached#dies
    • If attached entities given by "@attachto=" do not exist in the world (items picked up from the ground or NPCs being killed) then the script is powered.

  • @triggerif=attached#invisible
    • If attached entities given by "@attachto=" are all invisible, then the script is powered.

  • @triggerif=attached#visible
    • If attached entities given by "@attachto=" are all visible, then the script is powered.

  • @triggerif=attached#interacted (Not yet available)
    • If attached entities given by "@attachto=" are interacted, then the script is powered. (Only works for bells, if pulled or otherwise broken)
Script Keyword Reference
@clrplayer
  • [Attachable] [Player Only]
  • Clears most player data, removing stats, equipment and proficiencies. Does not change class. If keyword not attached, applies to all players.

@class=
  • [Attachable] [Player Only] [Single Value]
  • Reinitialises player to the class number specified, value of 0 is Barbarian @class=0, value of 20 is Hunter @class=20. Same order as on the character creation screen. If keyword not attached, applies to all players.

@clrstats
  • [Attachable] [Player Only]
  • Resets stats and HP/MP to default game values (0 for all stats, 30 HP/MP). Does not touch items. If keyword not attached, applies to all players.

@hunger=
  • [Attachable] [Players/Monsters] [Single Value]
  • Sets hunger to a value for attached entities. If script not attached, applies to all players.
  • @hunger=1500 is safely full hunger, @hunger=2000 is full to the point of sickness, @hunger=250 is "starting to feel weak", @hunger=150 is "feeling faint". To trigger the message and sound effect for players, set the value to 1 above the threshold such as @hunger=251

@nextlevel=
  • [Global] [Single Value]
  • Upon triggering, issues a /jumplevel X command to change the current map. The number of levels to descend is the value assigned.

@copyNPC=
  • [Attachable] [Players/Monsters] [Single Value]
  • Copies stats, equipment, and inventory from a "scriptNPC" Human monster to the attached entity. If keyword not attached, applies to all players.
  • Requires a Human monster sprite elsewhere inside the level named "scriptNPC". Naming a Human monster with this title renders them unable to move or interact with the world. Use the "Is NPC" field on the Human's monster properties page to match the value given.
  • E.g @copyNPC=2 looks for a "scriptNPC" with "Is NPC" value of 2, and copies stats, equipment, and inventory from the human. Can be used to copy a template to all monsters of a given type to modify random generation.

@stSTR= @stDEX= @stCON etc...
  • [Attachable] [Players/Monsters] [Single Value]
  • Sets a primary stat (STR/DEX/CON etc) to the value given. If keyword not attached, applies to all players.
  • Optionally, a plus sign can be used to add more primary stat points e.g @stSTR+5 gives 5 more STR stat.

@pro0= @pro1= @pro2= etc...
  • [Attachable] [Players/Monsters] [Single Value]
  • Sets a proficiency (Tinkering/Appraisal etc) to the value given. If keyword not attached, applies to all players.
  • Optionally, a plus sign can be used to add more proficiency points e.g @pro0+5 gives 5 more Tinkering proficiency.
  • @pro0= refers to the Tinkering proficiency. @pro15= refers to the Alchemy proficiency. Uses the same order as shown on the Player Proficiency sheet for all other proficiencies to get the index needed.

@power=
  • [Global] [Map Range]
  • Upon triggering, generates pre-powered pressure plates at the location given by the Map Range (editor map sprite 34).
  • If there is already a pressure plate at a tile, it will not add an additional plate, but instead force the existing plate to power on.

@unpower=
  • [Global] [Map Range]
  • Inverse of @power=. Upon triggering, unpowers any pressure plates at the location given by the Map Range (editor map sprite 34).
  • Does not delete the pressure plate entity, the pressure plate is left un-interactable after this script tag is executed.
  • Does not affect temporarily powered pressure plates (editor map sprite 33).

@freezemonsters=
  • [Attachable] [Monsters] [Map Range]
  • "Freezes" monsters located within the given Map Range. Frozen monsters are unable to move, but are able to be attacked.
  • Useful for keeping monsters in-place during a fixed map encounter, to be later unfrozen.

@unfreezemonsters=
  • [Attachable] [Monsters] [Map Range]
  • Un-freezes monsters located within the given Map Range. Monsters will resume normal activity when unfrozen.
  • Used only after freezing monsters with the @freezemonsters= keyword.

@killall=
  • [Attachable] [Monsters] [Map Range]
  • Immediately kills all monsters (followers and enemies) within the given Map Range.

@killenemies=
  • [Attachable] [Monsters] [Map Range]
  • Immediately kills all enemy NPCs (followers excluded) within the given Map Range.

@nodropitems=
  • [Attachable] [Monsters] [Map Range]
  • Marks an NPC's items and inventory to be undroppable on death within the given Map Range.

@setenemy=
  • [Attachable] [Monsters] [Map Range]
  • Manually marks NPCs as enemies to players (damageable without Friendly Fire being required) within the given Map Range.
  • NPCs marked as enemies will attempt to attack players and will block player movement.

@setally=
  • [Attachable] [Monsters] [Map Range]
  • Manually marks NPCs as allies to players within the given Map Range. Will not attempt to target players or allies.

@findtarget=
  • [Attached Required] [Monsters] [Map Range]
  • Requires to be attached to a monster. Instructs the attached monster to find the closest enemy within the given Map Range.
  • Best used when the player cannot evade line of sight quickly from the monster as the monster's target will be lost.

@addtochest=
  • [Attached Required] [Monsters] [Map Tile]
  • Requires to be attached to items. Removes attached items and places them inside a chest sprite at the Map Tile location.
  • Set the chest F2 property "Chest Type" as 8 - empty for best results to build your own chest inventories.

@seteffect=
  • [Attached Required] [Players/Monsters] [Multiple Value]
  • Requires to be attached to players or monsters. Sets effect(s) for a duration.
  • @attached.seteffect=5;0 sets the status effect 5 (invisible) for 0 duration (infinite).
  • @attached.seteffect=5;1-3 sets the status effects 5 (invisible) for 1 to 3 random seconds.
  • @attached.seteffect=5-10;1 sets the status effect 5 (invisible) for 1 second.
  • @attached.seteffect=5-10;1-3 sets the status effects 5 to 10 (invisible, blind, greasy, messy, fast) for 1 to 3 random seconds.
  • Some complex status effects such as Polymorph, Dash, Fear, Knockback will not work correctly.
  • Full list of status effects currently in-game as of v3.3.3:
    • EFF_ASLEEP = 0
    • EFF_POISONED = 1
    • EFF_STUNNED = 2
    • EFF_CONFUSED = 3
    • EFF_DRUNK = 4
    • EFF_INVISIBLE = 5
    • EFF_BLIND = 6
    • EFF_GREASY = 7
    • EFF_MESSY = 8
    • EFF_FAST = 9
    • EFF_PARALYZED = 10
    • EFF_LEVITATING = 11
    • EFF_TELEPATH = 12
    • EFF_VOMITING = 13
    • EFF_BLEEDING = 14
    • EFF_SLOW = 15
    • EFF_MAGICRESIST = 16
    • EFF_MAGICREFLECT = 17
    • EFF_VAMPIRICAURA = 18
    • EFF_SHRINE_RED_BUFF = 19
    • EFF_SHRINE_GREEN_BUFF = 20
    • EFF_SHRINE_BLUE_BUFF = 21
    • EFF_HP_REGEN = 22
    • EFF_MP_REGEN = 23
    • EFF_PACIFY = 24
    • EFF_POLYMORPH = 25
    • EFF_KNOCKBACK = 26
    • EFF_WITHDRAWAL = 27
    • EFF_POTION_STR = 28
    • EFF_SHAPESHIFT = 29
    • EFF_WEBBED = 30
    • EFF_FEAR = 31
    • EFF_MAGICAMPLIFY = 32
    • EFF_DISORIENTED = 33
    • EFF_SHADOW_TAGGED = 34
    • EFF_TROLLS_BLOOD = 35
    • EFF_FLUTTER = 36
    • EFF_DASH = 37

@clreffect=
  • [Attached Required] [Players/Monsters] [Single Value Range]
  • Requires to be attached to players or monsters. Removes active effects from the above list.
  • @attached.clreffect=5 removes status effect 5 (invisible).
  • @attached.clreffect=5-10 removes status effects 5-10 (invisible, blind, greasy, messy, fast).
Script Keyword Reference #2
@addtomonsters=
  • [Attached Required] [Items] [Map Tile]
  • Requires to be attached to items. Removes attached items and places them in 1 or more monster inventories within the Map Tile location. (Same quantity of items given to all monsters)

@equipitems=
  • [Attached Required] [Monster] [Map Tile]
  • Requires to be attached to monsters. Adds all items within the Map Tile location to the attached monster(s) equipment slots. Any existing equipment will be replaced and deleted if the items on the Map Tile match existing equipped items. (Same quantity of items given to all monsters)
  • Spellbooks are used as weapons for monsters to cast spells repeatedly (Shopkeeper/Imps etc)

@pickupitems=
  • [Attached Required] [Players/Monsters] [Map Tile]
  • Requires to be attached to monsters or players. Adds all items within the Map Tile location to the attached player(s)/monster(s) inventory. (Same quantity of items given to all attached entities)

@reattachto=
  • Alternative to @attachto. @reattachto= only checks the specific Map Tile range AFTER the script is powered, while @attachto= is initialized when the map loads. For example, this can be used to dynamically attach to players that walk into a certain room and play messages, excluding other players in the world.

Future keywords not yet available:
@breakablespawn=
  • [Attached Required] [Breakables] [Monster Name]
  • Requires to be attached to breakables. Adds a monster spawn when the breakable is destroyed with the given name e.g @attached.breakablespawn=skeleton
  • Bats spawn in twos
  • Only 1 spawn is available per breakable, hand placed breakables do not spawn monsters

@breakablejumpspawn=
  • [Attached Required] [Breakables] [Monster Name]
  • Requires to be attached to breakables. Adds a monster spawn and destroys the breakable when a player is nearby, or spawns when the breakable is destroyed e.g @attached.breakablejumpspawn=rat
  • Bats spawn in twos
  • Only 1 spawn is available per breakable, hand placed breakables do not spawn monsters

@addtobreakable=
  • [Attached Required] [Items/Gold] [Map Tile]
  • Requires to be attached to items or gold. Makes attached objects invisible and reveals them when a breakable is destroyed at the given map coordinate.
  • Does not relocate the objects inside the breakable, so place them on the same tile as the breakable.
  • Only 1 item is available to be hidden inside a breakable, though multiple pieces of gold can be hidden inside a breakable.
Script Tutorial/Example Map Part 1
As part of this guide, we've created a Steam Workshop map to explore and see all the latest scripts in action! Subscribe to this link and start a game using the Workshop option at the Barony main menu. https://steamhost.cn/steamcommunity_com/sharedfiles/filedetails/?id=2025195984

When creating a character, it does not matter what is chosen, so skip ahead through all the prompts and let's get started.

Entry Room


We'll be covering the scripts in the order encountered. Inside the start room, the player is facing North - a new option for the Player sprite in v3.3.3!


First script:
  • @script @attachto=players @attachrange=15-16,29-30 @attached.clrplayer @triggerif=always

We start with the @script tag in the Text source near the player sprites to designate that this source is a script. This script is then attached to 'players' within the coordinate square from X:15,Y:29 to X:16,Y:30 using @attachto= and @attachrange=. The square covers all 4 player start positions - we know the player must start within these tiles to attach the script to.

@attached.clrplayer resets your character to the default 0 stat line, 30 HP/MP, and clears your inventory. @triggerif=always makes the script run ASAP upon level load. Inside the Text Source F2 properties window, the message delay is 0, and the message is marked to only send once.

Some scripts use the message delay to control timing, and if the script is triggered by a resettable power source (levers/pedestals) you can define the script to be repeatable every time someone toggles the lever. If you only intend it to run once, then best practice is to set the script to run once just in case you want to change how it's powered later down the line!

Second script:
  • @script @attachto=items @attachrange=15,27 @triggerif=attached#dies @power=14-17,27

This script attaches to the Bottle of Water located at X:15,Y:27 directly infront of the player. If the Bottle of Water 'dies' (gets picked up and disappears from the map), the script is triggered with @triggerif=attached#dies.

The action that is executed is @power=14-17,27, which powers 4 tiles - (X:14, Y:27), (X:15, Y:27), (X:16, Y:27), (X:17, Y:27), powering both gates to exit the start room. You could also use 2 separate tags @power=14,27 @power=17,27 to specifically only power the gate tiles if space is a restriction - but we've got plenty of room so powering extra tiles is not a big deal.

In this Text Source properties page, you'll notice extra right padding on the first line - I've chosen to fill out the line with spaces to help readability. If you don't add spaces, the next time the window is opened will join all the text fields together as close as possible - creating text that overflows from 1 line to the next.

Third/Fourth script:
  • @script @unpower=14-17,27 (no delay)
  • @script @power=16-17,23 (2 second delay - 100 ticks)

In the next room when the lever is pulled, 2 adjacent scripts will fire. The first will @unpower the previous gate tiles behind us, and 2 seconds later, the two gates ahead on (X:16,Y:23) (X:17,Y:23). The Text Source delay property is used for timing the second script for dramatic effect.

===============================================================

Lights and a Frozen Skeleton


To the immediate left starting in this room, a lever will turn on the lights in a timed sequence with Light Source sprites.


First script:
  • @script @power=18,19

The 3 Text Source sprites along the left wall power various lights within the room with the @power tags we saw before. A mix of delays in the script and light sources are used for the different timings to show that either sprite can be used for delays.

Second script:
  • @script @attachto=skeleton @triggerif=always @attached.freezemonsters=all @attached.nodropitems=all

This example is attached to a monster NPC instead of players. @attachto=skeleton specifically requires a skeleton to attach to - @attachto=monsters is an alternative if you know exactly where the monster is.

This does NOT use @attachrange= - instead the default behavior for an attached script is to look at the tile it is on. As we know the skeleton is on top of the Text Source, then we can save a little extra typing and omit @attachrange=.

The script triggers immediately and @attached.freezemonsters=all freezes attached monsters across ALL the map. "=all" is generally used for Map Ranges when dealing with attached scripts - as we already specified the location of our monsters when we attached the script. The skeleton is also set to not drop items on death with @attached.nodropitems=all, again using the "=all" Map Range for the same reason as the previous tag.

The skeleton can be unfrozen with the lever situated next to it:

Third Script:
  • @script @attachto=monsters @attachrange=18,18 @attached.unfreezemonsters=all

This script does not use "@triggerif=", so the lever allows the script to run. For an alternative example, @attachto=monsters is used instead of @attachto=skeleton for this script - we know only the skeleton monster will occupy that tile.

As the skeleton is not located on top of this script, @attachrange=18,18 is required to attach the script to the skeleton at X:18,Y:18. The lever will not power the previous script underneath the skeleton since it uses @triggerif=always and ignores power sources.

Fourth Script:
  • @script @attachto=items @triggerif=attached#dies @killenemies=13-18,15-22

Finally, at the end of the room there is a Bottle of Booze sitting atop a podium, attached to the fourth script. As the script is on the item's tile - no need for @attachrange=. @attachto=items is the tag to specify items instead of monsters or players.

This script is driven by an event of the item - @triggerif=attached#dies makes the script run if the item disappears from the map. If this script was attached to a monster, it would trigger when the monster died.

The action that occurs is @killenemies=13-18,15-22, killing all enemies within the rectangular Map Range (X:13,Y:15) to (X:18,Y:22). The rectangle is the whole room, since if we unfroze the skeleton and let it roam around we can't be sure which 1 tile it will be on when you pickup the Bottle of Booze.

Of course, you could manage to lead the skeleton out of the room! Using another Text Source script attached to the skeleton can solve this - send power from the item script using a @power= tag to the additional script. This is left as an exercise to the reader.
Script Tutorial/Example Map Part 2
Boulder and a Slow Skeleton


Stepping inside this room relays a purple message to the player using the Text Source sprite to stand still and watch the events unfold! This Text Source is hidden beneath the room's pressure plates in the editor.


First and Second scripts (bottom to top):
  • @script @attachto=skeleton @attachrange=13,9 @attached.unfreezemonsters=all @power=15,9
  • @script @attachto=skeleton @attachrange=13,9 @attached.findtarget=13-18,9-13 (0.5 second delay - 25 ticks)

We have to use 2 scripts attached to the same skeleton in this room since timing is important between the tags being used. The first portion @attachto=skeleton @attachrange=13,9 we've seen previously in the 1st part of this tutorial - both scripts are attached to the lone skeleton in the room.

The first script unfreezes the skeleton and allows it to move, and 0.5s later a new tag @attached.findtarget=13-18,9-13 tells the skeleton to find an enemy (the player) within the room - Map Range (X:13,Y:9) to (X:18,Y:13). The timing issue comes with instructing an NPC to path to a target while it is immobile - wait at least 1 or 2 ticks for the skeleton to update it's in-game "unfrozen" state and then telling it to find a target works consistently. 25 ticks was chosen as a safe measure.

So stepping on the pressure plate causes the skeleton to slowly march towards the player - in the path of a boulder! This boulder comes to a stop and prevents the player from advancing. The third script gives the player the strength to move the boulder once a lever is pulled.


Third script:
  • @script @attachto=players @attachrange=all @attached.stSTR+5 @power=13,8

Using @attachrange=all here allows us to attach to every player on the map, no matter where they are! As the lever can be pulled from various locations within the room, we could also specify a rectangular Map Range to do the same job. But what if in multiplayer another player was busy elsewhere? Using @attachrange=all covers that scenario for certain scripts.

@attached.stSTR+5 @power=13,8 gives the attached players +5 STR and unlocks the gate in the opposite end of the room. As the player starts with 0 STR, adding +5 gives 5 total.

Next to the lever is a Sound and Text Source providing audio/visual feedback that the player's stats were modified.

Fourth script:
  • @script @attachto=skeleton @triggerif=always @attached.freezemonsters=all @attached.nodropitems=all

We've seen this previously in Part 1, to freeze the skeleton immediately on map load until the player walks in and unfreezes it. Setting up monsters with this script prevents them wandering around and making distracting noises. Again this skeleton also does not drop items on death.

===============================================================

Hand Placing Items in Chests


This room shows how to place items in chests and giving the player proficiency points.


First script (bottom to top):
  • @script @attachto=players @attachrange=all @attached.pro3=100

Hitting the lever in this room gives the players 100 Appraisal skill to identify the chest contents with @attached.pro3=100. Proficiency 3 refers to the 4th item from the top in the player's Proficiency sheet, the count starts at 0. So @pro0 is Tinkering, @pro7 is Magic etc.

Second script:
  • @script @attachto=items @attached.addtochest=13,6 @triggerif=always

This script is located on top of 3 gem items on the ground, and attaches to them by default as it is located on the same tile as them. A new tag @attached.addtochest=13,6 removes the items from the world and populates them inside a Chest sprite at the map coordinates X:13,Y:6. @triggerif=always fires the script immediately on map load.

Tip: Adding items to a chest in this method will briefly render the items on the ground while the map loads! To hide this, move the items inside a wall!

Third script:
  • @script @attachto=players @attachrange=all @attached.clrplayer

Finally, this script demonstrates @attached.clrplayer once again, removing the +5 STR bonus and gems from the player's inventory.

If a player was savvy enough to throw a gem over the clrplayer checkpoint, a plain Text Source is attached to the pressure plate as a little extra.
Script Tutorial/Example Map Part 3
Changing Class, Gnome Allies and Effects

Proceeding on, a few new scripts are shown in the next few levers and rooms.


First script (top-right):
  • @script @attachto=players @attachrange=all @attached.clrplayer @attached.class=7 @power=12,2


The first lever encountered will change the player's class to Wizard and reset stats and inventory to what the wizard starts with using @attached.class=7. 7 is the index of the Wizard class from the Character Select screen (counting starts from 0 with Barbarian):


Using @attached.clrplayer is recommended when changing class - changing class can set your HP to 0 since class change through the menu (what we're emulating) assumes the player has 30 default HP/MP. The Wizard reduces MAXHP and HP by 10, so an injured player can die with this script. We also limit the amount of times this script runs with the "Send message once only" field - as we have a retriggerable lever that could trigger the script multiple times, awarding duplicate Wizard starting loot.

The gate situated next to the lever is also powered with @power=12,2 - superfluous as we could just use a wire, but this is new and exciting! This also means we can remotely unpower it with the next script to funnel the player through.

Second script (middle-right):
  • @script @attachto=gnome @attachrange=1-9,1 @attached.unfreezemonsters=all @unpower=12,2 @power=10,4

The second script attaches to the group of gnomes pictured inside the room (along the row (X:1,Y:1) to (X:9,Y:1) and unfreezes them when the player hits the nearby lever. These were frozen in a future script labelled 1 in the diagram - to avoid the sounds of jib jabbing Gnomes while progressing through the level.

@unpower=12,2 closes the gate we just opened, funnelling the player forward, and @power=10,4 opens the gate ahead into the Gnome room.


Gnome room scripts (labelled 1):
  • @script @attachto=gnome @attachrange=1-9,1 @attached.setally=all @triggerif=always @attached.freezemonsters=all @attached.nodropitems=all @attached.clreffect=0

This script runs on map load with @triggerif=always - this is what freezes the Gnomes in place using the same @attachrange as mentioned previously. @attached.nodropitems=all is also used to prevent taking the Gnome's lightning staffs and fish.

In addition, a new tag @attached.setally=all sets the Gnomes as player allies! The means that monsters may be recruitable if normally hostile, and will ignore the player. Humans can recruit most monsters set as allies in this way. Walking into this room now is a safe place to explore.

Note: Other races likely won't be able to recruit manual allies as the follower code is more robust for the more recent DLC races - humans being able to recruit them is a happy side effect of the original follower code.

Another new tag, @attached.clreffect=0 clears effect '0' - Sleep status from the Gnomes on map load. Some monsters (Trolls/Gnomes/Imps etc) are programmed to sleep when they initially spawn with a chance of 25%. Using this tag wakes up the Gnomes, ready for action and interaction! @clreffect= only takes 1 number as a parameter as it is a Single Value Range. Multiple statuses can be cleared using a range such as @clreffect=0-14. The full list of effect numbering is at the bottom of this section.

Gnome room scripts (labelled 2):
  • @script @attachto=gnome @attachrange=1-9,1 @attached.clreffect=0-40

The first lever script allows the player to clear all status effects from the Gnomes repeatedly by toggling the switch on/off with @attached.clreffect=0-40. As the "Send message once only" property has not been set, all lever scripts within the Gnome room can be repeatedly triggered.

Note that @attachrange=1-9,1 is used to attach to the Gnomes in the room - only the top row. Scripts attach on map load - NOT when the script is triggered! If the Gnomes wander around the script will still be attached to them without issue.

The remaining bunch of levers along the wall are used to inflict status effects on the Gnomes using @attached.seteffect= with a Multiple Value parameter:

Gnome room scripts (labelled 3):
  • @script @attachto=gnome @attachrange=1-9,1 @attached.seteffect=14;10

The lever furthest away uses @attached.seteffect=14;10 to set the Bleeding (14) status effect on all the Gnomes for 10 seconds.

Try all the levers! Each one inflicts a certain status effect. Clear them at any time using the first lever to clear all effects.


When you are ready to proceed after playing with status effects, take the Purple Orb from the pedestal to kill all the Gnomes and proceed with the following script:

Gnome room scripts (labelled 4):
  • @script @attachto=gnome @attachrange=1-9,1-4 @attached.killall=all @power=2,5

The pedestal is set to invert power - removing the Orb will trigger script #4, which does a @attached.killall=all to kill all attached Gnomes, as well as @power=2,5 to open the next gate and move on.

Script Tutorial/Example Map Part 4
Hunger and Copying NPCs


Once inside the next room, take the Purple Orb and place it inside the next pedestal to power the next script.


First Script (bottom-left):
  • @script @unpower=2,5 @power=4,8 @attachto=players @attachrange=all @attached.hunger=250

Placing the Purple Orb in the non-inverted pedestal triggers the above script, closing the gate behind the player with @unpower=2,5 and unlocking the next gate with @power=4,8.

A new tag, @attached.hunger=250 sets the hunger of every player to a value of 250, bringing up the hunger icon. The nearby Sound Source sprite plays the Hunger debuff sound effect for theatrical measure.

Inside this map's properties menu (ctrl+M in the editor) Hunger Loss has been disabled, so hunger does not otherwise decrease. A complimentary piece of meat is provided in this room to remove the Hunger status.

Note: If hunger was not disabled on the map, @attached.hunger=251 could also be used -when the game decreases hunger to 250 the associated sound effect and text message is automatically displayed.
Barony messages the player when hunger falls to values of 50, 150, 250 and 1500. Every minute, the hunger "value" decreases by 100 points - counting down each point every 0.6 seconds.


Moving on into the next room with human NPCs:


Second Script (top-right):
  • @script @attachto=players @attachrange=all @attached.clrplayer @attached.copyNPC=0

There are 3 humans situated with 3 respective Pressure Plate sprites, each with their own script! Stepping onto the pressure plate for each NPC modifies the attached player's equipment and stats to the human using @attached.copyNPC=0.

To explain @attached.copyNPC=0, this script tag looks for a human NPC, specifically with the name "scriptNPC" and "Is NPC" field of 0. This is set in the human's Sprite Properties window as in the image below.

The other 2 humans use "Is NPC: 1" and "Is NPC: 2" respectively. Humans named "scriptNPC" are unable to move or be interacted with. It's best to place the scriptNPC within a wall or hidden somewhere inaccessible to hide the magic from players.


Finally, there is 1 more scriptNPC human equipped with Gungnir and some cool looking armor! This human is set to "Is NPC: 3". To trigger the next script, hit the lever by the door.

Third Script (bottom-right):
  • @script @attachto=human @attachrange=7-11,6 @attached.copyNPC=3

@attachto=human @attachrange=7-11,6 attaches the script to the three other humans along the row of coordinates (X:7,Y:6) to (X:11,Y:6).

@attached.copyNPC=3 copies stats and equipment from a scriptNPC "Is NPC: 3" to the three humans - demonstrating that copyNPC works with both players and monsters.


Using this sequence, the player is able to move properties from monster to monster, and then monster to player to get ahold of Gungnir!

Take Gungnir to the final room...

===============================================================

Enemy Dummybots and the Gripping Conclusion

Walk into the next room and find 4 Dummybots blocking your path!


First Script (middle):
  • @script @attachto=dummybot @attachrange=6-10,13 @triggerif=always @attached.setenemy=all @attached.nodropitems=all @attached.freezemonsters=all

The first setup in this room is a @triggerif=always script to set some properties on the Dummybots. @attachrange=6-10,13 attaches to the Dummybot row (X:6,Y:13) to (X:10,Y:13) to freeze, set to nodropitems, as well as a new tag @attached.setenemy=all to make all the Dummybots hostile!

Setting a monster to an enemy will leave the player unable to recruit or move through monsters - leaving the player with no choice but to destroy them.

Upon entering the room - the below script is tied to a Pressure Plate sprite to unfreeze the Dummybots and let them make noise as normal.

Second Script (top):
  • @script @attachto=dummybot @attachrange=6-10,13 @attached.unfreezemonsters=all

To proceed in this room, kill all the Dummybots with the newfound Gungnir. The below script watches the state of all Dummybots and triggers when they all have been slain using @triggerif=attached#dies:

Third Script (bottom):
  • @script @attachto=dummybot @attachrange=6-10,13 @triggerif=attached#dies @power=8,15

When all Dummybots no longer exist on the map, @power=8,15 unlocks the final gate to the fanfare in the last room! The ladder at the end reloads the map from the start.

4 Comments
WALL OF JUSTICE  [author] 20 Jan @ 1:19pm 
Maybe add delay on the text object or trigger it with a pressure plate rather than "always".

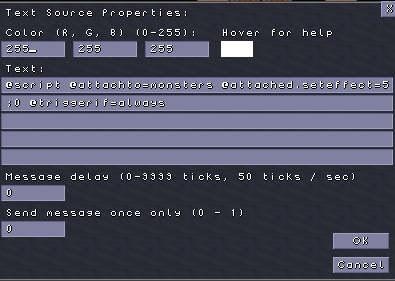
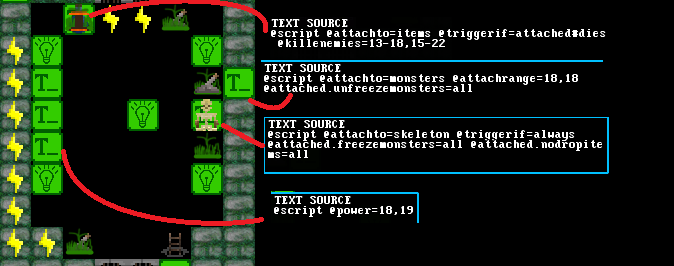
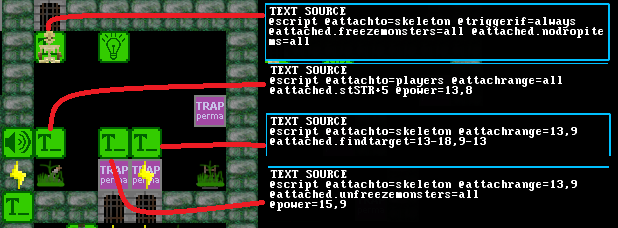
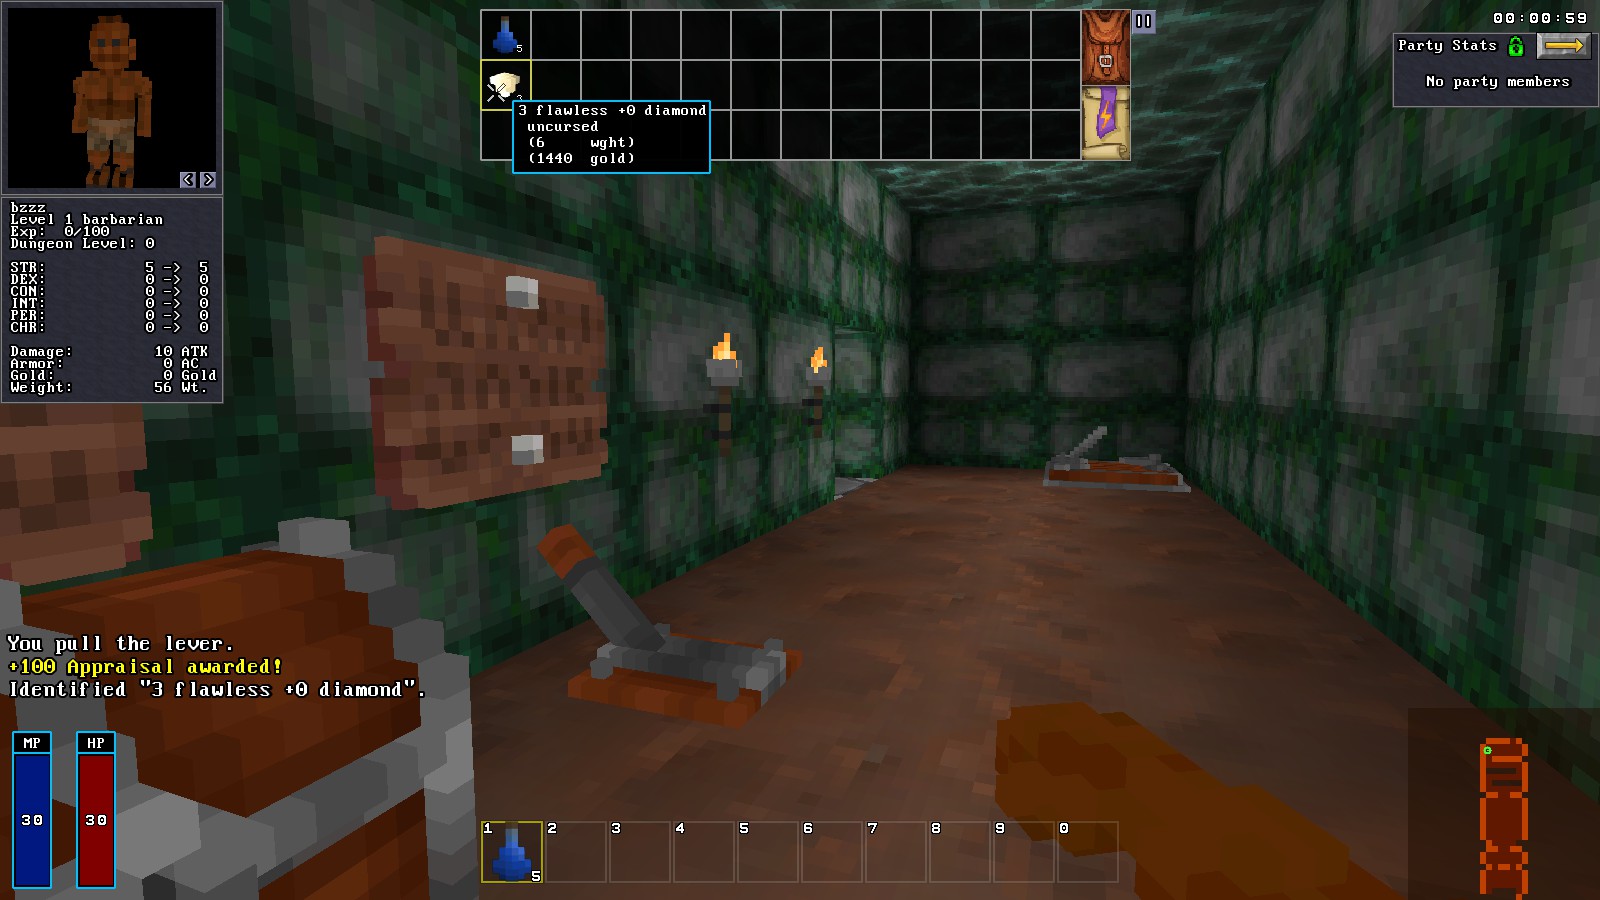
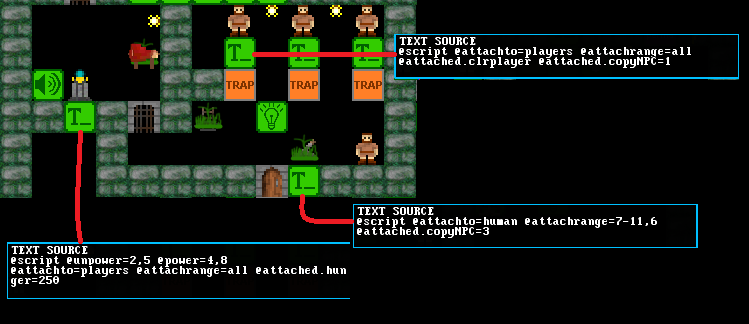
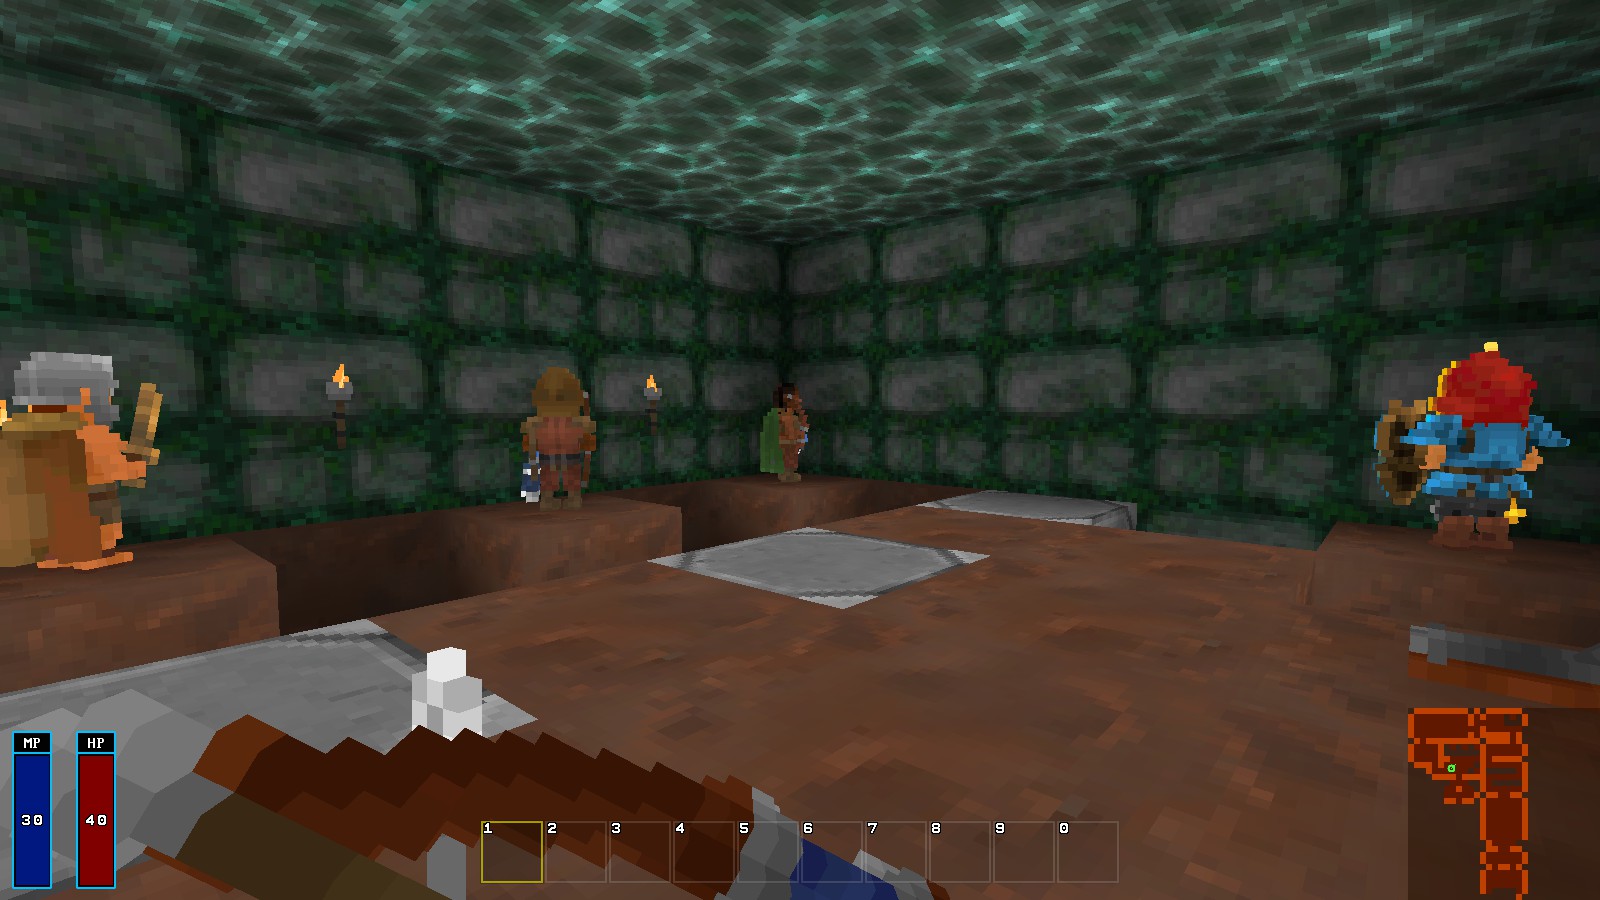
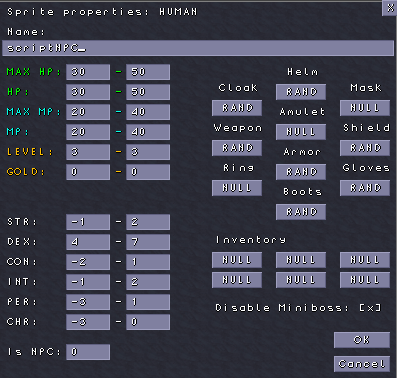
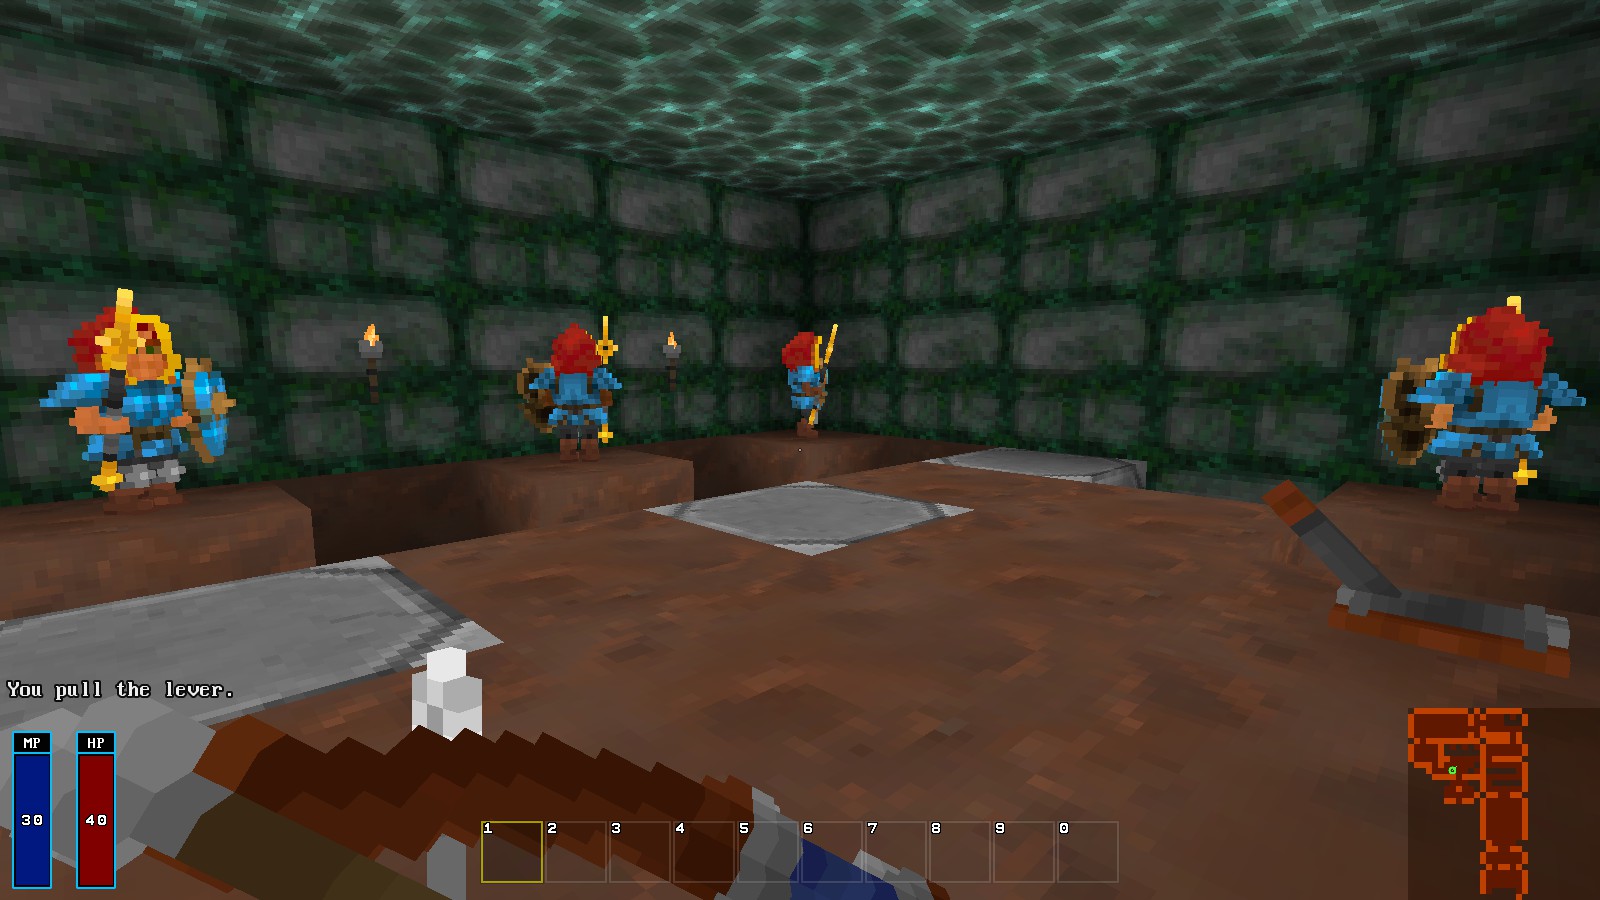
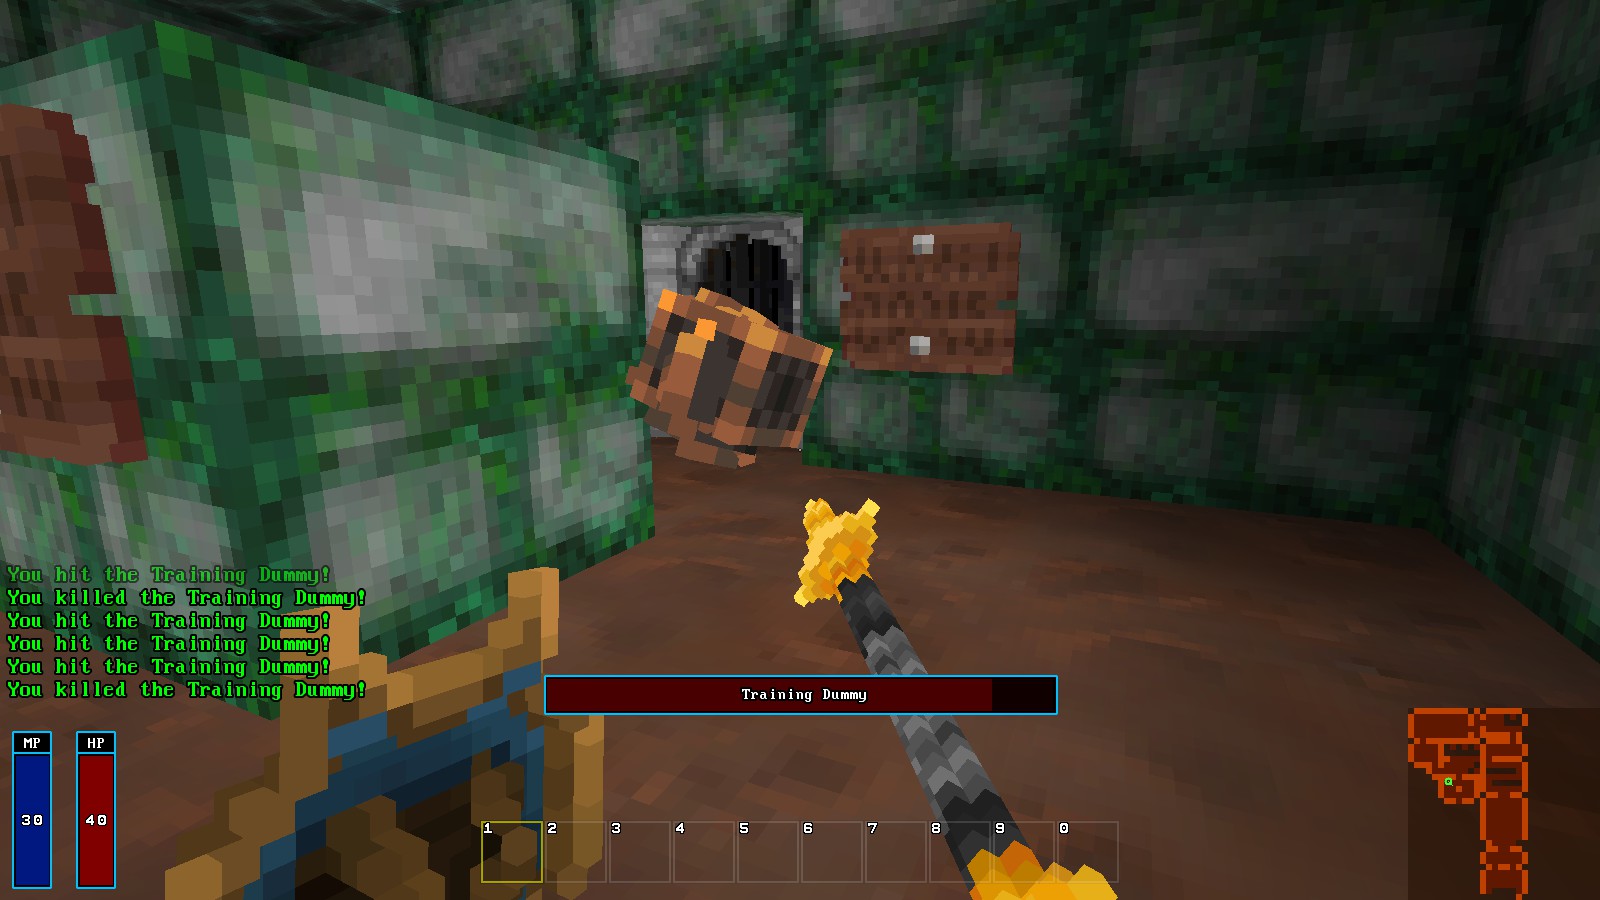
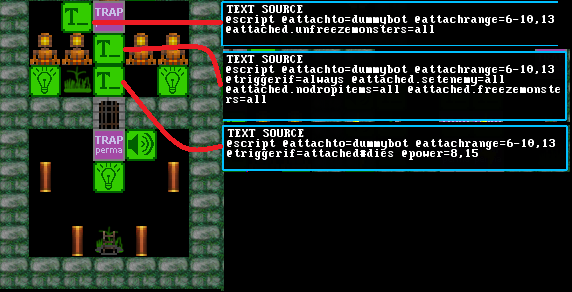
Definitely still works I use scripts in debug maps all the time.
Zea 20 Jan @ 9:49am 
Just tested. I made a new map in the editor, placed the player spawns and added a text sprite '@script @attachto=players @attachrange=all @triggerif=always @attached.stSTR+5'

when I add this script to the map, nothing happens.
If I go into your example workshop map, this same script works.

There's no way to get it to work outside of the map you created for some reason, I suspect you enabled a flag perhaps? If I open the .lmp-file, they're both LMPV2.9 I've put about 12 hours into this without any progress, I'm a programmer by profession, which is why it's really stumping me!
Zea 20 Jan @ 2:13am 
Does this still work? None of the examples I tried do anything!
Endonerios 6 Jan, 2022 @ 3:28am 
I have a question, and since it seems devs don't really reply to discussions section titled "Workshop Discussions" I will ask here.

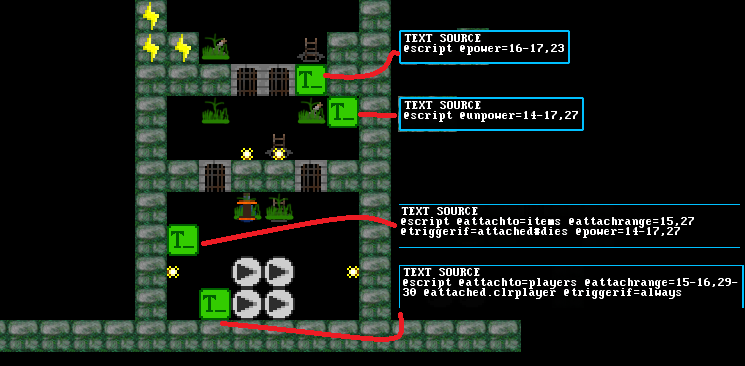
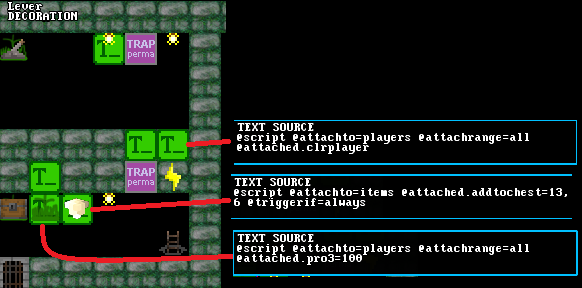
The next thing I am trying to do is: If (say player) picks up an item with script attached to it that powers ANOTHER script that attaches itself to ANOTHER item. So if the First item is never picked up, the second script never gets attached to the second item.
Is that even possible to accomplish using scripting?