Dead by Daylight

Dead by Daylight

45 ratings
A Player's Guide To: Deathslinger
By Yukari The Alpaca and 1 collaborators
This guide will discuss basics, tips, tricks, and counters to utilize against or in favor of Dead By Daylight's Deathslinger killer.
   
Award
Favorite
Favorited
Unfavorite
Introduction
The Deathslinger is a great chase killer. He can quickly shoot survivors with his firearm known as The Redeemer and reel survivors closer to him for a quick hit shortly after they have been shot.

Strengths

+ Quick Chase Potential
+ Quiet Breathing and Footsteps
+ Faster ability handling (windup and recovery) compared to Huntress.


Weaknesses

- Low Mobility (Low patrol speed and lack of mobility tools.)
- Slower movement speed than other killers (4.4 meters/second.)
- Tall
- Normal (32 Meters) Terror Radius.
Utilizing The Deathslinger
Power Mechanics
While holding the ability button, The Deathslinger will aim his rifle, The Redeemer, and can now fire it by pressing the basic attack button. If The Redeemer's projectile hits it's target, that survivor will become Speared, allowing The Deathslinger to perform a Reel action to quickly force the survivor to get closer to him. The Deathslinger can at any time Break the chain by quickly performing a lunge or quick attack with his weapon, applying no penalty to the recently Speared survivor or The Deathslinger. If a survivor is close enough, breaking the chain by using a lunge or quick attack may even be able to hit them, injuring Healthy survivors and applying Deep Wounds to the recently Speared survivor, or putting already Injured survivors into the Dying State. The Redeemer's projectile is just that, a projectile. This means The Deathslinger will need to aim ahead (how much depends on how close The Deathslinger is to his target) of moving survivors (and or predict their movement) to actually land a shot.


Countering Stuck Survivors
If a survivor is stuck on an object while reeling, try to re-position yourself so they will slide off the object to get closer to you, or, walk towards them without reeling to attempt to hit them (this is faster than moving forward and reeling, and is explained later). Try to make sure your chain is not colliding with walls or other debris so that survivors cannot Break Free at a faster rate. Against Healthy survivors, letting them Break Free while Speared just to injure them may be the best option if you feel you cannot attempt to perform a successful lunge or quick basic attack. It is very important to figure out where you should be standing when you shoot a survivor to try to successfully hit them afterwards.
Countering The Deathslinger
Basic Ability Counterplay
If The Deathslinger is aiming The Redeemer in your direction, you will hear a slight ringing noise. If you become Speared, the Break Free action will appear and slowly increase it's progress meter; once filled, you will no longer be Speared, and can move freely. While Speared and being reeled, try to move to the left or right to attempt to get caught on an object and prevent yourself from getting too close for The Deathslinger to hit you and or put you into the Dying state. If an object, whether it be a wall, obstacle, or even another survivor is between The Redeemer's chain and you while Speared, the Break Free meter will accelerate at a quicker rate; and can stack it's quicker progression if you also move backwards. Successfully finishing the Break Free action will cause The Deathslinger to become temporarily stunned, but the downside is that you will become Injured and suffer from Deep Wounds if you were not already. Finishing the Break Free action cannot put you into the Dying state.


Extending Chase Time
ALWAYS try and keep yourself healed against The Deathslinger. This gives yourself much more chase time and more breathing room to get further away from him. You can gain a huge distance advantage by successfully completing the Break Free action since it will stun him, give you a huge movement speed boost, and he will need to reload. Even though you may think getting the generators done without healing is a good idea since healing feels like wasting time, imagine The Deathslinger as a nurse without mobility. Do not loop him, but rather drop pallets early to create zones to better distance yourself from The Deathslinger, and always try to predict where he will attempt to shoot you. Keep yourself in areas with a lot of debris to utilize as cover against The Deathslinger and make it harder for him to successfully shoot you. Due to The Deathslinger's slower movement speed, it will take a lot of time to catch up to you, as well as just patrol.


Reload Punish
The Redeemer must be reloaded after firing a single shot if The Deathslinger wants to fire another shot, regardless of if the projectile fired from The Redeemer hits it's target or not. While reloading, The Deathslinger moves much slower, and cannot perform any action other than moving or turning until the reload animation finishes. The Redeemer's projectile has a maximum range of 18 meters, so staying outside of this range will prevent The Deathslinger from hitting you with it. Try to keep yourself on the move rather than loop The Deathslinger. Taking advantage of his slower movement speed and limited range allows you to gain a lot of distance if he misses just a single shot.


Keeping A Keen Eye
Look for tiny gaps in obstacles. The Deathslinger may be able to shoot through them to Spear you. Consider these small gaps as good areas to bait The Deathslinger to shoot, since most of these gaps must be shot on prediction, and give yourself time to run further away while he is reloading.
Advanced Mechanics
Reeling or Walking?

While reeling in a Speared survivor, The Deathslinger moves at a slower rate. Sometimes, it is a better option to just walk at survivors if they are Speared and caught on something, since they cannot interact with any pallets, windows, generators, or totems. Moving around a loop while a survivor is Speared at just the right angle will allow you to lunge at them and hit them before the Break Free action is finished, preventing you from becoming stunned and potentially putting the recently Speared survivor into the Dying state. This tactic can be EXTREMELY viable due to the use of Radius Abuse, which is explained below. Keep in mind that Reeling survivors towards you is a much quicker method to get them closer to you as long as they are not caught on anything. Try to learn when and where to Reel or walk. Sometimes it is best to use a combination of both!


Radius Abuse

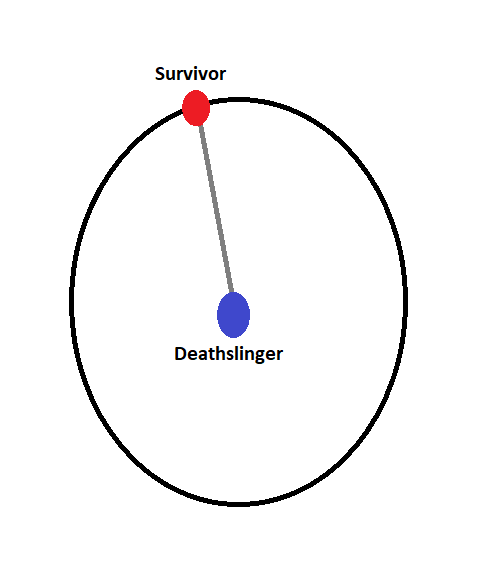
While a survivor is Speared, they can attempt to move to the left or right in a radius around the Deathslinger, which gets smaller depending on how much closer the Deathslinger is to the Speared survivor. This can be taken advantage of by The Deathslinger to better reel survivors. If The Deathslinger is moving backwards while reeling a survivor, the Speared survivor will appear to move quicker towards The Deathslinger, but in reality, they are always a set radius around him that is getting smaller depending on how close the Speared survivor is getting. While moving backwards as The Deathslinger, Speared survivors are given less time to attempt to get caught on objects, and survivors attempting to wedge themselves between The Deathslinger and the Speared survivor can no longer do so since the Speared survivor is moving too quickly away from them.


The Redeemer's Projectile

The Deathslinger's projectile is very small. This allows the projectile to hit survivors through tiny gaps that killers like The Huntress cannot. As The Deathslinger, utilizing these small gaps can grant you an opening to use the mechanics mentioned previously and allow you to catch survivors in areas that other killers cannot. A good example of small gaps that can be utilized are inside the killer shack, usually present on all outdoor maps.


Survivor Collision Boxes

The collision box of survivors is a capsule that is slightly taller than their head height. With good knowledge of collision boxes, you can get hits that look like they should not have landed. Female survivors also have the same size collision box as male survivors, despite having a much smaller frame. Most of these collision box tricks cannot be used if the survivor is crouching.


Quick Scoping

You can avoid giving survivors an audio indicator, and or "throw off" their reaction time by quickly aiming The Redeemer and then quickly firing it as soon as possible, but this can take a lot of practice to make consistent precise shots.
Tips and Tricks
- Unrelenting is a great perk to use on The Deathslinger since it reduces the cooldown of missed basic attacks, which must be used to Break the chain without penalties like being stunned. Using Unrelenting may even allow you to get just enough distance after Breaking the chain just to catch up and hit a recently Speared survivor.

- Speared survivors touching a window can be hit by a basic attack. Be careful, as the survivor must be close to the center of the window or the basic attack will miss.

- The Deathslinger's best addon combination is Warden's Keys and Prison Chain, as it allows The Deathslinger to quickly get another shot in, have less penalty for missed attacks, and or allows him to utilize the advanced mechanics mentioned previously in areas where he otherwise could not.

- Monitor and Abuse will cause The Deathslinger to have a shorter terror radius than the firing distance of The Redeemer. This is a great perk to catch survivors off-guard when used with Quick Scoping.

- The Deathslinger can reel survivors off of higher places (as long as the survivor doesn't get caught on anything) and bring them down towards him.

- The Redeemer can be used to catch survivors who just activated their Lithe or Sprint Burst perks to cancel their effects and instantly cause exhaustion.

- Any perks that affect basic attacks will also affect The Deathslinger's Break attacks. Try Surge, Unrelenting, Make Your Choice, No One Escapes Death, or Save The Best For Last, for instance.

- When "Yukari The Alpaca" plays The Deathslinger, they usually run Pop Goes The Weasel, Save The Best For Last, Unrelenting, and Nurse's Calling.

- Speared Survivors can be hit by a Basic Attack or Break Attack over certain short and thin obstacles when Reeled extremely close to them, such as Haddonfield's picket fences, Yamaoka's thin and short fence walls, and Fractured Cow Shed's indoor bar fences. Keep in mind that this does not seem to work at all areas where it may appear to.
In-Depth Base Ability Stats
Below is a list of base timings for all of Deathslinger's mechanics. Some of these are rough estimates.

(Confirmed) Reload Time: 2.75 seconds.

(Confirmed) Deathslinger Movement Speed While Survivor Speared: 3.3 meters every second.

(Confirmed) Break Free Charges Required: 100 charges.

(Confirmed) Break Free Default Depletion Rate: Adds 2.5 charges every second.

(Confirmed) Break Free Through Obstacle Additive: Adds additional 20 charges every second.

(Confirmed) Break Free With Backwards Movement Additive: Adds additional 15 charges every second.

(Confirmed) Deathslinger's Break Free Stun Duration: 4 seconds.

(Confirmed) Missed Projectile Cooldown Time: 1.5 seconds.

(Confirmed) Max Projectile Range: 18 meters.

(Confirmed) Projectile Speed: 40 meters every second.

(Confirmed) Reloading Movement Speed: 2.64 meters every second.

(Confirmed) ADS Time: 0.15 seconds.

(Confirmed) ADS Movement Speed: 3.3 meters every second.

(Confirmed) Terror Radius Size: 24 meters.

(Confirmed) Movement Speed: 4.4 meters every second.

(Confirmed) Killer Height: Tall.

(Confirmed) Can Aiming Audio Cue Be Heard Through Walls: No.

(Estimated) Reeling Speed: 2.6 meters every second.

(Estimated) Delay Before Aiming Audio Cue: 0.5 seconds.

(Estimated) Maximum Angle Considered Aiming At Survivor: 20 degrees.
In-Depth Addons
All of the addon statistics listed have been taken from the "Official Dead By Daylight Gamepedia" webpage.


(Common) Spit Polish Rag - Reduces missed projectile cooldown time by 0.25 seconds. Stacks.

(Common) Snake Oil - Increases reeling speeds by 10 percent. Stacks.

(Common) Rickety Chain - Increases base charge depletion rate by 5 charges every second. Grants 50 percent bonus Bloodpoints for Speared Score Events. Stacks.

(Common) Modified Ammo Belt - Reduces reload time by 0.25 seconds.

(Uncommon) Rusted Spike - Hitting a recently Speared survivor with a basic attack will inflict the Mangled status effect onto them for 60 seconds. Does not stack.

(Uncommon) Poison Oak Leaves - Increases mending time by 1.5 seconds. Stacks.

(Uncommon) Marshal's Badge - Reduces The Deathslinger's Terror Radius by 4 meters while aiming down The Redeemer's sights. Reduces The Deathslinger's movement speed by 5 percent while aiming down The Redeemer's sights. Stacks.

(Uncommon) Jaw Smasher - Increases The Deathslinger's movement speed by 5 percent while aiming down The Redeemer's sights. Stacks.

(Uncommon) Chewing Tobacco - Reduces The Deathslinger's stun time by 0.5 seconds when a survivor successfully completes the Break Free action. Stacks.

(Rare) Warden's Keys - Reduces reload time by 0.5 seconds. Stacks.

(Rare) Wanted Poster - Increases The Deathslinger's movement speed by 10 percent while aiming down The Redeemer's sights. Stacks.

(Rare) Tin Oil Can - Reduces missed projectile cooldown time by 0.5 seconds. Stacks.

(Rare) Honey Locust Thorns - Survivors who finish the Break Free action will be inflicted with the Mangled status effect for 60 seconds. Does not stack.

(Rare) Bayshore's Gold Tooth - Increases reeling speeds by 20 percent. Stacks.

(Very Rare) Prison Chain - Adds 10 charges to the default Break Free action. Stacks.

(Very Rare) Gold Creek Whiskey - Reduces The Deathslinger's Terror Radius by 8 meters while aiming down The Redeemer's sights. Reduces The Deathslinger's movement speed by 10 percent while aiming down The Redeemer's sights. Stacks.

(Very Rare) Bayshore's Cigar - Reduces The Deathslinger's stun time by 1 second when a survivor successfully completes the Break Free action. Stacks.

(Very Rare) Barbed Wire - Increases mending time by 3.5 seconds. Stacks.

(Ultra Rare) Iridescent Coin - Survivors that are hit by The Redeemer's projectile from at least 15 meters away are inflicted with the Exposed Status Effect. This effect will remain until a successful or unsuccessful Break attack is performed.

(Ultra Rare) Hellshire Iron - While a survivor is Speared, the auras of all other survivors are revealed to The Deathslinger as long as they are within his Terror Radius.
26 Comments
Gallow  [author] 8 Jun, 2020 @ 8:27am 
We'll probably try to go more in-depth on counters for deathslinger since apparently people think looping him is the way to go. (Spoilers, it isn't)
Yukari The Alpaca  [author] 8 Jun, 2020 @ 8:09am 
@GoodLuckG Guessing is similar to predicting. You are not going to be 100 percent sure where he is aiming, you just have to predict his aiming path. Try changing up your movement if he likes to quickscope, or, if he prefers to aim, try and bait his shot. Don't forget to also pay attention to your running path. Try to stick behind solid walls and debris to make it harder to hit you. If you do nothing but loop, chances are you are going to die. Different killers require different playstyles, and Deathslinger is no exception. Do not try to loop him, but rather take advantage of his limited mobility and range and just keep running.
niixx 8 Jun, 2020 @ 3:35am 
I can go against a killer like a good billy or good huntress and get downed to being genuinely outplayed or outpositioned, look at my own gameplay, and see what I could of done better. You can't say the same with slinger when it's a near guess at loops. Also dedicated servers and killers having high latency can make even 15+ meters impossible to react. Juking his hook feels like absolute guessing, not predicting. Also, good slingers know how to abuse quickscopes to the point where you can't even predict his hook. At loops it is LITERALLY impossible to predict a shot, it is pure guessing, with a 99% chance getting hooked by a good slinger.
Dexy 7 Jun, 2020 @ 6:04pm 
There's many reasons why I can't agree with it being good, mostly with the reasons I previously mentioned and the factor of opportunity cost, but it's just my feedback after a lot of experience on him. Do with it what you will
Gallow  [author] 7 Jun, 2020 @ 11:12am 
Unrelenting allows Deathslinger to benefit from shots he would otherwise not be able to get a good pay-off for hitting.

Multiple times I have seen the use of Unrelenting in allowing me to down a survivor when I could not afford to keep them on the chain any longer, it's an amazing perk for deathslinger that allows him to take a wider variety of shots with a higher chance of a pay-off because he can catch up quicker.

He's easily the only killer who can make practical and consistent use of the perk, even just hitting survivor to keep them in place is a good idea with Unrelenting because you're gaining distance on them and a setup for a more lethal shot.
Dexy 7 Jun, 2020 @ 6:57am 
Very good guide overall. I've put a lot of time into playing Deathslinger, so I have a little bit of feedback:
- Unrelenting, just like on any other killer, is a waste of a perk slot. While he is the killer that has the most use for it, there's still no reason to have this perk on. If you are forced to take a shot that you cannot follow up with an M1 while they are healthy, it's better to just let the chain break and take the stun. If they're injured and you can't follow up, then you shouldn't have taken the shot and it's good to learn not to take those shots. Unrelenting just makes your mistakes slightly less punishing, and it's not good to make your build around your mistakes.
- I'm All Ears is amazing on Deathslinger. You can bait survivors to run past a window after they vault it, and then shoot them once they are within line of sight.
Chlorine 7 Jun, 2020 @ 1:37am 
I can't believe i'm seeing this, respect for the time and effort put in but god damn, please don't tell people how to be more aids with an aids killer.
Almalexia 6 Jun, 2020 @ 6:39pm 
ngl im not a big fan of slingy boy but i respect the effort put into this guide
Yukari The Alpaca  [author] 6 Jun, 2020 @ 8:10am 
@DornaTeFaceBine Press E when about to die.
Yukari The Alpaca  [author] 6 Jun, 2020 @ 8:10am 
@Ohcid :(