Half-Life 2

Half-Life 2

1,017 ratings
100% Achievement Guide: Half Life 2
By Cynic 0055
This is a comprehensive 100% Achievement guide detailing a step-by-step walkthrough to take you from 0 all the way to 100%. If you are looking for a particular Achievement or Collectible, use Ctrl+F & type it into the search bar for more direct help.

I run support & debug help on all my guides. If you have any questions, problems, or find errors in the guide itself, do not hesitate to leave me a comment & I will get back to you as soon as I am able to. Happy Hunting!
18
70
5
2
6
4
2
4
4
4
2
2
3
2
   
Award
Favorite
Favorited
Unfavorite
Introduction:

Achievement Breakdown: (33)
Story Related: (14)
Secondary Objectives: (9)
Collectibles: (1)
Slay: (9)

The Achievement breakdowns for Episodes 1 & 2 can be found in the Sequences they are covered in.

Important Disclaimer!:

Half Life 2 has now been merged with Half Life 2 Episodes 1 & 2. If you owned the separate copies of the Episodes, they will no longer be visible in your Library however they can still be found in the Tools tab of it; toggle the Games drop down bar & you can access the Tools tab where you can find the Half Life 2 Episodes. Your Achievement progress for those games will remain intact as well & can still be earned separately.

Note that if you have already 100%ed the two Episodes & still have the Cloud Saves, you will automatically unlock all Achievements simply by starting up Half Life 2 & idling in the Main Menu for a few seconds.

We can earn all Achievements in Half Life 2 within a single playthrough. There are easily missed Collectibles called Lambda Caches we will be searching for along with a couple Chapter specific Achievements. I recommend making frequent Saves, as since these games are very linear, it is quite easy to accidentally progress too far forwards & be unable to backtrack. Fortunately, if you do miss anything, you can use Chapter select to replay them.

For those interested, here is an organized list of all the Achievements/Secret Achievements. This is how I derive my Achievement Breakdowns & the first reference I create before I begin my 100% journeys.
https://steamhost.cn/steamcommunity_com/sharedfiles/filedetails/?id=3378873640

This guide contains major spoilers*
Sequence 1: Smell the Ashes
1. Half Life 2: Point Insertion, A Red Letter Day, Route Kanal
2. Lambda Caches: 6/45
3. Achievements: 6/69
-----------------------------------------------------------------------------------------------------

We can obtain our first 33/69 Achievements in the base Half Life 2 campaign. There are no Achievements associated with Difficulty, so feel free to play on whichever you prefer…

Chapter #1 – Point Insertion:
When the game begins, step off the train & begin making your way through City 17 processing; everything is linear so far so just play along.


Achievement #1 – Defiant: Hit the trash can cop with the can.
When we escape an interrogation by jumping out of a window, take some stairs up to re-enter the processing building. As we approach a gate, a Combine Soldier will approach a garbage can & knock a can off of it onto the ground. Make a Save here!

For this Achievement, pick up the can & throw it at the Combine Soldier.


Achievement #2 – Submissive: Put the can in the trash.
Reload your Save, this time drop the can in the trash for the alternative Achievement. If you choose to hit the Combine Soldier, then place the can into the trash afterwards, the Achievement will not unlock.


Achievement #3 – Malcontent: Escape the apartment block raid.
Story Related. Now all we have left to do is complete this Chapter; there are no other Achievements to earn on it. Enter into an apartment building & escape the Combine Soldiers performing a raid on it by using the rooftops to get away…

Chapter #2 – A Red Letter Day:

Lambda Cache #1: After we are rescued by Alyx, Chapter #2 will begin as we follow her to the hideout. To enter the hideout, Alyx will open a secret door to a vending machine that has an orange Lambda symbol painted on it; these mark Lambda Caches.

For the Lambda Collector Achievement, we need to locate all 45 Lambda Caches in the game; typically, they are secret locations that contain Health & Ammo for us. Our first Lambda Cache is unmissable.


Achievement #4 – What Cat?: Break the mini-teleporter in Kleiner’s Lab.
Enter into Dr. Kleiner’s Lab & speak with the group to eventually be reunited with the classic HEV Suit. Afterwards, everyone will enter into a different room; before we follow them, there is something we must do first.

At the back of the lab, near the door we entered it through, we can see a weird mechanism that has a potted cactus on it. Push the button on the device & it will teleport over to an adjacent pad. To unlock this Achievement, send the cactus (or any other object) back & forth through the teleporter; on the 11th time, the teleporter will explode & we will unlock this Achievement.


Achievement #5 – Trusty Hardware: Get the Crowbar.
Story Related. Follow the group into the secret room & the door will close behind us. After we are teleported further into City 17, we will need to get away from some City Scanners taking pictures of us. As we run, we will be unable to progress further due to wooden blanks barring our way.

Head back the way you came, & Barney will show up to drop an old friend off for us…

Chapter #3 – Route Kanal:
With the Crowbar in hand, we will drop down into a trainyard & become under fire from the Combine. Escape to the far end of the yard & pass through the building ahead to enter Chapter #3.

Lambda Cache #2: Get back up to the City, & continue to evade the Combine. Traverse across a moving train to get to the opposite side of the tracks, & climb up a ladder to continue on. Enter inside a small building & look over to the leftmost wall to see a Lambda symbol painted on it; the Lambda Cache is on the ground right beneath it where the flooring has been torn up.

Lambda Cache #3: Leave this building through the back, & hop over a fence. You will then have to make your way through a vent that has a Lambda symbol painted on it; the Lambda Cache will be found directly in your way inside & cannot be missed.

Lambda Cache #4: Continue on with your escape, & fight your way through the canal we drop down into. Take over a Mounted Machine Gun to fight off a Combine assault, & carry along the top of the walkway to our right. Take some stairs down inside a large concrete pipe & look along the wall to the left as soon as we enter it to see a Lambda symbol next to a broken red car. Climb over the car to find the Cache tucked in behind it.


Achievement #6 – Barnacle Bowling: Kill 5 Barnacles with 1 Barrel.
Continue to fight through the canal & blow up a wooden bridge in our way using Explosive Barrels. Head up a short slope underneath an overpass to get back underground & you will see two Barnacles ahead of you. Slide down towards the Barnacles & you’ll probably have to kill one or both. Look around the corner from them, & you will see some Explosive Barrels along with a line of 14 Barnacles ahead of you. Make a Save here!

Grab one of the Explosive Barrels & roll down towards the center of the Barnacles so one of them grabs it. As it is being lifted into the air, shoot it when it is close to the top & try to kill at least 5 of the 14 Barnacles with the explosion.

Lambda Cache #5: Continue along through the canal & we will eventually be chased by a Hunter-Chopper. Pass through a blue door to escape it, & head down the stairs where we can see a Lambda symbol painted on the wall below us. There is a ladder just to the right of the grate at the other end; climb down to loot the Lambda Cache.

Lambda Cache #6: Continue to evade the Hunter-Chopper & we will meet up with a Railroad Resistance member. Defeat the Man-Hacks that will ambush us through the corridors, swim through a tunnel where the spinning turbine is, & you will reach a large metal pipe with steam coming out of it that we need to traverse.

To progress, you will have to break through some wooden boards on your right near a Lambda symbol. Drop down, but do not drop down into the water nearby & instead crawl back around underneath the pipe to find a Lambda Cache beside a corpse.
Sequence 2: High Speed Pursuit
1. Half Life 2: Route Kanal, Water Hazard
2. Lambda Caches: 17/45
3. Achievements: 8/69
-----------------------------------------------------------------------------------------------------

Chapter #3 – Route Kanal:

Lambda Cache #7: Make your way further through the drainage rooms & you will drop into a room full of Explosive Barrels & Man-Hacks. Find a way to fill the room with water to continue fighting onwards. Eventually we will climb up a ladder & see a Lambda symbol on your left at the top. Make a Save at the top of the ladder!

Carefully follow the planks along without falling, & head to the far end across them to find a second Lambda symbol; the Lambda Cache is just on the other side. If you fall prematurely, you will be unable to get back up to the Cache!

Lambda Cache #8: Drop down now off the walkway, & we will enter a sewer tunnel full of toxic waste. As soon as we enter it, walk up the planks immediately off your left & use the rusted pipes to get across to the opposite end where a Lambda symbol is painted; the Lambda Cache is up on a ledge beside a corpse.


Achievement #7 – Anchor’s Aweigh: Get the Air Boat.
Story Related. Fight through the rest of the Chapter & link up with another group of Resistance members after evading the Combine’s “Headcrab Ordinance”. Here we will be given the Air Boat & enter into the next Chapter…

You will come across the Air Boat at the end of this Chapter.

Chapter #4 – Water Hazard:
Once onboard the Air Board, drive it along & open up a sluice gate to be able to continue on down the canal & begin Chapter #4.

Lambda Cache #9: Shortly after we take that big drop in the canal at the start of the Chapter, we will drive the Air Boat into an area that has a Lambda symbol painted on the wall to our right in the open sunshine. Dismount the Air Boat & we can spot a ladder heading up across from the symbol. Climb up & we will find a Lambda Cache on a broken piece of the metal walkway.

Lambda Cache #10: Take the Air Boat out of the canal, & we will finally be outside of City 17 where we can see a red barn with a crane on top of it. Drive over towards it & carefully navigate all the way up to the upper loft where the crane controls are. Dislodge a Barrel that is blocking the release mechanism, & the crane will drop a large container of items that happens to be our Lambda Cache.

Lambda Cache #11: Return to the Air Boat & now take it further down the canal away from the city. Complete a short puzzle to make a ramp for the Air Boat to continue, & a Combine Dropship will fly over us while another can be seen deploying reinforcements.

Drive over to where the troops are (after killing them) & we can see a line of three drainage pipes stuck into the right wall. One of the three will have its grate removed & a Lambda symbol beside it. Exit the Air Boat & use the nearby Barrel to climb into the open pipe. The Lambda Cache can be found at the back end of the drainage pipe after passing through a flooded section.

Lambda Cache #12: Return to the Air Boat & continue onwards evading the Combine assault. Exit the Air Boat to open up another canal sluice blocking our way by invading a Combine outpost. With the sluice open, keep driving forward through the canal & a Combine Rocket Artillery will begin bombarding us.

Ignore this one, until you encounter a second further down the canal. Drive straight towards the wall below the APC & get underneath it where we can find a hole in the iron bars blocking our way. Crawl through them & we can find a Lambda Cache in the back left corner.

Lambda Cache #13: Escape the Rocket Artillery & continue your Combine evasion through the canal. Drive past a third Rocket Artillery, & you will head into an underpass area of the waterway. Carry on through it until the tunnel opens up, making you take a right; we can see a Lambda symbol painted on a pillar right in front of us as we round the corner.

Exit the Air Boat & you can see the Lambda Cache above us inside a small pulley. Across from it, is a pulley on the ground containing cinderblocks. Remove them & it will rise up lowering the Cache down to you.

Lambda Cache #14: When we exit the underpass, the sluice doors of Gate 5 will close in front of us & we will need to get them open. Do just that, & use the Mounted Machine Guns in the control tower to drive off the Hunter-Chopper harassing us. Once this is done, return to the Air Boat & continue on & a different Hunter-Chopper will come after us.

As we drive down the canal, we will take a right & see a bridge with a stalled train on it. Park underneath this bridge, exit the Air Boat, & quickly rush over to the left past the metal supports to find a Lambda Cache hidden in the darkness.

Lambda Cache #15: Evade the Hunter-Chopper through the canal & we will eventually pass through a segmented set of concrete pipes, that will open up into a small square room before returning to piping that we can see daylight through. Before you leave this room, look up to your left from where we entered & you can see a Lambda symbol painted above a wooden platform; crash the Air Boat into it & loot the Lambda Cache that falls.

Lambda Cache #16: Keep evading the Hunter-Chopper down the canal, & you will eventually come to a stretch where the canal has very narrow/slanted sides. In the distance ahead of us you can see two red/white smokestacks; off your left will be a chain fence leading to a red building. With speed, drive up the left bank towards the red building till you see a patch of green graffiti. Jump out of the Air Boat, & there will be a path leading to the Lambda Cache; you really need to drive fast to get up here otherwise you’ll stall out & just get shot by the Hunter-Chopper...

Lambda Cache #17: Continue on down the canal & when we round the corner to the left, we will see two bridges with Barnacles hanging from their undersides. Before reaching the first bridge, look off to your left to see two open spaces in the canal walls. Enter into the second one, & we can find a Lambda Cache at the far back end of it near a bedroll.


Achievement #8 – Heavy Weapons: Get the Air Boat’s mounted gun.
Story Related. Take the Air Boat all the way down the canal until you get to the Resistance Checkpoint. After discussing strategy with one of the operatives, you will return to the Air Boat to find they have installed a mounted gun onto it.\
Sequence 3: A Friendly Reuniuon
1. Half Life 2: Water Hazard, Black Mesa East, We Don’t Go to Ravenholm
2. Lambda Caches: 20/45
3. Achievements: 13/69
-----------------------------------------------------------------------------------------------------

Chapter #4 – Water Hazard:

Lambda Cache #18: Leave the Resistance Checkpoint, scare off the Hunter-Chopper, & the Combine will close another set of sluices on us which we can just skirt around in the Air Boat. Fight your way further down the canal & a Combine Dropship will fly overhead with a Rocket Artillery.

Shortly after we see this, we will come across two bridges with Barnacles underneath them. A little ways past them, we will reach a junction in the canal that has a left & right path. Take the path to the right & fight through some Combine along with some Headcrab Zombies at the far back. Exit the Air Boat, & we can climb up a nearby ladder to enter a makeshift shelter where our Lambda Cache will be.


Achievement #9 – Revenge!: Destroy the Hunter-Chopper in Half Life 2.
Story Related. Progress further through the canal until we enter a large outdoor reservoir & an alarm will sound heralding the return of the pestering Hunter-Chopper. Unload your new gun turret a few times into it, & destroy it to unlock the Achievement.


Achievement #10 – Vorticough: Discover the hidden singing Vortigaunt cave in Chapter #4 – Water Hazard.
After destroying the Hunter-Chopper & opening the next sluice, you are supposed to drive up a broken wooden walkway to get up to the area above us. Before we do this however, drive past it to the left & you will see a concrete wall with two pipe drains in it. One of these drains will have its grate jarred open. Back the Air Boat up to it & jump on top up over your motor fan to get up inside it; we will keep sliding off of the Air Boat which makes this jump really tricky.

Once we are in, make a Save; there is unavoidable toxic waste filling the tunnel & you probably won’t be able to make it back out alive! Sprint as fast as you can down the tunnel & take a left at the end to enter a secret cave. In the back of the cave will be a campfire with a Vortigaunt beside it; approaching the Vortigaunt should unlock the Achievement.

For some, the Achievement may be delayed in unlocking. If it doesn’t, wait around to let the Vortigaunt finish its song, loot the Crates at the back, & hang out a bit; whenever it unlocks for you, just be sure to check your Achievements before leaving the cave to make sure it unlocked…

Chapter #5 – Black Mesa East:
Return back to the Air Boat & get the waterway gates open so we can finally leave the canal behind us to enter Black Mesa East…

Lambda Cache #19: There is only one Lambda Cache in this Chapter & it cannot be missed. After we drop down from the hydro dam, we will need to climb up a ladder marked with a Lambda symbol to reach Eli’s Lab; this counts as our Lambda Cache…


Achievement #11 – Zero-Point Energy: Get the Gravity Gun.
Story Related. Get to Eli’s Lab & catch up with an old friend. Hang out in the lab for a bit, & we will eventually head outside to spend some time with Alyx where we will get the Gravity Gun to mess around with.


Achievement #12 – Blast From the Past: Find the HEV suit charger faceplate in Eli’s scrapyard.
As soon as we get the Gravity Gun, look to the wall directly to the right of where you took the gun from & we can climb up Crates onto some old terminals. From here jump up & down to look through the railing & we can see a bright yellow metal faceplate from an old HEV Charging Station found in Black Mesa. Use the Gravity Gun to pick it up, & we will unlock the Achievement.


Achievement #13 – Two Points: Use Dog’s ball to make a basket in Eli’s Scrapyard.
Once we have the Gravity Gun, we will enter further into the Scrapyard where we will meet Dog. Dog will begin throwing Crates at us that we will want to catch with the Gravity Gun & carefully put down beside us. After we have caught three, Dog will go & grab his Ball which is essentially a disarmed Roller Mine. Once the Dog’s Ball is out, make a Save as sometimes if you wait around too long the Chapter will progress & we will be forced to leave the Scrapyard.

For this Achievement, we need to use the Gravity Gun to get Dog’s Ball into the hoop. While you can most certainly do this the old fashioned way with trial & error getting your aim down, we can also cheat this as well by stacking up Crates to climb up on & simply dropping Dog’s Ball through the hoop.

Dog’s Ball: In the next Chapter, to unlock the Zombie Chopper Achievement, we need to complete it using only the Gravity Gun. To kill enemies, we will have to shoot breakable objects at them that are easy to lose or destroy. Dog’s Ball is indestructible & can be shot infinitely without it breaking. The only thing that can destroy Dog’s Ball is fire & explosives so keep that in mind…

After we make our basket, & the Combine have discovered our position, be sure to use the Gravity Gun to pack Dog’s Ball along with us!

Chapter #6 – We Don’t Go To Ravenholm...:
Make a Save as soon as you see we have begun this Chapter; once again, for the Zombie Chopper Achievement, we cannot use any of our Weapons to beat it except for the Gravity Gun. We cannot even use the Crowbar! As you progress through the Chapter, try keeping Dog’s Ball, cinder blocks, saw blades, or any other heavy projectile with you at all times in case we are attacked by an enemy.

If you lose Dog’s Ball (which is very easy to do) don’t stress too hard about it; there are plenty of objects & Explosive Barrels we can use to keep us alive…

Lambda Cache #20: Progress through Ravenholm, & we will shortly encounter a survivor who will help us. To continue on, we will have to disable an electrified fence. Put out the flames below where we saw the survivor, & we can enter inside a room with two green generators above us. Head up to them, & climb onto the first generator to see a vent in the wall. Pass through the vent, & it will lead us back outside where we will drop down onto a Lambda Cache.
Sequence 4: Tread Lightly
1. Half Life 2: We Don’t Go to Ravenholm, Highway 17
2. Combine Gunship Kills: 1/6
3. Lambda Caches: 25/45
4. Achievements: 16/69
-----------------------------------------------------------------------------------------------------

Chapter #6 – We Don’t Go To Ravenholm...:

Lambda Cache #21: Turn off the electrified fence & after encountering the survivor once again, we will be able to access a new area of Ravenholm with two manual car-drop traps. Approach the second car-drop trap, activate it & jump onto it as the car is slowly raised up. From up here, there will be wooden planks leading onwards; ignore these. Instead, look below us along the wall to see a Lambda symbol painted on a wooden wall blocking off a dark area. Carefully leap over the wall into the darkness, & we can find a Lambda Cache in behind a strange metal structure.

Lambda Cache #22: Take the car-drop trap back up to the walkway again, & we will see the survivor again who will introduce themselves as Father Grigori. Progress through the next building & we will drop down into a street full of Headcrab Zombies. Use a ladder to get up onto some steel girders to continue.

The path we are supposed to take will be the wooden walkways leading to a building off our right. Ignore that for now & walk a little further along the steel girders to take a path off our left into a different building. While there is loot immediately visible where a Lambda symbol is, the actual Lambda Cache is further along in the attic space in the far right corner beside a second symbol.

Escaping Ravenholm: We no longer have to worry about Lambda Caches in Ravenholm & can now focus on simply getting out of here (still only using our Gravity Gun). Link up with Father Grigori & he will toss us the Shotgun (that we cannot use, unfortunately). A lot of the time, we will fight Fast Zombies on rooftops which is the worst combination. Whenever you can, try fighting indoors as it is much easier to keep track of the current objects you’re using as Weapons; this includes when you have to wait for the elevator as well as the gondola cart. If indoors is not an option, then down in the street is just as good…

When you start encountering the Poison Zombies, if possible, just run away from them as they are pretty challenging with only the Gravity Gun.


Achievement #14 – Hallowed Ground: Escort Grigori safely through the church cemetery.
Story Related. After you join forces with Father Grigori after crossing the gondola, you two will head through the cemetery maze battling zombies the whole way. Unlike us, Father Grigori is fully able to kill Zombies with his gun; let him do a lot of the heavy lifting for us.

Eventually, he will lift a fence gate up so you can crawl through. Make it under to the other side & the Achievement will unlock.


Achievement #15 – Zombie Chopper: Play through Ravenholm using only the Gravity Gun.
Father Grigori will now leave us, & we will be on our own for the final stretch of Ravenholm. Fortunately, we don’t have far to go. Drop down into the Headcrab infested mine, & ignore the Barnacles in the flooded section as they mean certain death to us & swim further underwater to safety. When we reach the far rail tunnel, activate the bladed rail cart & follow it through the horde of Zombies to reach the surface.

If you successfully have only been using the Gravity Gun this entire time in Ravenholm & have never fired a single shot nor used Grenades or the Crowbar, then this Achievement will unlock after you step outside the mine back into City 17.

Lambda Cache #23: As soon as you exit the mine & are staring at a train car in City 17, turn around & look up to see a Lambda symbol pointed just above the exit. Climb up the stack of crates on your left & jump up onto the ledge; the Lambda Cache is just under a vent duct.

Chapter #7 – Highway 17:
Now we are finally safe to use all of our Weapons once again. Evade the Combine Snipers, & follow the railway tracks along until you reach another group of Resistance Fighters. Speak with Alyx over the radio about where to go next, & we will enter into Chapter #7…

Lambda Cache #24: Leave the Shorepoint outpost, & we will be given the scout car Buggy to get us to Nova Prospekt “safely”; the Buggy will be dropped by the crane lowering us down & you will have to use the Gravity Gun to flip it over.

Follow the trail along the beach until it takes you up onto a concrete road. Take a jump & a right turn, & you will eventually come to a tunnel where you can see a Lambda symbol painted on a shack to its left. Enter the shack & you can find the Lambda Cache in the center of it.

Lambda Cache #25: Drive through the tunnel back onto the beach & drive up the next hill to find an abandoned house. The door will be locked. To the door’s right is a cellar with a bunch of junk piled on it. Break your way in & climb up the stacked crates to get up to the first floor. Jump across to a side room with a Poison Zombie in it, & we can find the Lambda Cache in the corner.

Combine Gunship #1: Return to the Buggy & continue driving onwards until you reach the next Resistance outpost at New Little Odessa. Speak with Colonel Cubbage, & we will be informed of an impending Combine assault by a Gunship. For the One Man Army Achievement, we need to destroy a total of 6 Combine Gunships throughout the game. Use the RPG we just collected & take it down; Gunships will take 3 direct hits from Rockets before they are destroyed…


Achievement #16 – Where Cubbage Fears To Tread: Defend Little Odessa from the Gunship attack.
Story Related. Destroy the Combine Gunship assaulting New Little Odessa & we will unlock this Achievement. Good job!
Sequence 5: Rough Road
1. Half Life 2: Highway 17, Sandtraps
2. Combine Gunship Kills: 4/6
3. Lambda Caches: 29/45
4. Achievements: 18/69
-----------------------------------------------------------------------------------------------------

Chapter #7 – Highway 17:


Achievement #17 – OSHA Violation: Kill 3 enemies using the crane.
Leave outpost N.L.O. & make your way over to a small shipping depot. To progress, we will need to use a magnetic crane to move the Buggy. Climb up the ladder & enter the crane. Before we carry on, it is a good idea to Save now in case you mess this next part up.

Immediately turn the crane right to face the Northern Petrol warehouse & a garage door will open up & out will come some Combine Soldiers. Use the crane magnet & lift up a large storage container; there is a red one just across from where the soldiers come out of on an isolated landing. Lift the container, then lower it while moving to sweep it into the soldiers; kill all 3 of them while in the crane to unlock the Achievement. This is the only time in the game we can earn this Achievement; if the Combine Soldiers all die, & you do not unlock the Achievement, reload & try again!

Combine Gunship #2: After getting the Buggy past the shipping depot, we will be attacked by another Combine Gunship as we go to cross a bridge. Continue further down the road across the bridge, & we can find a cache of Rockets near a wrecked red semi off the side of the road. Make a Save, & take the Gunship down!

Lambda Cache #26: After destroying the Gunship, clear a path through the roadblock ahead using the Gravity Gun. A short ways down the road from it we can spot a wrecked blue van on the left side of the road; we can find a Lambda Cache inside it.


Achievement #18 – Targeted Advertising: Pin a Soldier to the billboard in Chapter #7 – Highway 17.
Carry on down the road past a blockade of Combine Soldiers & eventually you will see another group of structures across from us that is barred off by a lasered gate at the end of a bridge. As you approach, there will be another car blockade in front of us – this one with a tipped over oil truck in it. Before we go to clear the blockade, head up the small hill to its right & you will find the Crossbow.

Pick it up & look through the scope back at the far end of the bridge to see a Petrol billboard with a Combine Soldier standing directly in front of it as a lookout. Line up your shot, & pin the poor lad to that billboard to unlock the Achievement; this is the only point in the game we can unlock this Achievement…

Lambda Cache #27: Disconnect the Combine APC from the laser field gate in the community. From here, you will see a large gas tank behind a chain link fence off the left of the bridge exit. Drive the Buggy over & jump off it over a bent section of the fence into the enclosure & we can find a Lambda Cache in behind the gas tank.

Lambda Cache #28: Drive through the next tunnel & you will see a Dropship flying away from another small community. Make your way past the first house & chain link fence to the right of the road but stop just before the fence ends. Hop out of the Buggy & cross the road to the left side towards a jagged line of rocks a little bit behind you. Walk around these rocks & you will see a square of wooden fencing where we can find a Lambda Cache inside.

Combine Gunship #3: Drive up to the long bridge ahead, but it will be blocked off by a laser gate. Travel down into the community on foot & head across the bridge underside to disable the forcefield. As soon as we do, another Combine Gunship will arrive to harass us; we can find multiple Rocket caches all along the underside of the bridge to take it down.

Chapter #8 – Sandtraps:
With the laser gate down, cross over the bridge & use all the nitrous you have to get past the oncoming train! Enter into the next tunnel, & we will begin Chapter #8.

Lambda Cache #29: Clear your way through the infested tunnel & carry on a ways down the road until our progress is blocked by a closed gate. As we approach the gate, two Combine Dropships will arrive to send reinforcements that we will need to deal with (they do not count as Gunships we need to destroy).

After the Combine is dealt with, we need to collect two batteries & place them inside the red shack to open the gate. Just across from where the batteries go will be a small bathroom. The Lambda Cache is located just on top of this bathroom roof. If you jump on a table or bring in a barrel or two to stand on, you can use the Gravity Gun to collect the contents of the Cache.

Combine Gunship #4: Continue on down the road now & we will reach the Lighthouse outpost. Stash the Buggy & get prepared to fight off a large scale Combine assault. Kill off the Combine Soldiers & eventually a Gunship will arrive – take it down.

If you need Rockets, we can find some stashed inside the lighthouse’s upper floor.
Sequence 6: Jail Break
1. Half Life 2: Highway 17, Sandtraps, Nova Prospekt
2. Combine Gunship Kills: 6/6
3. Lambda Caches: 33/45
4. Achievements: 22/69
-----------------------------------------------------------------------------------------------------

Chapter #8 – Sandtraps:
Stay Off the Sand!: Leave the outpost through a secret exit, & head along the cliffs till you find two Resistance members. One will shout at you to stay on the rocks! We must do just that for Keep Off the Sand Achievement. We have to make it all the way to the end of this stretch without touching the sand once. If we do, Antlions will attack us & void the Achievement. Make land bridges out of whatever you can find using the Gravity Gun. After making it to solid rock, ferry your bridge parts forward & reuse the pieces as often as possible. Save at the very beginning of this section, & make separate Saves afterwards/Quick Saves to be safe!

Patience is everything. Take your time, & if at any point Antlions spawn, then you have failed & must reload…

Lambda Cache #30: Carefully make your way along until you eventually reach a wooden bridge you will need to counter-balance to get across. Complete the puzzle & from where we get across, look up to your left to see a wind turbine on a rock connected to another off in the distance. Below the closest turbine, will be a tiny white shack that will have a Lambda symbol painted on it.

To reach it, you can either head the long way around heading towards a small red shack using our land bridges or you can use a very long wooden plank on the hill directly across from it before we drop down to bridge the gap. Either way, you will have to climb onto the roof of the ruined red below the white one & use the Gravity Gun to collect the contents of the Lambda Cache.


Achievement #19 – Keep Off the Sand!: Cross the Antlion beach in Chapter #8 – Sandtrap without touching the sand.
With the Lambda Cache collected, all we need to do now is to get through this section of the Chapter without touching the sand. Continue to Save often, & when you drop down into the large sand pit with all the Explosive Barrels, the Achievement should unlock.

If you were successful & did not trigger any Antlion attacks it should work for you, if not, just reload your Save & try again.

Antlion Guard: After successfully passing through the Antlion field, we will drop down into a large sandy arena where an Antlion Guard will emerge. Throw Explosive Barrels at it, Grenades, & even Rockets if you have them to spare to take this thing down. Once it is dead, we can collect the Pheropod Bait.


Achievement #20 – Bug Hunt: Use the Antlions to kill 50 enemies.
After collecting the Pheropod Bait, make your way along the beach to Nova Prospekt. There will be a whole host of Combine Soldiers in our way trying to stop us; if possible, exclusively use the Antlions to kill them. There are more than enough enemies in this section for the Achievement.

Combine Gunship #5: Fight your way to the outer compound to Nova Prospekt with your Antlion compatriots, & we will soon be ambushed by another Gunship.

Fortunately, we can find more Rocket ammo in the area ahead of us when the Gunship engages us. Preserve your Rockets if you can… At the very back of the compound we can find a re-supply crate full of them.

Combine Gunship #6: Immediately after we destroy the previous Gunship, a second one will arrive to attack us. Scavenge around the compound for your Rockets & defeat it.


Achievement #21 – One Man Army: Destroy 6 Gunships in Half Life 2.
If you destroyed the three Gunships in Highway 17 & the three in this Chapter you will unlock this Achievement.

Chapter #9 – Nova Prospekt:
If possible, whenever we get attacked by Man-Hacks, try grabbing them with the Gravity Gun & launching them into Combine Soldiers. For the Hack Attack Achievement we need to kill 5 Combine Soldiers this way…


Achievement #22 – Flushed: Kill an enemy with a toilet.
This can be earned immediately upon entering Nova Prospekt. When the Chapter begins, walk down the cell block & you can find a toilet in the last cell on your left. Grab it with the Gravity Gun & head downstairs. From here, enter the cell just left of the stairs & climb through a hole in the wall. As soon as you enter the hole, a Headcrab will jump out at you. Kill it with the toilet to earn this Achievement.

It is possible to miss with the toilet, & it will break. If this happens, reload your last Save & try again…

Lambda Cache #31: Fight through Nova Prospekt & eventually you will reach cell block A5. Get across to the other side & get up to the next floor where we will have to dispatch two of the Combine Sentry Guns – courtesy of Aperture. Once we are up the stairs, we can see a Lambda symbol painted on the wall near a set of white double doors. Bust the planks off the window & crawl through, to find a Lambda Cache just behind the doors.

Lambda Cache #32: Defeat another Antlion Guard mini-boss & pass into the next cell block area where we can kill some more Combine Soldiers with Man-Hacks. Disable the forcefield for us to continue on, then head up the nearby stairs to clear out the Combine in a checkpoint tower above us. As we approach it, we will encounter a laser trip mine.

Across from it through an open door, we can see a Lambda symbol painted on the wall. Walk over to it & blast the cell door on its left with your Gravity Gun to open it up to find a hidden Lambda Cache.

Lambda Cache #33: Continue to fight through Nova Prospekt past cell blocks B2, B4, & eventually you will enter a large laundry room in the prison. Clear out the Combine Soldiers & then head over to the right side of the room.

There are two passages blocked by a small rail. Hop over either of them & in the back, head to a small side room to find a Lambda Cache near a Health Station; the side room with blood leading to it will have a Poison Zombie in it so be careful!
Sequence 7: The Freeman!
1. Half Life 2: Entanglement, Anti-Citizen One
2. Lambda Caches: 40/45
3. Achievements: 27/69
-----------------------------------------------------------------------------------------------------

Chapter #10 – Entanglement:
Drop down into cell block C2, & we will need to fight off yet another Antlion Guard; fortunately the room will be full of Explosive Barrels we can use against it. Escape the building, then quickly climb up a ledge before some “crawling walls” completely squish us like a trash compactor to begin the next Chapter.

Lambda Cache #34: Link up with Alyx, & help her contact her father further into Nova Prospekt. Alyx will take over a control console, & begin opening prison gates for us to progress further into Nova Prospekt. When she opens up the first gate for us, we can find a vending machine off our left that has a Lambda symbol painted above it. Use the Gravity Gun to pull the items off the top of the vending machine to loot the Lambda Cache.


Achievement #23 – Hack Attack!: Kill 5 enemies with a Man-Hack.
You probably wouldn’t have gotten this Achievement during the previous Chapter, but ideally you will have gotten 1 or 2 Man-Hack kills by now. There will be two sections during this Chapter where we will need to hold out & defend against Combine Soldiers where Man-Hacks will also be present.

Any time you see one, grab it with the Gravity Gun & launch it into a Combine Soldier to kill them. The Achievement will unlock after killing your fifth one this way.


Achievement #24 – Warden Freeman: Survive the second Turret standoff in Nova Prospekt.
Story Related. Pretty self explanatory. After the first area where you defend yourself with Turrets, you will come across another room shortly afterwards where we must do the same. Survive the waves, & the Achievement will unlock when Alyx arrives once again.

Chapter #11 – Anti-Citizen One:
Reunite with Alyx once again & locate the captured Dr. Mossman. We will then have to defend Alyx as she re-aligns the Combine portal prototype from waves of Combine Soldiers. Escape with her through the portal, & we will enter the next Chapter…

Lambda Cache #35: As soon as the Chapter begins, we will drop down an elevator shaft & head outside. Off your right will be a large upturned storage crate with two green dumpsters beside it. Jump on the dumpsters & using a nearby Crate get on top of the ledge above them where we can find a Lambda Cache in the far right corner.


Achievement #25 – Follow Freeman: Gain command of a squad of rebels in the uprising.
As you make your way through the Chapter, we will become separated from Dog & have to press onwards on our own. Soon you will come across your first Resistance fighter. Check in Options – Keyboard what your Send/Recall Squad hotkey is set to; the default is C. If you are using a Controller the default command is the Back Button.

Collect the Resistance member into your squad & carry on a short way to find another 3 Resistance fighters pulling down a monitor with Dr. Breen on it. Approach them & collect them into your squad as well. Once you have four members, the Achievement will unlock.

Lambda Cache #36: With your new squad, fight your way onwards through City 17 & get past the alley full of Hopper Mines. Continue down a street where a Strider attacks us & more Hopper Mines are deployed. Enter the next alley at the end of the street & we will be ambushed by some Combine Soldiers. In this alley, we can spot a Lambda symbol painted on near a red metal shack. Move aside the metal slat beside the Explosive Barrel to reveal a crawlspace hiding the Lambda Cache.

Lambda Cache #37: Fight your way through a series of buildings until you get to a large Combine barricade. Fight off through the Combine & get past the blockade, & continue to fight through an office building full of Soldiers & we will enter into a basement with three Combine Sentry Guns. Disable them, & we can drop down through a hole in the wall.

The way we are supposed to go is left down the hall, but take the stairs up to the city streets off our right instead. Up here we can find a Lambda Cache in behind a barred fence that we cannot get to; use the Gravity Gun to loot it.

Lambda Cache #38: Go the way we are supposed to now & we will exit into a large underpass area… full of Man-Hacks. At the end of the tunnel there will be a caved in section we need to get around. Do just that, & we will encounter more Man-Hacks & some Combine Soldiers in the tunnel. Before we head down to where the Combine Soldiers are/were, turn around & walk back to the opposite side of where the cave in is to see a small shelter with a lit campfire; the Lambda Cache is found right beside it.


Achievement #26 – Radiation Levels Detected: Get through the toxic tunnel under City 17 in Half Life 2.
Story Related. After the Man-Hack tunnel, you will enter an area filled with radiated waters. Hop across Crates, or if you have the health for it, sprint to the other side. Once you climb up the broken pipe & drop through the vent you will unlock the Achievement.

Lambda Cache #39: Eventually, after having a bridge lowered for you by a Resistance fighter & you will have to lower one yourself further ahead. Just before that bridge as you make your way up some rubble steps you can find this Lambda Cache right before the exit outside to the bridge.

Lambda Cache #40: Lower the bridge & head across it to fight your way to the basement of the next building. Drop into a room where some Combine Soldiers are fighting Zombies, & you can find a Lambda symbol painted by a doorway that leads outside. Walk out to it to see iron fencing to your left & right; the Lambda Cache will be the supply crates on your left that can be collected using the Gravity Gun.


Achievement #27 – Plaza Defender:Survive the generator plaza standoff in Chapter Anti-Citizen One.
Story Related. When you link back up with Alyx you will be tasked with defending her in the plaza while she cracks open the Combine gates barring the way. Survive the waves of Combine & after you make it to the other side of the gate the Achievement will unlock.
Sequence 8: Till the Bitter End
1. Half Life 2: Anti-Citizen One, Follow Freeman
2. Combine Snipers: 5/5
3. Lambda Caches: 45/45
4. Achievements: 31/69
-----------------------------------------------------------------------------------------------------

Chapter #11 – Anti-Citizen One:

Lambda Cache #41: After the fight in the plaza, make your way through the underground tunnels next to continue. Climb along a pipe & drop through a vent to reach a room with Combine Soldiers above you on a walkway. Make your way down the stairs two levels, & you can see a Lambda symbol painted on a ledge lower down. Drop from the walkway above it or use the Gravity Gun to loot the Cache.

Lambda Cache #42: When you enter the sewer where Combine Soldiers rappel down to fight some Zombies – drop down with them. Take the passage around to the left until you find a ladder on your right. Head further down the passage, past the ladder, & we can see two slots in the wall ahead leading to a room with a Poison Zombie in it. In the wall slot to the right, we can find a Lambda symbol painted above a vent hole. Look through the hole, & use the Gravity Gun to collect the contents of a Lambda Cache at the back.

Lambda Cache #43: Carry on further down the tunnel, past the room with the Poison Zombie, & we can see a passage blocked by a series of yellow metal caps. Hop across the caps to the back & we can loot a Lambda Cache at the dead end.

Lambda Cache #44: Get out of the underground tunnels & we will enter a large warehouse. Use the “slow lift” to get to the upper levels, then climb up a ladder attached to a cyan steel support system. At the top of the ladder, we can look across the way to see a Lambda symbol painted in a dark corner behind a red metal shack at the top of the warehouse.

To reach it, you need to get up to the very top of the warehouse using the final ladder, then drop back down onto the walkway below us to continue. To escape the warehouse, we need to drop down one more floor where the blue-lit hall is; ignore this, & instead walk around the outside of that red metal shack to collect this Lambda Cache.

Chapter #12 – Follow Freeman:
Escape the warehouse down the hall & we will immediately begin the next Chapter. During this Chapter, we need to locate & kill all 5 Combine Snipers for the Counter Sniper Achievement. The Snipers are killed by throwing Grenades into their windows; make a Save before attempting each throw so you do not waste/run out of Grenades!

Combine Sniper #1: As soon as we stop outside, we can see the blue laser sight of a Combine Sniper at the far end of the street. Run to the end & lob a Grenade into his window to kill him.

Combine Sniper #2: On our way to Sniper #1, we passed an alley with Sniper #2 in it. Backtrack to the alley off our left & rush up to the rubble blocking the way. Lob a Grenade over the rubble into his window to kill the Sniper; Save beforehand as this one can be especially tricky to pull off & you may use up all your Grenades trying to figure out your angles.

Combine Sniper #3: After clearing out the second Sniper, we will enter a building full of Zombies & have to clear them out of a flooded basement. Exit the basement back up to the surface & there will be more Zombies along with another Combine Sniper in the building across from us. You know the drill. Save, then lob those Grenades!

Combine Snipers #4, #5: The final two Snipers are just above us. Head up to the next floor where Barney is hiding to see two different Sniper laser sights. Save. Then blow them both up.


Achievement #28 – Counter Sniper: Kill all 5 of the Snipers in City 17.
After blowing up the last two Snipers attacking Barney you will unlock the Achievement.


Achievement #29 – Fight the Power: Shut down the suppression device by disabling its generators.
Story Related. With Barney, fight your way into the Overwatch Nexus building & disable all three generators to progress through the Chapter; the Achievement will unlock after the third generator is disabled.

Lambda Cache #45: Get to the roof of Overwatch Nexus & we will need to destroy a Combine Gunship to continue. Fight your way down into the courtyard & we will then have to defeat 5 Striders using scavenged Rockets from around the area. Clear them out, & fight through a Combine blockade to continue on through a series of rooms underground after being chased by a Strider through a tunnel.

Fight through to the top of a ruined building ahead where there will be another Strider & a Rocket re-supply crate in the broken stairwell at the back. Across from Rockets, is a hole into another building. Jump across & the Lambda Cache will be right in front of you.


Achievement #30 – Lambda Locator: Find all 45 Lambda Caches in Half Life 2.
If you have been following along with this guide, upon collecting the last Lambda Cache, you will have unlocked this Achievement.


Achievement #31 – Giant Killer: Survive the rooftop Strider battle in the ruins of City 17.
Story Related. Ignore that previous Strider, & carry on past the final Lambda Cache & fight through the streets past Combine & more Striders alike. Get to the top of the roof where the Rocket re-supply crate is & kill the two Striders we find up here to unlock the Achievement.
Sequence 9: Inter-Dimensional Operator
1. Half Life 2: Our Benefactors, Dark Energy
2. Achievements: 33/69
-----------------------------------------------------------------------------------------------------

Chapter #13 – Our Benefactors:
From the rooftop, navigate along the top towards a brass horse statue you can see nearby & drop down into the streets below to link up with Barney & Dog. Dog will lift up a Combine crawling wall toe, & we can drop down into the hole it made to enter this Chapter…


Achievement #32 – Atomizer: Disintegrate 15 soldiers by throwing them into a Combine Ball Field.
Invade the Citadel & use a prisoner coffin (the one farthest from us not closest) to ascend deeper within it. After we exit the coffin, we will be dropped down into a Confiscation Field that will destroy all our gear… except the Gravity Gun which will become supercharged. As of now, the Gravity Gun is so strong we can suck up enemies with it & throw them.

Fight through the waves of Combine that attack us until we drop down into a circular room with a blue laser beam in its center. The enemies seem to be infinite in this section, stick around & grab Combine Soldiers & launch them into the beam to disintegrate them. Do this 15 times to unlock the Achievement. Note that their bodies have to touch the center beam to be disintegrated otherwise they will just enter Zero-G & fall out the other side…

Chapter #14 – Dark Energy:
Fight through to the rest of the Citadel, lower the elevator then take it up, kill the Strider with Energy Balls, take another prisoner coffin onwards, & we will reach Dr. Breen.


Achievement #33 – Singularity Collapse: Destroy the Citadel’s reactor core.
Story Related. Get to the Citadel’s dark reactor core & chase after Dr. Breen as he ascends to the top of the reactor. Get to the top, & use the Gravity Gun to fire Energy Balls into the core to destroy the Citadel!

47% Complete
Sequence 10: Episode #1
1. Episode #1: Undue Alarm, Direct Intervention, Low Life
2. Achievements: 39/69
-----------------------------------------------------------------------------------------------------

Achievement Breakdown – Episode #1: (13)
Story Related: (5)
Missable: (1)
Secondary Objectives: (2)
Slay: (5)


All Achievements of Half Life 2 – Episode #1 can be earned in a single playthrough. The main Achievement we will be working towards is The One Free Bullet Achievement. The only weapons we are allowed to use are: the Crowbar, Gravity Gun, Grenades, & Rockets. While we are able to fire a single bullet, it is required to progress through the game by shooting a padlock.

There is no Achievement associated with Difficulty, so playing on Easy will really make things simpler for you.

Chapter #1 – Undue Alarm:
As soon as the Episode begins, we will find ourselves outside the Citadel in the aftermath of the dark energy singularity.

Supercharged Gravity Gun: Armed with only the Gravity, get yourself back inside the Citadel with the help of Dog & Alyx. As we navigate through the Citadel with Alyx, we will re-acquire the Supercharged Gravity Gun when we get trapped in another Confiscation Field.

Overwatch Elites: Shortly after collecting the Supercharged Gravity Gun, we will begin encountering enemies. Amongst them, will be the Overwatch Elites, who are the Combine Soldiers in white armor with a red eye in the center of their helmets; they look like Aperture Turrets from Portal…

The Overwatch Elites have the ability to fire Energy Balls out of their AR2 Pulse Rifles. For the Think Fast! Achievement we need to catch a fired Energy Ball & kill the soldier who shot it. As well, for the Conservationist Achievement we also need to kill 5 enemies with a single Energy Ball. Keep these Achievements in mind as we play, & look for good opportunities; I have two good spots mentioned in the guide in case you do not find any yourself…


Achievement #34 – Watch Your Head!: Make it to the bottom of the Citadel’s main elevator shaft in one piece.
Story Related. Eventually you & Alyx will step onto a glass elevator & it will slowly begin descending the Citadel. As we descend, pieces of rubble will fall from above & begin breaking the elevator; knock the rubble out of the air with the Gravity Gun.

Get off the elevator safely at the bottom, & we will unlock this Achievement.

Chapter #2 – Direct Intervention:
At the bottom of the elevator, pass through the blast shield doors into the next area to enter Chapter #2…


Achievement #35 – Think Fast!: Kill an Elite Soldier with his own Energy Ball.
As soon as this Chapter begins, you will exit through the blast doors into a narrow hall. Save here in case you mess up! Shortly after leaving the doorway, some Overwatch Elites will round the corner & attack us; there is a very high chance one will launch an Energy Ball at you right away. When they do, pay attention to who shot it, grab the ball, & launch it back at them for the Achievement.

The Citadel Core: Alyx will soon summon an elevator that will take us down into the Citadel Core. From here on, we cannot kill any Stalkers we come across for the Pacifist Achievement. Stalkers are very annoying & will impede us.; always pay attention where you fire your Energy Balls in case you accidentally kill one. I recommend Quick Saving every time you get across a bridge, so you do not have to redo it if you fall…


Achievement #36 – Conservationist: Kill 5 enemies with the same Energy Ball.
Solve the Hard Light Bridge puzzle with the two Stalkers, then climb up a ladder in the center of the Citadel Core to get up to the next level. Cross over the small Hard Light Bridge then make a Quick Save on the other side in case you mess up this next part.

Follow the path left & grab an Energy Ball before entering a narrow hallway up ahead. When you enter, a group of 5 Combine Soldiers will charge out at you. Hold position in the hall for a second so they all bunch up in front of us in the hall then launch the Energy Ball into them to get the Achievement. If you mess up, reload your Save & try again…


Achievement #37 – Containment: Contain the Citadel Core.
Story Related. Re-activate the three dark energy stabilizers & you will have successfully mitigated the Citadel’s imminent destruction.


Achievement #38 – Pacifist: Contain the Citadel Core without killing any Stalkers.
If you did not kill either of the two Stalkers in the first section of the Citadel Core you will unlock this Achievement as well.

Chapter #3 – Low Life:
Escape the Citadel with Alyx onboard the Stalker freighter; exit the freighter once it stops to enter Chapter #3.

The One Bullet: After we pass through an air duct to find a way to power a locked door, we will drop down into a room with a gate locked by a padlock. In this same room, we can collect the Shotgun & Pistol; shoot the padlock firing only a single shot from the Pistol.

From here on, we cannot use our guns at all! For the entire rest of the game, we can only use the: Gravity Gun, Crowbar, Frag Grenades, or the Rocket Launcher.

Flares: While we are in this underground area, we will encounter Flares. When they are picked up with the Gravity Gun, they will ignite. For the Zombie-que Achievement, we need to use Flares to light 15 Zombies on fire! Whenever you see Flares & Zombies… use them; you can use the same Flare to ignite multiple Zombies as well!


Achievement #39 – Car Crusher: Use the cars to squash 15 Antlions in Episode One.
Continue through the underpass tunnels & eventually you will reach a section where you must turn a wheel to open a garage door. In this room will be a pit that infinitely spawns Antlions; you must use a car to cover it. Before covering it, use the Gravity Gun to bounce the car into the Antlions. There will be a number of other pits we can use throughout the rest of the Episode, or you can just farm 15 kills right here for the Achievement.
Sequence 11: Never Tell Me the Odds
1. Episode #1: Low Life, Urban Flight, Exit 17
2. Achievements: 46/69
-----------------------------------------------------------------------------------------------------

Chapter #3 – Low Life:


Achievement #40 – Zombie-que: Use Flares to light 15 Zombies on fire.
This Achievement can potentially cause you problems if you do not make a point of working towards it as soon as possible. After getting through the Antlion section, eventually you will reach a section where you will have to wait for an elevator to arrive. During this time, waves of Zombies will begin attacking us.

If you were lucky, you may have lit some Zombies on fire earlier with the few Flares we may have come across. Make a Save just before summoning the elevator in case you have to reload your game for more kills...

1. There are two Flares right in front of the elevator
2. One Flare is in the far-right corner near where you first entered this room.
3. There are two Flares a little ways down the left side behind a square chain link fence.
4. Another Flare can be found in a padlocked chain link fence enclosure; use an explosion to destroy the padlock.
5. The last Flare will be in the same room as where you find the elevator control box.


Achievement #41 – Elevator Action: Survive long enough to get on the parking garage elevator.
Story Related. This will unlock after you enter the elevator & begin making your way up to the next Chapter.

Chapter #4 – Urban Flight:
This Chapter will begin as soon as we exit the elevator we took from the Zombie infested tunnels…


Achievement #42 – Live Bait: Help Alyx snipe 30 enemies in Episode One.
Progress through the Chapter until you encounter a Combine Sniper in the streets. Dispatch them, then Alyx will climb up to their position & equip their Sniper Rifle. This is a pretty easy Achievement if you are going for The One Free Bullet Achievement; simply just let Alyx kill all the enemies you come across with the Sniper Rifle, & the Achievement will unlock.

In the second street area, there is an Antlion spawn pit you can farm the Achievement for if you are worried about missing it.

Antlion Guard: After Alyx is done sniping, we will pass through a Combine blockade before we exit back outside… where an Antlion Guard will be ravaging some Combine Soldiers. This fight is much more difficult with only the Gravity Gun.

Keep the Combine Soldiers alive if you can to distract/damage the Guard, & focus on locating & launching all Explosive Barrels in the area.


Achievement #43 – Attica!: Destroy the Gunship in the hospital attic.
Story Related. Fight through the rest of City 17 until you can link with Barney & more survivors. Get up to the roof of a hospital, & use Rockets to destroy a Combine Gunship that is harassing us to unlock the Achievement.

Chapter #5 – Exit 17:
Fight through the rest of the infested hospital, & exit out at the train station to enter the final Chapter…


Achievement #44 – Citizen Escort: Don’t let any Citizens die when escorting them to the escape train.
When the Chapter begins, we will have to ferry 14 Citizens across an area & get them safely to the train evac. You will be pestered by Combine the entire way; Save after each successful trip.

Keep an eye on your squad when you are taking Citizens over. If you lose any, reload your last Save. It is easiest to try & sprint through a lot of this but be careful. Use the Rocket Launcher to quickly dispatch any Combine Soldiers in your way. Clear the area of Hopper Mines or Combine Snipers before grabbing your next set of Civilians.

There will be 5 different sets you have to ferry; the final one will have Barney in it. When Barney reaches the exit & you have not lost a single Civilian, the Achievement will unlock.


Achievement #45 – Escape From City 17: Escape City 17 with Alyx.
Story Related. When the Civilians & Barney have escaped, you & Alyx will need to find your own train. Before we can, we will need to defeat a Strider in the trainyard by working our way up to the top to collect Rockets.

Take out the Strider, & successfully escape City 17 with Alyx before the Citadel explodes to complete Episode #1 & unlock this Achievement.


Achievement #46 – The One Free Bullet: Finish the game firing exactly one bullet. Grenade, Crowbar, Rocket, & Gravity Gun kills are okay!
This Achievement will unlock at the same time as the last Achievement if you have met the perquisites. Overall, it is not too difficult, there are only a few sections that can prove challenging, but mostly just when you are being corned by enemies. Save often.

66% Complete
Sequence 12: Episode #2
1. Episode #2: To the White Forest
2. Antlion Grubs: 30/333
3. Achievements: 49/69
-----------------------------------------------------------------------------------------------------

Achievement Breakdown – Episode #2: (23)
Story Related: (8)
Missable: (1)
Secondary Objectives: (3)
Collectibles: (4)
Slay: (6)


In this Episode, we have to squish 333 Antlion Grubs for the Get Some Grub Achievement. Each Grub has a fixed location, meaning if you miss even one, you may have to replay the entire Chapter over again to find it. The good news is these are only found on two Chapters.

Unfortunately, that will not be all our tedium. Another important Achievement will be the Little Rocket Man Achievement. In the first Chapter, we will find a garden gnome. We must then carry this gnome aaaalllll the way to Chapter 6 & launch him into space; if you have played Black Mesa, this gnome is the equivalent to the Purple Hat/Pizza Box. Save often! Unlike in Episode #1 however, we do not have to worry about The One Free Bullet Achievement & can safely go back to using all of our Weapons again!


Achievement #47 – Gnome Alone: If you are reading this Achievement, Gabe Newell has successfully launched Gnome Chompski into space. If you did not also receive the Achievement 'Manufacturing Ascent', Newell has abandoned his plans to shoot Noam Chomsky into space.
I am a little fuzzy on the lore behind this Achievement, but all we have to do to unlock it is load into the Half Life 2 – Episode #2 Main Menu & the Achievement will unlock as easily as that.

Chapter #1 – To the White Forest:
Once again, there is no Achievement associated with Difficulty so play on whichever setting you like. Episode #2 will pick up right where Episode #1 left off, on our escape train from City 17.


Achievement #48 – Grave Robber: Steal a Zombine’s Grenade.
Exit the train & we will need to enter into a mine tunnel to progress onwards. Drop down further into the shaft, & we will begin encountering Zombies. Before carrying on outside the tunnel, make a Save! Immediately when we exit the tunnel, we will see a group of Zombies fighting some Antlions – there will be a Zombine amongst them. Zombines more often than not will whip out Grenades & blow themselves up using them; whenever you see this happen, quickly use the Gravity Gun to yank the Grenade out of their hands to unlock this Achievement.

Gnome Chompski: After the first encounter with the Zombies, we will enter the communications room. Inside, we can find Gnome Chompski underneath a wooden shelf to the right of the exit of this room – he will look like your typical garden gnome. Carry him in your hands or with the Gravity Gun, & prepare to take him on a journey no gnome has been on before... For the Little Rocket Man Achievement, we have to take this garden gnome all the way to Chapter #6 – Our Mutual Fiend & place him inside a rocket to be shot into space.

While he can be used as a projectile, it can be very dangerous, & there is a high chance you will lose him. Save often, as so much can go wrong…

Entering the Mine: With Gnome Chompski in hand, make your way through the mine exterior & we will encounter a Combine Hunter. After it leaves, we will need to escort a friendly Vortigaunt to a safe place below the surface & we will acquire the Crowbar in the process.

As something to note, we will need to kill 30 enemies using objects thrown by the Gravity Gun for the Bone Breaker Achievement; I recommend working towards this Achievement straight away & getting it done first before using other Weapons to kill enemies.

With the Gnome, carefully remove the Crowbar from the elevator & immediately pick the Gnome back up before we start to descend; it is very easy for the Gnome to fall off & get stuck under the elevator…

Antlion Grubs #1-5: Take a crank wheel elevator up a shaft, & quickly drop off with the Gnome where we will collect the Handgun. Carefully drop down through a few holes in the next shaft & we will fall into some water… & so our struggles begin. As of now, we will start encountering Antlion Grubs. They are white & glow yellow while also making an audible screeching sound which can be useful for locating them; if you are ever unsure if a Grub is actually dead, just use your Handgun to “double tap” it. With that said, I also recommend conserving all your Handgun ammo for shooting down Grubs off hard to reach places as well!

While in the room with the water, look back up where you dropped from to see the first 5 Grubs along the walls.

Antlion Grubs #6-8: From these Grubs, begin making your way down the tunnel ahead to find 3 Grubs along the walls before we reach a web wall.

Antlion Grubs #9-11: The web wall in our way will have 1 Grub attached to it, with another 2 Grubs on the ground directly below it.

Antlion Grubs #12-14: After the web wall, enter the next chamber & we can find 2 Grubs off our left with 1 Grub across the small pond near some webbing higher up.

Antlion Grubs #15-19: Leave this chamber & enter the next tunnel to find 3 Grubs on the ground in our way with another 2 Grubs further down.

Antlion Grubs #20-23: Blocking the tunnel ahead will be another web wall that will have 1 Grub inside it with another 2 Grubs on the ground below it & 1 Grub on the wall up to the left of the web wall.


Achievement #49 – Acid Reflex: Kill an Acid Antlion Worker.
From the previous Grubs, drop down the hole ahead & we will be attacked be a glowing green Antlion. These guys fire toxic goop at us & more often than not will kill Grubs making it irritating finding them afterwards. Kill the Acid Antlion Worker to unlock the Achievement.

Antlion Grubs #24-26: With the Acid Antlion dealt with, turn around from where we dropped down from to see a dead end made up of webbing – there will be 3 Grubs to the right of this webbing on the ground.

Antlion Grubs #27-28: Carry on further & we will collect the Shotgun after dispatching another two Acid Antlions. In the room with the Shotgun, we can find 1 Grub directly across from the hole we have to drop down next.

Do not drop down the hole yet though! Before we do, walk around the hole towards where Grub #27 was, & there will be a blue locker; open it up to find 1 Grub.

Antlion Grubs #29-30: Remove the wooden boards from the hole now & we can immediately see 1 Grub near the top along the wall. Before dropping down, make sure you have the Gnome!

Drop down the hole & we can find another 1 Grub at the very bottom.
Sequence 13: Grubbing In the Dark
1. Episode #2: To the White Forest
2. Web Cache: 1/9
3. Antlion Grubs: 91/333
4. Achievements: 49/69
-----------------------------------------------------------------------------------------------------

Chapter #1 – To the White Forest:

Antlion Grubs #30-32: Start heading down this next tunnel & we can find 1 Grub in our way inside some webbing on the ground with another 1 Grub at the tunnel exit on our side of the rubble blocking the way ahead.

Antlion Grubs #33-34: Up ahead will be a massive chamber that will be full of Antlion Grubs. There are also some Acid Antlions you will want to deal with asap before they kill off Grubs without us knowing; Grubs killed by Antlions still of course count towards the Achievement, but it can make tracking your count & missing some very likely. Do your best.

For simplicity’s sake with how many Grubs are in this chamber, don’t kill them until you are directly below them; focus on how I’ve listed them in their clusters.

The first 2 Grubs of this room will be right in front of you on the first rock slab leading up.

Antlion Grubs #35-49: Progress along the slab & there will be a web wall in your way with 1 Grub on it. Another 2 Grubs will be on the floor directly in front of you with 4 more Grubs on the wall to your right – below a hole in the wall.

Look above that hole in the wall now, & we can see another 3 Grubs just below some long webbing along the ceiling.

Turn around & drop down into the water now to look even further up the same wall beyond that hole to see 2 more Grubs below a second hole & a final 3 Grubs above it near more webbing; you will need to shoot these ones down.

Antlion Grubs #50-56: Head back up the ramp where you were previously & jump over into the water to access the second half of the chamber. Where we drop down, we will see 2 Grubs on the ground near the water. Look back where we jumped from & we can see another glowing hole in the wall with 4 Grubs around it & 1 Grub a little ways inside it.

Gnome check! Do you have Gnome Chompski with you?

Antlion Grubs #57-60: Drop over into the third section of the chamber now & we can find 2 Grubs in the second alcove on the left beside the water. Across from where we are here, we can find 1 Grub inside an underwater tunnel we need to pass through to continue, & 1 more Grub on the wall above it.

Web Cache #1: While we are still in the same room of the large chamber, drop down into the water pool in front of us & swim down to the left. Down here we can find a glowing web with corpses behind it; smash it open, then swim down & bust a second web wall to raid our first Web Cache.

For the Piñata Party Achievement, we need to raid all 9 Web Caches.

Antlion Grubs #61-64: Swim through the underwater tunnel we found one of the Grubs in to enter the fourth section of the chamber. Where we emerge from the water, there are 2 Grubs immediately on the wall off our right, with another 2 Grubs on the ground ahead of us.

Antlion Grubs #65-67: Further past the previous Grubs, we can see some Barnacles hanging from the ceiling & a small aluminum rowboat. To the right of the rowboat, we can see 2 Grubs up in a small alcove in the wall. To the left of the rowboat a little ways further, we can see 1 Grub in another small alcove beside the water.

Antlion Grubs #68-70: Carry on to the back of this room now, past all the Barnacles, & we will have to deal with another Acid Antlion. Once it is dealt with, we can find 2 Grubs on the ground near a wooden crate with 1 more Grub on the wall to the right of the chamber’s exit.

Antlion Grubs #71-72: Leave this large flooded chamber now & we will encounter 2 Grubs on the ground in our way just past the final Barnacle; watch out for an Antlion ambush…

Antlion Grubs #73-77: Enter the next part of the tunnel & there will be more water here along with another Acid Antlion. Close to where we enter the flooded portion of the tunnel, we can find 4 Grubs in a web along the wall. We can find 1 more Grub at the far end of this flooded tunnel at the back on the ground though it is likely it may have been killed by the Acid Antlion…

Antlion Grubs #78-80: Head down the next tunnel & we can find 2 Grubs in our way on the ground. We can find 1 more Grub shortly afterwards off our right on the ground before entering the next large chamber.

Antlion Grubs #81-87: In the next chamber, you will want to quickly dispatch the three Acid Antlions before you do anything else. Once they are dealt with, return to where we entered to find 1 Grub off our right on the ground.

Directly across from this Grub, look up to your left to see a small side tunnel where 1 more Grub will be on one of the walls.

In the main section of the chamber will be a large stone pillar. On the opposite side of it, we can find 3 Grubs on the ground (that may have been crushed by the Antlions). When you go to leave this chamber, we can find 2 more Grubs near the exit beside a ribcage in the tunnel.

Antlion Grubs #88-91: To progress through the tunnel, we will have to destroy another web wall where we can find 1 Grub on the web & another 2 Grubs just below it. We can then find 1 more Grub on the ground just past the web wall.
Sequence 14: The Alyx Vance
1. Episode #2: This Vortal Coil
2. Web Cache: 5/9
3. Antlion Grubs: 156/333
4. Achievements: 51/69
-----------------------------------------------------------------------------------------------------

Chapter #2 – This Vortal Coil:
Continue through the tunnel & we will take a small drop that we cannot get back up to enter into Chapter #2.

Gnome check! Do you have Gnome Chompski with you?

Antlion Grubs #92-93: 2 Grubs are found right in front of you in the tunnel as soon as the Chapter begins.


Achievement #50 – Deadly Harvest: Kill an enemy by planting a Hopper Mine.
When we drop down the hole ahead of us, we will find two Resistance fighters defending the Vortigaunt healing Alyx. We are about to be assaulted by Antlions so prepare; find somewhere safe to stash Gnome Chompski where he will not get in the way...

There are two crates off to the side full of Hopper Mines near the tunnels. Plant some down all four of them, & you should be guaranteed in killing at least one Antlion with the Hopper Mines.


Achievement #51 – Into the Breach: Help Griggs & Sheckley hold off the Antlion invasion inside the mine shaft.
Story Related. Hold off the initial nine waves of Antlions assaulting us & eventually we will be aided by three more Vortigaunts. Complete the final stand against the Antlions, & we will unlock the Achievement.

Leaving Gnome Chompski Behind: For the rest of this Chapter, we will be leaving & returning back to this central area to revive Alyx. If you leave Gnome Chompski somewhere close to Alyx (or just somewhere you will remember him) he will stay here for when we return. This takes a lot of hassle out of this Chapter, as we can just focus on killing Grubs.

Before you leave Gnome though, make sure you make a Save & do not Save over it until we return back just on the rare chance something happens to him while we are gone!

Antlion Grubs #94-98: Follow the Vortigaunt down the tunnel & into the side passage where we can find 3 Grubs right in our way. Another 2 Grubs will be found a little ways further ahead.

Antlion Grubs #99-102: Blast open a web wall, & we can find 1 Grub just outside of Web Cache #2; open up the Web Cache to find another 3 Grubs inside the it.

Web Cache #2: We will break open Web Cache #2 to destroy Grub #99.

Antlion Grubs #103-105: Just to the right of the Web Cache, will be a web wall in the tunnel; there are 3 Grubs just to the left of it on our side of the web.

Antlion Grubs #106-111: Destroy the web wall & we will enter a large chamber. There are 3 Grubs on the ground in front of us as soon as we enter with another 1 Grub below us. Follow the path along left to find 2 more Grubs hanging off the wall to the left; we will soon be attacked by some Acid Antlions.

Antlion Grubs #112-114: Carry on further down the path to find 1 Grub on the ground with 2 more Grubs ahead of us on the wall to our left; we will be ambushed by more Acid Antlions from behind us.

Antlion Grubs #115-118: Continue on to the exit of the chamber, around the backside of a large stalactite & look directly up from here to find 2 Grubs on the ceiling. Go to exit the chamber now & we can find 2 Grubs on the ground at the tunnel entrance.

Web Cache #3: Head down the tunnel out of the large chamber & we can find a Web Cache off our right containing some Grubs.

Antlion Grubs #119-120: 2 Grubs found inside Web Cache #3; one can be hard to see as it is on the ground over the lip of the hole.

Antlion Grubs #121-130: Enter into the next large chamber & fight off an Acid Antlion. From where we enter, we can find 2 Grubs on the ground. Continue along the upper left path of the chamber, fighting off more Acid Antlions, & we can find 4 Grubs clinging to the wall just above where the path starts dipping down; one of the Grubs is hidden in webs here & can be hard to see!

Follow the path along a narrow ledge where 1 Grub will be in our way with another 1 Grub on the ground where the path switchbacks.

Another 2 Grubs can be found at the entrance to the tunnel leading out of the large chamber (these may have been killed by Antlions).

Antlion Grubs #131-134: Continue down the tunnel ahead to find 2 more Grubs on the ground just before we reach a Web Cache (these also may have been killed by Antlions).

Carry on & we can see a blood spatter on the ground near a skeleton with a glowing Web Cache up in the wall to our left – it will have 2 Grubs behind it.

Web Cache #4: On the ceiling up to the left after leaving the latest large chamber.

Antlion Grubs #135-139: From the Web Cache, continue down the tunnel to find 3 Grubs in our way. Another 2 Grubs can be found on the wall to our right further down.

Antlion Grubs #140-142: Walk down the tunnel until you see a red blood spatter on the ground. Look up to your right to see 2 Grubs on the wall below a Web Cache with 1 Grub inside it.

Web Cache #5: Web Cache #5 is found above a blood spatter in the tunnel near Grubs #140 & #141; it will drop a live Grenade when it is opened!

Antlion Grubs #143-148: Leave the tunnel & we will drop back into the mine. Where we land, we can find 3 Grubs off our left on the ground. Ignore the Grubs behind a fence ahead of us for now, & remove the wooden boards off the gate to let us into the room with the Zombies. Eliminate the Zombies (remember to try killing as many as you can with Gravity Gun objects for the Bone Breaker Achievement), & we can find 3 Grubs clumped up together near a red fuel can.

There are two Antlion Grubs that are pinned to the wall here as well, but they are already dead, & do not count for us…

Antlion Grubs #149-156: Continue to ignore the Grubs in the other room, & use the weighted elevator ahead of us to reach a room lower down. At the bottom of the shaft, look back up & we can spot 3 Grubs clinging to the side of the wall above our heads.

Step off the elevator, & we can kill another two groups of 2 Grubs & 3 Grubs here.
Sequence 15: Grub’ocalypse
1. Episode #2: This Vortal Coil
2. Web Cache: 5/9
3. Antlion Grubs: 256/333
4. Achievements: 52/69
-----------------------------------------------------------------------------------------------------

Chapter #2 – This Vortal Coil:

Antlion Grubs #157-165: Leave the elevator room, & we can spot 3 Grubs in behind a fence ahead of us.

Go into the next room & there will be 1 Grub on the ground to our left, 1 Grub underneath the elevator, & another 2 Grubs across from us past the elevator. Before we activate it, stand on the elevator & look up the shaft to spot another 2 Grubs stuck to the wall.

Antlion Grubs #166-171: Activate the elevator (use the steel girders to weigh it down so we can get on in time) & take it up to the next level. Defeat the Zombies up here, & we can find 1 Grub on the wall behind the elevator & a set of 3 Grubs & 2 Grubs along an old railway track.

Antlion Grubs #172-176: The Vortigaunt will open up the path for us to go forward & we will reach a junction. To the right, we can see 1 Grub inside a minecart that will fall off of the edge when bumped. Walk to the edge where the minecart falls, & we can see 4 Grubs across from us to the right around a glowing hole.

Antlion Grubs #177-185: Return to the junction & take the path straight ahead along the rail line. Break some wooden boards in our way, & we can find 9 Grubs along the track ahead. Not only will a minecart detach & crush 7/9 of the Grubs, but we will also be attacked by Zombies & Acid Antlions. Be sure to double check the track & beside it to make sure all the Grubs were killed.

Antlion Grubs #186-197: Climb up a ladder, & drop down through an ore chute to land inside a minecart… that will begin to move. We will pass a lot of Grubs; do not try to kill them yet. We can walk back up the track to kill them accordingly.

From where we fall into the water, climb up the ladder & we can see 3 Grubs on the wall just above the water. At the top of the ladder, we can find 3 Grubs along the wall at the top of the pit with another 1 Grub just over the edge near the ladder.

Looking down into the pit, we can see another 2 Grubs along the wall to our right with 3 more Grubs on the same wall further down.

Antlion Grubs #198-209: Now turn around & begin heading up the tracks; note that any number of these Grubs may have been killed by the minecart or the Vortigaunt fighting off the Zombies. At the bottom of the tracks, there are 3 Grubs hanging off the ceiling in a small alcove to our left with another 3 Grubs beside the tracks on a red fuel can.

Further up the track we can find 3 Grubs on the ceiling along with another 3 Grubs beside the track.

Antlion Grubs #210-216: Head back down the rail track near where the pit is, & we can enter into the next large chamber through a hole in the wall. From where we drop down, we can see 3 Grubs off our left, 2 Grubs in a small crevice in the wall to their right, & another 2 Grubs near the ledge above the trench ahead.

Antlion Grubs #217-226: Walk across the small land bridge to the other side of the trench, & look up above us to see 4 Grubs inside a glowing hole with 1 Grub on the wall just above it.

Stay standing where you are, & look all the way to the chamber’s ceiling above that glowing hole to spot 5 Grubs way up there near another glowing hole; you’ll have to carefully snipe them.


Achievement #52 – Bone Breaker: Kill 30 enemies with thrown physical objects.
Drop down into the area with the Antlions & the “vibratory device” & we will be in another great location to earn more Gravity Gun kills. If you have been chipping away at this when you could, you may unlock this Achievement here. If not, there are so many opportunities to earn this Achievement over the course of Episode 2 so do not fret.

Note that thrown Exploding Barrels, Propane Tanks, or Fuel Cans do not count as physical objects for the Achievement as they are explosives.

Antlion Grubs #227-230: After holding off the Zombies & Antlions waiting for the elevator, take it up to the top & wait for the Vortigaunt to open up the path ahead. Carry on ahead & we will encounter the Ancient Guardian… it couldn’t be easy now, could it?

Drop down through a hole in the floor & break down a barred off section of the mine to progress. Just past the wall we knock down, we can find 2 Grubs on the wall in front of us with 2 more Grubs on the ceiling above them.

Antlion Grub #231-236: The path forks here. First, look down the tunnel off our left to find 2 Grubs on the wall; the rest of this tunnel is a dead end.

Take the path off our right next & break down another barred off section of the mine tunnel to find 4 Grubs beside a rail track.

Antlion Grubs #237-240: Continue down the mine tunnel & leap across a gap near the elevator shaft to reach a lower level that will take us to the inner chamber. Unfortunately, we will become separated from our Vortigaunt friend here…

Get passed the vent turbine & follow the duct along to encounter 1 Grub in front of a hole in the floor. Before dropping through the hole, we can kill another 2 Grubs on the opposite side of the hole along with 1 Grub down the hole along the wall lower down.

Antlion Grubs #241-246: Drop down the hole & there will be 2 Grubs immediately below the web we break through. Break through two more webs, & there will be 4 Grubs below the last web. Most will die when we break it through it, but some may not; be sure to look back up at the hole to shoot any you may have missed.

Antlion Grubs #247-248: In the water, we can find 2 Grubs on a large stalagmite in the center of the cavern.

Antlion Grubs #249-256: Swim down under the water & break through a web wall to be able to swim over to the far side that has some Barnacles hanging from the ceiling. From where we emerge, we can find 2 Grubs on the ceiling of a small alcove off your right. Further down the cavern in another alcove near some Barnacles, we can find 4 more Grubs. Lastly, we can find 2 Grubs on the ground near the cavern’s exit.
Sequence 16: Be Adequate!
1. Episode #2: This Vortal Coil
2. Web Cache: 9/9
3. Antlion Grubs: 333/333
4. Achievements: 54/69
-----------------------------------------------------------------------------------------------------

Chapter #2 – This Vortal Coil:

Antlion Grubs #257-259: Enter a yellow & bloody tunnel to leave the cavern & there will be 1 Grub in your way upon entering, another 1 Grub further down in some blood, & a final 1 Grub around the corner on the side of the wall.

Antlion Grubs #260-263: Drop down into a new tunnel & we will have to dispatch some Acid Antlion. When they are dead, we can go left or right; it is a big circle. Take the path to the right & you will see another yellow tunnel off your left. Inside, there is 1 Grub on the wall near the entrance with 3 more Grubs at the back of the cave.

The Ancient Guardian: Progress further down the tunnel, & we will be ambushed by the Ancient Guardian. We cannot kill it, & we must flee!

Antlion Grubs #264-272: Flee from the Guardian, & it will chase us into another yellow tunnel. Here, there will be 2 Grubs right in the entrance which you will probably crush when you enter. There are 3 more Grubs a little bit further inside.

Drop lower down in the tunnel & you will crush 1 Grub when you land; there will be 1 more Grub hanging off the wall to the left before a web wall.

Break the web wall, & before you rush out of the tunnel, we can kill 2 Grubs clinging on the wall outside the exit.

Antlion Grubs #273-278: Evade the Ancient Guardian again, & quickly rush down the tunnel to find another yellow one off our left a short ways along; there will be 2 Grubs on the wall outside it. Inside the yellow tunnel, we can find 1 Grub in our way on the ground with 3 more Grubs further down before a drop.

Antlion Grubs #279-286: Drop down in the yellow passage & there will be 3 Grubs immediately on the ground in front of us with 3 more Grubs close by them. Once again, we can also find 2 Grubs hanging on the wall just outside the yellow tunnel exit.

Antlion Grubs #287-292: Exit the yellow tunnel, but take the path to our right this time to run over to the next yellow tunnel; there are another 3 Grubs hanging on the wall outside it with immediately 3 Grubs inside.

Antlion Grubs #293-295: Take the drop in the yellow tunnel, & there will be 1 Grub on the wall beside a web wall. Destroy the web wall, & we can find 2 more Grubs hanging on the wall just outside of the tunnel.

Antlion Grubs #296-300: Leave the tunnel, & we will have to maneuver around the Ancient Guardian to get through the tunnel it is protecting. Rush down the tunnel, & we can find another yellow tunnel refuge a little ways down off our left; there will be 2 Grubs outside it. Inside the yellow tunnel, we can find 3 more Grubs.

Antlion Grubs #301-311: Unlike the other yellow tunnels, this one leads nowhere & we will have to leave it. Continue rushing down the tunnel away from the Ancient Guardian & we will drop down at crossroads. Take the path to the right & we can find another yellow tunnel with 3 Grubs outside it. Inside the tunnel we can find 3 Grubs immediately in front of us with another 3 Grubs near the web wall at the tunnel exit; 2 Grubs will be outside on the walls past the web wall.

Web Cache #6: Exit the yellow tunnel & take the path off our left where we can find a boarded up doorway we can break through. Do just that, & we will drop down into a mine passage. At the end of the rail track, break through a web wall to enter a massive chamber… we will work our way around it counterclockwise.

Immediately to the right of were we entered, we can find a Web Cache inside the wall close to some Grubs.

Antlion Grubs #312-316: We can find 1 Grub inside the Web Cache we just looted along with 3 Grubs in the corner beside us.

Continue to follow the room around counterclockwise, & we another Web Cache with 1 Grub in front of it.

Web Cache #7: Destroy the Web Cache where we found the previous Grub; be careful as there is a Poison Headcrab hidden inside it.

Antlion Grubs #317-322: From the Web Cache, keep going right along the wall; there will be 3 Grubs on the ground in our way. From here, look across from us to see a Barnacle hanging down in between some steel beams. Beside it, there will be 2 Grubs around another Web Cache in the ceiling; there will also be 1 Grub behind this Web Cache.

Web Cache #8: Close to the Barnacle in the ceiling; destroy it.

Antlion Grubs #323-328: Head across the room towards the elevator now & we can find 3 Grubs near the back wall behind it.

Lastly, head towards the center of this chamber & we can find another Barnacle on the ceiling with the final Web Cache beside it. There will be 2 Grubs on the ceiling outside the Web Cache & 1 Grub inside it.


Achievement #53 – Piñata Party: Find & break all 9 Web Caches in Episode #2.
If you have been following along with this guide, you will unlock this Achievement after breaking all 9 Web Caches.

Antlion Grub #329-332: Locate the missing gear & activate the elevator to let our friend Vortigaunt down. Follow him down the tunnel where we can find 1 Grub beside the generator he powers up to let us through. On the other side of the gate he opens, there is a group of 3 Grubs.

The Larval Extract: We have finally reached the inner chamber of the Antlion hive & can collect the Extract sample. With it, return to Alyx & revive her. After you catch up, you will be able to take the central elevator up to start, leaving this cavern system, & end this long Chapter.

Before you go: grab Gnome Chompski!

Antlion Grub #333: Take the elevator up with your companions, & begin walking down the path until the Ancient Guardian tries to break through a wall off our right. When it leaves, look through the holes in the wall to spot the final 1 Grub on the side of an Explosive Barrel.


Achievement #54 – Get Some Grub: Squish all 333 Antlion Grubs in Episode #2.
If you have been following along with the guide, then you should unlock this Achievement after destroying the final Grub. If it doesn’t… that means you have missed one somewhere. Unless you specifically know where, & have Saves throughout the Chapter, you unfortunately will have to replay the entire Chapter & re-squish all 333 Grubs.
Sequence 17: Road to White Forest
1. Episode #2: Freeman Pontifex, Riding Shotgun
2. Achievements: 58/69
-----------------------------------------------------------------------------------------------------

Chapter #3 – Freeman Pontifex:
With Gnome Chompski in hand, drop down in the mine shaft to exit it entirely & we will begin Chapter #3. When we leave, we will witness a large Combine army transporting an anomalous Advisor towards White Forest. We must beat them to it!


Achievement #55 – Twofer: Defeat both Antlion Guards outside the White Forest.
Story Related. Make your way across a valley bottom using “vibratory devices” to evade some Antlions trying to harass us. At the end of the valley, the Ancient Guardian will bust out of a sealed up entrance to the mine & attack us. Shortly after the Ancient Guardian, a “regular” Antlion Guardian will also emerge from the tunnel across from it.

Put Gnome Chompski near one of the vibratory devices to keep him safe, & begin unloading your Weapons in the Guardian; it is time to finish this! Neither Guardian will breach the safe zone the vibratory devices give us, so we can use them as a haven. When both Guardians are defeated, we will unlock the Achievement.

Leaving Gnome Chompski Again: With the Antlions defeated, we will press on to a section where we must leave Alyx & the Vortigaunt to grab the Car found quite a ways down from us on top of a bridge. Before we leave them, look to the left of the nearby console to see a steel bay door that appears to have chopped a Zombie in half. When we collect the Car, we will arrive on the other side of this bay door & will open it for Alyx & the Vortigaunt. The problem, is that the bay door closes behind them almost immediately giving us very little time to collect Gnome Chompski if we leave him here.

Make a Save while facing the bay door, pick up Gnome Chompski with the Gravity Gun & launch him over to the other side as safely as you can. When you can confirm he is somewhere on the road behind the bay door, make a different Save again for due diligence. When we arrive at the other side of the bay door with the Car, Gnome will already be waiting for us & we do not have to worry about him getting trapped.

Finding the Car: Now to grab that Car. Navigate through the Zombie infested lower level, & get up to the bridge where the Car is located. To use the bridge as a ramp, we need to knock some ruined vehicles at the far end off with our Gravity Gun to tilt it down towards. Once it is angled, boost off of it to return back to our friends… & Gnome.

Driving With Gnome Chompski: The next two Chapters will incorporate us using the Car to travel around… but we also need to transport Gnome Chompski; we cannot drive & hold him at the same time. Place Gnome in behind the seats of the Car, & drive very slowly. Due to physics clipping & bouncing, Gnome will regularly be ejected from the vehicle for one reason or another; constantly be checking to make sure that he is still in the vehicle. Save frequently as well as you progress (with Gnome still in the Car) so if things go wrong, you do not lose a bunch of time…

For me personally, I just like having Gnome on the floor right at my feet where the gas/brake pedals (or in between Alyx) so I can drive & have him always in view at the same time; this way I can use the Car to bounce him around if I see him getting too close to one edge or the other. On sharp turns, he is prone to falling out… but he is bound to fall out eventually anyways regardless of where you put him.

Chapter #4 – Riding Shotgun:
After you & Alyx drive the Car through the tunnel, we will enter into the next Chapter.


Achievement #56 – Payback: Kill a Hunter with its own Flechettes.
Drive along with Alyx… & Gnome, & we will eventually come across a radio tower. Power up the radio tower, & we will be attacked by not just one but five Combine Hunters.

The Hunters will fire Flechettes that will stick to whatever they are shot at before exploding. With the Gravity Gun, pick up a medium sized object like tires, wheelbarrows, steel barrels, etc., block the Flechettes with the object then fire it back at the Hunter. It may take a few tries but if you can kill one this way with the explosion you will unlock the Achievement.


Achievement #57 – Meet the Hunters: Survive the Hunters ambush with Alyx.
Story Related. Defeat all 5 of the Hunters during the ambush at the radio tower to unlock the Achievement.

The Advisor: Leave the radio tower & continue to drive along slowly with Gnome until you reach an abandoned farm with a barn & house. Leave Gnome in the Car, & we will encounter an Advisor inside the ruined barn.


Achievement #58 – Hot Potat0wned: Kill a Combine Soldier with his own Grenade.
After driving off the Advisor, the barn you are in will be stormed by Combine. This is a good time to try for this Achievement. Kill the first three Combine Soldiers then head down the hall from where we collect the Crossbow & Save.

Walk about halfway down the next hall towards the outside to trigger the next set of Combine Soldiers then run back through the doorway you walked through. Wait for Alyx to get behind you (so she doesn’t kill them), then watch the soldiers run towards you.

Wait for a Combine to throw a Grenade; grab it with the Gravity Gun & kill him with it to unlock the Achievement. If the quarters are too tight & you keep shooting the Grenade past him, grab it with the Gravity Gun & charge him while holding it. Killing him this way also counts. This may take a few tries getting him to throw the Grenade…

The Hunter-Chopper: Deal with the Combine attacking us at the farm, & a Hunter-Chopper will soon arrive; we are ill equipped to deal with it. Locate the Car & make sure to check if Gnome Chompski is still inside; if you parked too far away from the farm, the Car will be teleported closer, & Gnome will be on the ground where the Car originally was!

Get in the Car, & very carefully drive along with Gnome while evading the Hunter-Chopper. The Hunter-Chopper can not only kill Alyx extremely fast, but can also shoot Gnome Chompski right out of the Car; this is a terrible combination. Inch by inch, make your way along, & Save as often as you can (when it makes sense to).
Sequence 18: Danger Line
1. Episode #2: Riding Shotgun, Under the Radar
2. Radar Caches: 5/5
3. Achievements: 63/69
-----------------------------------------------------------------------------------------------------

Chapter #4 – Riding Shotgun:

Evading the Hunter-Chopper: When you reach the train tracks, they will lead to a tunnel. Make a Save, & leave Gnome Chompski at the end of the tracks then boost the Car as fast as possible to the very end where a tunnel will be. Drive through the tunnel until you hit the Loading Screen, then immediately turn around & drive back the way you came to re-collect Gnome where you left him; the Hunter-Chopper will not be around!

Return back through the tunnel with Gnome Chompski, & very carefully make it over the jump ahead of us. Slowly navigate along in the Car & eventually, we will reach a wooden wall with a Lambda symbol painted on it. Boost through it with the Car… & it will be destroyed… the Car I mean.

Make sure you have Gnome Chompski with you before continuing!


Achievement #59 – Puttin’ On A Clinic: Defeat the Hunter-Chopper in Episode #2 without any misses.
With the Car destroyed, we now have nowhere to run. Take Gnome along with you & you will discover a group of Resistance fighters; here we can finally take this thing down!. Save… & put Gnome somewhere safe/you will remember!

Now we have to fight the Hunter-Chopper, but for this Achievement, we cannot miss any of our shots. To make the situation worse, we will not get a Rocket Launcher! Instead, we must use the Gravity Gun to throw the Hunter-Chopper’s own Mines back at it. If you made a Hard Save where Gnome is, make a Quick Save after each successful hit to the Hunter-Chopper with it’s Mines. If you miss, reload your last Quick Save.

On Easy Difficulty, it should take three direct hits using the Hunter-Chopper’s Mines to destroy it & we will unlock the Achievement.

Chapter #5 – Under the Radar:
With the Hunter-Chopper destroyed, we now need our Car repaired before we can continue on to White Forest. Fortunately, the Resistance here will oblige, & we will enter into the next Chapter…

Be sure to have Gnome Chompski with you before progressing!

Waiting For Car Repairs: While we wait for the Car to be repaired, we will be tasked with destroying a Combine Autogun that has been restricting movement to White Forest. We can leave Gnome Chompski here in the garage, but leave him in a corner or against a wall; do not place him on any physical objects like a table or there is a good chance he will completely despawn! Before we leave the garage, make a Hard Save!


Achievement #60 – Gunishment!: Destroy the Combine Autogun in the scrapyard.
Story Related. Sneak through the scrapyard until you reach the Combine Autogun building, kill the Combine Soldiers inside, then throw a Grenade inside the control console to destroy the Autogun & unlock our Achievement.

Back Behind the Wheel: With the Autogun destroyed, we will return back to the garage where the Car & Gnome Chompski are. The Resistance will have also equipped the Car with a Radar Beacon – this becomes important from here on!

As something to note, we need to kill 20 enemies by running them over for the Hit & Run Achievement. This is risky to do with Gnome Chompski in the Car, but it’s hard to avoid. If a good opportunity arises, smash the guy, but always make sure you collect Chomsky again afterwards…

As soon as we exit the garage, there will be a whole host of Zombies outside; this is a perfect opportunity to rack up some Car kills. Drive ahead, run over Zombies, collect Gnome Chompski to drop him off somewhere safe, then drive ahead to kill more Zombies… Our opportunities for Car kills are limited so take every chance you get!

Radar Cache #1: As we drive out of the scrapyard, Alyx will mention something on the radar. Stop the Car when she says so shortly after, & investigate the nearby van with an Explosive Barrel inside it. Destroy the Barrel, & we can loot the Cache inside.


Achievement #61 – Gordon Propelled Rocket: Unlock the Rocket Launcher Lambda Cache in Chapter #5 – Under the Radar.
Drive along past a large water tower, & carry on down the street. When you take a right from the water tower, you will pick up another radar signal coming from a warehouse off your left that has a white van lodged in its wall around the back.

Crawl through the van to get into the building & there will be a large metal plate inside we can knock down with our Gravity Gun. Use the Grenade Crate nearby to restock, throw a Grenade underneath the plate, & stand on it to be launched up onto the walkway. Flip the switch to unlock a fence gate, & we will unlock the Achievement.

Radar Cache #2: By completing the previous puzzle, not only can we now collect a Rocket Launcher, but we will also raid our second Radar Cache!

Radar Cache #3: Leave the warehouse, but do not go back to the Car yet. Instead, walk across the street towards the fenced in compound with all the C-Cans. At the back of the compound will be a small metal shed. Enter inside, & there will be a sawblade stuck into the floor; grab it with the Gravity Gun & it will reveal the Radar Cache underneath.

Radar Cache #4: Return back to the Car (with Gnome Chompski inside it) & continue to drive on through a tunnel up ahead. Take the switchback up towards the White Forest Inn, & after two switches in the road, we can see a fallen tree off our left with the road view going in between two rock faces.

Park the Car near the fallen tree, & walk around it towards the cliff wall. Search around here to find a cave in the cliff we can crouch through. Blast some rocks out of the way using the Gravity Gun, & we can find the Radar Cache inside.


Achievement #62 – Quiet Mountain Getaway: Survive the ambush at White Forest Inn.
Story Related. Drive up the hill to continue on, & we will reach the White Forest Inn; as you drive, we will eventually be trapped behind a Combine laser field. Fight your way through the waves of Combine & finish off the ambush force to unlock the Achievement.

Radar Cache #5: Leave the White Forest Inn & take the jump down below further along the road. Drive the switchbacks down past a flaming car & around until you get another signal from the final Cache. Head around some rocks, & you will see an arrow pointing up at a crate hanging from a tree. Grab a nearby rock with the Gravity Gun, & knock the crates down.


Achievement #63 – Cache Checker: Find all 5 Radar Caches in Chapter #5 – Under the Radar.
If you have been following along with the guide, we will unlock this Achievement after raiding the final Radar Cache.
Sequence 19: Unforeseen Consequences
1. Episode #2: Under the Radar, Our Mutual Fiend, T-Minus One
2. Achievements: 69/69
-----------------------------------------------------------------------------------------------------

Chapter #5 – Under the Radar:


Achievement #64 – Pedal to the Metal: Beat Dog in a race to the White Forest base.
Carry on along & we will eventually have to leave the road & follow a creek towards a sluice gate. Go to open the sluice, & we will be reunited with Dog!

After the pleasantries… Dog will open the sluice gate for us, & Alyx will challenge us to race Dog. Before entering the Car, make a Save just in case! There is no way we can keep Gnome Chompski in the Car with us & beat Dog, so place him somewhere safe on the ground & we will come back for him after the race.

As soon as Alyx says “step on it”, do just that! It is a short distance – head down the river then up the path on your right, around the corner, then you are pretty much there. Alyx will say “Better luck next time, Slow-Poke” if we were successful.

When the Achievement unlocks, make sure you turn around & drive back to collect Gnome Chompski!

Chapter #6 – Our Mutual Fiend:
When we arrive at White Forest, we will unable to continue with the Car. Exit it, grab Gnome Chompski, & we will carry on foot. Enter into the bunker, & we will start the next Chapter…


Achievement #65 – Little Rocket Man: Send the garden gnome into space.
Navigate through White Forest with Alyx & Gnome, & locate Eli. Once reunited, we will carry on to Silo 1 where we can find Dr. Kleiner & Dr. Magnusson. Dr. Kleiner will step down some stairs to come see us… & we will walk up them ourselves where there is an open hatch to the rocket.

Place Gnome Chompski inside (with Lamar apparently) & close the hatch. Make sure you close that hatch; just placing him inside the rocket & walking away will not unlock the Achievement! As soon as the hatch closes, we will have at long last unlocked this Achievement. Get in there you little (censored by Steam)… still no where near as bad as the Pizza Box or Purple Hat in Black Mesa…


Achievement #66 – Secondary Silo Secured: Secure the launch doors on missile Silo 2.
Story Related. While we are basking in the glory of being done with Gnome Chompski, alarms will sound, & we will be tasked with investigating what is going on at Silo 2. As we travel to it… White Forest will be breached by the Combine. They are here.

After fighting your way through Silo 2, close the overhead doors to the silo to unlock the Achievement.

Red Alert: Striders are on their way to attack White Forest. For the Neighborhood Watch Achievement, we cannot let them destroy any of the 3 buildings. There are 13 Striders total we need to defeat, & some will be escorted by 2-3 Combine Hunters; the Combine Hunters are great candidates to be killed by running them over in the Car for the Hit & Run Achievement if you still need to unlock it.

There are two types of Striders: building destroyers & base breachers. Building destroyers are the ones we need to pay the most attention to as they will, naturally, destroy a building as their primary objective; these Striders typically move extremely quickly. Base breachers on the other hand are heading all the way to the South to attack White Forest & typically move much slower. Always focus on building destroyers before attacking base breachers; granted, if a base breacher reaches White Forest it is still a “game over”.

Keep lots of Saves in case you Quick Save at a bad time & cannot make it to an area in time to save a building. The Striders must be killed with a Magnusson Device, but the Combine Hunters can/should be killed with the Car, RPG, Crossbow, Revolver, or Pulse Gun for best results.


Striders #1-2: Drive to the North end of the valley, & we will find the Sawmill. Briefly speak with the Resistance here, & the battle will commence. Strider #1 is a base breacher, & will arrive from the “cranes” Northwest of the Sawmill.

When it is defeated, Strider #2 will immediately arrive from the Northeast & sprint to destroy the Sawmill. You need to respond fast! If it is allowed to fire off its charged beam, it will destroy the Sawmill; if this happens, you need to reload.

Striders #3-4: The next two Striders will arrive, from the Northwest & the East, but they are base breachers. Catch up to each of them, & kill them.

Striders #5-8: The next four Striders will be coming in pretty quick succession. Strider #5 will come from the North & head to the Sawmill, but it is a base breacher. Shortly while we fight it, Strider #6 will arrive from the East, but it is also a base breacher fortunately, & you do not have to rush to destroy it.

After destroying Strider #5, Strider #7 will arrive from the Northwest & be b-lining towards the Western Supply Post to destroy. We must kill it before it reaches the building! Continue to ignore Strider #6 if you were not able to kill it, & rush to engage Strider #7!

With Strider #7 killed, you should have time to kill Strider #6 as it makes its way towards the base. Eventually, Strider #8 will arrive from the East & b-line towards the Eastern Supply Post to destroy. Ideally you killed Strider #6 close by, & can set up for Strider #8.

Make a Save after you defeat Strider #8 – the worst of this is over!


Achievement #67 – Hit & Run: Run over 20 enemies with the Car in Episode #2.
Ideally you have at least 15/20 kills earned towards this Achievement. Whenever possible, use the Car to ram Combine Hunters as, not only is it an efficient way to kill them, but it will net you the last few kills needed for this Achievement.

Kill any 20 enemies by running them over in the Car, & we will unlock the Achievement.

Striders #9-13: Fortunately for us, Strider #8 is the last of the building destroyers & the final 5 Striders are all base breachers. Use the Eastern & Western Supply Posts to stock up on ammo & take out the remaining Striders as they appear. They move slow, but we can still be overwhelmed by the Combine Hunters if we do not deal with them quickly enough.


Achievement #68 – Neighborhood Watch: Save all 3 buildings outside the missile silo from destruction.
If you successfully killed Striders #2, #7, & #8 without them destroying a single, we will unlock this Achievement!


Achievement #69 – Defence of the Armament: Save the missile silo from the Combine offensive.
Story Related. After defending White Forest from the Strider invasion force, you will also unlock the final Achievement of the game!

Chapter #7 – T-Minus One:
There are no Achievements found in this Chapter, enjoy the CLIFF HANGER for the rest of your life...
Conclusion:
Half Life 2 is a PC classic & the two Episodes are great continuations to the story. Why isn’t there a Half Life 3 about Gordon going after the Borealis? I have no idea… though we can find the interdimensional teleporting ice breaker as an Easter egg in Portal 2 which is pretty cool. What comes first in the story? Half Life 2 or Portal 2? Regardless, 100% Half Life 2 along with both Episodes took me around 30 hours to complete.

If this guide helped you achieve 100%, rate the guide or let me know in the comments. Helps me know if I am doing things right!


100% Complete!
Thank you for choosing Cynical Guides, & I will see you in the next one!

If you are interested in a little bit of patronage, support my projects & consider buying me a coffee. If not, no worries; my guides are, & will always be free content. Achievement Hunting is my passion, & writing these guides is a way for me to give meaning to a life long hobby!
https://www.buymeacoffee.com/cynic0055

Other Cynical Guides:
If you enjoy this game & my style of writing guides, be sure to check out my:
https://steamhost.cn/steamcommunity_com/sharedfiles/filedetails/?id=2974277146
https://steamhost.cn/steamcommunity_com/sharedfiles/filedetails/?id=2241677679
https://steamhost.cn/steamcommunity_com/sharedfiles/filedetails/?id=2246222046
Check out my profile for a full list of my works.
https://steamhost.cn/steamcommunity_com/sharedfiles/filedetails/?id=2992727030


64 Comments
xuxucmkox 10 Jul @ 12:33pm 
Thank you so much!
DefAlt0 8 Jun @ 12:45pm 
Awesome guide, pretty easy to follow. I must add imo the ridiculousness of carrying that damn gnome in a car while each shot from the heli threw the gnome out was so annoying.
Great job though, we should appreciate the time you took to write it, must have been a lot.
P.M.A. 30 May @ 11:20am 
awesome!!
PŌPPINGUMMY 18 May @ 6:43am 
Found a good spot to farm the "Hit & Run" achievement.

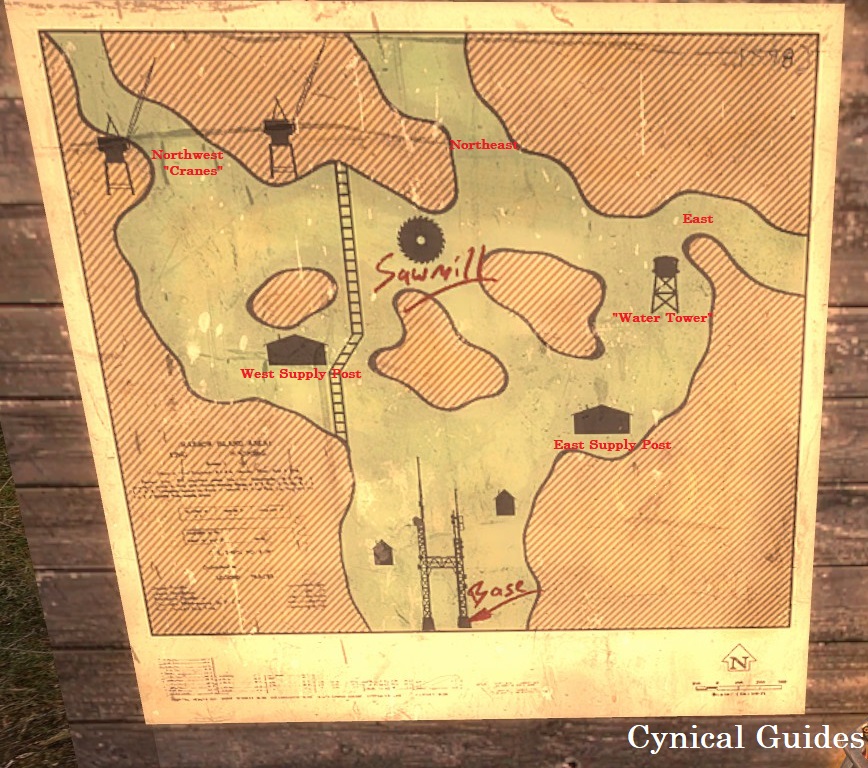
After you destroy the Autogun in Chapter 5 and you back in your upgraded car, you open to a road between the toxic pits and Autogun scrap yard. The zombies here seem to respawn infinitely so if you don't want to worry about hitting targets with the car later you can just farm it here.
Gramsci 6 May @ 11:39am 
Ridiculously well written guide. Honestly.
Some parts could use a little clearer wording but my god is this a lot of work. I respect that. On the other hand, your guide is fine without screenshots. Now that is an achievement on its own, eh?
Eat my points.
The Asian Dad You Never Had 18 Apr @ 2:37pm 
U always got the best guides, thank you brochacho :shadeknight:
sApieNz 14 Apr @ 7:51am 
If you'll ever feel bad, remember, that i took the gnome through the whoooole episode, put him into the rocket, did everything.. EXCEPT CLOSING THE F###ING HATCH :GDNormal: :GDNormal: :GDNormal:
acibi 13 Apr @ 10:34am 
Combine Sniper #2: Rocket Launcher also works.
Safari Buddy 6 Apr @ 10:58pm 
super helpful, thanks bud!
Skrewild 27 Mar @ 8:03am 
Thanks man, perfect guide as usual!:praisesun: