Dungeon Kingdom: Sign of the Moon

Dungeon Kingdom: Sign of the Moon

Not enough ratings
Walkthrough: Notes and Maps
By krasovski
My humble travel notes with the White Moon Gang. With pictures!
2
2
2
   
Award
Favorite
Favorited
Unfavorite
Better not to read all this!
Hello, folks! I would like to share notes on my playthrough of the game (Early Access v0.9.961).
!Better not to read them, because they are a complete spoiler. You've been warned!

And if you're still reading this, means you're stuck somewhere or can't find something .
Will not say that I know all the game secrets (only Kanda and Lord Creator know them)!

So, if I missed any riddle or did not indicate an important place on the map - write in the comments, I will fix everything! Also, if you find errors in the text, do not hesitate to correct me: not all of you read Russian perfectly, so I use a translator (thanks, Google!). So, let's go! :))

N.B. To view map in full size, click the middle mouse button on the image.

1. Barimbar Town
"Even the smallest person can change the course of the future." J.R.R. Tolkien

We recruit a team of thugs and go get some fresh air.
All the shops are closed because of the night, and the city gates are still locked, so let's do searches, robberies, and archaeological digs to get your gear!

At the crossroads, one of the team members offers to look around and turn left, where we find
the door [1] to the Cellar. A Knife is stuck into the box to the left of the entrance.
Another Knife lies on the barrel, inside the Cellar. Remove the firewood and find the lever
that opens the secret door [2]. Behind the gate [3] we find and kill the unfortunate mad dog.
Break the wooden wall [4] - behind it there is a tunnel, where two skeletons sleep idyllically.
Examine the location and find some junk: a Bag of Seeds, a Long Dagger, an Arrow and a Dart.


Then we go to the Graveyard [5], where we have an appointment: cute "green kangaroos"
are jumping there. We kill them all. To the right of Veren's crypt press the secret button [6]
and open the door [6]: find the scroll with the "Light" Spell and a few different things [7].
On the way back we admire the "warm greetings to Grimrock". He-he ;)) Arrows stick out
of the trees, and at the far end of the Graveyard, to the left, is another Knife. You can take it.

Do not forget to look inside all the barrels and boxes - there is food and things.
Since there is no trade in the game yet, you don't need to carry unnecessary junk on yourself:
we take only what is important - food, water, powerful weapons, gold & diamonds (joke!).

You can draw water from a Well [8]. And drink, too, of course.
Finally, we reach the Temple of Adwij [9] - let her name be holy(!) - and go inside {A - A}.

2. Temple of Adwij
At the entrance we ring the bell [1] and talk with Angie.
Then we explore the available rooms, read books and letters (you don't need to take them with you, just read them), also read all the signs on the walls. You will be credited!

In Angie's bedroom [2] we take the Cloak of the Moon. Further, on the way to the Cafeteria, we put something on the pedal [3] - a cache [3] will open in the Cafeteria, there we take Seeds.
Go to the Honey Storage [4-6], kill the all bees, and take the Olymenn's Helmet [6].


Now we go to the left: on the way we speak again with Angie and she opens the door for us [7].
In Jarius office [8], press two small hidden buttons [9] (on the column and to the right of the table) and open the secret [9]. We take Seeds, Dagger, Red necklace and Cloak of the Moon.

In Bavmorda's room [10] you can burn the bed (we are robbers, barbarians!), and you can find the Long Dagger. Now - into the door [7] and go along the aisle to the end.
There we lower 4 levers down [11] and open the two doors [11]: Orcs and Dwarves don't bow!

We are three ways: up (C), down (B) and forward. We go forward [12], straight through the Dormitory: there are curtains hanging at the end, they can be burned. Then we turn to the right and find a wall with a crack [13]. Break it and we find ourselves in a room with the Fountain of Resurrection and a hole in the floor. You can find a scroll with the "Path" Spell (I never came up with the use of this spell), and then we go down the tightrope into the unknown...

3. Basement
We go down the rope {D - D}. A huge "snowflake" is leaning against the wall. Next to it we take the Iron Key and open the door [1]. Let's go, keeping to the right. Take the Marble [2] and in the pit (with the rat) put one piece of marble on the pedal [3]. We continue moving, all the time turning to the right. Throw one more piece of marble onto the pedal [4].

We go along the same corridor (pink, it means it is higher, blue - lower) back to the end and we find a square room with a carpet on the floor. We burn the carpet.
Under it is a hatch [5] - we jump into it, then we go along the corridor, we go up the ladder and go out to the balcony. We take away the Statuette [6].

Having reached the end of the balcony, jump down and turn right and right again.
Go along the corridor to the end and - once again to the right: we see a wall with a crack. Behind her is another Statuette [6]. Install the figurines on the pedestals [6] (yellow squares on the map) - the door [6] opens.


We go along the corridor and turn right. At the end - we break the wall [7], then another one [8].
Entrance to the cave: we go to the right, there we take the Round Wooden Shield and we return back. I completely forgot: of course, we kill all the wonderful rats! :))

We reach the open door [10], enter, the door closes. We take away the Warhammer and the Red Ring in the chest. In the adjacent alcove, lift up the lever [10] and open the door [10].

We go further along the corridor, near the ladder we turn left.
Further - a closed door [11]. Opposite it is the pedal [11], on which we put something.
We lower the lever [12], return to the ladder and climb up on it.

We go along the corridor and at the fork we meet with Jarius. After talking with him, we turn left, into the room with statues and turn the small figures [15] into the same position as the large statues, thereby obtaining the Golden Key [16]. In the same place, in the hall with the key, we find the page of Jarius' Memoirs (Age1/p1) (unlike Spell scrolls, pages from Jarius' book disappear after being read, being placed in your archive).

We return to the fork and turn left.
In the hall with the Book of Prophecy, take the Strong Wooden Shield, activate the Moon Lock [13] and take the Adwij Key [14]. This opens a passage through an invisible wall [13], from where a rat crawls out. We kill her and leave here.

Leaving the door [6], we turn to the right and go, breaking the walls [17], [18], [19] to find a cache. In it we take one more (!) Seeds and Chain Armor. Then we go to the "arrival hall" (the one with the rope), killing cool flying animals along the way.

Open the Golden Lock [20] and walk into the darkness ...
We pass along the corridor, go down the ladder, and then jump down (2 - 2), to the very base of the Bell Tower (-2 floor). On the right is the staircase: we go up to the -1 floor and lower the switch [21]. Then we go down back and open the door [22] by pressing 2 buttons on the sides. We take in the chest the Axe and the "Fireball" Spell. Hurray, now let's fight!

We go up the stairs to the +2 floor, break the wall and lower the switch. Then we go down to the floor below (+1): behind the opened secret door [23] there is a staircase [24]: along it we go up to the very top of the Bell Tower (3). Take the Orc Sword and the Purple Ring from the chest. Uf-f-f!
We go down the rope down. On the platform, we lower the lever [25], a secret passage opens into the right wing of Dormitory. We are back {E - E}.

Now is the time to make the Offering: go down to the Offerings Room {B - B} and, after talking with the good Old Woman [26], put 4 bags of Seeds into the Basket [27] (you can do more if you are not greedy): a cache with Olymenn's Key [28] opens.
Now we have 2 Keys of Olymenn, you can go upstairs.

4. Olimenn level
Climb the stairs up {C - C} and turn left - into the Priest's Library.
The second bookcase from the entrance to the left - take a closer look at the blue book [1].
Oops: the cache has opened! "Health" Spell and another formula of "Light" Spell. Excellent.
To the right of the Telescope on the floor is the Jarius Manuscript (Age1/p2).

In the second room, we stand on the stove in the pool [2] and throw goblet into the opened niche [3]. Now let's go back along the corridor - near the room with grates on the floor, a cache has opened [3]. We take away the Greaves of Olimenn, Seeds, Arrow and Long Dagger.
Press the button [4] - now the wall in the room with the pools will not close.


In the Room of Maps, carefully examine the map on the wall.
The note advises to think about tears of happiness and about World. There is a small place on the Map in the form of a "tear" - if you find it, a secret will be revealed [5]: we take the Purple Ring, and the Poison Cloud Spell. Now you can go to the Chambers of Olymenn, take tests.

Our two keys open 2 locks [6] and [7]. We pass into the room and break the wall on the right [8]:
in the cache there is a Bow, Arrow, Norman's Helmet and Red Ring.

Climb the stairs to the Junction of Ages {F - F}, and go straight to the end: on the right in the niche there are 3 buttons [10] that open a secret passage. We go down two ladders, then in the square room we break the cracked wall [11] and find a Rat Tonnels.
We go along it, we break down one more wall [12] - and we find the Teleport (T1).

We decide to take a chance - and we are transferred to the room, where we find the "Lightning" Spell and the Dart. We open the hatch in the floor [14], jump and find ourselves in Temple Basement {G - G}! However, it was thrown far...

We return to the Level of Olimenn and with the Key of Adwij open the passage to the tests [9]. Here we are waiting for 4 Olimen's Lock`s [15] and 4 entrances (Age 1 - 4) - there we must find
4 Olimenn Key`s. By the way, if you burn one of the carpets on the floor, you can find the Dagger.

5. Junction of Ages
We begin the test with Age 1. Take the Sword of Justice [1] from the pedestal and enter the opened door. Kill flying monsters with fireballs and swords. A lever in the center of the room [2] raises the locked door. If you fell into the pit, you can go back through the Teleport (T2), opposite which there is a small cache [18]. After the victory we lower the lever at the entrance [1] and take the first Key of Olymenn [3].

Go to Age 2. On the floor in front of the fresco there is a scroll with the "Heal" Spell.
Take the Sacrificial Cup from the podium and go to fight. in the second hall there is a secret passage in the wall to the right [5] - there we find a Jarius Manuscript (Age1/p4). Then we kill the flying birds until the goblet is completely filled with blood. The quest is completed, we take the second Key of Olymenn [6].


Age 3. In the niche behind the curtain, we find the "Shield" Spell. We take the Staff of Shael from the stand in front of the door and enter the door. Everything is simple here: starting from position [9], we calmly go around the Mana Fountain on the plates (clockwise) until the Staff of Shael is filled with energy. A Red Necklace can be found under the stairs. To get out of there you need to jump into one of the holes.

In the room below is another page of the Jarius Manuscript (Age1/p3). Also here one of the walls is invisible [10] - we go through it and go to the end of the corridor [11]: here you can see the Age 2 hall, into which the Olymenn's Armor falls from above (you can jump and pick it up, or you can later). Go back and through the Teleport (T3).

Go down the stairs again and turn into the corridor on the right. Find the invisible Magic bridge [12] and when you cross to the other side, you will find a secret room on the right [19]: there are Dart and Morgenstern. lower the lever [13] to open the front door [8].

If you jump (fall) off the Magic bridge, you can reach the Teleport (T3) from the other side.
The quest is completed, we take the third Olimenn Key [14].

Age 4 - is the most difficult test of all. At the entrance we take a Hand Mirror [15] from the pedestal and, passing further, we read the note on the floor. There are 6 portraits in the hall and 4 more - in a room behind a secret wall [16]. Aim the Mirror at the portraits of three members of your group and one more in the secret room. The bell will ring, you have passed the test!
We take the last Key of Olymenn [17] - now we have everything to open 4 locks.

6. Olimenn Stone
We open 4 Olymenn lock`s and go up the stairs: on the left is a closed door [1], you need the 7 Olymenn Key, which we don't have. To open this door, you need to go to a small trick. But we are robbers, so we can be forgiven for cheating a little: we take the Olymenn Key from the door that was opened by the second in a row. Voila! We take the Chain mail greaves and the Spell "Shield".

To open the next door, you need to burn the banner to the right of the entrance to the hall with a large statue of the Dragon and activate sma-all button [2]. In this alcove take the Chain mail armor, the Norman Helmet, and the Purple ring.

Turn 4 small dragons statue [3] so that they look in the same direction as the big Dragon, and secret passage opens [3].

We pass along the corridor and on the left we see a Hall with a large Worm, around which smaller worms crawl. The best way - is to break through to the opposite wall and pull the chain [4]:
a passage on the right [4] will open, into which you can escape.
By the way, it is good to poison small worms with a Poison Cloud Spell, or Fireball Spell.


We go into the passage, there we turn the lever of the Valves [5] to drain the water into the Drowned Basement and move on. The tail of a large Worm descends into the Basement, which we chop, along the way we finish off the biting kids around.

Near the wall to the left lies the Sword, and on the sides of it there are secret passages in the wall [6], let's examine them. By the way, the Worm meat tastes quite good, try it!

Let's go back: after the death of the big Worm, the secret [7] was revealed - we get the Adwij Key. There are also 2 invisible walls on either side of the chain [8], look into these passages.

In the corridor there is another door with an Unknown Lock [9]: we try the found key -
it fits perfectly. In the hall, on a pedestal, there is a shining Olymenn Stone [10]!
You can finally take it and ...I think we've found all the Secrets of this Level! Go ahead!

So, we have the Stone and we are going back. But who is it? Footsteps are heard ...
Ah, this is the good woman we met at the Altar! Bon Soir, Madame, how do you pray here,
are the rats bothering you?
But, what is it?! Oh, you...
This malignant bitсh, instead of warm monastic hugs, throws us into the dungeon - one hand!!!
We fall, fall, fa-a...

7. Prison Break
“You can do more with a kind word and a gun than with just a kind word.” Al Capone

Here is the price of gratitude for a job well done: we are in a Jail!
Well, Angie managed to pass us the "Shrink Scroll" - we slip through the bars and look around.
Dark, as a coal miner in the... ;))

Go left to the end of the corridor and look around the Canteen.
On the table, take the Clover Key [1] and next to it - the "Activation Spell" scroll.
A good thing - it will help us turn on switches and open doors at a distance!
Around the corner, in the back room [2] we find Elborn's Shield and Darts.

Now, let's go the other way - past our former cell - to the next one, where some Ryan was sitting. To the right of the entrance to the chamber is a page of the Jarius manuscript [3] (Age1/p5), and to the left is the "Activation Spell". Turning the switch [4] we enter: on the wall there is a record of the former tenant, which advises us to look at two stones on the wall - higher and lower. We find the secret buttons [5], click and open the first cache [5]: it contains Elborn's boots, Shuriken and Kunai.

Go further along the corridor (counterclockwise): next to the camera is a dude with the nickname Guadje. Good name! In the cell, we find another page [6] of the Jarius manuscript (Age4/p2). Continue along the corridor, open the partition wall [7] and-opposite the Hoyas cell - remove the skeleton from the elevation: under it we find a cache [8] with Peridot's Ring.
By the way, if you are disturbed by skeletons and you want to move them to another place,
it is easier to put them in your Inventory than to drag them one by one ;))


Go straight: on the right, the Brig where the skeletons sit. Click the [9] and [10] buttons. When the doors open, you need to put a skeleton on each bench inside [11] (it is better to do this by standing sideways to the bench) - the Door [11] opens to a room with a pit in the center.
To the left of the entrance, we take another [12] Jarius Manuscript (Age1/p7).

Jump into the pit and kill all the skeletons and take Big Gear [26].
But it is not easy to go back: an Invisible Teleport confuses the tracks. In the end, we need to get to the point [27] and go through the hidden wall.

However, if you spend some time carefully studying these corridors, you will be able to find locations [35] and [36]: if you use a Hidden Teleport for a long time (which moves randomly from the point {L}), you will move to these places. There are hidden Spear, Dark Templar Cloak and Elborn Armor.

We pass through the invisible wall [27] and then go up the spiral staircase (2)-(2).
On the right, behind the invisible wall [28], the Fountain of resurrection [29].
Next to the stairs is a corridor, going to North. There we find Gifts Key [30] and three doors, with niches, next to each, these are Gifts Locks.

Open the each rooms (If you don't have a third key - it doesn't matter, you'll find it later): [31] - Spear, Shuriken, Kunai; [32] - Ring of Runes Signets and Arrow's; [33] - Ring of Moon Stone.

We leave this "Pere Noel hutch", turn right and go to the end: then - an Invisible Wall [34] -
after passing through it, we are again in the Prison Corridor.
But keep in mind - this wall only lets you pass in one direction!

Continue to go counterclockwise, all the time turning left. As a result, we come to a flimsy wooden bridge, under which there is a bottomless abyss... But, this Bridge of Fear is broken: you need to find three Gears to lower the cross part [13]. We mount the Big Gear In place.
Two more to go...

Going over the bridge and find the right Pantry - with food supplies, ropes and a hole. We tie the rope in a ring on the ceiling [14] and carefully descend into Catacomb B {J - J} - there are spikes at the bottom! Not deadly, but humiliating... Going West, climb the ladder and find first Small Gear [15]. Great!

Go back, just behind the spikes on the wall secret button - opens the door, behind it 2 ladders to the top (1)-(1). At the top we find a cache with a sword - they tell them to chop Ogres well. Let's see! Click on the button [17] and return to the Prison Corridor.

If you turn North from Canteen, you can get to Ogres Quarter. For now, we will not rush, but look into the corridor above Crossroads - where the passage is closed by a grate without a lock [18]. Let's try out a new "Activation Spell" on this door: it works perfectly, the passage is open! We find the hiding place where Elborn's Helmet is located [19]. And if you search, you can find another hiding place, behind an invisible wall [20]. We take another Ogre's Scourge there.

Now you can visit Ogres as well. A long corridor leads to their lair - it is convenient to retreat along it, shooting "Fireballs", but keep in mind, Ogres run fast! :))
When the Ogres are finished, we'll visit them: hidden under the balcony are Gift Key [21], another page [22] of Jarius Memoir (Age1/p6), and Scimitar [23].

To the East of Crossroads is the entrance to the home of a lone Ogre: it guards three empty cells. We pay him a murderously beautiful visit. In one of the cells, a certain Draze was serving his sentence - now all that remains of him is a skeleton sitting on a bench [24] - let's talk to him.

Now, going to the Torture Room. Activate the leftmost lever [25] and take the second Small Gear out of the cage. We go to the bridge and mount the last gear.

Here's Angie. Even in prison, a woman will find something to scold the men-they say: we are late, we are late! Well, well, okay - moving {M - M} on stairs in next hall...
O-ops! That hag is on our way again: Bavmorda is closing the passageway right in front of us.
Ok, as the young Volodya Ulyanov said: "- We will go the other way!" © ;))))

Fill empty flasks with green muck and set them in levers around the Green Fountain. There's one on top, second - from bottom arm to rotate horizontally ...and so 8 times. Now we go up the stairs: inside the "empty column" [40] we put the switch horizontally. We do the same near the doors closed by the Baymorda [41] - as a result, an exit opens [40] near the Green Fountain.
The path to freedom is open!!!

8. The Storage
There is a difference between knowing the path and walking the path. Morpheus.

Knock-knock, Neo! We wake up and go down the stairs: at the bottom we find the Fountain of Life, a locked door and a strange pit. The companions in misfortune unanimously want to jump there. Well, let's jump... at the bottom of the pit is a sheet with a diagram of the "Matrix" [1].

To get back out, we pass through an invisible wall [2] (at the same time we step on the pedal [3]
and hear that a door has opened somewhere). Click the secret brick [4] in the wall and jump into the Teleport [5], which is activated behind the secret wall.
We turn to the right and - trying to be very fast - run down the stairs to the open door [3].
We had time! We block the door by lowering the switch [3]: now you can look around!

The hall has 5 locked Storages [6], a door to the Alcove [8] and a spiral stair: let's go down (1)-(1) and see what's down there. On the right side is Potion storage, and in the room on the left you can find another page [7] of Jarius's Memoirs (Age2/p4).

To open the doors of the storages, push the "Matrix buttons" [6] in the center of the hall in accordance with the found scheme. In the Armory storage, we find Guardians Greaves,
as well as a secret place [9] where the Gift Key [29] is located (we should not forget to pay a visit
to the "Pere Noel Hutch" in the Jail again and pick up the Ring of Runes Signets).
If you decide to go through one of the walls in the center of the room [34], then you will receive a cool Guardians Armor and a War Axe (like the Vikings).

In other storages there are niches [8]: if you put in each item that "destroys" the contents of the vault - Fire, Teeth, Water, Flower - then we will open the door to the Alcove [8]. And if you search in the Food storage, you find a secret wall [10] and another passage to the Jail {O - O}.


*By the way, if you don't have your grandmother's false teeth with you, you should kill a one or two Goblins at the entrance to Goblin Caves {P-P}.

We go to the Alcove and break the wooden partition [11]. On the left is a room with a wooden floor and a closed door [12], on the right is a room with a pedal [12] in the floor and here is a page [13] of the Jarius Manuscript (Age2/p3).

We go further down the corridor and find three rooms with hatches in the floor: looking down, we see rats sitting in cages [14]. Kill the animals with "Fireball" spell and in the last room the door opens [14] to Ancient Foundations (alternatively, you can go down to the level below by the ladder (2)-(2) and start the "Poison cloud" spell into the cells).

We go to the Ancient Foundations [14], go down the ladders and, behind the destroyed wall [30], find a hidden room. Here we fight with combat rats, then explore the location. There are stone blocks on the floor - we use them to knock down the Magic Shard [15] from the shelf ...well, if you are so bad at throwing stones, then another Magic Shard [16] can be found in the next room.
There we also find a strange rift in the Magical Crust [17]. Unpleasant place, remember it.
You can break a couple of cracked walls: behind one of them is a cache [35] with page [36] of the Jarius manuscript (Age2/p7). Trying not to fall into the traps [18], we return to the Alcoves.

We go down to the level below on the ladder (2)-(2), go to the room located under the wooden flooring, and press the pedal in the floor [12]. There we find another page [19] of the Jarius Manuscript (Age2/p5). After that, we return to the top, activate the pedal [12] and quickly pass through the opened door [12] and fix it with a switch. Voila!

Ahead of the magic test! We pass through the door [20] and then open the next door [21] with the "Activation Spell". If you turn to the right and conjure again, you will open a secret room [22], where the Guardians Shield [23] is located. In this Room of Runes, we look everywhere for 4 runes [24], and remember what they look like; we'll also find the Moonstone ring there. On the Rune Table [25], click all (!) buttons where we only see the familiar runes: a secret passage opens [25].

If you like experimenting, try other combinations of buttons: for example, the first and last, or ...the second and thirteenth. In the first case, a hidden niche on the left [31] will open, where you will find Guardians Helmet and page [32] of the Jarius manuscript (Age2/p1), in the second case, in the niche on the right [33], you will find the awesome Guardian's Chief Shield. Such a small bonus.

Go over the stones to the Magic Portal [26] - around it 4 pedestal [27], where you need to insert the Magic Shard. If you stumble and fall into the water, do not worry: at the same time, look for the page [28] of the Jarius Manuscript (Age2/p2) and get back out.

9. Goblin Caves
We don't have enough Magic Shard yet - we need to find the missing ones...
Let's continue the search! Go to Goblins Caves {P - P}, where we enthusiastically explore caves and have fun killing Goblins. If you still haven't found the false teeth (for opening Food storage), then it's time to find them here!


Go to the right, open the doors [1] and explore West Fireplace. Then we go down to the South - there we also activate the switch [2] and inspect the South West Fireplace.

Next, we go South along the crossings. Under one of the stairs we find the Magic Shard [3], climb higher and see The Big Hall. We climb to Level 2 (1)-(1), and then - even higher, to Level 3 (2)-(2), where at the very top we find another Magic Shard [4].

If you then walk along the long bridge, to Level 2, you will find another page [5] of Jarius' manuscript (Age2/p6). And if you are really an avid collector, you can visit the Souih East Fireplace and pick up another Magic Shard there [6].
Now we have a complete collection of Manuscripts and stones: go back to the Magical Portal [26], install missing Magic Shard in the nest [27] and step into the unknown. Enjoy!

9. Black Mages Quarter
"A wizard is never late, Frodo Baggins. Nor is he early. He arrives precisely when he means to." ©

We were brought into an eerie place {Q - Q} - it smells unpleasant and the buzz is kind of suspicious. We examine the hall, read all the scrolls and books that we see: there may be clues
to our journey. With the help of the spell "Activation Spell" we pass through the door [1], about which the sign on the wall says: "Only Mages can pass".
Yes, yes, yes... "You shall not pass!" - I've heard it somewhere before! ;))

There is no descent, you have to jump. There are 2 ladders in the alcoves on the left (look up just in case) and on the right: we climb along them and, pressing the lever, open the grate [2] and [3]. There are 12 pressure plates [4] on the floor, which form a "Magic Bridge" in the air. After running back and forth, we create the desired path, walk along it and press three buttons [5] that open the door [5]. We get carrots as a reward! Well, Fountain of resurrection will not hurt, of course.

In the Bones Room we find the cracked wall [6] and break it: in the corridor behind the wall
the Scull Key [7] is imperceptibly lying around - we take it away and the door [7] opens.
In this corridor, fireballs are not terrible, but then - beware!

We enter the door and use the spell "Activation Spell" on the mirror on the right [8] - a passage
will open in the Syntonyzation Laboratory. Let's explore this place better: we go straight along
the corridor and in a small room we find Black Templar Letter and a scroll [9] with a new spell
"Magic Syntonization". We study the spell.


At the entrance to the next room, a plaque on the wall warns of "dangerous magic tests".
And exactly: on pedestals, in the rays of infernal light, deaths are suspended, and in the center
of the room a runic pentagram is shining [10]. Let's try a new spell on her?!
Kill all the reanimated skeletons and we pass, through the opened passage, into the next room, where we find the Copper Key [11].

With this key we open the door [12] and, after it, we find the door with the Skull Lock [13]: we have the key to this lock! Further along the corridor we see a Code Lock [14] and the entrance
to the Hub of the Laboratories, but for this you need to know the name of the Black Mage...
Who could it be?!

Opening the Skull Lock [13] and go further along the corridor and enter the Teleport [T1].
Exploring the room we found ourselves in: on the map it looks like some kind of giant letter.
To get out of here, press the same letter on the Code Lock [15] and go through the emerged Teleport [T2] further. We study again how this place looks on the map and, having pressed the next letter on the Code Lock [16], we go to the Teleport [T3]. We are in the next room: we study the area again, activate the Code Lock again [17], jump to the Teleport [T4] and repeat the same thing [18] in the next room [T5].


In the last room we finally find out the full name of the Black Mage and, having activated the Code Lock [19], we get out of this romantic place through the Teleport [T6]. In the next small room, the Teleport [T7] is already working. We read the sign on the wall, find the Jarius Manuscript [20] page (Age3/p6) and go back to the Skull Room.

We type the name of the Black Mage, the door [14] in the Laboratory Hub opens and we find ourselves in a large Hall, in which 3 entrances lead to different Experimental areas: Northeast [21], Southeast [22] and Southwest [23] - and each door is guarded by a Code Lock. Well, let's try to break the codes: maybe the found page of the manuscript will give us a hint?

10. Northeast Area
From the Laboratory Hub, we pass {R - R} to the Northeast Area entrance, type the name of the "so-called guide" on the Code Lock [21] panel and going to the corridor with a Atrium at the end: the further passage from it to the west and east is closed by crystal lattices.

In the middle of the corridor there is a descent to the Research Laboratory - a room with a large statue (on the left and right of which runic spheres rotate) and a big table with a letter on it.


On the left sphere [1] we cast the spell "Magic Syntonization" 1 time, and on the right - 2 times: the grate rises and opens a passage [2] to the large Western Hall with columns, where we apply magic to each of the eight runic spheres on the piedestals [3] - east grid rises [4] .

Going back to the Lab and stop both spheres (cast: 1 - slow rotation, 2 - fast, 3 - stop). Now we cast the spell 1 time on the right sphere [5] and 2 times on the left: the passage is free [6] - going to the Eastern Hall and explore it: here we find a Scroll [7] for opening the Southeast Area lock.

By the way, after returning to the HUB, check the wall opposite the lock that opens the door to it:
a small room [24] opened there, where you can take page [25] of Jarius' manuscript (Age3/p5)!

11. Southeast Area
We type the required word on the panel of the Code Lock [22] and enter {S - S} to the next location. To the left of the entrance are double closed grates [1] and [2], and further, to the left along the corridor - a niche in which the passage [3] to the Left-side Room opens from time to time. For open the first grate, you need to solve the riddle of this room: go through the Invisible Teleports (sages advise "turn only to the left") from I to the IV to the exit.
If the Victory Bell rings, then the grid is raised!

At the end of the corridor is a door [4] to Global Gravity Lab, let's look in with an inspection (after reading the scroll with intriguing advice, lying at the entrance): a mysterious sphere is suspended in the center of the room, and at the very end, in a niche [5], levitates a Magical Worm Screw, which we hide in a backpack (if only we could find a Magic Bottle with Magic Brandy!). Alas, after we entered, the door is blocked by a grate. To get free, cast the spell
"Magic Syntonization" into each of the rune spheres [6] on the sides of the niche.

Holy s#it, dude: the World has turned upside down!!!
But ...now you can reach the switch [7], which was previously inaccessible: press the button and order is restored. I forgot to tell you that Magic Worm Screw will be useful to us, but a little later - to drill the hole in the Magic Rift (well, like Bruce on an asteroid, remember?). ;))


The records found say that "for a greater buzz, you can repeat".
This remark is true not only for brandy: after performing the trick of turning the room over again, we open a secret storeroom [8], in which, in addition to the corn, someone hid the Moon Helmet. They say that God loves the Trinity: repeating the experiment, we hear (no, not really, no!) something else has opened up somewhere. Let's go look in the next room.

To enter Laboratory 3, cast the spell "Magic Syntonization" to the grate [9]: hooray, it worked!
So, what do we have here? Black Templars letter... a scroll with a Syntonization spell... Book...
...and open secret niche [10], where we are waiting for the excellent Moon Greaves and Kunai!

Now going even further south - through the Room of Corners - and enter the majestic Selected Gravity Lab, in the corners of which, in alcoves, 4 Blue Gem soar under the ceiling.
There is a rune inscribed on the wall of each alcove [11], and pressure plates on the floor around
the Large Generator [12].

In order in the right alcove for the anti-gravity to disappear and the Gem to fall, you need to display the rune of this alcove on all four plates. To do this, you need to stand so that there is a Large Generator behind your back, and the pressure plate is in front. When, you turn left or right, the rune changes, when you take a step to the side, it doesn't. It's simple. After we have all the Blue Gems, we put them in each corner of the Room of Corners [2] and the grate will rise [2].

We enter the room where we are waiting for a very simple task: to set the values of the runes
on the stones at the edges [13] in accordance with the runes on the center of the hall.
A passage opens [13] and we enter the Cell, where we meet Zeloran and he gives us some valuable tips, including the Code [14] for the last Lock. There we say goodbye to Angie,
and we go on without her: perhaps we will meet again, sister, don't forget the sailor! ;)))

12. Southwest Area
We dial the last code on the Lock [23], enter and look around.
Immediately to the right there is a descent into the basement, where we find some kind of scheme [1]. In the room opposite - food and the Fountain of Resurrection, and further along the corridor is a hall, at the entrance to which we read grandmother's advice "keep your feet warm".
A spiral Carpet runs from the entrance, which ends in the center, at the pressure plate [2] -
this resembles the diagram we just found.

Going along the spiral path (and really, a warm rug!), and when we reach the center, we hear
a cheerful bell. If you stand on the stove, the flying Teleport [T1] will turn on: in order to enter
it correctly, you must return (without leaving the Carpet) to the place, marked on the diagram,
and wait for the "train" to arrive. Voila!

We teleport to a new location: right in front of us is the entrance to the Laboratory of Illusion.
The sign on the wall urges you not to believe absolutely anything! So we will do: we open the door with an invisible lever [3], and boldly walk through the column into the room. We see the sign about "Tic-Tac-Toe" and notice that some walls [4] periodically disappear... and appear...
and disappear again. However, the signs do not hang in one place either.

Waiting for the wall to disappear and lower the invisible lever [5] opening the passage [5]. Immediately to the right is an illusionary lattice [6]: when the wall [4] disappears, take the
Cross Key [7]. To exit into the corridor, lift the lever [5] up and the passage [3] will open again.

We go to the left along the corridor, where the Teleport [T2] is buzzing (this is the way to the Carpet Hall), and even further the door [8] with Cross Lock: we already have the key, so we can safely open it. We find a switch on the wall [9] and Onyx Lock [10]. This bucolic landscape is complemented by a fireball, flying behind grates [11]. Well, let's go look for a Onyx Key.


The right side of the corridor leads us to the hall, where on the dais, the multi-colored Teleports change cyclically in a circle: yellow, blue, green, red (well, at least not CMYK). I'm gobsmacked!
Well, what's our favorite color? Select yellow and jump to Teleport [T3] (it doesn't really matter
what color it is
).

Yellow. In the corridor, the pressure plate [11] opens a passage to a secret niche in the room in the eastern part corridor [11]: we'll find a Spear in it, and there is also another door [12], which cannot be opened yet. At the west end of the corridor we lower the switch [13], in the room with the runes there is one more [14] and go to the Teleport [T7].

Blue. Opening the door with the switch [15], activate the lever in the room with the runes [16],
then go to the Teleport [T7].

Green. Opening the door with the switch [17], activate the lever in the room with the runes [18],
then go to the Teleport [T7].

Red. Opening the door with the switch [19], activate the lever in the runes room [20], then...
Then we don't go anywhere, because, when the switch is down in the fourth - last room with the runes - an invisible Teleport takes us to the Main Chamber [T8 ].

Take the Onyx Key [21] and lower the lever [12] - a Yellow Chamber secret door opens - go there through the Yellow Teleport [T3], where behind the raised grate [12] we find a double cache [22], where we take Moons Shield and various supplies.

We jump through the Teleport back [T7] (into the room with the Fireball), open the Onyx Lock [10] and, lowering the lever [9] (which raises the grate [9]), we run to the very end along the long corridor. On the right is a hall with a resting Ogre - do not be alarmed, this is an illusion.
To the left of the Ogre, there is another Cross Lock [23] - just click on the Lock and, lo and behold, we have another Cross Key in our hands. This Cross Lock opens a cache [23] around the corner where we pick up the last piece of the Lunar Kit - Moons Armor [24].

Behind the back of the fake Ogre there is a passage to the hall with the Portal: we boldly walk through the fat man and in the far corner of the hall, to the left, we pass through the wall [25],
where we find cache [26] with Dark Templar Cloak. Well, all the secrets have been solved,
all the things have been found: boldly going to the Portal [27] and return to Storage {Q - Q}!

13. Old Foundations
From the Portal, go left to the entrance to the Ancient Foundation [14] and go down to the Magic Rift [17]: it's time to drill the hole in it - spitting on the palm of your hands, we get our magic tool, and... Ta-da-ammm, it's done! The "Magic corkscrew" is no longer needed (throw it away) and, crossing ourselves, jump into the mysterious hole...

We landing. Ahead is a long corridor where crazy mushrooms roam.
Breaking the cracked wall [1] and find a cache with a Pear Key [2] and a lever [3] that opens the grate [3]. Going the corridor, we look for the secret button [4] and go through the opened door [4] to the hall with wooden floors: there are stones at the entrance, they will be useful to check the strength of the boards. Alas, but the first board breaks, forming a hole - there is no way out, we jump down [5]! Below we find fly agarics and spikes: we throw "Fireballs" - just some kind of "mushroom shashlik"!

Quickly killing everyone and then, on the south spiral staircase (1)-(1), go up to study the flooring in detail: some partitions can be broken, it's cool! In the corner, behind one of the partitions, there is a lever [6] that raises the grate [6] in the northern corridor: if go back in the lower level and through the spikes and climb the stairs (2)-(2), you can open the door [7].
This zone is now accessible from all sides.

We pass through the wooden flooring to the western corridor and, opening the key Pear Lock [8], activate the lever [9] in the chamber opposite (there is also a disposable scroll "Spell Cure Poison II"), thereby lowering the water level (do you like this sound?!).
Now can enter the Sewer and pick up the Iron Key [10]. On the way back, we look into the south corridor and open the door with the button [11]: in a small room we find a couple of chests with supplies [12], and disposable spell scrolls: "Spell Cure Poison II" and "Spell Fireball III". Further down the corridor, the Teleport [T1] buzzes - feel free to enter it!


We are transported to the corridor, under which terrible stingers rattle. After going all the way to the end and turning right, opening the door [13] to the already familiar corridor. If you now turn right again, and then left , then - going along the corridor to the North - on the right we will find a cracked wall [14], and behind it a secret room (almost like Potter's!), which has a lot of delicious things: Starbreeze Mace, Helmet, Guardians Helmet, Normann Helmet, Chain mail greaves, a War Hammer, a scroll "Activation Spell" and a chest with food. Cool dead drop!

If you now go down to the south and go east to the end, you can find a lot of interesting things: War Robe for the magician and the pressure plate [15], which opens the passage to the Abysses [15]: we enter a very hot zone [16] and meet our familiar Death`s Whisperer, with whom we chat sweetly and get all sorts of " buns" from him. You can go to the Teleport [T], but it's better not to. Most likely. ;))

On the way back, go to the long platform and activate the unattainable lever on the far wall [17] with the "Activation Spell", and then walk to the secret niche that opens [17], where finding some food and an amazing Cataclysme Sword!

Now we are ready to see what is down there in this huge hall: we reach the end of the wooden scaffold and fall below (3)-(3). You can jump from this place to the east pylon (4)-(4) and the west pylon (5)-(5) - choose to your taste, but it is better not to land on the spikes.
Jumping to the west pylon and find a chest [18] with food and Red Star Ring. Nice ring!
If jumping to the east pylon, we will find another Red Star Ring in another chest.

On the pylons there are gaps in the fence - through them we jump down, kill all the evil mushrooms and climb the ladder to the "meat grinder", through which you need to pass so as to stay alive. We get to the switch [20], which opens the passage [20] and raises the grate at the far end of the hall [20]. And if you go through the secret wall [21], you will find the Fountain of Resurrection (a useful thing in this area!).

Full of adrenaline, we jump back into the water to cool off and, at the same time, pick up the amazing Desolation Sword [22]. Through the passage [20] go to the Teleport [T3] and repeat the jump (3)-(3), but to another chest... and back to the Teleport.

Now, turn south along the corridor. To the south, there is a room with a Portal, but it is closed by a grating. To the east of it is another room with a lot of invisible walls and crazy mushrooms. We kill everyone, find the button [23] that raises the grate in the room with Portal - this is a way to the Temple of Adwij (6)-(6).

We find ourselves in a room where we were not allowed Bavmorda, slamming the door in our faces! Funded take another Red Star Ring [24], admire the Teleport {X - X} (leading to the Junction of Ages, but we don't need to go there yet), open the door [25] just in case, and go back through the Portal (6)-(6). We are waiting for Iron Lock [26], the last (last?!) the stage of our misadventures. Go north, past the secret room (Hello, Harry Potter!) unlock the bars [26] and turn left, on the west.

Here everything is simple and complicated:
there is a stone plate [27], standing up from which we open the grate [27] and then the hourglass starts ticking - time is short, but it should be enough if everything is done correctly.

We stand on the stone plate, pull the lever [28] (door is opened), turn around, quickly pull the lever [29] and, passing the next door [29], throw the "Activate Spell" into the lever on the far wall [30], turn left, run under the opening door [30] and quickly turn right, into the door [27].

Yes-s-s! We take the Toothed Key [32] and, lifting the grate [31], go to the end the corridor and turn left, where we are waiting for Deathrow {V - V}.


14. Access to Fortress
Go down the ramp {V - V} and open the Toothed Lock [1]. Hmmm...
The road of death is some kind, not otherwise, so it is worth saving. Probably ;))
Let's try to pass: we stand on the plate [1] and, as soon as the stingers fall, immediately(!) go to the next one. We wait for the second stingers to drop and move on. On the 4th square-quickly turn left and go through the wall. The main thing to remember is that "walking" on an already protruding sting is less deadly than when the sting sticks into you from below.

In the niche, we find magic for the uninitiated: even those who do not have the Power to read the scroll can cause a spell - in this case, "Spell Cure Potion I". Naturally, the scroll is disposable! In the chest [4] are two rings; Red Star Ring and Ring of Jade.
Nearby - Teleport [T1]: if you want to repeat the section of the path you just passed, feel free to step into it. No, you don't want to? Well, well - then we are treated as much as possible, rest, eat, save and... And go left along the corridor to the spiral staircase. I am sure you will succeed
(the main thing is that at least 1 live team member gets to the stairs).

We go up the stairs to the next floor: right Teleport [T2].
This is for particularly perverted masochists ;))) We go even higher up the stairs (1)-(1)
go down the corridor directly to the Fountain of resurrection (I'm sure you'll need it).

Yes, the place is unpleasant - spiders will fall on you and poison you (how can you do without it?!): it's better to kill them at a distance. On the left side of the corridor is a locked door [5] that can't be opened even by magic. Well, we go up the stairs to the next floor...

But this place is already more interesting - in the floor on both sides of the Murder-holes.
Here Meltor gets in touch with us via "Magic Skype" - we talk to him "about the hardships and difficulties of military service" and give him the found 17 pages of the Jarius manuscript.
Meltor praises us and gives us an prize: the bell rings - the Jarius quest is completed!

We climb even higher, but, alas, the passage is further blocked by a grate [6].
Well, let's look for another way: but do we have to jump into a hole?! Probably have to...


We go down to the level below and jump into the Killer-Hole [7]. In a small room we see a chest [9], in which we find "Spell Fireball III" and "Cure Poison II". And if take a step to the left, behind the secret wall [10] we will find another chest [11]: it contains a great War Robe for the magician, "Spell Fireball IV" and some food. Great!
Having refreshed ourselves, we boldly step into the Teleport [T3].

In the room where we were moved, on the floor are scrolls "Spell Fireball V" and "Cure Poison I", take it, come in handy. Fighting spiders, explore the room: we find a box with food [12] and, behind a secret wall [13], we find "Spell Fireball V" and "Cure Poison II".
We continue to walk on the left side and find Spider Key B in the niche [14].

Here's the way out. We lower the switch [6] at the entrance, but the grille does not open.
Rather, it opens, but not here, but two levels higher, which is also not bad, agree!
To the left of the switch is a round hole: we climb there and see the button in the depth.
Apply the "Activation Spell" to it - the grate is raised, the path to freedom is open!

Let's go and see what we have discovered: we go up 2 floors and exactly - the grate [6] is raised,
and we find 2 Spyder Locks [14] & [15], A and B. Weneed to find the missing key.
Once again, we descend to the level with Murder-holes and now jump into another hole [8].

Here, in this Spider's Lair, we again fight with the "children of the venerable Shelob" and, having won, we find on the right side of the hall a chest [15] with potions. We go further and in the right corridor we see Spider Key A [16], and next to it - two chests with supplies (this is if someone is hungry) [17].

Make our way to the exit and climb the stairs to the next floor (2)-(2), pass through the winding corridor and climb again. This level has a Resurrection Fountain and a switch [18] that raises the secret wall [18]. Pull the handle down and see (behind the raised wall, to the right), a closed grate. If you now raise the switch, it will open, but... the wall will start to fall: you can quickly step and have time to skip. Or you can do otherwise - leave the wall raised, then go down 2 levels below and lift up the lever [6] (the one near the inaccessible button in the hole, remember?).
This will reopen access to the locks: it's up to you to decide what's best to do.

So, open the last Spyder Lock [16], activate the levers [19] (after lowering the neighboring ones) - and go out into the hall with spikes on the walls, creepy sounds and another spiral staircase.
We hurry there {W - W} and... And we get the message that we are great fellows, but that's all for now, wait for Chapter "Fortress"!


Your move, Kanda, we are waiting
...and thanks for the great game! ;))

More & more & more...
Friends, this little guide is still in the process of being published and will be supplemented.
Feel free to write your comments, suggestions, questions and advice - I want to make it better.
And - of course - share the link with your friends, like it, put your grade (or don't)! :)))

The little White Moon Gang sends you a friendly hugs and wishes you a great game!


14 Comments
krasovski  [author] 6 Dec, 2024 @ 8:52pm 
Thank you for the warm feedback.
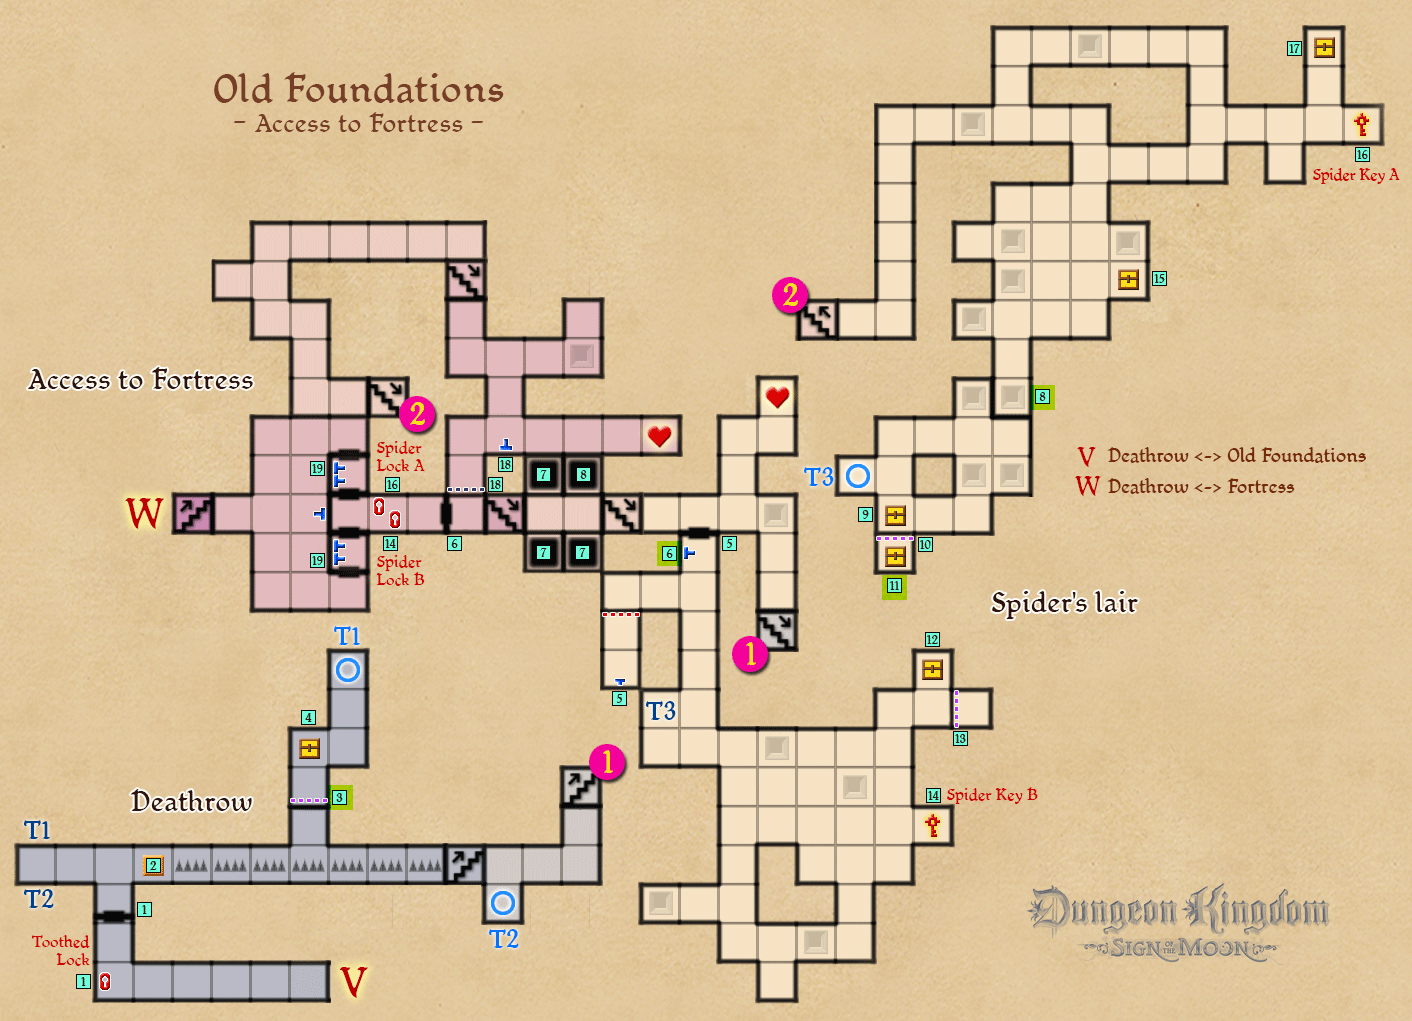
I do not exclude that some of the maps (which were) simply disappeared from Steam. This was already in the description that I made for another game.
I hope I will restore what was lost in the very near future.
aking25ster 1 Dec, 2024 @ 11:32pm 
Good walkthrough. Levels are described with location numbers. But where i can find maps for this levels?
Dark-Chummer 19 Oct, 2023 @ 4:43am 
Thank you for this good and helpful complete solution. I just missed various maps of the dungeons, where you even mention the numbers of the various locations, but unfortunately the maps are mostly missing.

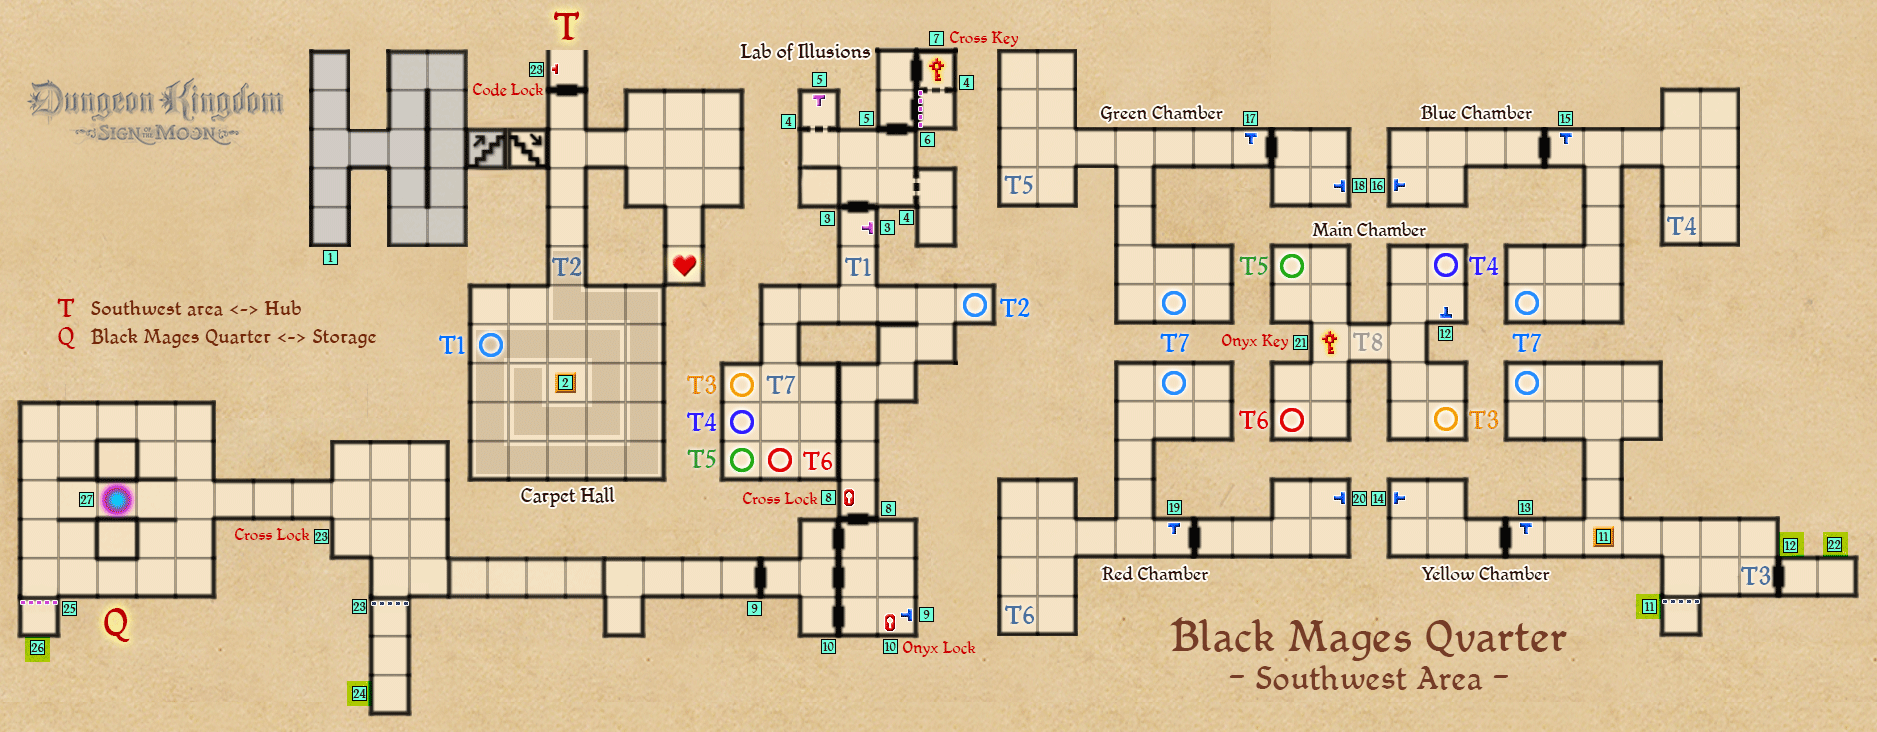
Otherwise, the problem with the cross key mentioned below still exists, which unfortunately cannot be obtained simply by clicking on the lock in question as described, as can be seen in a Let's play.

I got the key from the nice developer himself and got the last piece of moon armor. But it's a shame that the problem with the key still exists over two years later.

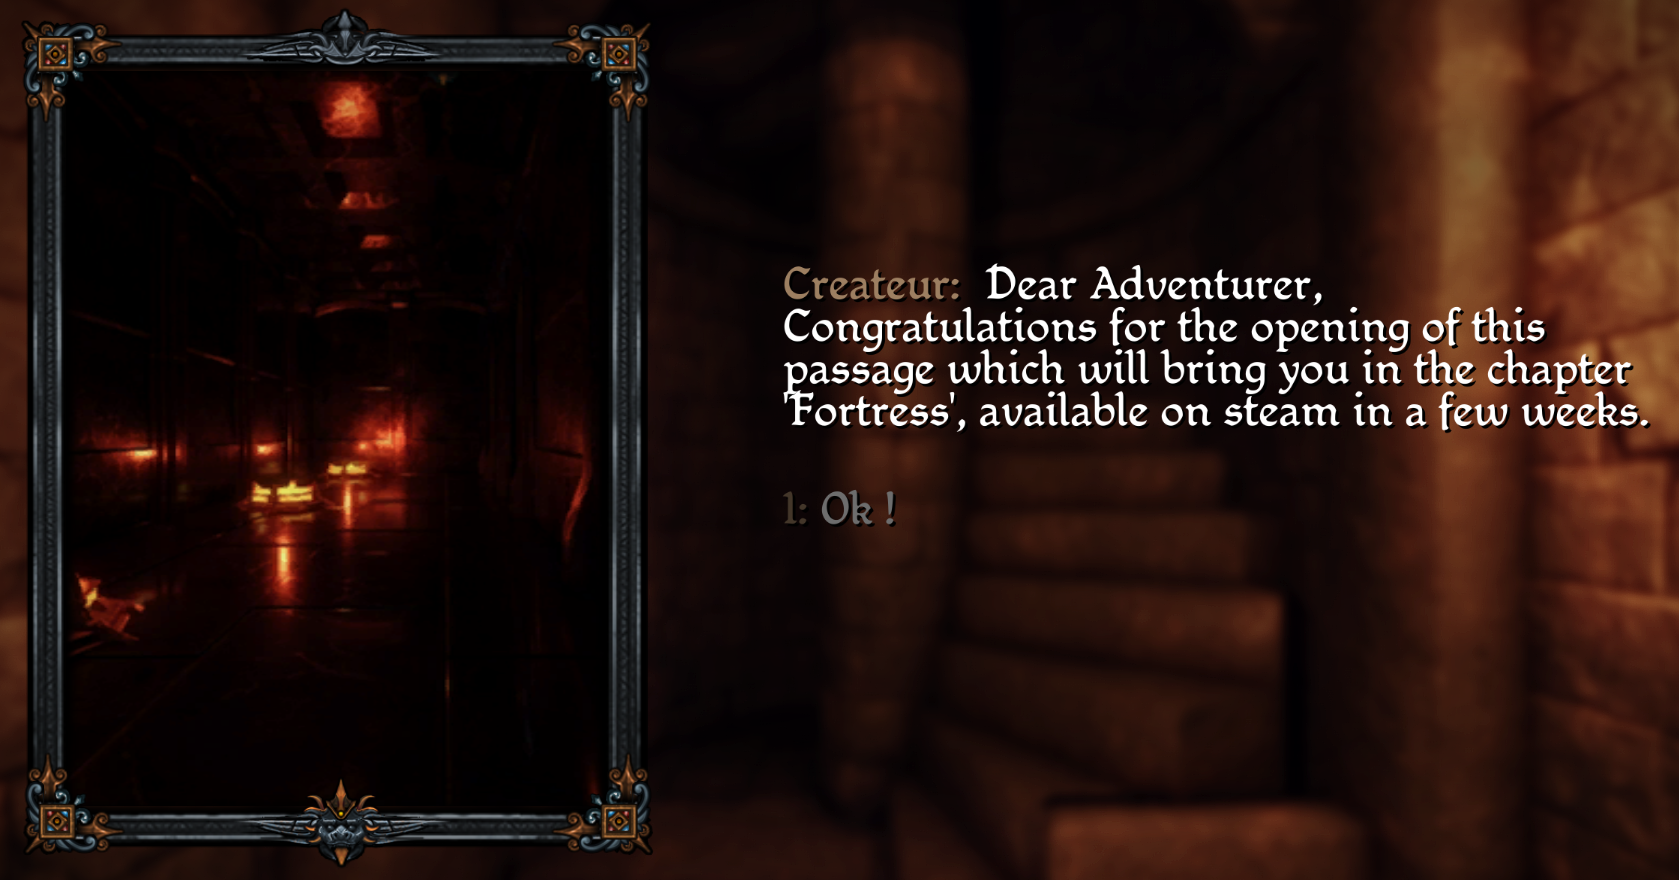
Oh and yes, the final dungeon is now accessible. So the end of the complete solution is still missing.
Kanda  [developer] 7 Sep, 2021 @ 12:32am 
@Ken_Tucky
Please, contact me on the steam forum or write me to contact@hydro-games.com , I will help you and check what happens. Thanks!
krasovski  [author] 6 Sep, 2021 @ 10:47pm 
2 Ken_Tucky
This was one of the points that I pointed out to Kanda.
Write to him - maybe he has already solved this problem.
And thanks for your compliments!
Ken_Tucky 30 Aug, 2021 @ 6:26am 
Btw, at the end of the Black Mages Quarter Southwest Area, where the illusion ogre is, you write that one can click on the cross lock to get a cross key (23). Doesn't happen to me, so I can't get into the cache and get the moons armor.
Ken_Tucky 28 Aug, 2021 @ 10:17am 
Great guide, thank you very much! :cozyspaceengineersc:
krasovski  [author] 14 Jul, 2021 @ 10:19am 
2 Malio Thanks!!
Malio 26 Jun, 2021 @ 8:04am 
Great guide! :cozybethesda:
krasovski  [author] 3 Apr, 2021 @ 3:17pm 
2 bkarsaker - welcome!!!