Cyberpunk 2077

Cyberpunk 2077

139 ratings
Cyberpunk 2077 - 100% Achievement guide
By Script
This guide will provide all the information you need to know to obtain every achievement in Cyberpunk 2077.
3
2
   
Award
Favorite
Favorited
Unfavorite
❤️ Support us
Note:
This guide is not finished yet, and we will fill up the "placeholders" with the actual content when we dive deeper into the game. Make sure to Rate up and Favorite this guide and check it out in future.

We also did a great job creating achievement guides for different games in the past!

And we promise you a good tutorial with good content-quality soon!

We love ❤️ the Cyberpunk community, and we will accept and appreciate your contributions to placeholders.
01. The Fool
The Fool
Become a mercenary. (Hidden)


Automatic story-related achievement cannot be missed.
Unlocks during the Prologue, after the tutorial.
02. True Soldier
True Soldier
Kill or incapacitate 300 enemies using ranged weapons.


Use Firearms (Pistols, Revolvers, Assault Rifles, SMGs, Sniper Rifles, LMGs, Shotguns, etc.) to defeat 300 enemies over the course of the game.
Keep in mind that you need 300 firearm kills for 02. True Soldier and 100 melee weapon kill for 02. True Soldier Alternate between these two or do Melee Kills first, and then the Ranged Weapon Kills.
Police also count as "enemies," so you can’t run out of enemies to kill and farm this in the open world at any time.
03. Stanislavski's Method
Stanislavski's Method
Use a dialogue option related to V's life path 10 times.


Warning: This achievement is missable!
The only missable achievement in the game. It will unlock regardless of which life path you choose.

You must pick 10 different dialogues tied to your starting lifepath throughout the game.
What lifepath you pick doesn’t matter. There are far more than 10 opportunities for this, but you could technically miss this if you already completed everything and didn’t make use of these dialogues.

You will have various dialogue options during story and side missions.
When either the Nomad, Streetkid, or Corpo options are available, choose them.
The tracker correctly monitors these so you can see how many are left to do. There are many more opportunities to use different dialogue options than just the 10 that are needed. You'll more than likely unlock this around halfway through the story, assuming, of course, you don't finish any side missions.
04. The Wheel of Fortune
The Wheel of Fortune
Interrogate Anders Hellman. (Hidden)


Automatic story-related achievement and cannot be missed.
Unlocks at the end of Main Mission "Life During Wartime."
05. Right Back At Ya
Right Back At Ya
Kill or incapacitate an enemy who threw a grenade at you.


This is a story based achievement early on. You encounter enemies who will throw grenades at you. Kill anyone of them, and the achievement will pop.
06. The World
The World
Complete the main storyline.


Automatic story-related achievement and cannot be missed.
Unlocks after Main Mission "Where Is My Mind?".
After the Credits, press "Sure, Just One More Gig" to be put back before the Point of No Return.
Then you can keep finishing up side activities in Free Roam.
07. The High Priestess
The High Priestess
Talk with Hanako Arasaka. (Hidden)


Automatic story-related achievement and cannot be missed.
Unlocks after Main Mission "Search and Destroy."
08. The Hermit
The Hermit
Find Alt Cunningham. (Hidden)


Automatic story-related achievement cannot be missed.
Unlocks after Main Mission "Transmission."
09. The Lovers
The Lovers
Steal the Relic. (Hidden)


Automatic story-related achievement cannot be missed.
Unlocks after Main Mission "The Heist."
10. Judy vs Night City
Judy vs Night City
Complete Judy Alvarez’s storyline. (Hidden)


This requires you to finish all of Judy Alvarez’s side jobs.
You meet her automatically during the story, and her side quests become available later in the story.

Below are her side quests and how to unlock each of them:
  1. Both Sides, Now (unlocks over the course of the story, added to your quest log automatically)
  2. Ex-Factor (a few days after the previous quest, you will get a text message from Judy to your phone called “EV’s Send-Off.” Reply to it and wait for Judy to call you back after a few hours)
  3. Talkin’ ‘Bout A Revolution (a few days after the previous quest, you will get another text message from Judy that will trigger this quest. Then skip time by 24 hours, and you will get a call from Judy that advances this quest).
  4. Pisces (a few days after the previous quest, you will get another text message from Judy. Reply to her text message with anything. Advance time by a day, and she will call you to start the next quest).
  5. Pyramid Song (after about a week and after doing some other side activities, Judy will call you again, which triggers this quest).

The achievement will unlock after “Pyramid Song.”
11. Legend of The Afterlife
Legend of The Afterlife
Reach max Street Cred.


You must reach 50 Street Cred, which is the maximum.
You can always see your Street Cred Level in the top left corner of the world map (and your Character Stats Menu).
Complete Side Jobs, Main Jobs, NCPD Events, and Gigs to increase your Street Cred.
The story alone gets you to Street Cred 20. The rest you will have to get from doing the side activities.
12. Frequent Flyer
Frequent Flyer
Find all fast travel dataterms.


Data terms are the Fast Travel Points in Cyberpunk 2077.
They get marked on the map by purple icons when you are within a few meters of them.
You have to get really close to unlocking them.
They are just small boxes with a hologram map above them.
(All Dataterm Locations will be added shortly)
13. Bushido and Chill
Bushido and Chill
Watch Bushido X with Rogue. (Hidden)


This requires you to finish all of Rogue’s side jobs.
You meet her automatically during the story, and her side quests become available later in the story.

Below are her side quests and how to unlock each of them:
  1. Chippin’ In (unlocks over the course of the story, added to your quest log automatically)
  2. Blistering Love (after the previous quest, call Rogue over the phone to take her out on a date).

The achievement will unlock after “Blistering Love.”
14. Gun Fu
Gun Fu
Kill or incapacitate 3 enemies in quick succession with a revolver or pistol in close combat.


To get this, you must defeat 3 enemies within 3.5 seconds from 5 meters or less.
Odds are you will get this naturally while playing as Johnny Silverhand.
He has a revolver that kills enemies in 1 hit.
This is easiest during his gameplay sections, and you will probably unlock it at some point without even trying.

If you still don’t have the trophy by the time you’ve finished the story, go to a blue NCPD event (Assault, Crime) in a low-level area.
These always have plenty of enemies close together. Get 3 low-level enemies close together and shoot them with a high-level revolver or pistol.
You should deal enough damage that they die in 1 hit.
After the story, you will have access to high-level weapons (either buy a revolver/pistol from a weapons dealer, upgrade an old one via crafting or pick it up from a defeated enemy).
15. To Protect and Serve
To Protect and Serve
Complete River Ward’s storyline. (Hidden)


This requires you to finish all of River Ward’s side jobs.
The achievement will unlock after his last quest, “Following the River.”
16. Two Heads, One Bullet
Two Heads, One Bullet
Kill or incapacitate 2 enemies with the same sniper rifle shot.


Here is a solution from Powerpyx
https://www.youtube.com/watch?v=xXMlNUYQLNk
First, you will need a Sniper Rifle.
You can either loot them from enemies (Snipers) or buy one. You should wait until you get one as an enemy drop. There will be plenty throughout the story and other side activities. Just remember to keep at least one Sniper Rifle you find.

Now look for 2 police officers standing next to each other.
You can frequently find them at street corners.
They are always standing still and close together. Line them up and then shoot both in the head, killing them with 1 shot.
It doesn’t matter what type of Sniper Rifle you use (a Tech Sniper Rifle works just as well as a Power Sniper Rifle).
If they don’t die in 1 hit, reduce the difficulty to easy in-game settings and/or come back after leveling up and getting a better Sniper Rifle.
17. Life of the Road
Life of the Road
Complete Panam Palmer’s storyline. (Hidden)


This requires you to finish all of Panam Palmer’s side jobs. You meet her automatically during the story, and her side quests become available later in the story.
Below are her side quests and how to unlock each of them:
  1. Riders on the Storm (unlocks over the course of the story, added to your quest log automatically)
  2. With a Little Help From My Friends (a day or two after the previous quest you will receive a call from Panam that starts this)
  3. Queen of the Highway (starts automatically after doing the previous quest, must travel out of camp and skip time by 24 hours, then go back to Panam to proceed)

The achievement will unlock after “Queen of the Highway.”
18. Temperance
Temperance
Let Johnny Silverhand keep your body. (Hidden)


Ending-related achievement, forgetting the “New Dawn Fades” Epilogue.
What Ending you get depends entirely on one set of dialogue in Mission “Nocturne Op55N1”.
Mysty (the girl from Ripperdoc) will take you to a balcony. Here you will talk to Johnny Silverhand, and it’s this single choice that decides the ending.

Update (Thanks to Mkslzk):
All decisions (excluding the deal with Arasaka) will let you choose whether to leave V or Johnny in Cyberspace. Leaving V in Cyberspace will result in reviving as Johnny and completing this achievement
19. The Star
The Star
Leave Night City with the Aldecaldos. (Hidden)


Ending-related achievement, for achieving the “All Along the Watchtower” Epilogue.
What Ending you get depends entirely on one set of dialogue in Mission “Nocturne Op55N1”.
Mysty (the girl from Ripperdoc) will take you to a balcony.
Here you will talk to Johnny Silverhand, and it’s this single choice that decides the ending.

As a prerequisite for this ending, you’ll need to have done all of Panam’s Side Quests.
Then you can choose to side with her and the Aldecaldos (her Nomad Clan) for the Epilogue.
Don’t worry if you haven’t done her quests yet.
After the story, it puts you back before the final mission.
Then you can still do Panam’s Side Quests and replay the final story mission.
20. Master Crafter
Master Crafter
Craft 3 Legendary items.


First, you must put 18 Attribute Points into “Technical Ability”.
Then in the Technical skill tree, you must buy the perk “Edgerunner Artisan” (on the right side of that skill tree).
It enables you to craft Legendary items.
To craft Legendary Gear, you will also need Legendary Specs (Blueprints) and crafting materials.
The Legendary Specs (Blueprints) you can buy from Weapon Vendors, they cost around $20,000.
The crafting materials you get from disassembling other gear and junk.
For Legendary Crafting Components, you must disassemble Legendary Gear.
21. Christmas Tree Attack
Christmas Tree Attack
Complete a Breach Protocol with a minimum of 3 daemons uploaded.


To unlock this achievement, you need to have at least 3 DAEMONS unlocked.
That doesn't mean you have to summon three infernal beings but have unlocked some skills in the INTELLIGENCE section.
You start with 1, which reduces the usage of RAM for the quick hacks, so you need the other 2.
The first 2 you could acquire from Intelligence are:
  1. MASS VULNERABILITY
  2. the one who shuts down all the cameras in a network for three mins.
Once you got three of them, find an enemy, and start BREACH PROTOCOL.
The usual minigame will show up as usual: now you need to activate all 3 of them simultaneously.
It may require a bit of practice to form a code that will unlock all three of them simultaneously without failing, some codes are easier than others, and that is up to the RNG god.
A little tip I can give you is that before inserting the numbers, try to form a mental path with all the numbers.
It'll help in not making any mistakes.
As soon as you insert the code that activates all the Daemons, the achievement will pop.
22. To Bad Decisions!
To Bad Decisions!
Complete Kerry Eurodyne’s storyline. (Hidden)


This requires you to finish all of Kerry Eurodyne’s side jobs.
The achievement will unlock after his last quest, “Boat Drinks.”
23. The Sun
The Sun
Become a legend of the Afterlife. (Hidden)


Ending-related achievement, for getting the “Path of Glory” Epilogue.
What Ending you get depends entirely on one set of dialogue in Mission “Nocturne Op55N1”.
Mysty (the girl from Ripperdoc) will take you to a balcony.
Here you will talk to Johnny Silverhand, and it’s this single choice that decides the ending.
24. The Devil
The Devil
Help Takemura avenge the death of Saburo Arasaka. (Hidden)


Ending-related achievement, to get the “Where is My Mind?” Epilogue.
What Ending you get depends entirely on one set of dialogue in Mission “Nocturne Op55N1”. Mysty (the girl from Ripperdoc) will take you to a balcony.
Here you will talk to Johnny Silverhand, and it’s this single choice that decides the ending.

====

The mission you need to be aware of is 'Search and Destroy.'

Close to the end of the mission and after the meeting. Arasaka invade Takemuras' hideout. Jonny informs you that there's no point in helping Takemura as he's likely dead. The objective also sends you straight out of the apartment building.

Ignore these warnings. Once you've got control back, enter the room opposite where you start and look for a hole in the wall on your left. At the back of the apartment is some steps. Go up there, kill the Arasaka agents to save Takemura. Makes sure you now leave with him in tow.

You can now complete the game as normal up until you hit the mission Nocturne Op55N1. Carry on through this until you reach the roof and have to make a decision. Choose "Think trusting Arasaka’s risky but worth it."

Next, choose "Take some Omega Blockers." This will now force you on a linear path that will guarantee you'll unlock it.

The achievement will unlock when you take the lift/elevator after finding Yorinobu. (Which means you don't even have to complete the game or get an ending).

I've added a helpful video from PowerPyx for those that prefer a visual guide.
https://www.youtube.com/watch?v=jXoUrRG7ZLE

Update (Thanks to Mkslzk):
Achievement is not possible to achieve if you cannot save Takemura in the middle of the story.
Against the boss fight against Oda, you should not kill him and let him alive.
25. The Wandering Fool
The Wandering Fool
Find all the tarot graffiti for the job Fool on the Hill.


Placeholder.
26. True Warrior
True Warrior
Kill or incapacitate 100 enemies using melee weapons.


Use Melee Weapons, such as Katanas, Knives, etc., to defeat 100 enemies over the course of the game. Keep in mind that you need 300 firearm kills for 26. True Soldier and 100 melee weapon kill for 26. True Soldier. Alternate between these two or do Melee Kills first, and then the Ranged Weapon Kills. Police also count as “enemies,” so you can’t run out of enemies to kill and farm this in the open world at any time.
27. Ten out of Ten
Ten out of Ten
Reach the max level in any skill.


Reach the maximum level for any skill. This achievement only requires you to max out one single skill (out of 12 Skills total).

Skill Levels are increased by doing the same type of kills/takedowns repeatedly. It’s nothing you level up with skill points. Instead, it’s “learning by doing.” So to level up the Handgun skill, you will have to do a lot of Handguns kills. To level up Blades Skill, you will have to do lots of Bladed Weapon takedowns. To level up Assault skill, you must make Rifle kills and so on.

To see your Skill Level Progression, press Touchpad > click on “Character” > scroll over one of the Attributes (Body / Reflexes / Technical / Cool / Intelligence) > It will show the 2-3 Skills tied to that Attribute. For example, Reflexes has the skills “Handguns, Blades, Assault” > Click on one of those Skills to and in the bottom left, it will show your progression XP towards the next level and the reward you get from each level.

If your progress towards a skill “gets stuck,” you must put more attribute points into its related attribute. For example, if you only have 3 attribute points in “Reflexes,” your progression on the underlying skills “Handguns, Assault, Blades” will get stuck at Skill Level 3. Then you’d have to spend an Attribute Point to raise Reflexes to Level 4 to gather more XP for those skills.

The easiest skills to level are the weapon kills under “Reflexes,” so put sufficient points into that attribute (also depends on your playstyle).
28. Breathtaking
Breathtaking
Collect all items that once belonged to Johnny Silverhand.


A total of 7 items once belonged to Johnny Silverhand that you must collect to unlock this achievement.

In the main story mission “Tapeworm,” which is in Act 3 of the story, there will be a point where you are speaking to Johnny Silverhand. It would be best if you chose the dialogue option “Ok; I’ll give you control.”. Selecting this dialogue option is necessary for you to get the “Chippin’ In” side job in Act 3 of the main story.

  • Johnny Silverhand’s Shirt - Automatically obtained in the main story mission “Tapeworm.”
  • Johnny Silverhand’s Aviators - Automatically obtained in the side job “Chippin’ In.”
  • Johnny Silverhand’s Jacket - Automatically obtained in the side job “Chippin’ In.”
  • Johnny Silverhand’s Gun (Malorian Arms 3516) - Obtained by picking it up from the floor beside Grayson (“Take gun” option in dialogue) in the side job “Chippin’ In.”
  • Johnny Silverhand’s Car (Porsche 911 Turbo) - Obtained by not drawing your weapon on Grayson (“Put weapon away” option in dialogue) and then following the rest of the objectives in the side job “Chippin’ In.”
  • Johnny Silverhand’s Trousers - Obtained during the Gig “Psychofan.” After getting off the elevator and going inside apartment 1702, I found a suitcase in the bedroom upstairs. The Gig “Psychofan” is located in southeastern The Glen, Heywood.
  • Johnny Silverhand’s Shoes - Obtained during the Gig: “Family Heirloom.” It is looted from the same locker the bootleg recording (which is the objective) is in. The Gig “Family Heirloom” is located in southeastern Charter Hill, Westbrook. You must reach Street Cred level 38 for this Gig to appear.

This is a video showing the locations of all 7 items: (All credit for this video to HarryNinetyFour)
https://www.youtube.com/watch?v=FwtCMQfbMO4
29. Must Be Rats
Must Be Rats
Perform the Distract Enemies quick hack 30 times without drawing attention to yourself.


This will come naturally through gameplay. However, it can be done quickly in the tutorial. When you learn to hack, one of the things taught is to distract enemies with Quick Hack. You can replay the hacking tutorial 30 times to get this done.

While I haven't done this myself yet, my counter has gone up, and I've only done this on the tutorial so far.

Warning: It doesn't seem like you can replay the tutorial should you select to finish it. So if you want to do this, then keep replaying it before you exit the tutorial area.
30. The Quick and the Dead
The Quick and the Dead
Kill or incapacitate 50 enemies while time is slowed.


First, you will need to get a Nervous System Cyberware implant with a “slow down time” effect. You can buy these from Ripper Docs, marked by white scissors on the map

These upgrades usually slow time during a slide or dodge. You should also buy the “Multitasker” Perk from the “Body > Athletics” skill tree. It enables you to shoot while sprinting, sliding, and vaulting.

Now slide to slow down time and kill enemies while the time is slowed. Repeat 50 times. Police count as “enemies” too. So you can farm this any time in the open world where police respawn infinitely.
31. Autojock
Autojock
Buy all vehicles available for purchase.


Over the course of the story and while free-roaming, you will automatically receive phone calls and text messages from people wanting to sell you cars.
These will then get added to your Journal (quest log) under “Rides.” In the Journal, click on them and then click “Track Job” in the middle of the screen.
This will put a yellow waypoint marker on the location where the car is being sold.
You can’t just go to a car dealership and buy them all, each has a unique location, and you must wait to get a call/message about it first.

New cars become available for purchase by leveling up your Street Cred (which you increase by doing Side Tasks).
You will need to reach Street Cred 50 to buy them all.

The easiest way to get them all to pop up is to finish the story first.
Then complete all Side Tasks to reach Street Cred 50. Then free-roam around the district where the car is being sold (listed below).
The district's fixer will text/call you about new cars for sale, but only while you are within the right district.
Example: You free-roam around City Center, you will receive text messages about new cars for City Center sales.
If your Street Cred is too low, you won’t get another message until you’ve reached a high enough Street Cred Level.
While doing all the gigs, NCPD events, and other side content, you should automatically unlock all the car messages.
You will unlock the car purchases in order from cheapest to most expensive.

Because of how expensive they are, you will have to complete many side activities to get enough money. Don’t “waste” too much money on weapons or Cyberware upgrades.
This could complicate things as you’d be low on money.
So keep this achievement in mind from the beginning and start saving for the cars.
Of course, buying cheap items is fine (especially Cyberware you need for other achievements), but don’t spend 150,000 Eurodollars on some Legendary Weapon.

These are the vehicles you have to buy, how much they cost, and their districts (free roam in that district to be notified of cars for sale):
  • Galena G240 – €$13,000 – Watson
  • Quartz EC-L R275 – €$29,000 – Watson
  • Thorton Colby C240T – €$39,000 – Watson
  • Maimai P126 – €$14,000 – Westbrook
  • Kusanagi CT-3X – €$22,000 – Westbrook
  • Columbus V340-F Freight – €$19,000 – City Center
  • Emperor 620 Ragnar – €$32,000 – City Center
  • Quadra Type-66 Avenger – €$55,000 – City Center
  • Thrax 388 Jefferson – €$17,000 – Heywood
  • Cortes V5000 Valor – €$37,000 – Heywood
  • Alvarado V4F 570 Delegate – €$62,000 – Heywood
  • Sopron FS3 – €$16,000 – Santo Domingo
  • Thorton Colby CX410 Butte – €$43,000 – Santo Domingo
  • Type-66 640 TS – €$58,000 – Santo Domingo
  • Thorton Galena “Gecko” – €$21,000 – Badlands
  • Thorton Colby “Little Mule” – €$49,000 – Badlands
  • Shion “Coyote” – €$115,000 – Badlands
  • … (rest still being added, list not yet complete)
32. Gunslinger
Gunslinger
Shoot an enemy grenade in midair with a revolver.


https://www.youtube.com/watch?v=-W7u1d9duTs
A revolver can be dropped from dead enemies or possibly bought at weapon shops (I will update when I find a weapon shop where a revolver can be purchased).

Be on the lookout for revolvers dropped from dead enemies. I found my first revolver from a dead enemy in the Pacifica region while I was doing a story mission there.

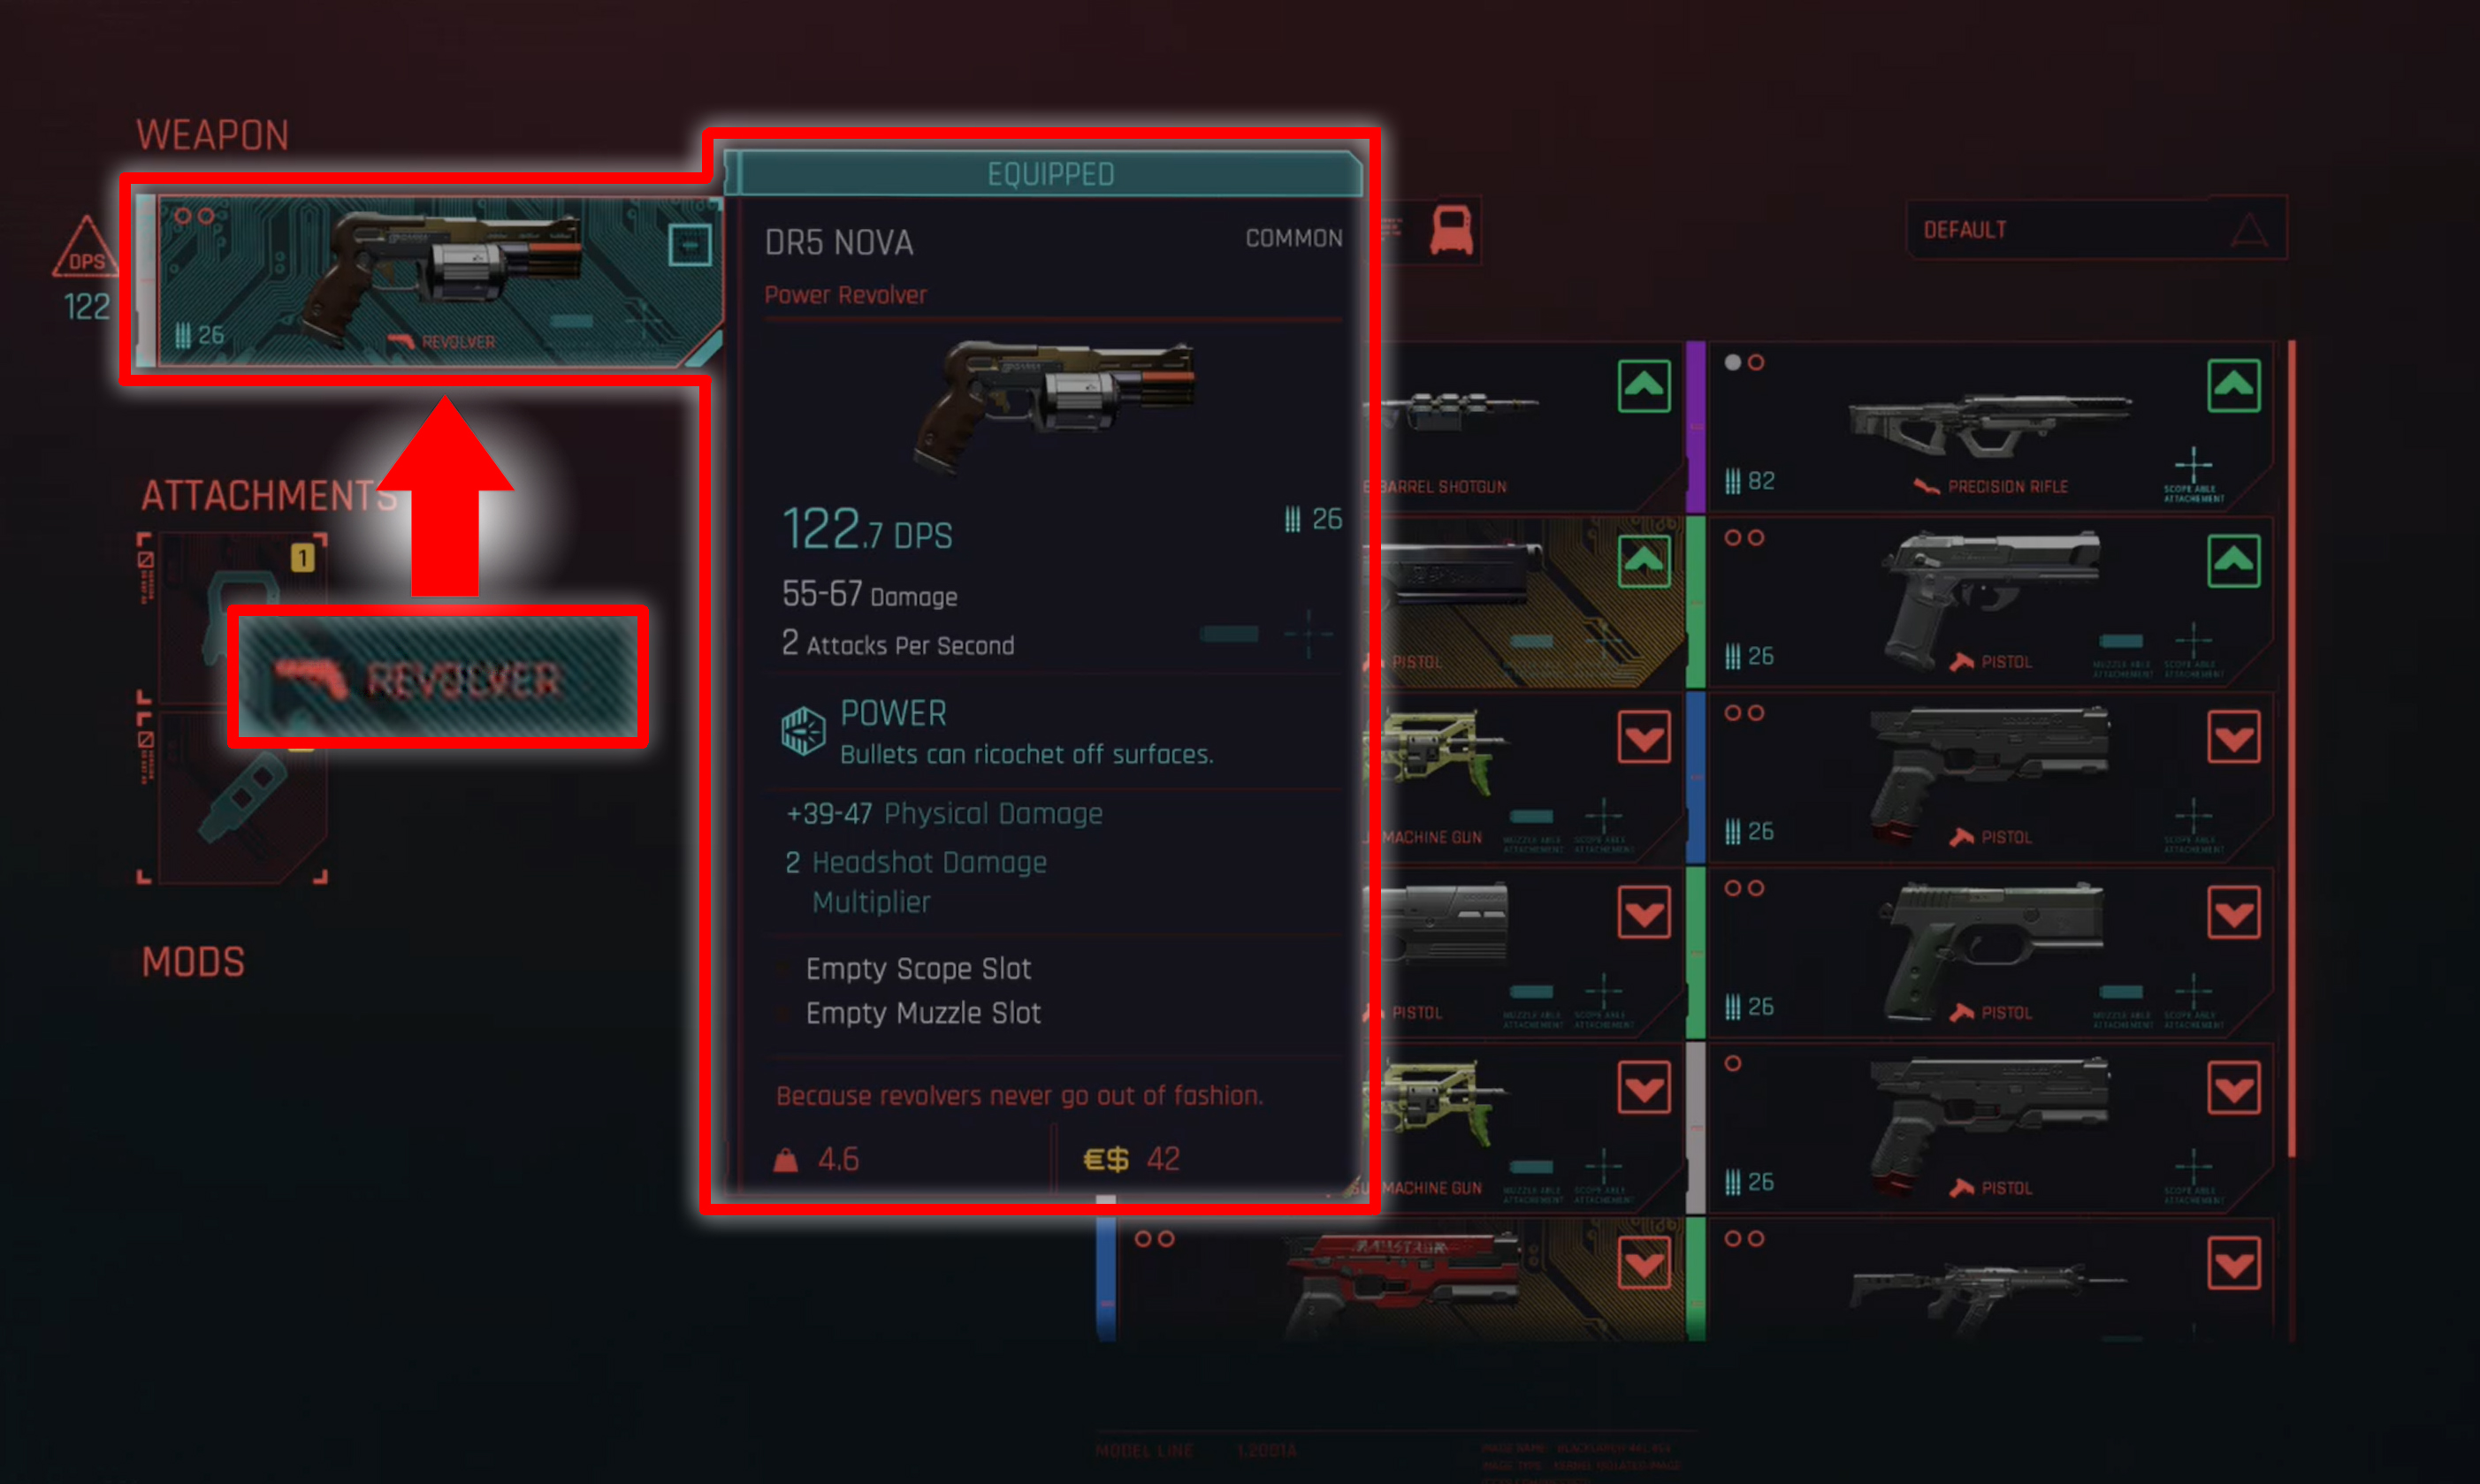
This is an example of what a revolver looks like in your inventory:

Once you have a revolver, find a group of enemies in an open area (story missions, side missions, around the open world, or police) and kill most of them so that there are just 1 - 3 alive. Move away and take cover from them so that there is a little bit of a distance between you and the enemies. Keep waiting from behind cover but keeping an eye on what they are doing. One of them should throw a grenade at you after a while. You must then shoot it midair with your revolver, so it explodes in midair before reaching you.

If you keep a distance from the enemies and keep waiting, they should throw grenades at you every so often. It seems enemies have an unlimited amount of grenades.

It also does not matter what type of grenade the enemy throws at you.

You can make a manual save before attempting this at a location (for example, in a story mission) so that you can reload and try again if you fail.

This is a video of how it is done:
https://www.youtube.com/watch?v=ZaAQLGC3fx4
33. Full Body Conversion
Full Body Conversion
Install at least one implant in each system and body part.


Implants are installed at Ripperdocs, marked by a white Scissors icon on the map: .
Different Ripperdocs sell different implants.

While viewing the world map, you can press filter for “Service Points” (which makes it easier to see them and filters out other icons).
You can either buy implants or unlock them as rewards from side activities and have them installed for free.
At Street Cred 20 & Street Cred 50, Ripperdocs will start selling more Implants.
Keep in mind you need a lot of money to buy all vehicles (31. Autojock).
So don’t overspend with the implants.
Some cost more than a vehicle. For the sake of achievements, it’s better to go for the cheaper ones to save money for the vehicles.
34. Greetings from Pacifica!
Greetings from Pacifica!
Complete all gigs and NCPD Scanner Hustles in Pacifica.


Placeholder.
35. I Am The Law
I Am The Law
Complete all Cyberpsycho Sightings.


Regina Jones gives the second side quest.
17 Cyberpsychos need to encounter.
Locations are all over the world and hidden by the typical mission mark (yellow exclamation mark).
- Thanks to Mkslzk.
36. It's Elementary
It's Elementary
Complete all gigs and NCPD Scanner Hustles in Watson.


To obtain this achievement, you need to complete all the gigs (the yellow exclamation/question marks on your map) AND all the blue ones (related to the police).
You can find them easily on your map (if you have trouble finding some of them, there are plenty of videos on youtube or check the Powerpyx site, all credit goes to him and his team).
What I want to UNDERLINE is a few key notions:
  1. In some cases, while completing the cops quest, you may find a shard, and if you read it (read all of them to be sure), that will CONTINUE the quest (usually changing the name). Most of the time, it's just to go to another part of the area to collect additional loot. Sometimes it may lead out of Watson, but what is IMPORTANT is that you NEED to complete these "hidden" parts as well.

  2. There are few secondary quests (not Gigs, but proper quests) that start in Watson, but they do not count for this achievement, such as the fighting pits (Beat on the Brat), the cabs one (Epistrophy), the street races, the Cyberpsycho (the one in Watson yes, the others no.
    To be more precise, in Watson, you have 5 Cyberpsycho that have their own little quest.
    It would be best if you did them, but not the main one, to neutralize all 17.
    There is another achievement tied to that) and the tarot ones.
    There may be more, but those are the ones I remember.
    The ones tied to the achievement are the YELLOW AND BLUE SIGNS on your map.
    Important NOTE: you need to reach a certain street cred level to unlock all the cops and yellow pointers.
    The first area should be around 35 (could be lower, though).
    Moreover, you do NOT NEED to buy any car for this achievement to pop.
    There is another achievement related to them.

  3. If you started to do that before patch 1.04, it might have happened that you finished some quests.
    They don't appear anymore on your map, but they are still stuck on the journal, and you have not received the rewards because Regina did not call you.
    That happened to me with 5 quests (I was stuck at 98% for quite a long time), and the way I was able to fix this (without reloading hours of content/restarting the game) was the following.
    FIND THE CYBERPSYCHO, it doesn't matter where on the map.
    Whenever you approach the area, you'll receive a call from Regina.
With patch 1.04, this shouldn't happen anymore (to me, it didn't, and I could clear Japantown way more easily).
I still have those 5 quests stuck in my journal, but the achievement popped, and I got my rewards.
37. City Lights
City Lights
Complete all gigs and NCPD Scanner Hustles in City Center.


Placeholder.
38. The Jungle
The Jungle
Complete all gigs and NCPD Scanner Hustles in Santo Domingo.


Note (Thanks to Enz):
You need to complete the 'For My Son' Gig BEFORE the fight; otherwise, it will no longer appear and will prevent you from unlocking it forever.
39. Mean Streets
Mean Streets
Complete all gigs and NCPD Scanner Hustles in Heywood.


Placeholder.
40. Little Tokyo
Little Tokyo
Complete all gigs and NCPD Scanner Hustles in Westbrook.


Placeholder.
41. The Wasteland
The Wasteland
Complete all gigs and NCPD Scanner Hustles in the Badlands.


Placeholder.
42. V for Vendetta
V for Vendetta
After reviving with Second Heart, kill or incapacitate the enemy who killed you within 5 seconds.


The second heart is a circulatory system Cyberware that cost $42000 and can be bought from the ripper doc in southwest Wellsprings (Heywood).
Just buy it and let someone kill you, then as soon as you come back, kill the one that killed you.
I would also say make a save before you buy it so when you have the achievement, you can re-load and keep the $42000.
43. Daemon In The Shell
Daemon In The Shell
Kill or incapacitate 3 enemies with one "Detonate Grenade" quick hack.


Detonate Grenade is an epic quality (purple) quick hack. I was able to craft it after unlocking the Hacker Overlord perk in the Quickhacking skill tree, which requires 16 Intelligence, though I suspect you will be able to find it from a vendor who sells epic quality quick hacks.

After that, find a group of 3 enemies gathered close enough together to be affected by the blast radius of a grenade. Lower level NCPD events seem to be the most likely to have the ideal circumstances for the achievement.
44. Rough Landing
Rough Landing
While Berserk Cyberware is active, perform a Superhero Landing to kill or incapacitate 2 enemies.


https://www.youtube.com/watch?v=yUdZllbpteI
After traveling to the "Luxury Apartments" fast travel point, make a new save file if you want the €$7,500 you spend on the Cyberdeck back.
22 Comments
LOGAN 23 Dec, 2022 @ 4:09am 
:HealthSD:
XGod 27 Dec, 2020 @ 4:25pm 
bruh why dont i have the ice pick daemon???? wtf
Script  [author] 17 Dec, 2020 @ 5:39pm 
@Enz, Thanks for sharing your experiences. I've added the note to the "The Jungle" achievement.
ENZLEY 17 Dec, 2020 @ 8:42am 
Note that for 'The Jungle' you need to complete 'For My Son' Gig BEFORE the fight otherwise it will no longer appear and will prevent you from unlocking it forever.

Another issue with 'The Wasteland' is Trevors body not spawning in the freezer. I had to reload roughly 10 - 15 times until his leg was clipping through the floor JUST enough to pick him up.

AND one last thing which I have yet to solve - there is a bug for one of the quests for "Little Tokyo" where Wakako never calls you (as she does when near a GIG) which will prevent any sort of interaction essentially locking you out of the quest.

I'll be sure to note any further issues (Ive been taking notes) here to help my chooms. :arasaka:
Script  [author] 16 Dec, 2020 @ 1:45pm 
@Reaper Thanks for reporting incomplete achievement information.
I've edited (24. The Devil achievement) and added more information along with the video.
Script  [author] 16 Dec, 2020 @ 1:39pm 
@mkslzk Updated
Reaper 16 Dec, 2020 @ 12:24pm 
I saved Takemura and spared Oda, completed aldecados ending but didn't get the Devil achievement, what line do I have to say to Johnny at the balcony?
mkslzk 16 Dec, 2020 @ 4:40am 
Update to Number 18

All decisions (excluding the deal with Arasaka) will let you choose whether to leave V or Johnny in the cyberspace. Leaving V in the cyberspace will result in reviving as Johnny and completing this achievement
mkslzk 16 Dec, 2020 @ 4:38am 
Placeholder to Number 35

Second side quest given by Regina Jones. 17 Cyberpsychos need to encountered. Locations are all over the world and hidden by the typical mission mark (yellow exclamation mark)
Script  [author] 16 Dec, 2020 @ 4:12am 
@mkslzk Thank you