Megaquarium

Megaquarium

57 ratings
The Ultimate Animal Guide (Original)
By Bistro
Your one stop shop for any and all information you may need on the animals in your aquarium. Stats, rewards, feeding, breeding, and whatever you may be needing!

This guide covers the base game, for the Freshwater Frenzy, Architect's Collection or Deep Freeze animals, check out my other guides at The Ultimate Animal Guide (Freshwater Frenzy), The Ultimate Animal Guide (Architect's Collection) and The Ultimate Animal Guide (Deep Freeze).
2
   
Award
Favorite
Favorited
Unfavorite
Introduction
As the title says, this guide aims to be your one stop shop for all the details you could ever need on your adorable little fishes if (like myself) you want to get into the nitty-gritty details of animal care. Most of this information has been pulled from in-game and the wiki, and personally I'm not a fan of how the game organizes your animals, even after the additional filters that have been added. As such, I aim to make this guide, and finding the information within it, as simple and intuitive as possible.

This guide starts off with several sections on the icons that you will find in the animal information boxes and an alphabetized list of all the animals in the game. The bulk of this guide sorts every single animal in the game by Rank and gives all of their data for your convenience. I have also included my personal recommendations for which animals should be paired up with who, mainly judged by shared food type and skill levels. Feel free to ignore these, as they are completely subjective.

All data has been taken from Normal difficulty. This guide covers the base game, for the Freshwater Frenzy or Architect's Collection animals, check out my other guides at The Ultimate Animal Guide (Freshwater Frenzy), The Ultimate Animal Guide (Architect's Collection) and The Ultimate Animal Guide (Deep Freeze).

Incidentally if you wish to access the wiki, here is the link: https://megaquarium.fandom.com/wiki/Megaquarium_Wiki
Credit goes to user FeelTheDango for the AcidicNeutral, Communal, Explorer and OpenSpace icons which I borrowed and edited for this guide.
Icons (Part 1)
This section will explain about all the icons shown on the animal information screens. Though most of these are self-explanatory, there can be some nuance to the details between different species, especially when it comes to breeding. The icons are organized in the same general order they show up in on the animal information screens, from left to right and up to down.

Prestige: Whenever a guest looks at an animal, there is a % chance that a certain amount of prestige will be generated. The number on the star shows the amount generated, while this guide will show the % chance that this will occur for 1 animal, and the # of animals needed to make that 100%. As an animal grows bigger, the % chance per individual will increase, and sometimes the base Prestige amount can increase as well.

When this icon is a superscript to another icon (e.g.), it means that the animal's base Prestige will be increased by fulfilling optional tank requirements, like having a certain number of individuals more than the needed amount, or adding more species when not strictly required.

Ecology and Science: Similar to Prestige, these show the # of Ecology or Science points generated whenever a guest looks at this animal. Unlike Prestige however, this is always 100%. Also like Prestige, these amounts change as an animal grows.

Size and Warning Type: On the animal information screen, this shows the base and max size of an animal, designated as # - #. If an animal does not grow, it only shows one number. Also, if an animal has more than two stages of development, you will have to hover the mouse cursor over the Clock icon to see the middle stages (or consult this guide). When hovering over the Warning icon, this designates all animals that do NOT otherwise belong to a special group, such as Crustaceans (so, most of the animals in the game).

Temperature: The temperature of the water this animal requires to survive. The amount of heat or cold generated by your equipment must always be ≥ the size of the tank, or for super chilled, to be at least double. Some animals require the temperature to be over the threshold by a certain % to initiate breeding.

Air Conditioning: This animal requires the tank to be Air Conditioned. The amount of Air Conditioning generated by your equipment must always be ≥ the of the tank, or for ice to form, at least double.

Filter Power: Identical to filter power provided by your equipment, these animals will increase the water quality of the tank. The amount is very small, so don't count on these to make a difference in anything larger than the smallest tank sizes.

Land and Perch: The amount of Land or Perch capacity each individual of this species requires. Each beach tank and polar dome has a fixed Land and Perch capacity, regardless of how small or large you make it. Animals requiring Land or Perch have their size stat halved when calculating the water tank capacity (ex. an animal with 40 only takes up 20 in the tank).

Water Quality: The base quality of the water in the animal's tank for it to remain healthy, determined by equipment, decorations and the bioload of all resident animals. The formula for calculating the quality has not been made public and is apparently fiendishly complicated, so this guide does not provide details on the animals' bioload unless specifically noted in-game. Note that water quality above the base threshold can improve the Survival % of an animal's offspring.

(and others) Food: The type of food this animal eats. Hovering over the icon will show the time interval between feedings, while the individual animal's information box will show the amount needed per feeding. This value increases as the animal grows. Note that the fry of an animal sometimes has a different diet.

Supplement: This animal will require a supplement every three days. It is always one supplement, and always three days, even after it grows.

Clipboard: This animal requires "observation" after the number of days shown on the icon, repeating for its entire lifespan. The observation task requires a staff member with the Feeding skill to use the clipboard tool.

Kreisel, Rounded and Abyssal: This animal must reside in a tank of this type to stay healthy. Animals without a tank requirement can live in either Kreisel or Rounded, though only Abyssal animals can live in Abyssal tanks.

Scavenger: This animal is automatically fed when any other animal in the tank is fed and does not affect the water quality of the tank. Animals with this trait will still require food every day, so do not pair them with animals that can go a day or more between feedings.

Lights: How many lights the animal will require it's tank to have. Some species require lights on their tank to initiate breeding.
Icons (Part 2)
Terrain Features: Many animals will need a certain amount of terrain features to feel healthy and at home (or dislikes the feature). From left to right are: Plant, Cave, Rock, Bogwood, Flat Surface, Floating Cover, Fluffy Foliage, Vertical Surface, Grass, Pebble and Den. Some animals will also require these for breeding purposes, as the offspring will live in these objects. Note that all Bogwood decorations will also provide acidity, some of the Floating Cover decorations have a depth requirement, and Grass, Pebble and Den decorations can only be placed on land.

Explorer: This animal will require a certain number of different decorations to stay healthy. These are simple to combine with the animal's innate terrain requirements.

Open Space: The tank this animal resides in must have a continuous unobstructed square area. There must be absolutely no decorations of any kind inside this area.

Tank Depth: The depth of this animal's tank must be at least the number shown.

Animal Type: Any animal with one of these icons does not belong to the default "Animal" group. From left to right these are: Crustaceans, Starfish, Soft Coral, Stony Coral, Anemone, Clams and Gorgonians.

No Conspecifics: Only one member of this species is recommended per tank, as any more will reduce the health of all members.

Wingman: This species must be paired with another animal with a size of the number shown or greater.

Shoaler: This species needs at least this many individuals (of its own species) per tank to be healthy.

Flying Bird: This animal can only be hurt by other animals that can attack Flying Birds.

Active Flyer: This animal will need its tank to be a minimum air volume to stay healthy.

Greedy: Consumes 33% more food and has a 33% increased bioload on the tank.

No Food Competitors: Cannot be housed with another species that eats the same food. Members of the same species are fine.

Wimp and Bully: A species with one of these traits cannot be housed with a species with the other trait.

Communal: This animal needs at least this number of additional species in the same tank.

Congeners: Can only be housed with species of the same group, or cannot be housed with species of the same group.

Active Swimmer: This animal will need its tank to be a minimum size to stay healthy.

Armored and Heavily Armored: This animal will have a higher effective size when determining whether it can be eaten. Hover over the icon to see the #. Heavily Armored animals cannot be eaten and are immune to Biters.

Acidity: All freshwater species will require a certain level of acidity to survive. This icon will indicate either neutral (green) or acidic (red). Some species can live in both.

Biter: This species will decrease the health of any animal not of the same species and at least 3 Size.

Plant Destroyer: This animal has a % chance to damage the plants in the tank. The more Plant Destroyers you have and/or the fewer plants you have will increase the % chance. With enough plants this can always be reduced to 0. Some species will count an individual as multiple Plant Destroyers.

Territorial: The combined size of the individuals of this species in the same tank must not exceed the percentage number shown of the tank's capacity (ex: a species of size 2 with 5 individuals has a combined size of 10. Therefore if the territorial percentage is 10%, the tank they inhabit must be at least 100 size).
Icons (Part 3)
Skill: When this icon is a superscript to another icon (e.g.), that task will take a longer time to complete. Staff members will need a correspondingly higher skill in that task to compensate.

Pairs Only: Members of this species must be kept in multiples of 2, or the single one will lose health.

Nibbler and Nibbleable: Similar to Wimp and Bully, A species with one of these traits cannot be housed with a species with the other trait. Multiple Nibblers will stack the health loss to the Nibbleable.

Warning: Hover over the triangle to see a list of other species that this animal may damage and/or eat. The victims are typically defined by type and a size range.

Hybrid: The offspring of this species have a chance to be a different color and/or pattern. This guide will not cover the process of hybridization, as it is purely aesthetic and not clearly defined.

Heart: Hover over this icon to see the breeding process for this species. This covers the initial requirements to initiate breeding and the offspring's diet and habitation needs.

Mucus: This offspring will require at least one parent to be present to feed.

Needs Parent: This offspring must share the tank with at least one parent. While they are growing, neither the offspring nor the parent can be sold or removed from the tank.

Predator: These offspring will lose one % chance for each animal that is size 5 or lower. Sometimes the parents will protect the offspring with an additional base % and sometimes they are Predators as well.

Days until growth: Shows how many days until this individual reaches its next growth stage as long as all of its basic care requirements are satisfied. Hover over the icon to see all of the growth stages and their timeframes.

Freshwater and Saltwater: The water type that this species will need in its tank. Some species can live in both.

Ice: At least this much Ice must be in the tank for the animal to stay healthy. Ice forms when Air Conditioning is at least double the tank's .

Enrichment: A certain amount of Enrichment decorations are required for this animal to stay healthy. Note that Enrichment decorations decrease in value beyond the first.

Survival: The base survival rate of this offspring. High water quality and parent protection can increase this, while predators and poor basic care will decrease this. This cannot reach 100%.

Eggs: The number of eggs or fry of this offspring. Every day this # will be reduced to the % (ex. 10 eggs and 70% means that the next day there will be 7 eggs).
Alphabetical List
A
Achilles Surgeonfish (Rank 9)
Angel Shark (Rank 11)
Arabian Bluelined Dottyback (Rank 2)
Arabian Butterflyfish (Rank 6)
Atlantic Cod (Rank 9)
Atlantic Mackerel (Rank 8)
Atlantic Pollock (Rank 5)
Azure Demoiselle (Rank 1)

B
Ballan Wrasse (Rank 6)
Bartlett Anthias (Rank 7)
Big Bellied Seahorse (Rank 10)
Blackbar Soldierfish (Rank 2)
Blacktip Reef Shark (Rank 10)
Blonde Skate (Rank 9)
Blue and Yellow Grouper (Rank 8)
Blue Knuckle Hermit Crab (Rank 4)
Blue Tubular Sponge (Rank 5)
Blue Whiting (Rank 10)
Bluespotted Ribbontail Ray (Rank 10)
Bonnethead Shark (Rank 11)
Bubbletip Anemone (Rank 7)
Bull Huss (Rank 7)

C
Clownfish (Rank 7)
Common Cuttlefish (Rank 7)
Common Lobster (Rank 8)
Common Starfish (Rank 5)
Copperband Butterflyfish (Rank 10)
Coral Beauty (Rank 5)
Coral Grouper (Rank 3)
Cuckoo Wrasse (Rank 5)

D
Daisy Star Polyps (Rank 6)
Disco Mushrooms (Rank 4)

E
Emperor Angelfish (Rank 9)
Emperor Gorgonian (Rank 12)
Epaulette Shark (Rank 6)

F
Fish Eating Anemone (Rank 9)
Flame Angelfish (Rank 3)
Flame Pipefish (Rank 11)
Foxface Rabbitfish (Rank 4)
French Angelfish (Rank 6)
Fried Egg Jelly (Rank 10)
Frilled Anemone (Rank 6)
Fuzzy Dwarf Lionfish (Rank 5)

G
Giant Pacific Octopus (Rank 12)
Greater Blue Ring Octopus (Rank 11)
Green Moray Eel (Rank 7)
Green Turtle (Rank 11)

H
Half and Half Chromis (Rank 1)
Horse-Eye Jack (Rank 7)
Humpback Snapper (Rank 5)

K
King Demoiselle (Rank 2)

L
Leaf Scorpionfish (Rank 10)
Leafy Seadragon (Rank 12)
Lemon Shark (Rank 12)
Leopard Giant Clam (Rank 12)
Leopard Shark (Rank 8)
Longhorn Cowfish (Rank 4)
Lumpsucker (Rank 8)

M
Mandarin Dragonet (Rank 12)
Manta Ray (Rank 12)
Marbled Serpent Starfish (Rank 7)
Meyers Butterflyfish (Rank 12)
Mirror Anthia (Rank 8)
Moon Jelly (Rank 6)

N
Nautilus (Rank 12)

O
Oblique Lined Dottyback (Rank 4)
Orchid Dottyback (Rank 1)

P
Panther Grouper (Rank 4)
Pie Crust Crab (Rank 7)
Plate Coral (Rank 10)
Porcupine Puffer (Rank 5)
Purple Plume Fan (Rank 11)
Purple Queen Anthia (Rank 11)

R
Red Leg Hermit Crab (Rank 9)
Redtail Butterflyfish (Rank 3)
Reef Squirrelfish (Rank 4)
Regal Tang (Rank 8)
Royal Gramma (Rank 3)

S
Schooling Bannerfish (Rank 5)
Slender Seahorse (Rank 9)
Sohal Surgeonfish (Rank 11)
Southern Stingray (Rank 8)
Spotted Boxfish (Rank 8)
Spotted Eagle Ray (Rank 11)
Staghorn Coral (Rank 10)
Starry Smoothound (Rank 10)
Striped Boxfish (Rank 6)
Sun Montipora (Rank 11)

T
Tassled Wobbegong Shark (Rank 9)
Toadstool Leather Coral (Rank 8)
Turbot (Rank 7)

U
Unicorn Surgeonfish (Rank 6)

V
Volitans Lionfish (Rank 4)

W
Whale Shark (Rank 12)
Wolffish (Rank 9)

Y
Yellow Tang (Rank 2)

Z
Zebra Moray Eel (Rank 3)
Rank 1
Azure Demoiselle (Damsels)
Recommended Tank Mates: Arabian Bluelined Dottyback, Blackbar Soldierfish, Clownfish, Half and Half Chromis, King Demoiselle, Oblique-Lined Dottyback, Orchid Dottyback, Reef Squirrelfish, Royal Gramma


32% chance at 1, 100% at 14
2 per day


Half and Half Chromis (Damsels)
Recommended Tank Mates: Arabian Bluelined Dottyback, Azure Demoiselle, Blackbar Soldierfish, Clownfish, King Demoiselle, Oblique-Lined Dottyback, Orchid Dottyback, Reef Squirrelfish, Royal Gramma


35% chance at 1, 100% at 12
3 per day


Orchid Dottyback (Dottybacks, Grammas and Anthias)
Recommended Tank Mates: Arabian Bluelined Dottyback, Azure Demoiselle, Blackbar Soldierfish, Clownfish, Half and Half Chromis, King Demoiselle, Reef Squirrelfish, Royal Gramma


32% chance at 1, 100% at 14
2 per day
Rank 2
Arabian Bluelined Dottyback (Dottybacks, Grammas and Anthias)
Recommended Tank Mates: Azure Demoiselle, Blackbar Soldierfish, Clownfish, Half and Half Chromis, Orchid Dottyback, Reef Squirrelfish, Royal Gramma


37% chance at 1, 100% at 11
4 per day


Blackbar Soldierfish (Soldierfish and Squirrelfish)
Recommended Tank Mates: Azure Demoiselle, Clownfish, Half and Half Chromis, Oblique-Lined Dottyback, Orchid Dottyback, Reef Squirrelfish, Royal Gramma


37% chance at 1, 100% at 11
4 per day


King Demoiselle (Damsels)
Recommended Tank Mates: Azure Demoiselle, Blackbar Soldierfish, Clownfish, Half and Half Chromis, Orchid Dottyback, Reef Squirrelfish, Royal Gramma


32% chance at 1, 100% at 14
2 per day


Yellow Tang (Surgeonfish)
Recommended Tank Mates: Achilles Surgeonfish, Coral Beauty, Flame Angelfish, Redtail Butterflyfish, Schooling Bannerfish, Unicorn Surgeonfish


39% chance at 1, 100% at 11
5 per day
Rank 3
Coral Grouper (Groupers)
Recommended Tank Mates: Panther Grouper, Picasso Triggerfish, Volitans Lionfish, Zebra Moray Eel


Original Size 5:
59% chance at 1, 100% at 6
7 per day
size 1-2, size 1-2
Size 9 in 3 days
Max Size 9:
(7), 64% chance at 1, 100% at 5
54
12 per day
size 1-3, size 1-3


Flame Angelfish (Angelfish)
Recommended Tank Mates: Achilles Surgeonfish, Coral Beauty, Redtail Butterflyfish, Schooling Bannerfish, Unicorn Surgeonfish, Yellow Tang


55% chance at 1, 100% at 6
3 per day


Redtail Butterflyfish (Butterflyfish)
Recommended Tank Mates: Achilles Surgeonfish, Coral Beauty, Flame Angelfish, Schooling Bannerfish, Sohal Surgeonfish, Unicorn Surgeonfish, Yellow Tang


39% chance at 1, 100% at 11
5 per day


Royal Gramma (Dottybacks, Grammas and Anthias)
Recommended Tank Mates: Arabian Bluelined Dottyback, Azure Demoiselle, Blackbar Soldierfish, Clownfish, Half and Half Chromis, King Demoiselle, Orchid Dottyback, Reef Squirrelfish


35% chance at 1, 100% at 12
3 per day


Zebra Moray Eel (Eels)
Recommended Tank Mates: Coral Grouper, Panther Grouper, Picasso Triggerfish, Volitans Lionfish


Original Size 4:
37% chance at 1, 100% at 11
4 per day
size 1-1
Size 9 in 4 days
Max Size 9:
44% chance at 1, 100% at 9
41
9 per day
size 1-3
Rank 4 (A - O)
Blue Knuckle Hermit Crab (Crustaceans)
Recommended Tank Mates: Anything that doesn't eat Crustaceans


32% chance at 1, 100% at 14


Disco Mushrooms (Soft Coral)
Recommended Tank Mates: Other Corals, Clams, Anemones, Gorgonians


Original Bioload 1:
28% chance at 1, 100% at 16
1 every 2 days
Bioload 2 in 3 days, Max 5 in 12 days
Bioload 2:
32% chance at 1, 100% at 14
10
2 every 2 days
Bioload 3 in 3 days, Max 5 in 9 days
Bioload 3:
35% chance at 1, 100% at 12
15
3 every 2 days
Bioload 4 in 3 days, Max 5 in 6 days
Bioload 4:
(6), 37% chance at 1, 100% at 11
20
4 every 2 days
Bioload 5 in 3 days
Max Bioload 5:
39% chance at 1, 100% at 11
25
5 every 2 days


Foxface Rabbitfish (Surgeonfish)
Recommended Tank Mates: Emperor Angelfish, Regal Tang, Spotted Boxfish


42% chance at 1, 100% at 9
7 per day


Longhorn Cowfish (Box and Pufferfish)
Recommended Tank Mates: Porcupine Puffer, Striped Boxfish


Original Size 4:
37% chance at 1, 100% at 11
4 per day
8
size 1-1
Size 9 in 4 days
Max Size 9:
44% chance at 1, 100% at 9
41
9 per day
18
size 1-3


Oblique-Lined Dottyback (Dottybacks, Grammas and Anthias)
Recommended Tank Mates: Azure Demoiselle, Blackbar Soldierfish, Clownfish, Half and Half Chromis, Reef Squirrelfish


55% chance at 1, 100% at 6
3 per day
Rank 4 (P - V)
Panther Grouper (Groupers)
Recommended Tank Mates: Coral Grouper, Picasso Triggerfish, Volitans Lionfish, Zebra Moray Eel


Original Size 7:
42% chance at 1, 100% at 9
9 per day
size 1-2, size 1-2
Size 14 in 4 days
Max Size 14:
(7), 48% chance at 1, 100% at 8
84
19 per day
size 1-5, size 1-5


Reef Squirrelfish (Soldierfish and Squirrelfish)
Recommended Tank Mates: Azure Demoiselle, Blackbar Soldierfish, Clownfish, Half and Half Chromis, Oblique-Lined Dottyback, Orchid Dottyback, Royal Gramma


37% chance at 1, 100% at 11
4 per day


Volitans Lionfish (Lionfish and Scorpionfish)
Recommended Tank Mates: Coral Grouper, Fuzzy Dwarf Lionfish, Panther Grouper, Picasso Triggerfish, Zebra Moray Eel


Original Size 6:
40% chance at 1, 100% at 10
8 per day
12
size 1-2, size 1-2
Size 11 in 5 days
Max Size 11:
(7), 46% chance at 1, 100% at 8
66
15 per day
22
size 1-4, size 1-4
Rank 5 (A - C)
Atlantic Pollock (Schooling Finfish)
Recommended Tank Mates: Fish-Eating Anemone, Frilled Anemone


Original Size 9:
44% chance at 1, 100% at 9
9 every 2 days
size 1-3
Size 16 in 4 days
Max Size 16:
49% chance at 1, 100% at 8
48
16 every 2 days
size 1-6


Blue Tubular Sponge (Soft Coral)
Recommended Tank Mates: Other Corals, Clams, Anemones, Gorgonians


Original Bioload 2:
32% chance at 1, 100% at 14
2 every 2 days
Bioload 3 in 3 days, Max 5 in 9 days
Bioload 3:
35% chance at 1, 100% at 12
17
3 every 2 days
Bioload 4 in 3 days, Max 5 in 6 days
Bioload 4:
(6), 37% chance at 1, 100% at 11
22
4 every 2 days
Bioload 5 in 3 days
Max Bioload 5:
(6), 39% chance at 1, 100% at 11
28
5 every 2 days


Common Starfish (Echinoderms)
Recommended Tank Mates: Anything that doesn't eat Starfish


Original Size 3:
35% chance at 1, 100% at 12
Size 7 in 3 days, Max 14 in 8 days
Size 7:
(3), 42% chance at 1, 100% at 9
18
Size 14 in 5 days
Max Size 14:
(4), 48% chance at 1, 100% at 8
35


Coral Beauty (Angelfish)
Recommended Tank Mates: Achilles Surgeonfish, Flame Angelfish, Redtail Butterflyfish, Schooling Bannerfish, Unicorn Surgeonfish, Yellow Tang


55% chance at 1, 100% at 6
3 per day


Cuckoo Wrasse (Wrasse)
Recommended Tank Mates: Atlantic Mackerel, Ballan Wrasse, Bull Huss, Lumpsucker, Tub Gurnard


Original Size 5:
39% chance at 1, 100% at 11
5 per day
size 1-2
Size 10 in 5 days
Max Size 10:
45% chance at 1, 100% at 9
45
10 per day
size 1-4
Rank 5 (F - S)
Fuzzy Dwarf Lionfish (Lionfish and Scorpionfish)
Recommended Tank Mates: Leaf Scorpionfish, Volitans Lionfish


39% chance at 1, 100% at 11
7 per day
10


Humpback Snapper (Schooling Finfish)
Recommended Tank Mates: Blue and Yellow Grouper, Epaulette Shark


Original Size 9:
44% chance at 1, 100% at 9
9 per day
size 1-3, size 1-3
Size 16 in 5 days
Max Size 16:
(8), 49% chance at 1, 100% at 8
88
16 per day
96
size 1-6, size 1-6


Porcupine Puffer (Box and Pufferfish)
Recommended Tank Mates: Longhorn Cowfish, Striped Boxfish


Original Size 3:
35% chance at 1, 100% at 12
3 per day
6
size 1-1
Size 8 in 5 days
Max Size 8:
(5), 43% chance at 1, 100% at 9
36
8 per day
16
size 1-3


Schooling Bannerfish (Butterflyfish)
Recommended Tank Mates: Achilles Surgeonfish, Coral Beauty, Flame Angelfish, Redtail Butterflyfish, Sohal Surgeonfish, Unicorn Surgeonfish, Yellow Tang


39% chance at 1, 100% at 11
5 per day
Rank 6 (A - E)
Arabian Butterflyfish (Butterflyfish)
Recommended Tank Mates: Copperband Butterflyfish, French Angelfish, Meyers Butterflyfish


37% chance at 1, 100% at 11
4 per day


Ballan Wrasse (Wrasse)
Recommended Tank Mates: Atlantic Mackerel, Bull Huss, Cuckoo Wrasse, Lumpsucker, Tub Gurnard


Original Size 6:
40% chance at 1, 100% at 10
6 per day
size 1-2
Size 13 in 6 days
Max Size 13:
(5), 47% chance at 1, 100% at 8
52
13 per day
size 1-5


Daisy Star Polyps (Soft Coral)
Recommended Tank Mates: Other Corals, Clams, Anemones, Gorgonians


Original Bioload 1:
28% chance at 1, 100% at 16
1 every 2 days
Bioload 2 in 2 days, Max 5 in 10 days
Bioload 2:
32% chance at 1, 100% at 14
12
2 every 2 days
Bioload 3 in 2 days, Max 5 in 8 days
Bioload 3:
35% chance at 1, 100% at 12
18
3 every 2 days
Bioload 4 in 3 days, Max 5 in 6 days
Bioload 4:
37% chance at 1, 100% at 11
24
4 every 2 days
Bioload 5 in 3 days
Max Bioload 5:
39% chance at 1, 100% at 11
30
5 every 2 days


Epaulette Shark (Sharks)
Recommended Tank Mates: Blue and Yellow Grouper, Humpback Snapper


Original Size 10:
45% chance at 1, 100% at 9
10 per day
size 1-4
Size 16 in 10 days
Max Size 16:
49% chance at 1, 100% at 8
112
16 per day
size 1-6
Rank 6 (F - U)
French Angelfish (Angelfish)
Recommended Tank Mates: Arabian Butterflyfish, Meyers Butterflyfish


Original Size 6:
40% chance at 1, 100% at 10
6 per day
Size 11 in 6 days
Max Size 11:
46% chance at 1, 100% at 8
72
11 per day
66


Frilled Anemone (Anemones and Gorgonians)
Recommended Tank Mates: Atlantic Pollack, Fish-Eating Anemone


Original Bioload 1:
28% chance at 1, 100% at 16
1 every 2 days
Bioload 2 in 3 days, Max 4 in 9 days
Bioload 2:
32% chance at 1, 100% at 14
9
2 every 2 days
Bioload 3 in 3 days, Max 4 in 6 days
Bioload 3:
35% chance at 1, 100% at 12
14
3 every 2 days
Bioload 4 in 3 days
Max Bioload 4:
(5), 37% chance at 1, 100% at 11
18
4 every 2 days


Moon Jelly (Jellyfish)
Recommended Tank Mates: None


Original Size 2:
32% chance at 1, 100% at 14
2 per day
Size 6 in 10 days
Size 6:
40% chance at 1, 100% at 10
42
6 per day


Striped Boxfish (Box and Pufferfish)
Recommended Tank Mates: Porcupine Puffer, Striped Boxfish


35% chance at 1, 100% at 12
3 per day
Size 6


Unicorn Surgeonfish (Surgeonfish)
Recommended Tank Mates: Achilles Surgeonfish, Coral Beauty, Flame Angelfish, Redtail Butterflyfish, Schooling Bannerfish, Yellow Tang


Original Size 8:
43% chance at 1, 100% at 9
8 per day
Size 18 in 8 days
Max Size 18:
(6), 50% chance at 1, 100% at 7
90
18 per day
108
Rank 7 (A - C)
Bartlett Anthias (Dottybacks, Grammas and Anthias)
Recommended Tank Mates: Mirror Anthia, Purple Queen Anthia


35% chance at 1, 100% at 12
3 per day


Bubbletip Anemone (Anemones and Gorgonians)
Recommended Tank Mates: Other Corals, Clams, Anemones, Gorgonians


Original Bioload 2:
32% chance at 1, 100% at 14
2 every 2 days
Bioload 3 in 3 days, Max 5 in 9 days
Bioload 3:
35% chance at 1, 100% at 12
18
3 every 2 days
Bioload 4 in 3 days, Max 5 in 6 days
Bioload 4:
37% chance at 1, 100% at 11
24
4 every 2 days
Bioload 5 in 3 days
Max Bioload 5:
39% chance at 1, 100% at 11
30
5 every 2 days


Bull Huss (Sharks)
Recommended Tank Mates: Atlantic Mackerel, Ballan Wrasse, Cuckoo Wrasse, Lumpsucker, Tub Gurnard


Original Size 10:
45% chance at 1, 100% at 9
10 every 2 days
size 1-4
Size 21 in 6 days, Max 35 in 16 days
Size 21:
(9), 52% chance at 1, 100% at 7
147
21 every 2 days
size 1-8
Size 35 in 10 days
Max Size 35:
(10), 58% chance at 1, 100% at 6
245
35 every 2 days
size 1-14


Clownfish (Damsels)
Recommended Tank Mates: Arabian Bluelined Dottyback, Azure Demoiselle, Blackbar Soldierfish, Half and Half Chromis, King Demoiselle, Oblique-Lined Dottyback, Orchid Dottyback, Reef Squirrelfish, Royal Gramma


35% chance at 1, 100% at 12
+2 Base Prestige if sharing with 1 or more Anemone
3 per day


Common Cuttlefish (Cephalopod)
Recommended Tank Mates: Blonde Skate, Nautilus


Original Size 6:
40% chance at 1, 100% at 10
6 per day
12
size 1-2, size 1-2
Size 13 in 8 days
Max Size 13:
47% chance at 1, 100% at 8
111
13 per day
26
size 1-5, size 1-5
Rank 7 (G - M)
Green Moray Eel (Eels)
Recommended Tank Mates: Blacktip Reef Shark


Original Size 8:
43% chance at 1, 100% at 9
11 every 2 days
size 1-3, size 1-3
Size 19 in 5 days, Max 28 in 12 days
Size 19:
(10), 51% chance at 1, 100% at 7
152
25 every 2 days
size 1-7, size 1-7
Size 28 in 7 days
Max Size 28:
(10), 55% chance at 1, 100% at 6
224
37 every 2 days
size 1-11, size 1-11


Horse-Eye Jack (Schooling Finfish)
Recommended Tank Mates: Leopard Shark


Original Size 10:
45% chance at 1, 100% at 9
13 per day
size 1-4, size 1-4
Size 18 in 3 days, Max 27 in 8 days
Size 18:
(10), 50% chance at 1, 100% at 7
153
24 per day
108
size 1-7, size 1-7
Size 27 in 5 days
Max Size 28:
(11), 55% chance at 1, 100% at 6
230
36 per day
162
size 1-10, size 1-10


Marbled Serpent Starfish (Echinoderms)
Recommended Tank Mates: Anything that doesn't eat Starfish


Original Size 3:
35% chance at 1, 100% at 12
Size 8 in 5 days
Max Size 8:
43% chance at 1, 100% at 9
40
Rank 7 (P - T)
Pie-Crust Crab (Crustaceans)
Recommended Tank Mates: Blue Whiting, Turbot


Original Size 5:
39% chance at 1, 100% at 11
5 every 2 days
10
size 1-2, size 1-2, size 1-2
Max Size 9 in 6 days
Max Size 9:
(7), 44% chance at 1, 100% at 9
54
9 every 2 days
18
size 1-3, size 1-3, size 1-3


Turbot (Oddballs)
Recommended Tank Mates: Blue Whiting, Pie-Crust Crab


Original Size 8:
43% chance at 1, 100% at 9
11 per day
size 1-3, size 1-3, size 1-3
Size 19 in 5 days
Max Size 19:
(7), 51% chance at 1, 100% at 7
105
25 per day
size 1-7, size 1-7, size 1-7
Rank 8 (A - C)
Atlantic Mackerel (Schooling Finfish)
Recommended Tank Mates: Ballan Wrasse, Bull Huss, Cuckoo Wrasse, Lumpsucker, Tub Gurnard


43% chance at 1, 100% at 9
8 per day


Blue and Yellow Grouper (Groupers)
Recommended Tank Mates: Epaulette Shark, Humpback Snapper


Original Size 10:
65% chance at 1, 100% at 5
13 per day
size 1-4, size 1-4
Size 24 in 5 days
Max Size 24:
(10), 73% chance at 1, 100% at 4
180
32 per day
size 1-9, size 1-9


Common Lobster (Crustaceans)
Recommended Tank Mates: Starry Smoothhound, Wolffish


Original Size 6:
60% chance at 1, 100% at 5
8 every 2 days
12
size 1-2
Size 11 in 7 days, Max 22 in 14 days
Size 11:
(10), 66% chance at 1, 100% at 4
99
15 every 2 days
22
size 1-4
Size 22 in 7 days
Max Size 22:
(11), 73% chance at 1, 100% at 4
198
29 every 2 days
44
size 1-8
Rank 8 (L - R)
Leopard Shark (Sharks)
Recommended Tank Mates: Horse-Eye Jack


Original Size 12:
46% chance at 1, 100% at 8
12 per day
size 1-4
Size 20 in 6 days, Max 30 in 16 days
Size 20:
(12), 52% chance at 1, 100% at 7
200
20 per day
120
size 1-8
Size 30 in 10 days
Max Size 30:
(13), 56% chance at 1, 100% at 6
300
30 per day
180
size 1-12


Lumpsucker (Oddballs)
Recommended Tank Mates: Atlantic Mackerel, Ballan Wrasse, Bull Huss, Cuckoo Wrasse, Japanese Spider Crab


Original Size 2:
32% chance at 1, 100% at 14
2 per day
4
None
Size 6 in 5 days, Max 10 in 12 days
Size 6:
40% chance at 1, 100% at 10
36
6 per day
12
size 1-2, size 1-2
Size 10 in 7 days
Max Size 10:
(7), 45% chance at 1, 100% at 9
60
10 per day
20
size 1-4, size 1-4


Mirror Anthia (Dottyback, Grammas and Anthias)
Recommended Tank Mates: Bartlett Anthias, Purple Queen Anthia


39% chance at 1, 100% at 11
5 per day


Regal Tang (Surgeonfish)
Recommended Tank Mates: Decorator Crab, Emperor Angelfish, Foxface Rabbitfish, Surge Wrasse


43% chance at 1, 100% at 9
8 per day
16
Rank 8 (S - Z)
Southern Stingray (Rays)
Recommended Tank Mates: Greater Blue Ring Octopus


Original Size 9:
44% chance at 1, 100% at 9
12 per day
size 1-3
Size 20 in 4 days, Max 40 in 12 days
Size 20:
(10), 52% chance at 1, 100% at 7
170
27 per day
size 1-8
Size 40 in 8 days
Max Size 40:
(13), 59% chance at 1, 100% at 6
360
53 per day
size 1-16


Spotted Boxfish (Box and Pufferfish)
Recommended Tank Mates: Foxface Rabbitfish


39% chance at 1, 100% at 11
7 per day
10
size 1-2, size 1-2,


Toadstool Leather Coral (Soft Coral)
Recommended Tank Mates: Other Corals, Clams, Anemones, Gorgonians


Original Bioload 3:
35% chance at 1, 100% at 12
3 every 2 days
Bioload 4 in 3 days, Max 6 in 9 days
Bioload 4:
37% chance at 1, 100% at 11
24
4 every 2 days
Bioload 5 in 3 days, Max 6 in 6 days
Bioload 5:
39% chance at 1, 100% at 11
30
5 every 2 days
Bioload 6 in 3 days
Max Bioload 6:
40% chance at 1, 100% at 10
36
6 every 2 days
Rank 9 (A - E)
Achilles Surgeonfish (Surgeonfish)
Recommended Tank Mates: Coral Beauty, Flame Angelfish, Redtail Butterflyfish, Schooling Bannerfish, Unicorn Surgeonfish, Yellow Tang


43% chance at 1, 100% at 9
8 per day


Atlantic Cod (Schooling Finfish)
Recommended Tank Mates: Angel Shark, Antarctic Silverfish, Arctic Char, Sea Needle


Original Size 10:
45% chance at 1, 100% at 9
10 every 2 days
Size 21 in 7 days, Max 32 in 14 days
Size 21:
(7), 52% chance at 1, 100% at 7
105
21 every 2 days
Size 32 in 7 days
Max Size 32:
(8), 57% chance at 1, 100% at 6
160
32 every 2 days


Blonde Skate (Rays)
Recommended Tank Mates: Common Cuttlefish


Original Size 9:
44% chance at 1, 100% at 9
9 every 2 days
18
size 1-3
Size 18 in 4 days, Max 26 in 11 days
Size 18:
(9), 50% chance at 1, 100% at 7
135
18 every 2 days
36
size 1-7
Size 26 in 7 days
Max Size 26:
(10), 54% chance at 1, 100% at 6
195
26 every 2 days
52
size 1-10


Emperor Angelfish (Angelfish)
Recommended Tank Mates: Decorator Crab, Foxface Rabbitfish, Regal Tang, Spotted Boxfish, Surge Wrasse


Original Size 6:
60% chance at 1, 100% at 5
6 per day
Size 11 in 7 days
Max Size 11:
(10), 66% chance at 1, 100% at 4
99
11 per day
66
Rank 9 (F - S)
Fish-Eating Anemone (Anemones and Gorgonians)
Recommended Tank Mates: Atlantic Pollack, Frilled Anemone


Original Bioload 4:
37% chance at 1, 100% at 11
4 every 3 days
size 1-1
Bioload 6 in 3 days, Max 10 in 9 days
Bioload 6:
40% chance at 1, 100% at 10
30
6 every 3 days
size 1-2
Bioload 8 in 3 days, Max 10 in 6 days
Bioload 8:
43% chance at 1, 100% at 9
40
8 every 3 days
size 1-3
Bioload 10 in 3 days
Max Bioload 10:
(6), 45% chance at 1, 100% at 9
50
10 every 3 days
size 1-4


Red Leg Hermit Crab (Crustaceans)
Recommended Tank Mates: Anything that doesn't eat Crustaceans


37% chance at 1, 100% at 11
8


Slender Seahorse (Seahorses and Seadragons)
Recommended Tank Mates: Flame Pipefish


Original Size 2:
32% chance at 1, 100% at 14
2 per day
Size 4 in 8 days
Max Size 4:
37% chance at 1, 100% at 11
52
4 per day
Rank 9 (T - W)
Tassled Wobbegong Shark (Sharks)
Recommended Tank Mates: Bluespotted Ribbontail Ray, Bonnethead Shark, Peacock Mantis Shrimp, Spotted Eagle Ray


Original Size 11:
46% chance at 1, 100% at 8
15 every 2 days
size 1-4, size 1-4
Size 24 in 7 days, Max 44 in 19 days
Size 24:
(14), 53% chance at 1, 100% at 7
276
32 every 2 days
size 1-9, size 1-9
Size 44 in 12 days
Max Size 44:
(16), 60% chance at 1, 100% at 5
528
59 every 2 days
size 1-17, size 1-17


Wolffish (Oddballs)
Recommended Tank Mates: Common Lobster, Starry Smoothhound


Original Size 7:
42% chance at 1, 100% at 9
7 per day
size 1-2
Size 16 in 6 days, Max 33 in 16 days
Size 16:
(10), 49% chance at 1, 100% at 8
144
16 per day
size 1-6
Size 33 in 10 days
Max Size 33:
(12), 57% chance at 1, 100% at 6
314
33 per day
size 1-13
Rank 10 (A - F)
Big Bellied Seahorse (Seahorses and Seadragons)
Recommended Tank Mates: Leafy Seadragon


Original Size 3:
35% chance at 1, 100% at 12
3 per day
Size 6 in 12 days
Max Size 6:
(15), 40% chance at 1, 100% at 10
87
6 per day


Blacktip Reef Shark (Sharks)
Recommended Tank Mates: Green Moray Eel


Original Size 10:
45% chance at 1, 100% at 9
10 per day
size 1-4
Size 21 in 8 days, Max 35 in 22 days
Size 21:
(12), 52% chance at 1, 100% at 7
221
21 per day
126
size 1-8
Size 35 in 14 days
Max Size 35:
(14), 58% chance at 1, 100% at 6
385
35 per day
210
size 1-14


Blue Whiting (Schooling Finfish)
Recommended Tank Mates: Pie-Crust Crab, Turbot


Original Size 8:
37% chance at 1, 100% at 11
4 per day
Size 8 in 4 days
Max Size 8:
43% chance at 1, 100% at 9
60
8 per day
48


Bluespotted Ribbontail Ray (Rays)
Recommended Tank Mates: Bonnethead Shark, Golden Jack, Spotted Eagle Ray, Tassled Wobbegong Shark


Original Size 8:
43% chance at 1, 100% at 9
8 per day
16
size 1-3
Size 17 in 9 days
Max Size 17:
(15), 50% chance at 1, 100% at 7
230
17 per day
34
size 1-6


Copperband Butterflyfish (Butterflyfish)
Recommended Tank Mates: Arabian Butterflyfish, Decorator Crab, Meyers Butterflyfish, Surge Wrasse


59% chance at 1, 100% at 6
5 per day


Fried Egg Jelly (Echinoderms)
Recommended Tank Mates: None


Original Size 4:
37% chance at 1, 100% at 11
4 per day
Size 11 in 10 days
Max Size 11:
46% chance at 1, 100% at 8
116
11 per day
Rank 10 (L - S)
Leaf Scorpionfish (Lionfish and Scorpionfish)
Recommended Tank Mates: Fuzzy Dwarf Lionfish


35% chance at 1, 100% at 12
3 per day


Plate Coral (Stony Coral)
Recommended Tank Mates: Other Corals, Clams, Anemones, Gorgonians


Original Bioload 2:
32% chance at 1, 100% at 14
2 every 3 days
Bioload 3 in 5 days, Max 5 in 15 days
Bioload 3:
35% chance at 1, 100% at 12
23
3 every 3 days
Bioload 4 in 5 days, Max 5 in 10 days
Bioload 4:
(8), 37% chance at 1, 100% at 11
30
4 every 3 days
Bioload 5 in 5 days
Max Bioload 5:
(8), 39% chance at 1, 100% at 11
38
5 every 3 days


Staghorn Coral (Stony Coral)
Recommended Tank Mates: Other Corals, Clams, Anemones, Gorgonians


Original Bioload 2:
32% chance at 1, 100% at 14
2 every 3 days
Bioload 3 in 4 days, Max 5 in 12 days
Bioload 3:
35% chance at 1, 100% at 12
23
3 every 3 days
Bioload 4 in 4 days, Max 5 in 8 days
Bioload 4:
(8), 37% chance at 1, 100% at 11
30
4 every 3 days
Bioload 5 in 4 days
Max Bioload 5:
(8), 39% chance at 1, 100% at 11
38
5 every 3 days


Starry Smoothhound (Sharks)
Recommended Tank Mates: Common Lobster, Wolffish


Original Size 9:
44% chance at 1, 100% at 9
9 every 2 days
size 1-3
Size 20 in 6 days, Max 29 in 16 days
Size 20:
(12), 52% chance at 1, 100% at 7
200
20 every 2 days
120
size 1-8
Size 29 in 10 days
Max Size 29:
(13), 56% chance at 1, 100% at 6
290
29 every 2 days
174
size 1-11
Rank 11 (A - F)
Angel Shark (Sharks)
Recommended Tank Mates: Atlantic Cod, Giant Pacific Octopus


Original Size 10:
45% chance at 1, 100% at 9
13 every 2 days
size 1-4, size 1-4
Size 20 in 8 days, Max 60 in 35 days
Size 20:
(13), 52% chance at 1, 100% at 7
220
27 every 2 days
size 1-8, size 1-8
Size 40 in 12 days, Max 60 in 27 days
Size 40:
(15), 59% chance at 1, 100% at 6
460
53 every 2 days
size 1-16, size 1-16
Size 60 in 15 days
Max Size 60:
(17), 64% chance at 1, 100% at 5
690
80 every 2 days
size 1-24, size 1-24


Bonnethead Shark (Sharks)
Recommended Tank Mates: Bluespotted Ribbontail Ray, Large Tooth Sawfish, Peacock Mantis Shrimp, Spotted Eagle Ray, Tassled Wobbegong Shark


Original Size 9:
44% chance at 1, 100% at 9
9 per day
size 1-3, size 1-3
Size 20 in 8 days, Max 30 in 21 days
Size 20:
(14), 52% chance at 1, 100% at 7
240
20 per day
120
size 1-8, size 1-8
Size 30 in 13 days
Max Size 30:
(15), 56% chance at 1, 100% at 6
360
30 per day
180
size 1-12, size 1-12


Flame Pipefish (Seahorses and Seadragons)
Recommended Tank Mates: Slender Seahorse


Original Size 2:
32% chance at 1, 100% at 14
2 per day
Size 4 in 14 days
Max Size 4:
(14), 37% chance at 1, 100% at 11
54
4 per day
Rank 11 (G - P)
Greater Blue Ring Octopus (Cephalopod)
Recommended Tank Mates: Southern Stingray


Original Size 3:
55% chance at 1, 100% at 6
3 every 2 days
6
size 1-1, size 1-1
Size 6 in 10 days
Max Size 6:
60% chance at 1, 100% at 5
54
6 every 2 days
12
size 1-2, size 1-2


Green Turtle (Reptiles)
Recommended Tank Mates: Manta Ray, Sohal Surgeonfish, Steephead Parrotfish


Original Size 10:
45% chance at 1, 100% at 9
10 per day
20
Size 25 in 8 days, Max 45 in 20 days
Size 25:
(11), 54% chance at 1, 100% at 6
225
25 per day
150
50
Size 45 in 12 days
Max Size 45:
(14), 61% chance at 1, 100% at 5
428
45 per day
270
90


Purple Plume Fan (Anemones and Gorgonians)
Recommended Tank Mates: Other Corals, Clams, Anemones, Gorgonians


Original Bioload 2:
32% chance at 1, 100% at 14
Bioload 3 in 3 days, Max 5 in 9 days
Bioload 3:
35% chance at 1, 100% at 12
23
Bioload 4 in 3 days, Max 5 in 6 days
Bioload 4:
(8), 37% chance at 1, 100% at 11
30
Bioload 5 in 3 days
Max Bioload 5:
(8), 39% chance at 1, 100% at 11
38


Purple Queen Anthia (Dottybacks, Grammas and Anthias)
Recommended Tank Mates: Bartlett Anthias, Garden Eel, Mandarin Dragonet, Mirror Anthia


37% chance at 1, 100% at 11
4 per day
Rank 11 (S)
Sohal Surgeonfish (Surgeonfish)
Recommended Tank Mates: Green Turtle, Redtail Butterflyfish, Schooling Bannerfish


Original Size 6:
60% chance at 1, 100% at 5
6 per day
12
Size 11 in 7 days
Max Size 11:
(9), 66% chance at 1, 100% at 4
88
11 per day
66
22


Spotted Eagle Ray (Rays)
Recommended Tank Mates: Bluespotted Ribbontail Ray, Bonnethead Shark, Large Tooth Sawfish, Oriental Sweetlips, Tassled Wobbegong Shark


Original Size 15:
49% chance at 1, 100% at 8
15 per day
30
size 1-6
Size 25 in 7 days, Max 60 in 31 days
Size 25:
(14), 54% chance at 1, 100% at 6
288
25 per day
150
50
size 1-10
Size 45 in 10 days, Max 60 in 24 days
Size 45:
(16), 61% chance at 1, 100% at 5
540
45 per day
270
90
size 1-18
Size 60 in 14 days
Max Size 60:
(18), 64% chance at 1, 100% at 5
750
60 per day
360
120
size 1-24


Sun Montipora (Stony Coral)
Recommended Tank Mates: Other Corals, Clams, Anemones, Gorgonians


Original Bioload 2:
32% chance at 1, 100% at 14
2 every 4 days
Bioload 3 in 5 days, Max 5 in 15 days
Bioload 3:
35% chance at 1, 100% at 12
24
3 every 4 days
Bioload 4 in 5 days, Max 5 in 10 days
Bioload 4:
37% chance at 1, 100% at 11
32
4 every 4 days
Bioload 5 in 5 days
Max Bioload 5:
39% chance at 1, 100% at 11
40
5 every 4 days
Rank 12 (E - G)
Emperor Gorgonian (Anemones and Gorgonians)
Recommended Tank Mates: Other Corals, Clams, Anemones, Gorgonians


Original Bioload 2:
32% chance at 1, 100% at 14
Bioload 3 in 3 days, Max 5 in 9 days
Bioload 3:
35% chance at 1, 100% at 12
21
Bioload 4 in 3 days, Max 5 in 6 days
Bioload 4:
(8), 37% chance at 1, 100% at 11
28
Bioload 5 in 3 days
Max Bioload 5:
39% chance at 1, 100% at 11
35


Giant Pacific Octopus (Cephalopod)
Recommended Tank Mates: Angel Shark, Japanese Spider Crab


Original Size 30:
76% chance at 1, 100% at 3
30 every 2 days
60
size 1-12, size 1-12
Size 65 in 16 days, Max 100 in 36 days
Size 65:
(24), 85% chance at 1, 100% at 2
1138
65 every 2 days
130
size 1-26, size 1-26
Size 100 in 20 days
Max Size 100:
(28), 88% chance at 1, 100% at 2
1850
100 every 2 days
200
size 1-40, size 1-40
Rank 12 (L)
Leafy Seadragon (Seahorses and Seadragons)
Recommended Tank Mates: Big Bellied Seahorse


Original Size 3:
35% chance at 1, 100% at 12
3 per day
Size 6 in 16 days
Max Size 6:
(18), 40% chance at 1, 100% at 10
105
6 per day
36


Lemon Shark (Sharks)
Recommended Tank Mates: Manta Ray


Original Size 16:
49% chance at 1, 100% at 8
16 every 2 days
size 1-6, size 1-6
Size 27 in 8 days, Max 75 in 42 days
Size 27:
(14), 55% chance at 1, 100% at 6
311
27 every 2 days
162
size 1-10, size 1-10
Size 45 in 14 days, Max 75 in 34 days
Size 45:
(16), 61% chance at 1, 100% at 5
540
45 every 2 days
270
size 1-18, size 1-18
Size 75 in 20 days
Max Size 75:
(19), 67% chance at 1, 100% at 4
900
75 every 2 days
450
size 1-30, size 1-30


Leopard Giant Clam (Bivalves)
Recommended Tank Mates: Other Corals, Clams, Anemones, Gorgonians


Original Bioload 3:
35% chance at 1, 100% at 12
3 every 2 days
Bioload 4 in 3 days, Max 6 in 9 days
Bioload 4:
37% chance at 1, 100% at 11
36
4 every 2 days
Bioload 5 in 3 days, Max 6 in 6 days
Bioload 5:
39% chance at 1, 100% at 11
45
5 every 2 days
Bioload 6 in 3 days
Max Bioload 6:
40% chance at 1, 100% at 10
54
6 every 2 days
Rank 12 (M - W)
Mandarin Dragonet (Oddballs)
Recommended Tank Mates: Purple Queen Anthia


35% chance at 1, 100% at 12
3 per day


Manta Ray (Rays)
Recommended Tank Mates: Lemon Shark, Whale Shark


Original Size 50:
62% chance at 1, 100% at 5
50 per day
Size 75 in 12 days, Max 144 in 47 days
Size 75:
(19), 67% chance at 1, 100% at 4
863
75 per day
450
Size 100 in 15 days, Max 144 in 35 days
Size 100:
(22), 71% chance at 1, 100% at 4
1200
100 per day
600
Size 144 in 20 days
Max Size 144:
(27), 77% chance at 1, 100% at 3
1872
144 per day
864


Meyers Butterflyfish (Butterflyfish)
Recommended Tank Mates: Arabian Butterflyfish, Copperband Butterfly, French Angelfish


39% chance at 1, 100% at 11
5 per day


Nautilus (Cephalopod)
Recommended Tank Mates: Common Cuttlefish


Original Size 2:
32% chance at 1, 100% at 14
3 every 2 days
4
Size 7 in 18 days
Max Size 7:
42% chance at 1, 100% at 9
84
9 every 2 days
14


Whale Shark (Sharks)
Recommended Tank Mates: Manta Ray


Original Size 100:
71% chance at 1, 100% at 4
100 per day
Size 150 in 12 days, Max 250 in 50 days
Size 150:
(27), 77% chance at 1, 100% at 3
1875
150 per day
900
Size 180 in 16 days, Max 250 in 38 days
Size 180:
(30), 80% chance at 1, 100% at 3
2250
180 per day
1080
Size 250 in 22 days
Max Size 250:
(38), 86% chance at 1, 100% at 2
3375
250 per day
1500
14 Comments
Neon Gaming 23 Feb @ 10:07am 
Nice
Kazuma 7 Dec, 2023 @ 11:59am 
Hey, thanks for the guide, I found it very helpful in planning my aquarium! Just one small suggestion, it would be helpful if you could specify if one or both tankmates should be fully grown first before adding them in. I got my baby Zebra Moray Eel eaten by my fully grown Volantis Lionfish. I'm guessing the guide assumes you add them all in at the same time?
QNTM 4 Nov, 2023 @ 9:40am 
Don't put too many animals sharing the same food into one tank! It makes them more prone to dying from hunger.
QNTM 4 Nov, 2023 @ 2:09am 
What's the "bioload" (in corals)? BTW some informations need update. Most notably jellyfish can't be in the same tank with non-jelly, and clownfish gives more prestige if with anemones.
Bistro  [author] 18 May, 2022 @ 10:13am 
@mishalunchbox
Oh wow, you're right, these must have been changed when the Architect's Collection was released. I'll go over them again and should have them fixed within a few days. Thanks for pointing this out.
mishalunchbox 18 May, 2022 @ 7:19am 
Thank you for this guide! I found it very helpful in making my pretend aquarium plans. That said...

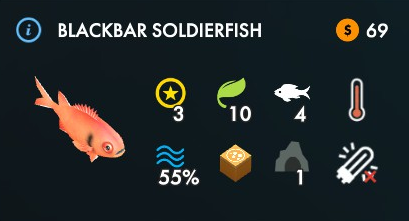
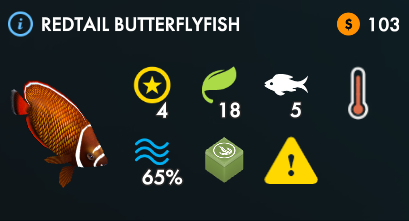
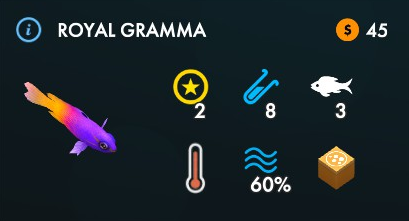
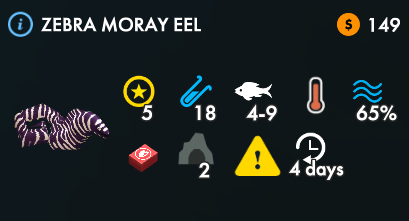
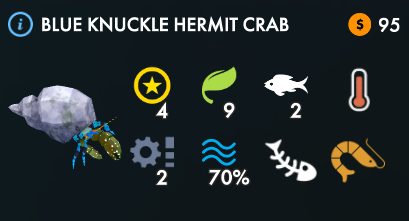
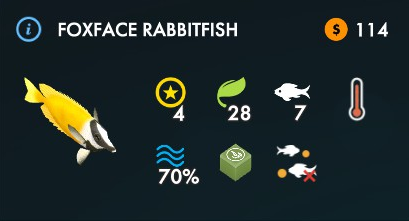
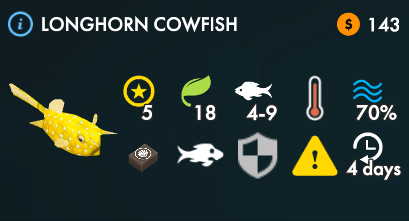
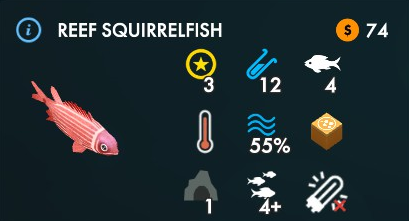
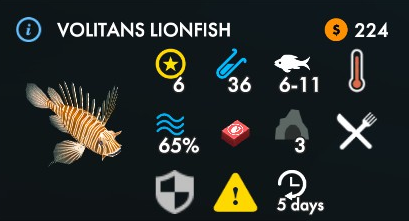
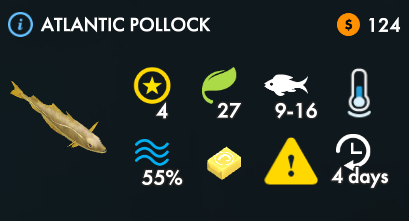
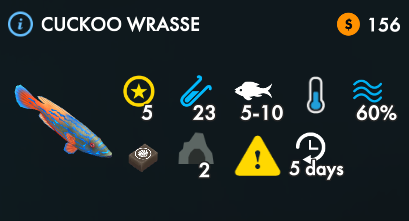
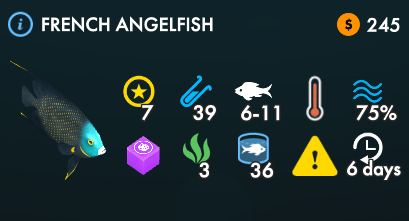
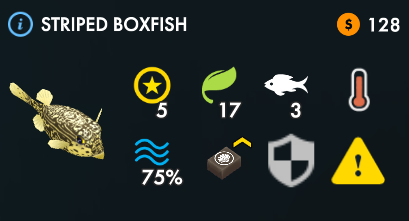
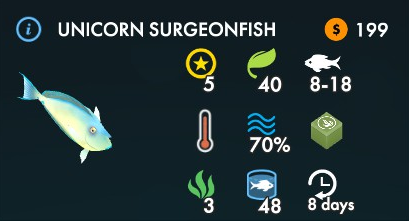
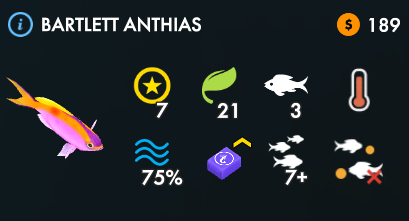
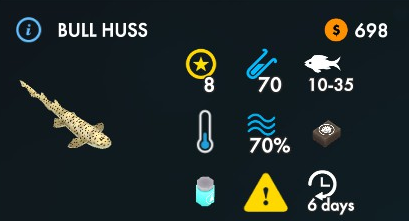
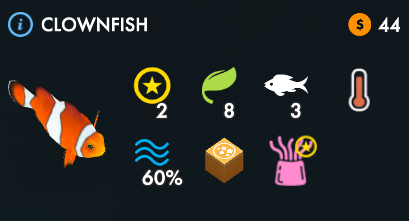
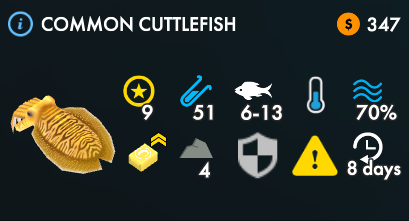
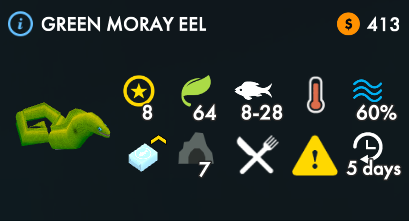
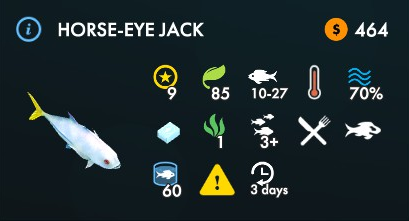
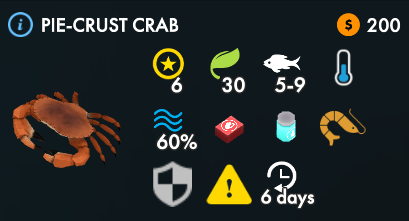
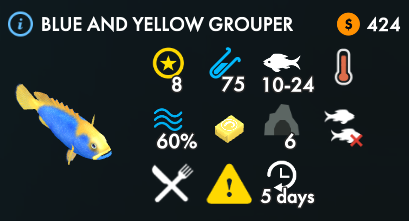
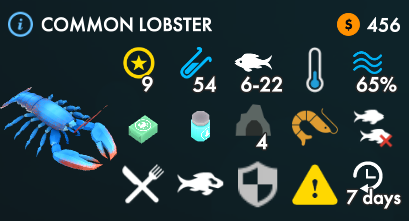
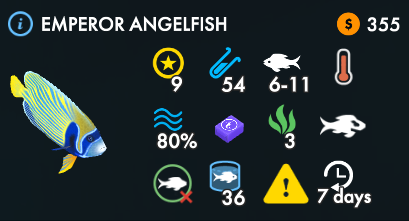
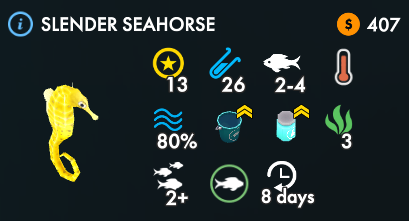
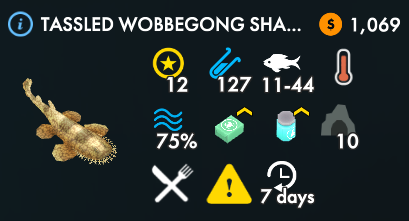
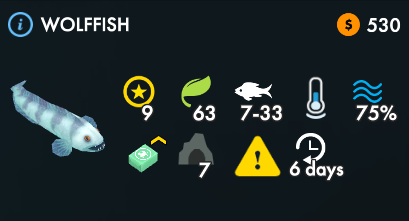
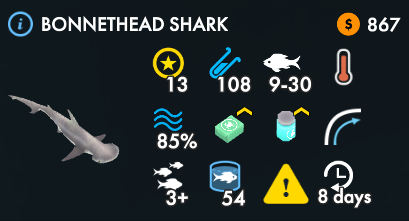
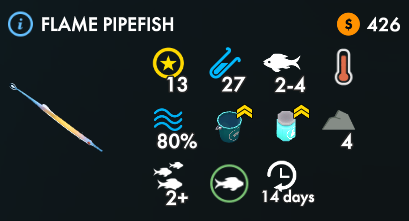
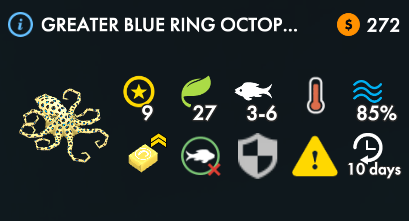
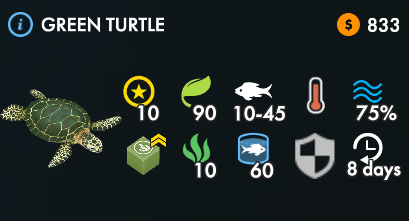
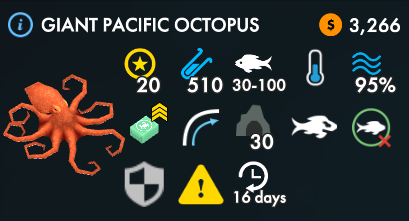
I noticed there were a handful of animals for which the data in-game didn't match that in your guide. I dunno if it was changed in an update that happened after you published, or if the stats change when one or more DLC is installed, or what. Whatever the cause, here are the discrepancies i found:

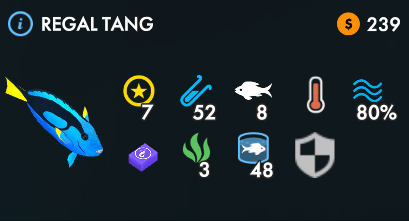
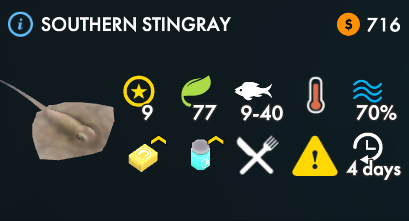
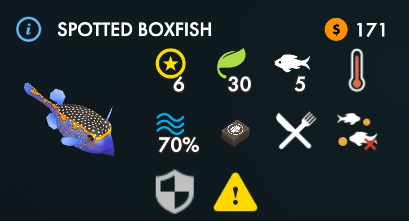
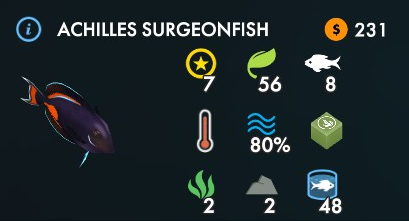
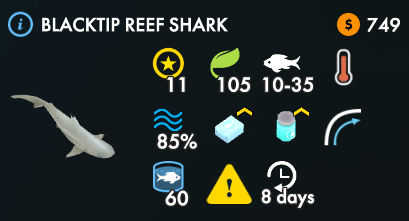
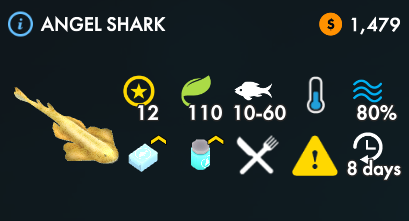
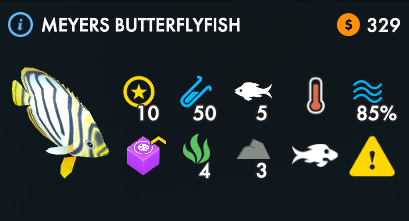
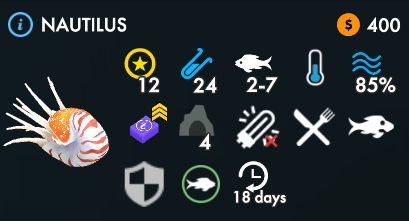
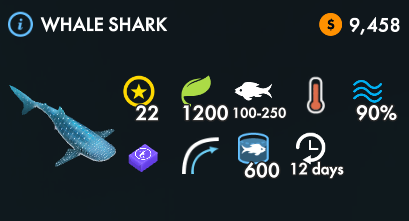
angel shark: size & sale price (should be 10-60 and $742, respectively)
common lobster: size (should be 6-22)
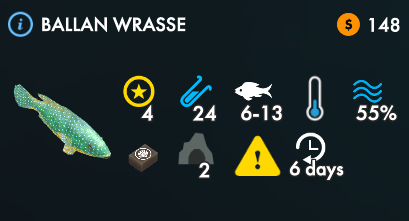
cuckoo wrasse: size (should be 5-10)
giant pacific octopus: size, price, animal/crustacean warning (30-100, $2244, 1-40)
longhorn cowfish: starfish warning (should be size 1-3)
pie-crust crab: starfish warning (should be size 1-3)
turbot: starfish warning (should be size 1-7)

I'm happy to provide screenshots if you need them. In case it turns out to matter: i have no DLC ATM, but don't know how long that will last :)
BlueFénix 30 Jan, 2022 @ 11:23pm 
288 hours into this game and I just found out about the not eating crustaceans thing.... this opens some interesting options.

Thank you for your guide
Bistro  [author] 30 Jan, 2022 @ 10:20pm 
@Alejandro Monteagudo
Correct, Blacktip Reef Sharks pose absolutely no threat to any Crustacean.

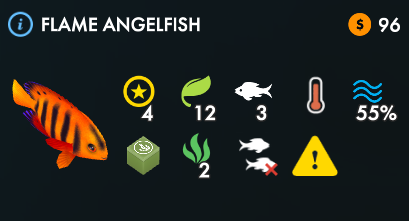
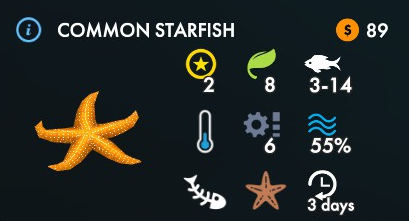
Starfish in this game are NOT coral eaters. They are in real life, but for some reason the developers decided not to include that.
BlueFénix 30 Jan, 2022 @ 2:28am 
Does this mean that the blacktip reef shark will not attack crustaceans no matter how small?

Also I thought starfish eaters were like coral eaters, and eat them no matter what

I was certain they did
Aden Keys 19 Jan, 2022 @ 10:25am 
ok, thank you for the help