Geneforge 1 - Mutagen

Geneforge 1 - Mutagen

56 ratings
A Shaper's notes on the first 50 areas
By fef
This guide shows where to find some important things in the first areas encountered in the game, such as quests and skills.

The playthrough I used to write this is for an Awakened Shaper, so some information/quests might be slightly different if you join a different faction (quests for other factions are not listed). But overall, the game stays pretty much the same for all the factions.
2
2
3
3
2
   
Award
Favorite
Favorited
Unfavorite
A few beginner tips
About the map
You can instantly travel to any "green" location on your map, or to the "red" locations that are immediately next to green one.
To make travelling easier, you therefore want to turn your network of locations as green as possible. The typical ways of doing that are:
  • By clearing an area from its monsters (either a specific monster, or a specific amount of them)
  • By reaching all the exits on each side of the screen. Don't hesitate when you reach a border to click on travel and when the map opens just go back immediately to the area you came from. This will open the connections on your map
  • By reaching a specific objective (completing a quest, speaking to an NPC... ). In that case this guide will explain what you need to do.

How to stay alive ?
  • Go back to any town to instantly recover your health / energy. You can also go to the pools in the 2nd area (Abandoned Vale) for the same result, and to recreate your army of creations.
  • You will get the Daze skill very quickly. Use it when you're facing multiple enemies to stun/disable them so you can focus on one target at a time
  • Don't raise shaping skills too fast at the beginning. If you right click a creation, you will see its control level. Try to keep it at Adequate(3) or higher to ensure you will not too often lose their control. If you raise the shaping skill, this control will lower. But levelling up will raise it, so first get some levels, and later you can focus on shaping skills.
  • Don't forget your shaper will get a Heal spell very early. Heal yourself and your creations when you need it
  • "Hit and run" is a valid strategy. Your army is expendable and you can recreate it. So sending your army to defeat 1 or 2 ennemies, and keeping your shaper behing to flee is a valid strategy. Then come back with a new army to fight a few more, and so on...
  • If you right click a monster, you will see its level and stats. If that level is quite higher than you, then the area is probably too difficult for you. Come back later and try to find an easier area. The map is quite open but some areas are meant to be explored only when you're high level. At the beginning of the game, stay in areas which are in the woods on the island map. Don't try to go in the desert to the north until you're level 10+

Which creatures should I use?
That is very personal. I will just share the way I did it, at least this will provide one working example. My builds - for the first 25 locations at least - are almost exclusively relying on ranged damage (and the shaper doing either Daze or ranged damage or Heal). It is the control level that determines if you can move down to the next one in the list. Try to keep it at Adequate level.
  • Start with a Fyora (with innate haste, always add this to the fyora)
  • Then 2 Fyora
  • Then 1 Cryora 1 Fyora
  • Then 1 Cryora 2 Fyora
  • Then 2 Cryora
  • Then 3 Cryora
  • Then 3 Cryora (with Hardiness)
  • Then 4 Cryora (with Hardiness)
  • Then 5 Cryora (with Hardiness)

About... other misc tips
  • Keep the items which are displaying a "value", ignore the other ones. You can sell those. And if you plan to sell something, use "CTRL + click" to pick them up so they will instantly go to your junk bag and avoid using up space in your inventory
  • If you need 1 or 2 living tools to open/use/disarm the elements in the game, do it. You will have more than enough living tools in the game. If the game asks you for more than 2... wait until you have increased your Mechanics skill. You can take a note of the location and come back later.
  • For the locks that require a crazy amount of living tools... they're usually not meant to be opened with Mechanics or tools. You may want to look for a key... or check this guide
  • In the second half of the game (areas 40+) you will encounter pylons that are extremely difficult to destroy. According to the developer, you're suppose to avoid/deactivate them rather than try to destroy them. In order to make this easier, I suggest to raise your Stealth to level 5 (it will cost you a total of 11 skill points) progressively during the first half of the game. You should be approximately level 13 by then.
Island map
Here's the island map for the first 35 areas. Those areas are probably the easiest (lowest level) that can be turned "green", i.e. that will allow fast travel. Those 35 areas will take your character to level 11 or 12, assuming a shaper gameplay fighting with creations.

Areas (A1 - A10)
A1 - Crumbling Docks
Map info:
  • 1 - Skill canister : Firebolt
  • 2 - Special item : Ruined Docks Key
  • 3 - To open the door with the shaper symbol : take the skill canister @1
  • 4 - To open the door near the shade : use the lever with the Ruined Docks Key from @2

A2 - Abandoned Vale
Information gained here:
  • The isle was abandoned over 100 years ago and its purpose was research.

Map info:
  • 1 - Codex entry : Secrets of essence
  • 2 - Codex entry : Making creations
  • 2 - Skill canister : Create Fyora
  • 2 - Skill canister : Heal
  • 3 - Codex entry : Notes on combat
  • 4 - Mind Tavit : grants passage through door @5
  • 5 - To open the door : talk to Tavit @4
  • 6 - Fyoras here can be tamed with 1 Leadership

A3 - Vakkiri
Information gained here:
  • There are 3 main servile villages : Vakkiri (neutral towards Shapers), Pentil (love Shapers) and Kazg (hate Shapers)
  • The Awakened (leader is Ellhrah, and in Vakkiri leader is Khobar) are looking for freedom and seeing shapers as equals
  • The Obeyers (in Pentil, leader is Rydell) are docile servants to the Shapers
  • The Takers (in Kazg, leader is Gnorrel) are hostile against Shapers
  • There is an old school to the north where you might find out why the isle was deserted
  • To leave the isle you should go to Pentil as they want to build a seacraft (from Khobar, but need 2 Leadership)

Map info:
  • 1 - Brodus Blade. Gives quest:
    • Q1 - Eliminate the bandits. Either negotaite with them (Leadership 3) or kill them. they are located in "A4 - Bandit Woods" @1 and in the northeast corner.
  • 1 - Inerny (moves around). Gives quest:
    • Q9 - Find stolen knife. Need to have 2 Leadership and talk to Lietz @11 to get it back.
  • 2 - Leader Khobar. Gives quests:
    • Q2 - Clear Watchhill. Need to go to "A6 - Watchhill" and kill the Watchhill Spawner @2
    • Q3 - Meet the Obeyers. Completed by reaching area A15 - Pentil
    • Q4 - Meet the Takers. Completed by reaching area A29 - Kazg
    • Q12 - Message for Ellhrah. Available after completing Q1. Ellhrah can be found in "A7 - Ellhrah's Keep" @2
    • Q14 - Clear Crag Valley. Available after completing Q12. You need to defeat the Crag Spawner in "A8 - Crag Valley" @2. Reward: Girdle of Strength
  • 3 - Codex entry : Awakened wishes (this book is also in "A7 - Ellhrah's Keep")
  • 3 - Sencia. Gives quest:
    • Q10 - Find Spy in Vakkiri. The spy is Nabb @12, he will admit being a spy.
  • 4 - Codex entry : Terrestia's leaders
  • 5 - Ham. Gives quest:
    • Q5 - Open Ham box
  • 6 - Codex entry : Helping the inutile
  • 7 - Learned Pinner. Gives quest:
    • Q6 - Search Ruined School. Go to "A5 - Ruined School" and talk with the mind @6
  • 8 - Dreet. Will open the left door for 200 coins, or with 4 Leadership
  • 9 - Skill canister : War blessing
  • 10 - Coale. Gives quests:
    • Q7 - Find Pixley. Pixley can be found in "A15 - Pentil" @2
    • Q8 - Find Arth. Arth can be found in "A28 - Kazg Ruins" @6
  • 11 - Lietz. Has stolen the knife for quest Q9 - Find stolen knife, and will give it back with 2 Leadership
  • 12 - Nabb. Gives quest:
    • Q11 - Kill Ellhrah. Ellhrah can be found in "A7 - Ellhrah's Keep" @2

A4 - Bandit Woods
Map info:
  • 1 - Ghurk. Can negotiate passage to NE corner with 3 Leadership. Item: Fine robe
  • 2 - Back door to bandit camp, requires 2 Mechanics to open
  • 3 - Item: Coated cloak
  • 4 - Skill canister : Daze

A5 - Ruined School
Information gained here:
  • The school was closed by a shaper woman from off the island. Because they had discovered dangerous knowledge on the island.
  • A special solution created by the shapers is used to keep the minds strong. There might still be some of it on the island.
Map info:
  • 1 - Rawbone. Item: Student's belti
  • 2 - Special item: School Key
  • 3 - Door opens with School key from @1
  • 4 - Skill canister : Searer
  • 5 - Skill canister : Agility
  • 6 - Shaper Records
  • 6 - Mind Povralus. Gain +1 Spellcraft with 5 Leadership
  • 7 - Skill canister : Create Artila

A6 - Watchhill
Map info:
  • 1 - Skill canister : Create Thahd
  • 2 - Watchhill Spawner. Killing it will turn the region green on the map, and is needed to complete "Q2 - Clear Watchhill" from "A3 - Vakkiri".
  • 3 - Seerula. Helps fighting wiith Leadership 3

A7 - Ellhrah's Keep
Information gained here (if Ellhrah trusts you):
  • The explanation for all the rogues might be located in shaper laboratories in the NE part of the island
  • To leave the island, the villages of Pentil and Kazg might have more information
  • There are some humans on the island to the east of Kazg which could have answers about the strange things happening on the island
Map info:
  • 1 - Swam. Will teach you +1 in all combat skills (melee, missile, quick action and evasion) if you join the Awakened after completing Q13
  • 1 - Codex entry : Awakened wishes (this book is also in "A3 - Vakkiri")
  • 2 - Ellhrah. Give him the message to complete "Q12 - Message for Ellhrah"
  • 2 - Ellhrah. Gives quest:
    • Q13 - Destroy Control Four. Quest is provided if you want to join the Awakened and your past actions have shown a real interest in Awakened philosophy (accept servile freedom and treat them as equals to shapers). Control Four can be found in "A9 - Spiral Burrow" @3. Reward: allowed to join the Awakened
    • Q15 - Secrets of Sucia. Quest is provided after you join the Awakened
  • 2 - Ellhrah. If you complete Q13 and then decide to join the Awakened, you will receive "Ellhrah Bronze Key" and "Ellhrah Gold Key" which open all the doors in the area
  • 3 - Skill canister - Cure affliction
  • 4 - Skill canister - Create Fyora
  • 5 - Girdle of Nimbleness
  • 6 - Mind Nutrients

A8 - Crag Valley
Map info:
  • 1 - Skill canister : Protection
  • 2 - The Crag Spawner. Defeat it to turn the area green on the map, and also to complete "Q14 - Clear Crag Valley". Drops Vat Boots
  • 3 - Power spiral can be broken with 3 Mechanics
  • 4 - Skill canister : Wrack

A9 - Spiral Burrow
Map info:
  • 1 - Skill canister : Searer
  • 2 - Vlish. Defeat it to turn the area green on the map. Drops Vlish Steel jerkin.
  • 3 - Control Four. Target of "Q13 - Destroy Control Four"
  • 4 - Skill canister : Create Roamer

A10 - Thorny Fen
Map info:
  • 1 - Skill canister : Wrack
  • 2 - Sleet. Can save the servile by killing the roamer
Areas (A11 - A20)
A11 - Inutile Village
Information gained here:
  • The human outsiders (already mentioned in A7-Ellhrah's Keep) are called the Sholai
Map info:
  • 1 - Brea Dawn. Gives quest:
    • Q16 - The Inutile Bandits. The brigands are @3
  • 1 - Inutile Key. Carried by Brea Dawn. Reward for solving quest Q16
  • 2 - Lily Belle. Sells items including Mica Band, Infused Robe, Warded Robe and Shining Shield
  • 3 - Brigands. Involved in Q16. Negotiations possible with Leadership 8. Iron breastplate, Clawbug Carapace
  • 4 - Door. Opens with Inutile Key from Brea Dawn @1
  • 5 - Guarded door. With Inutile Key from Brea dawn @1 passage is granted

A12 - Hills of Jars
Information gained here:
  • A human came and placed the traps. His name was Trajkov (from the servant mind, with 4 Leadership)
Map info:
  • 1 - Codex entry : mines
  • 2 - Minefield. Enabled/disabled by spore box @3
  • 3 - Spore box. Enables/disables the mines @2
  • 4 - Warehouse key. Opens almost every lever on the floor
  • 5 - Mind Nutrients
  • 6 - Skill canister : Create Thahd
  • 7 - Skill canister : Mechanics
  • 8 - Skill canister : Heal
  • 9 - Servant mind. Can turn off all remaining traps and turrets. Can tell the name of human with 4 Leadership
  • 10 - Minefield. Enabled/disabled by spore box @11
  • 11 - Spore box. Enables/disables the mines @10

A13 - Pentil Plains
Map info:
  • 1 - Chesh. Can be convinced to escort you to the northeast
  • 2 - Skill canister : Cure affliction

A14 - Pentil Woods
Note: The basement of the house in the center has creatures of level 10, which is much higher than the monsters outside. Probably best to avoid until later (and also until you know more about the strange pool, otherwise you won't be able to do anything with it)
Map info:
  • 1 - Spawner. Grounded Tunic
  • 2 - Vat Chitin
  • 3 - Skill canister : Create Artila
  • 4 - Strange pool

A15 - Pentil
Information gained here:
  • This island was previously directed by 3 shapers named Defniel, Corata and Danette. Someone named Toivo in Kazg might have some records about that. (from Learned Dayna)
  • To find out more about the boat, you should go south through the tombs (from Pixley)
Map info:
  • 1 - Godwin. Gives quest:
    • Q17 - Find Source of Vlish. Need to defeat the Spawner in "A14 - Pentil Woods" @1, Reward skill : Quick Action
  • 2 - Pixley. Involved in quest "Q7 - Find Pixley" from "A3 - Vakkiri". Also gives quest:
    • Q19 - Clear a Bridge. Turn either area "A20 - Northbridge" or "A21 - Southbridge" green on your map by crossing the bridge
  • 3 - Learned Jaffee. Will teach you Create Fyora and Sholai language if you have Leadership 5 and join the Obeyers
  • 4 - Codex entry : Obeyer's reminder
  • 4 - Leader Rydell
  • 5 - Girdle of Strength (in SW room upstairs)
  • 6 - Skill : Melee
  • 6 - Skill : Mechanics
  • 7 - Carnelian gloves
  • 8 - Mickall Blade. Gives quest:
    • Q18 - Destroy Hidden Rebels. The rebels are located in "A19 - Thorny Woods" @1
    • Q21 - Contact Outpost. Given after completing Q18. You will need to contact Doge who can be found in "A27 - Servile Outpost" @1. Reward: Shaped gauntlets
  • 9 - Codex entry : The common (in library)
  • 9 - Learned Dayna. Gives quest:
    • Q20 - Find Shaper Records. Shaper records look like books and can be found throughout the areas of the game
  • 10 - Skill canister: Create Roamer
  • 10 - Tranquil Baton
  • 11 - Skill canister : Magic Shaping

A16 - Wooded Valley
Information gained here:
  • Goettsch was 'kidnapped' by Trajkov to work for him, but he fled and stole some gloves (from Astrov)
  • Goettsch fled to some ruins in the desert to the northwest of the island (from AStrov)
  • Yu-La is in the desert to the north (from Astrov, available if you're on the quest Q31 - Yu-La's Treasures)
Map info:
  • 1 - Sniff. Will hint that info to open the door comes from people trapped east of Kazg. He will open the door once you start the quest Q32 - Contact Astrov
  • 2 - Astrov
  • 3 - Skill canister: Skill Affliction
  • 3 - Skill canister: Create Artila
  • 4 - Anya. Gives Spellcraft +1 if you have 5 Leadership

A17 - The Tombs
Map info:
  • 1 - Doors. They will only open if you carry the Tombs amulet key found @4
  • 2 - Hiley. Gives quest if you're level 10+ :
    • Q28 - The Dark Shades. This quest is only provided at level 10 or higher. Defeat the monsters which spawn @3 to complete it and receive a Bonding Knife
  • 3 - Altar. Touch the altar after starting quest Q28 - The Dark Shades. This will spawn some enemies.
  • 4 - Tombs amulet (in the cupboard)
  • 5 - Skill canister: War Blessing
  • 6 - Sarcophagus which provides Quick Action if you didn't already learn it
  • 7 - Sarcophagus which provides Evasion if you didn't already learn it
  • 8 - Sarcophagus which provides Mental Magic if you didn't already learn it
  • 9 - Sarcophagus which provides Blessing Magic if you didn't already learn it
  • 10 - Sarcophagus which provides Healing Craft if you didn't already learn it
  • 11 - Sarcophagus which provides Magic Shaping if you didn't already learn it
  • 12 - Sarcophagus which provides Battle Shaping if you didn't already learn it

A18 - Pentil East
Map info:
  • Defeat spawners 1,2 and 3 to turn the area green on the map.
  • 1 - Spawner. Girdle of Insight
  • 2 - Spawner
  • 3 - Spawner
  • 4 - Sorkin. . Will teach you Sholai language if you join the Awakened

A19 - Thorny Woods
Map info:
  • 1 - Rebel Key
  • 2 - Door, opens with the Rebel Key from @1
  • 3 - Skill canister : Create Fyora
  • 4 - Skill canister : Firebolt

A20 - Northbridge
Information gained here:
  • Trajkov is the leader of the Sholai (from Lahnee @2)
Map info:
  • 1 - Skill canister : Terror (S of gray mines)
  • 2 - Codex entry : Mines (N shop)
  • 2 - Lahnee : mentions that Trajkov is the leader of the Sholai (useful for @5)
  • 3 - Static band (W of SE ruins)
  • 4 - Minefield. To cross the bridge, get close to the first mine to make it explode, then heal, then go to next one, then next.... rince and repeat. Crossing the bridge will complete the quest "Q19 - Clear a Bridge"
  • 5 - Sholai. They are likely way too powerful for you, but you can tell them you know about Trajkov and they will let you pass. You need to learn about Trajkov for that, which can be done from Lahnee @2 or can already be known from previous locations such as in "A11 - Inutile Village"
Areas (A21 - A30)
A21 - Southbridge
Map info:
  • 1 - Sholai. They are likely way too powerful for you, but you can tell them you know about Trajkov and they will let you pass. You need to learn about Trajkov for that, which can be done in several locations such as in "A11 - Inutile Village" or in "A20 - Northbridge". Or even in the current area @2 if you have a good Stealth skill
  • 2 - Skill canister : Create Clawbug (NE corner)
  • 2 - Can learn about Trajkov here (can be useful to exit area east of @1 if you can sneak up to here)
  • 3 - The door will only open if you carry the Tomb Amulet found in A17 - The Tombs @4
  • 4 - Sarcophagus which provides Missile Weapons if you didn't already learn it
  • 5 - Sarcophagus which provides Spellcraft if you didn't already learn it

A22 - Ascended Labs
Map info:
  • 1 - Ascended Sessina. Gives quest:
    • Q22 - Tale of the Ascended. You will need to get the Gleaming Feather from the cockatrice fight @3. You may want to come back later when you're level 12 for this one (i.e. after exploring the first ~35 areas)
  • 2 - Door opens after completing "Q22 - Tale of the Ascended" and talking to Valyra
  • 3 - Cockatrice. Fight it to complete "Q22 - Tale of the Ascended". Drops Dante's Guile
  • 4 - Helix Bracer and Feisty Slap Glove. They can be infused.
  • 5 - Skill canister : Create Cockatrice

A23 - Buried Cells
Information gained here:
  • The reason the island was barred is related related to something called the Geneforge (from the Mind Servant)
Map info:
  • 1 - Buron. Gives quest:
    • Q23 - Get Spray Baton. The baton can be found @7
  • 2 - Buron's Key. Opens the door @3
  • 3 - Door. Can be opened with Buron's Key from @2
  • 4 - Mind servant. If given some Mind Nutrients, will open all doors and will mention the Geneforge probably for the first time.
  • 5 - Skill canister : Essence Lances
  • 6 - Skill canister : Speed
  • 7 - Chainmail Vest and Spray Baton needed for "Q23 - Get Spray Baton"
  • 8 - Ivory Band

A24 - Stone Circle
Map info:
  • 1 - Book that mentions that one of the pylons is different (the one @2)
  • 2 - Pylon which contains a Bone Baton (special object). Once you have the baton, standing on a circle (A) will open the nearby forest area (B)
  • 3 - Sage Boots

A25 - Crystal Burrow
Map info:
  • 1 - Skill canister : Create Vlish
  • 2 - Skill canister : Protection
  • 3 - Minefield (get close to the mines 1 by 1 and heal yourself to "disarm" them)

A26 - Quiet Marshes
Information gained here:
  • Shaping, canisters... is all about "genes" and therefore controlled genetic mutations (from Clois)
  • Serviles might just be humans genetically modified to serve others called shapers (from Clois)
  • There is a boat on the east side of the island (from Clois)
Map info:
  • 1 - Trapped canister (will poison you without providing you any skill)
  • 1 - Infused robe
  • 2 - Clois. Will provide interesting insight to the game's main background

A27 - Servile Outpost
Information gained here:
  • The Kazg leader is looking for something called the Geneforge (from Doge)
Map info:
  • 1 - Doge. He's the servile you're looking for as part of "Q21 - Contact Outpost."
  • 2 - Raid. When leaving the village, you will be raided by Artila at this location (and the villagers will help fighting)
  • 3 - Skill canister : Daze

A28 - Kazg Ruins
Map info:
  • 1 - Skill canister : Essence lances
  • 2 - Skill canister : Create Clawbug. Door opened with lever @3
  • 3 - Lever to open the door leading to @2
  • 4 - Lever to open the doors @5 and @8
  • 5 - Door opened with lever @4
  • 6 - Arth - Involved in quest "Q8 - Find Arth"
  • 7 - Rosen - grants you access to the town to the north even if you're Awakened
  • 8 - Skill canister : Essence shield. Door opened with lever @4

A29 - Kazg
Information gained here:
  • Island geography: There are workshops, research warrens and crystal mines to the north (from book @2)
  • The isle was barred by the council of shapers, including stopping the Geneforge (from book @4)
  • The Geneforge is key to everything on this island. And Sholai to the east know about it (from Houten @6)
Map info:
  • 1 - Toivo. Gives quest: (library)
    • Q24 - Servile Origins
  • 2 - Book - learn the location of some interesting areas on the island (library)
  • 3 - Codex entry : Calling the inutile (library)
  • 4 - Book - learn about the barring of the island (library upstairs)
  • 5 - Skill canister : Terror (north east)
  • 6 - Houten. Gives quest: (jail SW in main building)
    • Q25 - Message for Rydell. Rydell can be found in "A15 - Pentil" @4
  • 7 - Eko Blade. Gives quest: (N in main building)
    • Q26 - Kill Outsider Rebels
  • 8 - Gnorrel. Gives quest:
    • Q27 - Slay Ellhrah

A30 - Servile Warrens
Information gained here:
  • A powerful thing called Generforge is on the island (from the mind)
Map info:
  • 1 - Servant mind. Deactivating the 3 pillars grants you access to him. Then feeding it some Mind Nutrients will make it open the door leading to 2
  • 2 - Skill canister: Mass Energize. The door is opened by the mind @1
  • 3 - Skill canister : Essence Shield
  • 4 - Skill canister : Endurance
  • 5 - ? (door requires item found later in the game)
  • 6 - Specter Vlish, drops Slowing Shiv
Areas (A31 - A40)
A31 - Eastern Kazg
Map info:
  • 1 - Fanatic drops Ring of the Eye (NW)
  • 1 - Codex entry : Shrine of Defiance
  • 2 - Access is granted without fight only if you are on quest Q26 - Kill Outsider Rebels from Eko Blade (found in A29 - Kazg)
  • 3 - Snag. Will fight you unless you have 8 leadership (S in corner just W of large building)
  • 4 - Kurit. Sells access to some canisters (price can be dropped to 500 with 5 leadership)
    • Warrior artifact (west door) has a skill canister : Melee Weapons
    • Wizard artifact (middle door) has a skill canister : Firebolt
    • Shaping artifact (eastdoor) has a skill canister : Create Thahd
  • 5 - The control creature opens the vats and doors in the building. The vats trigger fights.
  • 6 - Use switch 2 from @5 to open the door
  • 7 - Skill canister : Heal. Door opens with level 3. Use switch 3 from @5 to open the door
  • 8 - Use switch 6 from @5 to open the door
  • 9 - Skill canister : Battle Shaping

A32 - Refugee Cave
Information gained here:
  • The Sholai are explorers from another continent. He found out some secrets from the Shapers and wanted to get that power, using something called Geneforge. He brought by force a Shaper called Goettsch to help him, but Goettsch fled somewhere on the island. One Sholai called Anfisa knew more and hid her journal in a magical chest. (from Masha)
  • The Sholai have a boat at the docks to the northeast, but Trajkov blocks it with some mines that can only be disarmed with a special wand (from Masha, after quest)
  • The Geneforge is located to the northeast of the island. To use it, Trajkov needs some gloves (from the journal in the chest, after Masha's quest)
Map info:
  • 1 - Narsu
  • 2 - Solyoni. Only speaks Sholai. Trader.
  • 3 - Masha. Gives quest:
    • Q29 - Recover Sea Chest Key. The key is located in "A34 - Eastern Docks" @3. Reward is access to 2x Sholai Language lessons
    • Q32 - Contact Astrov (available after completing Q29)

A33 - Dock Ruins
Map info:
  • 1 - Servant mind. Can be lied to, to access the nearby cabinet
  • 1 - Cabinet (opened by servant mind) containing a "Docks Key"
  • 2 - Door to the east opens when you pull both levers @3
  • 3 - Lever. Both are needed to open the door @2
  • 4 - Cupboard containing a Thahd Skin Jerkin
  • 4 - Skill canister : Daze
  • 5 - Door can be opened with the Docks Key from @1

A34 - Eastern Docks
Map info:
  • 1 - Door can be opened with the Docks Key from "A33 - Dock Ruins" @1
  • 2 - Skill canister : Essence Lances (3rd door)
  • 3 - Body carries the "Sea Chest Key" needed for quest "Q29 - Recover Sea Chest Key"
  • 4 - Arixy. Gives quest:
    • Q30 - The Purging. Involves visiting, and then killing Gnorrel. Gnorrel can be found in "A29 - Kazg" @8
  • 5 - Codex Entry : Terrestia's Leaders
  • 5 - Thrackerzod. Gives quest:
    • Q31 - Yu-La's Treasures. Go find Yu-La in "A52 - Barrens Research" and bring back the Vial of Goo she gives you. Then he wants more, go back to Yu-La and get the Purifying Blade

A35 - Kazg Plains
Map info:
  • (nothing special here)

A36 - Peaceful Vale
Information gained here:
  • The Geneforge was created by Danette (from Syros)
  • The Geneforge was created by Danette. It's in the NE corner of the island and grants a lot of power, but you need gloves to use it. Trajkov is trying to use that power, but Goettsch stole the gloves. (from Syros, when paying 1 skill point for information)
Map info:
  • 1 - Syros.
    • Grants access to east door @2 for 5 skill points when asking for magical skills
    • Grants access to west door @3 for 5 skill points when asking for items
    • Gives some overall information about the Geneforge, Trajkov and the gloves (which you can get elsewhere for free) for 1 skill point
  • 2 - Skill canister - Searer
  • 2 - Skill canister - Create Thahd
  • 2 - Skill canister - Create Artila
  • 2 - Skill canister - Cure affliction
  • 3 - Chests with Leaded Shield, Jeweled Wand, Stability Boots, Restoration Spores, Fibrous Breastplate

A37 - Tribal Woods
Map info:
  • 1 - Four spawners. Can take the first 2 without starting the fight with the others if fought from a distance. Getting rid of them turns the area green on the map
  • 1 - Rusty key on one of the bodies
  • 2 - Door opens with the rusty key from @1
  • 3 - Skill canister - Speed
  • 4 - Skill canister - Create Roamer
  • 5 - Village entrance. Can enter peacefully when talking about trading

A38 - Holding Two
Map info:
  • 1 - Bore, carries Fyoraskin Shield
  • 2 - Skill canister - War Blessing
  • 3 - Skill canister - Create Vlish
  • 4 - Girdle of Nimbleness, Steel Breastplate
  • 5 - Servant mind. Leadership 5 to convince it to open the cupboard with some Mind Nutrients (special item), and the door @6
  • 6 - Door opened by servant mind @5, or with high mechanics

A39 - Icy Tunnels
Map info:
  • 1 - Specters drop Fibrous Shield, Shielding Band
  • 2 - Use pylons to open coffins. Stabilizing Band in the south coffin, Quick Action +1 in the north coffin
  • 3 - Area opens after visiting @1

A40 - Underground River
Map info:
  • 1 - Power spiral. Disables the lava tiles @2
  • 2 - Lava tiles, can be disabled with power spiral @1
  • 3 - Coated cloak
  • 4 - Living knife in the cupboard (north)
  • 5 - Skill canister - Create Vlish
  • 5 - Power spiral. Disables the lava tiles @8
  • 6 - Power spiral. Disables the lava tiles @7
  • 7 - Lava tiles. Disabled with power spiral @6
  • 8 - Lava tiles. Disabled with power spiral @5
  • 9 - Switch. Operating it will complete the bridge and turn the area green on your map. Disabling the 2 power spirals around it will prevent it from functioning
  • 10 - Power spiral. Disables the lava tiles @11
  • 11 - Lava tiles. Disabled with power spiral @10
  • 12 - Servant Mind. Can convince it to give a 25% discount. Sells Oozing Belt, Guardian Cloak, Static Band and Dancing Boots
  • 13 - Lava tiles. Walk through it. Can be disabled later @14
  • 14 - Power spiral. Disables the lava tiles @13
Areas (A41 - A50)
A41 - Eastern Mines

Generic tip: Go to the Mine Core and ask the servant to disable the defenses in the eastern mines to disable all the fire tiles and the pylons, so you can explore this map without any risk.

Generic tip: To turn this area green, travel from the Eastern Mines, Mine Core and Western Mines and leave to the west. Then all 3 areas will become green at the same time.

The mines may seem difficult at first due to the pylons. The path shown here in orange is a rather safe way to walk around the pylons to reach the servant of the mines, who can then help to disable those pylons. If you've been following the tips at the beginning of the guide and have 5 points in Stealth, then the pylons won't even see you on the marked path. If you have less stealth you will be targeted a few times on the path, so you'll have to heal between each pylon.

Map info:
  • 1 - Machine that creates Blast Crystals for 5 rough crystals
  • 2 - A cupboard difficult to open (3 live tools with 11 mechanics skills) containing a Reflecting Shield


A42 - Mine Core

Generic tip: To turn this area green, travel from the Eastern Mines, Mine Core and Western Mines and leave to the west. Then all 3 areas will become green at the same time.

Map info:
  • 1 - Skill canister: Protection
  • 2 - Tinker's gloves (+2 mechanic)
  • 3 - Servant Mind. After giving it nutrients, it can disable the defenses (lava tiles/paylons) in the Mine Core. It can also disable the defenses in one other mine area (northern mines, eastern mines or western mines), but only one at a time.
  • 4 - The mana/healing pools can be reactivated by using the power crystals in 5
  • 5 - Power crystals that can be used to reactivate the mana and healing pools in 4

A43 - Western Mines

Generic tip: Go to the Mine Core and ask the servant to disable the defenses in the western mines to disable all the fire tiles and the pylons, so you can explore this map without any risk.

Generic tip: To turn this area green, travel from the Eastern Mines, Mine Core and Western Mines and leave to the west. Then all 3 areas will become green at the same time.

Map info:
  • 1 - Skill canister: Airshock
  • 1 - Machine that creates Discipline Wands for 20 rough crystals

A44 - Northern Mines

Generic tip: Go to the Mine Core and ask the servant to disable the defenses in the northern mines to disable all the fire tiles and the pylons, so you can explore this map without any risk.

Generic tip: To turn this area green, travel from the Eastern Mines, Mine Core and Western Mines and leave to the west. Then all 3 areas will become green at the same time.

Map info:
  • 1 - Skill canister: Wrack
  • 2 - Mine Key. Opens all the locks/levers in the mines.
  • 3 - Machine that creates Shaped Blades for 30 rough crystals
  • 4 - Danette's Cloak (NE room)

A45 - The Arena
Map info:
  • 1 - Skill canister: Protection
  • 2 - Activate the 2 spirals then you can use the control panel. Each switch opens one of the doors @3
  • 3 - Doors opened by the control panel @2
  • 4 - Skill canister: Create Clawbug
  • 5 - Prav. Can be convinced to fight for you with 8 Leadership
  • 6 - Servant Mind. Can open the door @7 if using the proper conversation topics
  • 7 - Skill canister: Healing Craft. Door opened by teh Servant Mind @6

A46 - Patrolled Dell
Map info:
  • 1 - Sholai Language
  • 2 - Skill canister: Create Drayk

A47 - Guarded Bridge
Map info:
  • 1 - Book : learn that something needed for the Geneforge is in the South Workshop

A48 - Winding Road
Map info:
  • 1 - Augment Vestment (cultist's lair)
  • 2 - Symbiotic Cloak
  • 3 - Skill canister: Dominate
  • 4 - Znaf. Teaches Sholai Language for a fee
  • 4 - Flig. Teaches Mechanics for a fee. Gives quest:
    • Q33 - Kill Wounded Beta @5. Reward is to open the door@6
  • 5 - Wounded Beta for quest @4
  • 6 - Skill canister: create Fyora

A49 - Dry Wastes
Map info:
  • 1 - Skill canister: Essence Shield

A50 - The Junkyard
Map info:
  • 1 - Shock. Gives quest:
    • Q34 - Find equipment. Bring him some "shaper equipment"
  • 1 - Proof. Gives quest:
    • Q35 - Clear Ghost Gate
Areas (A51 - A54)
A51 - Western Wastes
Map info:
  • 1 - Book: Wastes Journal
  • 2 - Skill canister:

A52 - Barrens Research
Map info:
  • 1 - Yu-La. Merchant. Gives a Vial of Goo for the quest "Q31 - Yu-La's Treasures". Once returned, Yu-La starts selling special wares and gives the next item for the quest: a Puriyfing Blade.
  • 2 - Ascended Alonzo. Involved in quest "Q22 - Tale of the Ascended", she asks to kill Oroboros and gives you the Barrens key which opens the door @4.
  • 3 - Mind Swanwick. Gives quest:
    • Q36 - Cockatrice Research
  • 4 - Door leading to the Barrens Bunker. Opens with the key from Alonzo @2

A53 - Freeplace
Map info:
  • 1 - Ell : opens storage @2 if you have 7 leadership
  • 1 - Skill canister: Create Battle Alpha
  • 2 - Storage with Grounding Vest

A54 - Power Station
Map info:
  • 1 - Gyah-Ki (stun it at the beginnning of the battle with 4 leadership). Kill to turn the area green.
  • 2 - Skill canister: Create Glaahk
  • 3 - Servant Mind Gallus Meg. Give nutrients to revive. Gives quest:
    • Q37 - Find Gallus Meg Crystals. Find the 4 focusing stones (one is @4)
  • 4 - Focusing stone in the cupboard (near lava east of gallus)
Skills and quests
Here's a summary of the skills and quests listed in the previous maps.

Location
Skills
Quests
A1 - Crumbling Docks
Firebolt
A2 - Abandoned Vale
Create Fyora
Heal
A3 - Vakkiri
War blessing
Q1 - Eliminate the bandits
Q2 - Clear Watchhill
Q3 - Meet the Obeyers
Q4 - Meet the Takers
Q5 - Open Ham box
Q6 - Search Ruined School
Q7 - Find Pixley
Q8 - Find Arth
Q9 - Find stolen knife
Q10 - Find Spy in Vakkiri
Q11 - Kill Ellhrah
Q12 - Message for Ellhrah
Q14 - Clear Crag Valley
A4 - Bandit Woods
Daze
A5 - Ruined School
Searer
Agility
Create Artila
Spellcraft (requires 5 Leadership)
A6 - Watchhill
Create Thahd
A7 - Ellhrah's Keep
Melee Weapons (Awakened quest reward)
Missile Weapons (Awakened quest reward)
Quick Action (Awakened quest reward)
Evasion (Awakened quest reward)
Cure Affliction
Create Fyora
Q13 - Destroy Control Four
Q15 - Secrets of Sucia
A8 - Crag Valley
Protection
Wrack
A9 - Spiral Burrow
Searer
Create Roamer
A10 - Thorny Fen
Wrack
A11 - Inutile Village
Q16 - The Inutile Bandits
A12 - Hills of Jars
Heal
Create Thahd
Mechanics
A13 - Pentil Plains
Cure Affliction
A14 - Pentil Woods
Create Artila
A15 - Pentil
Create Fyora (Obeyer only)
Sholai language (Obeyer only)
Quick Action (quest reward)
Melee
Mechanics
Create Roamer
Magic Shaping
Q17 - Find Source of Vlish
Q18 - Destroy Hidden Rebels
Q19 - Clear a Bridge
Q20 - Find Shaper Records
Q21 - Contact Outpost
A16 - Wooded Valley
Skill Affliction
Create Artila
Spellcraft (with 5 Leadership)
A17 - The Tombs
War Blessing
Quick Action (if not known yet)
Evasion (if not known yet)
Mental Magic (if not known yet)
Blessing Magic (if not known yet)
Healing Craft (if not known yet)
Magic Shaping (if not known yet)
Battle Shaping (if not known yet)
Q28 - The Dark Shades
A18 - Pentil East
Sholai language (Awakened only)
A19 - Thorny Woods
Create Fyora
Firebolt
A20 - Northbridge
Terror
A21 - Southbridge
Create Clawbug
Spellcraft (if not known yet)
Missile Weapons (if not known yet)
A22 - Ascended Labs
Create Cockatrice (quest reward)
Q22 - Tale of the Ascended
A23 - Buried Cells
Essence Lances
Speed
Q23 - Get Spray Baton
A24 - Stone Circle
A25 - Crystal Burrow
Create Vlish
Protection
A26 - Quiet Marshes
A27 - Servile Outpost
Daze
A28 - Kazg Ruins
Essence Lances
Create Clawbug
Essence Clawbug
A29 - Kazg
Terror
Q24 - Servile Origins
Q25 - Message for Rydell
Q26 - Kill Outsider Rebels
Q27 - Slay Ellhrah
A30 - Servile Warrens
Mass Energize
Essence Shield
Endurance
A31 - Eastern Kazg
Melee Weapons
Firebolt
Create Thahd
Heal
Battle Shaping
A32 - Refugee Cave
Sholai Language x2 (quest reward)
Q29 - Recover Sea Chest Key
Q32 - Contact Astrov
A33 - Dock Ruins
Daze
A34 - Eastern Docks
Essence Lances
Q30 - The Purging
Q31 - Yu-La's Treasures
A35 - Kazg Plains
A36 - Peaceful Vale
Searer
Create Thahd
Create Artila
Cure Affliction (all 4 skills cost 5 skill points)
A37 - Tribal Woods
Speed
Create Roamer
A38 - Tribal Woods
War Blessing
Creat Vlish
A39 - Icy Tunnels
Quick Action (coffin)
A40 - Underground River
Create Vlish
A41 - Eastern Mines
A42 - Mine Core
Protection
A43 - Western Mines
Airshock
A44 - Northern Mines
Wrack
A45 - The Arena
Protection
Create Clawbug
Healing Craft
A46 - Patrolled Dell
Create Drayk
Sholai Language
A47 - Guarded Bridge
A48 - Winding Road
Dominate
Create Fyora
Sholai Language
Q33 - Kill Wounded Beta
A49 - Dry Wastes
Essence Shield
A50 - The Junkyard
Q34 - Find equipment
Q35 - Clear Ghost Gate
Infused items
Some items can be infused. To infuse them, you need to take them to an energy pool. Each pool can only be used once.

The items that can be infused are:
  • Helix Bracer (when infused: +1 intellect, +1 to creations intellect). Found in "A22 - Ascended Labs"
  • Feisty Slap Glove (when infused: unarmed attacks do more damage and can daze enemies. Found in "A22 - Ascended Labs"

The pools can be found in:
  • A14 - Pentil Woods (basement)
10 Comments
Leaf 23 May, 2024 @ 7:14am 
thanks a lot for this guide. Was honestly kinda stuck since I didnt know you needed leadership to get info about the Sholai so was trying to fight them but got my ass kicked lol
Nitarmjo 9 Jul, 2022 @ 9:26pm 
The servant mind in the Mine Core can be awakened without feeding if you have enough Leadership (mine is at 10).
Sly 4 Jul, 2022 @ 9:20pm 
Bracer can be infused in Pentil Woods for +1 Intellect, +1 Int to creations. It can be infused a second time in the basement of Diarazad to give an additional +1 Strength, +1 Str to creations.
Nitarmjo 4 Jul, 2022 @ 9:12pm 
-In Ascended Labs, the hint book says that there are some rogues south of the Cockatrice that you can talk into helping you. I haven't done this, so I don't know how much Leadership is needed.
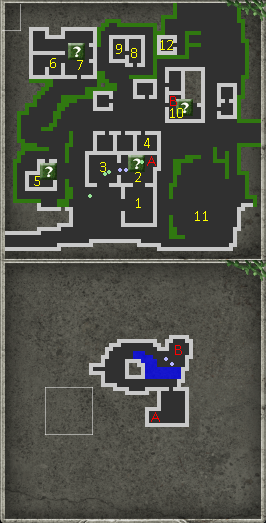
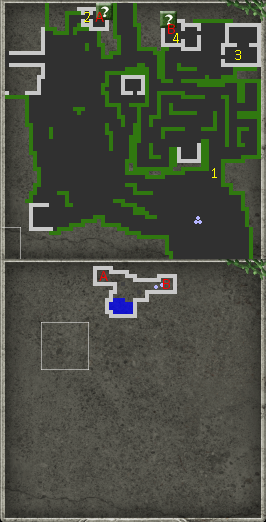
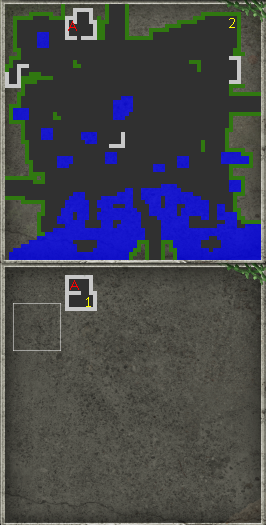
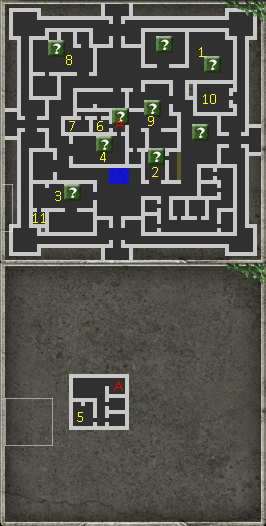
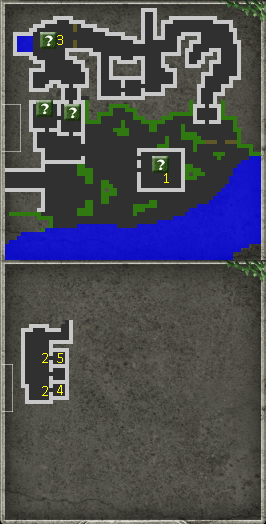
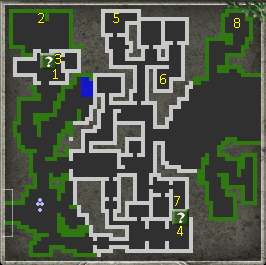
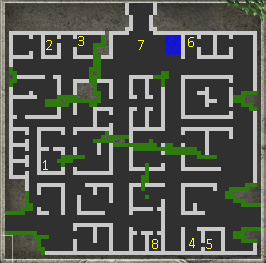
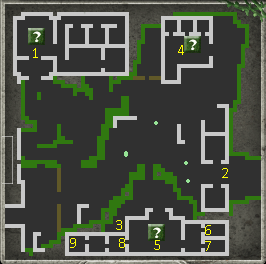
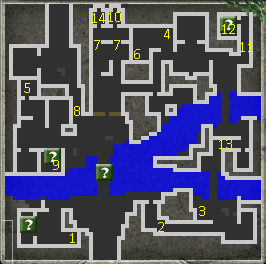
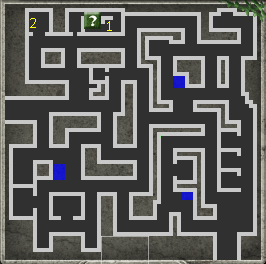
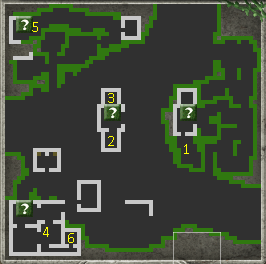
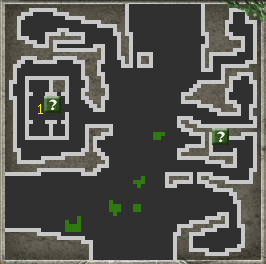
-In Buried Cells, the canister at 5 is guarded by a Reaper Turret.
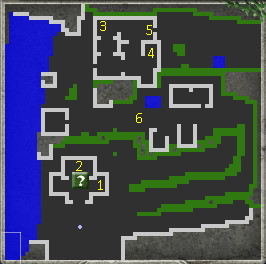
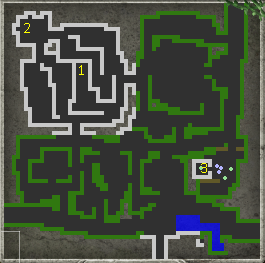
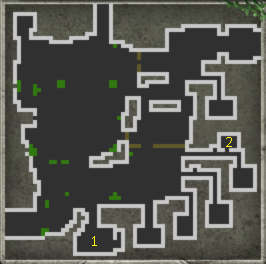
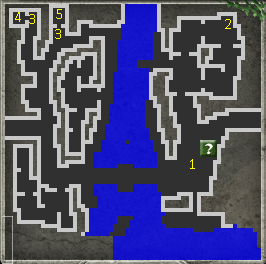
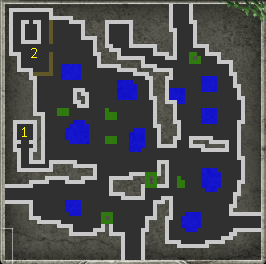
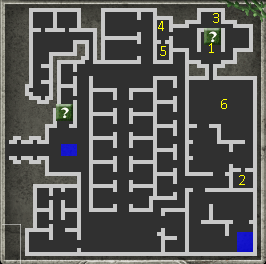
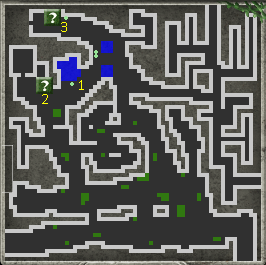
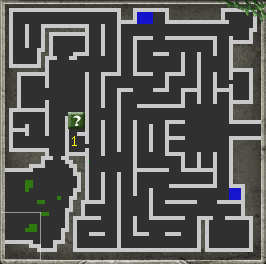
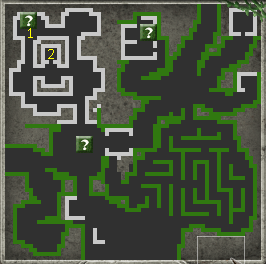
-In Crystal Burrows, there's a spore box in the western corner of the actual burrows (in the "elbow" of the path) that disables the mines.
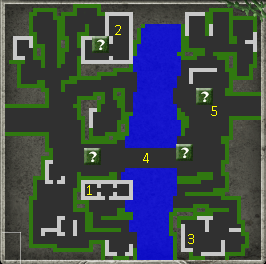
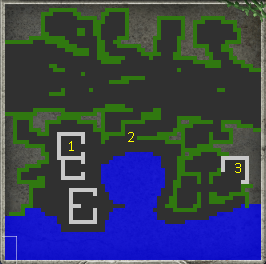
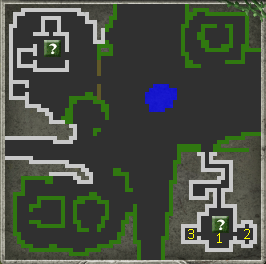
-In Kazg Plains, there is a servile hiding in the north corner of the map named Hew. They have some generic information that you can get elsewhere, and some more that they only give to Obeyers.
-In Kazg Ruins, the Taker patrols can be pacified if you have enough Leadership and/or tell them that Trajkov sent you. This might work in Kazg Plains; I haven't checked.

That's as far as I've gotten so far.
Nitarmjo 4 Jul, 2022 @ 9:12pm 
Thank you for making this guide. It's been a great help so far. I have a few notes for some of the areas (some of this is from memory, so I suggest testing to verify):
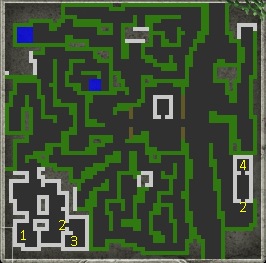
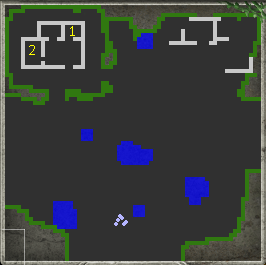
-In Vakkiri, I got Lietz to drop the knife with 1 Leadership.
-In Bandit Woods, the Leadership option is accurate, but getting Brodus to accept the deal takes more.
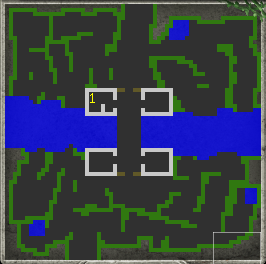
-In Inutile Village, I managed to negotiate with 7 Leadership.

More spoiler-ish notes in my next post.
fire_varan 10 Nov, 2021 @ 9:24am 
Thank you so much for your guide, it is very helpful for me as I play Geneforge for the first time now.
jeremiah.syndicate 14 Sep, 2021 @ 5:45pm 
Love this! Helped in my second gameplay as a Guardian on Veteran
airboy 28 Mar, 2021 @ 8:05am 
Many thanks for sharing your ideas. The quest maps are very helpful in finding the quest giver quickly after a quest is completed.
fef  [author] 23 Mar, 2021 @ 1:56pm 
Thanks, I've updated the corresponding tip
bobsson 22 Mar, 2021 @ 10:21pm 
There's no need to go back to Abandoned Vale for the pools - just walking into a town fully refills everything. If you really need to keep creating and destroying creations for some reason, and need to keep your essence full, there's often a pool around in town, or you can leave and immediately reenter.