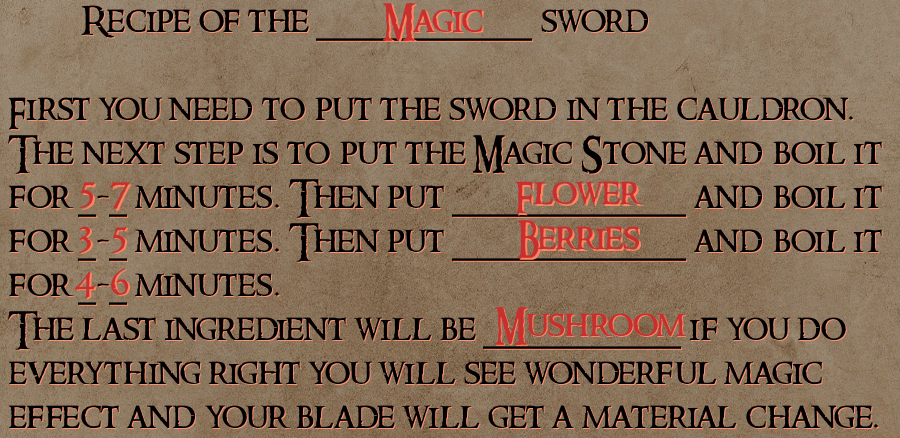
Fantasy Blacksmith

Fantasy Blacksmith

46 ratings
Complete Fantasy Blacksmith Tutorial
By Meissner_Effect
Outline:
- Introduction
- Leveling up quickly
- Shop
- Coke Stove: Worth the Risk?
- Furnace
- Smelting
- Forging
- Tempering
- Alchemist Table: Perfect Damascus
- Sharpening
- Assembling
- Customer Exchange
- Magic Table: All Spell Patterns
- Cauldron: All Recipes
- Altar: All Elemental Enhancements
- Mining
- Achievement Guide
4
4
2
3
2
   
Award
Favorite
Favorited
Unfavorite
Introduction
Fantasy Blacksmith can be challenging partly due to the plethora of bugs in the game. This guide aims to help players navigate past the bugs to hopefully have a more enjoyable experience with the game.

Before you begin the game, here are a few tips for setting up the game that I have found help to make it more playable:

  • Either turn on V-Sync or change graphics card FPS cap to your monitor refresh rate. Otherwise, game tends to run at 500+ FPS without any additional benefit.
  • Turn Graphic Quality to the Lowest Setting. Game runs smoother and doesn't look much different. If anything, it seems a bit easier to see changes in metal colors and for making perfect damascus.
  • Adjust your brightness and gamma settings. Here are the settings I used for this guide, which will be particularly important in the making perfect damascus every time section.
  • If you ever want to see the name of something, press "T" while holding it to see the name appear


Leveling up quickly
Unlike most RPGs, the leveling system in this game is linear. In other words, the amount of experience required to get from level 12 to 13 is the same as that required to get from level 1 to 2. Each level requires 15 skill points to level up. While there is no max level, you will max out all available upgrades at lvl 16.

There are three ways to get skill points:
(1) Selling a weapon: 3 skill points
(2) Helping a customer with tasks such as sharpening, sorting runes for spells, or damascus forging: 1 skill point
(3) Skill books found while mining: 1 skill point

Leveling up allows you to make upgrades in five categories:
(1) Luck: better mining drops
(2) Mining speed: faster mining
(3) Forging: faster forging
(4) Sharpening: slows minigame making it easier to score higher
(5) Assembling: slows minigame and higher margin of error for higher assembly scores


If you are struggling to get 100% assembly or sharpening, you are not alone. Upgrading those skills make them much easier.

Here is one example of speed leveling which nets two levels per cycle:
(1) buy 10 bronze bars (cart holds 10)
(2) forge and temper one of them
(3) after tempering the first one place another bar into the furnace
(4) while bar is heating up in furnace, assemble and sharpen the previously tempered one
(5) by the time you finish sharpening, the next bronze ore should be ready to be forged
(6) repeat the cycle until all 10 are completed and then sell all 10 using "u"
Shop
The shop is where you can buy materials, items, and upgrades. You can access it by selecting the scroll on the right side of the table shown here.

The shop charges a delivery fee which is a set fee per location. Thus, you can reduce the amount of coins you spend on delivery by purchasing a full cart at a time from a single location. Note that the shop stock varies from time to time. Logging out and back in can sometimes reset the stock. Some upgrades and scrolls only occasionally appear, which means you may want to save some coins for when the desired upgrade or scroll is in stock. Try not to leave too much in the cart at any given time as you may lose items if they don't fit.

Village
- Delivery Cost: 10 coins
- Forge: Bronze [100], Guard [10-15], Handle [10-15], Pommel [10-15], Water Can [20], Coal [20], Torch [40], Thermometer 1 [20]
- Interior: none
- Magic: none

Town
- Delivery Cost: 20 coins
- Forge: Iron [60], Guard [20], Handle [20], Pommel [20], Pickaxe [40], Coal [20], Torch [40], Thermometer 2 [40], Metal Box [60], Ferrum [10], H2O2 [10], HCl [10]
- Interior: Furnace 2 [200], Ore Smelter [100], Trash Box [60], Dice Table [100], Alchemist Table [100], Shelves [120], Dwarf Shield [40]
- Magic: none

Magic Woods:
- Delivery Cost: 30 coins
- Forge: Titan [220], Guard [15-35], Handle [20-30], Pommel [15-25], Coal [20], Torch [40], Metal Box [60], Ferrum [10], H2O2 [10], HCl [10], Water Can [30]
- Interior: Magic Table [160], Volcano Anvil [800], Scarecrow [100], Darts [150], Magic Woods [50], Spear [70], Emblem [120]
- Magic: Berries [200], Root [180], Bark [150], Flower [250], Poison [160], Magic Stone [40], Clear Stone [20], Nature [190], Rune Nature [30], Rune Blizzard [50]

Abandoned Cemetery:
- Delivery Cost: 40 coins
- Forge: Tungsten [650], Guard [35-45], Handle [25-30], Pommel [25], Coal [20], Coke [50], Torch [40], Thermometer 3 [60], Metal Box [70], Ferrum [10], H2O2 [10], HCl [10], Water Can [30]
- Interior: Furnace 3 [350], Coke Stove [200], Magic Cauldron [200], Cemetery [80], Skull Flag [65], Stone Shield [135]
- Magic: Skull [100], Urna [100], Magic Stone [40], Clear Stone [20], Blood [240], Rune Soul [200], Rune Death [150], Rune Blood [50]

Mithrill Mine:
- Delivery Cost: 50 coins
- Forge: Mithril [1200], Mithril Pickaxe [500], Guard [35-50], Handle [35], Pommel [30-35], Coal [20], Coke [50], Torch [40], Thermometer 3 [60], Metal Box [70], Ferrum [10], H2O2 [10], HCl [10], Water Can [20]
- Interior: Furnace 3 [350], Altar [450], Coke Stove [200], Axe [190], Ice Shield [380], Scary Night [600]
- Magic: Horn [200], Ice [200], Eye [150], Fang[100], Magic Stone [40], Clear Stone [20], Green Clover [200], Blizzard [250], Rune Thunder [250]

Dragon Cliffs:
- Delivery Cost: 60 coins
- Forge: Elandoor [3000], Guard [35-55], Handle [35-40], Pommel [35-40], Coal [20], Torch [40], Thermometer 3 [80], Metal Box [70], Ferrum [10], H2O2 [10], HCl [10], Water Can [20]
- Interior: The Dragon [550], Dragon Flag [400], Mirror Shield [1200]
- Magic: Sting [180], Slug [180], Centipede [300], Spider [300], Cobra [270], Magic Stone [40], Clear Stone [20], Red Clover [250], Hell [700], Rune Fire [100]

Royal Castle:
- Delivery Cost: 40 coins
- Forge: Silver [1500], Gold [6000], Guard [40-50], Handle [40], Pommel [35-50], Coal [20], Coke [50], Torch [40], Thermometer 3 [60], Metal Box [60], Ferrum [10], H2O2 [10], HCl [10], Water Can [20]
- Interior: Coke Stove [200], SPQR [250], Templar Shield [440], The King [350], The God [400]
- Magic: Holy Water [300], Shell [240], Magic Stone [40], Clear Stone [20], Fire [400]
Coke Stove: Worth the Risk?
The coke stove allows you to make coke from coal boxes, which takes about 5 minutes and some tricky maneuvers with the tongs. As noted above the shop sells coke for over twice the cost of coal. So why would anyone not want this in their shop? Because once installed it creates one of the only places in game where items can get permanently stuck. Once you have the volcano anvil, forging skill upgraded, and have mastered the art of using the water can + air pump to save on coal usage, one box of coke can last you many swords and the 30 coin price difference becomes insignificant. For this reason, I do not recommend ever purchasing this item as once it is purchased you cannot remove it.
Furnace
The furnace serves two main purposes: heating up metals and damascus. For simplicity, I will refer to watering the furnace as turning it off and firing furnace up using the air pump as turning it on. Note that damascus works even when furnace is turned off. The only benefit for thermometer is during the initial heating of a cold bar simply so you can approximate how long it will take until it hits the required temperature. Note that even though you point thermometer into the furnace, the temperature is actually that of the metal which you are measuring. The actual furnace doesn't take any time to heat up or cool down. Thus, you can use water and air pump at will to turn it on and off without any loss of heat generating power.

Here is the work-flow I recommend:

(0) Place cold metal into furnace. Check temperature using thermometer to see how long it will take to reach required temperature. If the temperature stops rising and metal is still not at desired temperature, then you likely need more coal/coke. Skip this step if taking metal out of smelter.
(1) Place metal on forge using tongs.
(2) Turn furnace off using watering can
(3) Forge metal until it cools to point you can't forge any more
(4) Place metal back into furnace
(5) Turn furnace back on using air pump once
(6) Repeat steps 1 through 5 until forging is done. Furnace should be off when you finish as you will likely go straight from step 3 to tempering. If you needed to heat metal up more prior to tempering, then turn furnace off after tempering.
Smelting
Smelting allows you to make metal bars out of the ore you find while mining. Try to save coal chunks for the smelter instead of using them for the furnace. Simply place 3 of any types of ore (you can mix and match them) into the top of the smelter and then add a single coal chunk in the bottom to run the smelter. Placing the coal chunk can be tricky due to the buggy nature of the game. One method I have found consistently works is to crouch by holding [Ctrl], run toward smelter, and then right as you run into the smelter press [E] while facing smelter head-on. The flames should appear beneath the smelter if it worked. If not, then look around the room as the coal chunk might have been flung behind you if it didn't make it into the smelter. Smelting time varies depending on the ore type, but you can leave ore in there indefinitely without any adverse effects. While you can make the bar and let it cool before using it, you can save resources and time by forging immediately after the bar is made as the bar comes out of the smelter already at the max temperature.
Forging
Forging allows you to turn heated metal into a sword by hitting it with a hammer on an anvil. I strongly recommend saving up 800 coins for the rare shop item Volcano Anvil so you can get it when it appears. Volcano Anvil keeps the metal warm for longer allowing you to forge for longer without going back and forth between furnace. I find it easiest to make everything to close and then go from the tip of the sword back getting closer to hilt of sword with each hit to make entire sword done. Also, try to hit at a spot just above the midline to forge the top and bottom portions simultaneously, which effectively doubles your forging speed.
Tempering
Tempering is a fast way to add value to your sword, at least it is fast if you get it right the first time. The sword has to be sufficiently hot and then sit in the oil for just the right amount of time. I rely on the audio cues to determine when to remove the sword. Try to find a system that gets it right nearly every time as if you don't get it right the first time it can take a significant amount of time to reheat the sword as it is reheating from a low temperature state.

Here is the method I recommend:
(1) Make sure sword is at least bright red. If not, then heat it up a bit more.
(2) Turn your audio on with volume up if you have not done so already.
(3) Pick up sword with tongs and walk to the oil station. Do not place into the oil station. Just place the tip of the sword into it. Try to place it close to one of the sides so you can remove it faster.
(4) This is the trickiest part. Listen carefully to the boiling sounds. As soon as it stops, quickly remove sword from the oil by moving mouse to the side. If you were successful, then you will see a message saying sword was tempered. If not, then you will need to reheat sword before trying again. With practice it is possible to get the sword tempered nearly every time.
Alchemist Table: Perfect Damascus
Special thanks to rainyday's guide and Impossibum Plays' YouTube video.

Steps to Get Perfect Damascus:
(0) Minigame: make sure each column has three different metals using the 5 large and 5 small plates that time similar to Tetris
(1) Add in Iron Cuttings (Fe)
(2) Add in Hydrochloric Acid (HCl) until you reach the dark wood line on table (or 6 counts)
(3) Heat until 11 counts of shrinking which starts after boiling
(4) Add in hydrogen peroxide (H2O2) until the color turns brown-red (or 6 counts)
(5) Wait 3-5 minutes and then place in water barrel (use timer such as computer or steam overlay Tab+Shift). I recommend aiming for 4 minutes.

Sharpening
Simply hold C until it gets to 100% while constantly holding down Grind. Do not let go of Grind early before pressing C or else you get a score of 50%. Can be hard to get 100% at first, but with a few skills upgrades as mentioned in the Leveling section this task becomes much easier.
Assembling
Simply press the hit button once the dial reaches the top. This can be very challenging without any skill upgrades as mentioned in the leveling section. Note that you do not need to bring any supplies to assemble a sword as it will use default 0 value parts if none are added. This feature can also be used if your assembler bugs out preventing you from adding any parts (handle, etc) as often once you assemble a sword with the default 0 value parts you will then be able to add in the high value parts with the next sword.

Never do the assembly customer miniquest. They don't provide the blade and you lose more money than the worth of the blade. It is also incredibly buggy (much more so than usual).
Customer Exchange
Selling items to customers can give you more than just coins. Here are some of rewards available for selling items of a certain value:

Magic Table: All Spell Patterns


Nature:


Blizzard:


Blood:


Fire:


Thunder:


Death:


Soul:


Hell:


Cauldron: All Recipes, including the Staff
Here are all the recipes listed in the game. The times are sequential. So you have to wait the entirety of each time separately. For example, if it says wait 3-5 min then 4-6 min then 6-8 min, then you will need to wait at the minimum a total of 13 min. Here is a YouTube video by Fynnpire on how to make a magic sword.

If you fail a recipe, then there is a 25% chance to get a magic staff instead of a sword. It isn't too hard to get a staff since you can use an ingot as the material, then just place magic stone, two random materials, and lastly one final material. You can even ignore the times and just place them one right after the other. You will see a yellow glow when you successfully make a staff. Use a cleansing stone if you fail to reset the cauldron. Here is a YouTube video by 1986Merlin on how to make a staff.

Frost Sword: Value 1150

Fur Sword: Value 1000

Web Sword: Value 1600

Ghost Sword: Value 850

Saint Sword: Value 2000

Hydra Sword: Value 1500

Magic Sword: Value 2500

Lava Sword: Value 2500

Water Sword (req DLC for lobster): Value 2000
Altar: All Elemental Enhancements
Special thanks to MythicStatus' guide.

Essentially, you can add an element to your weapon by using two items. The first item confers the type of element and the second item increases the value it adds to your weapon. Note that you can add more than one element to the same weapon by repeating this process using the different elements. If you make a weapon that has all four elements, then it gets the infinity element and you earn an achievement.

Each enhancer gives a multiplier for the elements added. Simply take the base value of the elements times the enhancer multiplier. The base value is additive for all the elements that have been added and only the final enhance multiplier influences the total value added.

For instance, Infinity gives a base value of 200 (Protection) + 250 (Flame) + 300 (Light) + 350 (Power) = 1100. Then if you used an enhancer with a 3x multiplier such as gold ore you get a final value of 1100 x 3 = 3300.

Elements:

Green Clover gives Protection Element (200 value) and can be purchased from Mithrill Mine


Red Clover gives Flame Element (250 value) and can be purchased from Dragon Cliffs


Sphere gives Light Element (300 value) and can be found while mining:

Claw gives Power Element (350 value) and can be found while mining:

Enhancers:

Coal Ore: Multiplier 0.6x, found mining

Ancient Amphora: Multiplier 1.0x, found mining

Orthodox Cross: Multiplier 1.1x, found mining

Copper Ore: Multiplier 1.1x, found mining

Iron Ore: Multiplier 1.2x, found mining

Old Bracelet: Multiplier 1.3x, found mining

Titan Ore: Multiplier 1.4x, found mining

Pagan Cup: Multiplier 1.5x, found mining

Tungsten Ore: Multiplier 1.6x, found mining

Golden Bracelet: Multiplier 1.7x, found mining

Gryphon Egg: Multiplier 1.8x, found mining

Silver Ore: Multiplier 1.8x, found mining


Golden Cross: Multiplier 2.0x, found mining


Necromancer cup: Multiplier 2.4x, found mining


Gold Ore: Multiplier 3x, found mining


Phoenix Egg: Multiplier 3x, found mining
Mining
While mining starts out slow, once you get Mithril Pickaxe and fully upgraded mining skills you will be plowing through walls with loot flying everywhere. You can find ores, artifacts, assembly materials, magic ingredients, skill books, coins, and items used for adding elements to weapons as described above.
Achievement Guide
Special thanks to Moon_Irbis' Guide.

Here are all the achievements and how to get them along with Global Achievement rates (as of July 2021):

Do Tutorial
32.4% The beginning. Complete the tutorial stage - can load up a new save spot if you missed it the first time through.

Make stuff and put it on display
22.2% Sell Iron Sword. Simply make an iron sword and place it on the display stand. Bar purchased from Town for 60 coins. Also ore can be found mining.
14.2% Sell Copper Sword. Ore can be found mining.
13.3% Sell Titan Sword. Bar purchased from Magic Woods for 220 coins. Also ore can be found mining.
8.2% Sell Tungsten Sword. Bar purchased from Abandoned Cemetery for 650 coins. Also ore can be found mining.
6.0% Sell Mithril Sword. Bar purchased from Mithrill Mine for 1200 coins.
5.6% Sell Silver Sword. Bar purchased from Royal Castle for 1500 coins. Also ore can be found mining.
5.0% Sell Elandoor Sword. Bar purchased from Dragon Cliffs for 3000 coins.
3.9% Sell Gold Sword. Bar purchased from Royal Castle for 6000 coins. Also ore can be found mining.

Use the Cauldron
6.3% Boil a magic sword in the cauldron. Recipes can be found above.
3.1% Boil a magic staff in the cauldron. 25% chance to get staff if you fail recipe.
- Please seen Cauldron section above for more details.

Dig in the Basement
18.0% Miner. Dig up 100 pieces of ground. Go down to the mine and start digging.
3.7% Miner Expert. Dig up 1000 pieces of ground.
- Getting Mithril Pickaxe and all the mining upgrades makes these achievements go by quickly.

Gain Reputation
7.0% Royal Castle. Open royal castle location. Unlocks as you accumulate reputation.
3.0% Great one. Get 50,000 reputation.
2.4% The Best. Become the number 1 blacksmith.
1.6% The greatest. Get 100,000 reputation.
- Selling expensive swords is the fastest way to get lots of reputation quickly as you can get as much as 10,000 reputation per sword with the end game swords.

Level Up
3.0% Maximum Level. Reach level 16 - highest level which unlocks all upgrades in game
- Please see leveling section above for tips

Perfect Damascus
3.0% Get a perfect damascus.
- This require perfect damascus Tetris-like minigame, perfect alchemy damascus, and perfect timing of placing it into the water barrel (3-5 min). Finally, place your weapon on the item stand and inspect to get achievement. Please see perfect damascus section above for more details and tips.

Sell an Expensive Sword
2.0% Royal Sword. Sell a sword for more than 10,000.
1.1% 4 Elements. Make the sword with 4 elements. See the elemental section above for details. Recommend making a sword with all 4 elements (grants infinity element) at the same time as going for the royal sword as it significantly boosts the value of the sword.
- Basically, just make a sword using gold base, 50-coin guard with gold, 40-coin handle with gold, 50-coin pommel with dragon lava, forge, temper, damascus, assemble, sharpen, enchant with Hell spell, and add all four elements to give it infinity element with the final secondary item being either a gold ore or phoenix egg. This should get you an item worth between 13k-16k coins depending on the quality of each step, which should give you plenty of wiggle room to hit that 10k mark.
16 Comments
ChillCannon 13 Jul @ 11:34am 
Damascus is broken since the last update apparently. I dont know how he could allow this to happen and not fix it. at this rate i wouldnt buy any sequals he makes.
Tregon 9 Aug, 2024 @ 12:00pm 
Perfect damascus has been explained in thread. Add fe, pour 7 increments of first liquid (when you release button one more amount pours out), heat and count 11 shade changes of liquid. Add 7 increments of second liquid (again it gives one additional one). Gives perfect outcome reliably.
Kirpzy 5 Aug, 2024 @ 7:23pm 
Even this man doesn't know how to apply a perfect damask.
Gopnik Drifter 2 Jun, 2024 @ 2:58pm 
what are the raritys of the mining loot items :KSmiley:
Yopt 28 Jan, 2024 @ 12:05pm 
@CrimsonSolace, I think OP meant those two colored lines at the right side of the alchemist table, One is green and one is brown; those lines should kinda help indicate the correct colors for the mixture.
CrimsonSolace 17 Jan, 2024 @ 12:11am 
what dark wood line did you mean in the damascus steps?
Sapog_B_Kote 11 Jan, 2024 @ 12:46am 
what may i do, if i some of my crystals for the magic table, doesn`t work with the runes ?
Blaze 12 Nov, 2023 @ 12:22am 
Can I suggest to add more info about coal and coke in the furnace section.

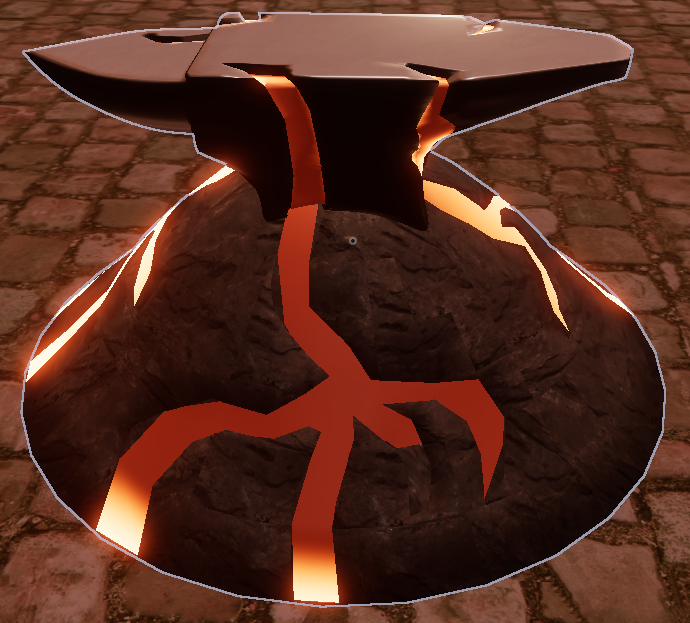
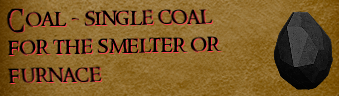
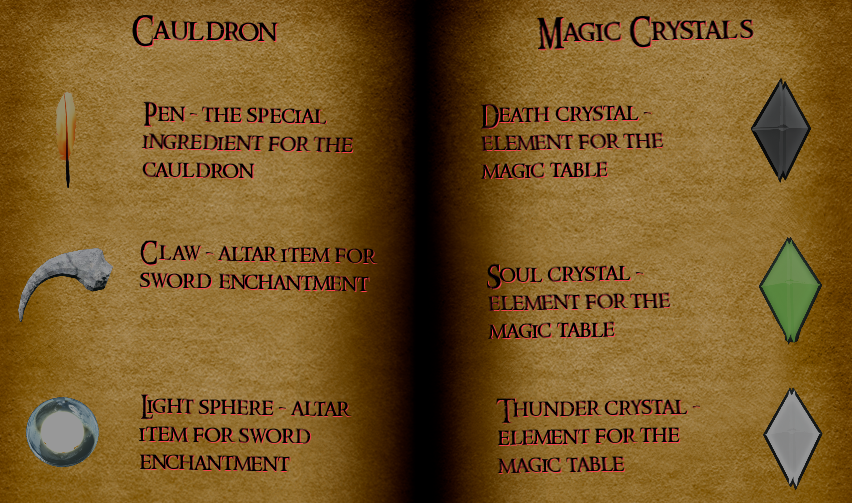
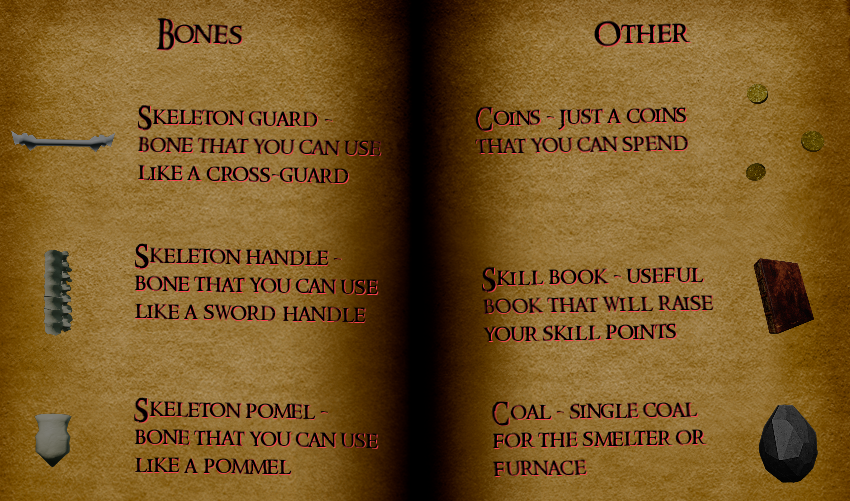
Coal is useful for ingots up to titan as their max heat can only reach up to 1700.

Coke on the other hand can go further but DO NOT PUT OUT THE FIRE while you're still forging to "save fuel" because if the metal cooled before you finished forging, the temperature will no longer go above 1700 and you have to waste another box of coke.
Ninja 31 Jul, 2023 @ 9:19pm 
You Sir! Have Earned 11 Awards! Take My Money!
Forskalia 15 Sep, 2022 @ 1:27am 
Hi, just wanted to add that "Find Last Sword" in the menu can help solve the missing blade when you get a hilt assembly request. The blade should drop on the table with the books/map where you buy things. It doesn't always work immediately after accepting the job but if so try putting the rest of the hilt on the assembly bench and try the "Find Last Sword" again. I haven't lost a blade since doing this.