The Black Masses

The Black Masses

Not enough ratings
The Black Masses Divine Weapon Loot Spot
By Bomb Cruise
Welcome Traveller! This is a Guide to show you the best location to recover all iterations of the Divine Weapons in The Black Masses Early Access. (Guide Written September 2021).
2
   
Award
Favorite
Favorited
Unfavorite
1. Welcome, Traveller!
Aye aye fellow Beta Testers, Veterans, Newbies and Friends, welcome to this The Black Masses Divine Weapon Loot Spot Guide!

Veteran Travellers, the sections are numbered for your benefit! If you have already a broad knowledge of the different areas of the game head straight for section 10 and read on from there, I will not waste your time quibbling!

For new Travellers, acquaint yourself with the control scheme via the games loose story tutorial.

Buckle up for a potentially challenging speed running extravaganza, replete with hordes of possessed enemies, more hordes, some parkour, jumping puzzles and terrible puns that may make you cry.

But most importantly of all, LOOT! >:D

The Dream speed running soundtrack is optional but recommended... for purely scientific reasons of course.
2. Where to begin?
Newbie Travellers, welcome, and feel free to ask questions along the way.

Some immediate tips, holding shift key will enable you to sprint, which oddly enough is your best friend for the purpose of following this guide while surviving... besides me of course. :D

Your second best friend, will be using spacebar to enable you to jump, and climb.

Jumping requires just a quick tap of your spacebar, and can be combined with sprinting to leap further and faster.

Erstwhile, climbing requires you to hold spacebar until your hands materialise to grab onto ledges, rocks, scaffolds, walls, or whatever unfortunate obstacles you intend to tackle (puns-a-plenty).

Also, I highly recommend pressing "M" right now, to open your map and zooming out to appreciate its scale. Use this map in case my directions are unclear (I tried my best).

As a footnote to this; "I" is a useful button for monitoring your inventory, generally double clicking equipment will make you equip it, otherwise there are certain keybinds like "Q" to use a consumable, "E" to interact with objects in game, and many others...

Our little guide here begins with your in-game tutorial, so I would recommend you follow it initially.

Be sure to stock up on every item you find along the way, as I am sure your bag is quite empty. Indiscriminate killing of undead abominations is tiring work after all.

Fear not a weight limit! I have not yet encountered one and yet I have picked up far too much in my time playing with no issues at all.

Complete your tutorial, and once you've done so head North towards the closest named town.


Strathsyre a minor settlement, is located directly North of where you begin your weird, possessed, zombie laden adventure upon starting a New Game.

It contains the first Safe Zone recommended to obtain before you head into imminent danger.

Once you navigate inside the wooden pallisades, look for a Church building and vault the hastily assembled barricades.
3. Beyond Strathsyre

After finishing up your business in town and obtaining the Safe Zone, head due North East of Strathsyre towards Fort Wyver.

BE VERY AWARE, TRAVELLER

There is an incredibly large horde of possessed, so be amply equipped and supplied before moving on.

Be prepared to massacre, to run and hide, and to potentially die a few times before you manage to work your way through the horde and beyond to the walls of Fort Wyver.
4. To the Fort!

Now, getting past the horde will be rather challenging for newer players, as outlined in the previous section.

There will be a new type of possessed here to counter also, the possessed knights! They are harder hitting, but slower moving than other possessed. Definitely a tougher encounter for newer players.

You should be able to kite them easily, and avoid being hit, inflicting light damage over time due to their armor - hold down your mouse for charged attacks while backing up!

Onto some techniques and tips that may assist your endeavours.

  • Run around the edges rather than through the middle
  • Expect to do some degree of fighting
  • Don't underestimate the usefulness of jumping over and onto possessed (knockdown)
  • Use the terrain, and scenery to get up high if things look bleak
  • If things go south, run away!
  • Dying is just fine, if you do die, just make your way back over from the last obtained Safe Zone

Now as for directions you will want to stick close to the far left of the wide basin like area that precedes the Fort.

Hug the cliffside and attempt to clamber up and maintain a steady height, until you are able to work your way toward the Fort wall.

You should be able to reach a similar height to the Fort wall with relative ease, now you need to get up and onto the wall.

Once you are up, you are; "Out of the Frying pan...
5. Into Wyver!
...and into the Fire!" Now, here's one of the tougher parts of the little journey.

Once on the wall you're safe, but looking down, you might notice the possessed have suddenly jumped leagues above you in levels. Oh dear!

The average level of possessed in Fort Wyver now sits somewhere in the Mid-Twenties, the highest level encountered was lvl 29 to give some perspective. The presence of possessed knights cannot be ignored here either.

The tips here remain the same as the previous sprint. However, we're aiming not to pass straight through Wyver, but to head to the Safe Zone.
6. Relative safety

Now while avoiding or killing the possessed in Wyver at your own discretion...

Try to parkour your way through the tightly packed streets and head due North of the wall, for the rear area of the Fort.

Keep your eyes peeled and on the skyline, on it you will find a similar Church building to that encountered in Strathsyre. This is where the Fort's Safe Zone is located.

Make a beeline directly for this building and vault the ramshackle wall. Obtain the Safe Zone and we will be ready to respawn here, closer to the final objective if required.
7. Leaving Wyver

Now for more running through the streets in panic, or indiscriminate slaying.

You're going to have to head due South East of the Fort Wyver Safe Zone, aim towards a castle wall.

You will find a gatehouse through which you will be leaving the Fort before heading to the next objective.

Be aware that this section of the Fort is a little more prone to tripping you over fences, low walls and other annoying obstacles while you may be fleeing from enemies.

Expect some degree of panic stricken navigation skills being put to the test.
8. A long road from here...

Now that you have left the comfort of Fort Wyver with its welcoming committee, you are going to want to head along the main path directly from the gate to the East.

The possessed in this whole area are pretty tough, so be prepared to fight or run from them if you need to.

Don't bother heading off the path to the left or right unless you need to resupply, there are a few scant scattered houses in clusters along this route should you need to.

Follow this pathway along the scenic coastal route, complete with broken down wagons and small hordes.
9. Getting closer

Heading along this pathway, keep your eyes on the cliffs to your left, and above.

You will likely notice that there is a town with towers and gatehouses, coming into view, this is our next target.

Make your way along the second of the two paths you will encounter on the left side of the coastal route, each oath will lead you into the town.

A word of warning however, be prepared to fight or run upon entry, as the possessed encountered here carry similarly high levels to those encountered back in lovely Fort Wyver.
10. To Ernwick!
The idyllic cliffside village of Ernwick is our next stop!

Entering the gates and running through the streets will likely prove your best first step.

A word of caution, the streets are a little twisty and packed with the same tier of possessed as found at old Fort Wyver, as outlined before.
11. Get off the streets!

Try to keep on the main path through the town as it winds its way up through the different tiers of the town, keep your eyes open for the next Safe Zone.

To identify the Safe Zone it will be on the Right hand side of the path as you're climbing up the hill, look for a hastily assembled barricade, much like you've seen at the other Safe Zones.

If you encounter a large grey stone building that looks like an odd cross between a Church and a Town Hall with busted doors, you've gone too far up the path.

Obtain the Safe Zone and we will be able to move onward and upwards to our final destination.
12. The Tower!
Now, to our Prize!

You may have observed a particularly prominent tower on your climb up through Ernwick town...

One that is located somewhat centrally, and to the rear, quite possibly the highest man made point of Ernwick.

There are two options for reaching the tower, you can head for its base... and fight through more of the possessed, or simply stick to the main path through Ernwick until you reach the far gate, at the Northern edge of the town, running through considerably less mess.

Heading out of the northern gate is far more efficient, but each to their own... no judgements reserved.

The choice is yours... however I would recommend the second option for Veterans and Newbies alike! :D

The next section will be a bit weighty, as there are two options to consider, how thoughtful.
13. Out the Tower or Up the Gate...?
Option 1 - Up the Tower! (Less Efficient/More Killing):


Run through more possessed enemies by taking the first set of double gates encountered on the left hand side of the path leading up through Ernwick, until you reach a very odd area of the town where it forms a courtyard of epic proportions.

This courtyard is a shambles of walls and weird wooden walkways, coupled with town buildings and stone castle walls.

You're aiming for the tower, so you'll want to bypass or fight your way through the hordes, and head straight for the staircase and walkways leading to the door.

Enter the tower, and shut the door behind you, you... peasant! >:D

You may be glad or sad to learn that unless you let some in, the Tower is devoid of any possessed to kill, take the time to snag some supplies if you need any.

Climb up to the many floors until you encounter a rough looking wooden door in the outer wall of the tower, ignore the first you see, it leads only to a balcony where you can stare out Rapunzel style at a lovely cliff face.

You'll want to pay attention to the second door you see however, this one leads you out of the tower and closer once more to your prize.


Head up the simple path to another odd little cluster of buildings and scaffolding. Take a gander at the scaffolding, you'll be wanting to climb to the top of it!

Once you're at the top of the scaffold, peek up yonder, you'll see a wooden beam gracefully stretching overhead. You can attempt to jump for it, with a little sprint (hold spacebar to grab at the air).

Or you can take a tactful attempt at jumping on the nearby cliff face, working your way along until you're eye level with a particularly tall tree.

At which point you'll have to be careful of poor visibility, before hopefully dropping down onto the beam from above... or into the claws of the ground and any possessed if you mis-judged the distance, like I did the first time. :(

Moving on, you're on the beam! Walk along it until you reach a nice little plateau, and lo! The top of the Tower is in view! Make the last jump and we can move to the next section!

Option 2 - Out the Gate! (Most Efficient/Less Killing):


For the people who wanted far less trouble, take a leisurely stroll, or full-tilt sprint along the main path of Ernwick Town, heading uphill until you reach the aforementioned Gatehouse.

Leave the blasted town behind you. Head straight out the gate and follow the path as it vaguely curves to the left.

Clamber up the spine of the hillside as you go, pretty much to the top, follow and hug keeping the hillside on your left side...

Looking down to your right hand side, you will see a strange area of Ernwick town from above, a kind of scaffold may be visible! You want to carefully clamber down some of the cliff toward this scaffold, and make a sprint leap to land on the top of it (from a sensible altitude, or it may be a painful landing).

From here, spot the graceful wooden beam as it passes over your head. Make a second tactical sprint leap from the top of the scaffold to this beam and hold spacebar to grab at the air.

Follow along this wooden beam til you reach a plateau, and lo! The top of the Tower is in view! Make the last jump and we can move to the next section!
14. The fabled artifacts, blessed relics!
Having made your landing at the top of this awkwardly laid out tower... you are now clear to explore, peruse of the barrels, boxes, chests and other miscellania, you may find the odd bit of tat.

However, you'll probably want to head down a few levels, because your prize lies a few floors down.

Make your way down, til you reach the bottom of the top of the tower. Some planks will stop you.

From here, open the door, and enter the yonder room, look on the floor, here you will see... hopefully... a divine weapon!

If you see nothing... I apologise for your poor luck, and wish you the best in future attempts, because you have discovered a fixed random spawn for Divine Weapons!

Rinse and repeat by quitting your game and restarting a hosted session, the weapon spawn along with all the possessed will have respawned, and you can make your next attempt.

A word of caution: use this newfound power responsibly, and ofc wreck the ever loving *possession* out of any possessed you may encounter, henceforth.
15. Stats and Disclaimer
Divine Weapons appearing at this spawn are from the following selection for which I have provided summary stats:

Divine Dagger:
Type - 1h
Speed - Very Fast
Reach - Very Short

Divine Axe:
Type - 1h
Speed - Fast
Reach - Medium

Divine Sword:
Type - 1h
Speed - Fast
Reach - Medium

Divine Mace:
Type - 1h
Speed - Average
Reach - Medium

Divine Greatsword:
Type - 2h
Speed - Average
Reach - Long

A disclaimer:

The stats for these weapons are almost entirely dependent on your proficiency with the weapon class e.g. 1h Skill, 2h Skill.

Secondarily to that, your Stats affect damage, durability affects damage too.

Any supporting skill trees you invest in will similarly affect damage output too, hence why I will not use number stats here.

Rest assured, that to my knowledge, there are no finer tools of wrath in the game so far than these 5 divine weapons.

Having run this gauntlet multiple times between myself and 3 friends, I can say that we have only found these 5 variations of Divine weapons in easily 20+ runs.

Googling around revealed that this information would be new to many people playing the game, since most people assume only of the existence of the Divine Greatsword via a quest and some other random axes that were comparatively under powered compared to these divine weapons.

This method does not guarantee a divine weapon every run, since this reveals to you a possible spawn location for said divine weapons.

You will have to run this gauntlet at least 5 times to obtain a copy of each of the divine weapons.

To my knowledge only guaranteed divine weapon comes from a quest that I currently forgot the name and starting location of, for which the reward is the Divine Greatsword.

*disclaimer ends*
Farewell, Traveller!
I appreciate you making it to the end of this Guide.

I'm not gonna spiel about wanting you to like follow and subscribe my non-existent YouTube, or Twitch, I'm just glad you found this Guide useful.

If you have any questions, recommendations, corrections or simply want to chat... you can add me up on Steam and I'll be glad to hear from you.

Until our paths cross, Traveller.

Yes, at some point I intend on adding some additional handy screenshots to this guide, once I have more time.
3 Comments
ChocoNoodles 7 Oct, 2024 @ 2:19am 
and dont jump on top of that roof cuz it has no collision box somehow
ChocoNoodles 7 Oct, 2024 @ 2:18am 
Midridge market SZ also have a divine weapon right beside. just teleport there, face the woman npc, turn 90degree right, and jump down into that church building right beneath. there's a divine axe on the ground in it, but it would be considerably risky cuz there are multiple possessed knight and even a demon grunt guarding
Fayled Xperiment 14 May, 2022 @ 12:54pm 
good guide and still up2date now in beta 0.1 as of today
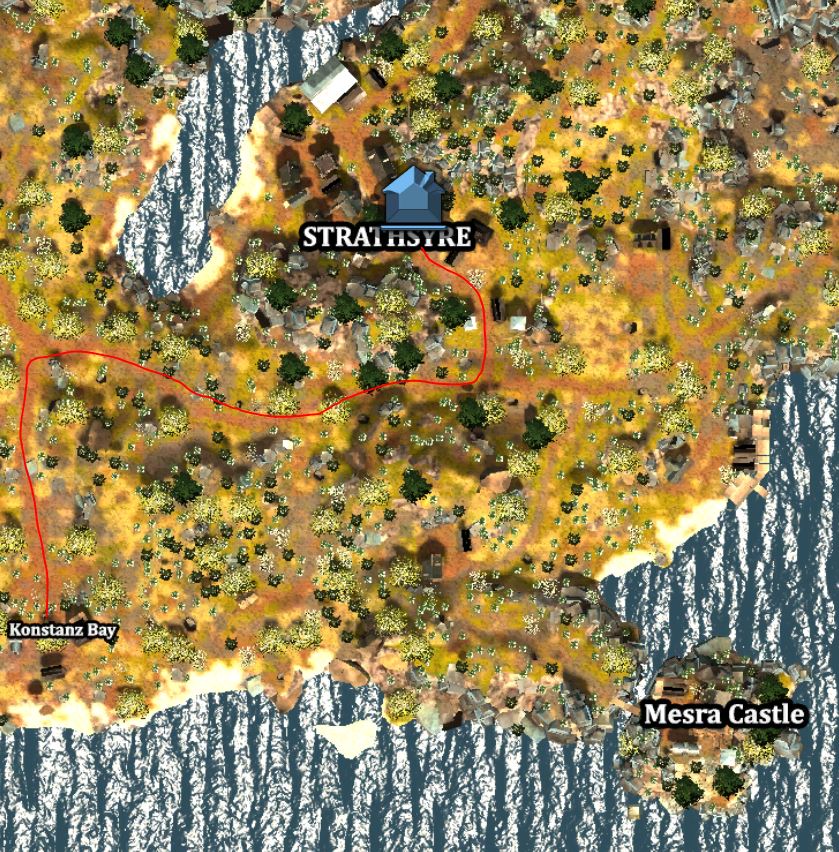
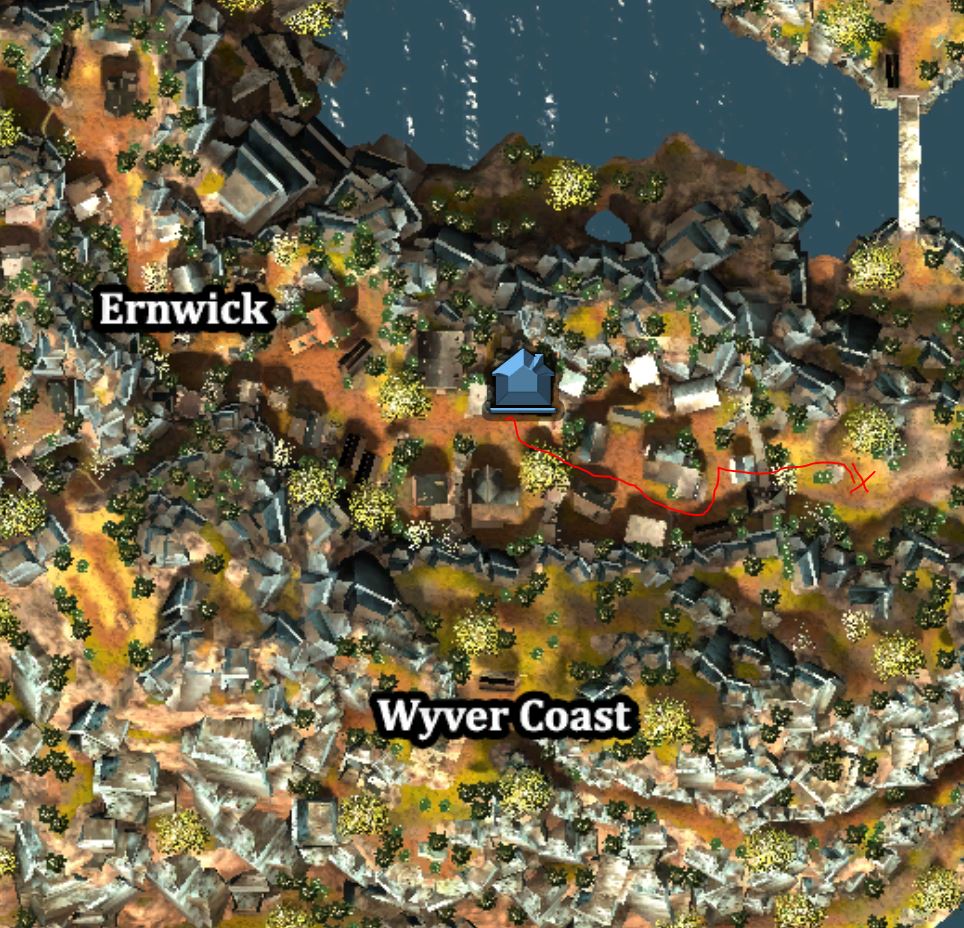
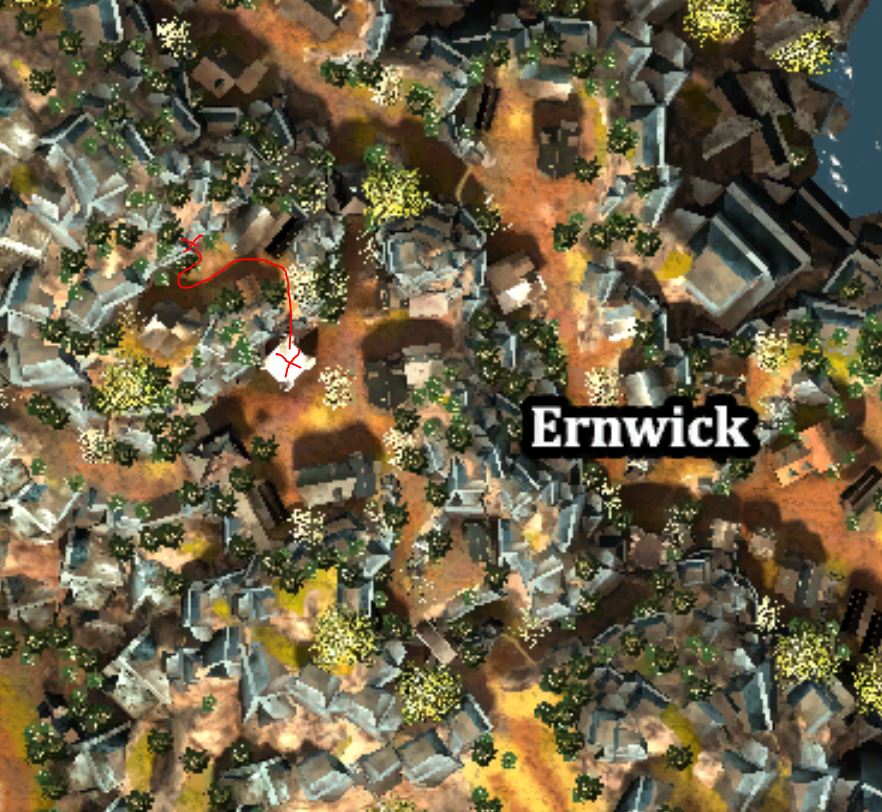
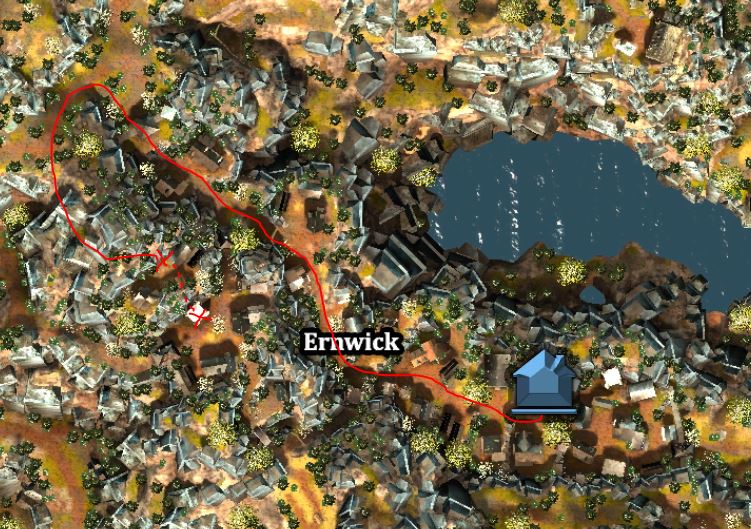
i actually found this one with a mate in coop without any guides just by exploring and we figured that it spawns different weapons because both of us had different weapons on the spot (he had the 2h sword and i got the dagger) and wanted to write a guide myself but after scrolling through the guide list i saw that this one already existed. so thumbs up^^

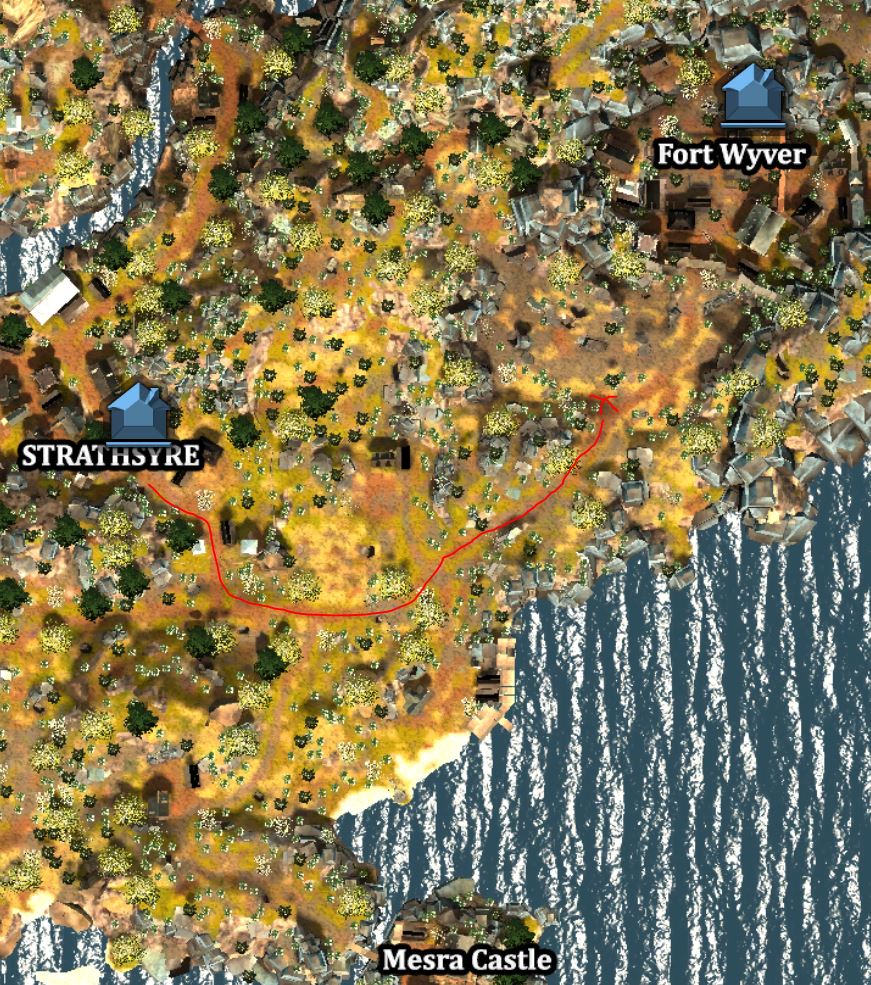
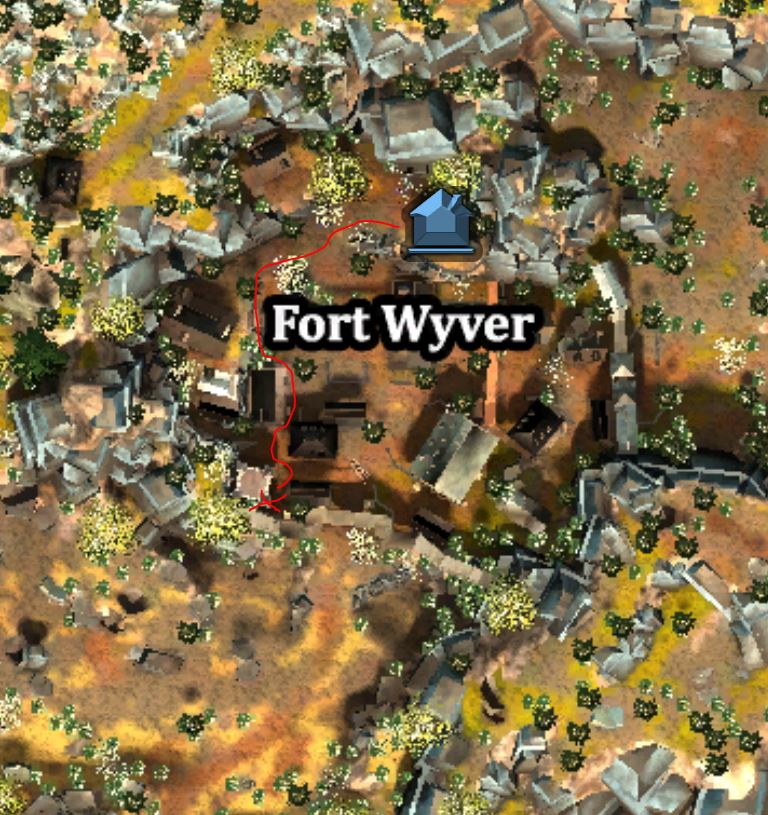
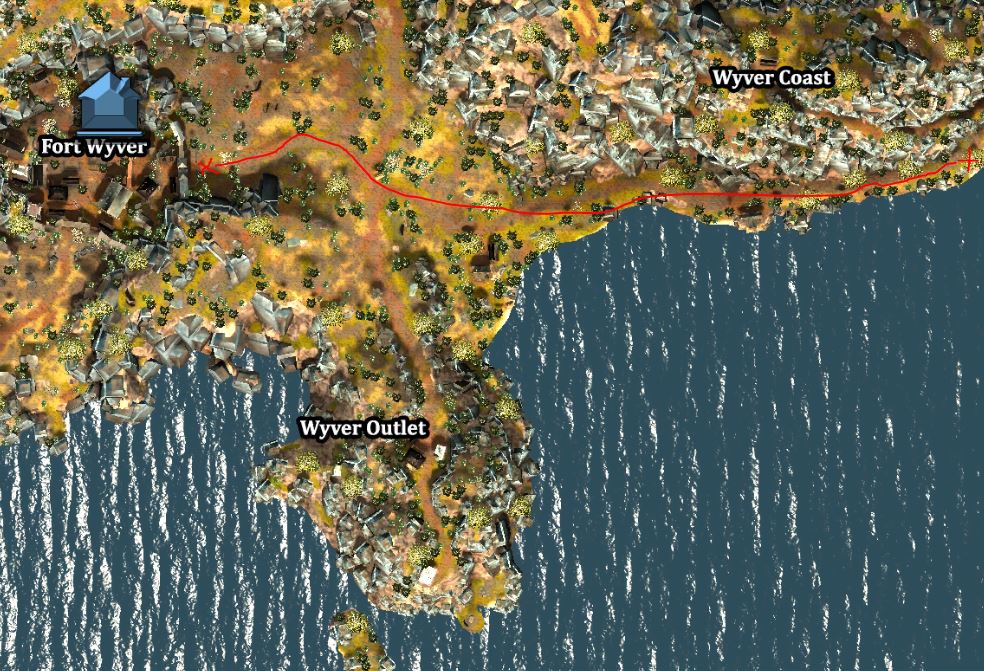
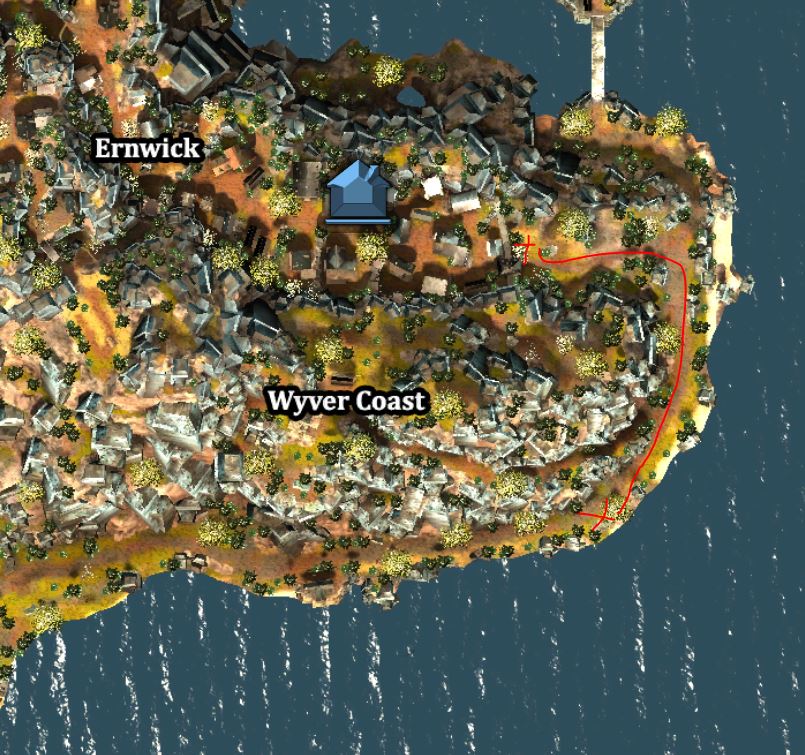
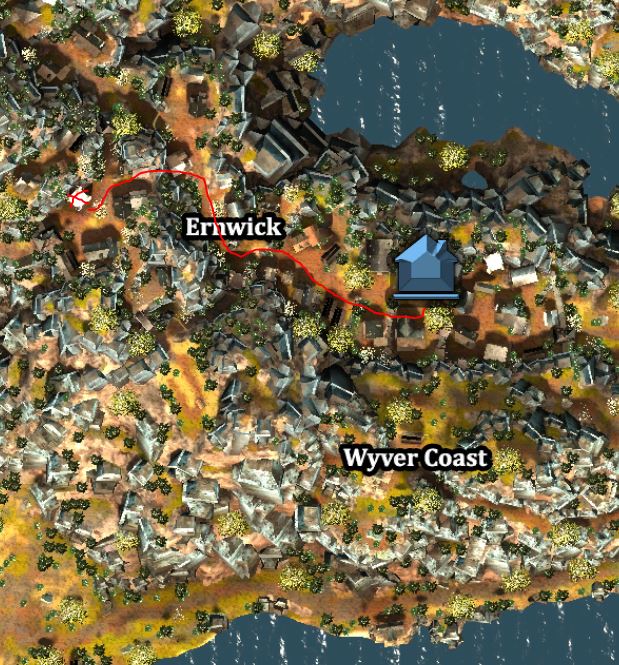
on a sidenote, while i use the ernwick spawnpoint and slaughter my way up to the weapon spawn for xp, my mate usually spawns in fort wyver and when he leaves on the right side he follows the "mountain" path north which has way less zombies until he comes to the tower area.