Game Character Hub

Game Character Hub

118 ratings
User Guide
By Archeia and 1 collaborators
A comprehensive guide on how to use Game Character Hub!
   
Award
Favorite
Favorited
Unfavorite
Creating a new Character Sheet
New Sheets
While Game Character Hub was built with RPG Maker VX and XP sprites in mind, it is also
possible to create character sets to your own dimensions.

By default, you can use the following methods to automatically create a new file with an XP or VX
template grid:

Menu
Shortkey
File > New > RPG Maker XP character
Alt + 1
File > New > RPG Maker VX character
Alt + 2

For a sheet which uses your own personal dimensions, use:
Menu
Shortkey
File > New > Character
Ctrl + N


Using the interface which appears, you can pick a filename for your sheet, determine how many
frames your sheet will have and how wide the frames will be. It is important to know how your
chosen engine animates each frame before you decide on this.

Hint:
Typical XP characters are 4 frames wide (left foot, stand, right foot, stand).
Typical VX characters are 3 frames wide (right foot, stand, left foot).
Both are 4 frames tall (down, left, right, up)


Templates
By selecting 'Your own character type here!' you can create custom templates for ease of use,
making it more efficient than defining dimensions for every new sheet. This is the Character Type Management interface:

Create a new template by first selecting Add > New from the bottom of the interface. This will allow you to customize your sheet using the input boxes on the right. You can input a template name and, just like character sheet creation, you can select how many frames the sheet will have and how wide/tall they will be. Press OK when you are finished to add the new template to your list, or click Add > New again to add another new template.

To create a new file from a template, go back into File > New and select your template from the
list by its filename.
Alternatively, up to 8 of your templates are given Shortkeys using Alt.

Menu
Shortkey
File > New > Your Template 1
Alt + 3
File > New > Your Template 2
Alt + 4

Custom templates will be given Shortkeys ranging from Alt + 3 up to Alt + 0, after which they will
have to be selected manually from the File menu. To assign Shortkeys to specific templates, you can use the up and down buttons at the bottom of the Character Type Management interface to push templates up and down the list.

Templates can be edited later from the Character Type Management interface by clicking on them in the list and changing the properties in the boxes on the right.

You can also make use of templates for bases for characters. If you create a sprite you wish to use as a base, you can save it as a template by clicking File > Set as template character. You can then load this template by using File > New > New character from template.

User Interface (Part 1)
This is the default layout of Game Character Hub. The widgets can be moved around the screen to suit your preferences by clicking and holding the top of the widget, dragging it and releasing in the place you wish for it to be docked.


Widgets

(1) The Options Bar
with options for how your image appears in the editor's Central widget. In order from left to right:

New – Shortcut to creating a new character.
Open – Shortcut to opening a previously saved character.
Save – Shortcut to quick saving. Overwrites the file with the newest version.
Save as – Shortcut to saving your character, confirms where you want to save the file to.
Save all – Shortcut to saving all of your currently open files.
Add item or drawing layer – Adds a new layer on top of the one currently selected. You can select a new item from the library, or just add a blank new drawing layer.
Undo – Reverts the last change you made to the image by cycling through history.
Redo – Reverts any changes made through the Undo command by cycling through history.
Zoom- - Zoom further away from the image, shrinking it on the screen.
Zoom+ - Zoom closer to the image, enlarging it on the screen.
Hint: The dropdown box between these two icons can be used to select between x1 and x64 zoom, and you can also hold Control and use the mouse wheel to zoom in and out.
Frame size – Options to change the height and width of the grid, which resizes and positions the image to fit.

2 The Toolbar
Contains the tools supplied for editing your character's appearance. In order from left to right:

Frame selection – Click on individual frames to select them, or click and drag to select multiple frames at once.
Hint: You can also select multiple frames at once by holding shift instead of dragging. Control + Click also works to select individual frames that aren't necessarily close together.

Pixel selection – Click and drag anywhere on the image to select a rectangle of pixels. Two boxes will appear underneath the bar if this tool is selected, which will allow you to change selection shape and type.
- The shapes are rectangle or elliptical.
- The types are:
  • Overwrite - overwrites any old selection with a new one
  • Add - adds each new selection area in addition to any currently selected
  • Intersection - trims any current selections to only include areas within the newly drawn one
  • Exclusion - current selection areas within the newly drawn box are deselected
  • Reverse - flips unselected areas within the box to selected, and likewise selected areas become deselected

Magic wand – Select an area based on all similarly colored pixels nearby. Two boxes and a slidebar will appear underneath the bar if this tool is selected. The selection mode choice is the same as for pixel selection. The filling mode choices are:
Contiguous – the pixels are selected if they are a similar color and directly next to each other. This is a good way to select big blocks of color.
Global – every similar color on the image will be selected.

The tolerance slidebar is used to determine how similar colors must be to become selected. The closer it is to 0%, the selected colors will be most similar to that of the pixel selected by you.

Move selection pattern – Click and drag selected areas to move the selection boxes around the image, not the pixels themselves.

Deselect pixels – Deselect anything currently selected.

Move – If nothing is selected, move pixels around within a single frame.
Hint: If you select multiple frames at once and use this tool, it will move each frame around respective to where you drag.

Move pixels – Move selected pixels freely across the image by clicking and dragging.

Colorize – Based on selection, use the sliders in the interface to change the hue, saturation and lightness of either pixels or frames selected.

Noise – Based on selection, use the sliders in the interface to generate noise on the selected areas of the image. You can choose to keep hue, saturation and/or lightness to generate noise pixels.

Resize – Resize the selected area's height and/or width. You can stretch the image and also add smoothing using the interface.

Rotate – Rotate a selection using the slidebar in the interface.

Flip horizontally – Flip the selection horizontally.

Flip vertically – Flip the selection vertically.

Eyedropper – Click a color on the canvas using this tool to pick the color up in the Colors widget.

Pencil – Draw pixels onto the current layer. Using the options that appear under the toolbar, you can select pixel width, shape (square or circular) and composition mode.

Fill bucket – Fill a selected area with the current color in the Color widget. The options under the toolbar will allow you to change the regions filled and composition mode.
Contiguous – the pixels are filled if they are a similar color and directly next to each other.
Global – every similar pixel on the image will be filled.

Eraser – Delete pixels from current layer. Options under the toolbar can be used to choose eraser options, shape and size. Eraser options allow you to choose to delete with a tool similar to the pen or by selections.

Line tool – Draw a line by clicking where the line begins and dragging to the point where you want it to stop. Using the options under the toolbar, you can select line thickness, composition mode and anti-aliasing options. Anti-aliasing will blur the edges of the line.

Rectangle/Circle tool – Similar to the line tool, draw a shape by clicking where one corner begins and dragging to where the opposite corner ends. Tool options include:

Drawing mode:
  • Fill shape – fill the whole shape drawn.
  • Draw shape's stroke only – draw an anti-aliased border around the shape.
  • Draw shape and its stroke – draw both the filled shape and an anti-alised border.

Filling mode:
  • Single color – fill the shape with one selected color in the Color widget.
  • Gradient – fill the shape with a gradient which slowly increments from one color to another. The Edit gradient button allows you to change shapes, colors and distances for the gradient.
User Interface (Part 2)
(3) The Items widget
This is where each of your items and drawing layers will appear. You can select a layer by clicking it, and the actions and tools you use will appear on that layer.

Right clicking on a layer brings up more tools specific to that layer:

Cut – Erase the layer and copy it to the clipboard.
Copy – Copy the layer onto the clipboard.
Paste – Paste a layer from the clipboard.

Hide/Show – Make the layer invisible and visible respectively.
Duplicate – Create a copy of the layer above the current one.
Move up – Push the layer further up the list, gives the item a higher visibility priority and makes it appear closer to the top of the image.
Move down – Push the layer further down the list, gives the item a lower visibility priority and makes it appear closer to the bottom of the image.
Deselect – Unhighlight the layer and stop selecting it.
Delete – Erase the layer and remove it from the list.
Merge with the item below – Combines the selected layer with the layer beneath it to create one single layer.
Generate palette – Add every color on the layer to the Color widget palette.
Properties – Bring up an interface that allows you to change the layer name, opacity, and whether it is shown or hidden.
Hint: This can also be achieved by double-clicking a layer.

Some of these layer options also appear at the bottom of the widget, and will apply to the currently selected layer when used. There is also the 'Add item' button.

Add item will open a new interface where you can select assets from the library to use on your sprite. With the default library, you can select from VX or XP style sprite parts. After double- clicking into one of these folders, more subfolders will appear which lead to different potential elements of the sprite such as body, hair, clothes, etc. Every Item you add is put on a new layer.

You can add a new Item by double-clicking the item you wish to add, or selecting it from the library and clicking 'Add' at the bottom of the interface.

You can also make changes to the color of the sprite part. If you click the item you wish to add, a bar will appear below the item preview which will allow you to select a single color, or choose a more varied color from a sliding bar.

There is also a Fast preview tickbox on the interface which will show you potential sprite changes to your image in the Central widget without applying the change. It will not applied until it is added.

At the top of the interface, you will find a search function for finding items by name. The Filters dropdown menu lets you search for .png files, Items or Groups of Items, and also how many frames you wish to be visible on the Item. If the item is not available in the library, it will not appear.

Groups of Items will add multiple layers to your image. This is sometimes the case for Items such as cloaks, which will add a layer above your currently selected layer with the top of the cloak, and a layer under the current one for the back of the cloak.
Hint: These can be moved up and down the layer list later using the Up and Down buttons or by clicking and dragging the layer to the place you wish for it to appear.

(4) The Preview widget
Shows an animated preview of your sprite in real time. It will show all directions of the sprite based on how it is formatted.
Hint: If the animation appears to be showing only parts of frames, it could be that your grid format is incorrect and needs to be changed before it will animate properly.

There is a Play/Pause button to the right of the widget which will stop and restart the animation from playing. Underneath this, there is a book icon which opens the Preview properties. These can be used to change the speed of the animation based on time between each frame. You can also change Animation management here and choose how many frames you want your spritesheet to display.

(5) The Central widget

Your spritesheet will appear here, and any editing done to the character through tools will be applied here, meaning you can draw onto the sprite using the Central widget.

You can use tools in the Options bar to display the image differently, such as with Zoom and changing frame sizes.

If you have multiple files open at once, you can switch to them by clicking the tabs labelled with their filenames at the top of the Central widget.

Unless otherwise colored, the background of your sprite will always appear as a grey and white checkerboard. This means the background is transparent, and there are no colors present. When imported into an engine such as RPG Maker from an exported .png, no color will appear on this layer and you will see only the character's sprite.

To show where each frame's boundaries are, there is a thin, dotted line over the character. This will not appear on the final character sheet and is not part of the image, but it is there as a helpful guide. It can be hidden and unhidden by going to View > Show grid or pressing Control + G.

(6) The History widget
Shows all changes made to your character so far. It can be used to cycle through any changes you've made and revert the image to a previous stage.

You can return to a previous change by clicking it in the History widget, which will display that change and keep the history until a new change is made. Once a new command is made, it will overwrite any old history after that point and start fresh from there.

You can also undo an action by pressing Control + Z, and redo actions by pressing Control + Y.

(7) The Color widget
This is the location of your palette for adding and selecting colors.

The Primary color is the one used for drawing with the Pencil or Fill bucket.
The Secondary color is used for antialiasing and tools which include “strokes.”
Hint: You can swap these two colors by clicking the arrows between them.

The array of colors at the top is your palette, which you can add new colors to by making the color you want your Primary color, clicking Add color and selecting a square on your palette to add it to. This will replace the color occupying that square.

To the right, there is a dropdown menu where you can Save your current palette to a .gchp file, which can be loaded later using Open palette.

You can also Generate a palette using the colors currently in use in your character. This will take every color used and add it starting at the left of the palette, replacing any colors currently there.

There is also the option to restore the default palette, pictured to the right.
Saving and Loading a Character
Saving

You can use the buttons on the Options bar at the top or go through the File menu to find the following options:

Save – Shortcut to quick saving. Overwrites the file with the newest version.
Save as – Shortcut to saving your character, confirms where you want to save the file to.
Save all – Shortcut to saving all of your currently open files.

It is possible to save a file as a .gch or .png.

A .gch is a program specific file which can be reopened using Game Character Hub. It will keep all of your layers and changes in tact, so they can be edited separately later. These filetypes cannot be imported into RPG Maker.

A .png is a flat image file which can have a transparent background. These are the filetypes which RPG Maker will accept for charactersets when you import them.

Loading

You can load a .gch or .png file by using the button in the Options bar called Open, or using File > Open.

If it is a .gch file, it will load all progress from the last time it was saved. If it is a .png file, it will load a flat image on a single layer.
Importing New Items
.PNG files can be imported into the Item library for use with your characters by opening the library directory folder and copying the files where you want them to appear. The directory folder can be found by default in your Documents, or by going to File > Open item library folder.

Game Character Hub won't recognise these files unless you refresh it. To do this, go to File > Refresh item library and your new graphics should appear in Add item.

Upon using the new graphics, the editor will ask you how many frames the file is designed for. You can input this manually each time you use the image, or you can alternatively use a .gchi file which remembers this information for you.

This can be done by going to File > Import items and using this interface:


Through here, you can import single or multiple items in one go. Select the .png you want to use as a .gchi when prompted and you will be asked how many frames the image is intended for.

Importing multiple files will ask you to specify how many frames there are for each image.

You can also import entire folders in a similar way. The program will ask about frame format only once when you import, so they must all be the same amount of frames.

Compilation of items
You can import numerous files for one Item using Import > Compilation of items. This will add in Items with multiple layers on them, and is useful for pre-built characters or multi-layered outfits.

Name your Item and click Add Items to start adding in .png spritesheets you want in the compilation. Once a .png has been chosen, it will prompt you to apply any opacity if you want the image to be translucent.

You can keep adding items to this list until your compilation is complete. At the bottom, it asks how many layers are to be inserted below the selected layer. This means you can insert some of the layers under the current one, while the others go above it.

For example, if you had two layers and the number entered was 1, the top layer would go above the current layer and the bottom layer would go underneath.
Character Conversion
You can convert premade assets to fit certain frame formats, for example VX > XP and vice versa. To do this, go to File > Character conversion.


Select a file to convert, choose its original formatting style → the format you desire. You can convert between RPG Maker 2003, RPG Maker XP and RPG Maker VX Ace.

Some RPG Maker charactersets are one character (four directions) per sheet, such as RPG Maker XP. Others, like VX Ace, can either be one character or eight characters per sheet. The program may ask how you want the new files to be formatted if this is the case. Converted files will be dumped in the same folder as the original file.

You can also convert multiple files in a folder at once by selecting Convert a whole folder of characters.
Tileset Merging
In RPG Maker XP, you can have an unlimited number of tiles per tileset. Using Game Character
Hub, you can merge multiple existing tilesets into one sheet for ease of use.

To do so, select File > Tileset merging.


You can use this interface to add as many existing tilesets from your hard drive as you want on the
sheet. You can either select them all in bulk or add them one at a time from separate locations.
When you are finished selecting tilesets, click OK. You will be prompted to choose a filename and
destination for the new tileset. After merging is complete, you can import the resulting .png into
RPG Maker XP.

This can be used for pre-existing RPG Maker XP assets, but it will also convert images with RPG
Maker VX tileset formatting for use in XP also.

Hint: This will work with other kinds of assets that follow a 32x32 grid, but some items may be
automatically trimmed to fit into an XP tileset.
17 Comments
Alltheyuriz 2 Jul, 2021 @ 1:57pm 
So im kinda dumb and i lost my preview window, how do i get that back?
Emily 5 Aug, 2018 @ 11:22am 
How do I upload a character sprite to the workshop?
Seff 6 Jan, 2017 @ 3:40pm 
So you really *can* put any tile anywhere in XP? That's amazing. I wanted to make a 'cut the grass' event but didn't want to mess with the tilesheets and text files in Ace.
rj_viridian 19 Jan, 2016 @ 11:06am 
Ist it actually possible to convert to MV? Didn't see the option yet, but maybe i'm just to blind. :>
A Sentient Bowser Husbando 10 Sep, 2015 @ 10:25pm 
So, then RPG Maker VX Axe actually DOES limit you on the number of tiles per "tileset"? (or file, I suppose) I'm trying to cut down on my clutter by merging as many character spritesheets into a single tileset as I can, and I'm running into problems going past even just the default 8 characters per tileset that is set up in VX Ace's stock materials. With Face portraits and item/battle status icons I have had no problems stretching the tilesets to include extra faces/icons per tileset. Any idea what I might try?
Owll 5 Jun, 2015 @ 2:31pm 
Ok it is a basic question, as I am a newbee although I use Ace since at least 1 year.

When you use the random generator to get a character, how do you find the matching face to that character just like the generator from Ace?

Thanks in advance...
Marquise* 28 Jan, 2015 @ 9:51pm 
Hullo. Sorry I get lost at some point there I had made in photoshop 8 full complete sprite animations in one big sheet as most of the character sprite sheets we find in the RPGMaker RTP.

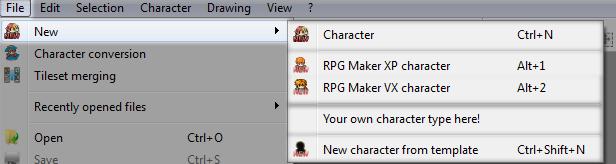
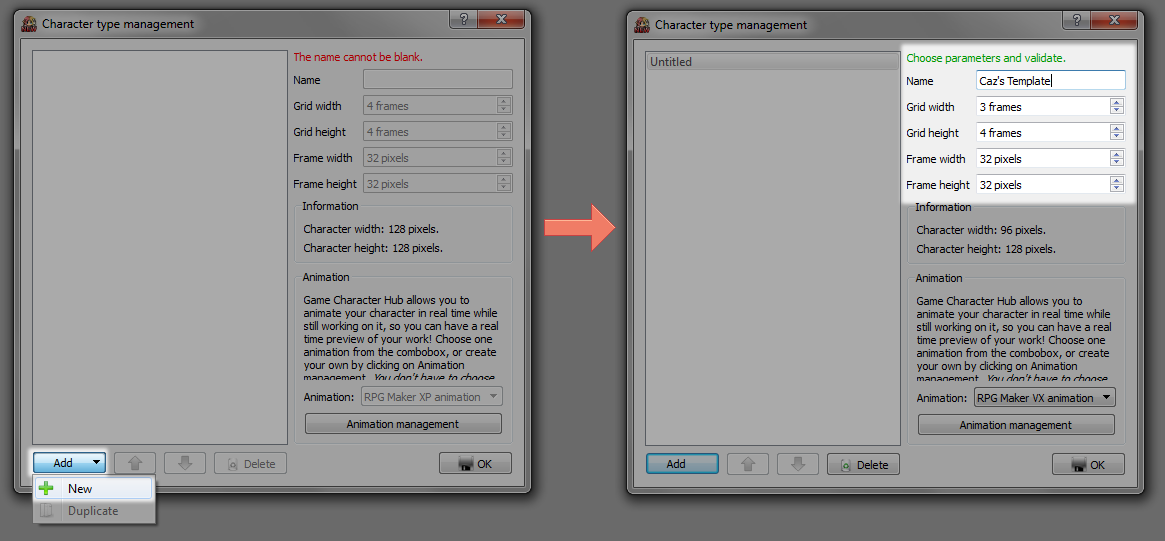
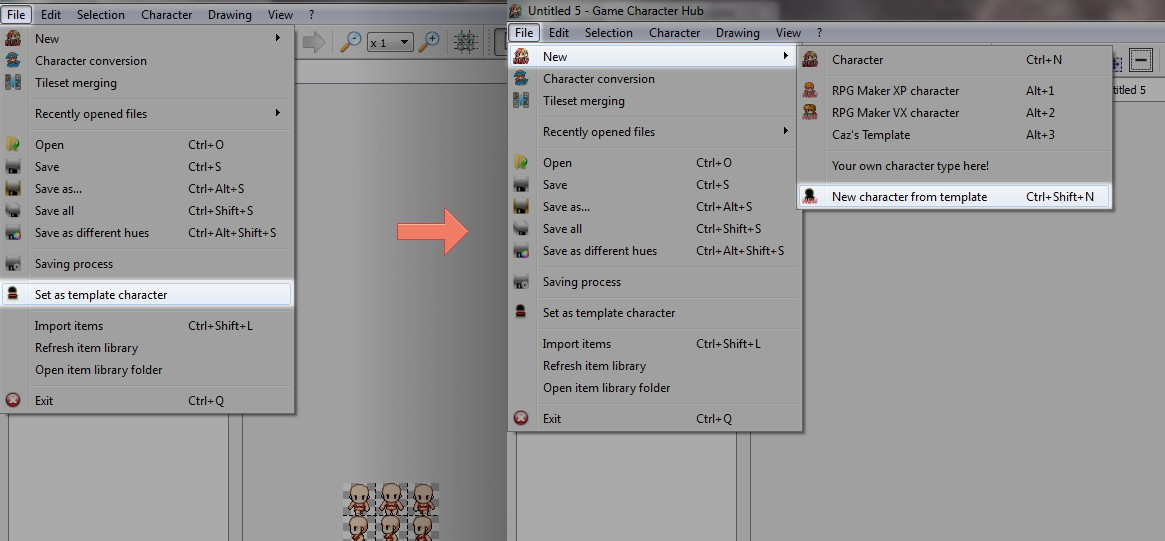
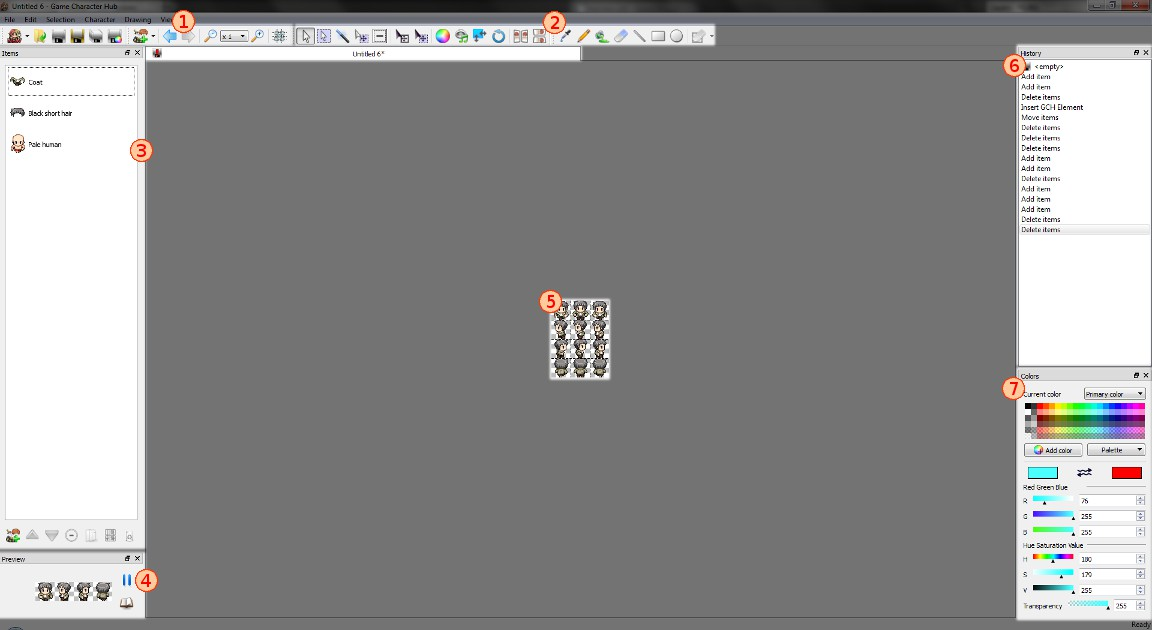
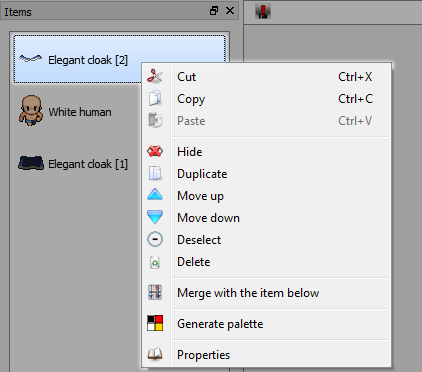
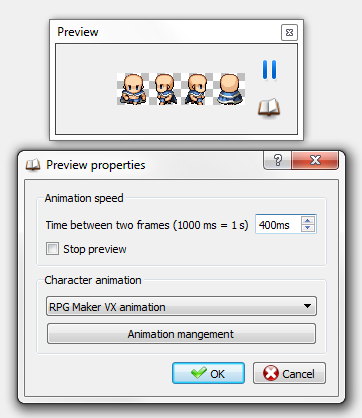
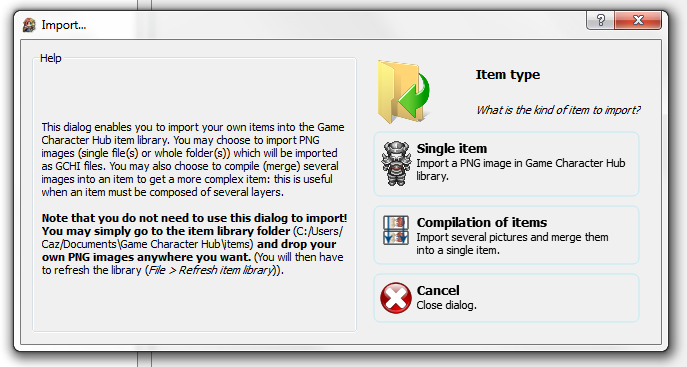
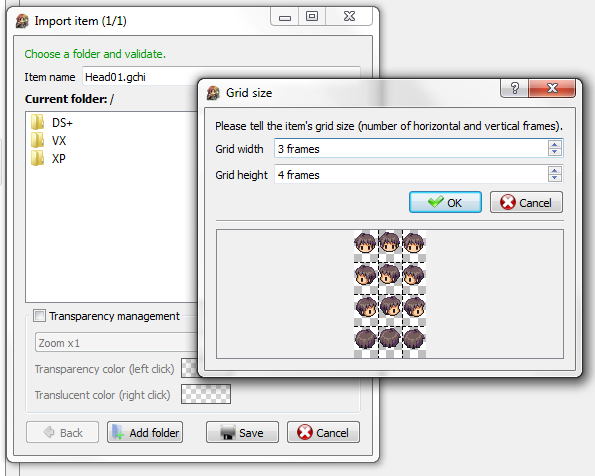
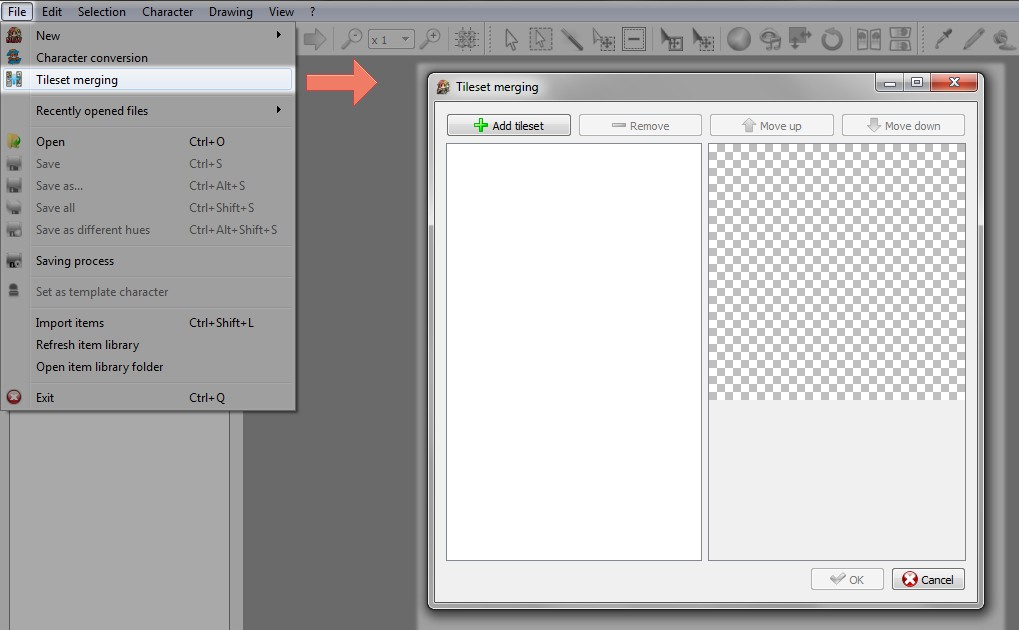
I know I did that before but each times I get lost at after importing the sheet, getting the correct window to load the exact selection of animated sprites (3 columns and 4 rows) on the sheet. Anywhere where there is a visual refresher of where I open up the menu when I got my .PNG imported?
Sparkbomber 29 Aug, 2014 @ 10:31am 
Dunno if these were answered, but since no reply's been forthcoming...

A tileset can be made yes, just bop up the dimensions of say the standard rtp tilesets and figure out how many tiles (32/32) fit in them. I've tried a few non-full tilesets and the prog seems to handle them well enough.:rbat:

It seems like you need to make them one layer to move the pixels. I'm not 100% sure if it would work, but have you tried selecting the frame, then ctrl+c -> ctrl+v in a new spot?

And larger chars? Make sure they're still in a proportionate grid and add $ in front of the pic when saving. For refs, look up the standard rtp big monster sprites.


Anyhoo, time for a question of my own. The face set generator is handy, but is there a way to generate faces en profile instead of en face?:shovelknight:
BTeam_Gritty 2 Jul, 2014 @ 3:43pm 
first off, this is very well written and is a very helpful guide.
secondly, can i make a whole new tile/tileset from scratch? not a merged tileset for xp, I use vx-ace btw
misadventures 30 Jun, 2014 @ 8:51pm 
Is there a way to copy all pixel layers in a frame and move the frame (or at least the all contents)? I have a character I've already created through RPG Maker VX Ace (.png) that I used GCH to flip horizontally for aesthetic reasons, but now I need to get the left-facing sprites in the grid swapped with the right-facing sprites in the grid (the 2nd and 3rd rows).