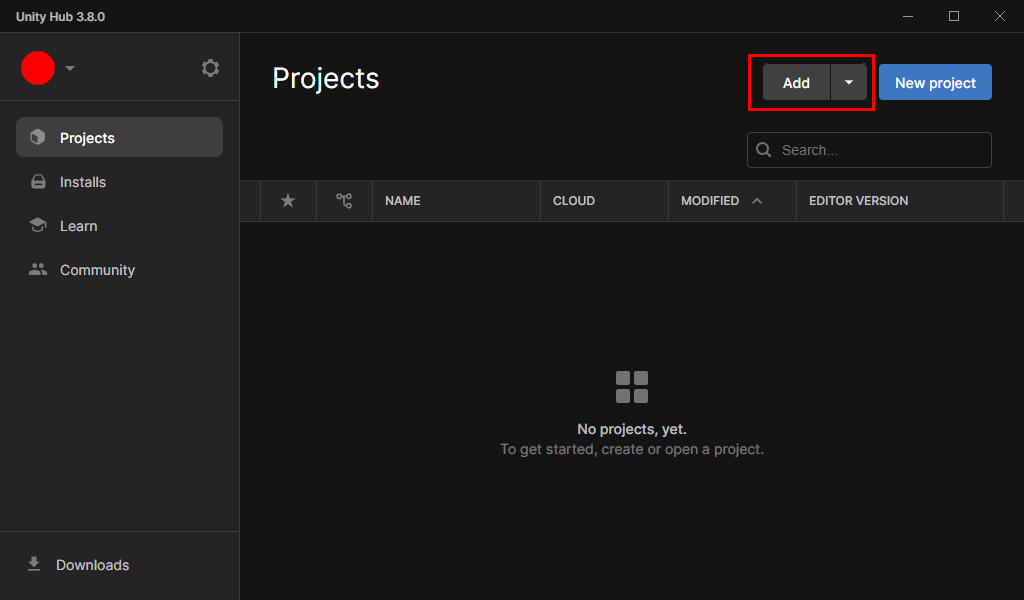
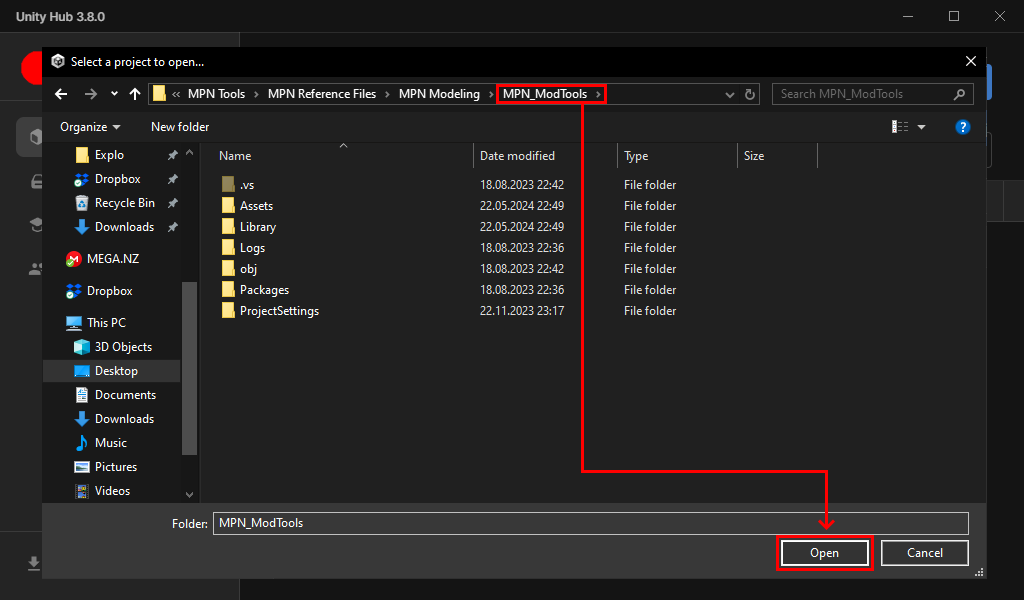
MADNESS: Project Nexus

MADNESS: Project Nexus

140 ratings
Modder's Guide to Madness [UPDATED]
By Explo⁧⁧☄
The semi-complete guide to asset extraction and modding.

Now updated for the Workshop Update!
3
7
   
Award
Favorite
Favorited
Unfavorite
◄---INTRO---►
It's finally here! With the workshop update modding has become easier then ever before!
I'll show you exactly how to get a hold of the original game textures, models and
how to add your very own weapons, armor and more into the game.


author note: eugh, this is a mess. need to fix when time.
Regarding usage of models outside the game
For those intrested; Yes, you can use assets from Project Nexus for your own projects,
as long as you give credit to the Dev team, along with a link to the game's steam page.
// PHASE 1: Setup //
To get started with our modding endeavors.
We'll need our modding tools and resources!

Firstly
our modding tools, the things we will actually be using for every mod.If any of these links go down,
refer to the Master Document[docs.google.com] managed by Swain himself.

Which also contains all the other guides I used to make this mega-guide, and even some extras!

Secondly
our resources, our templates and references for replacing assets.
// PHASE 2: Converting Models //
This is the part where we put our model onto a grunt,
and turn it into a format that MPN can actually read.

Thanks to teery for helping me fix this.


Open Blender, then
Open the madness_rig.blend file.[drive.google.com]
(which you downloaded earlier.)

Here you'll see an armature and a grunt,
rigged for your pleasure.


Import your model, pose it right,
attach it to the armature, weight-paint it,
delete all models marked DNU,
and export as FBX with the specific settings.


// PHASE 3.1: Importing Models //
So you have your model ready, time to get it into Unity.
Open up Unity Hub, and open the MPN Unity ModTools[drive.google.com] project.

After the project is open, import your assets from the top left.
Make sure to import both the FBX and any MAP Textures you made.


⠀⠀Next stop? The import settings!
⠀⠀Make sure to check them off
⠀⠀as they are in this (very tall) gif.


⠀⠀IMPORTANT NOTE:
If you are using Blender 2.79 then your SCALE FACTOR will be 45 with Convert Units ENABLED ----------------------------------------------------------------- And If you are using Blender 2.8 or later then your SCALE FACTOR will be 0.45 with Convert Units DISABLED

⠀⠀Don't forget to also Extract The Textures
// PHASE 3.1A: Inverted Model //


Hold on, does your model look inverted?

Y'know, like this one, you can see it's insides
That's not good, but there's a simple fix!


Go back into Blender and INVERT your Normals.
by pressing ( Shift + N ) and selecting INSIDE.


Now it's inside out, yeah, yeah it is.
But it's going to look normal inside Unity.
// PHASE 3.2: Creating an Object //


Time to give this model it's scripts!


Right click on your Hierarchy
and create a New Empty object.

Give it a unique name, without any spaces.
This is what your MadCards will hook onto later.

Now drag and drop your model into the object.


Now, go down into your model.
In the Inspector change
the shaders to the Madness shaders.

Apply your texture and your effect map.
// PHASE 3.2A: Inverted Model //
Okay okay, you're the guy with the Inverted Normals right?
(If you're not skip to the next part)

Let's take a moment again, you see Outline Width down in the shader options?

Yeah, sorry since your Normals are inverted, the shader thinks they're inverted now.
This means it places the outline of the object on the inside of it... oops!
We kinda off-loaded the problem for later, but later is now so let's actually fix it!

We're gonna do a little hack together here.
You might notice you can't actually set the value to a negative. So that's what we're gonna change.
Get down in your project file manager and go into the shaders and open the one you're using.
If you're following this tutorial to a T, then it's the second one, Character - Standard.


Now don't worry you don't have to rewrite anything major,
we're just going to double click on that open it in a text editor like notepad or notepad++.

In here, go down to outline thickness,
and change the first number to have the same limit as the latter number.


Now you can set your outline to a negative number, which will fix the issue.
// PHASE 3.3: Adding Properties //
Now we gotta give the object it's appropriate type.
Do this by adding a component to the empty object we originally created.

Anything the character wears is armor, anything that you apply at the mirror is a body-part.


Here you can add alternate meshes or materials, but you do not have to add either.

If you do decide to add an alternative mesh or material,
you have to set the the first mesh and material as the first "alts" for them to be usable in-game.

// PHASE 3.4: Building MadObjects //
Now that you have your object nice and ready, it's time to package it up for M:PN

Start by dragging the entire object you created into the Prefabs folder.


⠀⠀Now, select your prefab
⠀⠀


⠀⠀and type the name of your mod
⠀⠀into the AssetBundle section.


⠀⠀Apply this new AssetBundle to
⠀⠀every other object which
⠀⠀you want to package into your Mod.

⠀⠀You CAN split your objects
⠀⠀across multiple AssetBundles
⠀⠀but there's no point to doing so.


⠀⠀Once you have everything selected, go to the top-left,
⠀⠀click on Madness > AssetBundle > Build.

⠀⠀Once Unity is done building, the bundle's folder will open up.
⠀⠀Copy this file out to your desktop for now.


⠀⠀Good job! You're done! You can close out of unity now!
⠀⠀Save your scene though, just in case.
// PHASE 4.1: Creating MadDecks //
Step 1.
Open up the MadCard Deck Manager you downloaded earlier.
From here, click on the green plus icon to start creating your Mod.

Fill in your Mod info here, tags are separated with a space, so don't try typing in sentences.


Then open up the Mod itself by selecting it and then clicking on the gear icon.


Step 2.
Create your MadDeck and MadCard.


Each MadDeck is a bundle of MadCards.
You should put associated items in the same MadDeck, eg,
Items made for a specific enemy should all go in their own deck along with the enemy.

From here on you will feel right at home if you used the Dossier before.

Step 3.
Fill in your MadCard
Select a card type, then select the base object your card will be referencing.


Set the name of the file,
then continue down to set NameShort to anything you like. It's just an identifier.
Further down you can set the description and which slot your item goes on.

[Note: Objects in the new slots are NOT visible in the store, so use this only on NPC items.]

There are a lot more options, but I'll let you go through those on your own.

⠀⠀Once you're done, save the card and deck.

// PHASE 4.2: Assigning AssetBundles //
⠀⠀⠀We're not done yet!
⠀Now we need to actually assign the AssetBundle you made to the object.
Remember when I told you to copy that file to your desktop?
⠀Yeah I'll show you where to put it now.

Navigate to
%Appdata%/LocalLow/Gibbing Tree/Madness Project Nexus/Mods/YourModFolderHere

⠀First drop the AssetBundle from your desktop here.

⠀Then, in the same folder open the .json file storing your MadDeck.


⠀Next you need to add a line of code that will tell the game what the name of your Prefab is.
"ObjRef": "PrefabNameHere",
Copy it, just like this, under one of the other lines. Then save the text file.


⠀⠀⠀⠀⠀⠀Good work! You're done here!
You should be able to load your model inside the game now!

Remember to turn on your Mod in the Mod Menu!

// Before Uploading //
⠀⠀To upload your mod on the workshop you'll need a little icon, like one of these!


⠀⠀I've thought up a little visual sorting system and I'd like you to join in on it.
⠀⠀Depending on what type of mod it is, color a different corner!

⠀⠀If it's an Origin?
⠀⠀Top Left.
⠀⠀If it's a Stage?
⠀⠀Top Right.
⠀⠀If it's a Weapon?
⠀⠀Bottom Left.
⠀⠀If it's an Armor?
⠀⠀Bottom Right.
⠀⠀If it's Something Else?
Don't put anything at all!

⠀⠀Easy as that, let's get it running, shall we?
// Uploading Mods //
Move the whole folder with your mod to your desktop for easier access.


You'll need to use an image that's under 1MB for the icon of the mod,
so pick a nice one out now.
Afterwards, open the MPN Workshop Uploader[github.com]
This will greet you with a nice command prompt menu.

Just follow the instructions on screen and you'll be done in a jiffy.


Once you get this message, there's one more thing to do!
Go to your Mod's steam page and set it to Public!


Woaah you did it! Good job!
Now go and rake those steam awards for your creation! You deserve them!


You can acquire your own copy of THE CUBE here ↓
https://steamhost.cn/steamcommunity_com/sharedfiles/filedetails/?id=3256271452
◄---EXTRA BELOW THIS POINT---►
< ADDENDUM 0: Importing old models >
Oh, so you don't have the .blend file anymore, happens to all of us.
To import your .FBX model back into blender you'll need to use these settings.


Thanks to Lucky Bunny for pointing this out.
< ADDENDUM 1: Extracting assets >
So you want assets from the actual game? No problem! We have tools for that!

Tip: Usually opening level58.dat will let you find most of the models you want.
It's the ArenaMode hub, which means it has to have the most assets preloaded.
Level specific textures will still need you to find the correct level they are from.


Step 1: Install AssetStudio
Recommend using the 2.2 Stable release [Asset Studio][github.com]
Used to view and export models into .OBJ format.
and to view and export textures into .PNG format.

Step 2: Open AssetStudio and navigate to your MPN folder and open up a level.
(Why a level? Because level files fetch all their linked asset bundles automatically!)


Step 3: Find your model and/or texture and select it, you can preview them in the viewport.
Once selected click on MODEL and Export selected objects (split).


Step 4: There is no step 4, you're done.
You can find the models and textures in separate MESH and Texture2D folders,
at the address where you extracted them to.
< ADDENDUM 2: Origin Icons >


⠀⠀
⠀⠀Import into Unity like usual,

⠀⠀set it to a Sprite,
⠀⠀(Yes, this is necessary.)

⠀⠀make sure to enable transparency.

⠀⠀Now
⠀⠀LISTEN CAREFULLY.
⠀⠀DO NOT ADD THE TEXTURE TO AN EMPTY.

⠀⠀YOU NEED TO ADD THE TEXTURE ITSELF
⠀⠀TO AN ASSETBUNDLE.

⠀⠀Then Build.

⠀⠀Then add the Icon asset
⠀⠀to your origin's .json file.

⠀⠀Remember you'll also need to
⠀⠀put the AssetBundle in the Mod's folder.


< ADDENDUM 3: Text Formatting >
When editing any in-game text,
you can use these tags to spruce it up or mention other characters.

< > Tags can be used to modify the style of text.
  • <b> TEXT </b>
    Boldens the enclosed text

  • <i> TEXT </i>
    Italicizes the enclosed text

  • <color=#FFFFFF> TEXT </color>
    Colors the font with the specified hex value.[www.w3schools.com]

  • <size=##> TEXT </size>
    Resizes the font to the ## number.

    PS: Setting the font size somewhere above 60 crashes the game.
    For example, 80 is guaranteed to crash the game.

[⠀] Tags are used to refer to entities which's name can change.
  • Serial numbers enclosed in brackets [##]
    allow characters to refer to characters with the designated serial by name.

  • [PSQUAD#]
    Refers to a character in the player squad based on order. (PSQUAD0 is typically the player)

  • [PLAYER]
    Refers to the player controlled character by name

  • [ENEMY]
    Refers to the character's current enemy the unit is targeting.

You can also use the standard JSON escape characters,
but these have to be written manually into the JSON file,
as MadCard Maker doubles the backslashes in an attempt to write "the right text".
  • \n
    Creates a new line
  • \t
    Creates a tab, as if you pressed the TAB key on your keyboard in a text editor.
< ADDENDUM 3.1: What about fonts? >
Note: Fonts with OpenType Font Variations can only show their first variation.
Preferably, use fonts without OpenType Font Variations.


Packaging them is easy! Same as everything else.


Now to apply the actual font

First, make a Chatter in MadCard Maker.
You'll notice you can't change the font there yet.

Why? Because Darksignal doesn't like ambiguity.

Save the file
⠀⠀and
close MadCard Maker completely,

then open the chatter .JSON file in a text editor.


⠀⠀Add this bit of code right under the name,
⠀⠀replacing "FontName" with the File Name of your font, without the extension.
"Font": "FontName",
⠀⠀


⠀⠀⠀⠀AND

⠀⠀⠀⠀IT'S

⠀⠀⠀⠀DONE!


<Mini-Addendum: "Style">
Style just decides if your entire text will be Regular, Bold, Italic, or Both at once.
  • "Style": 0, = Regular
  • "Style": 1, = Bold
  • "Style": 2, = Italic
  • "Style": 3, = Bold & Italic
< ADDENDUM 4: EffectMaps >
To make an Effect Map, you just copy your texture and paint over it with specific color values.
The RED value corresponds to how GLOWEY the texture will be at that part.
The GREEN value corresponds to how SHINY the texture will be at that part.
The BLUE value corresponds to which tint that part of the texture skews towards.
If you set the BLUE value to 126, the that part of the texture will not be tinted.
alpha also exists, changes transparency on glass.

After you make it, put it in your item's material here.

You will also have to add the Effect Map texture itself into your AssetBundle to have it show up in-game.


Note: MPN's shaders make everything very bright, so I would recommend darkening your texture to about 2/3rds to get a more accurate tints if you're using a EffectMap.


< ADDENDUM 5: Alternate Bodyparts >


⠀⠀After exporting the parts,
⠀⠀make a new Character in the MadCard Editor, rename it and save it.
⠀⠀Then open it in a text editor and add this code anywhere in your character.
"AltParts": [ "PARTNAME", "PARTNAME" ],
⠀⠀Adding one "PARTNAME", in between for every new custom body part and ofcourse,
⠀⠀renaming each PARTNAME to the names of your prefabs.
< ADDENDUM 6: Adding Sounds >
For now, I would recommend reading the wonderful guide[drive.google.com] by LoreRaider.

You will need FMOD Studio[www.fmod.com] and the FMOD sample project[drive.google.com].
< Origin.Tips_1: Hiding SpecialSkills >
So you might've wondered,
"Wait, if I give my origin this Special Skill it doesn't really fit thematically with how the description is worded. Can I do something about that?", probably not but here's how to get around that!

Thanks to this trick from Geesplei.

Look at the two images below.


Here we have two SpecialSkills applied to the origin, and the character the origin is based on.


The SpecialSkill from the Origin appears, but the one from the Character is invisible!

You can use this to write a custom description for all your skills,
just by putting them all in the Character instead of the origin,
or you can hide them completely just the same!

Now comes the other question,
How do we make our description's formatting look like the real thing?

Don't worry, just plop this down where your old description is!
"Description": "ORIGIN BLURB\n\n\t\t\t<color=Yellow>[SPECIAL]</color> <color=White>SPECIAL BLURB 1</color>",


There's one small problem.
If you try typing this into MCM it's going to double the backslashes,
which makes our formatting not apply.

We need to edit this in the raw .json file MCM generates for us.

Anyways, let me make that more readable for you now.

ORIGIN BLURB - we put the description of our origin here.
\n\n - this puts two line-breaks in the paragraph, giving some empty space.
\t\t\t - this offsets the text three tabs to the right, so it lines up with the buffs.
<color=Yellow>[SPECIAL]</color> - this makes our pretty little [SPECIAL] tag.
<color=White>SPECIAL BLURB 1</color> - and here we write our actual special blurb text!

All put together, it's gonna look something like this!

◄---Closing Words---►
Thank you for reading, hope this guide helps you with your escapades.

If you have any questions, leave a comment and I'll try to get back to you.
Have fun, but don't overwork yourselves!

-Explo ☄
93 Comments
Willtastic 30 Mar @ 7:24pm 
Quick question, How do I replace the old story mode with my custom made one? Do i just drag the new files and replace the old ones? Most importantly how do i even download my mod deck?
EvilDuckGuy 11 Jan @ 5:09am 
Hello, Sire. Explo

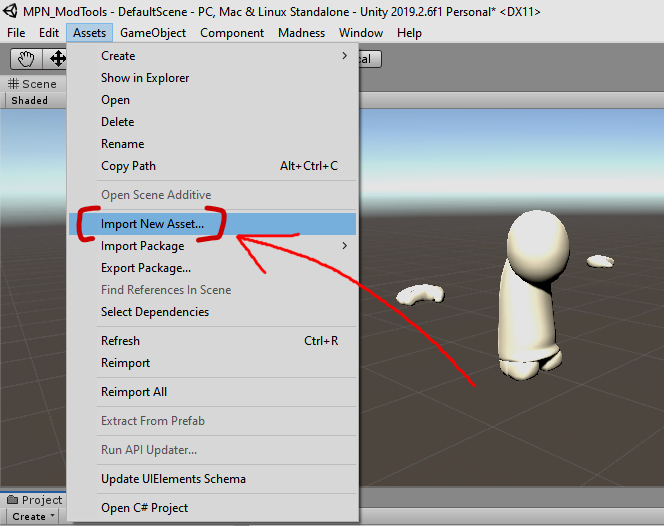
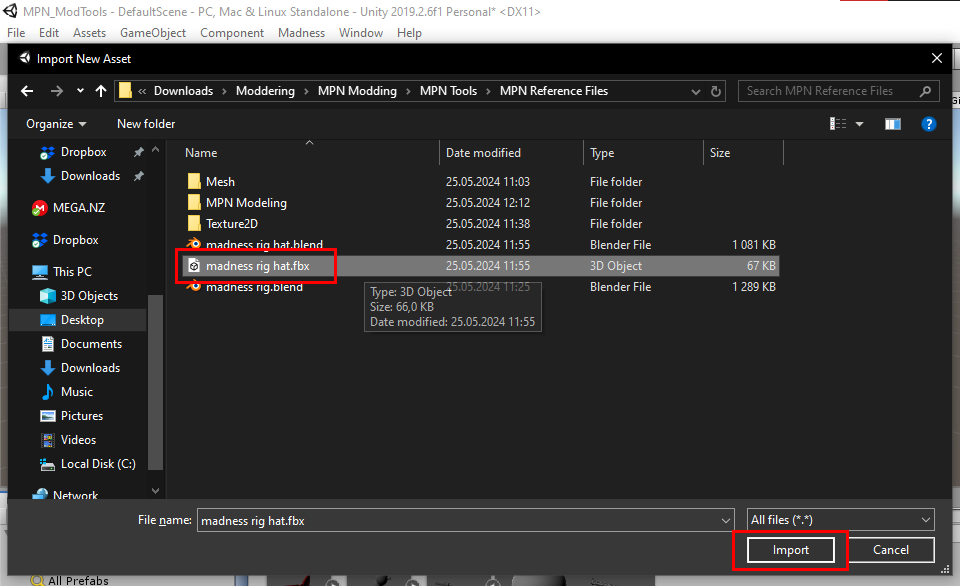
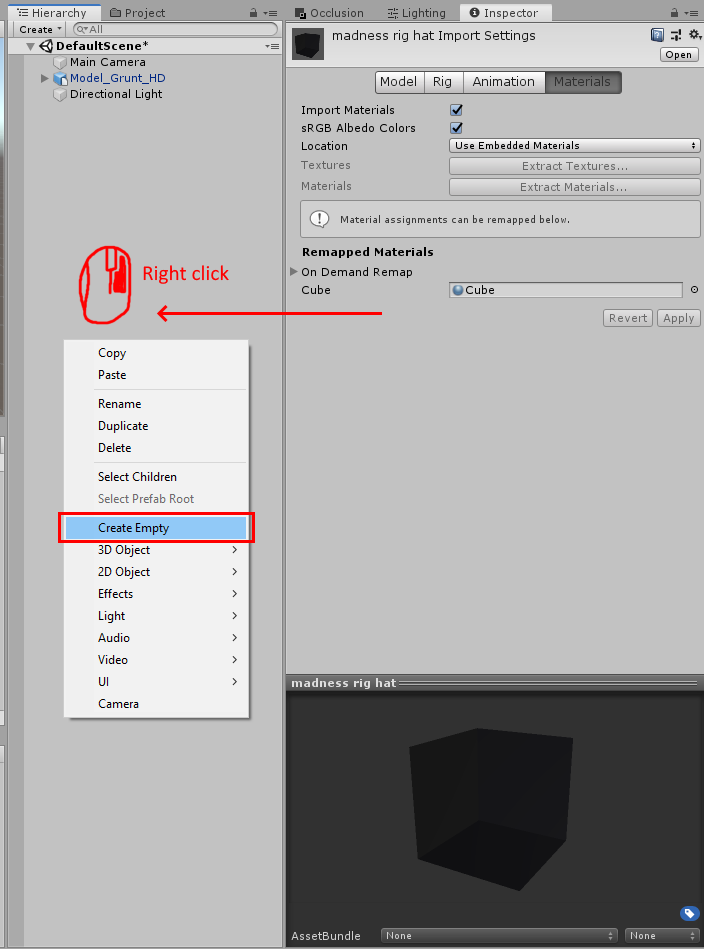
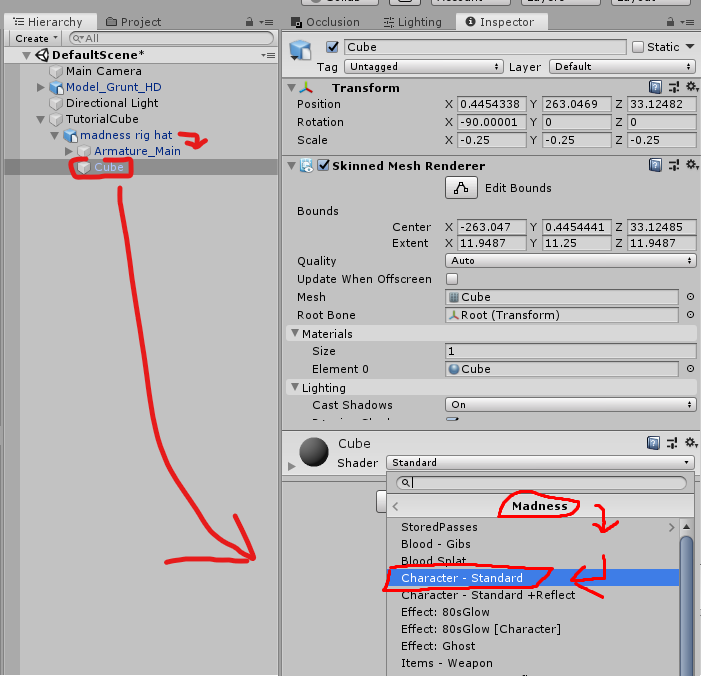
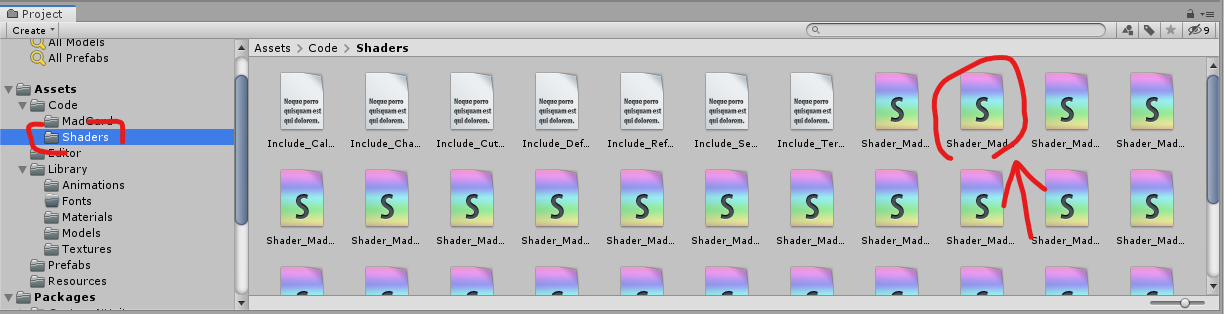
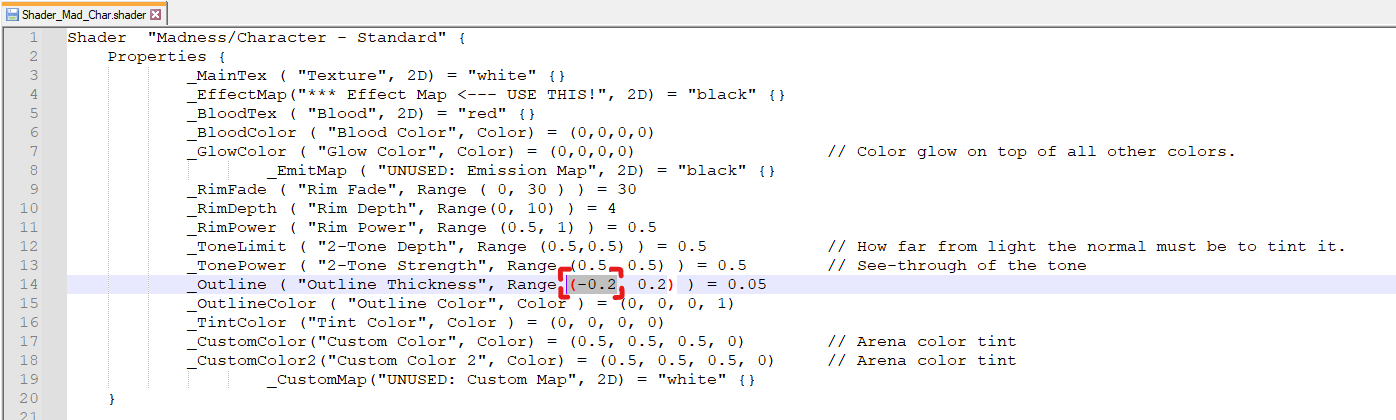
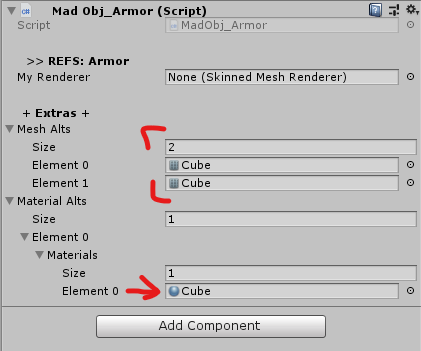
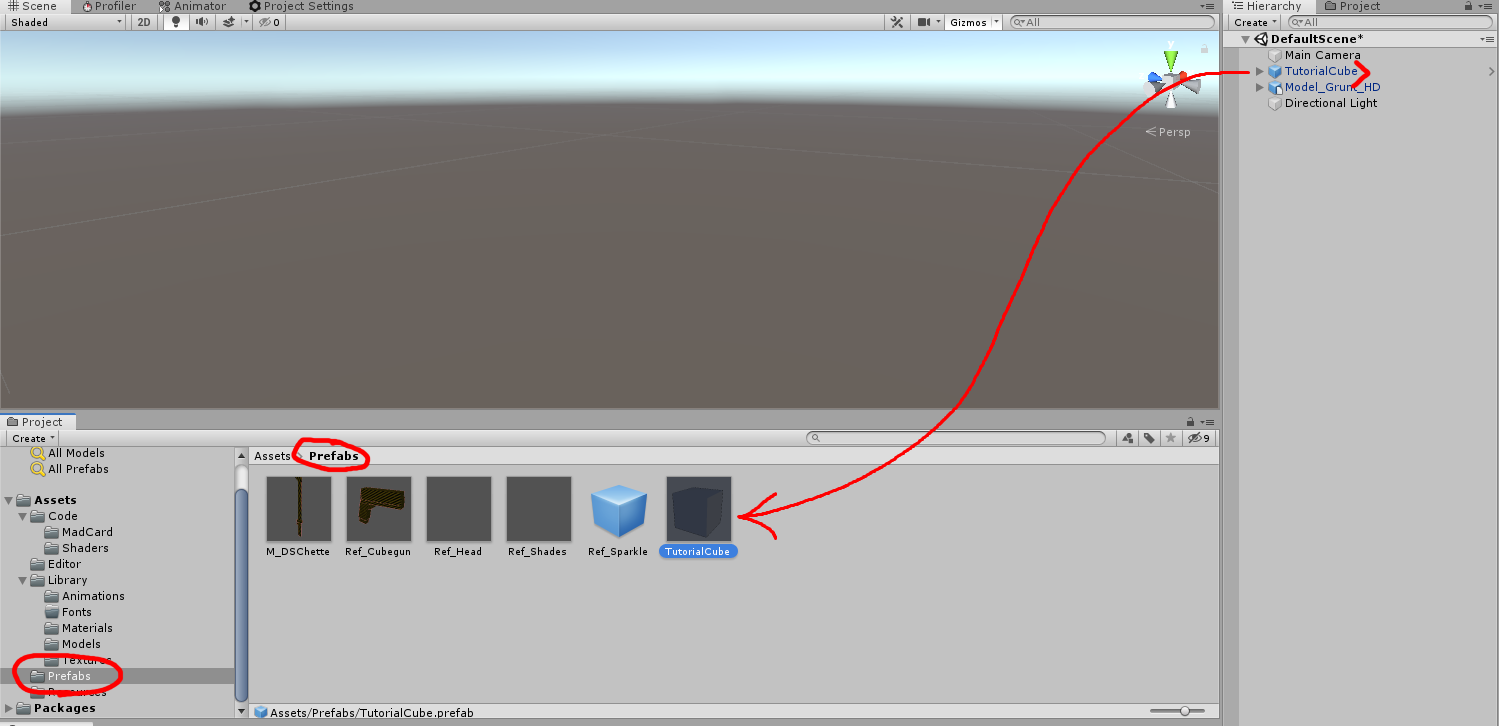
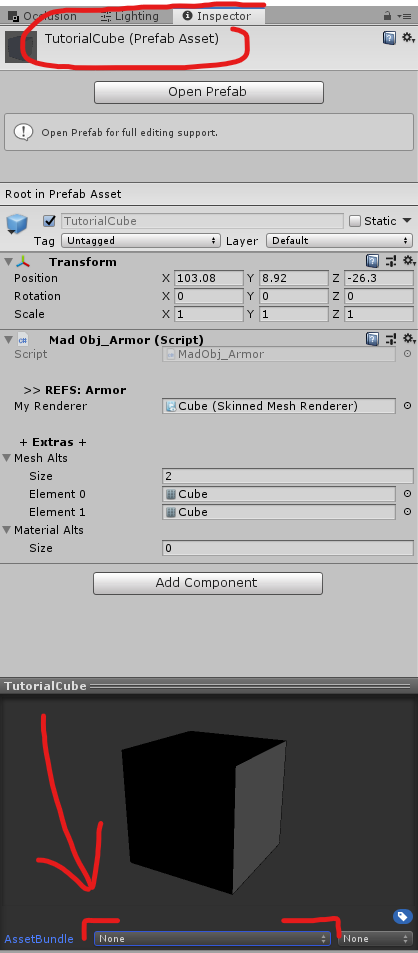
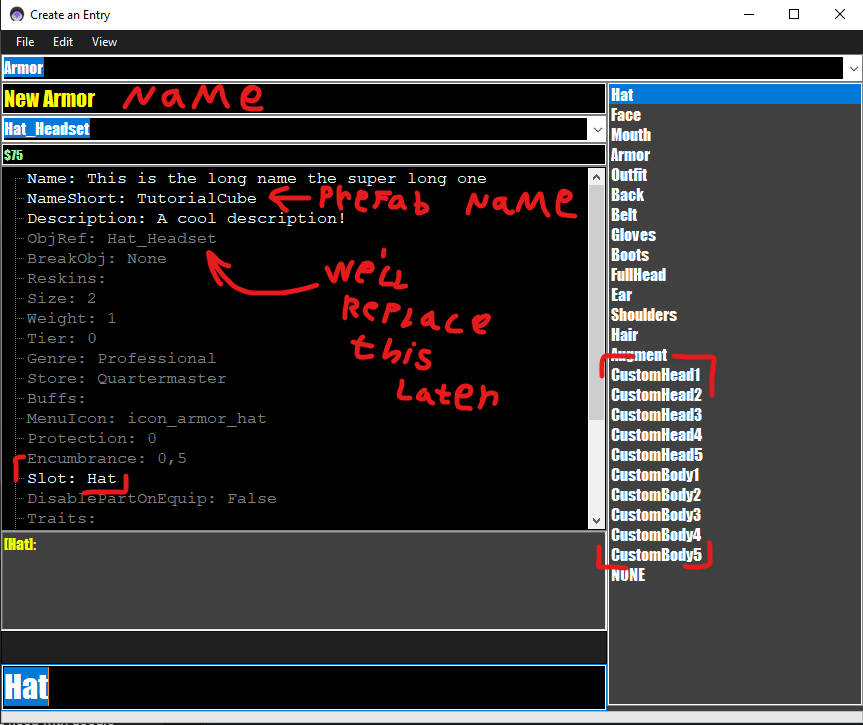
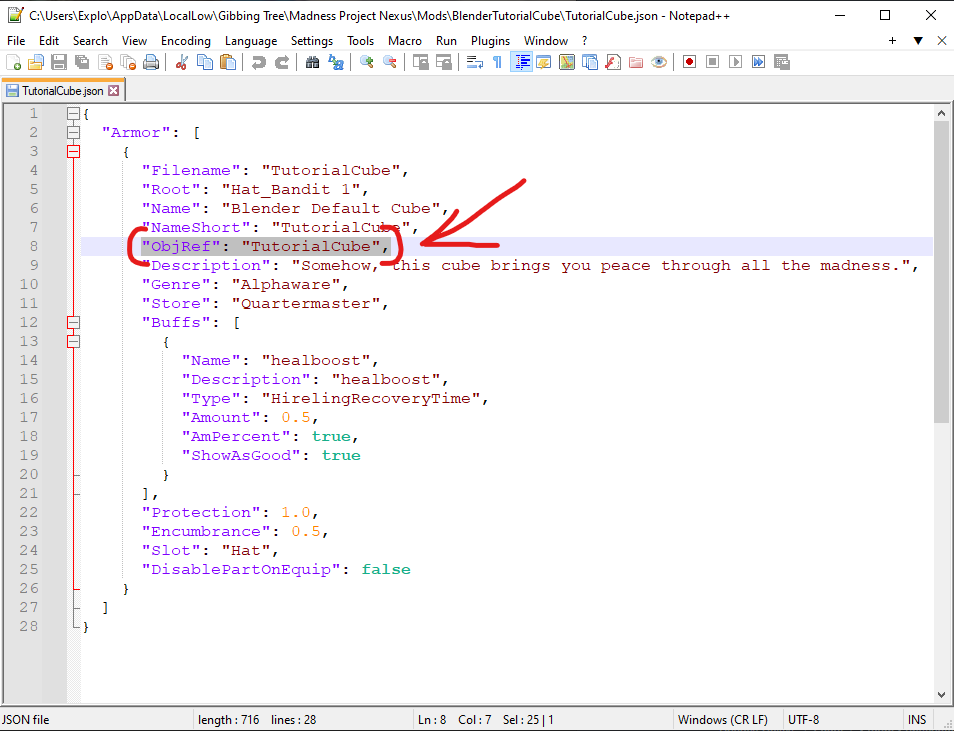
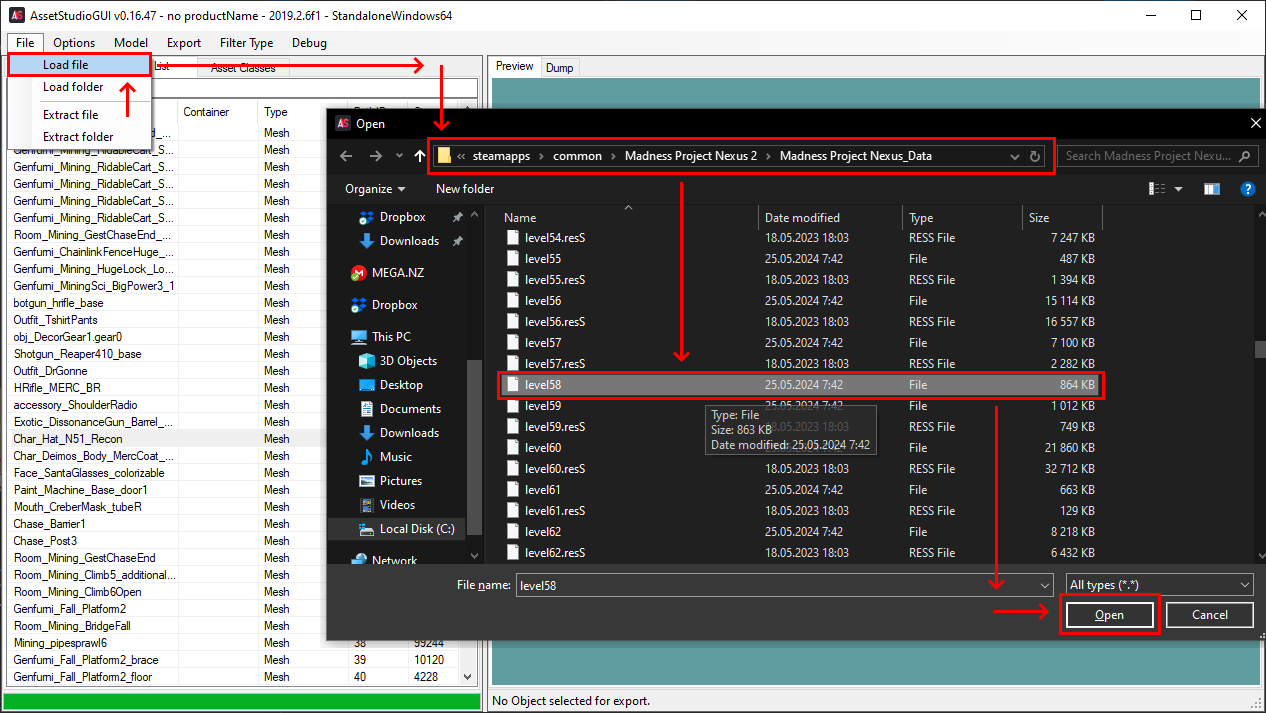
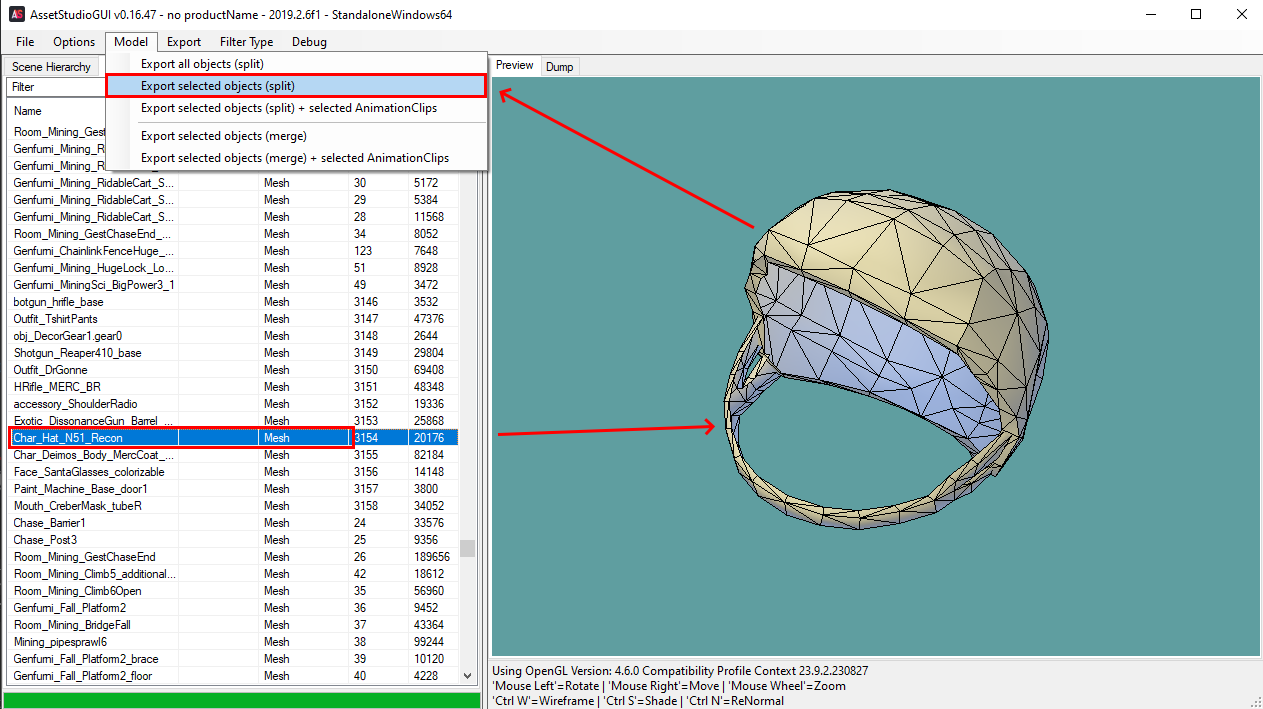
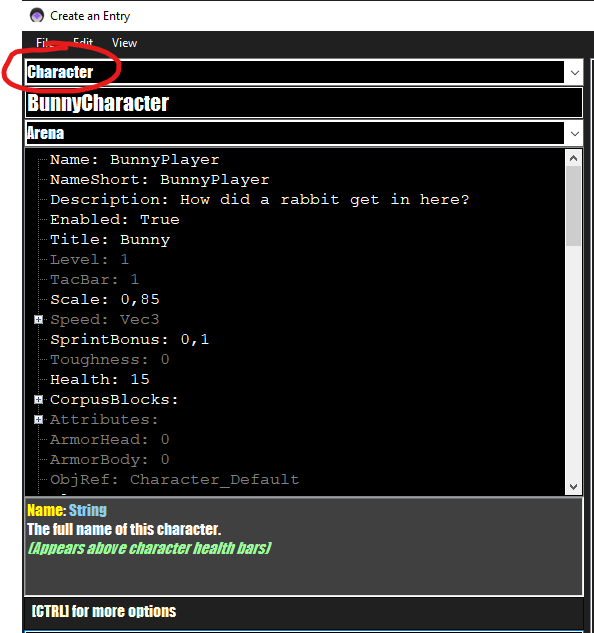
I would appreciate it if you could add some extra detail in at chapter 4.2 Assigning AssetBundles . I spent a few hours trying to rack my brain on why my custom model wouldn't get assigned to my weapon. After asking in the discord, I was informed that you need to use the name of the MODEL that you import and setup in unity and NOT the name of the MAD OBJECT you create. If possible you could add a line or two for the few of us without higher functioning brains, that would be most appreciated.

Yours always, EvilDuckGuy
the screecher 19 Dec, 2024 @ 1:25pm 
what are the inside names for things like the fire debuff and such?
Max 26 Nov, 2024 @ 2:07pm 
I should also note that the text for the obj_ref is red
Max 26 Nov, 2024 @ 2:05pm 
I'm using the code and putting the asset bundle in it's name, but when I try to play the game the modded accessory I made still has an asset from the game and not the one I modeled.
thelethalweapon 12 Nov, 2024 @ 12:33pm 
How do I change focus and weak skills of origins added from the workshop?
ToothyDeer 3 Nov, 2024 @ 1:36pm 
My bad it was suppose to say with arena characters but thanks
Explo⁧⁧☄  [author] 2 Nov, 2024 @ 10:56pm 
Making the Filename the same as the original filename for whatever your replacing will do the job.
ToothyDeer 2 Nov, 2024 @ 9:14pm 
I wanted to ask if it was possible to replace the campaign characters with yours for a custom story. If it is, how do I do it?
Explo⁧⁧☄  [author] 11 Aug, 2024 @ 12:17pm 
The GIF is just a visual example of all the things listed earlier!

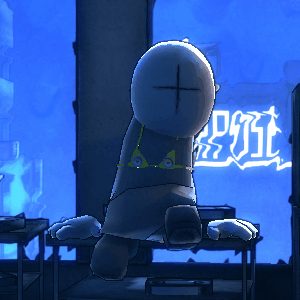
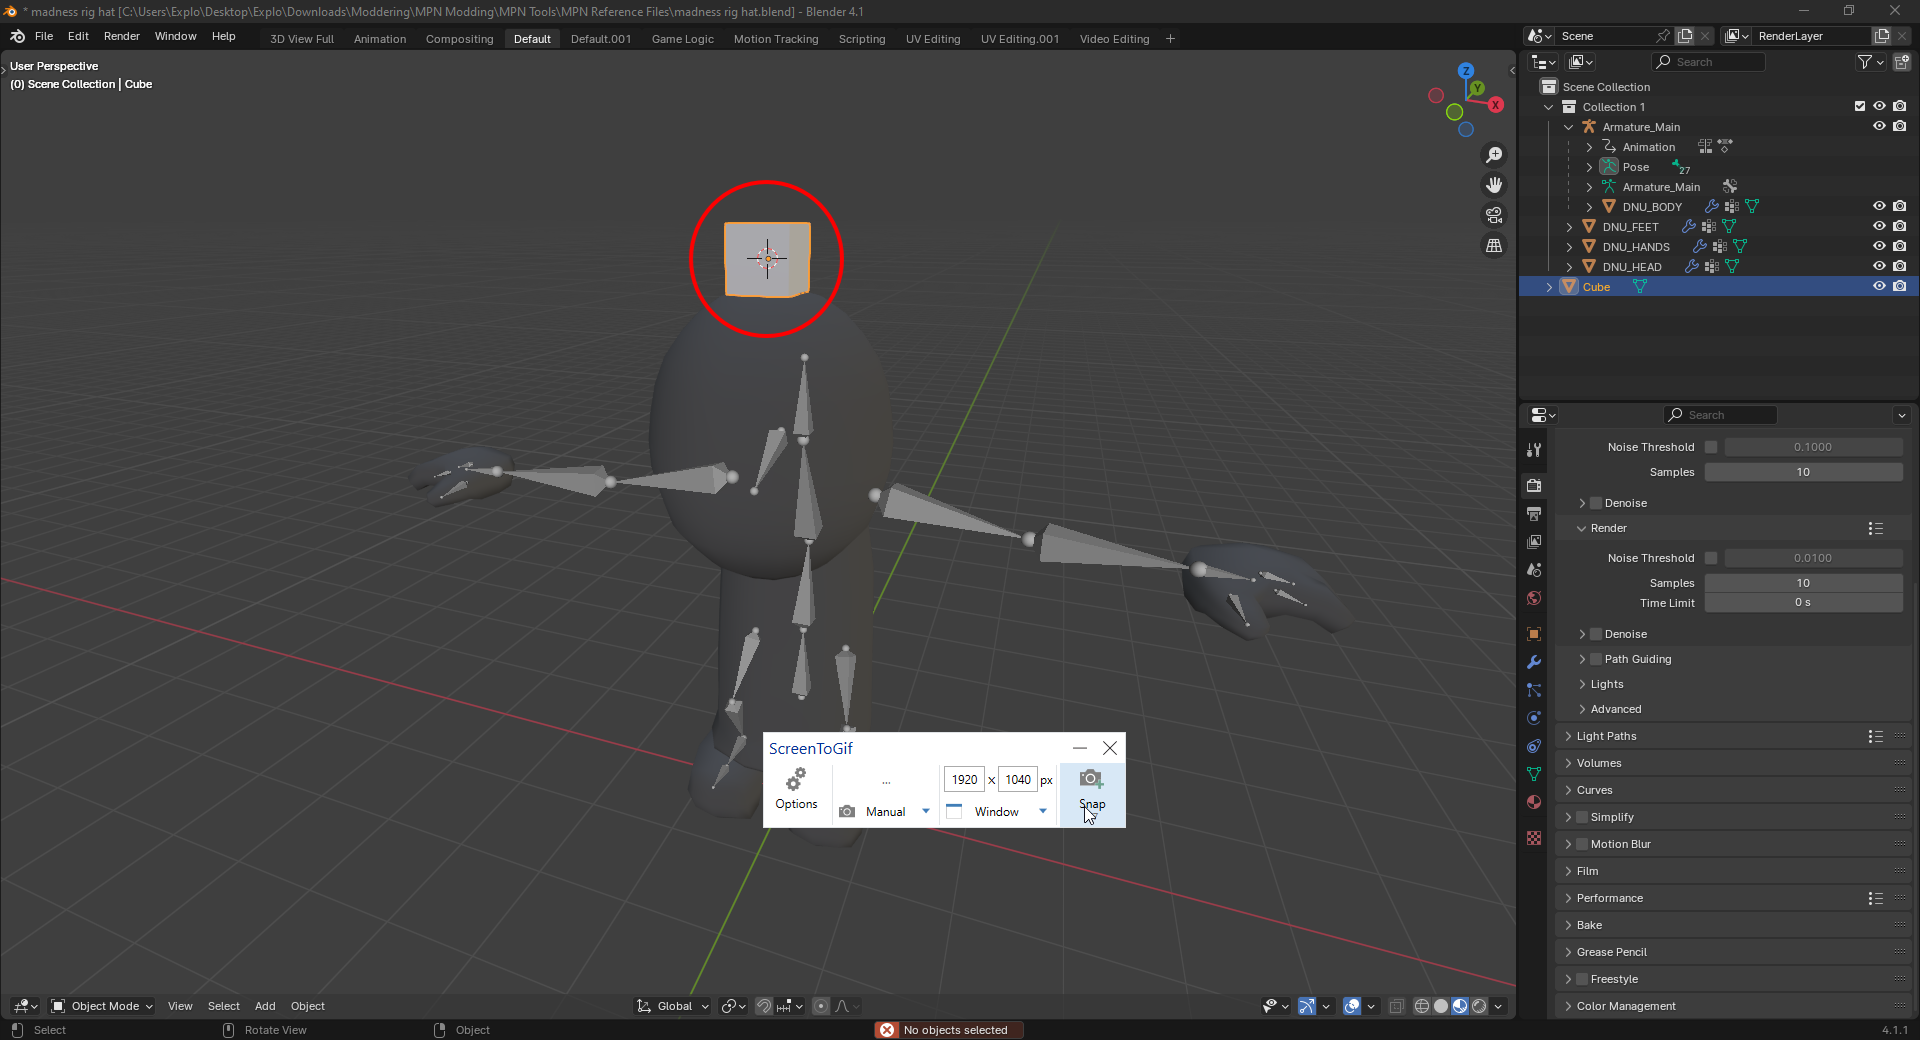
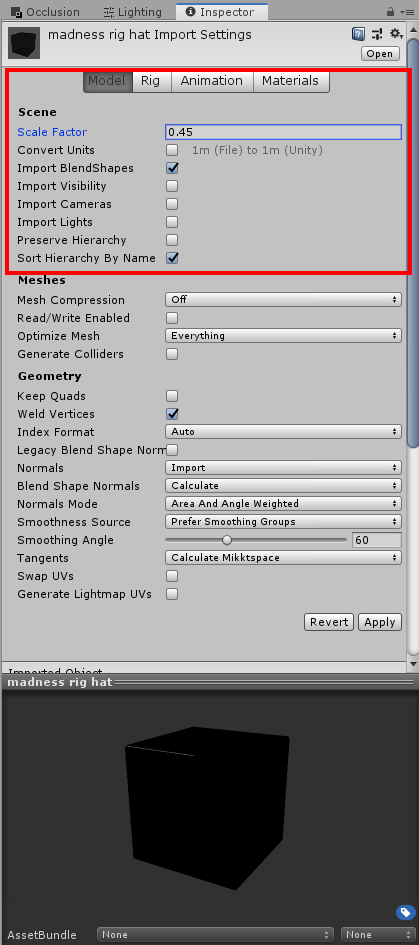
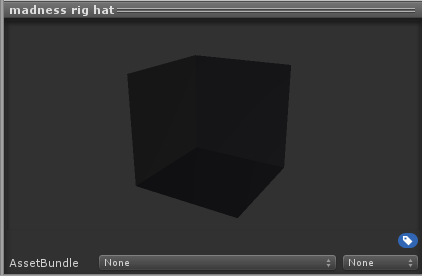
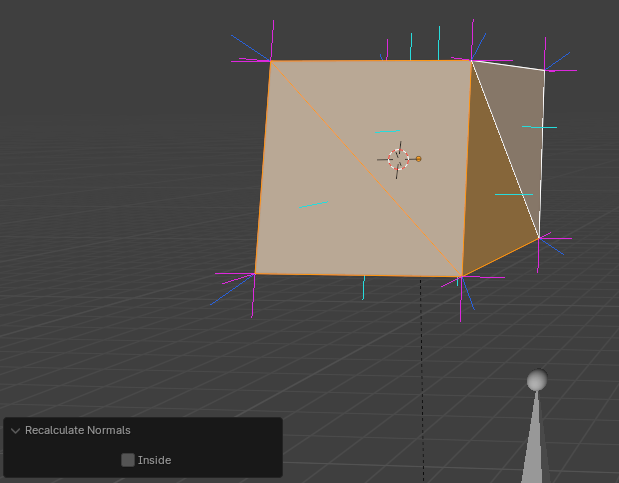
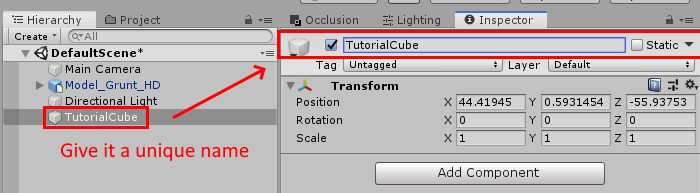
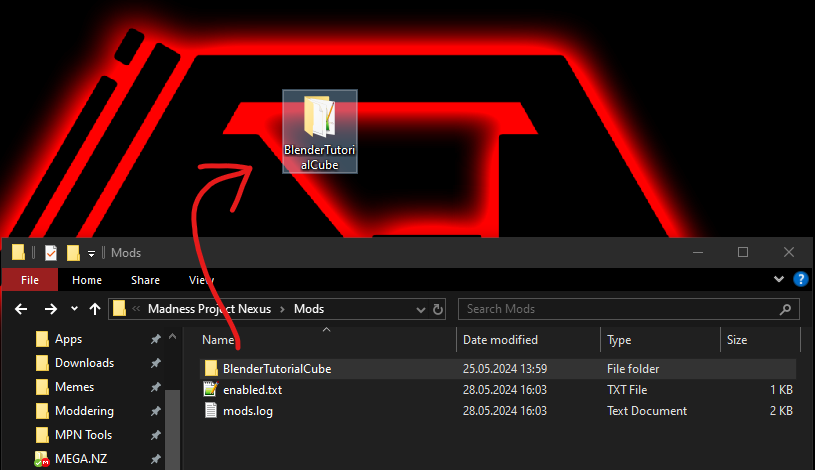
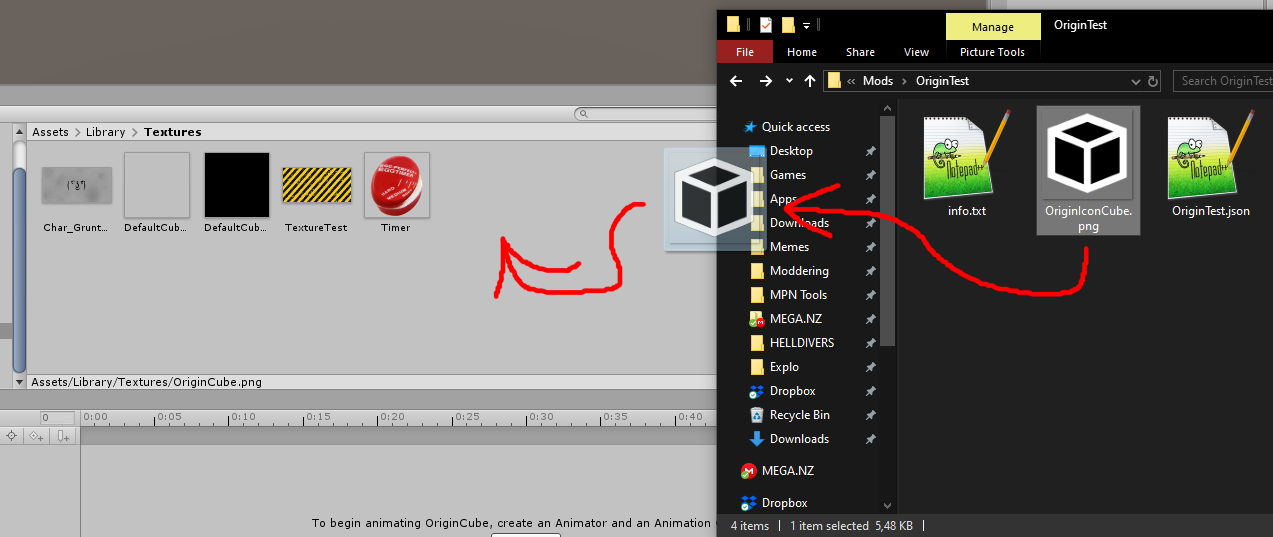
Import your model, pose it to match the armature.
attach it to the armature, weight-paint it,
then delete all the models marked DNU, so they don't appear later.
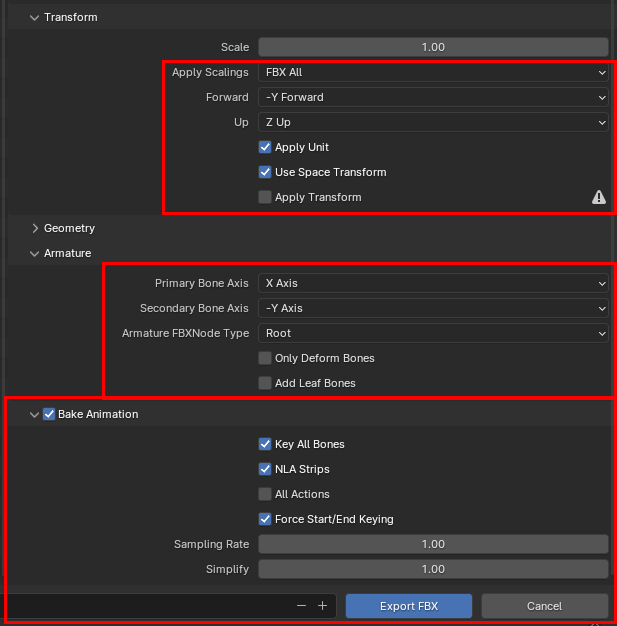
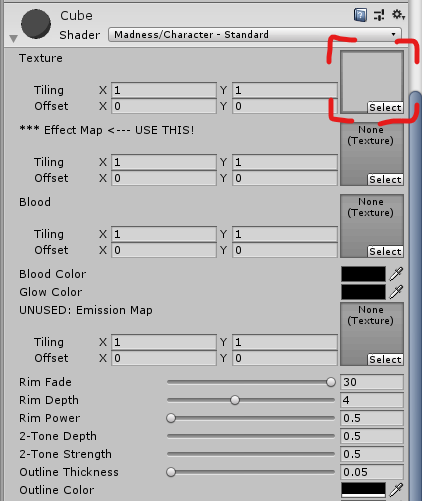
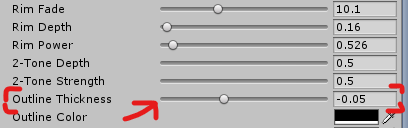
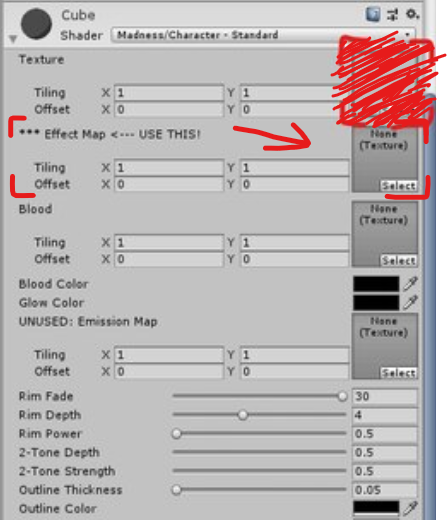
and export as FBX with the specific settings listed in the images below.