Salt 2
67 ratings
Helpful topics, locations, information on the game
By WillieSea
Includes information on different features in the game, types of enemies and loot available, few hints on playing the game, locations of special places on the 'Default' seed. And much more.
5
5
8
2
   
Award
Favorite
Favorited
Unfavorite
Beginners Start - spoiler free
Updated 6/2025
Relax, you cannot die of starvation in this game, but you can die from injury, falling great heights, or drowning.

You can strip the starter island of all resources. Wood logs, plants, clam shells along the beach that contain pearls, coral pots in the shore water with resources in them and sometimes a key that can be used on a single chest in the water that is at every island.

After a short time some resources will re-spawn so you can collect them again. Just keep circling the island to collect the stuff.

Can't handle the dark? Then find a campfire or tent and activate it to sleep the darkness away. Later you can build a bed on your boat to sleep nights away. This does use up some of your food level making you a bit more hungry.

Follow all quest instructions exactly as it says, there are no false leads or misdirection.

Read the book on the table in front of you at the start of a new game. It tells of a dungeon on the starter island with everything you need to build a raft. Look for it then search every chest inside the dungeon until you find the raft resources.

The map you find gives the location of a seaport which you can look at to put a 'marker' on your map. You can use the sextant (equip then click while looking at the sun, moon, or any planet) to find your location. Press 'M' to look at your map. If you use a sextant on an island, you can open your map and there is now an icon you can click to mark that island on your map.

Head to the Seaport (from the map you have) and talk to the Cartographer for ship building instructions.
Check the Job board for side quests and get rewards for turning them in at any mailbox.
Find and talk to the two guys standing around town. One of them will tell you about the Marauder's Guild, the other gives you a map.
Sell all your gathered pearls and anything on the tab for "junk" items, and any gemstones you might have found, to any merchant.
Merchants can no longer run out of money so you can sell them everything.
Most other resources you will want to keep for later crafting.

At the Seaport island gather more pearls and then sell them. You should now have plenty of money for the essential stuff.

Do not go exploring the world too much until you complete the cartographer quest.
Make sure you apply stats bonuses to any of the weapons or clothes you find. (Look at the item, then look at the screen for what keys to press for different functions.)
The Seaport blacksmith has a forge you can use if you need to use one early on.
The Seaport also has crafting tables, some are outside, some are inside like the Cartographers hut.

The town cartographer will give you supplies for your first waveskipper if you find something for him (quest).
He will send you to a pirate island to find it.

1. Raft over to the pirate island indicated by the cartographer.
2. Keep killing pirates until one of them drops the thing you were sent to find.
3. Raft back to seaport island.
4. Talk to the Cartographer to receive materials to build your first big ship, the waveskipper.
5. Buy crafting stations for your waveskipper from the cartographer.
6. The cartographer may have another quest for you to find somebody named Ebnor (this starts the main quest line)
7. From your inventory menu click the "tab" for ships and place your waveskipper while facing the ocean.
8. Board your ship from the ladders on either side of the ship and then place your crafting stations on the ship.

With the Waveskipper you never need to use your raft for travel again.


Keyboard usage:
==============
Press "R" to change between the last two items you had in your hand.

Press and hold "R" to put away what is in your hand.

To assign an item to a hot slot, from inventory hover your mouse over an item and press a hotkey from 1 to 8 to assign it. You can unassign an item by hovering over that item in inventory and press the hotkey that it is assigned to.

Press "F" to pull up the 'wheel menu' to select other equipment. From the inventory screen, select the tab on the top of the screen for the wheel menu. To assign an item to the wheel, click on a wheel slot and then from the inventory menu select an item for that slot.
Helpful notes - Contains some Spoilers so Beware
This will be edited as I find more information. If you have missing information let me know in the comments and I will make the proper updates.

Rarity:
White (Common) World Tier 1
Green (Uncommon) World Tier 2
Blue (Rare) World Tier 3
Purple (Epic) World Tier 4
Orange (Legendary) World Tier 5

Coin:
100 copper = 1 silver
100 silver = 1 gold
100 gold = 1 platinum

World Tier:
You can see your world tier by pressing ESC, look at the bottom of the screen where your character experience level is displayed, the world tier is right above that.
It controls the rarity of loot you find, and the rarity of mining ores & wood you are 'more likely' to find. As you get a higher world tier, better equipment starts dropping for you.

Equipment Traits:
Ensure you select 'traits' on your equipment to take advantage of better quality gear. Click on the item on your inventory screen, and it will display a random set of traits you can select from. Each rarity level gives one more trait to select.

Lone Fisherman dock house sometimes has a chest you can use the Sunken Key on. That key can be fished out of the ocean.

Boats/Ships:
From your boat inventory tab, you can place the boat again and it will find a valid piece of water to put itself on. You should then be able to sail away again.
On the ESC menu there is an option to 'return to your ship' no matter where you are on the island.

Placed items on your ship:
You can pick them up again by pressing 'R' when you look at the place-able (tool tip says "toggle"), then press 'F' to pick it up.

Dungeons:
If you get stuck in a dungeon, on the ESC menu there is an option to 'return to cave entrance'.

Island types:
Starting Island: The initial starting point with the start quest.
Natural Island: Green trees and grass. Any ore type, but copper mostly.
Large Natural Island: Four times the size of a Natural island.
Desert Island: Tan sand covers island, lots of rocks. Mining caves can be found here.
Pirate Island: Random pirates and a pirate camp.
Battlemaster Island: Red trees and orange grass with battlemaster fort.
Pirate King Island: Tall stone blocks and a fort.
Marshlands Island: Dead trees, covered in fog.
Merchant Ship: Anchored sailing ship with a merchant below decks.
Redwoods Island: Thick red tree trunks, very tall evergreen trees
Outpost Island: Very small island with tall rocks
Sunken Island: A bit of rock above the waves with a cave system below.
Seaport Island: Flat land containing a merchant village.

Mining ore veins:
Levels Mining. Your mining level determines which ore you can mine. Every 10 levels increases your mining ability by one ore type (tier).

Sandstone: On desert islands you can find sandstone when mined.

Copper: You can mine this from the start of the game. Found everywhere, inside and out. Mostly on natural islands.

Iron: You can mine this once you reach mining level 10. Found everywhere, but mostly desert islands. Can have Aquastone.

Silver: You can mine this once you reach mining level 20. Found uncommon everywhere, mostly battlemaster islands. Can have Aquastone.

Gold: You can mine this once you reach mining level 30. Found uncommon everywhere, mostly battlemaster islands. Can have Cursed Gold & Runestone.

Platinum: You can mine this once you reach mining level 40. Found rarely anywhere, but mostly in mining caves. Can have Aquastone & Runestone.

Ebony: You can mine this once you reach mining level 40. Found rarely anywhere, but mostly in mining caves. Can have Runestone.

Moonrock - Found at night on Marshlands. Contains 1 moonrock.

*Randomly found in ore veins in random quantities: Stone, Sandstone, Flint, Oil

Ingots:
You start knowing how to smelt all ore into ingots. But you need to have the correct blacksmith level in order to smelt the ore into an ingot. So, at blacksmith level 10, you can smelt iron ingots.

When you smelt the ore down into ingots, you need 1 ore of the previous ore tier.
For example, to make an iron ingot, you need 4 iron ore and 1 copper ore.
To make a gold ingot, you would need 4 gold ore and 1 silver ore.
So don't use up all your low tier ore making ingots you don't need, since you will need the 'lower tier ore' to make the higher tier ingots.

Leveling Combat
Slashing, bludgeoning, archery experience gain is dependent on your character level.
Level / Experience
1-10 / 100 XP
10-20 / 500 XP
20-30 / 2,500 XP
30-40 / 12,500 XP
40-50 / 62,500 XP

Leveling Herbalism
Wood log (10xp) (Level 1)
Greenwood (15xp) (Level 2)
Hardwood (20xp) (Level 10)
Aged wood (35xp) (Level 20)
Wyrmwood (50xp)

Yellow Flower (10xp), Also: Plant fibers, Strong Plant fibers

Herb (Orange flower) (10xp) : Plant fibers, Strong Plant fibers, Sage
Hemp (Purple flower) (50xp) : Hemp
White Jute (White flower) (100xp) : White Jute
Nightbloom 90xp (only found at night on marshlands)

Cave Mushroom 5xp
Brown Cap Mushroom 10xp
Whiteball Mushroom 15xp
Toadstool Mushroom 20xp

Clam:
Found along the beach, open for small chance to find:
- Raw Pearl - 5Cp
- Pearl - 50Cp
- White Sand Pearl - 1SP

Forged Keys:
Ancient Key 2 Ancient moss, 2 Ancient stone shard King's Dungeon Key 3 Dungeon key shard (see Quest section below) Lockpick 7 Hardwood, 5 Iron ingot, 4 Strong plant fiber, 4 Flint Rite of Passage Key 3 Rite of Passage Key Shard

Found Keys:
Adventurer's Key - Marshland rare spiders Ancient Key (green) - Forge from 2 ancient moss, 2 ancient stone shard Catacombs Door Key Davy Jones Entrance Key - Mr. Bones quest Door Key - Found at location Dungeon Master Key - Found under Beau's bed at Dungeon Master location Gate Key - Found at location King's Dungeon Key - Forge from 3 dungeon key shard (40 blacksmith) Lockpick - Forge from 7 hardwood, 5 iron ingot, 4 strong plant fiber, 4 flint Loot Cave Key - Looted from pirates Mr. Bones Key - Found on windowsill in his tavern. Pirate Captain's Key - Looted from pirate captains Rite of Passage Key - Forge from 3 rite of passage key shard Shack Door Key (Iron) - King's Island table Shack Door Key (Gold) Sunken Key - Tier 1 fishing item Treasure Room Key - Sea Scholars Guild quest Warlord's Key - Craft in blood bowl in Warlord dungeon from 3 Warlords Tokens.
How to go somewhere - Sextant, compass and map
1. Use the sextant (equip in your hand and press the mouse button). Point at the sun, moon or one of the brighter points of light (a planet) and the sextant reticle will turn green if your location can be determined, then click the mouse button to take a reading. This will put a red circle on your map as your current location.

2. Press 'M' to look at your map. There are icons on the right side, be brave and experiment clicking them to see what they do.

3. If you are on or next to an island, and use your sextant, the map will have a new button you can click on to mark the island on your map.

4. Looking at your map, your mouse cursor when moved over the map shows the coordinates of that square. If you need to go to a certain location, you can figure out which way you need to go from your current location (see step 1 above). If you forget which direction is which on the map, the top left has the compass reading. North you will go up. South you will go down. West you will go left. East you will go right.

5. Use the compass to sail in the direction you need to go.

If you find a map, it will show up in your inventory, click on the 'map' tab to see them. If you want to mark the maps location on your personal map, hover over the map and press and hold 'F' until it is marked. You can then go to your personal map and you will see a red X on it. You should be able to determine which compass heading to go in order to get to it from your current location.
Fishing lists, junk items
Fishing Lures & Bait:
Tier 1-2 -------- Worm Bait 50% 1cp Deer Guts 50% 1cp Fishing Lure 50% 1cp Spinning Lure 30% 3cp Angel Fish Lure 50% 2cp -> Angel Fish Bass Bait 50% 2cp -> Smallmouth Bass Crab Lure 50% -> Red Crab Tier 3 (Green) ------- Barracuda Bait 50% 5cp -> Barracuda Blue Tailed Spinner 50% 5cp -> Spotted Eel Lucky Lure 20% 10cp Ray Spinner 50% 5cp -> Manta Ray Red Tailed Spinner 50% 5cp -> Electric Eel Ribbontail Lure 50% 10cp -> Sawfish Shark Bait 50% 10cp -> Sand Shark Shiney Lure 50% 5cp -> Salmon Yellow Tang Lure 50% -> Yellow Tang Tier 4 (Blue) ------- Deepwater Spinner 50% -> Marlin Snake Spinner 50% 10cp -> Anaconda Topwater Jig 50% 10cp -> Bonefish Treasure Hunter's Hook 50% 5cp -> Floatsom Tier 5 ------ Fisherman's Exquisite Lure 10% 5cp (very low chance)

Fishing catch tiers:
Fish---01-09----60xp----> Cooked recipe-------80xp----Buff--------- Angel Fish 4cp Barricuda 5cp Blue Fish 2cp Blue Grouper 2cp -> Seared Grouper 10cp - Dex +2 Brim 2cp Floatsom 2cp Map in a Bottle 5cp Piranha 3cp Red Crab 5cp -> Spicey Crab Stew 10cp - Agi +2 Rotten wood plank 1cp Salmon 2cp -> Slow Roasted Salmon 5cp - Con & Dex +1 Seaweed 1cp Smallmouth Bass 2cp -> Fried Bass 10cp - Str & Agi +1 Sunken Key 0cp Yellow Grouper 4cp -> Fried Grouper 10cp - Str & Agi +1 Fish---10-19----400xp---> Cooked recipe-------400xp---Buff-------- Blue Bellied Fish 10cp -> Honey Glazed Fish 10cp - Str & Agi +2 Clown Fish 10cp Electric Eel 10cp -> Spicey Sauteed Eel 10cp - Dex +3 Large Mouth Bass 12cp -> Fish and Chips 10cp - Agi +3 Spotted Eel 12cp -> Eel Sushi 10cp - Str & Agi +2 Yellow Tang 12cp Fish---20-29----1200xp--> Cooked recipe-------2000xp---Buff-------- Bonefish 15cp -> Bonefish Filet 20cp - Agi +4 Discus Fish 15cp -> Grilled Fish in Mush - Str & Agi +3 Manta Ray 15cp -> Ray Fin Pasta - Str & Con +3 Sand Shark 17cp Saw Fish 15cp Sharpnose Puffer 15cp -> Roasted Puffer - Str & Dex +3 Spotted Mandarin 17cp -> Honey Glazed Manarin 20cp - Con & Dex +3 Tiger Fish 20cp White Crab 3cp -> Crab Cake 20cp - Dex +4 Fish---30-39--------6800xp--> Cooked recipe-----12500xp---Buff----- Black Sea jellyfish Blue Crab 35cp Bull Shark -> Shark Fin Soup - Dex +5 Cow Fish 40cp Golden Puffer 35cp Hammerhead Shark 40cp -> Seared Hammerhead - Agi +5 Marlin 35cp -> Marlin Soup - Str & Con +4 Mako Shark 30cp -> Seared Mako - Str & Dex +4 Sea Anaconda 30cp Siamese Fighting Fish 35cp Fish---40+------------32000xp--> Cooked recipe----------xp------Buff----- Giant Sturgeon Great White Shark -> Shark Skewer - Str & Con +5 Glowing Jellyfish Blood Belly Jellyshish Viper Fish -> Viper Skewer - Agi +7

*********************************************

JUNK
====
Ancient chalice
Axe head
Broken climbing gear
Broken ancient tablet
Clam
Cracked telescopic lens
Damaged Nomad scroll
Wolf (Dog) collar
Human bone
Loyalist quill
Ruined book
Skull - *Can be placed on Ship
Spider husk
Starfish
Waterlogged book
Web sac
Wooden bowl
Wooden ladle
Enemies and their rarity and common loot
Rarity is the color (not listed for animals) White, Blue, Green, Purple, Orange

Common loot (not listed for animals) is what 'might' be possible to get when the creature is killed.


Deer, Island Doe, Alpha Stag Fox (Battlemaster Islands) Boar, Golden Boar (Desert islands), Gold Fang Brown Bear, Black Bear, Grizzly Bear (Caves) Ghostly Apparition - Listen to his story, then kill for Ectoplasm. Loot the nearby containers. Skeletons: Crystal Miner White coin, bone Crypt Walker White coin, bone Crypt King Blue ancient stone shard, crypt king skull, crypt kings circlet Crystal Miner White bone the Foreman Blue coin, ancient stone shard, bone, recipe, rite of passage key shard, skull, potion Forgotten Miner White rock, gem, potion, coin, bone Old Tree Guardian Purple coin, ancient key, tree cutter blade, potion, old guardians compass, the old tree painting Skeleton Archer White bone Skeleton Fighter White coin, bone, plant fiber, ore Skeleton Guardian Blue coin, ancient moss, bone, potion, recipe, lockpick, cultist seal, rite of passage key shard, ancient stone shard, skull Skeleton Swordsman White coin Skeleton Thrall White coin, bone, potion, ore Skeletal Warlord Purple belum dominus painting, warlords beacon, coin, ancient key, warlords cleaver, potion Undead Excavator Blue coin, ancient moss, cult seal, bone, recipe, rite key shard Undead Pirate White coin, bone, cultist seal the Undead Priest Purple deadlands painting, coin, ancient key, Nebula (weapon), gem Undead Sailor Green coin, potion, map, bone, loot cave key Adept Swordsman White coin, weapon, captains key, fiber, junk Battlemaster Berserker White potion Battlemaster Bowman White arrow, potion Battlemaster Sailor Green coin, recipe, compass Captain (named) Blue coin, 2 potions, cave key, pirate key, pirate seal Elite Fighter White coin, ore, potion, junk Grave Keeper Green Master Archer White coin, food, starfish, arrow Pirate Archer White coin, food, arrow, junk Pirate Battlemaster White Pirate Brigand White pirate seal Pirate Cook Green coin, food, ingredient Pirate Miner Green ore, fish hook, potion, ancient stone shard, pickaxe, jewelry piece, recipe Pirate Navigator Green coin, compass, map, potion Pirate Stalker White coin, banana Pirate Warrior Green potion Prison Guard White banana, potion Smuggler Green coin, ore, loot key, potion, map, weapon the Warden Blue coin, captains key, clothing, 2 potions, pirate seal, recipe Spider White spider junk Mistwalker Green coin, potion, spider junk Queens Emissary Blue coin, potion, spider junk The Spider Queen Purple coin, adventurers key, webslinger bow, potion Trained Wolf White wolf collar King's Servant White ore, fish hook, pirate seal Bounty Hunter Pirate King King's Guard White potion King's Protector Blue Night Watchman White ore Elite Captain Blue coin, clothing, lockpick, recipe, gem Elder King Orange "Kings Sanctuary" Painting, coin, exit key, scepter servitude, potion, loot key Cultist White coin Cultist Defiler White coin, potion, junk Cultist Elder Green coin, ancient stone shard, recipe, bone, rite of passage key shard, skull Guise of Davy Jones Purple Gate Key, Hook of the Deep One, Mr Bones Contract
Official Quest List
WIP 6/16/2025

Game Start Quest
==============
>New Beginnings
--Note from a stranger (read book on table in front of you)
--Find and enter the cave (use compass and head North to cave)
--Loot the supply chest (find it and collect all items)
--Return to camp
--Raft crafted (use cartographers station to build raft)
--Meet the cartographer in his shop (sail on raft to coordinates in quest journal)
--Cartographers stolen compass obtained (sail on raft pirate camp coordinates)
--Return to a cartographer at a seaport

>New Craftsman
--Waveskipper crafted
--Speak to the cartographer
--Buy crafting stations and put on your Waveskipper

>The Journey begins
--Find Ebnor at the Crusty Clam Tavern (3E 7S)
--Speak to Innkeeper at the Crusty Clam (Wheatley)

>A Cure for what ales you
--Mermaids blade obtained (5W 8S)
--Bring the herb to Ebnor at the Crusty Clam Tavern
--Meet Ebnor in the cellar at the Crusty Clam Tavern

> Let there be light
--Lantern of Revealing obtained (Cave ruins 8E 2N or 5W 20N)
--Return to Ebnor at the Crusty Clam Tavern

>The Temple of Light
--Tome of Chaos obtained
--Return to Ebnor at the Crusty Clam Tavern

>The Temple of Trials
--Spear of Eris handle obtained
--Spear of Eris shaft obtained
--Spear of Eris tip obtained
--Return to Ebnor at the Crusty Clam Tavern

>Forging the Spear
--Find the Silvervale Sanctuary using the map Ebnor gave you (4W 29S)
--Talk to Ebnor

>In Search of a Map
--Cultist map obtained
--Return to Ebnor at the Silvervale Sanctuary

>Into Darkness
--Use the lantern of revealing to find the hidden entrance to the Black Forest
--Return to Ebnor at the Silvervale Sanctuary

>Meeting Marcus
--Speak to Marcus at the Silvervale Sanctuary

>Doctors Orders
--Find the Witch Doctor at the Village of the Marsh
--Find out what happened to the Witch Doctors assistant in the marsh village sewers
--Report back to the Witch Doctor with news of his assistant

>Book of Shadows
--Give the Book of Shadows to Markus at the Silvervale Sanctuary
--Speak to Joshua at the Silvervale Sanctuary

>The First Artifact
--Mad Kings Skull obtained (Mad Kings Shipwreck)
--Return to Joshua at the Silvervale Sanctuary

>The Second Artifact
--Holy Tincture obtained
--Return to Joshua at the Silvervale Sanctuary

>The Final Artifact
--Cursed Shroud obtained
--Return to Joshua at the Silvervale Sanctuary

>Pursuit of a Prince
--Summon and defeat the Prince of Power in the Sacramental Chamber
--Return to Markus

>Speak to Ebnor
--Return to Markus

>Blood Brothers
--Speak to Yorick at the Silvervale Sanctuary
--Speak to Markus
--Find the Cathedral of Blood
--Defeat the Blood Brothers and find information on the Necromancer
--Return Cult Writings to Markus at the Silvervale Sanctuary

>Return of a Goddess
--Look for the Strange Door in the guild cellar (door on side of back altar)
--Speak to the glowing light

>Like a Dream
--Speak to Markus about the dreamsnare potion
--Speak to Yorick at the Silvervale Sanctuary
--Witches Amanita obtained (volcanic caves)
--Return to Yorick at the Silvervale Sanctuary

>Prison of the Damned
--Use the dreamsnare potion to enter the Prison of the Damned
(door on side of back alter, activate 4 glowing pyramids again, enter portal, talk to glowing light)

>Peace at Last
--Speak to Markus at the Silvervale Sanctuary
<End of Quest>


Sea Divers Guild Quest
==================
>Start: Talk to a recruiter in a town for a map.
--Talk to Nathaniel at their HQ (2W 10S)

>Rebreather repair
--Broken divers mask obtained
--Bring the mask to Nathaniel at the Sea Divers Guild

>A Mermaids Goblet
--A mermaids goblet obtained (Flooded Shrine 8W 2N)
--Bring the goblet to Nathaniel at the Sea Divers Guild

>The First Map Piece
--Map piece one obtained (Sea Kings Chamber 22E 1N)
--Bring the map piece to Nathaniel at the Sea Divers Guild

>The Second Map Piece
--Map piece 2 obtained (Ancient Ruins chest 5W 4S)
--Bring the map piece to Nathaniel at the Sea Divers Guild

>The Third Map Piece
--Map piece 3 obtained
--Bring the map piece to Nathaniel at the Sea Divers Guild

>Taking the Trident
--Find the Sea Kings Trident at the White Whales Lair (15E 32S)
--Return to Nathaniel at the Sea Divers Guild
<End of Quest>


Trading Company Merchant
======================
>A High Seas Request
--Deliver the ship manifest to a trading company representative at a desert seaport (3E 18N)
--Return to the High Seas Trading Merchant

>Research and Development
--Book supply case obtained
--Deliver the book supplies to Elijah at the Sea Divers Guild
--Return to the High Seas Trading Merchant

>Shipwreck Supplies
--Missing supplies obtained
--Return the supplies to the High Seas Trading Merchant
<End of Quest>
*You can now buy from the High Seas Trading Merchant.


Sea Scholars Guild
================
>Sea Scholar Initiation
--Speak to a recruiter on a desert Island Seaport

>Find Tome
--Aquilla ? tome found
--Bring tome back to the Sea Scholar Recruiter

>Finding the Scholars
--Find Location
--Speak to the guild leader (Mason)

>Missing Member Quest
--Investigate the residence room (Find and read Fredricks Journal
--Return to the guild Leader at the Sea Scholars Guild
--Find Fredrick at a pirate prison
--Return to the guild Leader at the Sea Scholars Guild

>Strange Lockbox
--Skeleton key obtained
--Return the key to to Mason at the Sea Scholars Guild

>Secrets of the Guild
--Speak to Oliver (Shipwreck)
--Confront Guild Leader Mason at the Sea Scholars Guild
--Enter Guild Leaders Chamber
--Investigate the room
--Confront Guild Leader
--Return to Aiden at the Sea Scholars Guild
<End of Quest>


Marauders Guild
==============
>Meet Marauder's scout at seaport
--Kill Battlemaster and get the token
--Return to the Marauder's Scout

>Marauder's Guild Entrance
--Find the Marauder's headquarters using the map
--Speak to the guild leader (Victor)

>Crime and Punishment
--Find Gabriel
--Prison Warden killed
--Speak to Gabriel

>Warlords totem
--Speak to Max
--Warlords totem obtained
--Return to max at the Marauder's guild

>Search for the schematic
--Find Thaddeus
--Pickaxe schematic obtained
WIP
Quests, Guilds, Bosses, and Lone professionals
Marauder's Guild
----------------
1. (?)
2. Goto Warlord Shrine, kill skeleton, get Warlord Totem from chest.
3. Goto Mine, find pickaxe schematic.
4. Find Spirit blade and kill vengeful spirit

Sea Scholars Guild
------------------
1. Rescue member from Pirate Prison.
2. Find skeleton key on high level skeleton.
3. Get book Oliver stole at a shipwreck.
4. Find embalming agent.
5. Kill old guild master.

A. In a spider cave (example: 3W 35S) collect venom extract from a spider and deliver to Dominic
B1. "Legends of Evil" book about cursed dagger, talk to Godfrey
B2. Find cult shrine location and look for notes about dagger location
B3. Search catacomb location for dagger hilt
B4. Search spider cave location for dagger blade
B5. Return to Godfrey to get reforged dagger
B6. Kill 20+ pirates with dagger
B7. Go to a redwood island and find blood cult shrine to get updated dagger

Mr Bones Tavern
----------------
1. To enter, find the vintage spiced rum from a Pirate corpse loot.
2. Find the Seeing Orb from an ancient chest.
3. Find Klaus spirit at a shipwreck and talk to him with the Seeing Orb in your inventory.
4. Drink Poison of the Deep while "swimming" in the ocean.
5. After dying in the water, complete dungeon to find Guise of Davy Jones Boss & loot contract.
6. Return to Mr. Bones with his contract and give it to him.

Kings Island Door
----------------
On every Kings island there is a door at the back of the wood wall.
1. You will need to kill 3 Kings from 3 separate kings islands to get the 3 shards needed to craft the key.
2. You will need blacksmithing skill level 40 to craft the key at the forge. You should get the recipe from defeating a king.
3. You will need to be world tier 5 to open the door.
4. After traversing the long dungeon, you will enter a room with a special purple boss. He drops an orange rarity scepter weapon when defeated.

Merchant Ship - Trading company
------------------------------
1, Deliver case of books to Elijah at Sea Scholar base.

Seadiver's Guild
--------------------
1. Find broken Diver's Mask and return to guild
2. Search for 3 map pieces and return to guild
3. Find Trident and return to guild. You keep Trident.

Red Raider Guild
-------------------
1. Kill a battlemaster and return with their seal.
2. Kill Crypt King and return with its skull.
3. Cayde - Find Rinn in seaport and deliver weapon supply chest.
4. Skimmer - Kill Elite Captain found on Kings Fortress Island and return with intel.
5. Holt - Dig up grave in graveyard and return with heirloom.
6. Booker - Soren is missing, investigate his house.
6a. Cellar key in book.
6b. Report to Booker.
6c. Get seaglass from Crystal Caves and return for key.
6d. Kill Soren in Red Raider Temple.

*********************************************

Lone Blacksmith
- Quest: Foremasters Pick found in mining cave.

Lone Cartographer
- Quest: Golden Sextant

Lone Fisherman
- Quest: Any fish

Lone Hunter
- Quest: Deer Tails
- Quest: Fur Tuffs
- Quest: Deer Iris

Quest Items
===========
Boar tusks - Boar
Deer Iris - Deer
Deer Tails - Deer
Fur Tuffs -
Golden Tusk - Golden boar
Island Doe fur - Island Doe
Island Doe tail - Island Doe
Moon Crest - Ancient chest
Pirate Plans - On named pirate captain
Pirate War Horn -
Shiny Shackles - Pirate prison
Shiny Antlers -
Special Quest Walkthroughs
Trial Entrance Blue - Trial of Force
===========================
Two levers on rocks, two levers on the front wall to drop each box, push both boxes over pressure plates to open gates.

Trial Entrance Green - Trial of Wind
============================
Straight in light the 3 fire sconces to open gate, take key and pull lever.
Open gate with key. Match blocks to the statue behind them and pull lever.
Go to chamber and climb wall, push block out of way, push ball, pull lever, push ball into target.
Pull winch, hurry up fallen pillar and push floating ball onto ledge. Push ball to target.

Trial Entrance Red - Trial of Orbs
==========================
Pull entrance lever. Turn statues to face forward (1-Left 2-Right 3-Left) then pull lever & grab key.
Ball lever & use key open gate, push red ball up slope to red target.
Left side move blue ball up slope to blue target.
Get purple ball to first target. Pull lever to raise target with ball. Climb ladder and push ball to final target. Get treasure.
Recipes to be found for Food and Potions
Food:
======================
Blackened Grizzly Ribeye
Bonefish Filet
Captain's Cookies
Cheese Filled Muffins
Cheeseballs
Cooked Bear
Cooked Boar
Cooked Venison
Crab Cake
Eel Sushi
Fish and Chips
Fish and Potato Soup
Fish Shish Kebab
Fried Bass
Fired Grouper
Gourmet Blackened Venison
Gourmet Truffle Stew
Grilled Fish in Mushroom Sauce
Honey Glazed Eel
Honey Glazed Fish
Honey Glazed Mandarin
Jelly Glazed Crab Cake
Loaded Potato Soup
Marlin Soup
Mushroom Smothered Sturgeon
Mushroom Soup
Pilgrim's Pie
Ray Fin Pasta
Roasted Puffer
Seared Grouper
Seared Hammerhead
Seared Mako
Seared Ribeye with Jellyfish
Seared Venison Filet
Shark Fin Soup
Shark Skewer
Slow Roasted Salmon
Smoked Venison
Soup with Meatballs
Spicy Bear Tenderloin
Spicy Crab Stew
Spicy Jellyfish Soup
Spicy Mushroom Broth
Spicy Sauteed Eel
Spicy Stuffed Venison
Steak with Mushrooms
Stewed Mushrooms
Toadstool Tea
Vegetable Soup
Vegetable Stuffed Puffer
Viper Skewer

Potions:
======================
Cure Poison Potion
Diver's Breath
Draught of Vitality
Health Potion
Infused Elixir
Pirate's Courage
Poison of the Deep
Potion of Agility
Sailor's Potion
Scholar's Drink
Stamina Potion
Strong Health Potion
Thief's Elixir
Warrior's Decoction
Default seed - Locations of places
Locations based off world seed: Default

WIP 6/2025
-------------------------------------------------------------
A Rock and a Hard Place: 18E 1S
Ancient Ruins: 2W 22N, 5W 4S, 8E 2N, 5W 20N, 5W 12N, 14W 18S, 18W 23S, 22W 7S
Astrologer's Cave: 4W 21N, 8W 5S
Blood Shrine (Quest): 18E 1N, 22E 4N

Cargo Cellar ($): 2E 3S, 10W 6N
Catacombs: 5E 5N
Cathedral of Blood (Q): 11W 32S
Cave Ruins: 8E 2N
Crusty Clam: 3E 7S
Cult Shrine: 7W 19N, 11W 16S

Desert Island Seaport: 3E 18N
Desert Cave: 3E 2S, 34W 7S
Dungeon Master: ?? 7E 158S, 850W 10S
Excavation Site: 30W 19S
Flints Hideout (Quest): 11W 10S
Flooded Shrine: 8W 2N
Ghostly Apparition: 7W 10N
Graveyard: 7W 10N, 10W 36S, 4W 0S, 38W 7N
Grim End: 18W 7N
Hawthornes Tomb (Quest): 3W 14N, 8W 46S
Jellyfish Caverns: 7E 18S

Klaus's Shipwreck (Quest): 16W 4N
Lone Blacksmith: 9E 14N
Lone Cartographer (Cartographers Assistant): 8E 10N, 8W 6N
Lone Fisherman: 2W 22N
Loot Cave: 20E 0S, 24W 7S, 39W 42S, 25W 2S, 8W 6N

Mad Kings Shipwreck (Q): 2W 33S
Maurader's Guild: 3W 9S, 6W 4S, 9W 9N
Mining Cave: 2W 20N, 3W 3N, 3E 2S, 30W 31S
Mr Bones Tavern: 3W 14N, 15W 24S
Museum of Piracy: 9E 18N

Pirate Crypt (Quest): 22E 4N
Pirate King Island: 13E 33S, 9W 20N, 5E 25N
Pirate Prison: 2E 3S, 0E 31N, 18W 20S
Pirate Tribunal (Q): 7W 37S
Pool of Life: 18E 1N, 1W 10N

Red Rider Hideout: 18E 1N, 6W 13S
Researcher: 7W 10N
Right of Passage: 5E 3S, 8E 2N, 7W 19N, 18E 1S, 7W 12N

Sea Divers Guild: 2W 10S, 3W 32N, 8W 12S
Sea Fortress: 19W 11S, 30W 22S
Sea Kings Chamber: 22E 1N
Seaport: 7E 7N
Sea Scholars Guild: 4W 21N
Shimmering Shroom: 17E 1N
Silvervale Sanctuary (Quest): 4W 29S

Ship - Gunpowder Gus: 1E 3S
Ship - High Seas Trading Merchant: 9E 39N, 3E 7S, 13W 5N, 4E 28S, 1W 5S
Ship - Potion Seller: 10W 13S, 4W 14S, 3W 3S, 3W 20N, 11W 7N
Ship - Rum Runner Innkeeper: 1W 11S
Ship - Sea Fisherman (Quest): 12W 4N, 24W 6S
Ship - Sailor: 20E 4N, 4E 24S, 4W 13S
Ship - Shady Merchant: 11W 4N, 5W 11S, 24W 27S
Ship - Shipwright: 3E 5S, 1W 21S, 4W 11S, 14W 9N
Ship - Stargazer: 7W 29S, 1W 4S

Shipwreck: 5E 3S, 2W 20N, 11W 16S, 18W 23S
Spider Cave: 3W 14N
Strange Door (Well): 7W 19N

Temple of LIght: 4W 0S
Tree Worshiper (Cave): 10W 6N
Trial Entrance (Blue Trial of Force): 3W 1N, 5E 3S
Trial Entrance (Red Trial of Orbs): 6W 13S
Trial Entrance (Green Trial of Wind): 8W 5S

Underwater Cave: 16W 18S
Vault: 8E 14N, 14W 4N
Village: 9E 14N, 20W 11N, 3E 21S, 24W 21S, 32W 7N
Village of the Marsh: 10E 28S
Volcano Island: 22E 33N, 30W 19S, 4E 35S
Warlords Shrine: 0E 4N, 10E 0S, 10W 6N
White Whales Lair: 15E 32S

Mythic Chest: 1E 20N
Legends of Evil book in cave: 3W 14N
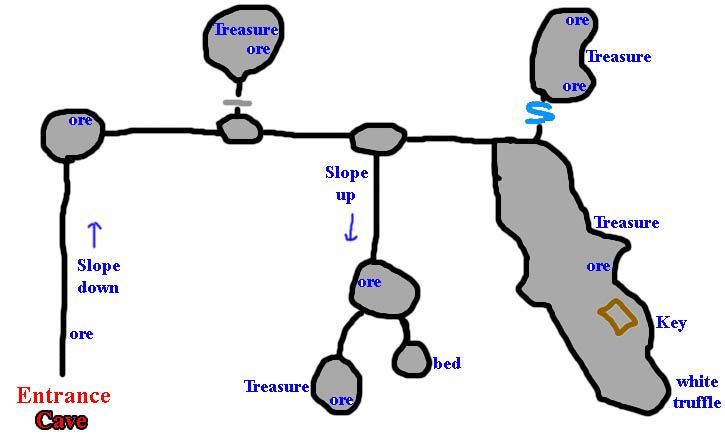
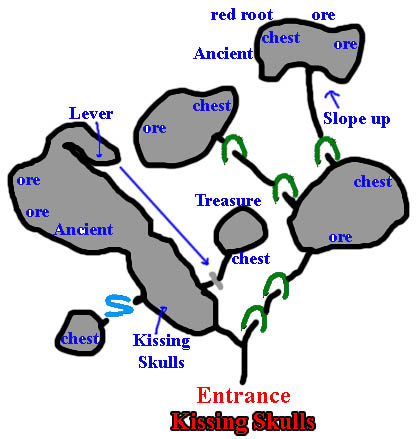
Dungeon Maps - 1
Maps of different "bigger" caves/dungeons.

Spoilers!


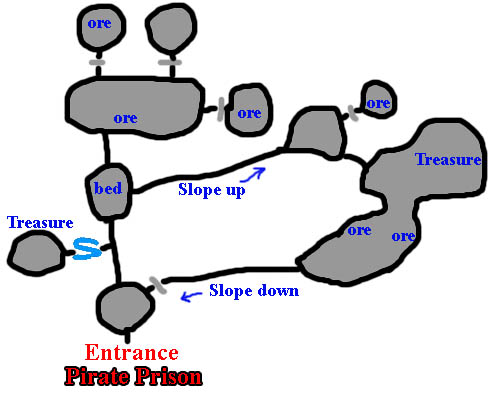
Dungeon Maps - 2
Maps of different "bigger" caves/dungeons.

Spoilers!

Once I figure out why I can only upload 4 map images, I will add more maps.


42 Comments
WillieSea  [author] 25 Jun @ 3:33pm 
Updating guide with information from a new game started in June of 2025.
WillieSea  [author] 13 Dec, 2023 @ 6:20am 
Also, you cannot cook any food without the recipe. I will add a section on recipes.
WillieSea  [author] 13 Dec, 2023 @ 6:19am 
@Baku - I don't think any food spoils anymore, that was removed. The only foods I have listed are foods that can be cooked from fish.
BuKu 13 Dec, 2023 @ 1:51am 
Which food items decay ofer time? Is it about prepared foods and meat, or also about fish, bananas, cheese and potions? List of food would be great :)
WillieSea  [author] 13 Nov, 2023 @ 6:12pm 
I really need to update it with the information I have written down. There is just so much time in a day and priorities get in the way.
milk. sometimes bleach. 13 Nov, 2023 @ 6:10pm 
Wonderful guide! Very informative. I was thinking of also making a guide for Salt 2, but I would want mine to be a spoiler-free guide with some general tips and such to make the Salt 2 experience buttery smooth. WillieSea, if you are interested in possibly collaborating some information on a guide one day, I sent you a friend request so please let me know! Thanks again! :)
Symatrix Hill 14 Jan, 2023 @ 5:56pm 
I just find 1 ancient ruin and 1 catacomb on the same island 8E+4S, take a look if you don`t have that coordinator or if you need it.
WillieSea  [author] 11 Jan, 2023 @ 8:04am 
it is a small list of fish, there is no reason to show them in alphabetical order since rarity is more important.
WillieSea  [author] 11 Jan, 2023 @ 8:02am 
You keep all fish. You can look at recipes from the cooking fire and it will tell you how many of each fish you have. I keep around 4 of each fish on hand, and sell the rest when I get more than 6. Currently rotten status means nothing for turning them in for quests or for cooking.
Symatrix Hill 11 Jan, 2023 @ 5:38am 
Please do that mate because what is really important is which fish we need to save for recipes and which fish we can sell or eat.

Basically i/we like to know which fish is useless for recipes :)

And if you wanna improve your guidance even more then please make a new overview for the to place every fish in alphabetical order and that will even make it more easy to track every single fish species :)