Lords and Villeins

Lords and Villeins

58 ratings
Very Basic Guide for New Lords [WIP] (v1.0 Release)
By Haend
Read this before playing (or restarting) to avoid baldness and broken monitor.
3
2
4
2
   
Award
Favorite
Favorited
Unfavorite
Introduction

If you find this guide helpful, consider donating for my caffeine addiction. Thank you![www.buymeacoffee.com]

This guide is designed and written by a player that only started playing the game when 1.0 comes out. It will help you understand mechanics and minor bugs that you will face and unexplained anywhere. You WILL need to understand all of this to succeed. Most players who have managed to make their settlement prosperous played the heck out of this game and knows about all of this. I know I didn't, and I almost slammed my keyboard trying to understand all of them.

Big thanks to all Lords & Villeins discord members, and especially Nowei for his saint-like patience in testing everything. Half of the things I wrote in this I wouldn't ever figure out without their help. Check Nowei's guides for a more specialized, comprehensive understanding of how everything in the game ticks. In this guide you will find links to the guides that Nowei made. I highly recommend reading them as well to fully comprehend the mechanics beyond the basics.

This guide is still a work in progress and I will frequently update the content. Feel free to tell me if you think I made wrong statements or missing something. I will correct and update accordingly.
I. Tutorial is NOT What You Think It is.


Most people will start the game in tutorial mode. Know that it is a separate game mode and you won't be able to convert it to a standard game and there will be some major differences, like king's tax system not being enabled, etc. There are also a lot of misleading little things that the tutorial does or doesn't tell you.

If you ever wish to complete the tutorial, perhaps for the achievement, just finish the tutorial as quick as humanly possible and stick to the stuffs they tell you to do and nothing more. Understand that as time passes by the tutorial is going to get harder to finish due to dwindling supplies and population thinning out. So please, trust me on this, don't bother doing decorating and making things pretty while doing the tutorial.

The rest of the guide will assume that you have completed the tutorial, and will point out all the wrong conclusions you might came to after finishing it.
II. Understanding Socage, Farm-Fee, and Stewardship Tenure
Before we continue, it is imperative that you understand what the tenure/contracts are and how they work. Letting the tenures stay in default will make you lose the game, guaranteed. So if you really don't have the time or want to read, at least just read this section and try playing the game after.

Socage


Socage tenure is the default contract for all production zones. This tenure basically means that you borrowed the land you own to a family that will give you a defined percentage of any items they produce inside that specified land each season in return. So for example in a 10% socage tenure if you grand a tiny farmland to a farming family and they produce 100 potatoes in one season, they will send you 10 potatoes on tax day.

10% is the default for this contract, and the tutorial never mentioned about increasing or decreasing this. YOU WILL DEFINITELY LOSE IF YOU LET IT STAY ON DEFAULT because you won't be able to pay king's tax, and you probably will die of hunger. If you don't know how much you should tax, go for 25-30% tax on default. For further efficiency, feel free to increase it if you feel like the family are extremely rich, or have way too many products that villagers won't buy. Decrease it if the villagers need more items that the villagers produce.

Fee-Farm


Fee-farm tenure is the default contract for all housing zones. This is basically equivalent to our modern way of rent. You're the landlord and you charge said family specified amount of money to use the land. It's basically the same as Socage, but you tax them money instead of products.

This tenure is honestly best for residential zones only. It's an excellent way to indirectly assist the families. If you notice specific families constantly ran out of money, you can lower their house rent fee. It also can be used the other way, so if you see families that have tons of money, just put higher rent fee for their household.

Stewardry


The tenure that is not on default anywhere, and is probably the easiest to understand and manage. This tenure is basically the way pretty much every other village builder game works. Every single products they produce belong to you and the city, and in turn they will be paid by you instead. You're turning them into your personal worker, and every zone that use this tenure is basically your own personal business.

Of course, you can and most likely will sell said products back to your own villagers to get the money. This is honestly the best tenure, and you will have significantly easier time with fulfilling the king's tax. You also will gain most money from this tenure, since all products are yours you can use them personally, sell them back for villagers need, and then sell the rest to trade caravans. This tenure honestly feels pretty cheaty though, since villagers don't really mind you paying them low salary as long as they have enough to survive.

Frankalmoigne


Frankalmoigne is the default and only tenure you can assign to clergy. This tenure basically means that until you modify the contract further, the specified land is granted entirely for free. This is a great tenure to use for housing for families with stewardry production tenures. With the combinations the villagers will only use the money you paid them to buy items they need like foods and repair kits, and save the rest of the money.

If needed, you can also use this tenure to assist struggling families that seems to always run out of money. Making their housing frankalmoigne can often solve this issue.
III. Food - Ingredients and Cooking
Food is the one thing that most players struggle with, and is the one fail state that most players will get. Either the demesne/ruler family doesn't have any food because of the king's tax, or villagers are dying out due to hunger. This is compounded by the fact that the tutorial ends with you only having a single family of farmer, forager, and fisher each. This section will only explain the basic stuffs. Read this guide if you want a more in-depth explanation and calculation.

https://steamhost.cn/steamcommunity_com/sharedfiles/filedetails/?id=2868780365

Food Production
If you played medieval city building games, I'm sure you already know that winter is always the toughest challenge to food and this is also the case for your villagers in this game. Your farmers will produce nothing during the winter, so you will have to compensate this on the other three seasons. A very dedicated player by the name of Nowei have done a thorough calculation and came to the conclusion that 33% of your population should be farmer.

You probably can survive with less farmers than that depending on situations, but it is the sweet spot that you should strive for. This fact alone is probably why most people fail the game, because this is never mentioned in the game at all, and the tutorial gives you the false impression that a single farmer family can produce enough food for all the families the tutorial grant you.

While there are multiple food producing families, Farmers are without a doubt the king among them all. Hunters will require butchers to further process the animal carcasses, fishermen produce fishes very slowly, and foragers can't reliably produce fruits. Farmers also produce enough food varieties that it can create even Excellent Meal on it's own.

Food Consumption aka Cooking


Your villagers and royal cooks will process the raw ingredients and produce them into "meals". Everyone will try to eat meals, unless there's none and they are in danger of hunger, in which they will just eat the raw food directly. Nobles and the ruling family will want to eat "good meal", which comprises of 3 types of products. Every families and your personal cook will always attempt to have 5 meals stored per person each day. When the number gets low they will cook until they reach that number back.

To cook, a person will need access to well, cooking table, cauldron, firewood, and of course, the ingredients. Try to place these as close as possible because cooking takes way longer than you will expect. Well is usually the one thing that most people will not place down on each household since it takes a lot of stone. Instead you can place it in a public area and they will draw water from there to cook.

Make sure to pay attention to the kind of things you can store on each type of storage. For a typical kitchen you will need a shelf to store the meals, meats, and animal products; A barrel for the rest.

Food Tips
- Do not follow the tutorial and grant families your own meals. Use them as buffer for the demesne and rulers while you focus on building up the villagers zones.

-ACORN IS NOT FOOD. It serves as feed for pigs, and ironically you most likely will have tons of it since your ruler family and demesne will not use it.

- Grain can't be consumed directly as well and is used as feed for the rest of the animals. Miller family can process grain to flour, and finally be sold to baker family to convert into bread. It's a complex process and honestly barely worth it, but I guess it's a nice extra addition of food production chain later on.

- To produce grain, you will need to plant Wheat, Barley, Oat, or Rye, and place down Flailing Spot for the farmers to whack them into grain. You will also gain Hay this way, which you can use for roofing or walls.

- You can build orchards by placing down trees in farming zones. This is a great way to make use of the forest grounds. Note that any type of villagers can and will harvest fruit trees if they own the zone. Because of this you can help struggling families by creating a farming zone, assign it to farmers, tell them to plant down the trees, and then re-grant the land to the struggling families.

- Place the same amount of fishing rod based on the number of fishermen in the family, and plop down large amount of nets. Nets will automatically capture fishes on their own and the fishermen will harvest them for 1 to 5 fishes per net. While fishing rod will get them fish right away whenever they finish a fishing action, they will also only produce a single fish each, which is not viable and usually result in them not producing enough to even buy the things they need.

- You can place down bridges and shape it like piers to add more places for the nets and fishing rods.

- Because of the hard-coded 5 meals per person rule, don't be confused when you see your cooks doing nothing. The moment they achieve the amount of meals they will just go for "wandering around" mode.
IV. Professions, Part 1
Each family has a specific profession in which they can only work at. This includes noble family. Careful selection of families is incredibly important early on. The more product types your villager produce, the tougher it is for you to fulfill his demand.


Peasant Professions

Farmers

Farmers are one of the starter family, and there's a reason for that. They are the single most important family you will have, and you should have way more farmers than the rest of the professions. If you follow Nowei's recommended calculation that means you would want at least 1 farmer family for every 2 other families. They can create orchards to produce fruits, the only one that can produce vegetables and grains category, make hay for construction, make grain for animal feed and for millers, can take care of sheeps for wool (for tailors), cows for milk and butter, and chickens for eggs.

Because of the varieties of their products and the fact that every villagers need those to eat, villagers will always buy things from them, and they themselves barely need to buy anything. All of these makes farmers extremely low maintenance, and you will never ever see them ran out of money.

Tips: For me personally, I prefer to employ at least one farmer family on Stewardry tenure, which produce I use to feed the demesne and ruler family. I find this method excellent to prevent starvation.
Click here for in depth guide.
https://steamhost.cn/steamcommunity_com/sharedfiles/filedetails/?id=2863124285
Foragers

Another starter family, the foragers are your one stop shop for everything related to forestry, and works in Royal Forest zone. They will plant and produce blueberry, chop trees for fruits and wood, and even process them into planks. They can also take care of pigs, which are great source for meat when you later have a butcher family. As you can probably imagine forager is your source of wood and planks, which is the most used building materials early on, and even until late game for the peasants. Planks are also used by the carpenters to make repair kits to fix buildings, so they are an important part of your village. Their usefulness will degrade as your settlement develops and you no longer build new buildings.

Tips: be careful with placing down too many saw horse. Your foragers tend to be overzealous with processing wood into planks, and often resulted in no wood ever sold. I personally only place 1 saw horse per family, or 2 if I really need the planks. Don't hesitate to have 1 stewardry foragers. You will need the wood and planks for both building and king taxes.
Click here for In-depth guide.
https://steamhost.cn/steamcommunity_com/sharedfiles/filedetails/?id=2863768263
Fishers


Fishers are the last family you will start with, and is probably the weakest among the three. They often ran out of money, and will need yarn, which you won't be able to produce early on, making them the only starter family that will have to rely on either caravan or your own personal stock in warehouse. They are a valuable source of meat early on, however.

Tips: As I mentioned before, place down a lot of nets. The net will automatically catch fishes every few hours and the fishermen just need to harvest them. They do need yarn to maintain because they can break, but it's generally better than using fish rods.

Carpenters

Probably the first family that you should request or focus in getting. Carpenters unlock access to "T2" structures and furniture like "Good Wooden" furniture set, and all wood and plank structures. They're also the only ones that can build said buildings and will be paid by others to build.They also process planks into repair kits, which are needed to repair buildings. Without them everything will slowly degrade and reduce beauty in the area, making people mood worse.

Tips: Limit the amount of Builder's Desk based on your need. If you have too much they will overproduce repair kits, which means no one will buy it while they keep buying planks, and goes bankrupt. Note that you also will require a lot of repair kits since you will use your own personal stock to repair the public and domain facilities like cottage, barracks, and public area.

Tailors

This profession is very important yet somehow the tutorial never mentioned this profession. Tailors bought wool the farmer produce (with sheeps) into yarn, which is needed for fishermen. They then further process the yarns into silk that you need for certain furnitures. Finally they use both yarn and silk to craft all kinds of clothes that everyone needs. Technically with tailors and the four professions before this you have achieved full dependency and you will barely need the service of caravans, therefore allowing more money to circulate within the settlement.

Tips: Play around with the priority list. Usually if you don't touch it the tailors will overproduce the yarn to the point of making it entirely unprofitable. A single spinning wheel requires two sheeps to maintain the supply of wool, so consider allowing the farmers to buy more sheeps if necessary.

Hunters

Hunters are meant to kill wild animals, and be killed by them. You probably will stress yourself out seeing the family getting killed by the animals all the time. They will buy bows and crossbows, and they're 100% focused on hunting alone. They DO NOT process the carcass into anything, so be prepared to get a butcher family ASAP once you have hunter family in play.

Tips: Whether they die or live a long life depends entirely on what animals they happen to hunt. If they happen to shoot a wolf or a bear in a pack, you better be prepared to see the death notification. You can never fully prevent this from happening, but you can try to minimize this by fencing in areas, heavily trap the entry ways, and place baits inside the fenced areas. This is just my own personal way to maximize the chance of survival, to a somewhat mixed success.

Butchers

Pretty sure you can already guess what this profession do from the name. They purchase animal carcasses to chop into meat, and further process into sausage. They will also produce hide that tanners need. Without this profession hunter families are entirely useless.

Be careful with butchers. They sometimes purchase farm animals past the number you gave (i.e. you tell farmer family to keep 2 sheeps, the butcher buys and kill all of them). Probably a bug, and hopefully fixed soon. Place down feeders in butchers building as well, because they can actually buy baby animals and feed them until they're ready for the chopping block.

Tanners

One of the professions that I'd call "processors". Buy specific products to process into one single product that can't be used for anything except specific professions. As you can guess tanners process hides into leathers, which is only bought by the leatherworkers to process further.

Leatherworkers

Buys leather from the tanners and other materials to turn into lower tier gears for your soldiers. Notably they hilariously produce the most detailed variations of boots you will ever see in a medieval city builder game. They also produce horse saddle which you will need if the king requested for cavalry soldiers.

Millers

Another processor profession. Processes grain into flour for bakers. Nuff said.

Bakers

Turn flours and all kinds of fruits into bread and pies. They technically are supposed to be your end game producer of food, but the numbers are very off at the moment and are very inefficient. Important to know that baker ovens will require architects to construct.

Read this guide for a more detailed info about baking.
https://steamhost.cn/steamcommunity_com/sharedfiles/filedetails/?id=2869138667
V. Professions, Part 2
Miners

Miners are your first approach into access to "T2" buildings, furniture, and products. They mine out mountains and once mined out, you can plop down mineshafts for them to get the resources underground. All of the items they produce require further processing by other professions, so I recommend saving up your favor points and get all of the professions in quick succession for a complete production chain, as each professions are entirely useless without the complete chain.

Masons

Masons turn raw stone and limestone into blocks and tiles, which are used to create walls and flooring made of said materials. Technically speaking their products aren't too important and only used if you like decorating and use the fancy flooring and walls. Good thing the way they produce things are really simple and don't need any crafting tables, so a tiny masonry building will do.

Smelters

The GOAT, the best, the one and only. This family is the best moneymaker in the game. They are unexpectedly able to dig clay on dig site, and process them on their own into bricks, which caravans buy for high price. A lot of veteran players use stewardry tenure for this family due to how much gold they can produce. They can, as you can expect from their name, buy ores from miners and smelt them into ingots.

Architects

The actual gate to the "T2" building. They quite literally do the same thing as carpenters, just with different materials, which are stones, bricks, and metals. They also process stones into advanced repair kits, which are used to repair buildings made of said materials.

Tips: You can easily look at which buildings requires carpenters or architects by hovering over them in the building menu. It will say "requires carpenter/architect"


Blacksmiths

Very self explanatory. Produces all steel armors and melee weapons you can imagine. Notably they also produce steel rods which are used for some specific decors and hunter's traps.

Brewer

This profession produces beer, and beer alone (the rest of the alcohols are produced by the clergy). They are somewhat self sufficient, requiring only basic materials like planks, grains, and straws. They can grow hops by themselves and produce the highly profitable beer barrel that inns will use. This profession is somewhat optional though, as inns will buy barrels from caravan when brewers are not available.

Glassmakers

Now we're entering esoteric territory. This profession creates glass. A material with ultra specific function which is to build decorative windows. The ability to place down windows, is of course, cool and fancy, but if you're not the type that focuses on making things look good, you can entirely bypass this profession and be entirely fine. At least they are entirely independent and doesn't need to buy any products from any other professions.

Bowmakers

The winner of self explanatory name award, Bowmakers exclusively makes bows and crossbows. These weapons are used by the hunters, but you can also equip your soldiers with them, if you so wish. Aside from that, their products will mostly be bought by the caravans.

Ropemakers

The last peasant profession that is also ultra specific, but somewhat needed. Ropemakers make. wait for it. Ropes. They buy yarns from tailors and process them into ropes, which you use for specific decors. Miners also require ropes to operate their mineshafts, making them the one single buyer of ropes.

Tips: Stewardry for End Products

Consider using Stewardry for professions that produce end products that villagers rarely or never use (bowmakers, glassmakers, etc). Unlike them, you have a lot of money and is more capable in holding the products until caravans buy them off. Set them on stewardry and auto sell the products to caravan when you reach certain amount.
VI. Noble Population and Professions
Nobles are later addition to the game and as such, adds extra flairs but entirely optional. You need them to continue the royal family line (by arranged marriage), and all of their work zones does not produce anything that anyone really needs. Nobles are also the only population that you can appoint to three of the six High Council positions, which are Master of Law, Affairs, and Coin. Since you need Master of Affairs for Town Hall to be operational, without nobles your peasant populations will never marry.

Tavern
To attract noble family you need to have a tavern, which functions exactly the same way as the inn, but exclusively for noble. You might want to make the place a little bit swankier with finer furniture. You don't need to make the place as big as the inn since only nobles and rulers will ever hang out there, so you can build less bedrooms.

Nobility Wealth
Unlike peasants, noble families have wealth. Story wise they have other businesses all over the kingdom, and will generate wealth on their own. That's right, this technically means that nobles will never go broke, simply because they are on cheat mode and produces money out of thin air. This also technically means you will be bringing more money in from outside to circulate within your settlement, creating wealth.

Nobility Needs
Perhaps somewhat surprisingly, noble families actually work and do chores like peasants would. They will build themselves buildings in the zones you assign to them, and will cook for themselves as well. Notably however, noble families want to eat good food and sleep in good beds the same way your ruler does. Because of this, ensure that you have enough food varieties for them to buy. They will also do their sunday service in chapel instead of the peasant's church.

Noble Professions
All professions for nobles are entirely superficial, does not add anything worthwhile to your settlement (except artists). They are the desserts of the dinner: sweet, nice to have, but optional.

Artists
Artist is the single profession that actually contributes something new to your settlement. They create the material products needed to build statues and painting decorations, which are great decor items that actually people will go to avoid "boredom" mood debuff. They need paper stacks to create painting art though, which means you will need to have the clergy's paper maker for them to work. Statue materials are provided by the masons and smelters. Similar to glassmakers, none of the products they make are used by anyone except us players to build the decorations.

Alchemists
Probably one of the most exciting sounding profession out there. Alchemists create all kinds of interesting potions like "stamina potion" and "magic potion" that does.... absolutely nothing. They quite literally are your snake oil salesman, and doesn't produce a single thing that people actually need. Interestingly, however, other nobles will buy them. I guess they need their stamina potion for their tavern crawling session or something.

Jewelers
Self explanatory. Jewelers create jewelries that both peasants and nobles can wear. Entirely optional, and none of them will ever complain for not having jewelries.

Actors
Actors work in theatre buildings and serve as a form of entertainment for the noble families. They do not consume or produce any items in their production zone, but does increase the noble mood.

Coinmakers
Coinmakers quite literally are your money printer, but actually not figuratively. They actually spend more money buying items that they need to produce the coins, so they actually operate at a loss. The only saving grace for them is that like other nobles they produce money out of thin air, so they still won't run out of money even if their business doesn't generate money. Avoid this profession at all cost.
VII. Inns and Taverns
Inns and taverns are two unique zones that can be worked by any peasant professions. If you have completed the tutorial you should be aware that these two buildings are very important for a specific reason: They allow you to get new families, inns for peasants and taverns for nobles. They're an integral part of your settlement, and without it you will only practically able to add one family each year by using favor points, assuming you manage to have enough items to pay the king's tax.

Both inns and taverns practically turn the family assigned into cooks. They will keep cooking until there's enough food on the bar for visitors to purchase. Inns should be prioritized since important necessary products are produced by the peasant families, not the nobles. Caravans will also sleep in inns at night when it's available, which might cause the inns to have enough bed for new visitors. Because of this I highly recommend to build huge inns with tons of beds so you'll get constant offer of peasant families joining.


Families that do not yet have any zones will also sleep in the Inn, which is excellent because that way you can prevent them from dying to hypothermia when they're still in the process of building their homes during winter, for example. Family members that don't have enough beds in their households will also do this.

One thing to be very mindful about is food consumption. Know that since your inn will be cooking food for people that are outside of your settlement, your innkeeper will be consuming SIGNIFICANTLY more food ingredients than a single family would. This can, and often does, cause starvation to your settlement if you're not prepared. It's probably fair to say that a single inn can consume a single family of farmer full production, so please prepare accordingly before operating an inn.

A lot of veteran players start the game by building an inn and assign the starter fishermen as the keeper, which is a good method if you want to expand quickly. Just make sure that you get farmers ASAP if you decide to go this route, because the three starter family will not produce enough food for the king's tax and themselves if you have an operational inn.

Probably somewhat unexpectedly, taverns are actually easier to manage, because the only people that will spend time there are the noble families, including the ruler. Because of this their food consumption is significantly lower, and there will only be a single noble family outside of the domain visiting and renting the beds.
VIII. Clergy
IX. Military and High Court
X. General Tips and Tricks
9 Comments
Levictus 3 Jul, 2024 @ 7:29am 
Good intro, would be cool to see the guide completed.
Panacea 4 Sep, 2023 @ 8:02am 
@Haend I totally get it. I usually can't focus on a game for more than a few weeks. Never long enough to write a guide. It was kind of you to confirm, thank you.
Haend  [author] 4 Sep, 2023 @ 7:20am 
Hey there. Yes it is currently abandoned, because I haven't played the game since then. I do plan to play again someday, and plan to update this again when the time comes.
Panacea 3 Sep, 2023 @ 5:10am 
"This guide is still a work in progress and I will frequently update the content."

Hasn't been updated since '22. Still valuable, but possibly abandoned.
Astigadigs 5 Jul, 2023 @ 5:38pm 
@Haend are you gonna be working on the military and high court side? Once I reach point where the king asks for troops, my economy takes a nosedive since i try to speedrun the creation of a regiment
Ozzimandias 10 Jan, 2023 @ 10:38am 
A little correction there: The Alchemist is one of the most important families in my community. The mass production of philosopher stones keep my royals and my other important town members from aging, so my ruler (who started as adult) already rules for over 10 years and still hasn't reached the "old" age because of a continous supply of philosopher stones.
Boski 13 Dec, 2022 @ 7:56pm 
Thanks for the guide.
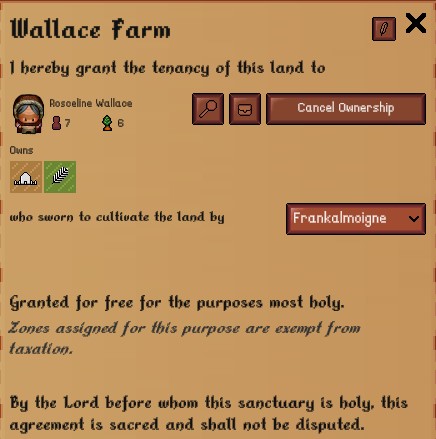
also please make a guide about Town Hall
I build it all it needs, but still, the public hearing didn't happen
Already a appoint my son as Master of Affair.
build all structures ect. still public hearing didn't happen
thanks!
Haend  [author] 4 Dec, 2022 @ 9:21am 
@Grim it's not too important, but the easiest way to solve it is by building a tavern and having tables in your cottage. It will be easier, but it's not entirely foolproof. There will be times when it will still show up. The game doesn't even tell the NPC to fix the problem, they don't want to.

Basically those people don't even want to socialize, so it will be fixed if they randomly happen to be communicating.
Grim 3 Dec, 2022 @ 11:12pm 
I have a question, how change "my member of this domain is bored"