The Dungeon Of Naheulbeuk: The Amulet Of Chaos

The Dungeon Of Naheulbeuk: The Amulet Of Chaos

92 ratings
Walkthrough including Ruins of Limis and Back to the Futon
By TheInternetGuru
This is a step-by-step walkthrough and strategy guide to every phase of the Dungeon of Naheulbeuk and both DLCs. It contains a screenshot of a recommended approach to each battle, along with maps, solutions to all puzzles, critical game tips, and skill recommendations.
8
5
4
11
3
2
2
2
   
Award
Favorite
Favorited
Unfavorite
Introduction
This walkthrough is intended to show you all the fights, in order, and give you a recommended strategy for the ones that are not easy. Each includes a map. I solve every puzzle in the game as part of this walkthrough. I am also providing critical recommendations that will make the game much easier.

When you begin, go into Settings right away and uncheck “Retain the random seed.” This allows you to replay fights and load saved games but get a different result the next time, after you reload. You can use this to work through combat in steps, if you’d like. You can also increase the number of rounds your characters lie unconscious before they die ("K.O.s duration in turns"—increasing this number makes the game easier). Getting through the tougher difficulty settings can be frustrating, otherwise, because RNG is ridiculously unfavorable sometimes.

Most screenshots are from EPIC GEST difficulty; if you choose this mode, fights are straightforward and challenging but a few are rather difficult. Your attacks will miss a lot, early on in the game, but it gets better after a few levels if you follow recommendations in this guide. The TAVERN SONG mode is not very difficult, even in the worst fights, assuming you make good decisions along the way. Play that mode if you're just trying to have fun and don't want to lose fights. The GRIPPING TALE is absurdly easy unless you're not picking the right skills. I'd pass on that if you're using this walkthrough. You might want to avoid GZOR'S NIGHTMARE difficulty unless watching your characters roll critical fails and miss attacks all the time is fun for you. It's not a well-tuned mode of difficulty.

Note that this walkthrough assumes you choose the Priestess as your final party member; you're crazy not to, for reasons mentioned later.
Glossary of Terms
I use a lot of RPG terms and abbreviations. Here is a quick glossary if you're coming to this without a ton of RPG experience.

Mob: An enemy.

Add: A reinforcement enemy who appears later in combat.

Melee: A character or opponent who attacks up close (e.g., with a sword).

Ranged: A character or opponent who attacks from far away (e.g., with a bow or a spell).

Tank: A character whose job is primarily to survive and draw damage away from other less-armored (squishier) characters (like ranged characters). In the Dungeon of Naheulbeuk, the Dwarf is your main tank, and the Ogre is your backup tank.

Buff: A skill which gives enemies or players some kind of passive benefit. Most buffs have a duration and then expire.

Debuff: A skill which gives players or enemies some kind of penalty. Debuffs have a duration, normally, then expire.

RNG: Random number generation. It refers to the luck-factor in the game. RNG plays a big part in this game. A few good/bad rolls can determine a battle (too much, in my opinion, but that’s how the devs designed it). You can choose to mitigate RNG by saving the game, then loading your save and trying again. The game itself offers you the chance to replay a fight if you lose (which is essentially the same idea).

AOE: Area of effect. An attack that damages multiple opponents at once (rather than a single opponent). Some AOE attacks are in a perimeter of a target; others proceed from the one casting it (in a pattern that appears on the floor, sometimes, or in a straight line, which I sometimes refer to as a linear AOE attack).

Crowd-control (CC): These are abilities that stun, knock over, and freeze you or your opponents, leaving them (or you) unable to attack for at least a full round. They are arguably the most important skills for your party. Secondarily, there are abilities that immobilize and scare opponents that have some (lesser) utility for CC.

Re-spec: This means you are resetting a character's attribute points and skills and re-picking them. You can do this by purchasing and using an Elixir Of Oblivion, available from the bartender in the tavern (and certain other vendors). You might need to do this if you make a mistake along the way and choose the wrong skill, or to pick a different approach for the last couple fights (the Losax fight, in particular). It's also helpful in the Limis DLC if you are fighting with the necromancers; the vampires have unusually high protection, and you can re-spec characters to mitigate that.
General Tips
Items
You will be picking up gear throughout the game, either from loot chests or as a drop from combat. Pop open your inventory and equip any upgrades on a regular basis. Gear comes in four levels (grades) in the main game (prior to the Futon DLC) which you can determine based on the background color of the icon. Dark gray is the most common kind of item. Red is better, then light gray, then finally yellow, which is epic. Some items have no stats or function (i.e., junk) and can be sold asap, though three junk items are used to solve riddles in the game and should therefore be retained (a throwing hen, an egg, and a rope, though the puzzle with the rope is part of a useless breadcrumb and can be skipped). You will also want to hold onto three pieces of epic (yellow) junk to bring to the Limis DLC, as pictured below. Don't sell these to a vendor. More on that in the Limis section of this guide. (You only really need two, though, because you will find one immediately prior to reaching the wishing well.)

There are vendors in key locations, noted in the guide, who will sell you item upgrades, and in some cases, epic items. This is the primary purpose for your gold later in the game. The shop (in the basement) offers different item selections in later chapters. In chapter 8, there are epic items for sale.

Each character has five pieces of epic (yellow) gear available in the game for the following slots: head, wrist, chest, feet, and weapon. The Ranger and Dwarf also have epic shields, and there is an epic bow that drops in the Temple for the Ranger. There are no epic items for neck, waist, or finger slots until the DLCs. You will first encounter epic gear from vendors on the Prison level, and you will pick up a ton from chests in Urik's Depths and the Temple. Some will be for sale in the shop during chapter 8, and a few final drops from fights occur in chapters 8 and 9.

When evaluating upgrades, generally speaking, choose a higher-grade item over a lower. For comparable item grades, I recommend choosing offensive stats to defensive for all characters except possibly the Dwarf. Items that confer a bonus to movement are highly preferable (there is at least one case in the game where a common item with a movement bonus—Boots of Strategic Retreat, fight #4—is better than a light gray item without). Items that convey precision are also valuable. Precision means you miss less often. Items that bestow crit are particularly important to the Thief. Crit increases your chances of a critical hit (double damage).

Some of the items you collect are books. Once you have all the volumes of a particular book, you can turn it in at the appropriate bookshelf and receive a bonus to your attributes. I have noted all book locations at the point you encounter them and where to turn them in. (If you can't find a volume, use ctrl-F and search for the title in this guide.) I have also included standalone sections in this guide that specifically identify where books (and bookshelves) are located.

Attribute Points
As you level up, each of your characters will earn attribute points that can be assigned in any way you choose. Choose wisely.

Except for the Priestess, you should assign all initial attribute points to agility in the first few levels, then slowly start to distribute them to a secondary category (continuing to allocate some portion for agility as you level up, until the character’s precision is near or over 100 by level 10). Agility gives you precision as well as defensive stats (like dodge). The mode you're playing in has an impact on how much precision you need; the harder the mode, the more likely you are to miss and therefore the higher your precision should be.

Aside from stacking agility early on for all characters except the Priestess (who gains precision from intelligence—stack that early on, instead, for her), focus on building critical stats for their role. The Dwarf is your main tank; you should make sure he allocates about half of his total points toward constitution. (Later in the game, you can allocate some of his points to strength.) The Barbarian and Ogre are the opposite; allocate primarily to strength, but put a few toward constitution later. The Wizardess needs intellect; the Elf, Ranger, and Thief need strength, and the Priestess needs charisma. If you don't put adequate points into these stats, you won't do much damage.

Randomia Gauge
You have a gauge that fills up incrementally on the lower-left part of the combat screen each time you miss or have a critical fail. It allows you to rescue your group and offset bad RNG. There are other ways to mitigate bad RNG, so you might want to save Randomia for moments of extreme desperation later in the game.
Combat Tips
Use CC to prevent enemies from attacking. Some skills give you the ability to knock down, stun, and freeze enemies. This should be your primary strategy in almost every fight: crowd control. Learn to watch the queue of attacks at the top of your screen during combat, and CC enemies before they have a chance to attack.

Finish enemies off. Use AOE attacks to reduce health pools in a group with the plan to finish them off individually. Single-target and burn down enemies until they are gone, whenever possible. Better to finish an enemy off than wound a new one. Enemies with even a little health can attack and hurt you.

Your enemies have this same strategy—they know which of your characters they are most likely to take out with an attack, and they will make every effort to take out that character. Once one of your characters is wounded, it's a primary target of any mobs that can reach it.

Push enemies back from other characters. The Ogre has an attack (Kadoula Opog) that pushes an opponent away from him; the Wizardess has a similar ability called Namzar’s Slap. The Dwarf eventually gets one called Get Tae F@$. These can all be used to trigger an attack of opportunity. Opponents who exit the three spaces directly in front of one of your characters are subject to an attack of opportunity. This is a free attack that happens out of sequence and doesn’t cost an action point. So if (for example) an enemy is in front of the Ogre and the Ogre pushes it backward, the characters to each side will get a free (standard) opportunity attack, assuming they are facing the mob. This strategy (using the support of other characters who do melee damage when pushing back an opponent) is something you should try to use as much as possible. It's the only way, early in the game, to one-shot melee mobs. (Abilities that scare enemies can similarly be used to trigger an attack of opportunity. A scared mob will run away uncontrollably. Normally, enemies in front of your characters will deliberately not subject themselves to an attack of opportunity unless they have a lot of health.) Other than when you face opponents who use AOE attacks, you want to stay close together to gain the benefits of support, opportunity attacks, and healing.

Face your characters toward mobs (especially in melee range) (leave them facing that way at the end of the turn). You are more likely to dodge or parry an attack if you're facing toward them. If you can sneak behind an opponent to attack without engaging sprint or being subject to an attack of opportunity, try to do so.

Keep ranged characters away from the front lines. If you’re doing it correctly, the Elf, Wizardess, and Priestess should rarely or never take melee damage.

Delaying your turn allows you to put a character at the end of the initiative queue (i.e., to suspend their attack until after your enemies attack). This is something you will use in a majority of the fights, except for the Ranger (who needs to buff the group at the start). Many of your opponents start from a long way off; if you can't reach them, delay your turn and allow them to move closer. Delaying your healers means they can assess damage at the end of the round.

Overwatch is primarily useful when you aren't in range of your opponents but don't want to waste a turn. The same can be said of Defensive Stance, which has very limited value. Overwatch can sometimes turn out to be powerful but shouldn't be used as a primary strategy. Use it if, after delaying your turn, enemies still aren't in reach. Enemies can detect overwatch and will try to avoid coming into range.

Consumables are not very helpful in combat (other than the Thief carrying a bomb), though keeping a health potion on your belt is a smart move. This is because rounds in combat are precious; you will nearly always want to use a round to attack, and most consumables don’t help with that. The devs tried to make consumables more interesting in the Futon DLC, but even then, they're items of last resort, except for healing potions. NOTE TO DEVS: More consumables that don't expend an action point.
Skills: Ranger, Dwarf, Elf
The most important thing you can do to ensure success in the game is allocate skills optimally. Choose active skills that immobilize opponents as a top priority. Ignore active skills that give buffs, and instead choose skills that do damage or heal (the exception to this are a couple of the Ranger’s skills). Choose passive skills that give a constant bonus and that fit the attack style of the character. Ignore passive skills that are a benefit only in rare situations (like where a character is next to another character). Ignore passive skills that give you both a benefit and a handicap.

Here are specific recommendations. (I list the skills in order of priority because the fact that I chose a skill in a character's chart doesn't necessarily imply you should take it when it first becomes available.) When I refer to a skill by level, I mean the numbers on the left side in Roman numerals.

Ranger

Active skills:

Tactic: Defensive Maneuver > Tactic: Protection: This is your opening buff for almost every fight in the game (with the exception of a couple that hinge on increased initial mobility). You’re not going to need or use Tactic: Charge but you can’t re-spec to reclaim that point.

First Aid: Take the level 2 version that cures knocked over and stunned effects.

Shield Bash: Take this all the way down, though bring along Loubet’s Anticipation to level 3 before you choose the level 5 version of this skill. This is an important skill to neutralize melee mobs. Normally you will have the Ranger hanging back but sometimes need him to stun a mob who gets close to your ranged characters.

Loubet’s Anticipation: Take this all the way to level 4. There are numerous fights where the movement and precision buffs are very handy. The Ranger is a utility player who manages to do decent damage later in the game, but early on he’s weak. He’s mostly a ranged class and backup healer, and provides important buffs.

Passive skills of note:

Ranger of Good: This is very useful. The Ranger can do a quick crowd-control at the beginning of a fight. It is affected by resistances.

Archery Training: Despite advice given elsewhere, the Ranger works better when you prioritize him as a ranged player. He will still do decent melee damage later in the game, but earlier on he’s more valuable for his bow. If he dies, his buff will expire, so best to let him hang back.

Dwarf

The Dwarf is your primary tank—i.e., he is great for distracting and absorbing enemy attacks while other characters focus on doing damage. At higher levels, he is very hard for your opponents to kill off.

Active skills:

Yakak Charge: Essential skill. When you get the level 5 version, choose the one that hits more enemies. The one problem the Dwarf has is that he doesn’t do much AOE damage. This alleviates that, later in the game.

Gurdil’s Whirling Wallop: Pick the version at level 2 that has a chance to stun. This skill becomes more useful after the Ogre has the ability to throw the Dwarf into a group of mobs.

Thunderthigh Charge: This has some utility because it’s kind of a mini-ranged attack. You will find chances to back up four spaces and charge opponents once you get used to this skill.

Get Tae F@$: Useful when you have the level 4 version that stuns.

Dwarf Insult: This is a situationally critical skill that I don't normally use until late in the game when I'm facing a boss-type mob. Therefore, don't select this with any priority, but it's very helpful on the Losax and Golbargh fights in particular, though you might also use it when you fight Barney on the prison level. Having a boss chase around the best defended character and ignore the others gives you more time to whittle down the boss's health.

Passive skills of disrepute:

Despite advice given elsewhere, don't put points into the skills that optimize trade. You will have more gold than you need in this game without that.

Elf

Prioritize keeping the Elf out of harm’s way. If she's attacking with her sword, you're doing something wrong. Once her precision is high enough that she's not missing attacks, channel all remaining points to strength.

Active skills:

Elven Ricochet: Choose the version at level 2 that won’t hit allies. (This ability isn’t very useful until you have that.)

Long Shot: Pick the version at level 2 that does more damage. Simply immobilizing opponents isn’t as useful (until, perhaps, the Lorax battle, late in the game).

One Shot, One Kill: Pick the version at level 5 that stuns the opponent.

Cheering Kiss: Great back-up healing ability. Pick through level 3, though don’t prioritize this over skills that do damage.

Stabilization: Choose only at the end of the game when you don’t have other options. Not very useful as it wastes a round when you could be launching an attack.

Passive skills of note:

Swift footed: Do not miss choosing this ability, and I’d choose it early in the game.

Elf Eyes: Choose this as soon as it’s available. Being able to escape melee adds without penalty who manage to force their way next to her is huge.
Skills: Thief, Barbarian, Ogre
Thief
The Thief starts as a weak character, but late in the game is an effective assassin. You will normally be moving him out in stealth mode and attacking a high-health enemy from behind, hoping to generate a critical hit.

Active skills:

Stealth: The Thief is invisible to enemies unless he occupies the three spaces in front of them (typically occurs when he moves in front of a mob or a mob moves next to him, so have him pick safe places to stand while in stealth mode). Cool thing of note is that it allows him to evade overwatch attacks entirely.

Sneaky Strike: Take the version at level 2 that immobilizes an opponent.

Caltrops: Limited usefulness but you have to choose something. Take the version at level 2 that doesn't break stealth.

Moodkeela's Blinding Powder: Kind of like Caltrops. Limited usefulness but you need to take something.

Nervous Burst: The most important skill he has, allowing you to crit and one-shot almost any mob in the game. I pick the version at level 5 that gives four chained attacks.

Crippling Shot: Some limited value. Pick this at the end if you don't have better options.

Passive skills of note:

Take This, Self-Care: Emphasize crit all the way (with skills and gear). Abilities that give him crit when he is at full health mean it's important to avoid all damage at the start of the fight. Later in the game, you will send him out in stealth and use Nervous Burst to one-shot the most worrisome mob you’re facing.

Barbarian
Your primary melee damage dealer. Keep him in range of healers, though; he's a little squishy.

Active skills:

Steel Barrage: I take the version that hits everyone in front of him (for more damage) rather than the one that misses allies. It’s generally not hard to set up this attack to avoid allies, and you need him to do max damage.

Yaaargh: Critical skill for one-shotting (or seriously hurting) mobs.

Rib Crusher: Some utility in this, but if you opt for Brutal Shot instead, you're fine either way.

Ferocious Pounce: An amazing ability, it extends your effective range of movement immensely as well as being a terrific AOE attack. Pick the version at level 5 that gives a chance of stunning.

Crom's Brawn: The version at level 4 has limited value (since mobs will move away before the attack completes, if they can, and they usually can), but picking this allows you to choose the version at level 5 that happens at the beginning of the next round. This becomes an essential tool to one-shot mobs later in the game. Just check the initiative queue to make sure the mob you're targeting won't have a chance to move before the attack goes off.

Passive skills of note:

Sword Training: You will find yourself occasionally using a bow, but not often.

Crom's Strength / Agility: I used to go for the passive stats, but now I pick Take This and gain crit. The chart doesn't reflect this, but the occasional crit is very helpful.

Ogre
Backup tank and strong melee damage dealer.

Active skills:

Kadoula Opag: Take the version at level 2 that knocks over the enemy.

Burps: You only need the level 1 version of this skill.

Gnolo: Pick the version at level 3 that does more damage.

Dwarf Throw: Pick this the earliest it’s offered. Then pick the version at level 4 that does more damage. Tremendous skill that does solid AOE damage and is the key to certain fights where you need the Dwarf at a distance, occupying enemies. Once you get it, you will always line the Dwarf up next to the Ogre (the skill isn’t available on your attack bar, otherwise). Make sure the Ogre always has at least as much courage as the Dwarf, so that he always attacks first.

Savage Tremors: Situationally very useful as a mini-AOE attack. Take the version at level 5 that knocks opponents over. Once you have this, keep an eye out for times when opponents stand in a line. It happens a lot.

Zogla Doulo: Only choose this if and when you need a reason to reach further down the chart. Rarely useful.

Passive skills of note:

Ogre Breach: You need this through level 2; there are many gear upgrades behind doors you must break down. Take this as a priority.

Diet plan: Choose movement as a priority.

Advanced Murderhoboing: Don’t take this until late in the game (when he turns level 8). The Ogre’s fists do more damage than any weapon he finds until you visit Urik's Depths (his epic hammer is in a chest behind the forge). No reason to spend a point on this until then.
Skills: Wizardess, Priestess
Wizardess
Your biggest damage dealer on the whole, once she builds her intelligence stat. Keep her out of range of melee mobs.

Active skills:

Wasaa’s Whirlwind: Solid AOE skill. Take the version at level 2 that stuns.

Namzar’s Slap: It's important to be able to push melee mobs so that your front line can get attacks of opportunity (which is a way to quickly eliminate melee enemies). The version at level 2 that knocks over is useful, but don’t pick it until later in the game when you are forced to make a choice at this level in the chart.

Cure Minor Wounds: Useful healing spell, but you can safely take it only through level 2 and use your points for other things. (If the Wizardess is doing a lot of healing, you’re not using her to full potential.)

Ice Bolt: Absolutely essential skill. It takes an enemy out for two rounds with high dependability (unless they have strong magic resistance). The version at level 4 does impressive damage (pick the version that is single-target). The Fireball does better damage but it’s more important to freeze enemies than simply hurt them; you can’t reliably take them out in one attack round, later in the game. By freezing them, you can eliminate damage to your characters and still get rid of the enemy in due course.

Jaruk’s Death Snake: Great skill; it ignores obstacles in line-of-sight and, when used on a melee mob, causes them to run away (which exposes them to attacks of opportunity). So used correctly, you can eliminate a melee opponent instantly with this ability.

Hectic Hailstorm: Better AOE late in the game than Wassa’s Whirlwind, plus a chance of freezing opponents (which is valuable later in the game when enemies have high health).

Passive skills of note:

Astral Reach: I find more range to be more valuable than more damage; she does a lot of damage as it stands.

Don’t pick any passive skills that give you a benefit and also a penalty.

Priestess
The Priestess is an essential utility character that you need so that the Wizardess and Elf are free to do damage. You won't encounter her until chapter 2. After you get her, use a potion of oblivion (available in the tavern) and lose Youclidh’s Inner Peace. It's a dumb buff. Keep in mind that the Priestess doesn't gain precision from agility, like the other characters; she gains it from intelligence. That means she's horrible at dodging attacks, so keep her the most isolated of all ranged characters. Later in the game she does pretty good damage, and I normally outfit her with the Collar of Martial Ubiquity (you will pick that up in the Limis DLC) which further permits her to do dependable and consistent damage when she's not healing.

Active skills:

Youclidh’s Recovery: Take the version at level 2 that cures crowd-control effects (like knocked over).

Youclidhian Detox Cure: Very useful to address status effects.

Youclidhian Lightning Chain: The version at level 1 is almost useless, but you need to pick it so that you can get the version at level 3 that ignores allies. That is a very useful damage spell on fights when enemies all group up standing next to one another.

Youclidh’s Laying on of Hands: Useful spell for melee heals.

Healing Wave: Essential spell. Take the version at level 5 that heals more but in a smaller area. The downside with the spell is that it will heal enemies as well as allies, but once you’re used to it, you can set up scenarios where your players are grouped and enemies are excluded. It turns out to be easier than you think and is a very valuable skill late in the game.

Youclidh Slap: Decent skill for inflicting damage, especially against mobs with high protection. Probably not worth taking down to level 5.

Passive skills of note:

Hands Off, You Pig: Take this the moment it’s available. Being able to escape melee adds without penalty who manage to push their way next to her is huge.
Chapter 1
The first four fights in the game are part of the in-game tutorial, so I won't bother including them. Let the tutorial guide you if you need help learning how to fight.

Leading up to the fifth fight are two traps. The first is unavoidable, but the Thief can disarm the second. Just select him so that he's leading, then click the wall feature that emits the trap. All traps emerge from this wall feature; it looks like a totem. (The next time you return to this level, the first trap will return and the Thief can disarm it. Once a trap is disarmed, it will never return.) Don't heal after triggering the trap; you will be healed automatically before the next fight.

There are a couple free loot locations accessible before this fight; check the map below, but ignore anything behind an ogre door.

The fifth fight is at the end of chapter 1; if you've enabled the tutorial, the game lets you know you're on your own for this battle (i.e., there is no assistance from the tutorial).

Fight 5

You're in a fight with Splat Jaypack (i.e., game show host Pat Sayjack) as your first “real” battle. Notice simply that you’re putting your “tankiest” characters in front and allowing the others to stand behind or take shelter. Reinforcements come from the left side of the room after a while, so you will want to move the Elf back from that side before they advance. Otherwise, a melee add will enter and rush over to attack her. Note: In some battles, adds appear in a region highlighted on the floor with red lines, sometimes more than once. They stand on the sidelines for one round before they enter and join the battle. Usually (but not always), you can end the fight before they enter by defeating all the mobs currently in the battle. If you do, the red lines will disappear and the fight will end.

Delay turns to let melee mobs reach your characters, then have the Ogre push one back to gain attacks of opportunity. Use the Wizardess to do an AOE attack on the goblins (they will group up on the left side if she delays her turn).

After this fight, you will be able to walk to additional locations on the level that provide free loot. They are marked on the map, though don't waste time on the ones behind ogre doors, yet. There is a loot cache south of this room on the balcony. Head west to the Ritual Room, if you haven't been there already. There is a chest nearby; the switch to lower the cage around it is in the Ritual Room. Also in the Ritual Room (south wall) is a loot location that contains Basic Spells for Basic Wizards 1/4. Now follow the main quest line back toward the stairs. You will find a copy of Secrets of Chicken 1/4 near the Pharmagician, immediately west of the stairs, before you head up.

Remember—when you level up, put all your points toward agility.
Chapter 2
Turn the statue in the hallway south of the dormitory to open the gate to the west.

You can reach quite a bit of free loot before this fight; check locations on the map. In the Training Room is a puzzle to reveal a chest; simply turn the top two statues east and the bottom statue south (i.e., turn each statue toward the dummy positioned near it).
Fight 6
In this battle you’re missing the Dwarf, but you gain the Paladin, who does significant damage and doesn’t miss a lot. Use the Elf and Wizardess to take out the archer hiding behind the top set of crates. The primary strat for this fight is to delay your turn and let your opponents come to you. (Rushing out means you’re separating your characters, which means they can’t support each other in attack, and if you move too far you will lose the chance to get heals.) You can use the Ogre to push a melee opponent and get an attack of opportunity from the other characters in your front line.

After this fight there is more free loot in a room nearby, then you will probably need to visit the bartender in the tavern to rest. Anytime you have multiple injuries as well as loss of health points, it’s usually economical to rest to recover rather than use potions and bandages. Tip: You will have more than enough gold in this game to buy everything you want if you sell back all your unused gear.

After visiting the VIP room, go to the entry to the kitchen and pick up the "Poultry Farming Tournament" quest, if you didn’t get it earlier. The seven blue chickens are all on this level (see map to the right). There is no fighting to complete this quest, and with any luck you should have a couple additional characters level up. If the Ogre is one of them, you can use a skill point for the ability to break down wood doors, then return to the reinforced door on this level and break through it. Wait until you have the Thief to bypass the trap inside or else take the hit to gain access to the chest. In a loot cache inside, you will find The Barbarians 2/3 and should now have all the books in the set The Barbarians, and can turn them in at the bookshelf in the co-op (on this same floor). (The other two volumes, The Barbarians 1/3 and The Barbarians 3/3, are in marked locations for loot on the map on this floor, one in the privy and the other in the dormitory. There is also a copy of Secrets of Chicken 2/4 in a loot location in the co-op.) Note that there is another wooden ogre door on the first floor to the southwest.

You’ll now be led to the basement by the Minstrel. After you sack the Shop, you’ll face another fight, below. (Alternatively, you can turn south when leaving the store and instead bash in the ogre door, which will provide loot for the Barbarian. See the map on the right for location. To solve the puzzle, flip these switches in order: Fox > Rabbit > Wolf > Goat > Boar > Deer > Elk. Ignore the bear, it’s not used in the puzzle.)

Fight 7
Stay away from the crates and straw in front of your group; the enemy will otherwise ignite them to do AOE damage to your group. (This can happen at any point in the fight, so best never to stand in that 3x3 region.) Later on, an enemy might throw a firebomb into the group, so after initial attacks you may wish to pull some of the squishier characters away from the front line and spread out a little (though not moving near the crates). This fight awards The Theory of Traps 3/4 and Okay-ish Daggers of Betrayal, which isn't particularly great but it ignores protection. I recommend holding onto it for the Limis expansion, should you choose to fight the vampires, who have massive protection. (It only assists the Thief when using standard attacks.)

After gaining access to the VIP Room, you will be given the Priestess as a companion and will be sent after the Thief.

Fight 8
The fight vs. the Thief and his cohorts is the first one that is a challenge. I recommend delaying your turn and allowing enemies to move in close. Use your ranged to blow up the spider on the right. Keep your ranged in the back so that an enemy doesn’t try to break through the front line to reach them. Have the Ogre take a step forward, between the crates, so that a mob can't run around him. Note that when the Thief dies, the fight is over, regardless of how many mobs remain.

Generally speaking, the game AI works this way: melee mobs will expose themselves to attacks of opportunity if they have sufficient health to survive and if it allows them to reach and get a hit on a weaker character (especially one they can take out). So you can anticipate your vulnerability to melee mobs going after your ranged, much of the time.

Fight 9
The next fight (which starts immediately after the previous and in the same location) is even harder, especially in Epic Gest or Nightmare mode, where you get a fourth opponent. The enemies have high health and will risk an attack of opportunity to get behind you. Part of the strategy is in noticing the order in which the four opponents attack (clockwise, starting top-left) so that you can get ready for them round-robin. Once you respond to each, you can move characters away to prevent easy access to your ranged. (E.g., the Ogre knocks back the top-right opponent then shifts to intercept the lower-right opponent before he can reach the Elf.) Once one is dead (hopefully the top-right opponent) the ranged can move that way to steer clear of melee attacks.

After this fight, you will be moved automatically to the tavern. If you left anything in the loot bag, you will have to return to this room to retrieve it.
Chapter 3
Pick the Priestess as your new party member and rest at the tavern. The Priestess is your dedicated healer and frees up the Wizardess and Elf to focus on damage. Buy an Elixir of Oblivion at the tavern and use it to reset the Priestess’s abilities. Put her initial points into intelligence (which improves her precision). Going forward, you will put most of the remainder into charisma, though keep some going into intelligence so that she's at about 100 precision by level 10. Pick Lightning Chain and Detox Cure instead of Inner Peace.

At this point you have to decide if you’re going to do Midrantir or Lemunster’s quest first. I picked Midrantir; the Lemunster fight in the kitchen is harder.

Fight 10
My opening move in this fight involves setting things up for a push from the Ogre, a Slap from the Wizardess, and attacks of opportunity from the Ranger and Barbarian to quickly eliminate the melee mobs. (The mobs initially gather in the lower-right corner, next to the Ogre.) Delay the turn for a couple characters to set up that push.

After this fight, you will have access to two switches in this room. One opens the passage to the caves, and the other gives you access to a loot chest in the small room off this one (behind Binsc). It contains A Brief History of Orcish Culture 2/2.

Prior to this fight (or immediately after) you might wish to return to the shop and upgrade some of your gear. You should return to the shop and make smart purchases throughout the game (better items appear in later chapters); there is no reason to horde gold. It exists primarily to allow you to upgrade your gear.

You probably have leveled up the Ogre and picked Ogre Breach II, which means you can return to the first floor and break open the ogre doors. Do it now while the loot is able to help you.

You should have already picked up the side quest for the Bottle of Chateau Les Louzeres in the tavern; this is also completed in the basement. You can get the Binsc and Moo quest out of the way now (or after the rats, if you prefer). You pick it up right around where you finish the previous fight (Binsc is standing near the privy).

Fight 11 - Binsc and Moo
The fight in the Binsc and Moo quest is unique in that it only involves the Elf and Dwarf. Just be sure to keep the Elf at maximum range to dissuade the rats from running to her. (If she stays at the limit of her range, they won't.)

There is a switch to the south of this room that will permit you to access the loot chest. It contains a copy of On Adventure 1/3.

Rest at the tavern, if you need to, then return to the basement to complete the wine quest.

Fight 12 - Bottle of Chateau Les Louzeres
In close-quarter fights like this one, it’s important to try and isolate the ranged characters. By placing a ranged behind a melee, you make it harder for a mob to slip past you (or else the mob is exposed to an attack of opportunity). The rats have the ability to run a long way and still attack. I placed the Ogre and Dwarf in the corners (rats will swarm to these points). The Thief will catch the rats coming from the top (he’s likely going to die, but the Barbarian can move to assist). Use your AOE and push attacks once the rats have come into melee range. This fight awards Demonology: Tuff'luk God of Fail 2/4.

Fight 13
The Lemunster (kitchen fight) is next; it can be hard on tougher modes because the big mobs have physical resistance to pushes and a lot of health. Focus them down one at a time and try for stuns. Don’t move your characters out, except maybe the Dwarf on the top/left side. Let them stay put and hope for an attack of opportunity. The chef throws an AOE attack, so it can be useful to keep the ranged far back from your melee (farther even than in my starting layout).

Before you move on to the fourth floor for the main quest line, there are some side quests you can complete. On the main floor, there is a room south of the gardens with an interior door; if you tried this fight earlier it was probably difficult, but now shouldn’t be. Note that it won't be available if you already looted the cache in the east wall.

Fight 14
Delay your turn so that the mobs come to you. If you use the configuration pictured, mobs shouldn’t run around your melee to reach your ranged, initially (but they will later, so move ranged back after the first round of attacks). Unless you happened to visit this room earlier, you will have access to some free loot on the east wall, including A Brief History of Orcish Culture 1/2.

You should now have all the books in A Brief History of Orcish Culture; these are turned in down in the basement (grants +1 impact to the party).

Now pick up the quest in the dormitory (floor 2), "The Cultists of Dlul," which sends you up against (you guessed it) the Dlul cultists.

Fight 15
The cultists group up, making it convenient to use AOE attacks against them. Don't forget to check the loot location in this room. It holds Basic Spells for Basic Wizards 2/4.

You will receive a key to open the door to the north. Outside and to the left is a lever that gives access to a chest (which is outside to the right). It contains History of Elves in Fangh 1/3. You will see a statue out here; this is one of the keys to unlocking the hidden boss fight at the end of the game. Turn the statue so that it faces west.

Chapter 3 - Goblin Workshops
Follow the main quest line up the stairs (by the VIP room) to the fourth floor. (On your way, near the stairs, is a loot location that contains Anthropological Function of the Goblin 1/3.) You will emerge at an ice rink. Try the door to the east to start the fight.

Fight 16
Don’t go on the ice; let the goblins (try to) come to you. The frozen goblins will eventually come to life, so kill them off when it’s convenient. Keep the ranged back; some of the goblins throw bombs that do AOE damage.

After this fight, make your way to the lift (disarming the trap along the way) so that you can use it to travel between the tavern and this floor. Next to the lift is a loot location that contains Anthropological Function of the Goblin 3/3.

Fight 17
I spun the camera before taking this screenshot to give you a better angle. In this fight, it’s important to keep your ranged back (move them even farther back after the first round of attack) and keep the Barbarian behind cover. Have melee delay turns until the goblins are standing in front of them. After this, push back and deal with any incursions behind the melee, and use crowd control when possible.

After this fight you should have access to two rooms to the east. One contains Ogrish Cuisine 3/3 and the other Anthropological Function of the Goblin 2/3.

There are two traps coming up as you head west, on the way to the final fight. Let the Thief lead and disarm them. Just past them, you will pass a loot cache in the Workshops room that holds Secrets of Chicken 4/4.

Fight 18
I spun the camera before taking this screenshot to give you a better angle. This fight is more difficult than the previous ones because of the big mobs. This configuration should allow you to escape the area attack they throw. Again, this is a fight where it’s not necessary to venture out into the room until near the end. Delay your turn and wait for the mobs to come close, then be prepared to heal (a lot).

After this fight, pick up the loot in this room (including a copy of Demonology: Tuff'luk God of Fail 1/4), and accost Reivax on the balcony (don't miss the chest south of him; it contains Demonology: Randomia 1/4). Next, head down to the southeast room on this floor and pick up the last volume of Anthropological Function of the Goblin 2/3 (if you didn't grab it already), then turn in the books in Reivax’s room before leaving this floor (+2 dodge for the party).

To the east (on your way out) is a puzzle involving switches; the solution is green, blue, yellow, red, green. There is an ogre door here that provides access to a room with a statue. This is one of the keys to unlocking the hidden boss fight at the end of the game. Turn the statue to face east.
Chapter 4
After the last fight mentioned, you can open the stairway from the ice rink to the fifth floor, as part of the "Demon of the Fifth Floor" quest line, but don't immediately proceed to the next step in the quest line "Put an End to Tuffluk Rituals." (Do open the chest in the room with the demon, however; it contains What of Golbarghs 1/2). Instead, head south and activate the lift to return to the tavern. Pick up the side quest "Bear & Ale Stew Recipe" from the cook in the tavern and finish it (the recipe is in the privy to the northeast). Pick up "Absolute Expertise" in the VIP Room from the vendor and "The Magic Faucet" from another guy there (named Hippolyte). You complete the "Absolute Expertise" quest in the basement, in the Gambling Den. Talk to the vendor, Gilbert Falgood, and he'll give you the antidote. (If you don’t drink the antidote, the Ranger bears a -4 charisma penalty but you can get an achievement by carrying the penalty to the end of the game.)

"The Magic Faucet" quest directs you to a fight in the southeast room on the fourth floor (where you picked up the last volume of Anthropological Function of the Goblin):

Fight 19
The fight is fairly easy; stay grouped until you have the melee mobs down, then move out to get the ranged mobs.

Head back to the fifth floor and resume the main quest line ("Demon of the Fifth Floor, Put an End to Tuffluk Rituals"). You will encounter a fight that splits your group:

Fight 20
This fight is pretty simple; let the mobs in the top section come to the Barbarian. Once the front two mobs are gone, the Barbarian can handle the top section by himself (the other characters can move to the lower side). In the lower section, quickly kill the mob that is stunned, then advance to create space between the other mob (who has a lot of health) and your group to give your ranged room to stand farther away.

Following the quest line, you’ll be overwhelmed in the next room and wake up on the first floor. The Pharmagician will give you the quest "A Magical Assistance" that will lead you into the garden and graveyard. (Ignore the option to locate the Umbrella of Resistance—that's a red herring.) Pick up the "Organic Gardening" (spider egg) quest from the gardener. The first item (magical butterfly wings) is in the northeast quadrant of the graveyard. The stagnant water is at the southwest part of the graveyard.

You will be able to flip a switch on your way back that provides access to the crypt. Don't miss the ogre door and loot chest in the back of the graveyard.

As you find your way back from the graveyard, the next fight will have you surrounded by rats.

Fight 21
This fight is tricky because it’s hard to keep your ranged safe. The configuration shown was my best effort. The rats were drawn to the Ogre and the Dwarf, initially. Delay turns until the rats are on you. I then had the Wizardess nuke the group around the Ogre and move a little toward the lower-right (to avoid getting snuck up from behind). Hiding behind the tombstones at the top-left isn't viable; the rats will sneak behind you.

Fight 22
The fight in the crypt can be difficult because the mobs often will use freezing arrows; you can bring a Local Warming Potion or two if you’re struggling with the fight. Explosive bombs are another (painful) way to thaw characters (and mobs). If they get lucky and freeze several of your characters, things can go downhill quickly.

Before you leave the crypt, go south and turn the statue to face south. This is one of the statues that unlocks the hidden boss fight.

Don’t heal after this fight; the Pharmagician will heal you when you complete the quest. As you leave, you will receive "The Priestess' Quest: Find the Hysterical Preacher." Head back to the crypt and go downstairs to find him. He’ll give you the next part of this quest. Beyond him is a puzzle:
You must turn the statues until they all face away from the wall. The solution is to turn them in this order: 1-1-2-3-4. (The switch will reset them.)

At this point, both the Priestess quest and the "Brave the Orktobearfest" quests are both pretty difficult, so I recommend going to the basement, taking the stairs down to the cave, and doing the "Organic Gardening" quest (as well as other side quests in the caves).

Head down to the caves using the stairway to the south (if the gate isn’t open, you need to throw the switch near Binsc and Moo). Head northeast from there. (You must bash in an ogre door to gain access.)

Fight 23
You should have no difficulty keeping your ranged safe, as long as you move them farther from the spiders after they attack. This is a safe fight to test out some of the new skills you’ve recently acquired. The Ogre should hopefully have his Dwarf Throw skill, which can be used to attack the two spiders at the top-right, while he personally confronts the spider directly above him. Use the Wizardess’s Ice Bolt to freeze a spider that runs next to her. Have the Priestess use her Lightning Chain (which should now be limited to damaging enemies) on the spiders to the left.

The second spider fight (to the north) is harder due to the number of mobs.

Fight 24
This is a great one for Dwarf Throw—he can hit at least three spiders and tie them up, away from the group. Then use Gurdil’s Whirling Wallop when he's surrounded.

Once you turn in the quest, head back to the caves. There’s a fight involving some rats to the west; you may as well fight them now.

Fight 25
Delay your turns (all except the Ranger) to let the rats move in, then use AOE attacks to bring them down. The lineup hopefully allows every character (except the Ranger) to delay their turn without the rats reaching the ranged.

Head southeast and pick up the "Matrimonial Marauding" quest (from the lady standing near the door). The corpse near the ogre door (that you passed on the way to the spiders) has the key to the door.

Fight 26
There are two fights in this area. The first has some enemies barricaded, and they use stealth. Throw the Dwarf toward the mobs to the upper left (try to hit three), then move the Ogre north behind the edge of the pile of crates.
Chapter 4 - Part 2
Before you reach the next fight, you will pass by a room to the north with a switch that unlocks a chest in a room to the southeast. There is also a statue in this room: turn it to face the east. This is one of the keys to unlocking the hidden boss fight at the end of the game. (Note that the loot location in the northeast part of the room can't be reached from here; you need to access it from the door, after the next fight.)

Fight 27
In this second fight, expect some mobs to appear in stealth from the left side and the center. This is one of the more difficult fights to this point. The best move is to stay grouped by the starting area so that you can support each other and trigger push-back attacks. (This will invite repeated AOE attacks by Tony Alto, but use CC methods to keep him knocked down, stunned, or frozen.) Let several of them come to you, then in the next round, close and attack. Don't spread your forces out too much; that's the biggest mistake you can make here. Use bombs and the Priestess's chain lightning to smoke out stealthy mobs before they can hit you from behind. (The ice bombs you pick up in the chest before this room can be very helpful in locking down two stealth mobs on the left side.)

There is a chest behind a trap if you follow the path west after leaving this room. It contains The Theory of Traps 2/4.

After this, it's time to return to the main quest line and brave the Orktobearfest.

Fight 28
The primary twist to this fight is that you need to blow up three crates positioned around the perimeter of the room: one to the lower left, one to the lower right, and one near the top of the screen. It is imperative you get to the crates as quickly as possible; adds will join the fight in waves until the crate corresponding to each entry point is destroyed. The first crate to bring new adds is to the lower-left, then they proceed counter-clockwise. You can’t prevent the first set of adds in time, but you can stop the others. Make sure you give the Thief, Ranger, and Dwarf explosive bombs—that’s the quickest method to destroy a crate at range while leaving maximal firepower to deal with mobs. One bomb thrown at each crate completely destroys it.

I send the Thief to the top crate, the Ranger to the bottom-left, and the Dwarf to the lower-right. (I have the Ogre throw him over the barricade and next to the crate. This requires that the Dwarf move first and draw closer to the crates so that the Ogre can come up from behind and chuck him over.) The reason I pick the Ranger to head toward the bottom-left crate is that he gets the first move and can get halfway there, even after Tactic: Protection. (You need the physical resistance from it to lower the chance of the Barbarian being knocked down by the big mob; you shouldn’t try to use Loubet’s Anticipation. It's not really necessary.) The big mob won’t bother the Ranger if he stays to the left. The Thief can move and blow his crate in the first round; keep him to the left of the barrels. (If he gets targeted with a crippling shot before he starts, the Priestess must heal him with Detox so he's not delayed.) The Dwarf and Ranger will blow their crates in round 2. You will only get 2 adds this way (lower-left). As long as you follow this strat, it’s a pretty manageable fight (easier than the Priestess’s quest, described elsewhere in this guide).

To heal after this fight, continue south but move carefully; there is a bartender who offers rest. Once you move a little bit past the bartender, the next fight is triggered. (There are books you need along the way, one in the privy—Basic Spells for Basic Wizards 3/4—and one in a shelf on the wall—Ogrish Cuisine 1/3.)

Fight 29
This fight is also straightforward if you delay your turn and let the mobs come toward you (and if you have some good RNG on magical resistance, since they try to freeze you). Use methods to push, stun, and freeze when possible.

The riddle for the door in the back is "a well." Inside is some loot, a bookcase, and a statue. Turn the statue to face south. This is one of the keys to unlocking the hidden boss fight at the end of the game.

Having picked up the last volume of Ogrish Cuisine, you can drop it off in the kitchen (next to the tavern; the Ogre gains +2 constitution). Note: If you're missing Ogrish Cuisine 2/3, it's in the kitchen in the marked loot location, not far from the bookshelf.

Careful on the way to the next (the third and last Orktobearfest) fight—you have to pass by three traps. (You can beat RNG by saving the game before you attempt to disarm each trap.)

Fight 30
On Epic Gest mode, this fight is more difficult than the Princess' Quest, so you may want to do that first. The mobs have very high health and Splat constantly wears down your characters. Vanna is the most irritating part—she charms one of your characters, who in turn attacks one of your other characters. It will likely be the Barbarian, who in turn will probably go after the Elf. Cross your fingers he doesn't kill her. Try to keep Vanna frozen/stunned/knocked out and focus on her until she’s dead. Then burn down the one big mob. Leave Splat Jaypack for last; he’s too hard to pin down earlier in the fight. In higher difficulty modes, he can dodge almost everything, and he's immune to stun. Three adds will appear on round 5. When you have mobs with very high health, it's always more critical to single-target and eliminate them, one after another, rather than doing AOE damage.

Splat throws long-range AOE attacks throughout the fight, so if you group your characters, he will continue to do damage to multiple targets. Try to keep characters spread out by at least 2 to 3 squares the entire fight.

After the fight, be sure to hit the ogre door to the north.

In the tavern, before proceeding with the main quest line, you can pick up the side quest "Co-Op Heist." It happens in a familiar location:

Fight 31
The fight is pretty simple; keep an eye out for a stealthy mob on the left side. This fight awards The Theory of Traps 1/4.
Chapter 4 - The Priestess' Quest
Follow the quest "Talk to the VIP Room Nobility" and go to the VIP room, next to the tavern. After you talk to the nobleman, head down to the basement. When you approach the shop, you will automatically trigger a fight:

Fight 32
Stay spread out initially, they throw bombs. This is a great one for Dwarf Throw in round 1 (aim for the group directly in front and to the left). You will have several mobs that are in stealth, so get prepared to bump into them as you advance. (When mobs are in stealth, they will try to avoid detection and get behind the closest character. Standing in formation with few gaps prevents that.)

Enter the shop and chat with the vendor; she will give you masks.


Go to the room in the basement with the floor hatch (pictured left—you need an egg to pass the riddle). Before you descend, turn the statue in the corner to face east. This is one of the keys to unlocking the hidden boss fight at the end of the game. Now go down through the hatch in the floor.


Fight 33
Before you start combat, open your inventory and replace the masks with your characters' proper headgear.

Have the Ogre push the first melee opponent back or (if you can act before the mob closes with you) use Dwarf Throw; try to maintain space between melee and ranged (fight the melee toward the bottom of the room). The Barbarian can close and hack up his opponent, then deal with the caster hiding by the table. At the top, the Ranger can close with the casters to draw their attention while your ranged hits them with AOE attacks. Moving in aggressively toward the ranged mobs at the top is critical. The most troublesome mob here is the Chosen Priestess because she will heal everyone; the best approach is to focus and kill other ranged mobs one by one (since she stays out of range and is therefore hard to pin down). This fight is difficult on harder modes because there are so many mobs active; you need to CC them and pick them off while healing your party from incoming damage. Like many fights in Naheulbeuk, the early phases are critical. Once you outnumber your opponents, the fight gets easier.

The Wizardess’s Whirlwind and Ice Bolt, the Dwarf’s Whirling Wallop and Yakak Charge, the Ogre’s Burps, the Thief’s Ice Bombs, and the Ranger’s Shield Bash are very useful tools to shut down mobs until you can kill them off. (The Thief’s Ice Bombs are useful throughout the game, while the other bombs become less useful due to weak damage.) This fight requires a little luck for an efficient outcome on harder modes; the mobs can easily get on a roll if you miss some immobilizing attacks.

Now you're back to the main quest line. Head back to the Abandoned Floor. Before you enter the portal in the demon’s room, make sure you’ve opened the chest that’s behind the pillar, behind him.
Chapter 5 - Library
Most of your characters will hit level six shortly after reaching the library. Visit the cursed barman to the northwest to purchase some gear upgrades. (Note that the first fight drops a nice staff for the Priestess, so you don't need to buy her one. The only exceptional upgrade worth your money is the Staff of Asymmetrical Arcanes for the Wizardess. She won't find anything comparable until fight #42, and the actual staff doesn't drop until fight #48.) At this point, quality upgrades have a light gray color. Pick up the quest line and head east.

Fight 34
The fight against these mobs is fairly easy. Delay turns so that the melee come to you. Use AOE, then move up to the next series of crates to deal with the casters. This fight awards Demonology: Randomia 2/4.

In the next room, you will find Cursed Knights for Dummies 2/3 in a loot cache. The next fight is to the west.

Fight 35
This fight uses fixed locations for your characters, which means you won’t be able to choose an optimum starting lineup. The primary challenge is keeping the melee mobs under control; stunning, knocking down, and freezing are critical because they have too much health to quickly eliminate them. Pull your ranged to the back after the initial round of attacks. Eventually, you will need to head to the bottom of the room and take out the skeleton archers. This fight drops a nice axe for the Dwarf.

Note about the library:

The fights on this floor are badly tuned; it’s extremely easy to miss attacks if you’re playing Epic Gest or Gzor's Nightmare modes, and the mobs have significant resistances that nullify many of your abilities. A lot of luck is involved. If you're frustrated, you might wish to configure this to an easier mode through the remainder of the floor. Notwithstanding, the Library is one of the coolest and most creative parts of the original game.

After these fights, you will have access to the library proper. There are two follow-along puzzles. One is a teleporting switch that starts to the west and ends up in the lich's office you had the first fight in. Every time you flip the switch, it moves to the next location. The numbers are noted on the map. At the end, you will flip the final switch three times and gain access to a chest on the table nearby that contains the book Secrets of Chicken 3/4.

The second puzzle is a strangely attractive wizardess. Each time you click her, she vanishes. Similar to the switches, click her three times and she'll provide you a magical amulet before departing permanently. Note that Cursed Knights for Dummies 1/3 is in a loot cache right near her starting point. I usually get both puzzles out of the way and locate all three volumes of Cursed Knights and turn them in before moving on.

The next most likely fight you’ll tackle is the "Book Worm" side quest (northeastern part of the library). Pick it up from the NPC standing outside the room.

Fight 36
This fight is no cakewalk. In this quest, the Thief initially walks through the stacks in kind of a reverse-S formation, starting left, turning right, then heading along the right side behind the top-right bookcase (see screenshot of the map, below). When he gets to the far back, combat starts, and the Thief is by himself at the opposite end of the room. You should run him all the way back down to the group, along the right side, at the expense of an attack of opportunity. There is no benefit in having him die by himself at the far end of the room.

The challenge in this fight is keeping the melee mobs away from your ranged, but with some ability to freeze and stun mobs, it’s possible. They will try to run around and can survive attacks of opportunity due to high health to get at your ranged. The layout I use is somewhat effective at minimizing this. The Elf can easily escape an attack of opportunity, at this point. Have the Dwarf use his Insult skill to distract any mobs next to your other ranged.

This fight awards The Theory of Traps 4/4.

Note that Cursed Knights for Dummies 3/3 is in a loot cache near the entrance to this room. You should theoretically have the collection and can turn it in at the bookshelf on this floor (it awards +2 physical resistance).

Fight 37
Back to the main quest line, you will head north and encounter some magical books. The books do a chained lightning spell (among other things), so make sure your characters are spread out (not standing adjacent to one another, horizontal/vertical/diagonal) throughout the fight. Books are immune to being knocked over or immobilized.

Fight 38
The fight in the Borrowed Book Room is frustrating because your opponents cast spells that raise your chance of a critical failure (not sure why the devs think this is a fun dynamic). Iznax is someone you will bump into in future fights as well; CC and kill him asap. He does heavy AOE damage. Besides this, just move your melee next to the casters and other ranged, and it will prevent them from casting spells. This fight awards Demonology: Tuff'luk God of Fail 3/4.

Fight 39
The fight in the Cursed Books Room is the last fight on the main quest line. It requires that you not stand characters next to one another. The books do a chained AOE spell that will jump from character to character. (The books do other AOE attacks that cannot be as easily avoided, however.) The Archlich does a very painful AOE attack; try to freeze/stun and burn her down asap. Alternatively, have a melee stand next to her to prevent her from casting. This fight rewards you with Basic Spells for Basic Wizards 4/4.

Fight 40
The last fight in the library is an optional quest, “Star Crossed Lovers,” available in the north-west part of the library. This is the hardest fight on the floor; if you save it until last, you will likely be level 7 and have additional attack capability. Like the previous fight, you want to target, freeze, and bring down the Archlich as soon as possible. Alternatively, have a melee stand next to her to prevent her from casting. I usually try to have the Wizardess chase her down and freeze her, then have her and the Elf burn her down as quickly as possible. I send the Thief out to assassinate one of the summoners, then have the Ranger stun and deal with the other. Once you finish the fight you need to find the shady witch, who is standing near the same location the strangely attractive wizardess began (marked "1" on the map). She will provide a nice amulet for the wizardess.

Before you leave the library, be sure to turn in the books Cursed Knights for Dummies (southwest room – gives +2 physical resistance). You can’t return to the library after you depart.
Chapter 6 - Prison
Returning from the library, you should now have all the books for the set Basic Spells for Basic Wizards, which you turn in a room near the tavern (awards the Wizardess +2 intelligence), as well as The Theory of Traps, which you turn in down in the caves (awards the Thief +2 courage—don't ask me why they did that).

Go back to the room of the first Orktobearfest battle (the one with the crates) and open the newly accessible door to the west (you need to offer a Throwing Hen to pass the riddle). The puzzle for the braziers is to click the statues in this sequence: left, left; then: left, right, right, left; then finally: right, left, right, right, left, right. This will initiate the next fight.

Fight 41
This fight turns on targeting/controlling/killing the Dungeon Lich. The other mobs are not really a problem.

There is a chest protected by a trap in the next room. It contains the book What of Golbarghs 2/2. You can now turn these books in the bookshelf on this floor. It awards the party +2 Magic Resistance.

Fight 42
The main quest line "The Dungeon Forge" leads you to this fight. This room wasn't previously accessible. This is a rather difficult fight in EPIC GEST mode or higher because there are additional mobs. You need to try to lock down and eliminate the bad guy you met in the library, Iznax, because he can do significant AOE damage to your party. The fight itself forces you to split your group. I had the Ogre throw the Dwarf to the northeast (then move back to help the Thief and Ranger), the Barbarian Pounced to take the southeast, and each eliminated all opponents in their zone before moving west to join the rest of the party. This fight requires a lot of healing, as they will target any ranged characters they can reach with their spells. Keeping the Elf behind cover and the Priestess and Wizardess as far back as possible is recommended. If you can get a melee character next to the casters, they will stop using spells.

After this you will have access to a stairway to the prison floor.

Once you get to the prison, you have the opportunity to upgrade gear (via the Blacksmith, the Seamstress, and a couple free-loot locations) before you need to fight again. The quest line will take you right to the Blacksmith, and the Seamstress is nearby. You should buy all the gold (epic) gear upgrades you can find and afford, from here on out. Don't follow the main quest line and visit the prison yet.

There is a side quest, "Turn the Coat," given in the VIP room that is solved on this floor. You may as well take it; it doesn’t involve fighting. The four button locations are marked on the map. One is near a trap that guards a chest that contains On Adventure 2/3. After you get all four, take them to the Seamstress, who is a vendor on this floor, then turn it in back in the VIP room.

Out in the garden area are four switches which are partially hidden behind shrubbery. Flipping all of them will provide access to a chest that contains History of Elves in Fangh 2/3.

As you're moving around to pillage all the free loot locations, you will find a stairway to the rooftop to the south. Take this up.

Fight 43
If you go up to the rooftop next (before visiting the prison, in the main quest line) and head west to the attic room, there is a fight here that isn’t active later. (If you complete any further step in the main quest line, like talking to the jailer in the prison, this fight won’t trigger. The mobs are standing there, but the fight doesn’t start.) It's part of the quest to find two anvils. Do it for the gear and the experience; it’s not hard. The mobs will blow the cover (the pile of crates) on the right side almost immediately so don’t hide behind it. The battle mage (upper-right) has a strong AOE to watch out for. Freeze him and eliminate him (and Robert the Anvil, lower-left) as a priority.

You should have all the volumes to Secrets of Chicken and can turn them in (the bookshelf is in the next room—awards +1 sprint). There is some gear there also, and a chest in the yard to the north, to the left as you exit the door (the chest contains History of Elves in Fangh 3/3). Don’t head further north to explore this level yet. You might want to flip the switch to give yourself elevator access to this floor, though.

Now head back down to the prison. You should have all the books for History of Elves in Fangh, and can turn them in near the alchemist. It awards the Elf with +2 agility.

You have three different approaches you can take on the main quest line. You can help Barney get his drink and give it to him, untainted. You can help him get his drink and let the alchemist doctor it up (you just need to chat with her before you deliver it to him). Or, you can refuse to get his drink and knock him out. (Note: Easiest course is to help him get his drink but allow the alchemist to modify it.)

If you decide to help Barney get his drink (whether or not you have the alchemist mess with it), you will face the fight below.

Fight 44
Delay your turn to let the mobs advance. The Dwarf Throw and Ferocious Pounce makes this fight fairly simple. You can have the Thief stealth and assassinate the caster in the back-right corner. Once it's over, you can retrieve Barney's booze. On your way back to his room, if you want to skip the next fight, chat with the alchemist.

Fight 45 (optional)
If you deliver the booze to Barney full-strength, you have to fight his pink hallucinations. Note that, once you defeat him, the mobs disappear and the battle is over. He’s the only serious threat in this battle; he can crit for an enormous amount and one-shot your characters. Every time you hit him, he pukes and does damage. So focus him down when you can.

If you decide not to help Barney get his drink, you face the following fight instead of either of the two previous ones. This is a harder fight, on the whole. (Either way, you will get the same gear drops.)

Fight 46
As mentioned before, the big threat is Barney. Focus him down (he’s immune to crowd control, at least on harder settings), otherwise, he will one-shot members of your party.

You can now access the prison, free the dwarf prisoner, and get access to more free loot. There is a statue nearby; turn it to face west. This is one of the keys to the hidden boss fight.

To the room south of the prisoner is a series of switches that gives access to a chest. If you stand in front of the levers, the correct order is 3-2-1-4.

You can head directly to Urik’s Depths, if you want (down in the caves), but I recommend you head to the rooftop. There are two additional fights up here available in chapter 6; you should undertake them now, as later (chapter 8) they will provide little or no benefit.

Chapter 6 - Rooftop
When you return to the rooftop, you will cross a yard with chickens. To the east is a small room with a switch that gives access to a nearby chest. There is also a statue here; rotate it to face south. This is one of the keys to the hidden boss fight at the end of the game.

Fight 47
The first rooftop fight is inside a warehouse to the north. It’s a great opportunity to use Dwarf Throw (targeting the goblins that are grouped north of the party). You can also send the Barbarian to rush out to Ferocious Pounce on two opponents to the lower-left.


To the east, following this fight, is a door protected by a riddle (“The future”). That switch you flipped in the room off the courtyard provided access to the chest.

Be wary of the trap to the west, on your way to the next fight.

To start the next fight you need to lower the walkway; use the levers as follows: red-red-green-yellow-blue-yellow.

Fight 48
Use Dwarf Throw and Ferocious Pounce and hurt almost all the goblins on deck in the first round. You can leave your ranged on the top deck and shoot from the railing. After crossing the second ramp, you will find a chest that contains On Adventure 3/3. Note that, despite what the objective says, you cannot stop the reinforcements from the second platform.

You should now have all the books for On Adventure, which you can turn in on the prison floor in Barney's apartment. It awards the Ranger with +2 charisma.
Chapter 7 - Urik’s Depths
Entering Urik’s Depths (down in the caves) will begin chapter 7.

After you’re commissioned by Narzatok, search all the rooms around the throne room. Two of them have epic gear in a chest (chests in rooms to the west contain Dwarven Strikes and Social Movements 1/5 and 4/5). The other room (east) has a switch that starts a puzzle (numbered 1 on the map). When you flip it, it immediately relocates to one of the other adjacent rooms (2). Flip it again, which will send it to the dormitory room outside the dwarven tavern on this floor (3). (Inside that room you will find Dwarven Strikes and Social Movements 2/5.) Flip it again and it moves immediately north to the mining area (4). Flip it again and it moves to the blacksmith’s room (5). (You can’t open that door until after you complete the next fight, though.)

Note that the bartender in the tavern has a few nice accessories to sell. Purchase three Pop Twits from him if you want to win the insult contest later ("Killing Time" quest).

Fight 49
Your first battle will happen on a narrow bridge. The key is to send a character to the far end of the bridge and pull a lever that will stop reinforcements from coming. You should send the Thief in stealth mode. If you’ve loaded him up with the proper gear, he should have a movement of 8 (increased by the Ranger using Loubet’s Anticipation at the beginning of the fight). The north (left) side of the bridge is clearer at the start, but you may need to delay or hold back a turn and later cross to the south side. Use other characters to take out or CC mobs to give him a path. If he is exposed, he won't make it. This one is a good one to use Dwarf Throw at the start rather than delay your turn; the orcs are bunched up in a group.

This fight drops an epic bow for the Elf.

Fight 50
A side quest is available in the blacksmith's room on this floor. Flip the teleporting switch while you're in there (that sends it to a side room in the dwarven tavern, 6). You don't need to do this quest right now, but it will allow you to pick up the Dwarf's epic weapon, which will help you in the fights that come next. So I recommend you do it now.

The fight is easy. Delay your turn and allow the melee mobs to line up, then use AOE attacks. This fight awards Dwarven Strikes and Social Movements 3/5.

Turn the quest in to the blacksmith, then go to the tavern on this floor. Flip the teleporting switch in the side room while you're there. Talk to the dwarf who will offer you the follow-up quest in the back of the tavern. He will give you a key that allows you to access the blacksmith's back room. Inside a chest in this room is an epic weapon for the Ogre. Grab the axe and return to the tavern. When you turn in the quest, don't give him the axe.

When you return to the throne room, you will be sent to the dwarven prison (on this floor) to deal with Braztog. You can either choose to help Braztog (the prisoner) or Narzatok (the king dwarf). Your choice will lead you through one of two possible collections of three fights.

Note: Before you head to the prison, you can complete the teleporting switch puzzle in the northeastern room, assuming you flipped the switch at 6. Turn both the statues (7 & 8) to the south and the door will open.

Fight 51 - Help Braztog
For this version, you start outside his cell, grouped up. Delay your turn and let the guards come close, then throw the Dwarf into their midst. Send the Thief to take out the ranged on the right side. This fight drops epic daggers for the Thief. Heal up using potions after this fight.

Don't forget to loot the chest in the far right cell. It contains Dwarven Strikes and Social Movements 5/5.

Fight 51 - Help Narzatok
This layout is a little more awkward than the other because the mobs don't group together tightly. But it provides a better opportunity for using overwatch, because you don't have to move (so you get two shots) and the dwarves have no choice but to move into range. This fight drops epic daggers for the Thief. Heal up using potions after this fight.

Don't forget to loot the chest in the far right cell. It contains Dwarven Strikes and Social Movements 5/5.

Fight 52 - Help Braztog
You get a little more room to set up in this version of the fight than the other. Otherwise they are similar; Dwarf Throw is, again, a great strategy for occupying their forces at range.

Fight 52 - Help Narzatok
.
Fight 53 - Help Braztog
In the third fight (throne room), taking Braztog’s side will put you with 12 opponents, including Narzatok and two war golems. If you take Narzatok’s side, you will end up with 11 opponents, including Braztog. I now typically start with Loubet's Anticipation to get additional precision and movement. In this version, focus, CC and try to take out Narzatok.

Fight 53 - Help Narzatok
I think the fight is a little easier in this second version, without the war golems. The dwarves seemed to group up more and were therefore easier to take out. Look at the previous version of the fight for my more recent lineup (which fits everyone close enough to use Loubet's Anticipation). In this version, focus, CC and try to take out Braztog.

Before you enter the temple, go to the tavern on this floor and sell any gear you don’t need. You’re going to pick up more than you can carry inside the temple.
Chapter 7 - Temple of the Big Anvil
Fight 54
When you enter the temple, you will have two fights against spiders (northwest and northeast). In the first spider battle, delay turns and let them come toward you and group up, then hit them with various AOE attacks. Plan to use potions for healing after both spider battles.

Note that there is a chest in the room for you to open after each of these spider fights, and there are two other unguarded chests in corridors on the way to the final fight. Don't miss any chests; they all hold epic gear.

There are four special statues in the temple, each of which must be turned to face the wall (see example). There will be a brief flare when oriented correctly. This opens the door to the treasure room (which is accessible after the final fight on this floor). Two of the statues are guarded by spiders; two are not.

In between the fights with the spiders, there is a puzzle room, where you must align five collections of statues to open a passage. Here are the five puzzles and how you solve them. For each puzzle, spin the camera so that the statues are at the top of your screen, then imagine they’re numbered from left to right.

Puzzle 1
(Face statues to the east): Turn each of them twice (the order doesn’t matter).

Puzzle 2
(Face statues to the south): Turn statue 1 twice then statue 2 four times. (Each statue rotates the other when it is turned to the south.)

Puzzle 3
(Face statues to the south): Turn statue 2 three times, then turn statue 3 three times, then turn statue 1 once. (Statue 1 turns 1-4; statue 2 turns 2-4, statue 3 turns 3-4, statue 4 turns only itself.)

Once you align the third series of statues you will open the far door (permitting you to exit), or you can continue to solve the final two series to reach a chest with epic loot, but you will have to pass two traps prior to puzzle 4, so make sure the Thief is leading, at that point. The traps look different here than in the main dungeon.

Puzzle 4
(Face statues to the west): You flip the switch in front of the statue for this puzzle. Flip switch 3 twice then switch 2 twice. (Switch 1 turns 1 & 2; switch 2 turns only 2; switch 3 turns 1 & 3.)

Puzzle 5
(Face statues to the north): Turn statue 2 twice then statue 4 twice. (Statue 1 only turns itself, statue 2 turns 1-3, statue 3 turns 1, 3 & 4, statue 4 turns 3-4. The switch resets the statues to their starting orientation.)

There are two more traps on the way to the treasure chest after you solve puzzle 5. Inside the chest is, among other epic items, an epic bow for the Hunter.

Fight 55
Neither spider fight is particularly difficult though it is a challenge, in this second case, of keeping your ranged safe. At this point, the Elf and Priestess should both be able to skip an attack of opportunity, allowing them to move away from a melee threat. Don't delay the Barbarian; have him jump on the two spiders to the lower-right, near the chest. Delay the Ogre and Dwarf, then use the Dwarf Throw to take out the mobs entering from the top-right.

Fight 56
The final fight splits your group around the forge. It poses difficulty in that there are two healers in the back who will undo partial damage, particularly on the top side (where I’ve sent the Barbarian). Delay your turn and allow the healers to go first (they will cast Globe of Thorns), you can then do damage on two consecutive attacks (one delayed and one not) before they can heal. Do your best to eliminate the mobs entirely.

Your old friend Iznax is in the lower segment. As in his earlier fights, focus and take out Iznax as early as possible; his AOE attacks do a lot of damage. Delay your attack and they will congregate so that you can have the Ogre take a few steps forward (to the corner in front of the Dwarf) then throw the Dwarf. Stun/freeze/knock down Iznax asap.

You can ignore any non-epic items in the loot bag; there are better epic pieces. Once you complete this fight, you can reach the treasure room to the north, assuming you got all four of the statues turned toward the wall. Equip what you need and throw away any red items to lighten your load. Try to get everything you need in one trip; you can’t return to the temple once you depart Urik's Depths.

At this point, you’ve completed Urik’s Depths and you should have solved the switch puzzle by now (once you’ve flipped and moved the switch through all its locations, you have to turn two statues south in the north-eastern room, numbered 7 and 8, to gain access to a treasure room). You more likely solved this before you entered the temple, but if not, do it before you leave Urik’s Depths and turn in the Dwarven Strikes book series before you leave the floor and return to the caves. You can't return to Urik's Depths once you leave.
Chapter 8
When you reach the surface, you will begin chapter 8 and will immediately trigger a fight:

Fight 57
In this one, Janos will switch places with another mob or one of your characters each time he’s attacked, so if necessary, leave him until last and instead focus down the other mobs. (He does summon melee adds, though, which is annoying and prolongs the fight a little bit.) To pin him down, group all your characters so that, when he switches places with one, he's still in range. This fight awards Demonology: Tuff'luk God of Fail 4/4 and an epic sword for the Barbarian.

Check the shop in the basement and purchase all epic gear now for sale. Everything in there is an upgrade. You will be close to level 10 on all your characters. If you weren't able to afford any gear on the prison level, you should have enough funds now (having sold back unused gear after the temple), though there are probably no real upgrades. You will notice that, in some cases, you have two options for epic gear, one of which is defensive and the other offensive. I choose offensive for everyone, except perhaps the Dwarf. Tip: Save as much high level gear as you can from here on out; there is no further need to sell it. Each of the DLCs will reset your gold but permit you to bring in extra gear you can sell to a vendor.

At this point, you will be able to pick up the side quest "Hoses before Sows," given by the Herbalist on the prison level. She sends you to the rooftop to collect a watering can, which is found in the northeast corner of the warehouse. Bring it back to her and the quest is complete. (I assume this is to assure you've completed fight #47 in this room, as described earlier in the guide, since it is possible to accidentally miss two fights on the rooftop. This quest is not available in chapter 6, when it would have made more sense.) This does award an achievement, for what it's worth.

On returning to the tavern, you will be sent in pursuit of Reivax, back on the goblin floor. This will trigger a fight in his quarters:

Fight 58
There are war golems in this fight as well as several casters. Use the Dwarf Throw to engage the golems to the south, and have the Barbarian jump on the casters to the west.

You will return to the tavern and be sent in pursuit of Mel Boots, who is down in the wine cellar waiting for you with his own evil party of adventures (i.e., his own barbarian-like creature, dwarf, wizardess, etc.).

Fight 59
This fight assigns you a fixed position at the start. Cast Loubet’s Anticipation to give your group superior movement and precision from the outset. The Thief can either stealth and assassinate the archer or the Wizardess can freeze her. The Elf could use her “One Shot, One Kill” to stun the enemy wizardess. Move the Dwarf up (he will likely have initiative over the Ogre at this point, or else delay the Ogre) then have the Ogre catch up to him and throw him into the middle of the enemy party in the back. The Barbarian can also run up and pounce into the remainder of the enemies. Most of the items that drop will be sub-par compared to what you got in the temple, except for the epic sword for the Ranger. Now go through the door to the west and turn in Demonology: Tuff'luk God of Fail while you’re here; your party will receive +1 precision. You will also find Demonology: Randomia 3/4 in a chest.

Fight 60
The next fight is a little silly; you are sent to fight mythical chickens on the rooftop level. Use AOE abilities to get rid of the regular chickens then burn down the powerful ones. Note that you will not have a chance to return to the tavern between this fight and the next one. You may want to use Elixirs of Oblivion to re-spec a couple characters to pick skills that immobilize, as this is a benefit in the next fight.

Fight 61
This is a rather difficult fight (one of the most difficult), as Losax spawns clones that you have to deal with; he does it automatically each time he moves. So your primary strat is to keep him from moving while you take out other high-health mobs.

I now normally begin with Loubet's Anticipation (switch the Thief and Ranger in the screenshot). At the start of the fight, I move the Dwarf out so that the Ogre can delay and come up from behind and chuck him into the middle of the mobs by the rocks (lower-left). The Barbarian pounces and assists. The Wizardess tries to freeze the remainder.

I have the Thief stealth and immobilize Losax using Caltrops or Spider Bombs, as often as possible. I respec the Elf so that her Long Shot immobilizes. Losax starts with massive protection, but +40 of it goes away after two rounds; don't bother attacking him until it's gone. He is immune to most effects but not immobilization or “scared.” You have to deal with his clones when they appear; too many running around makes the fight much harder. So burn down the other mobs asap, then whittle away at Losax’s massive health pool, immobilizing him as much as you can, taking out his clones shortly after they appear. Have the Dwarf use Dwarf Insult on him, to keep him focused on one character. He'll otherwise scuttle around the perimeter.

This is a fight where there is a lot of damage going out and you’ll be happy to have solid healing from the Priestess. Keep her as far from Losax as possible, behind but in reach of the rest of your characters. Make sure everyone has major health potions in their belt. This is usually the first time I have to use the Randomia gauge.
Chapter 9 - Zangdar’s Apartment
You will now have access to floor 3 (Zangdar’s apartment). The whole level is a little anticlimactic and there is actually very little to find or do. Some of the rooms on this floor are nothing more than breadcrumbs and can be skipped (because I am going to give you the clues directly). If you don't intend to attempt the hidden boss fight, head south for a fight in the prison, then north to the library to battle some cursed books, then east to face Zangdar. You don’t need to do anything else on this level.

If you want to attempt the hidden boss fight, you need to turn the final statue. Go to the room to the southeast (as indicated in the map above) and turn the pylons as pictured below. This will unlock the door on the north wall, which will allow you to retrieve a key.


Now go northwest to the bedroom. You will be able to open the door on the north wall and take the balcony around to reach the hall to the east. This will provide access to a storage room with a statue (see map on the right). You need to solve a riddle to enter; the answer is The Air. This is the final key to unlocking the hidden boss fight. Turn the statue to face west. For instructions on the hidden boss fight, consult that part of this guide. Also in this room is a book that gives clues on how to orient the nine statues to unlock that fight. You don't need it; I have provided the orientations.

Now you can turn to the fights on this level.

Fight 62
The prison fight is pretty easy; just stay off the power tiles. As a reward you will receive the last book Demonology: Randomia 4/4 and a couple final pieces to complete epic gear sets for your characters. (All your characters should now have five pieces of epic gear—head, chest, wrists, feet, and weapon—except the Dwarf, who should have six—counting his epic shield, and the Ranger, who should have seven—including an epic shield and bow.)

Fight 63
Similarly, the cursed books in the library are easy. You start from a fixed position. Move to the east and use AOE attacks. Alternatively, you can move into formation (having some players delay while others move) and use Loubet's Anticipation. See below. Increased mobility is useful in a room this size.


When you’re done, you can turn in the last set of books (Demonology: Randomia) in this room, which will replenish your Randomia gauge. If possible, don’t use it against Zangdar; it will prove useful in the Ruins of Limis.

If you wish to attempt the hidden boss fight, you should do it now, before engaging Zangdar. See information in the next section on that fight.

Fight 64
Finally, you meet Zangdar. Be aware – when this fight ends, the game is over (i.e., you are taken instantly and automatically to the first DLC, the Ruins of Limis). So don’t start this fight unless you’re ready to exit the dungeon. If you plan to attempt the hidden boss fight, do it before starting this battle. You might also, for example, want to load up on bandages for the next phase, if by chance you are low. If you haven't turned in any sets of books, do it before starting this fight (you will carry the bonus into Limis). There's no reason to horde gold; you will lose all of it when you reach the Limis DLC.

To complete the wishing well quest in the Limis DLC, it will help to have three epic pieces of junk in your inventory before you go (see below). You can find them in Limis, but then you won’t have the amulet from the wishing well in advance of many fights. (You only really need two, though, because you will find one immediately prior to reaching the wishing well.) After the first fight in the Futon DLC you will be cash-strapped (your existing gold will be taken away then, as well); it's worthwhile bringing some misc epic gear (that doesn't weigh too much) to sell to the vendor.

Now to the fight. I start this with Loubet's Anticipation; you don't need defensive buffs.

Zangdar, on his turn, will put up a shield if for any reason it is down. The shield cannot be damaged except by music. Your characters generate musical damage by standing next to one another (one square away, horizontally and vertically but not diagonally). The damage occurs the first time each character has a chance to attack. (It does not happen again if they delay their turn.) So there is no way to delay the musical damage. If you are not standing next to one another, you will do far less damage to his shield. Once his shield goes down, he is vulnerable to attack until the next time he has a turn (at which time he will put his shield back up and probably teleport to a new location). You won't be able to freeze him; he has 100% magical resistance. If by chance you can stun him, or knock him down, he will not replace his shield until he has recovered. (Note that he is listed at 100% physical resistance in Epic Gest mode, but the Elf was able to stun him with her One Shot. That basically means game over; it gives you two rounds to finish him off before his shield goes back up.)

Key to the fight: Estimate if you will blow his shield on a given round. You can usually tell if you’re getting close based on the graphic of his shield (it starts to fragment when it gets close). If so, delay all your turns. That way you will be able to attack with each character after the shield goes down and before he is able to restore it. The possible exception is the Priestess, who might need to heal your party. If you have a stacked group on the first round, you will certainly blow the shield. On Tavern Song difficulty, you will likely kill him before his shield is back online. On harder modes, it's unlikely. You can mostly ignore the adds that appear; save all your primary attacks for Zangdar, don’t waste them on adds. The second group of adds that comes in from the bottom left – he should be dead before they are able to engage you, or you’re doing this wrong (or are unlucky). If too many adds get into the room before he dies, you will be overwhelmed.

Example of epic junk that you can use in the Limis DLC:
Hidden Boss Fight: Golbargh
On each of the primary levels (excluding Urik's Depths, the Temple, the Library, and Under the Den) is a statue that must be oriented correctly to unlock a hidden boss fight with Golbargh. Golbargh is the captive demon you met on the Abandoned Floor who sent you to the library. If you turn each of the nine key statues to face the direction indicated (as you encountered them throughout this guide), you will be awarded with a Demon Orb. If you take that to Golbargh, you will start a battle the moment you enter his room.

If you didn't get awarded the orb, you probably missed a statue or turned it incorrectly. Hit ctrl-F and search this guide for "hidden boss fight" to review all the locations. The maps show the location of the statue on that level. Here is the orientation of each statue:
  • Floor 7 (Rooftop) - South
  • Floor 6 (Prison) - West
  • Floor 5 (Abandoned Floor) - South
  • Floor 4 (Goblin Workshops) - East
  • Floor 3 (Zangdar's Apartment) - West
  • Floor 2 (Tavern) - West
  • Floor 1 (Hall) - South
  • Floor -1 (Basement) - East
  • Floor -2 (Caves) - East
This is the hardest battle in the game. It awards a couple of epic items that are not really upgrades, so if you choose to pass on it, you aren't missing much except an achievement. You can also adjust the game to one of the easier modes, as on EPIC GEST or GZOR'S NIGHTMARE it's going to be extremely difficult.

Golbargh NORMALLY casts a targeted attack on rounds 1 and 6 that covers most of the floor. See below. BIG TIP: If your group is tightly grouped as in the screenshot above, however, he will cast an AOE on round 1, and use his targeted attack on round 2. The adds won't appear, in that case, until round 3. I find this a highly favorable beginning to the fight.

Whenever he casts his targeted attack, you need to move off the pattern before his next turn or he'll one-shot your characters. Starting with Loubet's Anticipation is therefore recommended. The Dwarf might survive, but none of the others will. So on that round, use ranged attacks and then move off the pattern (have the Thief hit him with Crippling Shot the round the targeted attack goes out). You can move your melee back into range after his attack goes off. BIGGER TIP: Have the Dwarf use Dwarf Insult and Golbargh will chase him and ignore your other characters. Lure him away from the door. Hit him with Crippling Shot so he won't get to your ranged or catch the Dwarf.

Golbargh hits for massive damage (reminiscent of Barney on the prison level) and will not hesitate to run around your melee characters to take out your ranged, so do not leave them anywhere close to him. He has an AOE attack that is painful, so except for the starting line-up, don't group your ranged.

Golbargh is immune to all CC abilities except immobilize. The way you're going to beat him is by doing as much damage as you can before you are overwhelmed by adds. Save all your biggest damage abilities for him, not the adds that appear. Get the Thief behind him and pray for multiple crits. I had the Barbarian spec'd with crit (from passive skills), and it made a difference.

In the round after his targeted attack, you will want to move your ranged to the north or south side of the room, away from Golbargh and the adds that will appear to the east. If you used Dwarf Insult and pulled him to the back, it's easier to stay clear of the adds.

On the round following his targeted attack, you will get a set of adds right by the door (the east wall). One of these is a caster called Incinerated Ex-Summoner who casts an AOE at your melee characters that will also heal Golbargh a huge amount. You must lock down this mob and take him out before he does that. If he is locked up at a distance, he won't do it. Have one of your characters knock him down or stun him. This mob's magic resistance might defeat an attempt to freeze him, so better to use a physical CC method (or use saved games to mitigate bad RNG). It's helpful to stun and distract this first group of adds so that you can have other characters focus on Golbargh.

Other adds will appear in later rounds from points north and south in the room. I was able to ignore most of them and kill Golbargh before they became a serious problem. On harder modes, I imagine you will need to deal with them as you whittle down Golbargh's health, but I haven't tried it. Doesn't sound like fun to me. Now go back and defeat Zangdar, then onward to the DLCs!
Menzorian Bookshelves
Just in case you missed a book in the walkthrough, here's a cross reference of all books (organized alphabetically by title), in the order you find them, with a detailed map, as well as the locations of the bookcases.

A Brief History of Orcish Culture (party +1 impact)
There are only two volumes. The bookshelf and second volume are in the basement. You can access this chest after fight #10 in the guide. A switch to the south of this room provides access to the chest.


The first volume is on the ground floor (the hall). It's in a cache at the back of the room, and unless you picked this up in chapter 1, you will trigger fight #14 when you enter. After this, you will be able to turn in the set.


Anthropological Function of the Goblin (party +2 dodge)
There are three volumes. The first volume is in the tavern, and you should get hold of it as soon as you gain access to the fourth floor stairway.


Both the bookshelf and two of the remaining volumes are in the Goblin Workshop. You will have the ability to turn these in after you complete fight #18 in this guide as you're heading northwest to have a little chat with Reivax.


The Barbarians (Barbarian +2 strength)
All three of the volumes as well as the bookcase are on the tavern level. This will be a set you complete early.


Basic Spells for Basic Wizards (Wizard +2 intelligence)
There are four volumes in this set. The first volume is on the main floor, and you will likely pick it up early.


A second volume is on the tavern floor; you will be able to get this early as well. The bookshelf is here, as well, when you're ready to turn them in.


The third volume is in the privy, off a hallway between fights #28 and #29.


The last volume drops from the final fight in the library. This means you should be ready to turn in the set upon your return (beginning of chapter 6).


Cursed Knights for Dummies (party +2 physical resistance)
The entire collection is found in three unguarded loot locations in the library. Be sure to turn them in before you leave the level, because you cannot return a second time.


Demonology: Randomia (fills randomia meter 100%)
This collection has four volumes. The first is located in the Goblin Workshops, in a chest on the balcony after you confront Reivax (after fight #18).


The second volume is in the library; it drops at the conclusion of the fight with the liches.


The third volume is down in the basement; you will gain access to a room with a chest after fight #59. So in other words, you won't pick this up until very late in the game.


The final volume drops in fight #62 on level 3 (Zangdar's Apartment), near the end of the game. The bookshelf is on that same level when you're ready to turn them in.


Demonology: Tuff'luk God of Fail (party +1 precision)
This collection has four volumes. You will come across the second volume first; it's in the basement. It drops at the conclusion to fight #12. Note that the bookshelf is here also, but you won't have access to it until you complete fight #59 in chapter 8 (near the end of the game).


You will pick the next one up in the Goblin Workshops, after fight #18.


The third volume is in the library. It drops after the fight in the east room.


The fourth and final volume drops at the beginning of chapter 8 in fight #57. You now have all the books, and can turn them in right after the conclusion to fight #59 (see above).


Dwarven Strikes and Social Movements (Dwarf +2 constitution)
There are five volumes in this set, and all of them are found in Urik's Depths. The bookshelf is there also. Most of them are in unguarded loot locations, but volume 3 drops from a fight (from a side quest given by the blacksmith—see fight #50).


History of Elves in Fangh (Elf +2 agility)
There are three volumes in this set. You will pick up the first volume in the tavern, after fight #13. It's outside, in a chest (which can be opened by throwing a switch, also outside).


The second volume is on the prison level, in a chest that is behind a fence. You open it by throwing all four switches nearby (they are hidden by shrubbery). The bookshelf is on this same level, by the way, when you have all three volumes.


The final copy is on the rooftop in an unguarded chest. Once you pick this up, you should be able to head right back down and turn them in.


Ogrish Cuisine (Ogre +2 strength)
There are three volumes for this set. You're probably going to pick up volume 3 before volume 1; it's in the Goblin Workshops on your way to the confrontation with Reivax, after fight #17.


Volume 1 is on the Abandoned Floor. You will have access after the first Orktobearfest fight (#28 in the guide).


Now, go to the kitchen in the tavern and turn them in. The final volume is right by the bookshelf. (You may even have picked it up earlier.)


On Adventure (Ranger +2 charisma)
There are three volumes in this set. The first is found on the ground floor (the hall). It is in a locked chest after you complete the "Binsc and Moo" quest (fight #11). Throw a switch in the south part of the room to gain access to the chest.


The second volume is in a chest guarded by a trap on the prison level. Note that the bookshelf is also on this level, so return once you pick up the final volume.


The third volume is on the rooftop, in a chest in the far northwestern corner after you complete fight #48. Head back down a level to turn them in (location shown in the previous map).


Menzorian Bookshelves - Part 2
Secrets of Chicken (Party +1 sprint)
There are four volumes in this set. The first is in an unguarded loot location on the main floor.


The second volume is in another unguarded loot location, this one in the tavern.


You are going to find volume 4 before volume 3. It's in an unguarded location you will reach after fight #17.


You won't have volume three until you reach the library. It's in a chest that appears once you solve the puzzle of the teleporting switches.


The bookshelf is on the rooftop, as pictured. You will have access after fight #43.


The Theory of Traps (Thief +2 courage)
This set has four volumes. You will find the third volume first; it's in the basement and is given as a reward for fight #7.


You're going to find the second volume next; it's in the caves; you will pass by it (it's guarded by a trap) after fight #27. Notice that the bookshelf is right next to it; this is where you will come back to turn them in.


The first volume is in the tavern; you will receive it when you complete fight #31.


You're going to locate the fourth volume next. It's in the library and is given as a reward from the "Book Worm" side quest. When you get back to the dungeon, you can return to the caves to turn in the set. +2 courage, whoopee.


What of Golbarghs (Party +2 magic resistance)
Both of the volumes are on the Abandoned Floor. You will get one right away (it's in the chest behind the demon); the second won't be available until after fight #41. The bookshelf is on this floor as well.


Chapter 10 - Ruins of Limis (DLC)
The Ruins of Limis is the first DLC (expansion) for the Dungeon of Naheulbeuk. On the whole, it wasn't well-received; the fights are badly tuned. Tavern Song mode, in the expansion, is as difficult as Epic Gest mode in the original game. If you're playing for enjoyment and not particular achievements, you might want to set this a level below what you played in the original game.

In Ruins of Limis, your party will be able to gain an additional level and pick up a few nice pieces of gear they can carry into the next DLC, Back to the Futon. Note that you will lose almost all your gold when this DLC begins.
Limis Fight 1
The key to the first fight is to prioritize disabling the spawn locations for new opponents. I used Loubet’s Anticipation from the outset to gain mobility, and delay the Ogre, Barbarian, and Dwarf to let the mobs close in. The Ranger went toward the leftmost statue (#1, northwest, risking an attack of opportunity), the Elf ran toward the far right statue (#2, northeast), and the Ogre went toward the closest statue to the right (#3, southwest), destroying the crates in his way. Have the Priestess use Lightning Chain. In the second round, the Elf, Ranger, and Ogre will be able to disable their statues. Once the Elf disables her statue, she will hug the east side and make her way toward the far right (#4, southeast) statue and will disable it. In this way, you will get the fewest number of new opponents spawning. The remaining characters should stay together where the fight starts and deal with the zombies clustered there (between the Dwarf, Barbarian, Wizard, and Priestess, you have numerous effective area attacks at your disposal). As long as you get the spawning points disabled quickly, this fight is not difficult. An epic crossbow drops from this fight.

From here you can proceed east, open the small gate and undertake the first riddle (Answer: The wind). The nearby chest contains the book Understanding Necromancers 1/3.

Limis Fight 2
As you head north you will walk into a fight between vampires and necromancers. They’re fighting you as well as each other. Sometimes the best course is to stand back and let them kill each other off, but they will also send opponents you're forced to deal with. Look out for isolated mobs nearby that don’t have the opposite faction nearby and instead target you. Use the Barbarian to Pounce on the mobs to the left and throw the Dwarf at the mobs clustering to the right, in the center of the battle.
  • The Necromancers (who look like wizards) have skeletons and death knights.
  • The Vampires have zombies and trolls.
The mobs usually target the weakest member (the one they are most likely to kill), so when you wound an opponent, it’s more likely the other side will finish the job for you. That means it’s sometimes to your advantage to hurt opponents in this fight without needing to kill them off.

Normally, at this point you will pick either the vampires or the necromancers (and your fights will be determined accordingly) but you can also forego choosing and instead trigger the trap in the haunted tavern and head down to the underworld next. After that, head to the troll caves and undertake the other portions (leading into the underworld), then come back at the end to choose which faction you will support. (If you want the full experience of Limis, you should save a game before you choose and try both options. In that case, do the underworld first so you don't have to do it twice.)

If you choose the necromancers or hold off choosing, there is loot in the necromancers' camp to the north, inside the building: You can find the book Vampire Hunting 1/3. There is also an ogre door and treasure room to the northeast (a switch outside the room gives access to a chest). There is a piece of epic junk inside the chest.

I will proceed as if you decided not to choose vampires or necromancers until the end (which is a perfectly sensible approach). Note that the map has features (such as vendors and stairways, and one chest, in particular) that become active based on your choice of vampires or necromancers. The vendor in the necromancer area will only appear if you choose necromancers, and the same for vampires, be aware.

Go instead to the haunted tavern (north of where you entered Limis).

Note: On the outside wall on the east of the haunted tavern is the second riddle with a mathematical puzzle. The answer is 30.

Limis Fight 3
Enter the privy in the haunted tavern and click the basin. You will emerge in the underground (the lower floor)—a basement that will incrementally fill with poison gas. You have five rounds in each room and must then flip a switch and move to the next room or else take significant damage from the gas. The rooms are numbered on the map. The strategy is to attack and advance in the direction of the exit, but don’t let any character block the way for other characters to proceed and don't let any character lag behind.

The final room holds a switch that stops the gas (ending the timer). I use Loubet’s Anticipation to increase movement at the door to the third room, then have a character (usually the Thief but you could do it with the Elf as well) sneak to the switch in the back of the final room to stop the timer before finishing off the remaining mobs. (Once you hit the switch, you have all the time you need, and no reinforcements will come.)

At the conclusion of this battle, you will pick up the book Understanding Necromancers 2/3 and troll legs.

After the battle, you will be in the underground and have access to a chest behind an ogre door (which contains a piece of epic junk), as well as have access to a stairway that leads up to the wishing well. You will find a third riddle here (Answer: Echo). (When the third riddle is answered, a troll’s head will appear in the dish at the altar. Click to pick it up. If you missed one of the other riddles, the troll's head will appear in whichever altar you complete the last of the three riddles.)

The wishing well requires three pieces of epic junk (see explanation earlier). There are two such pieces in chests and one sold by the Necro/Vampire vendors, but it's better if you bring them here from the original game. It will allow you to pick one of four epic amulets:

The Elf’s choice:

The Barbarian's choice:

The Ogre's choice:

The Wizardess's choice:

The Collar of Martial Ubiquity is a strong area damage effect that always hits and does dependably high damage. It uses no astral energy and is usable every other round. It’s easily the best call. I gave it to the Priestess; she uses it multiple times in every battle in this DLC and the next. You only get one choice from the well and can’t change it afterward.

Look for a loot chest in the south part of the gated area with the wishing well.

Travel south through the entry gate to the wishing well and rotate the statue outside the tavern (see map, right). The ghosts in the tavern will now be visible. You will be able to pick up the quest for the troll parts from one of the ghosts inside.

After this, you can head to the troll caves.
Ruins of Limis - Underworld
Limis Fight 4
The primary concern in this fight is the mobs' ridiculously high health and double slapping attack. Keep your ranged as far away as possible throughout the fight and not grouped up. The mobs will ignore attacks of opportunity to reach your ranged. Use crowd control skills and focus the trolls down individually, though note that they are immune to being knocked down at higher modes.

You will receive the troll torso as reward on this fight.


You will then be able to travel north and go down a stairway to the underworld. (It's part of the level you were at earlier, but a gate prevented you from reaching this section.) Head south to the casket puzzle. Pick up the eight junk items and deliver each to the corresponding epitaph:
  • Here lies Heub – His only fear was getting bored with the afterlife. Each of his friends deposited a gift in his grave, to keep him busy. (Porn Scroll)
  • Here lies Arsene – Gentleman thief, always had a joke at hand and a sharp tongue. Neither of which helped him when he got hanged. (Rope)
  • Here lies Ming – Outcast artist, his love of pots was only matched by his hatred for other containers. Even after his demise, none of his friends understood the difference. (Bronze Vase)
  • Here lies Grumpf the Toothless – Used to collect his opponent’s teeth for his own benefit. A longtime friend of the Fanghian Dentists Federation. (Orc toothbrush)
  • Here lies Yoraz the Head Slicer – His last hunt ended with a draw. (Bear trophy)
  • Here lies Marcel – A novelist who died too young, suffered from writer’s block up until his suicide note. (Dry inkpot)
  • Here lies Mirilla – Used to bronze, perpetual third place in every equestrian beauty pageant in Folonariel. She spent her last years peacefully knitting souvenirs for her friends. (Pony socks)
  • Here lies Jaap – A brilliant taxidermist, always on the lookout for new subjects. His last work shocked everyone, especially the mortician. (Stuffed crow)
I found this puzzle to be hilarious. This will give you access to a chest that contains the book Vampire Hunting 3/3 as well as a bucket that holds a troll arm.

Head back to the north for the last fight in the underground.

Limis Fight 5
The hardest part of this fight is massive damage from AOE attacks thrown by Dietrich Kane and Professor Van Hasling. You can keep this from happening at the onset by adopting the formation pictured, which will cause Dietrich Kane instead to face off against the Ogre and Dwarf. Clumps of characters will draw AOE attacks, so stay spread out throughout the fight. Obviously, you will want to eliminate Dietrich and the Professor asap.

This fight will give you the book Vampire Hunting 2/3.

Heading west, you will be able to open the gate that leads back to where you staged the underground battle, beneath the wishing well. You should return to the Haunted Tavern and turn in the quest, which will give you an amulet that can summon an undead troll to fight for you. (The troll is basically an additional character you can summon and control in combat. It has poor initiative and mediocre stats, but it has some value as a distraction.) I gave it to the Ranger. You will probably locate better amulets in the Futon DLC, but it's useful for the moment.

At this point, you've completed everything in the DLC except the fights pertaining to the choice of siding with the vampires or necromancers. So find your way back to the surface.
Ruins of Limis - Necromancers
If you choose to side with the necromancers:

You will gain access to the vampire crypt through a stairway in the necromancer camp (you will not have access to this if you choose the vampires). You will also have a vendor appear to the north of the camp that offers some excellent items (better than the ones the vampires sell, in my opinion, including a solid weapon for the Ogre). Keep in mind that you bring gear with you to the Futon DLC. You will not have access to the vendor in the crypt; that only appears if you fight for the vampires. Note that there is a chest in the camp, on the south side of the crypt entrance, that isn't available if you choose the vampires; it holds an epic amulet.

You might want to use an elixir of oblivion on selected characters and re-spec the Ranger, Barbarian, and Ogre; they each have abilities you probably didn’t take the first time through that ignore protection. Some of the vampires have ridiculously high protection. Ignoring protection means your attacks will, in some cases, do an additional 40 points of damage, and as much as 70 additional points on Karmilla.

Vampire Fight 1
This fight is a challenge in that most of the mobs have large health and will rush by (and take an attack of opportunity) in order to reach your squishier characters. Keep this in mind and keep your ranged at a distance when possible. Delay your initial turn; your opponents group up early in the fight, making some of your large AOE attacks fruitful.

Vampire Fight 2
The second fight is even harder, with mobs that stealth and attempt to go behind your ranged characters (which is why I have them in the far back). Expect several to come in along the left side (as depicted in this screenshot) and appear behind characters in round 2. You can use an area attack to expose them. Don't spread out much until the very end of the fight. Muire has protection 40 (varies depending on difficulty setting), as do some of the other lesser vampires. You will need attacks that ignore protection or do massive damage to take them out.

The library has the book Understanding Necromancers 3/3 in a chest. There's also an epic piece of junk inside. A switch, in the back of the room, will open the gate to the final battle.

Vampire Fight 3
This fight is all about controlling Karmilla until she’s dead. Stun her, then knock her down, then freeze her. Once she dies, the fight ends, so make her a priority. Her AOE attacks are ridiculously powerful and she has massive protection, so normal attacks do very little damage to her. Use the Barbarian’s two-turn “Crom’s Brawn” attack, the Elf’s One Shot, and the Priestess's Youclidh Slap to get through her protection. Focus on the mobs at the top of the screen first; the ones behind you take an extra round to get close. (Launch the Dwarf at them to keep them busy.)

Keeping your group spread out initially means there is less opportunity for them to set up a linear AOE attack, and they will instead match up melee-style.

A second, alternative layout that uses Loubet's Anticipation in the first round is pictured below. This allows select characters to reach Karmilla at the very beginning. E.g., have the Ogre hit her with PloinkPloink, then have the Dwarf knock her down.

Once you complete this fight, you can turn in the original quest and end the expansion any time you're ready (entering the troll caves and doing the underground portion is optional, if you haven't already done them). Be sure to turn in the books to each of the two bookcases before you initiate the last quest; you are teleported to Futon automatically and won't have a chance afterward. Keep in mind that you can carry any loot gained from Limis into the next DLC. Use all your extra gold to purchase as many epic items as you can carry, to sell in the Futon DLC. (You will lose all your gold but not items.) Since the Thief doesn't make it to Futon, unequip his gear before you return to the starting area and either sell it in the next DLC or use it to upgrade Agent X.
Ruins of Limis - Vampires
If you choose to side with the vampires, you will have access to their area under the crypt and that means you can enter the library and immediately retrieve the book Understanding Necromancers 3/3 from a chest. There's also an epic piece of junk inside. You will enter their crypt by clicking a book in the Limis Tower that will teleport you directly. (You will not have access using the stairway in the necromancer camp or the tunnel that links it to the crypt.) You will also have access to a vendor in the crypt that sells a few epic items (of dubious value, in my opinion). You will not have access to the vendor in the necromancer camp or the chest on the south part of the camp.

On the whole, I think the necromancers are significantly harder to defeat than the vampires due to the rate at which they summon new undead adds through the fights. It's frustrating but I'll explain how to mitigate it.

Necromancer Fight 1
The first necro fight is all about controlling the summoners, who are in the back-left corner (off the edge of this screen, upper-left): Casper the Necromancer and the Skeleton Assembler, to be exact. Every couple rounds, each can summon an entire group of adds. It's crazy. The Necromancer Motivators make things harder but aren’t as high a priority. I moved the Elf, Wizardess, and Barbarian down toward the two summoners after a few rounds, then kept them frozen and stunned until they were gone. After that, the fight is manageable. Don't wait too long to deal with them, or you'll be overwhelmed.

Necromancer Fight 2
The second necromancer fight is difficult because there are so many summoners hanging out in the back. Keep the party spread out initially. By round 3 or 4, you need to reach the summoners and begin to crowd-control and eliminate them, to stop them from bringing in reinforcements. Don’t remain too long near the starting area; you need to advance or you will be overwhelmed. (This fight is badly tuned and a source of fan complaints due to the summoning. You almost can’t make a wrong move here and expect to win in EPIC GEST or NIGHTMARE mode, so proceed carefully. You might need to revert to saved games during combat.) It’s not too hard to crowd-control and eliminate Eliphas early on, which is helpful.

Necromancer Fight 3
You don't change location for the third fight; you're just starting a little more to the south and you get different mobs. You can begin more tightly grouped but some of the mobs shoot arrows that will chain-freeze your group, so spread out during/after the initial round. This fight has fewer summoners (they don’t appear until later in the fight from a zone on the top-left) but it has more powerful melee with AOE attacks, so as much as possible, you will want to single them out and eliminate them, one after another. When the summoners appear at the entry zone, you need to crowd-control the group of them and burn them down before they can start summoning. You should leave Eliphas for last; he can’t be killed unless the blue chicken (which stealths around the lower-right perimeter) is killed first. That’s usually not feasible until most of the other mobs are cleared out. This is another badly tuned and frustrating fight on harder modes.

Once you complete this fight, you can turn in the original quest and end the expansion any time you're ready (entering the troll caves and doing the underground portion is optional). Be sure to turn in the books to each of the two bookcases before you initiate the last quest; you are teleported to Futon automatically and won't have a chance afterward. Keep in mind that any loot you gain in Limis can be brought with you to the next DLC. Use all your extra gold to purchase as many epic items as you can carry, to sell in the Futon DLC. (You will lose all your gold but not items.) Since the Thief doesn't make it to Futon, unequip his gear before you return to the starting area and either sell it in the next DLC or use it to upgrade Agent X.

Menzorian Bookshelves - Limis
The guide provides the location of books, but in case you missed one along the way, here they are with map locations.

Understanding Necromancers (Party +1 protection)
There are three books in this set. The first volume is in a chest after you finish the first fight (Limis Fight 1). Note that you turn the set in on this level, in a room to the far northeast part of the map, behind an ogre door.


The second and third volumes are in the underworld. You receive volume two after completing the 3-phase fight with the poisonous gas, under the haunted tavern (Limis Fight 3). Volume three is in an unguarded chest in the vampire's crypt. (You can loot the chest regardless of which side you're on. So if you're fighting for the vampires, it's really easy to get.)


Vampire Hunting (Party +1% crit)
Three volumes here as well. The first volume is unguarded, in a loot location in the necromancer's camp. You can reach this location easily if you fight on behalf of the necromancers, or if you remain undecided (they won't prevent you from accessing the loot cache inside the building). If you choose the vampires, you will need to win at least one fight against the necromancers before you can grab this volume, assuming you didn't get it previously.


The other two volumes are located in the underworld. Volume two is a drop from Limis Fight 5 (a rather difficult fight). Volume three is inside a chest in the abandoned vault, and is accessible once you solve the puzzle. Note that you have to turn in the set in the vampire crypt, which is rather easy if you're fighting for the vampires but will require you to win two battles against the vampires if you're fighting for the necromancers.

Back to the Futon (DLC) - Intro and New Skills
The final DLC is Back to the Futon, a faintly disguised reference to the movie Back to the Future. On the whole, it's more balanced and interesting than the Ruins of Limis DLC. Some of the fights are more fun than the original game, in fact. On whole, though, it is more challenging. There are numerous fights with quite a few mobs to manage, some with massive health. Mobs, generally speaking, can run farther and have better range. Your characters have the ability to reach level 16, and this time there are new skills available, some of which are critical to your success.

Let's run through those first.

Ranger
Hold Your Ground! – This buff has situational usefulness. E.g., in late phases of fights when you’ve got yourself well-positioned, or to protect your ranged (who don't need to move much in some fights) from AOE damage. In fights against the cultists, you often want to stay close together and don’t want to move much; the +30 protection at level VII is pretty good.

Mercury Coating – This is useful in combination with abilities that freeze. I give the Ranger the Amulet of the Hotancold Song, which allows him to freeze opponents. If you take the version of Mercury Coating that does bonus damage to frozen opponents, it’s a nice one-two attack. (Note: In the screenshot above, I had chosen Destabilizing Shot rather than Mercury Coating, but in later runs I switched this up.)

Destabilizing Shot – Not the most useful skill but it does decent damage at level VII. Try to nail the strongest mob with this in every fight to make them less likely to dodge and parry. Toss-up, taking this or Mercury Coating.

Passive skills of note:

Fireproof Clothes – Terrific skill in combination with the Amulet of the Hotancold Song (which drops after the battle in the crypt in chapter 12) which freezes an opponent but sets the wearer on fire. Once the Ranger is fireproof and the Ogre has his Stench Aura, it’s a method of CC you will use over and over.

Party Leader Aura - I’ve tried this on some runs but didn’t have a sense that it mattered a great deal. Courage is only situationally valuable; a lot of the time, you need to delay your turn anyway and respond to what the game’s AI does.

Elf
Rainbow Arrow – I love this skill. It does massive damage and, in a few fights, you can set things up so that the Elf hits a row of opponents with it.

Elven Song – Sometimes useful once you get the version at level VII that only hits your enemies. Take this last.

Agent X (Thief)
See the above chart for recommendations. Nothing here in the way of new active skills that are particularly exciting.

Passive skills of note:

Feet Clan Reflexes – Make sure you take this when it’s available. Being able to strike and move away without damage is a nice combination.

Ogre
Charge of the Green Giant – Situationally useful. Think of it as a line-of-sight ranged attack. You need the version at level VII that gives you initiative before you’ll really use it, though.

Spicy Belch – Not very useful but you have to take something.

Passive skills of note:

Stench Aura – Tremendous skill; it basically strips magic resistance from enemies near the Ogre, making freezing them easier. Pick the version at level VII with a larger radius. Many of the fights in Futon cause you to stick closely together, so this often comes into play.

Wizardess
Alkantarad Major Beam – I like this skill; you will find chances to hit several opponents, in some fights. But even hitting one opponent is money. I take the version at level VII with more damage vs. more range.

Pronfyo’s Swap – Some rare usefulness when you have an opponent at range that is running from your party, or to escape target attacks (where opponents put patterns on the floor and attack the next round). It's also helpful on the last fight, when she can get surrounded by adds. Otherwise, it's rarely useful because the Wizardess has so many better ways to hurt your opponents. You might prefer to go back and grab the fireball, in fact.

Dwarf
Durandil Axe Throw – Terrific damage-dealing skill for the Dwarf, who badly needs damage-dealing. Take it as soon as it's available and use it every fight.

Drunk Rage – Situationally helpful but rarely very useful. In Futon, you have fewer chances to be surrounded by a large number of mobs. Don't take this with any priority, as fun as it looks.

Pickaxe Strike – Rarely very useful, but you have to take something. (On some runs, I take the level VII version of this instead of Drunk Rage, which I never end up using.)

Barbarian
Crom’s Brawn – Taking this to level VII means you get a double turn on the turn it delivers. In other words, you don’t lose a turn when attacking. One of the biggest damage abilities, it's a must-have.

Terrifying Blow – On my last run I took this all the way down to level VI and passed on Rib Crusher, which I almost never use. I did find some use for this, instead, to set up auto-attacks. I also hit all the passive crit abilities.

Crom’s Pecs – Situationally essential on fights when enemies (e.g., cultist paladins) have an aura that drains you of your stamina (leaving you with no option but standard attacks). Try to take a point in this before the first fight at the DL. Use this ability to restore it to yourself and the other melee.

Crush the Weak – Situationally valuable. I gave the Ranger the Ring of the Big Nap, which allows him to put a mob to sleep for one turn. This allows the Barbarian to crush that mob during the same round with 400% damage. Some of the fights have adds sleeping at the beginning of the fight; you can use this ability there, as well, to take one out before it becomes a threat. This ability works against the Avatar's shield in the last fight, so you definitely need it at the end. The version of this at level VII isn't essential.

Priestess
Youclidhian Conduction – This ability becomes useful when you get the version at level VII that only hits enemies.

Youclidh’s Lightning – I wasn’t a fan of this before because it’s very situational, but the version at level VII is pretty good.

Passive skills of note:

Aura of Inner Wealth: Must-have skill, it basically provides residual healing in fights when your group is huddled up closely (there are quite a few like that). Also terrific for healing your ranged, who are often grouped near the Priestess.
Chapter 11 - Back to the Futon
There are lots of passive and unguarded loot stashes and chests throughout this DLC; some hold epic gear and you can get to them immediately—but don’t. Go to the first fight before sacking all the various free loot chests. You need to reach Balthazar (he’s in the hallway east after you complete the first fight) before you start accumulating gold. He will exchange all your gold from Limis for 6000 “new” gold. Don’t start adding to your pool of gold in Futon until you do this “conversion” first.

Futon Fight 1
Try to stealth-move Agent X to take out a spellcaster (to the right, not pictured in this screenshot), then do the same when a second caster appears (after adds appear from the top-right in round 4). Everyone else can stay grouped and close to the starting area. Adds will appear here also in round 4, but you can use crowd-control to eliminate them when they do (they line up great for the Collar of Martial Ubiquity). Leave some things in the loot bag so you can come back to pick up gold after you visit Balthazar.

Now head east and let Balthazar "convert" all your gold. Then you can visit all the loot caches noted on the map. A switch on the south part of the garden will lower the gate that gives access to a chest and bookshelf. (Advance warning: You do not want to turn in the books for this bookshelf; it gives you a penalty.)

Balthazar has a lot of gear upgrades, but you won't have the resources to purchase everything you need, initially. Look them over carefully and pick the ones that give you the biggest near-term advantage. Sell any extra epic gear you've been carrying around from the original game; he pays decently for it. Eventually, you will have more gold than you can spend and you'll be back to buy more. Note: Many items in Futon are not statistically much better than epic gear from Limis, but instead have built-in effects and abilities that are very powerful. Take close note of those.

There are two puzzle rooms on this floor.

The first is immediately south of the garden (see map right). Talk to the Puzzler in this room. Near her are four riddles, noted on the map. The answers are:
  • 1: North wall puzzle: Friendship.
  • 2: North-west wall: A map.
  • 3: South-west wall: Face to face.
  • 4: South wall: -13.

The second puzzle room is south of the first fight (identified by the green asterisk on the map). You will find a manual "The art of barter" which tells you how to calculate a math problem to solve the puzzle. Or just use this solution:

Beer + Skull x Chicken - Loot + Beer = Beer.

Inside is Drow History Book 2/3. Follow the main quest line, "Temporal Reconnaissance." It will lead you to the second fight.

Futon Fight 2
The quest line will send you down to the basement, where there is more free loot you can pick up. Note that you can't reach part of the level until chapter 12.

The mobs in this battle have the ability to change places with your characters, so expect them to end up right in the center of your group. Follow the lineup pictured. They are immune to freezing and being scared, but not stun or knockdown. This fight will award you with Temporal Magic 1/3.

On your way back you will get attacked by Dlul’s cultists; make sure you heal from the last fight before you start combat.

Futon Fight 3
This fight introduces you to the new sleep dynamic featured in many fights in the DLC. Certain mobs can put your characters to sleep; sleeping characters miss their turn if they're not woken up. If a character begins or completes a turn standing next to a sleeping character, or if the sleeping character takes damage, they will immediately awaken. (Healing them will not awaken them, but Youclidhian Detox Cure will.) If your characters wake up before the end of the round, though, they will regain their turn.

In fights with sleep attacks, keep your characters grouped together. Then, when one of your non-sleeping characters' turns comes up, they will automatically wake up characters next to them without needing to move. The fail is when you have a character separated from your group who cannot conveniently be reached by other characters.

Other than that, you will find this fight to be easier. The mobs will group up and expose themselves to AOE attacks.

Futon Fight 4
This one is on the main floor on the patio outside, to the south. Mobs are fairly well spread out in this one, but on the whole it isn't too difficult. I use Loubet's Anticipation at the start. I send Agent X to take out the Architect and Worksite Healer who are standing at range. Use the ranged to slow down and take down the golem as a priority. (If the golem goes into Overload mode, move away or you'll be one-shot, though a goblin can heal the golem and disable this mode.) The remaining adds group up for Dwarf Throw. Adds appear on round 5 from the west. It's difficult to finish off the others before they enter.

In the hallway by Balthazar, you will pick up a side quest called "Human Resources." It's got two fights that are harder than other fights in this chapter, so I'd save it until after fight #4, when your characters will have a chance to level up.

Futon Fight 5 - Petronella
Petronella is in the garden to the far north; this is perhaps the easier fight of the two, though you can take them in any order.

Keep your ranged in the back corner or melee mobs will run around your front line to reach them. Send Agent X in stealth mode to the bottom-right area and assassinate the summoner. Stealthy mobs will move up to the rocks (in front of where I have the Barbarian positioned) in the first round.

Futon Fight 6 - Ursula
This can be a somewhat difficult fight. The secret is to keep your ranged far back and away from any melee. There are lots of stealthy mobs in this one. Mobs will ignore attacks of opportunity to run around your melee and score on your ranged, so keep them as far back as you can.

I threw the Dwarf to deal with a cluster of mobs in the back-left, and had Agent X stealth back-right, to eliminate the summoner in the far back. Without the ability to keep summoning mobs and using some crowd-control for the melee attackers, this fight is manageable.

Futon Fight 7
Returning to the main quest line, you will be sent back to the future (i.e., to the DL, a.k.a. the Dungeon League) to fight in between bookshelves and crates. The cultists can put you to sleep, so this is another fight where you need to stay close together. Don’t move out to deal with ranged until all the melee are eliminated. In this fight you're introduced to auras, which provide a spatial debuff. The one draining stamina is brutal until the Barbarian has the skill Crom's Pecs, which replenishes stamina.

This fight drops the book Theology: Dlul 1/3. If you left anything in the loot bag, it will be sitting nearby when you return to the dungeon.
Chapter 12
This chapter assigns you a multi-part main quest called "In the Architect’s Boots." You can take these in any order.

Futon Fight 8 - Fix the north wall
The ogres have the ability to crush chickens and instantly heal themselves for 200. There are 6 such crates, each containing 2 chickens. Once freed, the chickens will attack the other crates and free themselves. AOE effects that kill chickens as well as ogres therefore have value. (Killing all the chickens that have gotten free is also part of the victory, so when you can't take out an ogre consider taking out a chicken.) If the chickens are dead, the ogres can't eat them and heal themselves.

Focus and eliminate individual ogres, one after another. Don’t stand in a line with other characters; the ogres do a linear AOE attack. Ogres have high physical resistance and low magical resistance, so your ability to freeze them will come in very handy on this fight.

Futon Fight 9 - Inspect the wine cellar
This is a relatively easy fight that requires you to advance to close with the mobs in the back. The top portion has an archer, the lower has a stealthy mob and several ranged. The Barbarian can jump the crates to pounce on the other side once he clears the top area.

The main quest line will send you upstairs to the tavern.

To the southeast of the tavern, near the stairs, is a switch that opens the gate in the garden, permitting you access to the south-east area, which has some loot, including a chest.

As you head west you will come upon a temporal anomaly puzzle. This is a shell game puzzle, where you have to keep your eye on the chicken that is targeted and then select it. On the third round, the chickens teleport in and out, making it impossible to track how they move. Instead, take notice of the color and shape of the teleport flash, and pick the targeted chicken that reappears using the same effect it used to disappear. This puzzle awards the book Temporal Magic 3/3. NOTE: You do not want to turn in this set of books. It awards a penalty, not a bonus.

Futon Fight 10 - Improve treasures
This fight comes after you make selections for the decor of your dungeon (the selections are irrelevant, as far as I can tell, though you can get an achievement for making the silliest possible choices). Head south along the walkway. It's critical to disable the two spawn points (directly down/south on the screen, on the opposite end of the room from the party). Adds will appear from the right also, but that location can’t be disabled and won’t be active until later in the fight.

I used Loubet's Anticipation at the start and sent Agent X to handle the switches. It’s a suicide mission, but it made the fight relatively easy to manage once those were flipped (if you use Loubet's, dodge one attack of opportunity, and you have the right gear, only one set of adds enters from the two spawn areas). Sending the Ogre behind the right pillar, by the way, will prevent an archer mob from running back there to harass your party.

Futon Fight 11 - Knocking on heathen's doors
West and south of the temporal anomaly puzzle is a room where you can pick up a side quest, "Knocking on Heathen's Doors." It will require that you visit two doors on this floor and then return for a fight. It's a pretty straightforward battle. The mobs will group up to permit a lot of AOE. The line in front of the Ogre and Dwarf are set up nicely for the Collar of Martial Ubiquity.

Head down to the basement to inspect the storage depot and develop the lower levels (no fighting required) then head over to the break room (southeast area) to find another side quest, "The Professional Backseater." This will send you to a fight east of the well of souls.

Futon Fight 12 - Professional Backseater
The melee who move in from the lower-right have strong AOE abilities. Try to crowd-control them and kill them off as fast as possible. The Ogre should have an anti-magic aura by now to obliterate their magic resistance and make them easy to freeze.

Heading back to the east after this fight, you will be able try the brazier puzzle. Flip the switch to start it. All you need to do is click two braziers of the same color, one after another until all have been revealed. Use the photo for reference:
The puzzle will give you a chest that contains the book Drow History 1/3.

You still have one part of the quest remaining—Set the Traps. Go to the garden and solve each of the puzzles.
  • Automated cauterizer with built-in cremation: Polarize the plumbing.
  • Carbonizing Blazing Plasma Fountain:
    Align the fishplates.
  • Poisonous trapdoor of neurotoxic breath:
    Stiffen the swivels.
  • Rotating carousel of triple cosmic perforation: Chamfer the hoses.
You will get traps assigned to the dungeon; having her trap the toilets is pretty safe if you don't want to be bothered by them. There's nothing important in the toilets (especially if you already looted them).

When you are sent to look for the inspector, you will trigger the next fight in the yard outside the tavern.

Futon Fight 13
This is another fight with ogres who possess immense health and access to chicken crates (and sausage crates, also). Like before, kill any chickens that get loose, and focus down individual enemies. Freeze and eliminate the queen and any others that are casters as a priority.

This fight drops a legendary (light-blue) weapon for the Ogre.
Chapter 12 - Part 2
There is a side quest "Sales from the Crypt" available from Vorgazar in the garden if you want to do it now. It's rather difficult. Alternatively, you can delay and do it in the next chapter, but if you do it now, it will probably push several of your characters to level 14, which is useful for the final fight of this chapter. If you choose to do it now, you will find Vince the Keymaster hiding in a room west of the tavern (on the second floor) then turn in the quest. Here's what you'll be facing in the crypt:

Futon Fight 14 - Sales from the Crypt
Be aware that the mobs have a lot of health and can run a long way. They will risk attacks of opportunity to reach your ranged, so keep them back as far as you can, as the fight develops.

A mob on the lower-right side will stealth and head toward the Priestess; if the Ranger moves back and right, next to the end of the casket, he will reveal him. The mob in the back right will also stealth and will move behind her.


Here's an example of what will happen:
Note that the mob at the top left will stealth and move to the end of the casket, behind the Elf.

A few rounds into the fight, adds will spawn on the west side of the room; they will cast an AOE that will freeze your characters, so keep the Elf, Wizardess, and Priestess behind cover.

This fight drops the Amulet of the Hotancold Song, a great CC device that allows you to freeze an opponent at the cost of setting yourself on fire. I normally give it to the Ranger (who has a passive skill that makes him immune to burning).

Back to the main quest line and the completion of this chapter:

Futon Fight 15
This is another fight with cultists; stay close together. Branching out means you won’t be able to rescue characters who fall asleep, and the mobs will incrementally gang up on you and kill you off.

There are two factions here, attacking each other (purple vs blue). I occupied the top region (as pictured here), cautiously took some mobs out at range, then let them thin each other out. There are too many mobs for you to eliminate all of them on your own. Have your own private war in that section of the map (a few adds will appear but they'll be easy to manage) and ignore the rest of the area for a few rounds. See the screenshot below for a sample of what I mean.


Have the Ranger use Hold Your Ground! (if you have it at this point) to give you better protection while you bide your time. Get healed, take on whichever mobs run up to harass you, kill the adds who appear nearby, and let the others kill each other off for several rounds. Then start to advance as a group to prevent sleep.

This fight will award the book Theology: Dlul 2/3.

After this, you’ll be taken automatically to the DL, but just for a cut-scene, then you return. When you return, chapter 13 begins and you're off to Urik’s Depths.
Chapter 13 - Caves and Urik's Depths
By this chapter, you have some of the more powerful active skills and should be feeling comfortable with them. The entrance to the caves is in the basement. You can pick up the quest "Bad Pick" from the workers near the entrance, but I recommend holding off and coming back to it later. If you pick it up and speak to Horace anyway, you will trigger a fight in the caves (below, fight 24). I would wait and not do it now.

Futon Fight 16
Down in the caves, you will fight glowing spiders and also be required to keep at least two allied dwarves alive. This is your first fight with allied NPCs. I start with Loubet’s Anticipation in order to move out more efficiently. I usually let the dwarf NPC on the left die (I throw the Dwarf next to him and the two spiders surrounding him, in fact; it's a lot easier to take those spiders out if you ignore the NPC) and act more aggressively to help the ones on the right. It's not a hard fight.

From here, you can venture to the northeast to encounter a Rock/Paper/Scissor puzzle with two additional components. Just make sure you select the item that wins both options, once two appear.
  • Rock > Chicken, Dagger
  • Parchment > Rock, Ale
  • Dagger > Parchment, Chicken
  • Chicken > Parchment, Ale
  • Ale > Rock, Dagger
This puzzle awards the book Theology: Dlul 3/3 (you should now have the set).

Futon Fight 17
In the second cave fight, you're dealing with spiders as well as mutated cave trolls. You're required to keep Halfazok, the dwarf king, alive (which is not too difficult; he has a lot of health and helps you against the opposition).

On the whole, it's not a hard fight given some of your new abilities. Chuck the Dwarf into the mass of trolls and spiders to begin occupying their attention. Don't line your characters up (horizontally, vertically, or diagonally); the trolls use a linear AOE attack, and they will detect the chance to take out a number of characters standing in a line. Keep your ranged behind cover, if possible, or at a distance from the trolls. Also, FYI, the trolls can eat the spiders and heal themselves.

When you're done sacking the free loot locations, head down to Urik's Depths. As soon as you get here, visit the vendor in the forge. There are some nice gear upgrades available.

There are side quests from Ragolax in the throne room and Korvac in the tavern. Hulfazok, the king, will send you after the slavers to the east. You can choose to do the side quests first or proceed with fight 18 on the main quest line:

Futon Fight 18
The Collar of Martial Ubiquity lines up nicely on this fight. Adds will appear at the top; you need to move your ranged out (behind some of the obstructions in front of the starting area) after a few rounds. There are opportunities for using Rainbow Arrow in this fight.

Futon Fight 19 - The Pavise of Kurinard the Immolator
You will receive a side quest for "The Pavise of Kurinard the Immolator." It has you find the entrance to an interior room in Urik's Depths, and when you initially enter, only the Elf, Ranger, and Agent X are present (the rest join after a couple rounds). I call that fun.

The left side gets blown, during the first round, so you should start the fight on the right. If you stay to the right side and don't move out, they will follow with a bomb to that side. Here is what it looks like when the Ogre and Wizardress appear at the beginning of round 3:

.
Futon Fight 20 - Arachnophilia part 1
This is another side quest. The spiders are tough to avoid, but this configuration keeps your ranged somewhat safe. Use Agent X to quickly eliminate a spider and make some space for your ranged. Adds will appear from the bottom of the screen, but by then you will likely have the fight under control.

Futon Fight 21 - Arachnophilia part 2
This fight is a challenge to keep the ranged safe—keep them far in the back. Spiders have a lot of health and will risk attacks of opportunity to reach your ranged, if they can. One set of adds joins the fight after a few rounds from the south. This fight will offer opportunities for skills like Rainbow Arrow, the Collar of Martial Ubiquity, and Youclidhian Lightning Chain.

Futon Fight 22
Back to the main quest line. Locate and burn down the three sisters. They stand in the back and charm the dwarves. Once they are dead, dwarf adds will fight for you rather than against you. A final group of enemy adds will spawn at your starting point on round five.

Delay your turns and let a couple melee mobs come forward at the start. I have Agent X stealth and assassinate Medoosa (top-left). One of the other sisters usually heads that way, and I have the Ogre and Dwarf combo take on one of the sisters (either the one that enters top-left or lower-left). Use CC to keep them from using their AOE attacks and burn them down as a priority. This fight awards the book Drow History 3/3.

Don't miss the chest in a cage to the northwest of this room.

Futon Fight 23
This fight starts automatically on your way back. It's difficult in that the dwarves charge and spin for immense damage (especially on Epic Gest mode and higher). On those modes, they're likely to one-shot your front line. Be prepared to heal. It's imperative to protect ranged from these early attacks, but there's really nowhere to hide. Run the Elf to the right side of the melee to line up Rainbow Arrow, if you can, to attack and hit many dwarves at once.

Be sure to turn in Drow History before you leave Urik’s Depths (the bookshelf is on this floor). It awards +1 crit to your party.

Futon Fight 24 - Bad Pick
This is from a side quest, "Bad Pick." You can pick it up in the basement once you leave the caves and Urik’s Depths. It returns you to the caves to talk to Horace, then on to the fight to steal pickaxes. Some of the positions in this fight are fixed; you need to move a healer in range of the Barbarian before too much damage goes out.

When you return to the basement, turn in Theology: Dlul in the Break Room (if you haven’t already). It gives your party +10 magic/stamina regeneration.

After this you're called back to the DL, but it’s just a cut scene, again, to transition to a new chapter; then you return to the dungeon with the final series of quests, “A Broken Clock,” to plant the hourglasses.
Chapter 14
At this point (if not earlier) you will be able to purchase Temporal Magic 2/3 from the vendor, Balthazar, on the main floor. It's easy to miss because this is the first time a book has been available from a vendor. But you don't want to—the book set awards -1% crit when you turn it in! A penalty.
Futon Fight 25
Your assignment is to kill three Mothers of Naps. (I know what you're thinking, but these are bad mothers.) The mothers are three NPCs standing at range (left, lower-right, and top-right) channeling a spell. They do not attack, but they’re guarded. As before, when fighting cultists, it is better to stay close, as much as possible, due to sleep attacks.

Use Loubet’s Anticipation at the outset for increased mobility. Send Agent X to assassinate the mother to the left, the Barbarian to the mother at the top-right, and the Ogre throw the Dwarf at the mother to the right. Only the Barbarian is at real risk of being put to sleep, and in that case, have Agent X run over to wake him once his target is eliminated (with Loubet’s Anticipation he should be able to cross the entire room in one round). The difficulty is staying grouped and also dealing with melee mobs with very high health, and adds who are sleeping at the start but wake up periodically (all enemies have high movement values, so when they awake they can run up to pretty much any of your characters).

The Elf’s Rainbow Attack and the Wizardess’s Alkantarad Major Beam were both handy in eliminating collections of opponents.

After this fight, there is a side quest "Oshassassination" available in the basement on your way to the next fight (it doesn’t require fighting). Accuse the Provost at the completion.

Futon Fight 26
In this fight, you face an evil party that is similar to your own but has both a paladin and a healer. It can be a rather difficult fight because the melee mobs have very high health. It's essential to stun/knock over and quickly take out the caster and healer.

The enemy thief will stealth and end up back by your ranged, be aware.

I send Agent X in stealth to quickly assassinate the evil wizardess, and throw the Dwarf down there to occupy them and the enemy ranger. Spells and abilities that freeze are essential; standing next to the Ogre, mobs have little to no magic resistance. The Barbarian can pounce and hopefully stun the group to the top-right; then, with some planning, the Elf can Rainbow Arrow and take a couple out.

Futon Fight 27
The third hourglass has you fight inside the tavern. I use Loubet's Anticipation at the start. Take out the Preacher of Dhisency who is to the lower-right (I use Agent X). Use Agent X and the Dwarf to take out the healers in the back, who annoyingly keep restoring partially wounded mobs to full health. The rest of the fight should be straightforward.

Futon Fight 28
Move the Ranger up to the mob in front of him after buffing the group. That will cause the enemy Thief to ignore Agent X and target your ranged (which is good because you want him at full health to generate crits).

There are three sets of anomalies in this fight, including Vanna and Losax in the second group, and Golbargh at the end. They act similarly to their counterparts in earlier fights (including Losax spawning clones), so it's imperative to knock them out asap. Other than that, the fight is simply a matter of managing a diverse series of mobs, including some at range. Use Agent X, for example, to take out the enemy thief before he can bomb your group. (He stealths along the top side of the room.) Note that completing this fight early does not stop reinforcements from coming in.

When you complete this fight, you're done with the dungeon proper. When you leave to go to the next step in the main quest line, you cannot return.

Chapter 14 - Back to the DL
You now return to the DL for the penultimate battle (the next two are connected; you can’t prevent the final battle from starting when you finish the one prior). Before you leave the dungeon proper, you might want to consider if you'd prefer to play an easier mode, because the next two fights are very difficult and critical fails are frustrating. If you do so choose, you have to modify difficulty before returning to the DL; you won’t have a chance afterward.

Futon Fight 29
Group your characters to avoid getting put to sleep by the cultists and to benefit from Loubet’s Anticipation (which I start with, here), and also to benefit from the Priestess’s healing aura.

I have Agent X move out and assassinate Gander Theogal, to stop his AOE attacks, then take out the other caster mob near him. Gander and the two paladins have an aura that kills off your stamina and doesn’t seem to stop even after they’re dead, so it means a rapid loss of abilities to your melee. Use Crom’s Pecs once the paladins are dead to restore your stamina. Try to keep the Elf away from them.

Initially, all the attack comes from the top-left, but sleeping adds will wake up as rounds progress. Adds tend to come in and position themselves in a line; you can blast them with Alkantarad Major Beam and Rainbow Arrow, so keep an eye on your positioning to make these abilities usable (i.e., don’t move a character into a position where either would hit them, if they were used in sequence).

Futon Fight 30
The final battle starts automatically after the one before.

The opening lineup doesn’t matter too much because you’re going to be forced to move, and the direction you move will likely be next to the Avatar of Dlul. This is a weird fight where you need to beat down a shield to stop a brutal area attack. If you beat it down before his turn, the Avatar will not finish the attack. On the other hand, the shield has massive health so, outside of the first round (when all your characters have their strongest attacks ready), it’s not possible to eliminate it dependably. While this is happening, adds keep appearing every round to annoy you. They start with low health but get stronger with each round. You can’t ignore them. So you will want to direct your AOE attacks at them when possible.

Points against the shield also count as points against the Avatar. So your attacks, even if they can’t take a shield down in the round, are still meaningful. Be aware that, when the shield is replaced, all the characters next to it (inside the square blue pattern box on the floor) will fall asleep. So this is your basic strategy:

On round one, take down the shield easily (with Agent X managing a crit or two). No need to move ranged out of the targeting pattern (this goes for any round where the shield is close to going down—no need to move unless it’s necessary to reposition to attack). Use abilities that do collateral damage to adds as well as the Avatar (e.g., Rainbow Arrow). Note that the Barbarian’s Crush the Weak ability will work on the Avatar when the shield is up.

On round two, move ranged characters to wake up other characters after they attack. Move all your characters off the targeting patterns this round. (So your melee will need to move to a new location before or after they attack.) On the ground around the Avatar is a box of glowing glyphs; as much as possible, finish your turn outside this area. Those are the bounds for his sleep ability. Use the Wizardess and Elf to help manage ranged mobs. Look at this as a battle of attrition; you have to keep the adds managed while you whittle down the Avatar. Ignoring the adds is not as viable a strategy.

Each round, keep an eye on where the next groups of adds will appear. Move the ranged away from the entry positions (since you’re in kind of a dance anyway); you don’t want them to get surrounded. Keep Agent X behind the Avatar all the time; use his best abilities as soon as they’re available. (The Avatar never turns.)

The adds do not have a ton of health but they do a lot of damage, can run a long way, and will prey on any wounded characters. They spawn in fewer numbers but higher health later in the fight.

Try to have a full Randomia gauge going into this battle.

Congrats, you defeated the last DLC.
Menzorian Bookshelves - Futon
The guide shows you how to acquire all the books while you're progressing through the quest line, but in case you missed one, here's how to find them. All three sets have three volumes each.

Drow History (Party +1 crit)
The initial volume you'll find is number two. It's in the puzzle room south of Futon Fight 1. You have to complete the puzzle to open the chest.


You won't find another volume until chapter 12. Volume one is awarded with the brazier puzzle in the basement. You have to complete this puzzle to open the chest.


You'll locate the third volume in Urik's Depths. It's a drop from Futon Fight 22 (a rather difficult fight). Note that the bookshelf is on this level, so be sure to turn the books in before you head back to the surface.


Temporal Magic (Party -1 crit)
You read that correctly; this book collection awards a PENALTY if turned in. So don't do it. (My guess is that it's intended to be a joke; it temporally turns back the benefit of the preceding book series.) But I'll show you where the books are regardless. Volume one is awarded at the completion of Futon Fight 2 (as described in the guide).


You're going to locate volume three next; it's awarded by solving the temporal anomaly puzzle on the tavern level.


The second volume is available from the vendor on the main floor sometime around chapter 14. You turn it in at the bookshelf nearby. DON'T!!!


Theology: Dlul (Party +10 magic/stamina regeneration)
Like the other sets in Futon, this one has three volumes. You will receive volume one as a reward for Futon Fight 7. I can't show you a map because it occurs in the DL, prior to chapter 12.

Volume two is awarded for completing the final fight in chapter 12 (Futon Fight 15).


The final volume, volume three, is given in the caves as an award for the rock-paper-scissors puzzle. You have to solve the puzzle to open the chest.


You turn in the books in the basement, in the break room. See the map.


Final Comments
The Dungeon of Naheulbeuk is a truly wonderful game that I (obviously) have spent many hours enjoying. I found the comic aspects of the game to be a welcome diversion and appropriate to the genre. I think the game would be improved by lowering the chance of critical fails and misses and instead creating additional complexity through combat objectives and a less predictable game AI (i.e., make the game more random at easier levels and smarter at harder ones). Options to add an action point would make the combat process more interesting. I hope the devs have a similar product in the works. Contact me if you want a playtester. :)

25 Comments
Xune 13 Jun @ 5:40am 
Great guide but i disagree about some choices of skills :

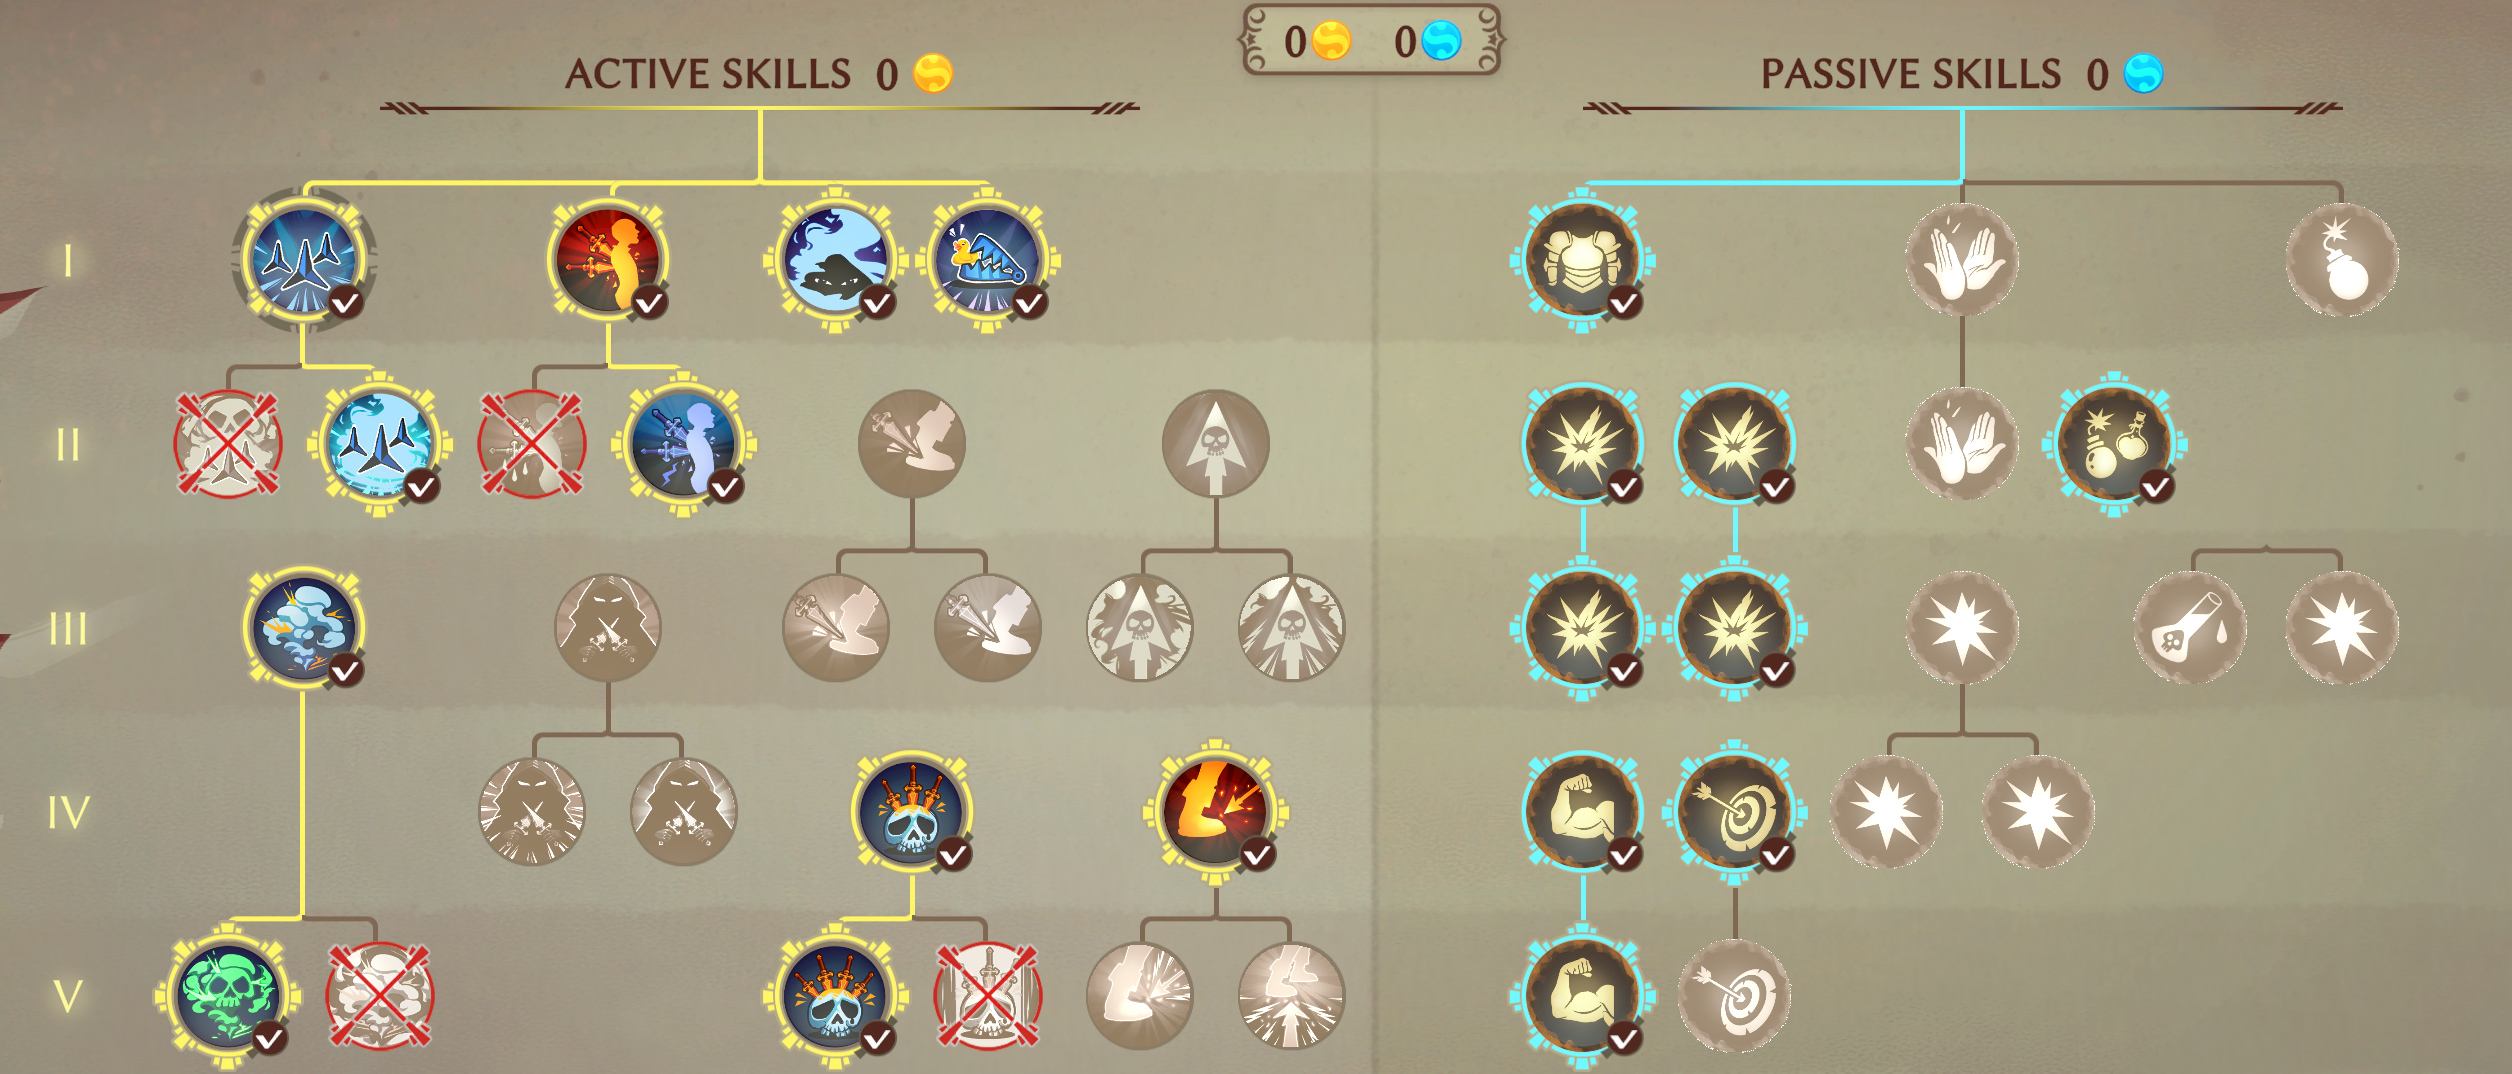
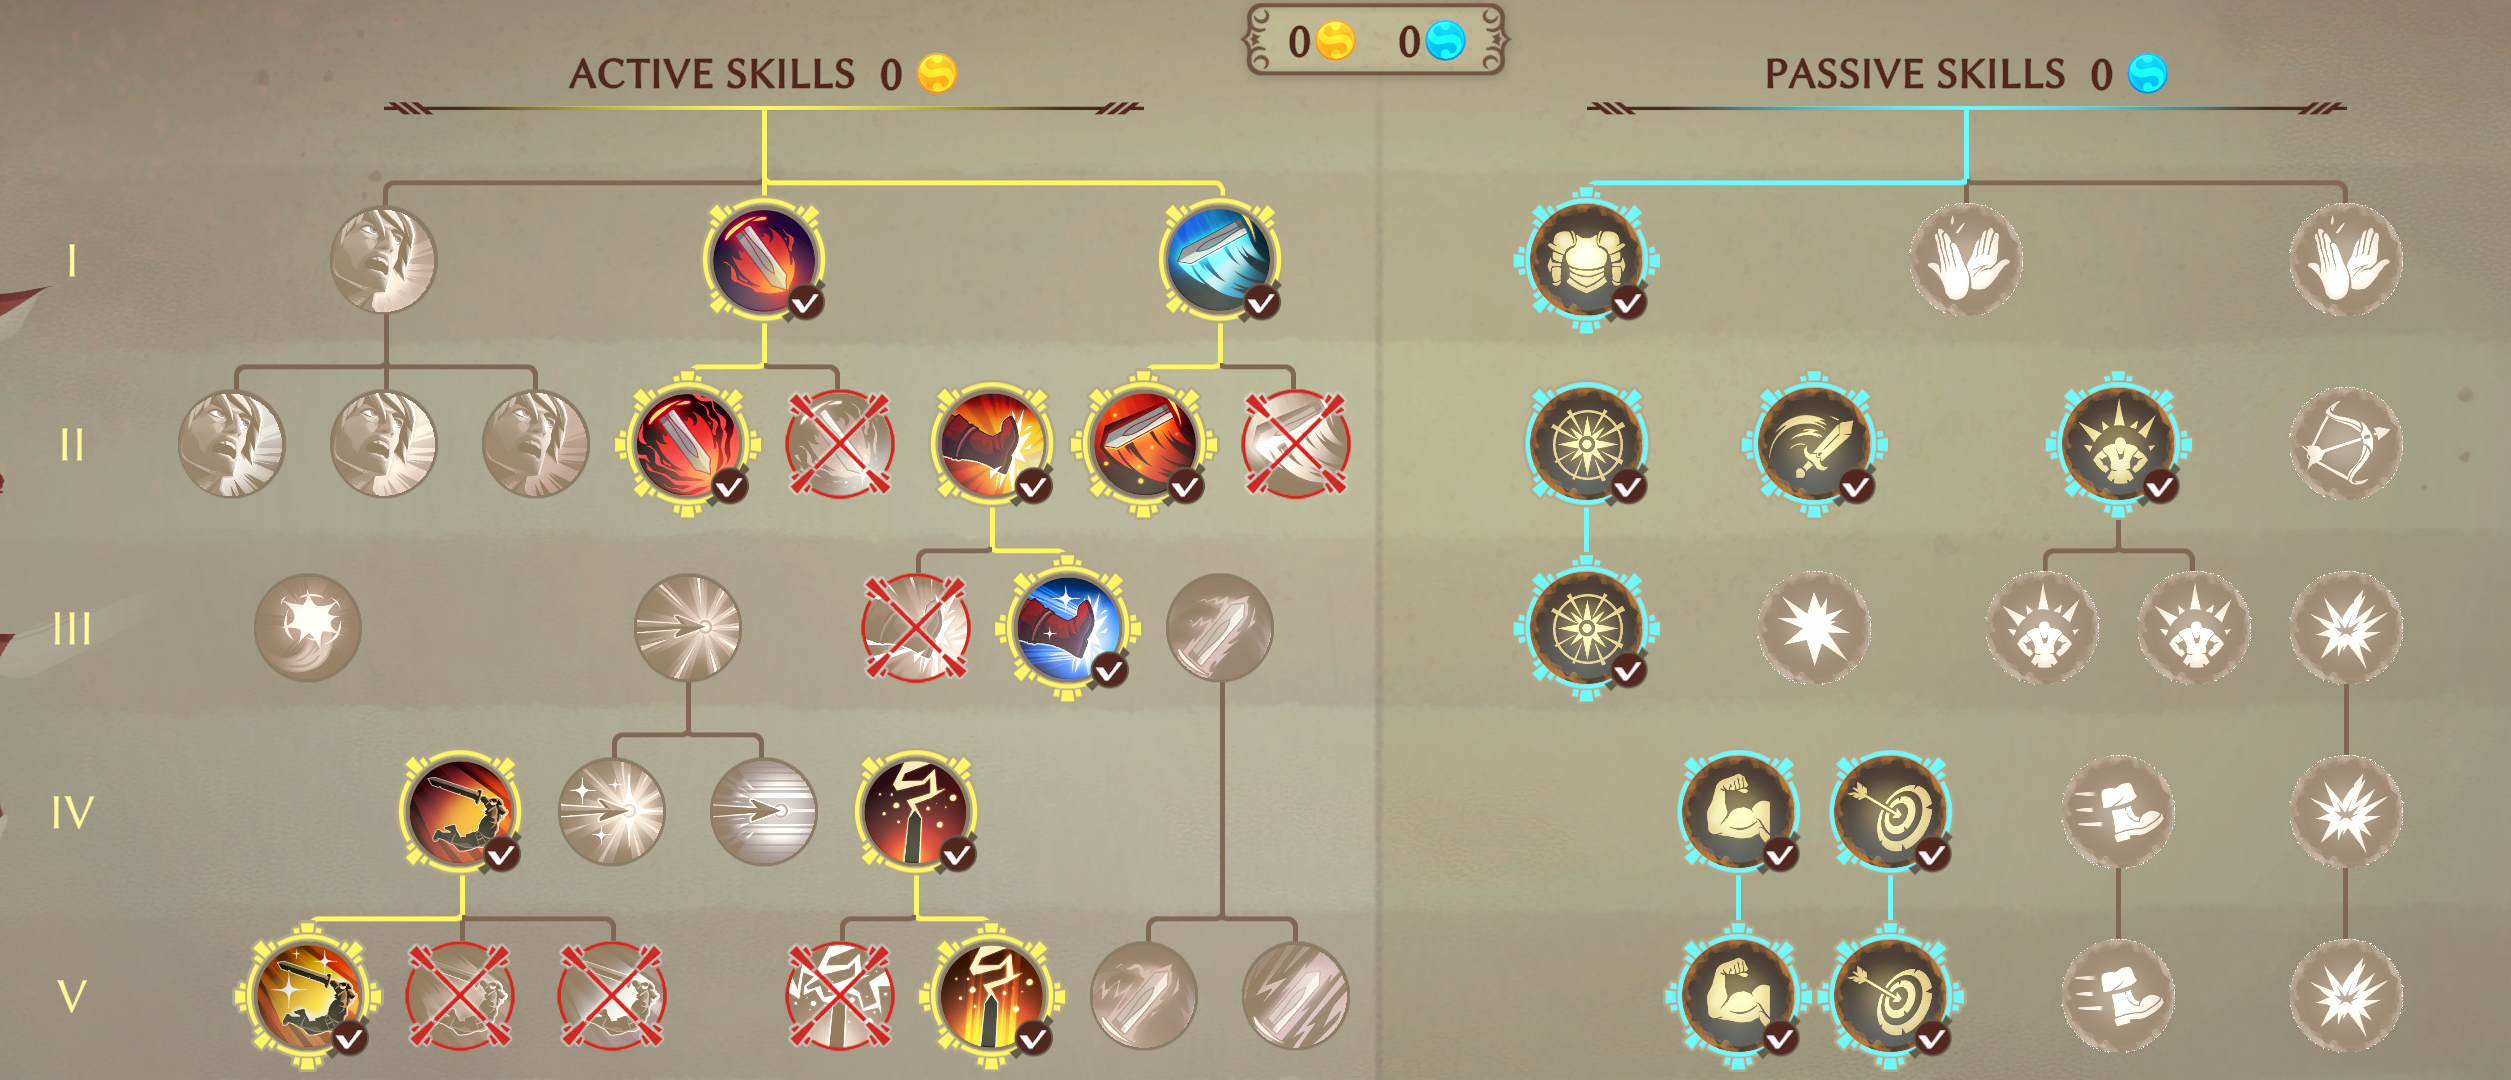
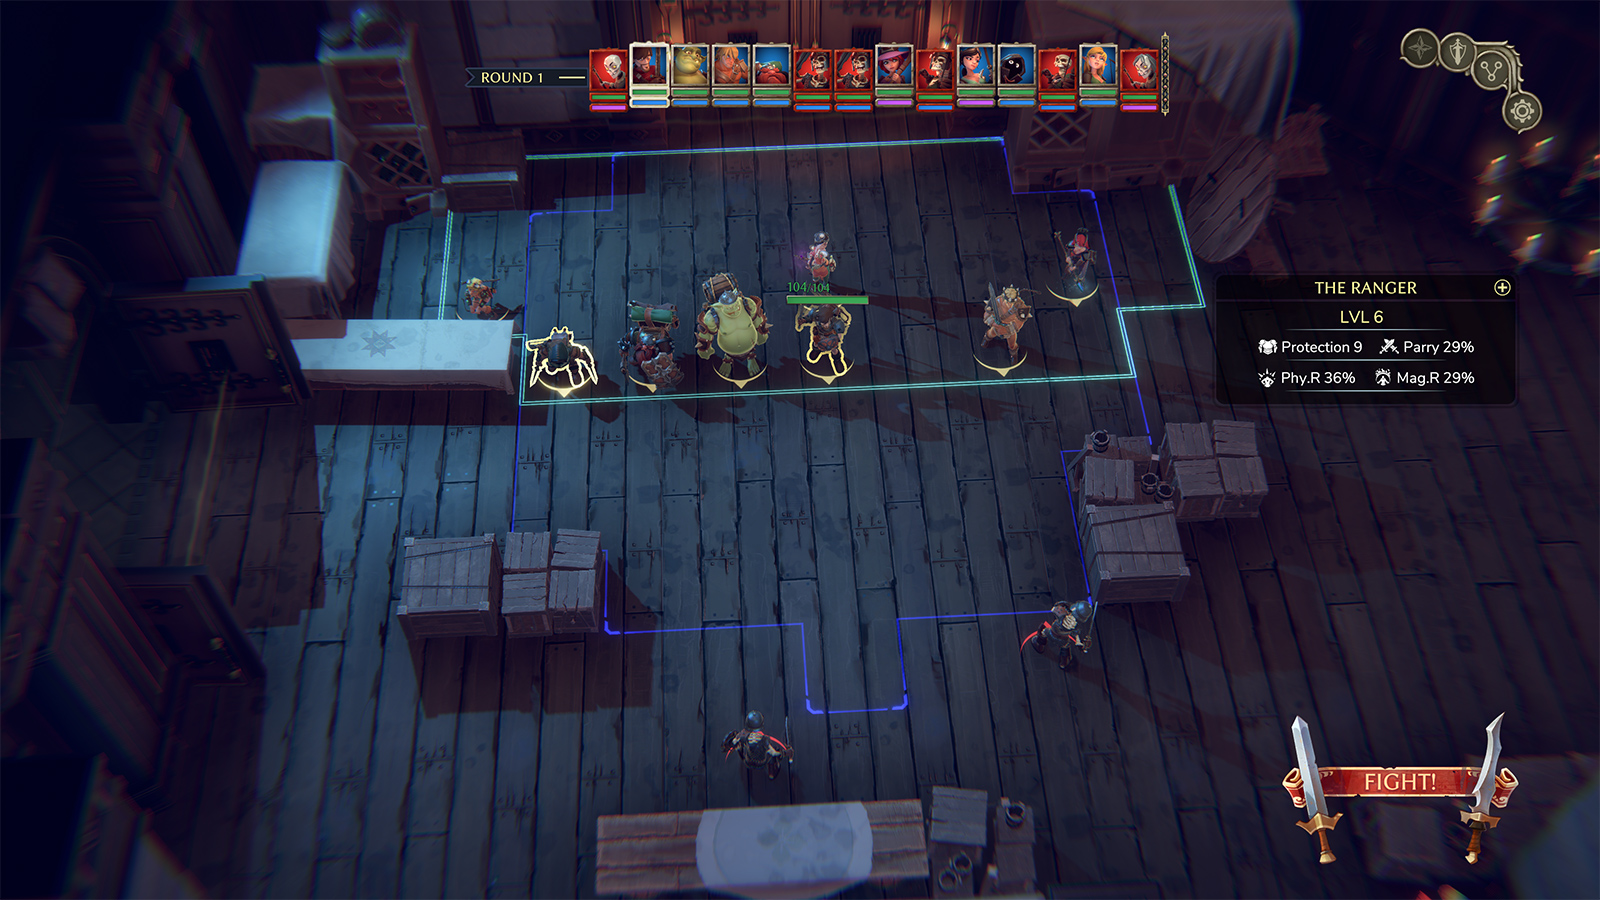
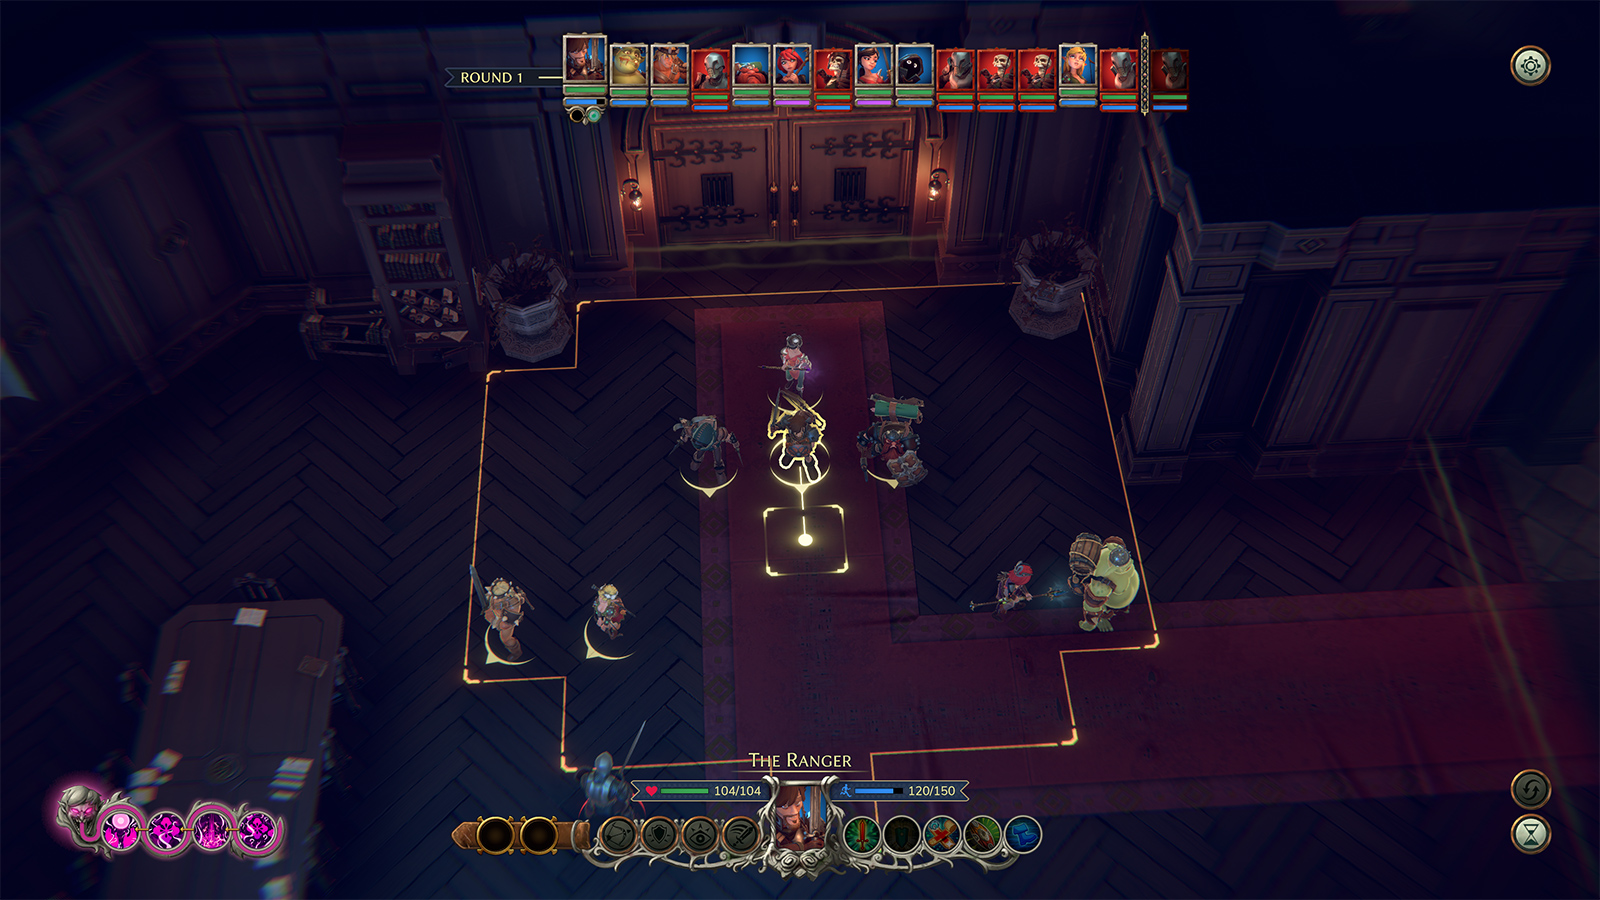
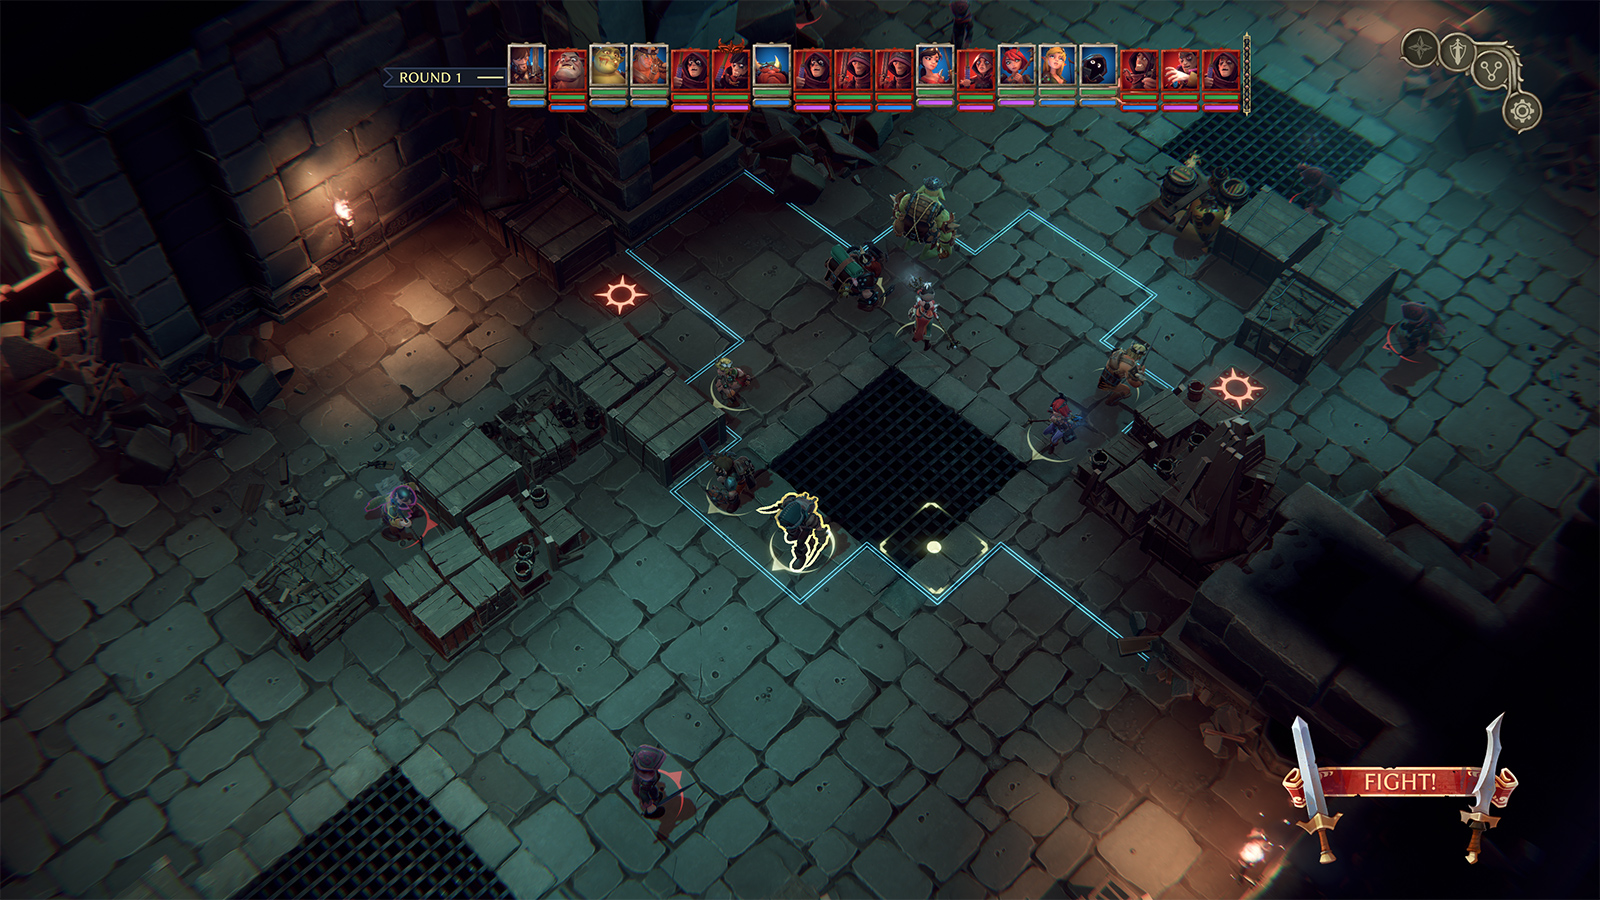
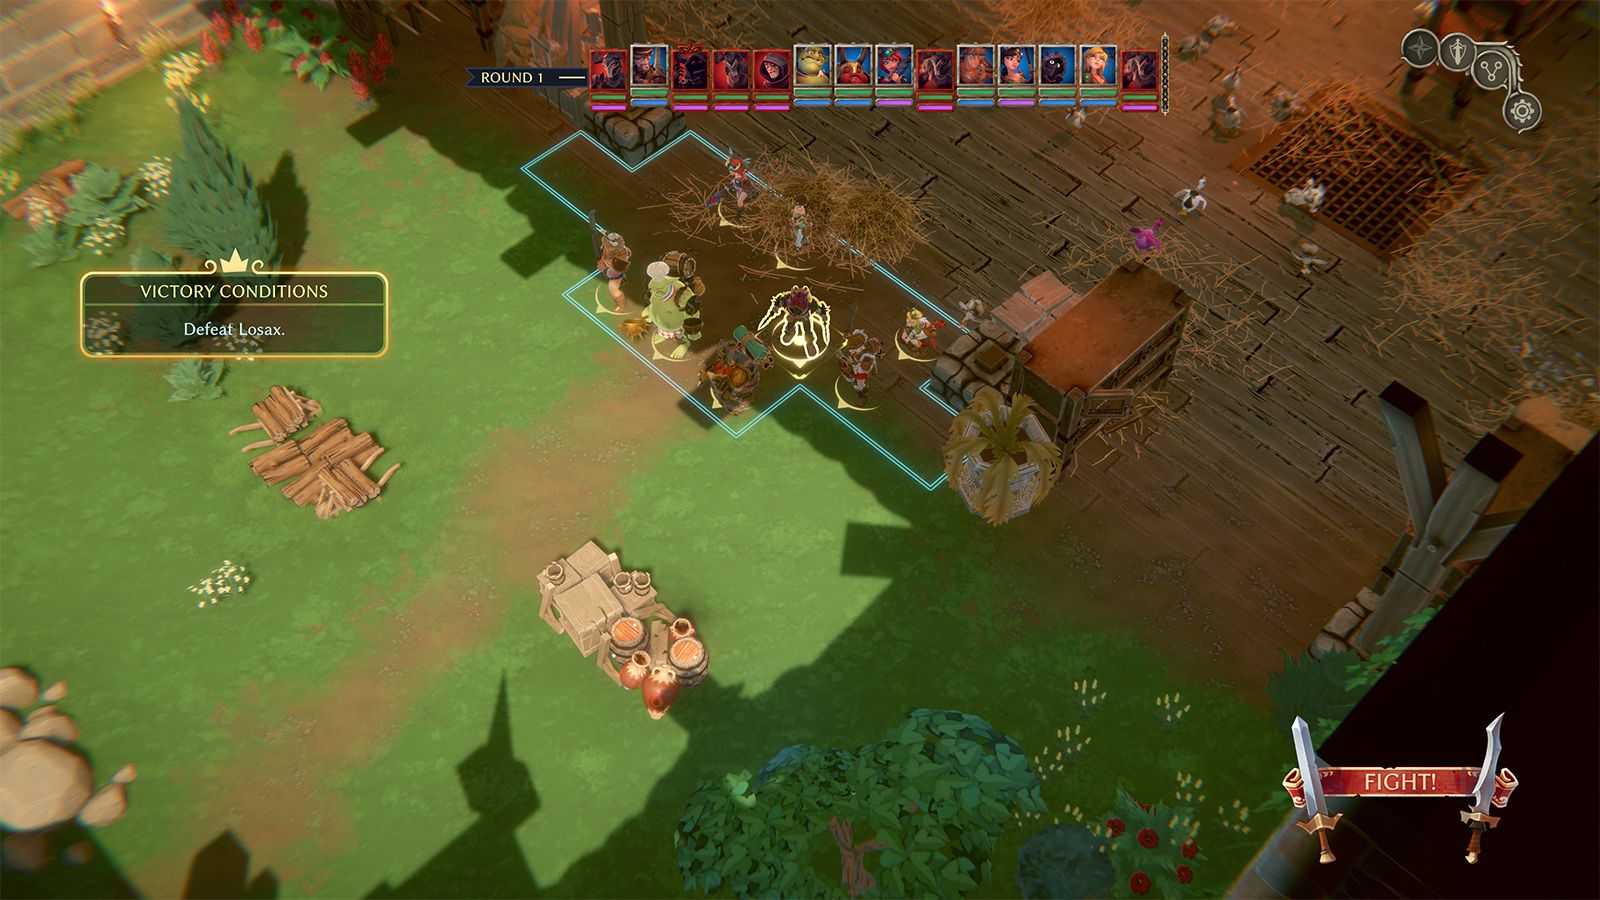
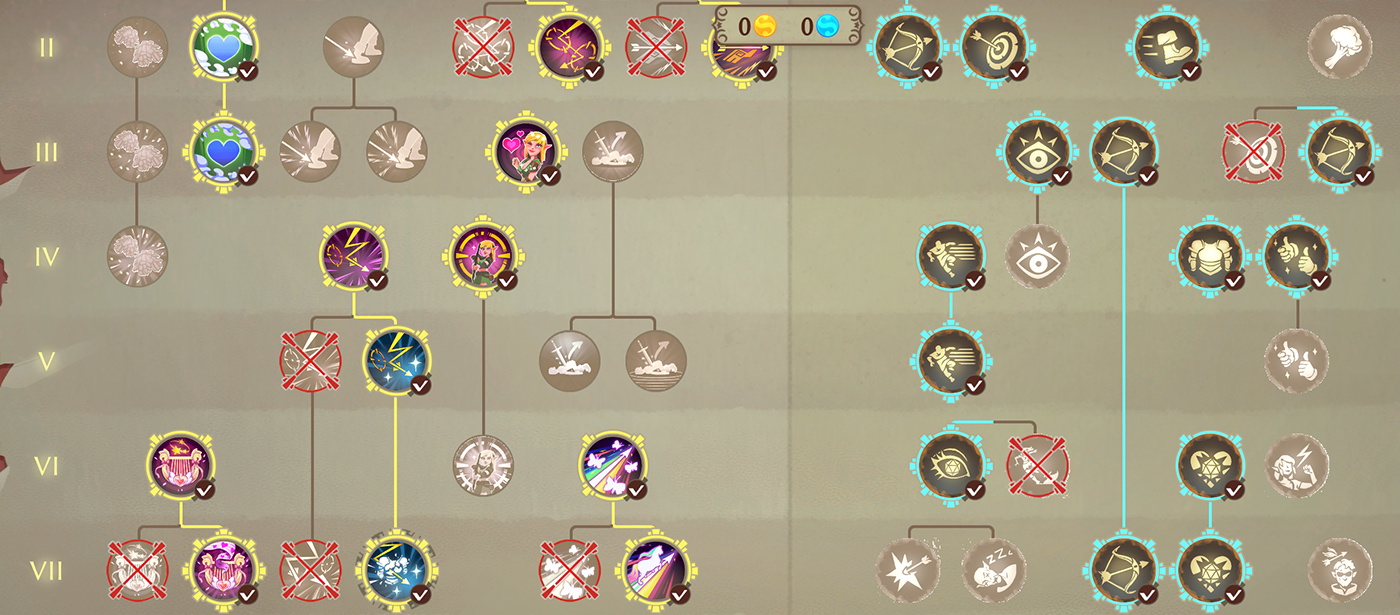
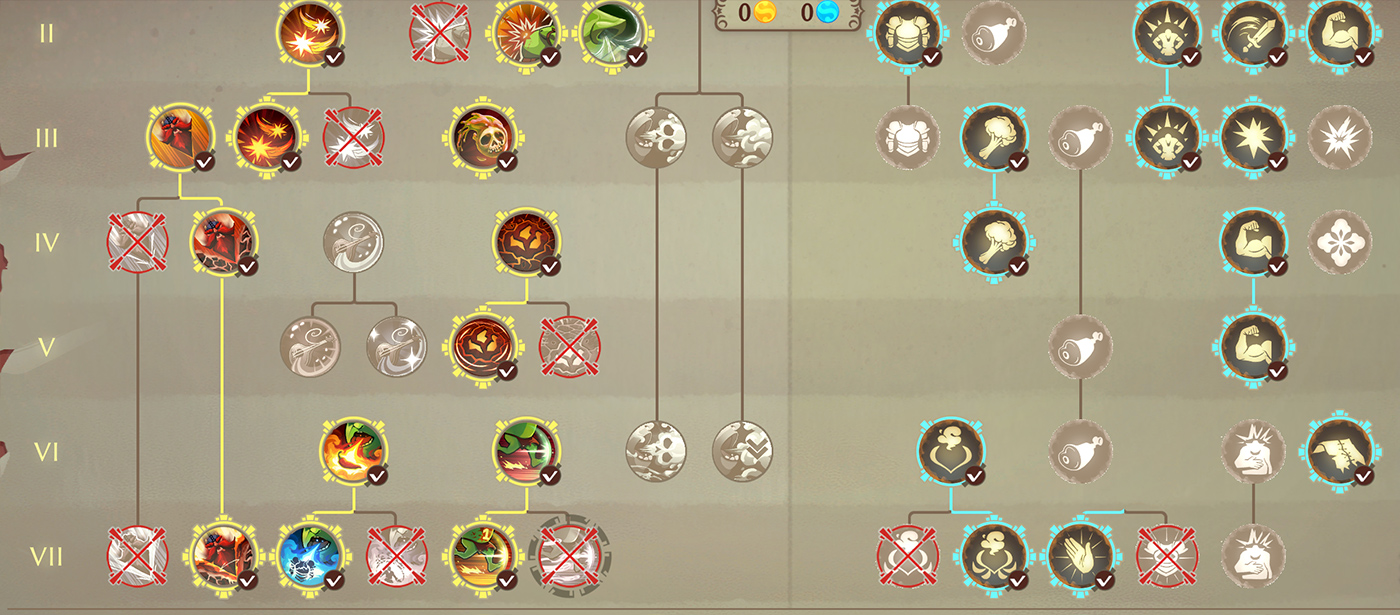
For the thief, taking the extra crit chance when you have no adjacent ally is a must have because he's often solo in the ennemy backline and even so it's an easy condition to do.
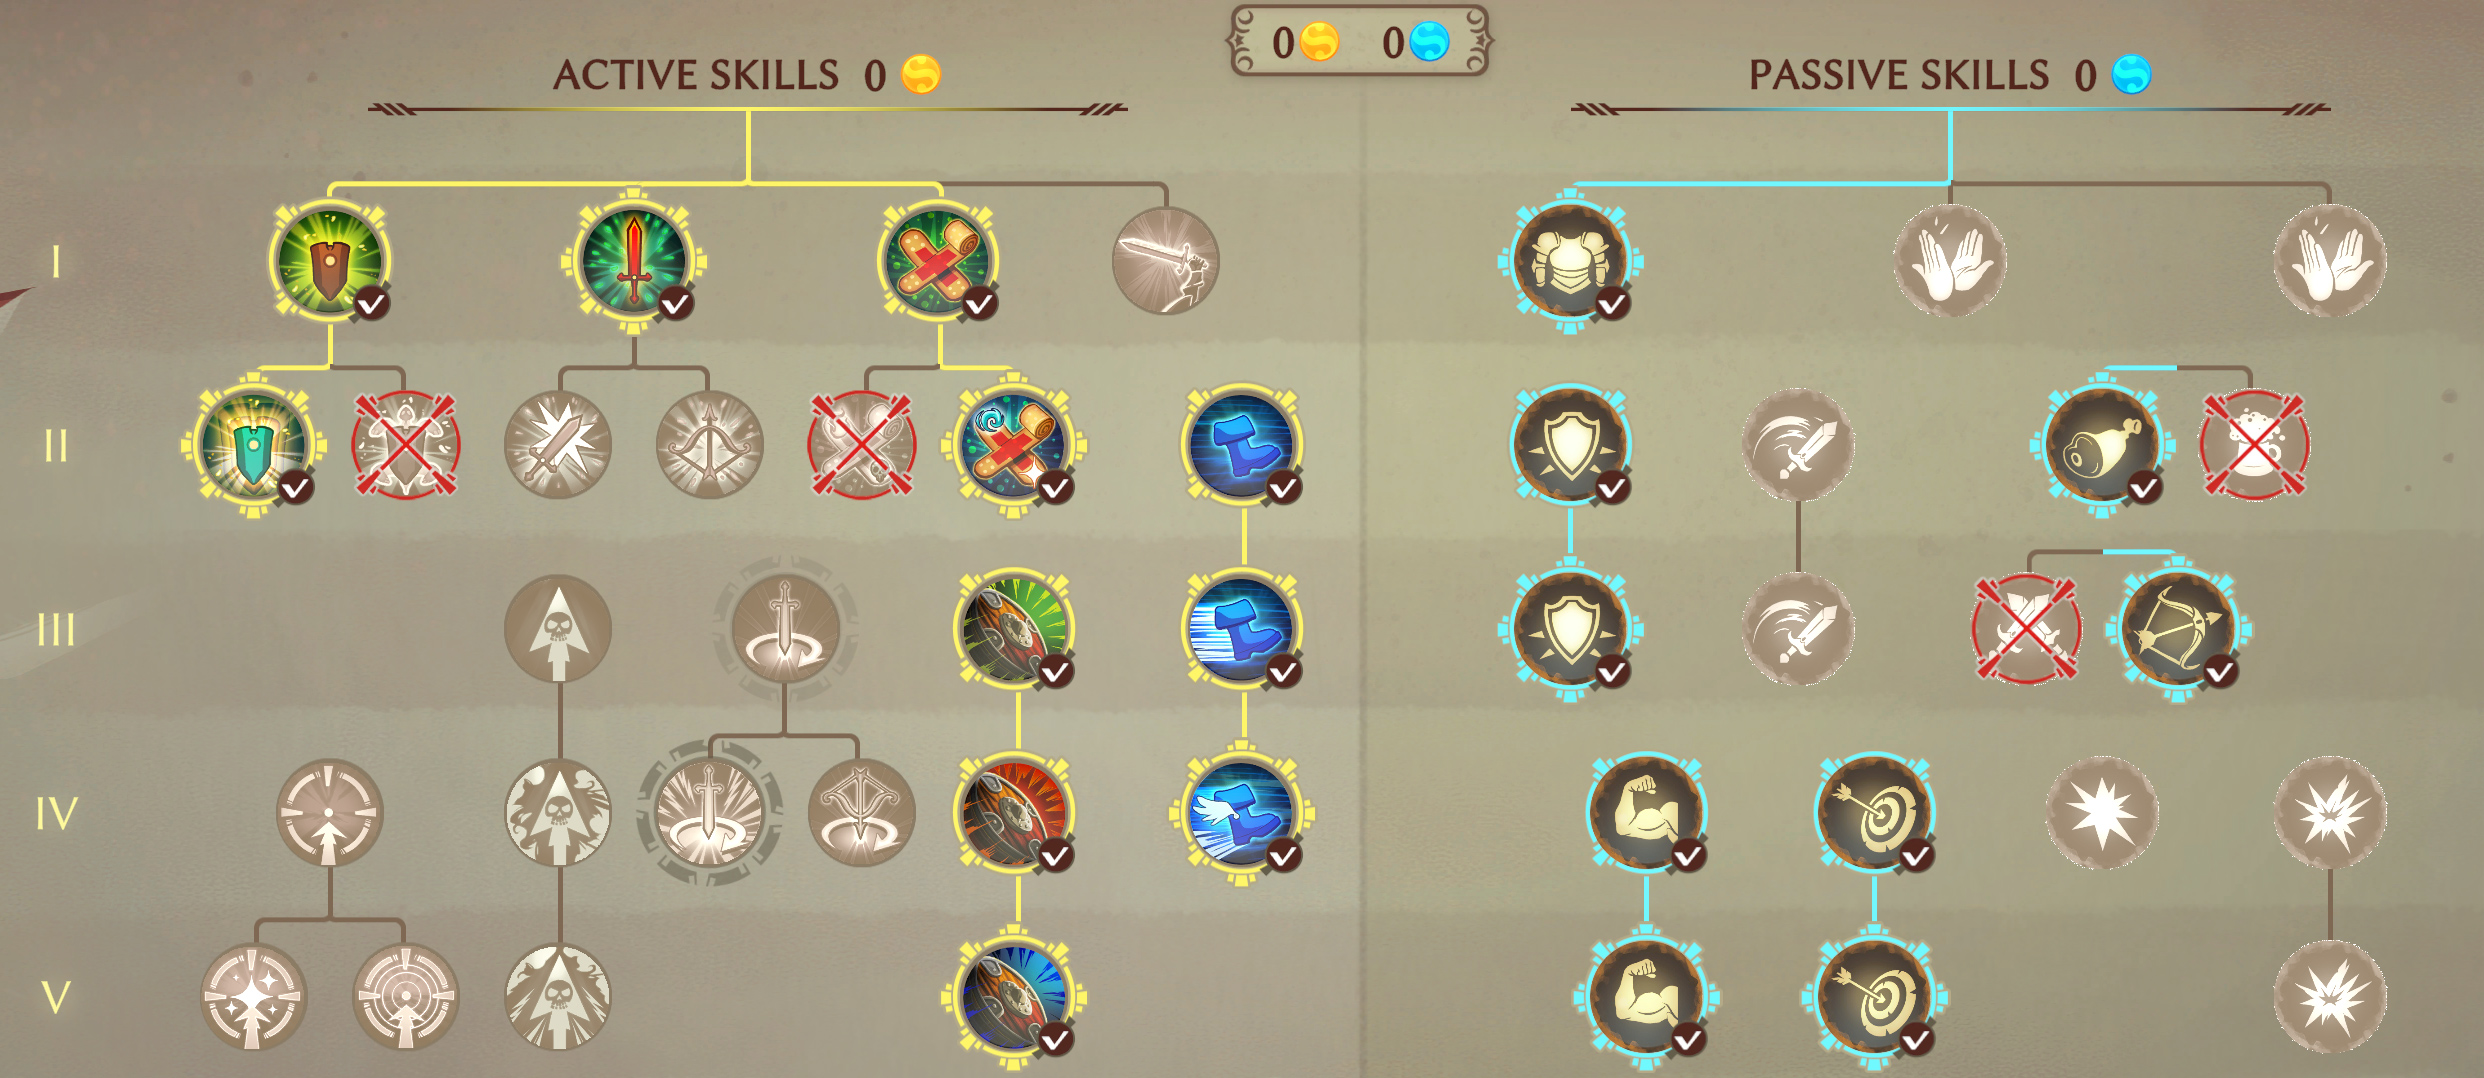
I suggest to avoid passive skills with the "full life" condition because you'll take damage at some point and lose the benefit completly.

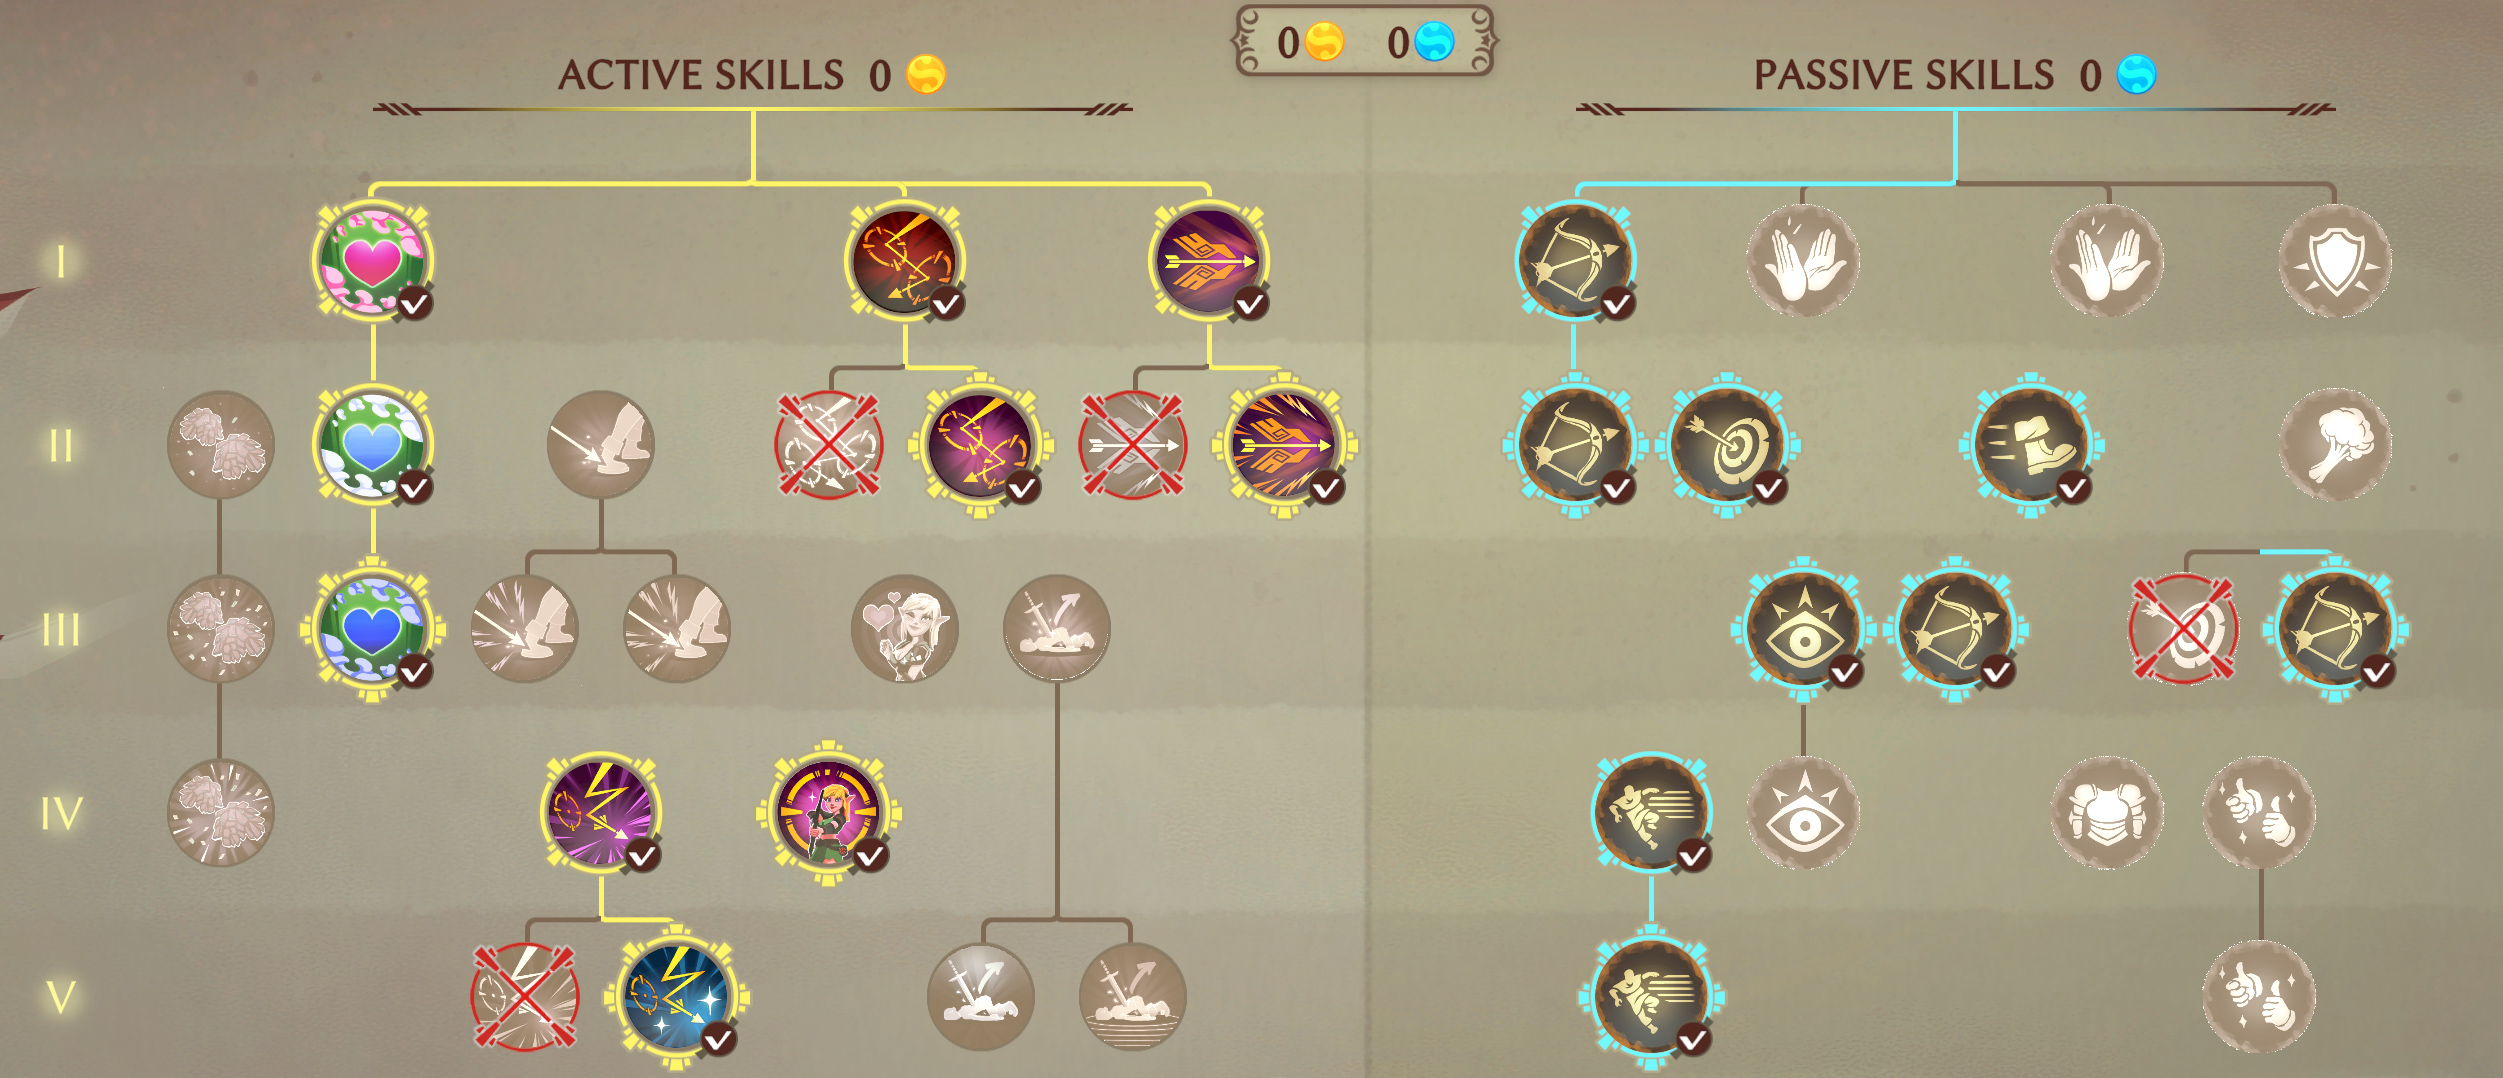
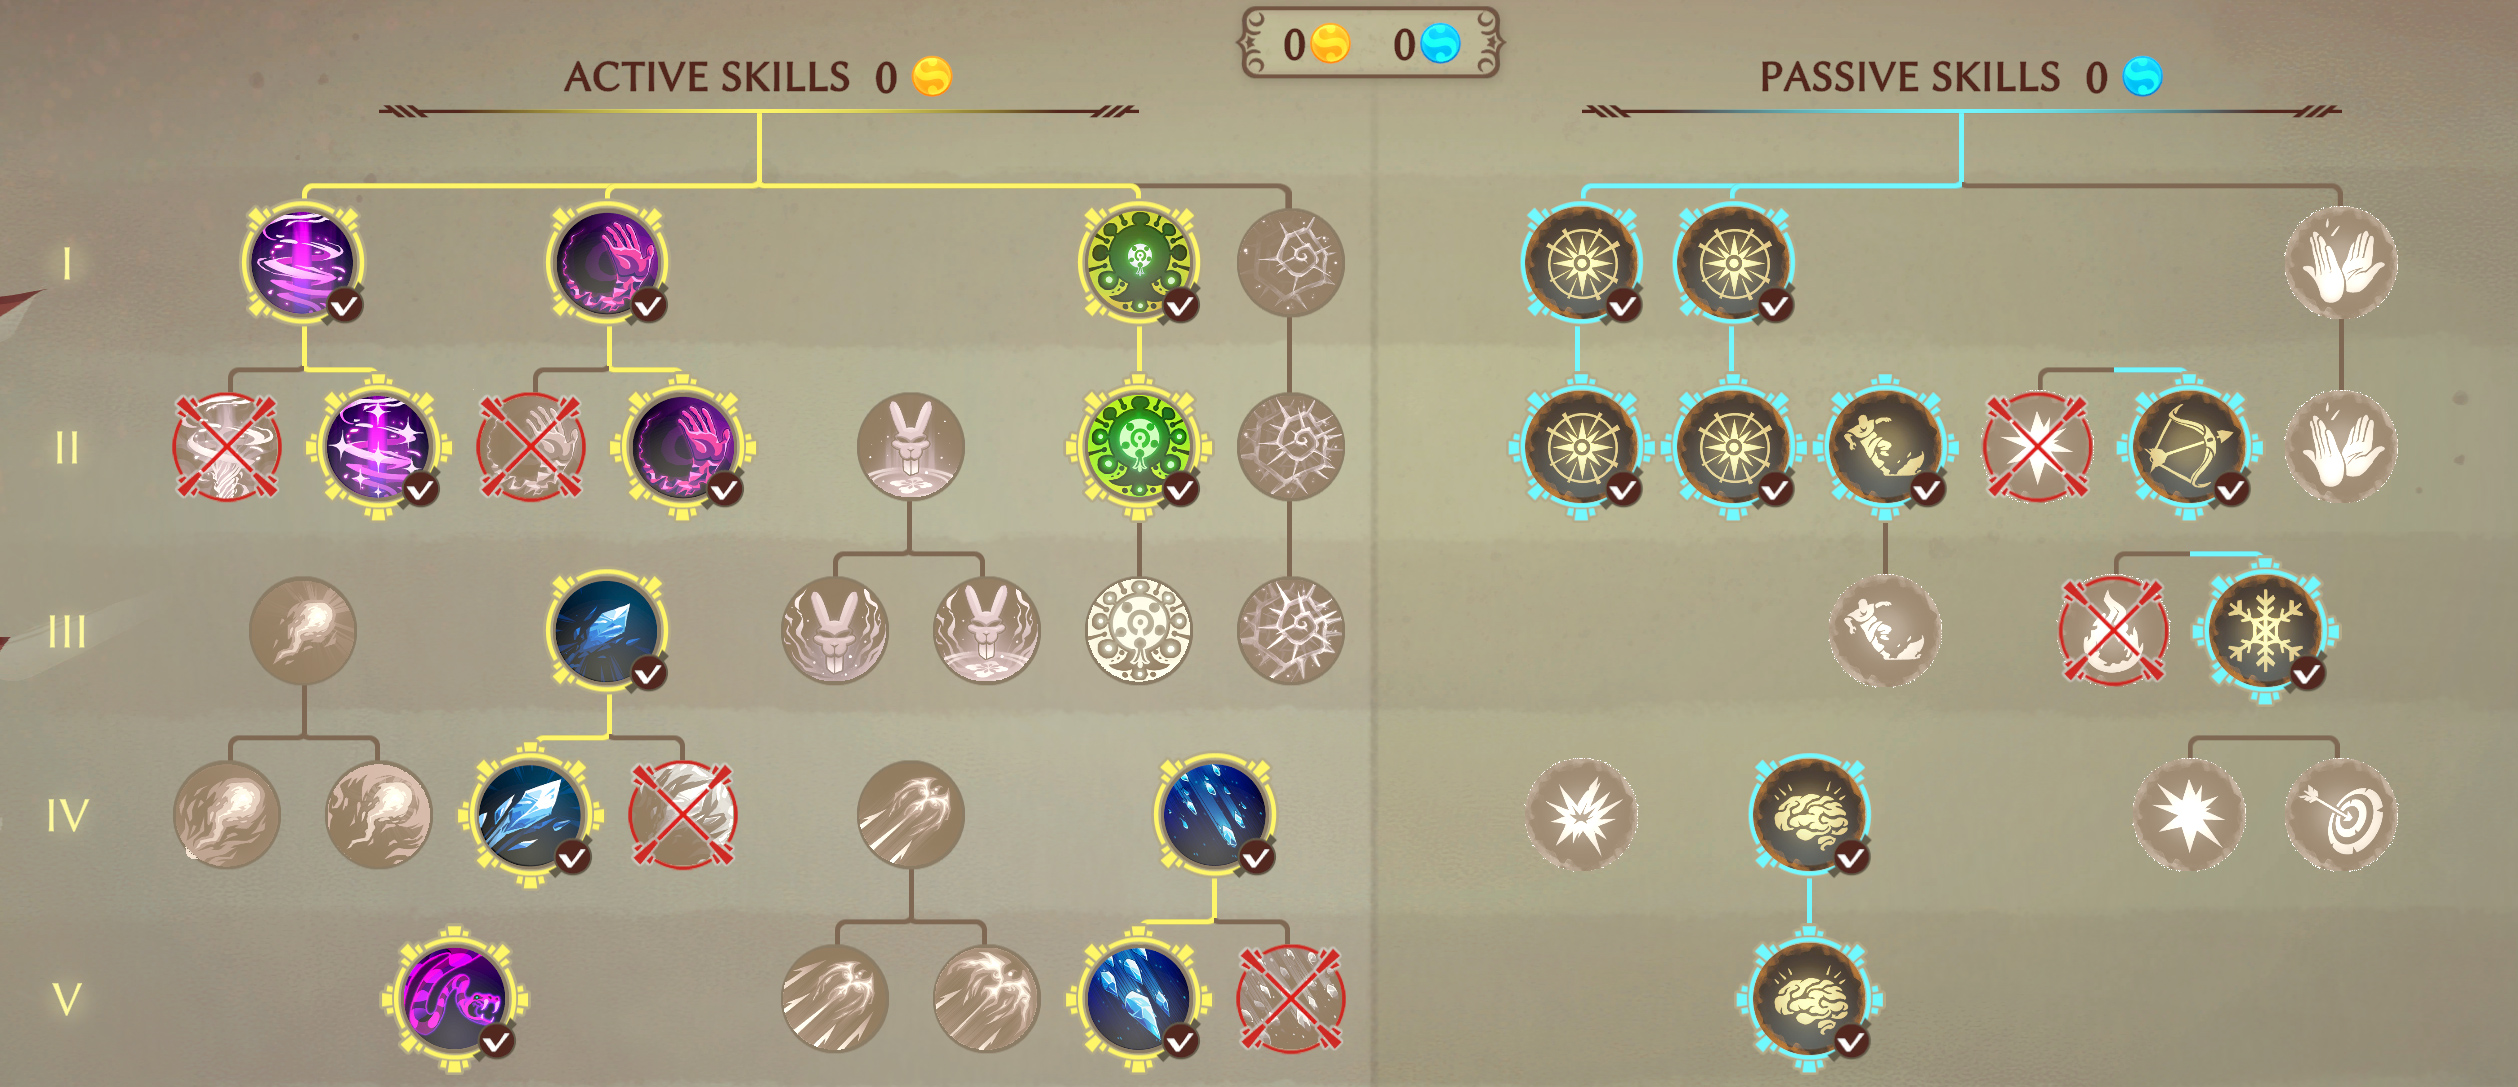
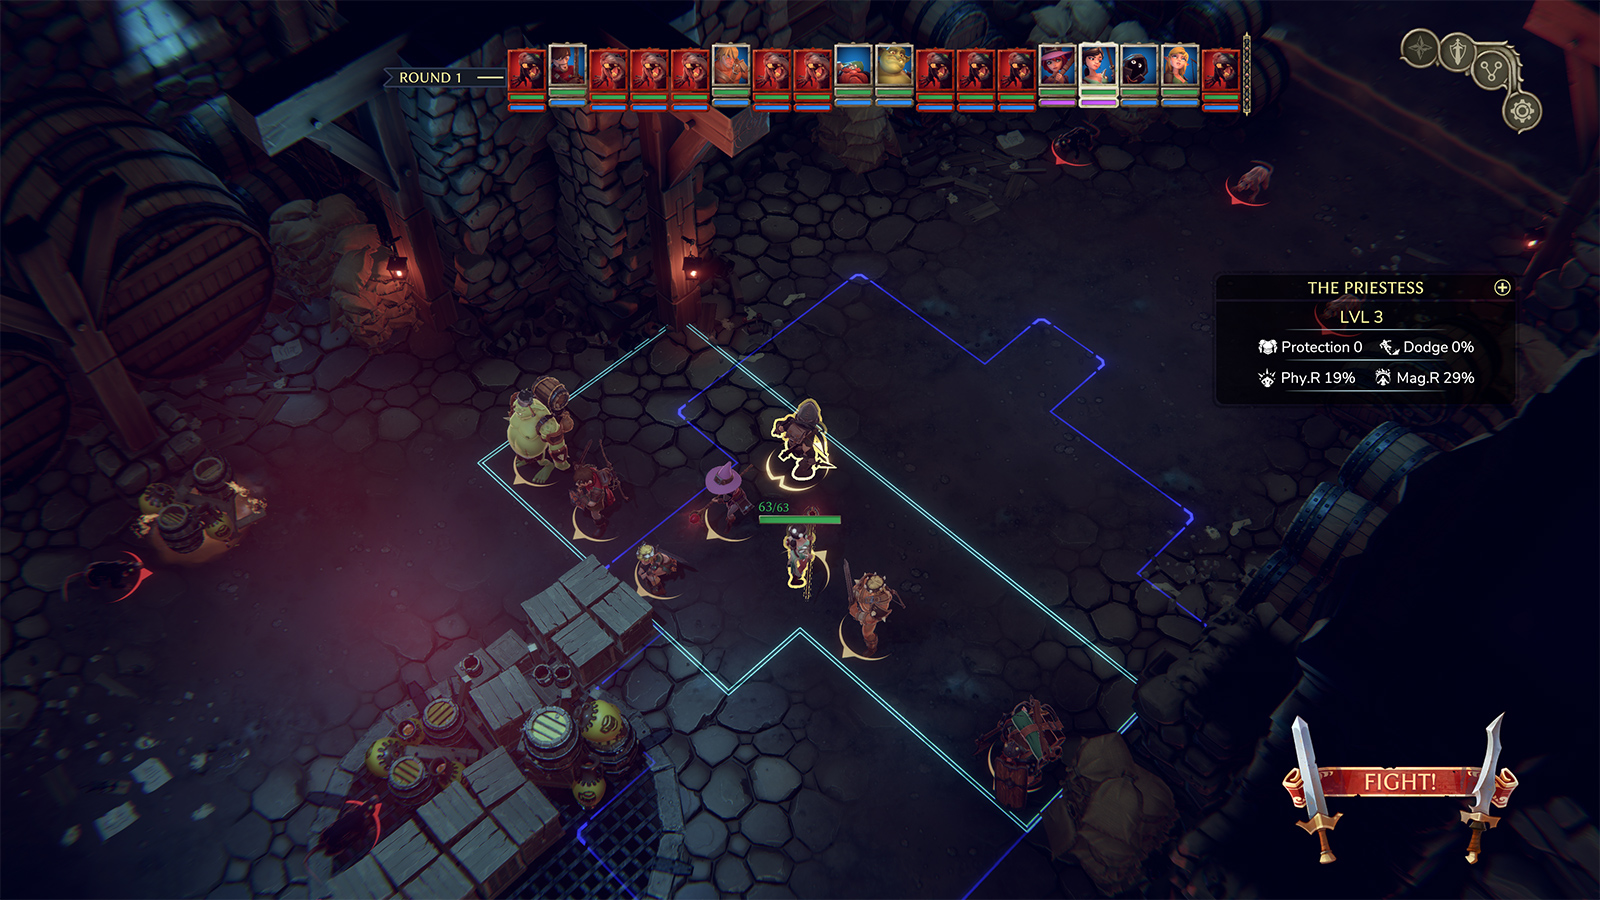
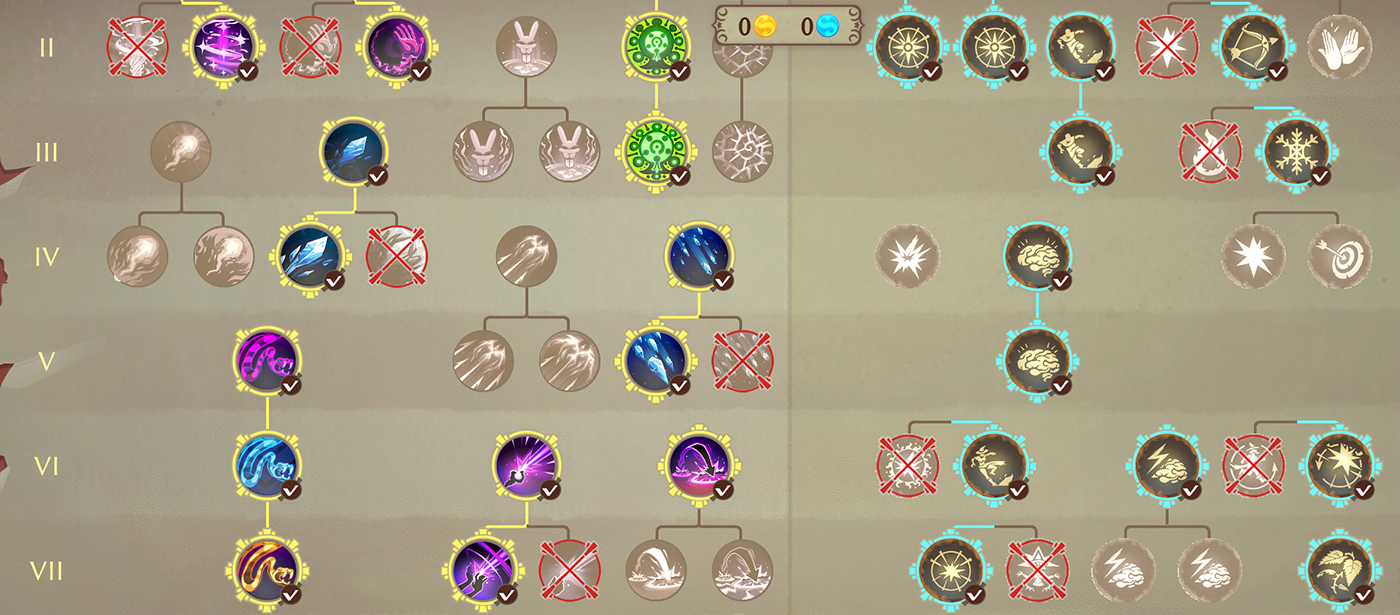
Imo the extra attack range on the prietress (double the base range of basic attack) is better than the precision malus.

For the wizardess, you must pick the 10% extra crit chance with the 5% critical failure. If you're worried about the malus it'll negate completly with a staff in the futon DLC. I personnaly took the fireball with the left upgrade and not the healing stuff because i didnt need it in the DLCs.
Nomad 21 May @ 9:28am 
Just dropped in to say thanks for this great guide ! I have this game on Epic, and just finished the base game with this guide. This is a very fun game, but the mechanics are a bit esoteric, so the guide was really helpful. Also, how did you figure out all the statue placements for the hidden fight ? There does not seem to be any in game hints that I could find about that !
Azeltorez Ⓢ 22 Mar @ 9:11pm 
The effect of Elf Eyes has seemingly changed since this was made to increase range, and given to swift footed to make it so the Elf avoids the first attack of opportunity each round.
Razzagall 14 Dec, 2024 @ 2:06am 
Hey, sorry to bother, I just started the game and there no really guide about the game except yours, and it's really helpful but you forgot to put the pitcure about barbarian build in the "Back to the Futon (DLC)
HB 6 Nov, 2024 @ 2:59pm 
hey are you really Michael Cranford? I saw your Bard Tale postmortem several years ago and loved the fact that you included Christian beliefs into that game.
Try_Fly 2 Jan, 2024 @ 1:58am 
Tnx a lot for the guide.
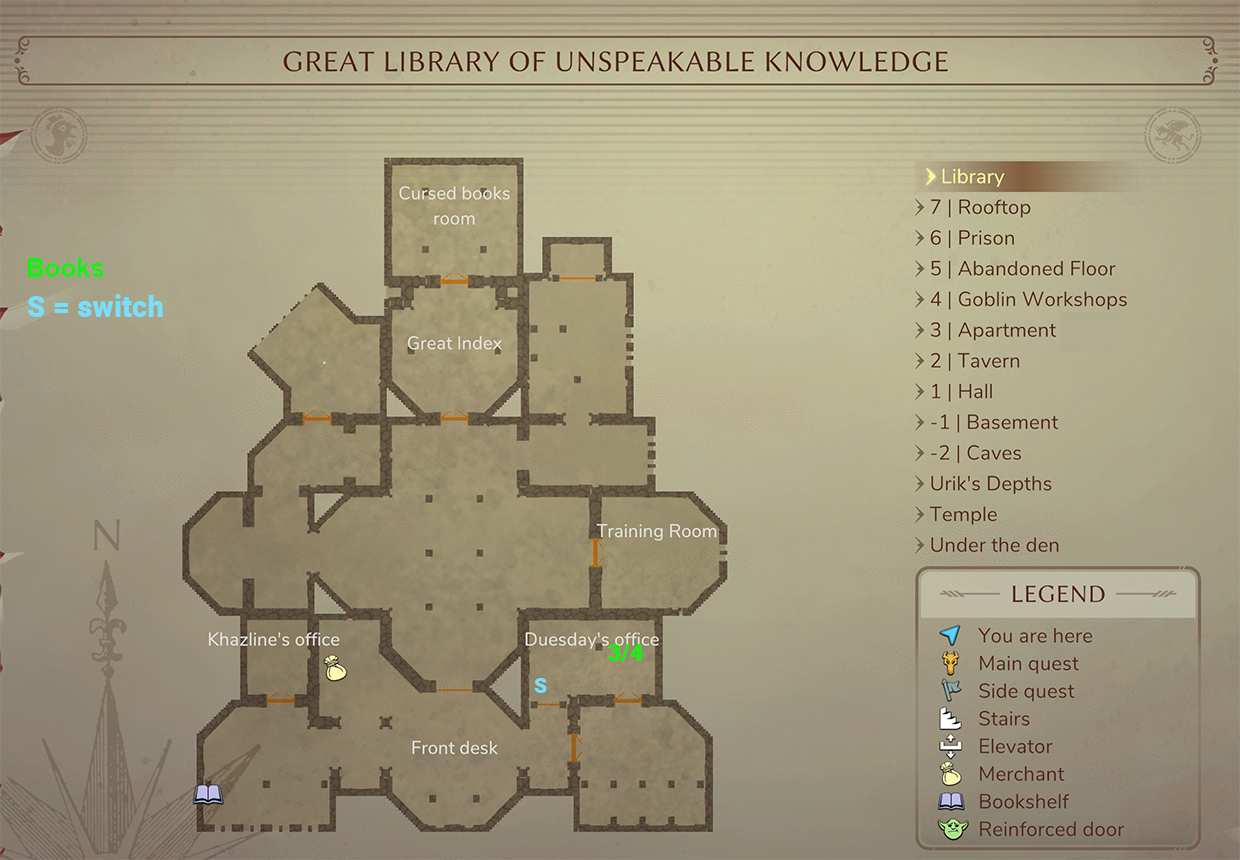
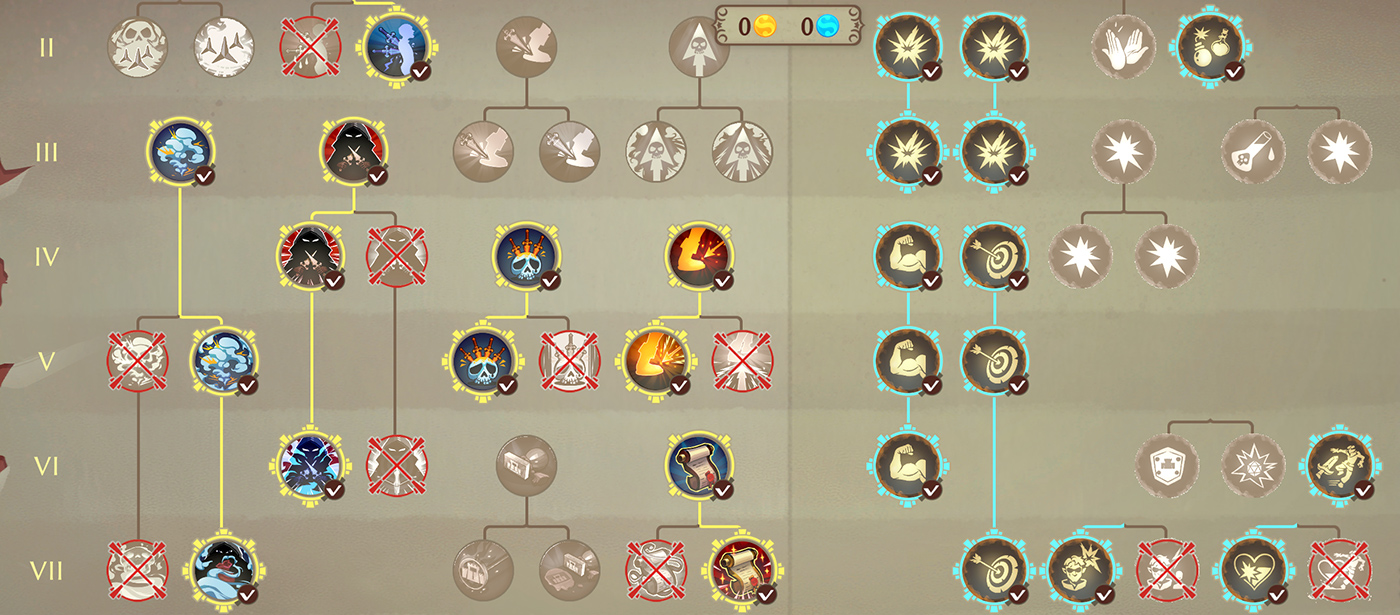
"But you don't want to—the book set awards -1% crit when you turn it in! A penalty."
It's not a penalty, -1% to critical failure
Nidalee ♥ 29 Nov, 2023 @ 3:56am 
Hello! Thanks for this amazing guide, helped me so much! That's one of the best game guides i've ever read, all games included :D
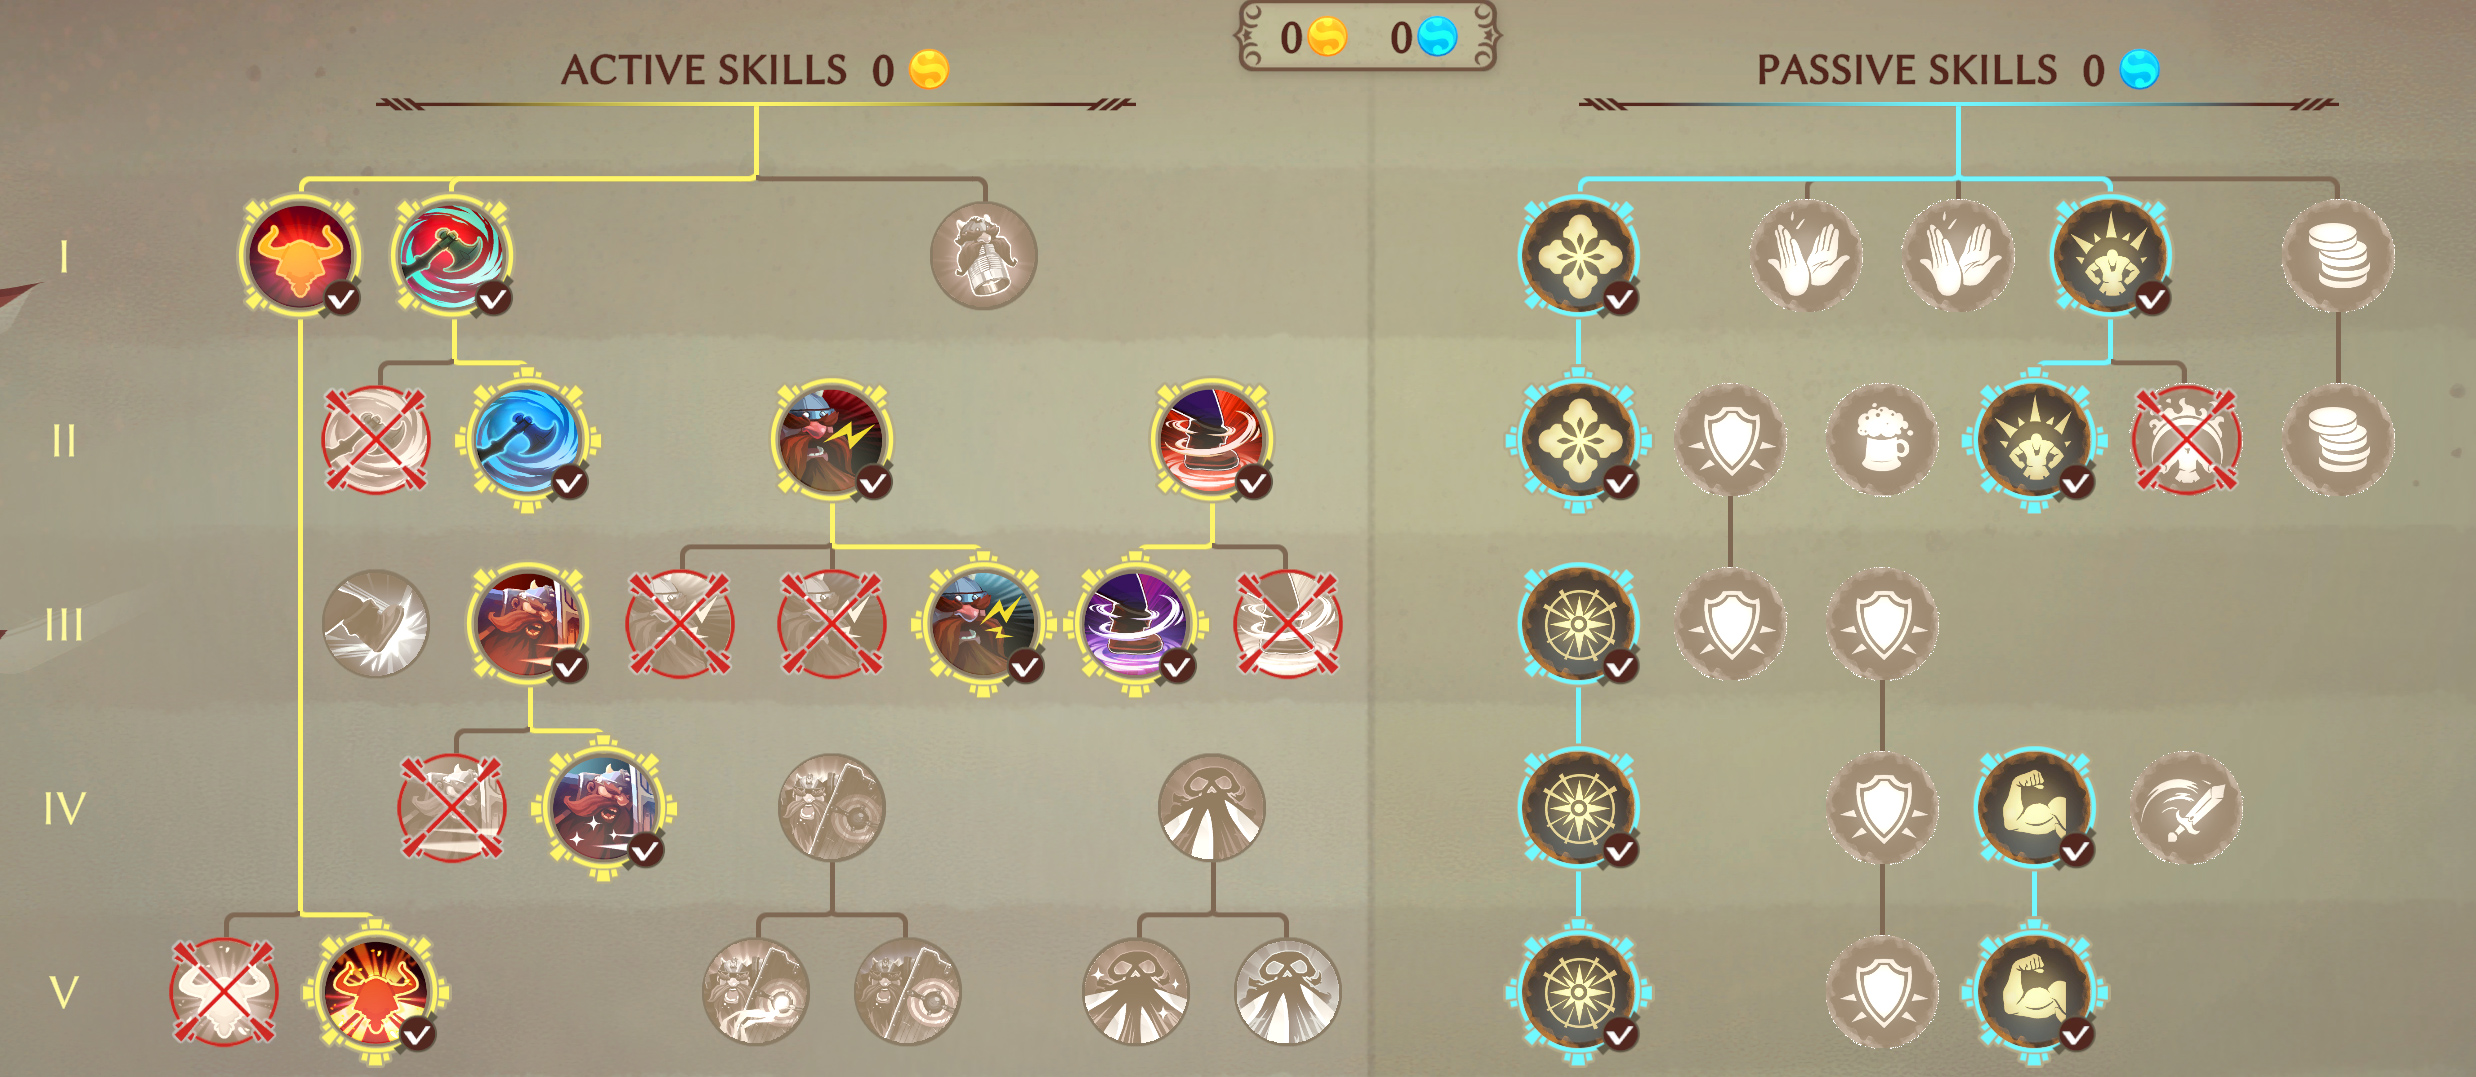
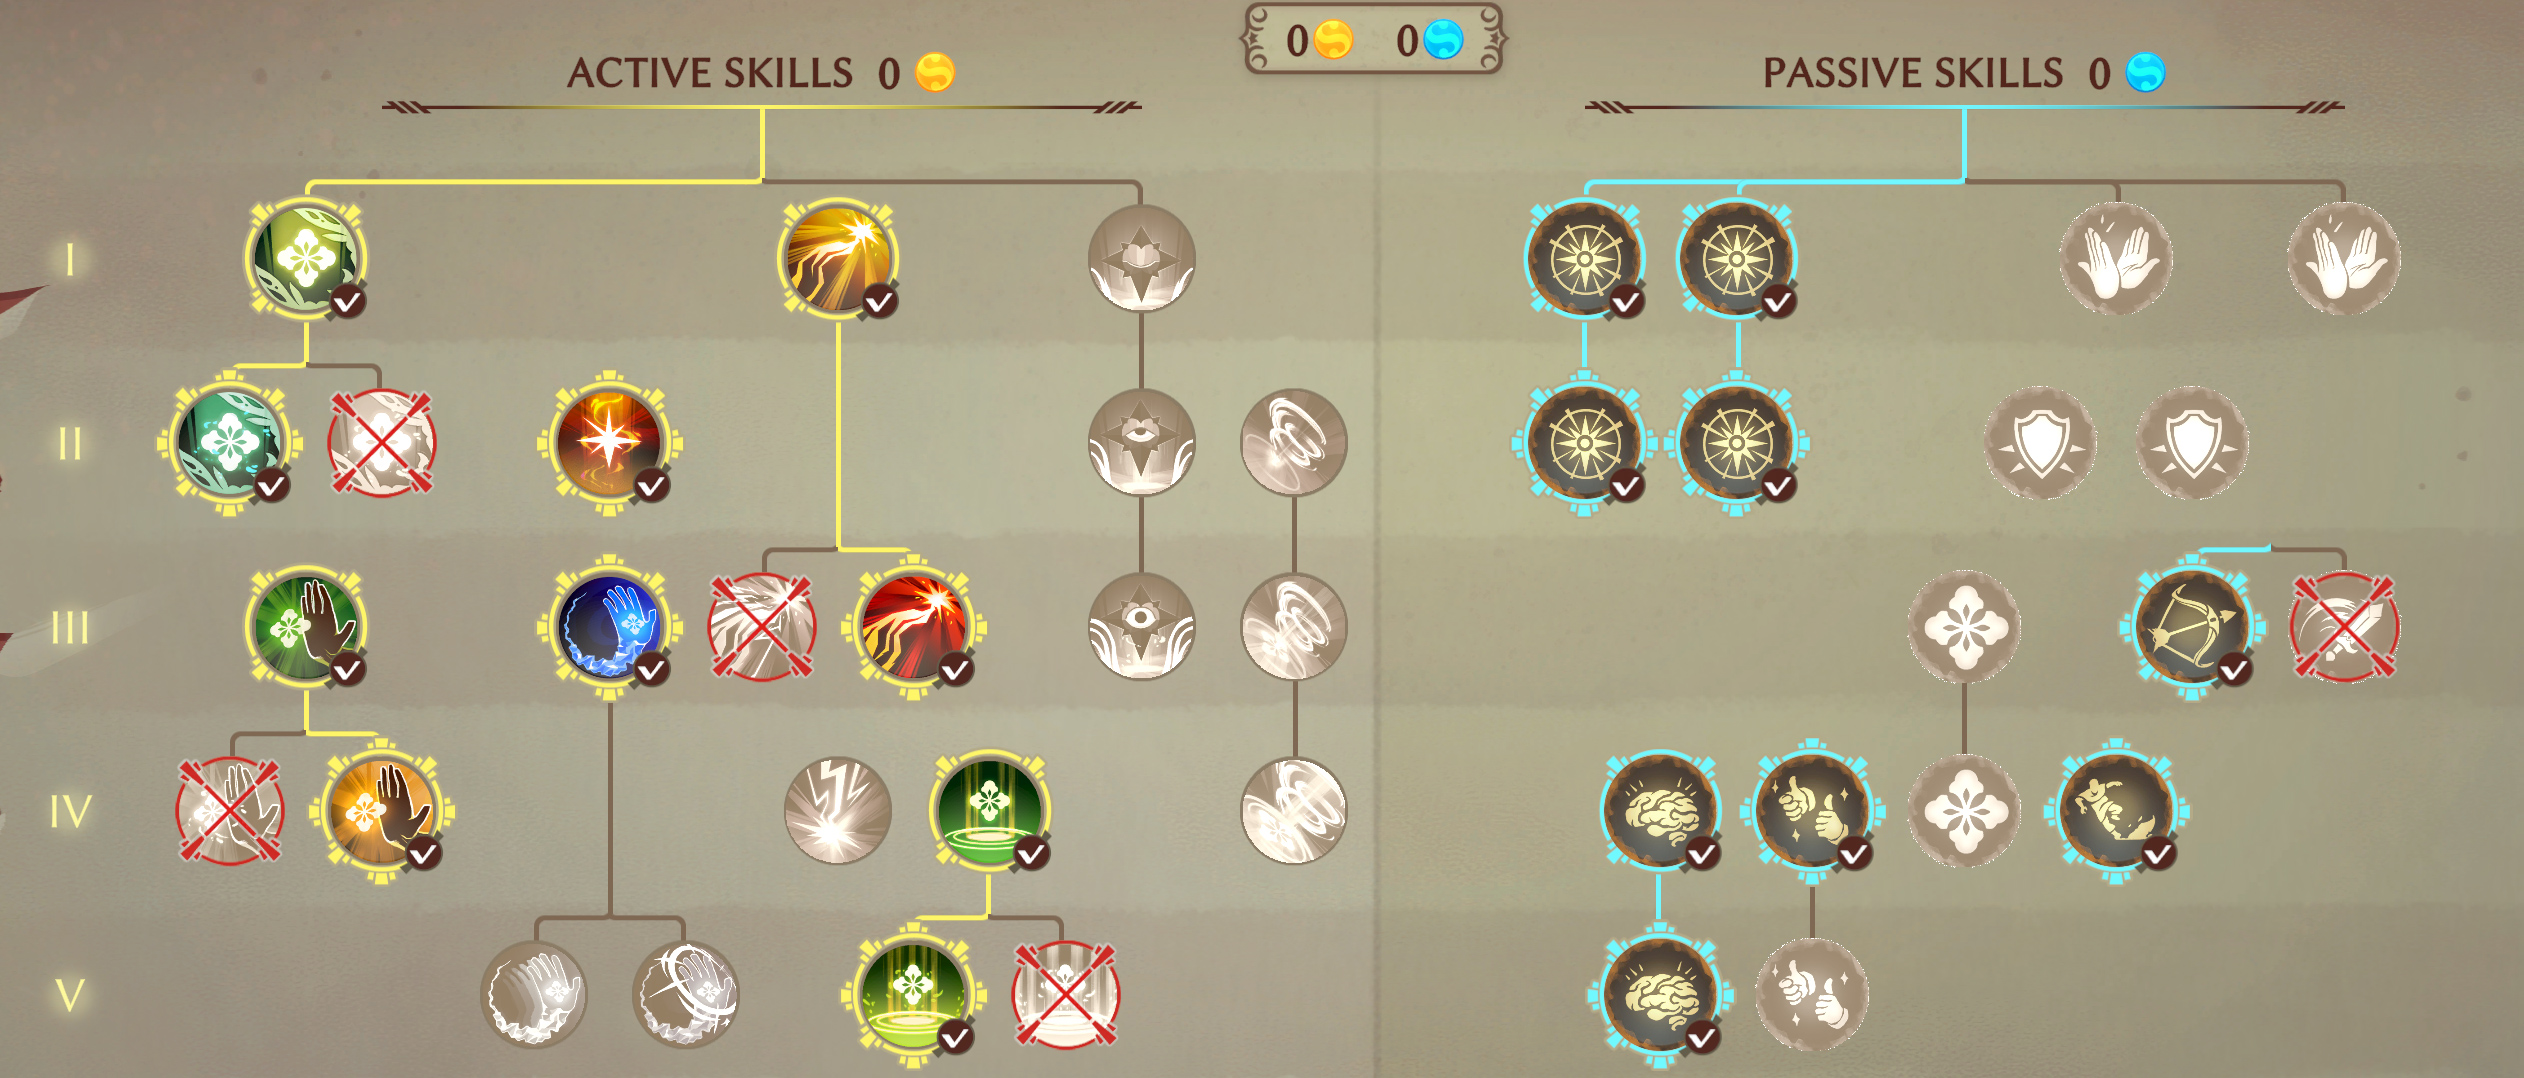
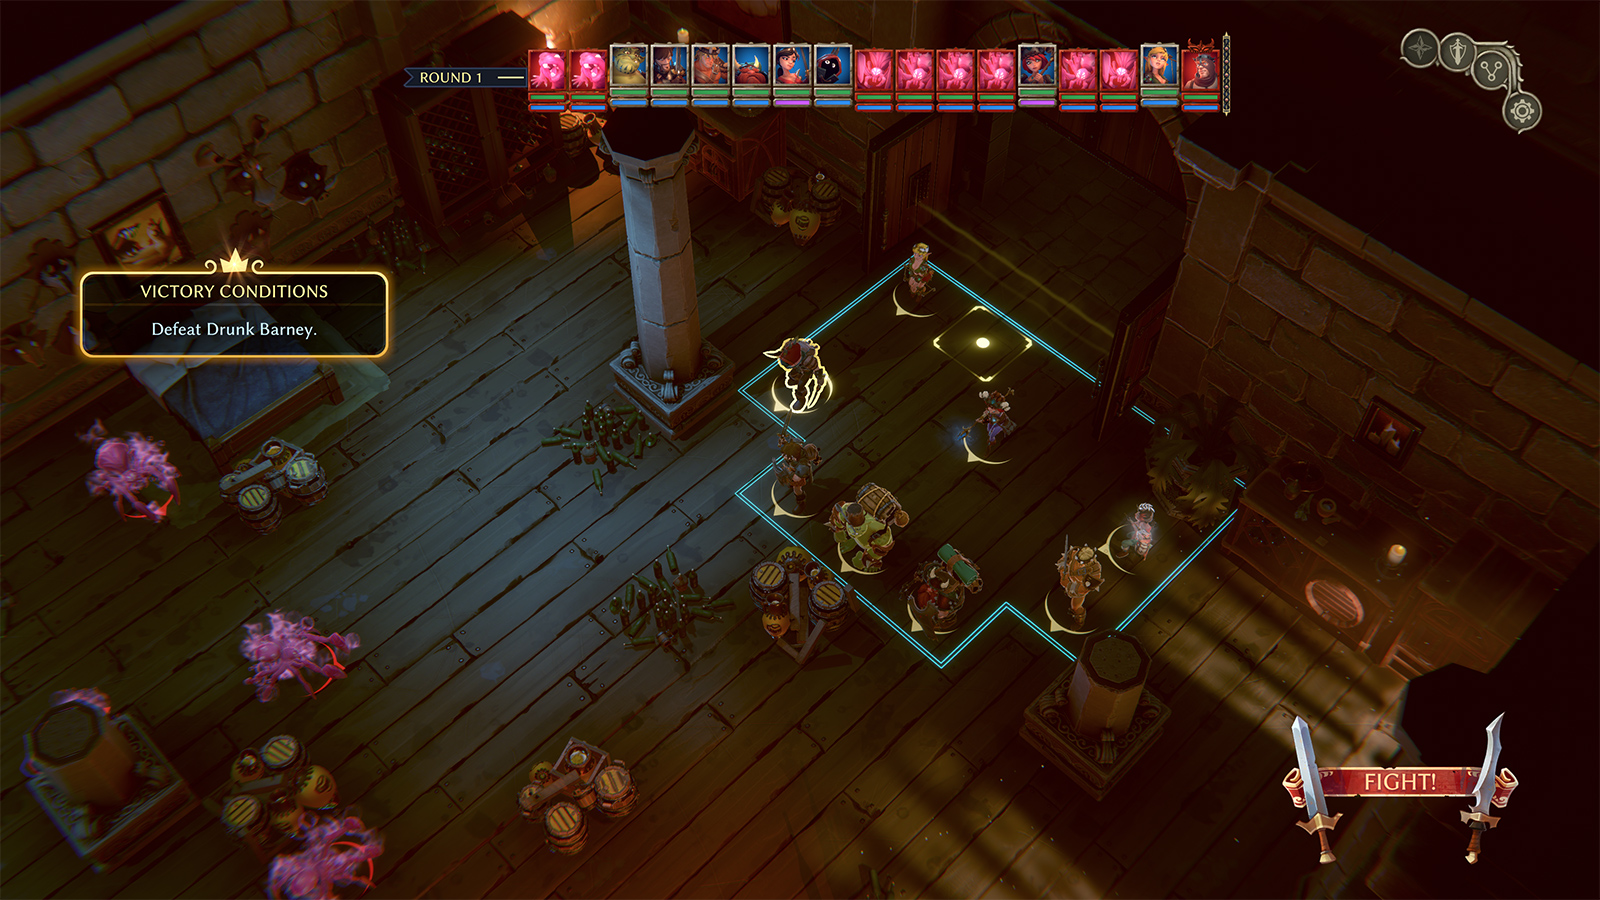
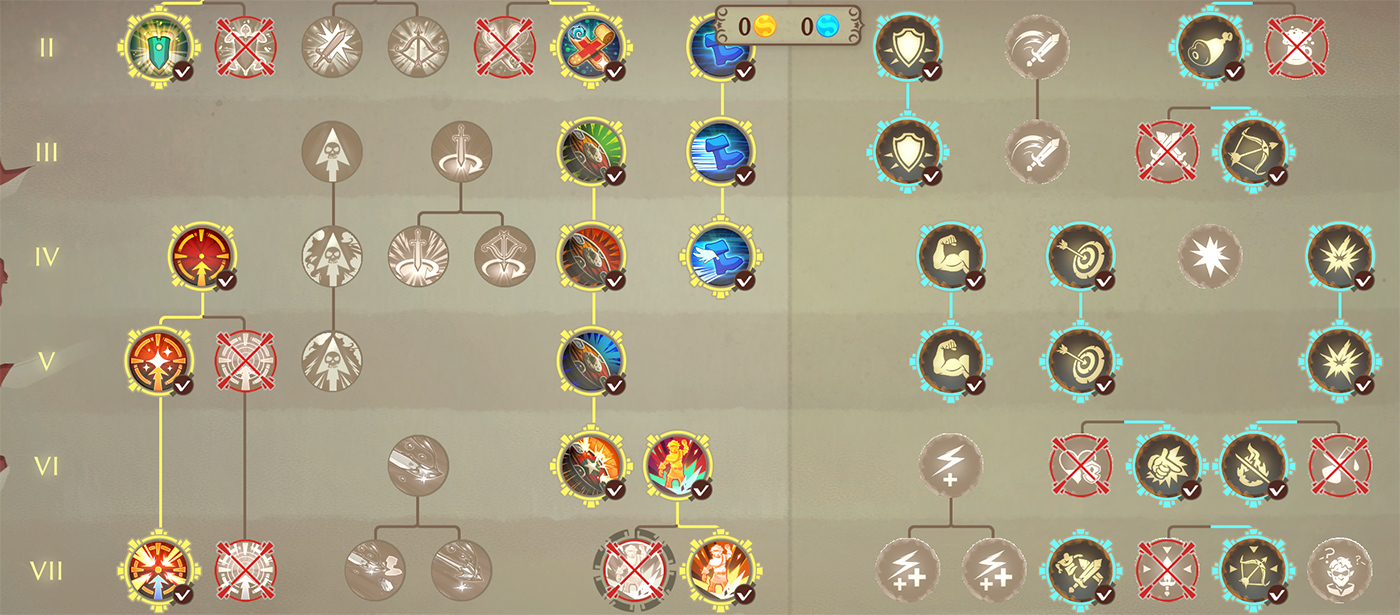
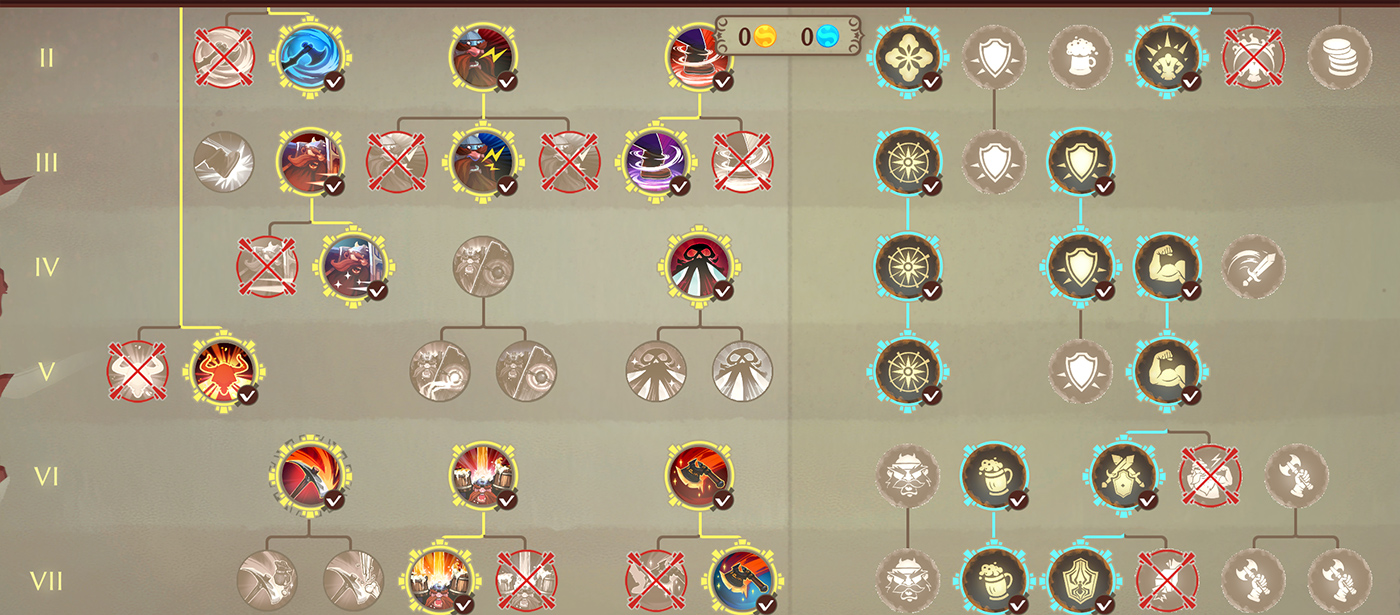
Just to let you know, the barbarian skill screenshot from the chapter "Back to the Futon (DLC) - Intro and New Skills" is missing :)
Have a great day!
HaWeTheGreat 15 Aug, 2023 @ 3:44pm 
Great guide! Thank you for your Support. Now i can proceed in chapter 5!
TheInternetGuru  [author] 14 Aug, 2023 @ 5:02pm 
Thanks, sounds like time to replay and test the new patch.
Eldanar 8 Aug, 2023 @ 10:35am 
Great guide. But the Temporal Magic books give -1% crit fail, not -1 crit ;)