Warhammer 40,000: Inquisitor - Martyr

Warhammer 40,000: Inquisitor - Martyr

115 ratings
Adepta Sororitas Build Guide (As Requested)
By Helena
A breakdown of my Battle Sister build. I have received more than a handful of requests as of late to share my current build.
5
2
4
2
   
Award
Favorite
Favorited
Unfavorite
Introduction
I'll be covering what my current Adepta Sororitas build has, and a few alternative options for certain gear slots. This build can easily handle level "118" missions, and has the survivability to theoretically continue on well beyond 118.

Sections:
Gear
Psalms/Shards/Psalm Doctrines
"Passives" aka Skills and the Perks Used
Battle Sister Specifics
Closing Thoughts

A fair bit of my build/guide will be borrowing from SanityIsOverrated's Psyker build, and just a generally accepted arrangement of "good" or "best" gear/items. So, credit to where credit is due.
I've made a lot of tweaks to fit the build onto a Battle Sister, and made many personal choices that not everyone may agree with.
Gear Breakdown
I will be primarily discussing the relic/archeotech enchants on each piece of gear (the top most enchant), The primary/secondary enchants are really up to personal preference, and at the end of the day, you really can't go wrong with Critical Strength. There are a few personal preferences in my secondary enchants such as "bleed damage" that are both highly unnecessary, and, quite frankly, not recommended. Dot damage is not particularly good in this game. If you're looking for something a bit more impactful in that slot, you could try something like damage against Champion enemies or damage against Bleeding enemies. With those disclaimers out of the way, let's get onto the main bits.


For the first Signum, I am running "Damage Bonus per Berserk token". This ties in nicely with the rest of the build, and provides a great source of damage. Using two of these is not recommended as that would be an unnecessary amount of damage.


The second Signum having "chance to add a general Vulnerability when the target gets a debuff effect" is pretty crucial to the build. We apply a lot of debuff stacks, and having a chance to apply a "Gen Vuln" on each one results in most of the enemy's defensiveness going away completely. Note that we have other vulnerability sources from our various Passives, namely Heat Vuln, but we'll discuss that more further down. Note that you could alternatively run a different Archeotech Signum than this one that has "Adds a Vulnerability to the target based on the damage type on Critical Hit" on it, but that one is not nearly as good as the one that I have equipped currently. The issue with the alternative one is that it will not stack up nearly as quickly, along with not being a "Gen Vuln". As mentioned, we have other sources for other vuln types such as Heat Vuln.


Ignore the fact that I need to upgrade to a six enchant still.
This one is really simple. Upwards of a 10% chance to have a perfect crit chance for three seconds. Three seconds is a very long time when it comes to dealing damage in Warhammer 40,000: Inquisitor. This results in not needing a single crit chance enchant on any other piece of your gear. Let me say that again. You don't need to increase your crit chance at all when using this enchant. 100% crit chance that can keep refreshing constantly? Yes please.
The weapon choice itself of using the "Blessed Blade & Rod" comes down to one factor: The primary attack on it. Onslaught is the primary attack of the weapon and has the following properties: "Cone Effect [Wide] [AoE], Shock, Slow, Vulnerability [General], Bleed [DoT]". This thing is basically the entire build encapsulated into a single attack. If the various heat auras (to be discussed in the later sections of this guide) don't do the trick by themselves, this attack will amplify that dramatically.


For the Inoculator slot, I'm running a four yellow Inoculator with "When in Enraged state enemies within 5 metres are Feared", The enchant itself is pretty vital here, as that is yet another debuff. We like debuffs. This works really well with our Gen Vuln Signum, among other things. As for the four yellow slots, I am just running four instances of "Psychon". Is this necessary? No, probably not. Does it make everything that isn't an ally go away? Oh yeah. If bosses aren't melting to your Heat Auras already, just press your Inoculator button for instant results.


There's really not much to say about the armour choice. Run the equipped "Invulnerability on Kill for 2 seconds (8 seconds cooldown)" or as an alternative, run another Holy armour that has "Grants Immunity to all DoT Effects". Both are great options, though I personally prefer the former rather than the latter. I chose Seraphim Armour here for the associated "Tactical Jump" ability that the armour has, but you can run Celestian or Dominion armour just fine. We'll talk more about the Act of Faith slots in a later section, and why you might want to run a Celestian armour over the Seraphim armour. Oh, and yes, I am using the Puritan path. I cannot speak in regards to the Radical Path or Daemonforged Armour. No clue. I use Holy, and I recommend using Holy for the survivability. At higher mission levels, you don't really need more damage. You just need to not die. Your damage will do just fine for the higher levels as is.


Inflict Bleeding on Critical Hit. Another debuff. We always crit. Moving on.


We live in Enraged state. Debuff. You see what's going on here.


I'm going to talk about both the Main Implant and the Eye Implant here at the same time, as they both serve the same purpose. This is our source of Berserk tokens, and a very quick-to-stack source at that. Massacre Effects are those little messages that pop up on the bottom-ish left of your screen when you kill a lot of enemies very rapidly and continuously. There are other ways to get Berserk tokens, but this is by far the quickest. One item with 15 Berserk tokens on Massacre effect could do the trick, but having both items with it makes a massive difference. The Warbringer's Frenzy Eye Implant is a Seasonal (Season Six) item, but before this, the go-to was the "Eye Implant of Insanity" Ancient Relic. Either one of these will work just fine, as they serve the same purpose (Berserk tokens on Massacre effect), but I definitely prefer the Seasonal item. Note that you can get a six enchant version of the seasonal item (I just haven't yet as of making this guide).


You can get this effect from said Warbringer's Frenzy Seasonal Neural Implant, or from a regular Relic (as the main Relic enchant). I just prefer the new Seasonal item for the primary enchants across the board. As for the actual effect itself, this is our source of Enrage. We crit pretty much all of the time, thus we stack up Enrage near instantly.


Summary
The overall concept of the build is to have both Enrage and Berserk tokens boosting your damage, and then a TON of debuffs causing various vulnerabilities to pseudo-lower the enemy's various defensive stats. This pairs nicely with the Psalm Code Doctrines and such that are used for the build. I'll discuss that below.
Psalms/Shards/Psalm Doctrines
This is all pretty straight forward. Heat Aura, HP/Shield Charge/Drain, Crit Strength, Vulnerability effectiveness.


For the weapon slot, I'm using the Phosphoenic, Technomartyr, Neuralis, and Binharic Psalms to create the "Creates a damaging Aura dealing +100% Heat Damage per second" effect. This is where all of the gear and enchants come together to create a very rapid damage source that shreds just about anything that I so much as run in the general direction of. I run a total of three Heat Auras (from different sources); however, note that the Heat Aura from the Psalm Code Doctrine does not stack with itself (if you were to equip two of the doctrine) for the purposes of providing a heat aura. You still only get one heat aura. What does increase from stacking them is the heat damage percentage, but, we don't bother with that. Stacking them doesn't really do us any good, thus we do not. Only run the one Psalm Code Doctrine Heat Aura. The other two heat auras that we get come from entirely different sources that we'll cover further down. The two remaining slots on the weapon go to a Magistratus Shard V for a chance to cause a ToA or Thunderbolt of Authority on Hit, which the main purpose of this is to give us a small speed boost, and an Uncreator Psalm, which we want (ideally) to have one Uncreator Psalm on each piece of gear that has slots, as you'll see below. We don't want to spec heavily into ToA at all, but having it in the build makes for a great after-thought speed boost.


On the armor, I've combined the Voltaic, Aegis, Hermeticon, Shroud, and Emanatus Psalms to create the "+12% of damage dealt is gained as HP and Shield Charge" Psalm Code Doctrine. The last slot goes yet again to an Uncreator Psalm. They do not stack within a single item, but they do stack per different item that you have one slotted into. The purpose behind having an Uncreator Psalm in each piece of gear is to hasten the frequency at which we apply our Vulnerabilities from our various sources (Gen Vuln, Heat Vuln, etc).


Then we come to our remaining three items. One Uncreator Psalm in each one, and as many Sicarian Shard V as we can fit in (five in total, in this case). As mentioned earlier on in this guide, Crit Strength is never a bad idea. For the shards, you can not get Crit Damage, but you can get Crit Strength, which is what we want anyways. For any Enchants on your equipment, note that we still want to take Crit Strength over Crit Damage due to the way Crit Strength stacking works (we want to get as close to the 150 Crit Strength threshold as possible, as our critical strikes will then be consistently doing as much damage as they can (barring any Crit Damage increases after that point)).

To summarise:
For this build, we use one Heat Aura Psalm Doctrine, one HP/Shield 'Drain' Psalm Doctrine, a single ToA Shard, and then Crit Strength and Uncreator Psalms wherever we can fit them in. Once again, keep in mind that you can only benefit from one Uncreator Psalm Code slotted into each item.
Passives and Perks.
We have a lot to cover here. So, let's just get right into it.

Passives


For the Puritan tree, the important part here is Holy Conclave. It may be a small boost in the grand scheme of things, but it adds up. Holy Rage is just a personal preference, and with how high my Warp Resistance is already, it's fairly unnecessary. Yet again another small damage boost.


This tree is pretty great overall, but the key points here are: Motoric Boost, Quickening, and Cerebral Feedback. Extra movement, and because we crit constantly, Cerebral Feedback just makes sense. -0.1 second may not seem like much, but it adds up very rapidly when you're doing Critical Hits to entire waves of enemies. Don't take Blessed Ruination.


The main bit that we want out of the Warfare tree is "Smite the Feeble". Because we live in the Enraged state, and because our Inoculator causes nearby enemies to be afflicted with the Feared debuff, getting a +30% damage bonus against every enemy is pretty solid.


The Suppression tree gives us a little bit of extra damage, movement speed, and defensiveness all around. Pretty straight forward.


Our weapon, as stated in the gear section of this guide, has the "Slow" property (among other debuffs) on the primary attack. Taking Paralyze from the Debuff tree is yet another small-ish source of damage that will affect our various Heat Auras after hitting an enemy with the Blessed Blade's Onslaught. "Demoralize" is just an added bonus source of defensiveness based on the amount of debuffs that we apply to any given enemy. Most enemies won't be surviving for very long against our Heat Auras, but anything that does may want to hit you pretty hard. This may subtly save your life.


I take the entire Area Effects tree, except for Optimal Dispersion. A "+3% Damage Bonus to Area of Effect skills for each enemy hit." sounds great in theory, but from what I have seen, it doesn't interact great with the heat auras. This may warrant further testing by someone else, but, because of the way that we move into a group of enemies, it doesn't count the horde as "multiple" for the purpose of said effect, thus we do not get the "for each enemy hit" effect. Each enemy hit by the various Heat Auras gets counted up individually. Not relevant, sadly. As for the rest of the Area Effects tree: Our Blessed Blade and Heat Auras count as AoEs for everything else here. Pick up the "Area Denial" skill here as I have if you want your Suppression bar to never drop below 100% ever again.


Extra Resistances go brrr. The capstone ability "Reanimator Glands" is just a really good ability overall. You could maybe drop some stuff here if you had an otherwise unnecessary amount of resistance enchants on your Armour or other pieces of gear, but frankly, it's easier to just pick up this skill tree and save your enchant slots for something more important once you're already fairly near the 60% cap for your resistances. I like picking up Runic Wards here for the extra Energy Shield Efficiency. By itself it's not all that great, but when combined with the next skill tree's similar effect, it adds up.


Speaking of which- We take Shielding Litanies here for the same reason as above. Extra Shield Efficiency. There are those that will say that Shield Efficiency isn't really worthwhile, and normally, they would be right. It can be pretty lackluster on its own. With the two combined, we end up with a nice 45% Energy Shield Efficiency.


Apart from the extra Heat Damage across the board, the capstone "Spontaneous Combustion" and "Supearheated Discharge" are really the core of this entire build once you strip the rest of it away. Burn debuff and Heat Vulnerability sources.


What can be said here? Even though we don't need the Crit Chance due to our weapon having 100% Crit Chance, we still want the capstone "Red Thirst" skill. This will add up very quickly and allow you to "snowball" your way through entire maps. I strongly suggest picking up "Torment" here to strip away the Suppression of tougher enemies that much quicker, thus applying our various effects to said enemy, and then our damage can kick in. I don't care much for Berserker Rage as the Doctrine used on the Armour already has HP Drain on it. Besides, if we get to a point where the energy shield is failing, and we suddenly need even more health restoration.. We have much bigger problems.


Fast Metabolism from the Damage over Time tree helps mitigate one of the easiest ways that we can still die. If you are using the DoT Immune Armour, swap this out for something else. There's also no need to take Haemophilic Shock as the Blessed Blade can already apply Slow. Sure, it's not the worst idea to pick up Haemophilic Shock, but it's really not needed.


Expose Weakness pairs really well with the Blessed Blade for when we want to apply a lot of vulnerabilities to a bunch of enemies so that our Heat Auras can do their jobs that much quicker.

Perks


Despite not saying so in the text of the Perk, this is a Supreme effect, thus it can go over the speed soft cap. This is a huge boost and lets you go from enemy to enemy very quickly. We have more than enough defensive stats elsewhere for the -10% Damage Reduction to not really matter at all.


Cull the Weak is truly in a class of its own. This is a 50% damage boost to, as far as I am aware, all damage sources.


Ad-Hoc Subjugation is why we don't need a Signum with the same effect on it, thus freeing our Signum slots up for more important things.
Sororitas, Faith, and Lack Thereof.
Here we'll cover the Battle Sister's Attributes, Acts of Faith, Sacred Rite of choice, and the complete lack of usage of the Embodied Saint form.

Attributes


The various Milestones here don't really matter all that much, but, this is where we dump all of our extra points for the "+1% Base Damage per Point".


The Shield Drain from the third Milestone here is what we're after. More Shield Drain. This, plus the Psalm Code Doctrine on the Armour are our sources of survivability outside of the Armour's Holy Enchant and the fact that I have a Rosarius Field equipped. Assuming that you are using the DoT Immune Armour and a different Belt item, then yeah, this is where a lot of your ability to stay alive will come from.


Yet again, the third Milestone here is what we want. Extra speed, and far more importantly, increasing the speed cap. The only reason why I have a total of 18 in this Attribute is due to enchants on my gear. You really have no reason to go over the 15 Milestone here or for the Resolve Atttribute path either.

Acts of Faith

The most important Acts of Faith for this build are Perfervid Fury and Expurgation Sweep.


For Perfervid Fury: This is what I consider to technically be our "third" Heat Aura, despite being the second one for the ordering/purpose of this guide. The reason why I say that this is our third Heat Aura is due to having to activate it once you are in mission. With the exceptions of interacting with teleporters, using the Escape Menu, and sometimes (though oddly enough not always?) tabbing out of the game, this will remain active for the entirety of any given mission once activated for the first time. Getting knocked down or knocked back can also cause this to cycle back to being off, but this really shouldn't happen often if you're running around constantly. Enemies take the full damage, but the damage that you take from this can be reduced by your Heat Resistance. At lower levels, this ability may cause you some issues, though once you have the Shield Drain of the build up and running, you won't really be bothered by the tick damage after that as your shield won't drop below full typically, and if it does, it'll jump back up again a moment later when you move slightly closer to another blob of enemies. Yes, the tick damage that we take hits your shield first instead of your health. The passive is okay, I guess? Not really relevant to the build. If you're benefiting from the passive effect, and actually getting use out of it? Something has gone very, VERY wrong.


Expurgation Sweep. The star of this Act of Faith is the passive of more Supreme Movement Speed. +15% is no small number. I personally use the active of Expurgation Sweep pretty frequently, but I could see why some might not be bothered with the active of it at all. The Blessed Blade & Rod is really weird when it comes to Two-Handed-Vs-One-Handed. Whether or not it benefits from the "Two-handed Melee attacks" part of this ability remains a mystery to myself, many others, and quite frankly, most likely to those at Neocore themselves. It may, it may not. Only Tzeentch truly knows.

If you happen to be using a Celestian Armour over the Seraphim Armour or a Holy Censer as your Belt slot, then you could look at using the Fiery Heart Act of Faith. More Heat, more AoE, more Burn. Does well enough as an after-thought. If you happen to be using both a Celestian Armour AND a Holy Censer, you could look at using the Wrath of the Penitent Act of Faith in addition to Fiery Heart. Wrath of the Penitent really doesn't do a whole lot here, but it does something. Good enough. You could also use the Ardent Onslaught Act of Faith over Wrath of the Penitent, I guess? Not much to say there. Pretty unnecessary.

Sacred Rite, Singular


This is our "second" source of Heat Aura, or third in terms of the build guide. This Sacred Rite really is just another source of Heat Aura. It generates basically no Faith for the purposes of achieving the Embodied Saint form, and that's okay. We'll talk more about that in just a moment. As for Burning Devotion as a Heat Aura, let's talk about Heat Aura stacking now that we've seen all three sources of it that we use for the build. When using these three separate sources of Heat Aura, they all tick separately from each other. The best way that I can describe this is as follows: Each of the three Heat Auras will tick at their own rates/times. With all three Heat Auras going at once, any effects that 'proc' due to hitting or getting critical hits will go off VERY quickly. In Season Five (keep in mind that we are now in Season Six as of writing this guide) this would result in the Harbinger of Judgement Belt's effect going off at an absolutely unheard of rate. Said effect is supposed to have a cooldown, but let me tell you from experience that when used with this, it does not. I have experienced up to four Judgement spells going off within 0.1 of a second from each other. It gets pretty crazy. Sadly, as this is Season Six, we don't have the luxury of having the Harbinger of Judgement Belt. The point being made, however, is that anything that procs in a similar fashion will trigger just as quickly if not quicker. For example, Critical Hits and anything that gets added as a result of getting a Critical Hit with this build. The rate at which I apply debuffs to enemies, and as a result, vulnerabilities to those same enemies, is a bit overkill if I'm being completely honest.

Lack of Embodied Saint Form

Due to the Burning Devotion's lack of any real Faith generation, the Embodied Saint form essentially never sees the light of day, so to speak. If you are using this build, and you have achieved Embodied Saint form, please refer to the commentary on Perfervid Fury's Passive effect: In other words, something has gone very, VERY wrong. As for the primary attack while in Embodied Saint Form- Blade of Eternal Flame- This is a strict downgrade from the Blessed Blade's primary attack, and, none of the Saintly Deeds make up for that enough to make it worthwhile to ever use the Embodied Saint form with this build (assuming that you ever actually achieve Embodied Saint form with this build).
A Closing Note on Heat Aura Stacking
The final point to be made about Heat Auras is that when stacking them, you can tell that they are stacking correctly by the "bloom" of the damage numbers coming off of any given enemy. When you have a single Heat Aura active, the damage numbers move "toward" the screen in a sort of snaking motion out from a singular point on the screen, coming off of an enemy being damaged by the Heat Aura. When you have multiple Heat Auras going off at the same time, this "snaking" effect is no longer a thing, and is instead replaced with a flower pattern of sorts of the damage numbers "blooming" outwards in consistent directions off of the enemy. We can see the former taking place if trying to use two Heat Aura Psalm Code Doctrines (friendly reminder: don't do this). In said situation, we can see the "snaking" effect just as you would when only one Heat Aura is equipped.


With that, this guide comes to a close. I hope that this helps at least one person out there to understand the class a little better, or at the very least, what one can do with the Battle Sister class to make it really strong, thus not having to worry about the other nuances of the class that can be a bit overwhelming to newer players or those trying out the Battle Sister for the first time. If it should help more than one individual, I will be eternally grateful for the opportunity to spread the Emperor of Mankind's will.


Sincerely, Sister Viktoria
For the God Emperor
14 Comments
Raphses 17 Jul, 2023 @ 7:10pm 
Where is the Hospitalier Skill Branch? Does it not appear because of a bug?
argenex 5 Jul, 2023 @ 6:04pm 
Well this guide is fantastic and comprehensive!
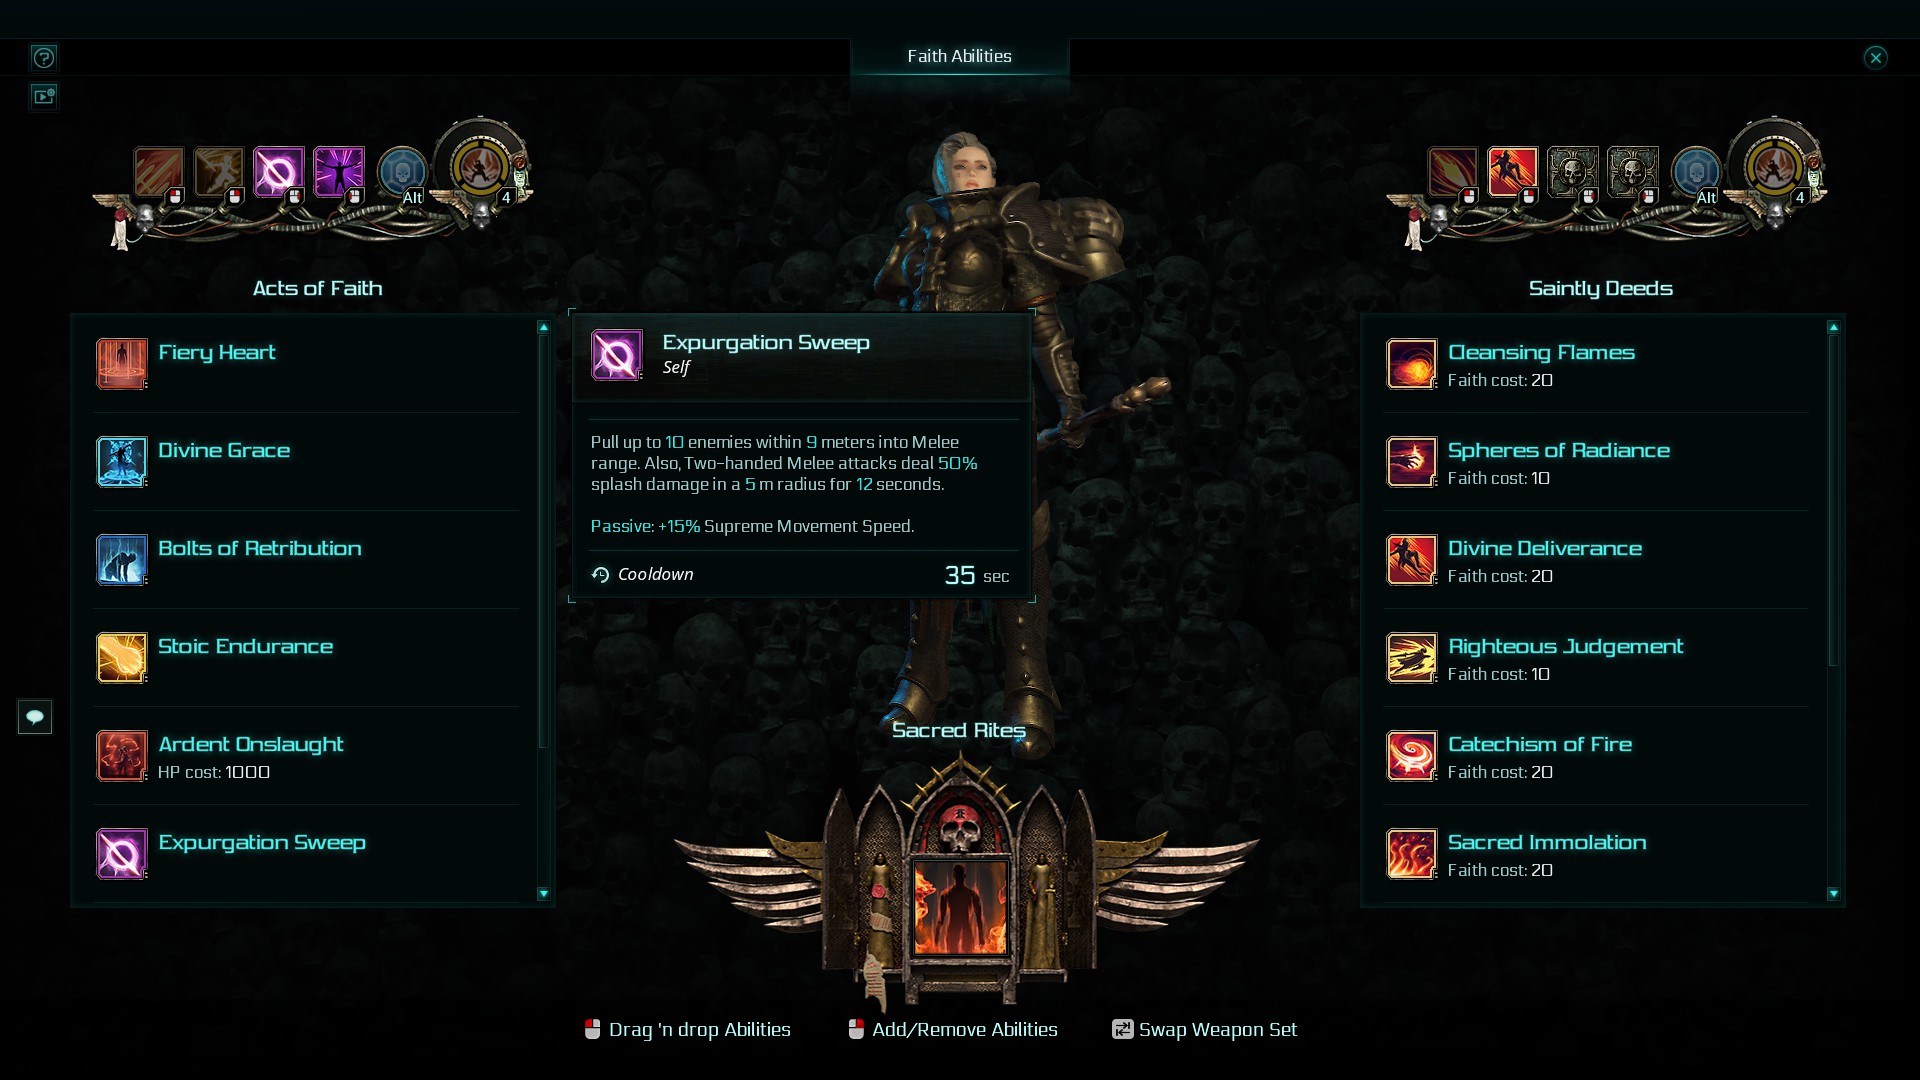
- At level 62 I can't really keep the third aura up, I just get melted by my own damage on top of enemies'
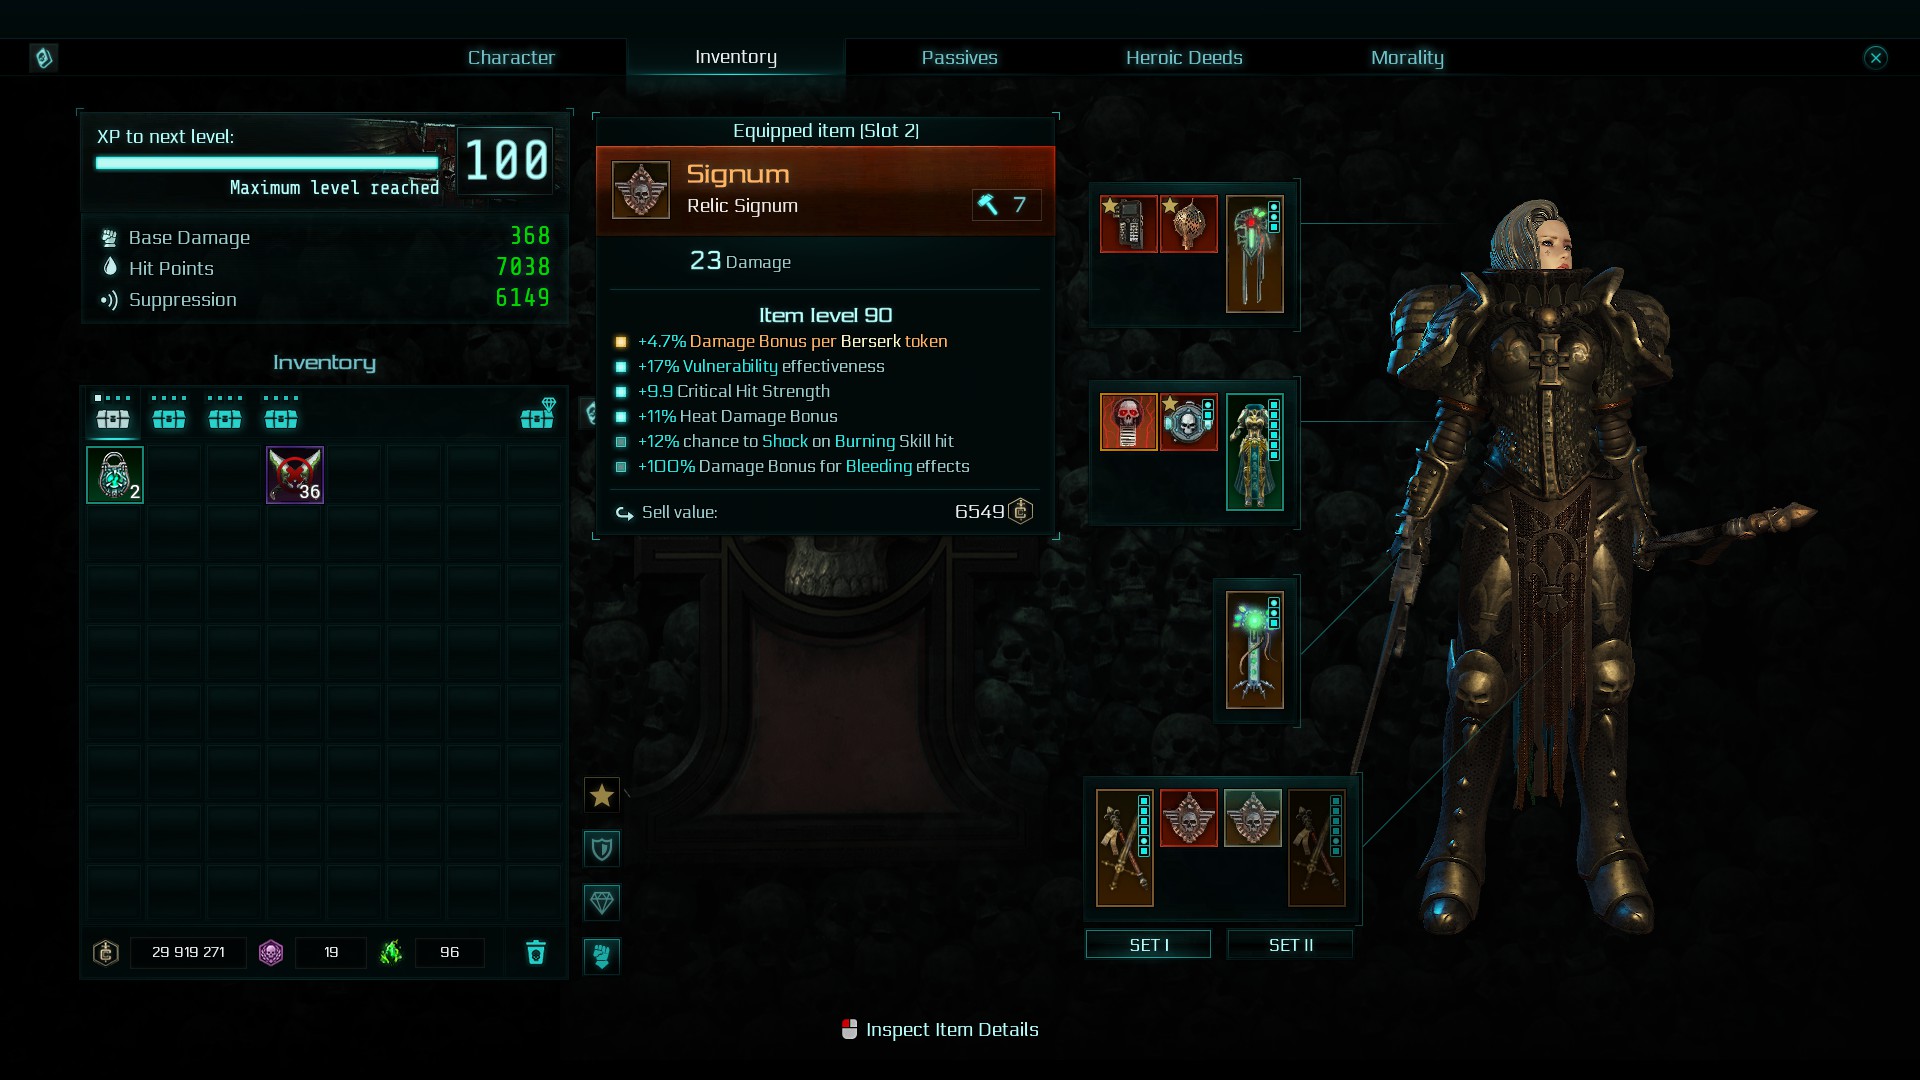
- Getting these specific rolls on Archeotech is going to cost probably millions and hours worth of grinding as you can't reroll that enchantment so you're limited to crafting them (only 5x per BP IF you find the BP or can buy it) or hoping you can get one to drop. Even worse probably for the holy armor.
- This season especially every enemy dying and exploding is causing havok with this build; you can't engage your melee attack or you'll get stuck and nuked.
- The BIGGEST PROBLEM is the suppression; constantly overwhelmed and exposed in seconds flat. Best I can do is run in, smack a few enemies, and flee for my life.

It has made trying to get xp a severe grind as anything higher than 3+ is a nightmare and takes 30m.

I want to love this build, I can see it being fantastic.
Osac 27 Jun, 2023 @ 6:17pm 
How do you unlock the damage over time skill tree?
whats traps do you use?
Helena  [author] 3 Feb, 2023 @ 10:02am 
To "Awesomer", while I don't tend to think of that typically, due to power leveling being a thing in Inquisitor, if I had to say.. I would likely suggest Critical Hits if you can get access to a Relic Blessed Blade with the 100% Crit for 3 seconds Enchant, and then the Movement and Area Effects Passive trees. Or, Area Effects and Movement right away if you can't get access to the Relic Blessed Blade. Everything else can be sort of tacked on as you please.
Helena  [author] 3 Feb, 2023 @ 9:56am 
If you're really struggling with some of the tougher enemies, swap in the Enemy Health Regen Negation Passive from the DoT Passive tree. As for proving my build with a gameplay video: Respectfully, and with regards, no thank you. I much prefer the written format above, and, quite frankly, recording software and myself do not get along very well. That likely makes absolutely zero sense to you, but I'm quite content with things as they are. Is this build less powerful than it was briefly during Season 5 when the DLC first came out and we could briefly use the Harbinger of Judgement Belt in the build? Yes, it is much weaker than said Judgement Belt variant, but it still carries itself exceptionally well into 118+. The lack of dying is quite the upside, I'd say.
Helena  [author] 3 Feb, 2023 @ 9:56am 
To redkelba and TheWitcher, sure, there's a bit of a lack of damage, though I wouldn't say a huge lack of damage. The thing is, you really can't die with this build, or if you do, you've been caught out in the 0.01 second between your invulnvs and your shield going away briefly. What I mean to say is that it's a very, very rare thing. For 118+, just go stand next to the tougher enemies for a while. They'll pop after a bit. I will admit, though, that there is a big flaw in this build, and that flaw is when heat resistance is added to the enemy. Please do keep in mind that I made this build guide for those that have had issues trying to get into playing the Battle Sister class, and this provides them with a fairly smooth way of doing so. I don't personally find that I have any issues on 118+, but I certainly do get snagged on the occasional Harbinger. Noting, of course, that the Harbingers are specific to this season, and are out of the norm for Inquisitor as a whole (usually).
redkelba 29 Jan, 2023 @ 6:31am 
working more or less as described at 110 max, for 118 there is huge lack of damage. Would be great if you can prove your build with gameplay video
TheWitcher 28 Jan, 2023 @ 11:28pm 
Я создал персонажа по этому билду и персонаж не может фармить карты +20
Твой билд говно.
В прошлом сезоне я играл за крестоносца на spin2win и проходил сезонные карты на +20 и +30.
Удали свой билд и иди играй в мобильные игрушки.
Awesomer 26 Jan, 2023 @ 4:30pm 
in what order would you recommend the trees we place our perks while levelling?
ChiliMac1776 24 Jan, 2023 @ 1:29pm 
Thanks for the guide. I am fumbling around with my build trying to figure out where to go for an endgame build (I''m currently level 94). I am certainly going to give this a try.