The Last Spell

The Last Spell

Not enough ratings
Theorycrafting
By Redgomor and 1 collaborators
The Last Spell has 20 different weapons, 12 Primary Attributes, 18 Secondary Attributes, 8 Perk Trees in 5 different Tiers, 5 Maps and 7 difficulty settings.
This game was in early access for 2 years and just got its full release.
That doesn't sound difficult, does it? Thousands of people should have played this game enough to provide information.

So why are all those guides so outdated and why are there so few new guides?

Because: As soon as you have a decent strategy, it is losing its value the moment you progress further in this game.

In my opinion, it is the common knowledge that helps you the most to progress further into the game!
I will try my very best, to provide you as much game knowledge as possible, that can be commonly used.
   
Award
Favorite
Favorited
Unfavorite
Why would you read a guide by me, when there are dozens of other guides out there?
Let me tell you something about my achievements of this game.

Ishtar Games has a Discord Server with high traffic. It is the perfect place to discuss strategies.

After succesfully beating the last Harpye on Gildenberg, we unlock Apocalypse 1. Now that more and more people have beaten Gildenberg on the first run, they start Lakeburg on Apoc 1, then going Glenwald on Apoc 2...
But is the game beatable, if we set the difficulty higher with every new map, beating them all on the first try, without getting our circle destroyed, all the way until all magic is banished for good!?

Beat every map in the following order on the first try:

Swampfurt
Gildenberg
Lakeburg - Apocalypse 1
Glenwald - Apocalypse 2
Elderlicht - Apocalypse 3
Glintfein - Apocalypse 4

- Do not use Boundless Mode!
- Make a Screenshot of every beaten map (Except Swampfurt; If you use Boundless, the Mode will appear on the victory screen, automatically failing the challenge)
- You win the challenge, if you have a Victory Screen on Glintfein, where Apocalypse 4 is shown, Apocalypse 5 had been unlocked and on the bottom left of the victory screen a "Run No 6" information is shown.

I have beaten that challenge.

Turn Based Strategy
There are 2 Types of Strategy Games: Real Time Strategy and Turn Based Strategy.
Do not mistake this game with RTS, although it can have a fast paced playflow.

Action Points(AP) and Movement Points(MP) are the most imporant ressources.
Your turn ends, when you press end turn, but your heroes ressources eventually run out, when you have no AP and MP left.

You can see the range of enemies movement in their turn, if you hold Alt.
Theory: You want to use your MP and AP in a way, where your hero will get out of the enemies Range at the end of his turn.

Note: Please keep in mind, anyone can approach this game and yes, although that may sound trivial to some people, other people may never crossed a thought about this.
Experience Codewise - Basics
This section explains the code and why it is a waste, to simply take a rare (the blue one) and therefor any lower Exp Upgrades per Level Up, which will be included to all following statements of this section, if there are no more Experience Modifiers included to the equation.

This is the Experience per Level Code:
<ExperienceNeededToNextLevel>200 * Pow(Level, 1.3) - 200 * (Level - 1)</ExperienceNeededToNextLevel>
Which means: 200 * x^1,3 - 200 * (x - 1) (x standing for Level)
The Code rounds up any decimals.
In order to reach the next level, you have to finish your current level in that equation.
You reach Level 2, if you finish Level 1.

Requirements to finish Level 1: 200x(1^1.3)-200x(1-1) = 200 Exp
Requirements to finish Level 2: 200x(2^1.3)-200x(2-1) = 292,46 Exp => 293 Exp
(Also the Percentages are rounded up, too, as pretty much everything in the Code does.)

Level
Exp. to finish current Level
Total Experience to finish Level
Exp. to finish next Level
1
200
0*
147%
2
293
293
149%
3
435
728
85%
4
613
1341
62%
5
821
2162
49%
6
1055
3217
41%
7
1310
4527
36%
8
1586
6113
31%
9
1880
7993
28%
10
2194
10184
25%
11
2517
12701
23%
12
2858
15559
21%
13
3213
18772
20%
14
3581
22353
18%
15
3961
26314
17%
This is how the Spreadsheet works: https://cdn.discordapp.com/attachments/741679195599405079/1096121633976102992/Explanation.jpg
*Not accountable, due to the fact, that the first Exp. Upgrade is available with having the first Level Up.

Given: Level 11 Hero; Finishing Level 11 = 12701 Total EXP needed; Rare (Blue) Exp. Upgrade = 20%
Additionals: Finishing Level 12 = 15759 EXP Total; 3 Heroes (Because, if you do a Solo Hero Run, you will get to very high Levels, so we are strictly talking about an average run)
Searched: Additional Levels per Modifier
Problem: Scenario where a Hero would finish Level 11 on a run (Without Modifiers this rarely happens). Starting on First Level Up with 20%. (See Notes on Formular) Does the 20% compensate a level?

Equation: 12701 x (100%+20%) = 15241,2 Total Experience

Finishing Level 12 = 15559 Total EXP needed > 20% Experience Upgrade = 15242 Total Experience gained

Conclusion: A rare Experience Upgrade on itself doesn't even compensate a single Level Up in an average run.


Theory: I hope that I made this one as understandable as possible. If you pick (the blue) +20% Experience, you want to at least compensate that pick, by gaining at least one additional Level Up. If you watch the Spreadsheet, you mathematically compensate that pick, if you complete Level 14, because only then the Level Up needs 20% of your total amount of Experience gathered from finishing Level 13.

TL;DR: 20% Exp. Upgrade on itself compensates on finishing Level 14 = On reaching Level 15.
Experience Codewise - Indepth
The main reason why I started this section was because of someone stating, that picking a +20% Experience Upgrade on Level Up was way more worth, than I would imagine it to be. So I tried to find an easy explanation with simple maths. But the maths on Experience are as fascinating as they are frustrating and the deeper I went into the equation, the more it sucked me down into its void. Let me show you on why stating a +20% Experience Upgrade can be worth 0 Levels and 2-3 Levels on different arguments.

These can increase your Experience Modifications:
Level Up
12%/ 17%/ 20%
Meta Progression
5%/ 10%/ 15%
Hero Trait
20%
Perk: Avid Learner
25%
Omen of Growth
30%

The 2 most reliant Experience Modifiers are the Meta Progression and the Omen of Growth. [But the Omen takes 3 Spots, so it is not a highly recommended Pick and because of another reason.* (See Note)]
Getting a hero with an Experience Upgrade on Level Up, a Hero Trait or the Avid Learner, that provide an Experience Increase are situational. But we need to set a fundament to make a proper statement on Experience Modification, so we simulate a Modification of 160% in total.
By doing that, we are using the 15% Meta Progression, 25% Avid Learner Perk and 20% Rare Exp. Upgrade to get a total of 60% Increase. The Avid Learner Perk is available on reaching Level 3, so we start our calculation on Level 3.

Level
Exp. to finish current Level
Total Experience to finish Level
Exp. to finish next Level
1
200
0* (See Note)
147%
2
293
0* (See Note)
149%
3
435
435
141%
4
613
1048
79%
5
821
1869
57%
6
1055
2924
45%
7
1310
4234
38%
8
1586
5820
33%
9
1880
7700
29%
10
2194
9891
26%
11
2517
12408
24%
12
2858
15266
22%
13
3213
18479
20%
14
3581
22060
18%
15
3961
26021
17%

IMPORTANT NOTES:
*1. If you have the Omen of Talent, you start with 1 additional Perk Point, therefor granting you access to the Avid Learner Perk on Level 2. This means, that this Spreadsheet does not affect you and you can use the other Spreadsheet instead.
BUT if you use the Omen of Talent you could have effectivly used the Omen of Growth instead, because in
Theory: Omen of Talent gives you a chance to get +25% Experience Increase on Level 3 and Omen of Growth gives you a guaranteed +30% Experience Increase on Level 1.
That's why these are not added to this simulation.

2. And there is also another important variable, that we technically need to add to the equation, which would be the amount of Exp that you already gained, before picking up the Avid Learner Perk.
For Example, if you reached Level 3, you most likely won't hit it exactly at 0/435 Experience Points. So any Spreadsheet that would technically be provided loses its argument, if you picked an Exp. Upgrade on any number between 1/435 - 434/435 Experience already gained of that level.
That's why this variable is not added to this simulation.

3. We do not alter the equation with additional specific variables, like:
1. Abandoning all heroes except for one, who therefor reaches higher levels way soone, than the average run.
2. Have a single hero get ALL kills, who therefor reaches higher levels way sooner than the average run.
3. Getting six heroes as soon as possible, so the heroes spread more Shared Experience per Hero which therefor reaches higher levels way later than the average run.
4. No hero has the Defensive Training Perk and all Units getting killed by Defensives, which therefor reaches higher levels way later than the average run.

In Conclusion: We want to make a commonly used statement to the strictly average event.


Given: Level 5 Hero; Finishing Level 5 = 1869 Total EXP needed; Exp. Modification = 60%
Additionals: (Finishing Level 6 = 1055 EXP) = 57% of total Experience collected

Equation: Exp. Modification = 60% > 57% of total Experience collected

Conclusion: Upon finishing Level 6 = Reaching Level 7, the Rare Experience Upgrade on Level Up gets compensated.

Theory: Technically picking a Rare Level Up will eventually compensate itself and outvalue itself, the higher the levels go, as the Difference of Experience per Level drops as higher the Levels go, in combination with other Experience Multipliers.

And finally, we've created an excel, ask us at the discord and we provide it to you.
Experience - Generally
There are 2 Types of Experiences

Shared Experience and Kill Experience.
When a hero kills an enemy, he gets his part of the shared experience and the kill experience.
A good way to check, on how far your hero progressed with experience, is his kill counter in his character sheet!

A Defense like a Ballista, Catapult or Trap take the kill experience and only share shared experience to all players.
A hero picking the defensive training perk, will get the Kill Experience of said defenses.
When 2 heroes pick the same perk, both will get the full amount of killer experience, per kill.

It is not a condition to concentrate on experience strategies on any run. As proven in beforehand going with a decent amount of Experience does compensate itself in most (but not all) occassions.

BUT there is also a decent Experience Ramp Strategy.
The Inn provides heroes equally to the level of your highest level'd hero.
Starting a game with a hero, that has high Experience and giving him the mandatory, if not all the kills possible, he will get his part of shared Experience and the kill experience.
Pair it up with defensive training and you most likely won't need other heroes for this strategy.
Theory: You can pump a hero with all Experience possible, to ramp him up, to get access to high level heroes in the Inn early on in the game.
Experience - Field Study and Conclusion
In order to proof my statements I did a little field study. I had a beautiful set up of a hero reaching 160% Experience Multiplication on Level 3, a hero staying on 115% Experience Multiplication and a hero having an item that reduced Experience Multiplication by 13%, leaving her at 102% Experience Multiplication.

Meet
Ramp: 160%
Mom: 115%
Oppigy: 102%


As calculated in the In Depths Section, the Hero Ramp compensated the +20 Experience Level Up upon reaching Level 7. Here is a direct comparison to the other heroes.
Ramp and Oppigy had roughly the same amount of Kills at that time, which almost perfectly put the Calculation in comparison, with Oppigy almost finishing Level 5, while Ramp hit Level 7 with the same amount of progress!
But something that was quite shocking were the results that were given to me, when I looked at the numbers between Mom and Oppigy.

As you can see in the following Screenshots, Oppigy had a total of 50 more kills in the whole run, which meant that she got an overall more Experience points than Mom did. But even a tiny amount of 13%Exp (Mom 115%, Oppigy 102%) has a huge impact on how far the results can differ from each other. This is a huge observation for a final statement!

Results:
_

The analytics of the Experience Code and the field study provided me two results and three observations on the topic, if it is worth picking Experience on Level Up.

1. Result: The theory of having an Exp Multiplier of 60% upwards is proven to work very well.
2. Result: If the +15% Meta Progression is handled as an Experience Upgrade on Level Up, the Upgrade would compensate reaching level ups sooner in this study.

1. Observation: Small Numbers (102% Exp) need high numbers (50 more kills) to compensate progression in relation to a 13% Experience difference. (Which is still fascinating to me.)
2. Observation: If you have a hero with high Experience Modification, giving him all the kills is the better investment.
3. Observation: The higher the Experience Modifier, the more value you get out of the strategy.

Conclusion: Picking an Experience Modification by itself does not compensate on a macrosight, but on a microsight.
On a microscale, the statement that it compensates is completely subjective and only shows in examples that are extreme, like missing a level up by a few numbers.
On a macroscale the true compensation and outvalueing starts with ramping up Experience to 60% and higher. Also it even pays off on small maps like Gildenberg!


Theory and TL;DR:
Picking +20% on an Upgrade on itself is worth 0 Levels and only imitates worthyness on a subjective view.
Picking +20% on an Upgrade on a hero with Experience modifications already available can be worth 2-3 Levels.
Defences
Ballistae, Catapults and Traps are Defences.

As stated before, Defences take Kill Experience, if you don't have the perk.
In the early game, you want to build catapults first, here is why:

Ballistae and Traps cannot be controlled, they damage enemies automatically at the end of the enemies movement, before the enemies start attacking.

Catapults provide:
1. Higher Skill Range
-> If placed centrally, they can support different sides.
2. Physical Damage
-> This damage type can melt armor and provides the perfect support for Magical and Ranged Damage only sides.
3. Average Damage
-> You might think, that's a contra, but no, remember: Defenses take Kill Experience. A good setup of low life enemies makes it possible for heroes on that side to clean it up, so they get the Kill Experience.
4. More AoE
5. Manual Attacks
-> Especially if you have sides that have to operate with an Isolation Hero, manually thinning down weak enemies can provide the perfect setup to isolate enemies. Even far into the lategame.
6. Undodgeable Attacks
-> For those Runner, Crawler, Dodger and Hunter nights.

You can see the progress of the night on the top left corner.

When you reach the end of the night, a number is shown on how many enemies are left to kill.
A good rule of thumb is to use Catapults in that time frame.

Theory: Use Catapults in the early to make Experience better accessable for your heroes and in the late game to thin down bulks, for easier setups.

Walls
Before we start talking about walls, this is the code on what enemies prefer to focus:

Clawer types: 1. <!-- Attack Heroes: aggro within 2 tiles --> 2. <!-- Attack Walls: aggro within 1 tiles--> 3. <!--Attack MagicCircle: default goal--> 4. <!-- Attack Buildings (except walls): no aggro, just hit them if they happen to be adjacent after moving-->

The following text regards Clawers only, but is adaptable to other enemies.

So basically any clawer always chooses a path within reason to the magic circle. If all pathes to the magic circle are blocked he pretty much goes straight at the circle destroying everything on its way.
If a hero stays 2 tiles next to an enemy, the enemy will walk to the hero. Same goes for Walls with 1 tile.

There are different types of walls and every Wall has its Pros and Contras. (O = Empty Field, X = Wall)


1. Wall

XXXXXXXX
OOOOOOO

You straight up Wall everything off.

+ Single melee units attacking single wall units
+ Enemies stack in front of the wall
+ Easier to generate Corpses
+ Perfect Orb Laser Setup
+ Stragglers are no threat
+ Very good Propagation Setup
+ Wall falls slow

- Stone Walls block Vision
- Cost heavy
- Difficult Isolation Setups
- Most AoEs don't work properly
- Difficult to enter or leave Walls
- Vulnerable to Splitter and Boomer AoE


Theory: If you don't run Isolation setups and have efficient ways to kill Boomers and Splitters, while having consistent access to lots of Materials, this strategy is perfect for you.
But the further you progress in difficulties, the harder it gets to pull of that strategy.


2. Chess Wall

XOXOXOXO
OXOXOXOX

You place your Walls in a Chess-like manner.

+ Cheap
+ Isolation Setups
+ Forcing Enemies into mandatory of AoE Setups
+ Splitters and Lancers only attack 1 Unit
+ No Vision Block
+ Winged prefer landing in the Chess field (for Isolation)
+ Easy access to Setup for Shortbows 4th Skill

+/- Diagonal Propagation is recommended

- Boomers can destroy up to 5 Units
- Difficult Propagation Setups
- Difficult to Leap through
- Wall falls fast


Theory: The idea is to have multiple enemies focus one wall, to set them up in an AoE lucrative position. Also this makes it easier to isolate single enemies, to get better access to the Isolation Setups.
The Problem is, that you will sacrifice your Defenses that way eventually. But the Overkill gets compensated mathematically, the less HP a defence (like a Barricade) has.

Example: 3 Units attack 1 Barricade: (Barricade HP:) 20 - (3 Units combined Damage:) 300 = -270 (Overkill damage)
The overkill damage would had been guaranteed damage to the 1. Wall instead.


3. Cheap Chess Wall

XOOXOOXO
OXOOXOOX

You place your Walls in a more efficient Chess-like manner.

+ Extreme Cheap
+ Funnily, enemies tend to isolate themselves more often, when they approach this wall
+ Up to 3 Units are guaranteed to attack the same Wall Unit
+ Boomers can only destroy 2 Walls at max
+ Splitters and Lancers can only attack 1 Wall max
+ Leaping is not mandatory

+/- Enemies set a straight path before they approach the wall (+ for Propagation / +/- for different AoEs)
+/- Easy passable (+ for heroes / - for enemies)
+/- Isolation and Propagation Setup (it really is a personal preference, if that's a + or a -)

- Wall falls extremely fast


Theory: The Chess Wall provides at least some Wall function, as the Cheap Chess Wall is just a joke of a Wall, BUT it IS a Wall. And sometimes, when Materials are warningly low, having a Wall that functions as the Chess Wall is more than nothing.
This Wall has saved my life more often, than I would wish for.
Maintenance Corridor
I've found out about this beautiful strategy on Ic0n Gamings Channel.

His idea is to make a such called "Maintenance Corridor", to get better access to other sides.


Source: https://youtu.be/V21T2DZQ-0E?t=596
Damage Codewise
When we are talking about dealing damage, there are a lot of factors adding to the equation. The Damage being dealt is Multiplicative not additive. This is the Damage Formular Codewise:

([Base damage x Attribute damage x Damage x Isolation x Opportunism x Momentum x Perks(Total Damage) x Resistance] - Block) x Critical = Dealt Damage

Name
Description
Base Damage
Range Damage of the weapon. Codewise the minimum Damage equals 0 and the maximum damage equals 1. The system "chooses" a number between 0-1 and applies that to the range of damage.²
Attribute Damage
Is the Multiplicator of Physical, Ranged or Magical Damage.
Damage
Multiplies Damage of any of the damage types and is therefore the most versatile pick.
Isolation
Only triggers, if a unit is isolated.
Opportunism
Triggers, if any negative alliteration is applied³.
Momentum
Only triggers on momentum related Skills.
Total Damage
All Total Damages can only be obtained via Perks.
Resistance
Applying Resistance to a target, reduces incoming damage. In vice versa, reducing the Resistance of a target below 0% increases its incoming damage.
Block
Blocks Maximum Cap is 100. It's useful in small numbers but loses its effectiveness in massive numbers.
Critical
Is guaranteed at 100%. It's multiplying with the Critical Damage Increase Multiplicator.
²For example Range of Damage is 100-200, the number chosen by the system is 0,5, the Base Damage will therefor be 150.
³The 4 negative alliterations are: Stun, Poison, Debuff and Contamination.

Theory: Even small numbers can ramp up to insanely high damage outputs, so you should pick at least one of each of the Damage Multiplicators, when they are available to you.
Some people just take all possible Attribute increasing Omens to compensate.

Regarding the question, on how Criticals work on Propagation, we got this statement provided by the Code Team:

Damage
The most consistent Damage Increase is Base Damage, which is located in the Range Damage of a weapon.

The Range Damage of a Wand Tier 0 is 60-80
The Range Damage of a Wand Tier 1 is 67-89

Do not fall for the trap of lucrative Damage Multipliers on that specific weapon!

Wand Tier 0 has +10% Damage as an attribute:
60-80 *1,1= 66-88 Damage in total < Wand Tier 1 67-89

Conclusion: The Wand Tier 1 IS superior.

Theory: You want to access High Level Weapons as soon as possible, to get superior weapons as soon as possible.
Poison Damage, Potent Toxins & Hex
Made by @𝐈𝐥𝐲𝐚 [Limit Breaker], now @ilyat.


I went ahead and took a look at how good the Potent Toxins perk actually is, if it is worth using and when it can be a trap.

The perk increases your Poison Damage stat by +100%, but reduces the amount of turns it will tick by -1.


When someone is looking to use Poison damage, they do so in three ways:
  1. Is the pump and forget: you know that X amount of Poison damage in the Y amount of turns it has is able to kill the target enemy with a single cast, meaning that it doesn't matter how long it will take, just that it will be both efficient in resources and one less problem to think about.
  2. Use is as a pseudo direct damage, trying to kill the enemies asap usually the turn it is applied in.
  3. The third way of using it, which is weaken the enemy enough but not killing it, and then bringing it close so you can stack it into a Corpse Pile using direct damage.


I did some calculations on where the Potent Toxins perk actually increases damage for the total duration of the Poison, and where it reduces it:

Here are the hero's Poison Damage stat thresholds:
  • 200%, with a 3 turn Poison source, using all (except Orb) available sources of Poison.
  • 300%, with a 4 turn Poison source, using all (except Orb) available sources of Poison with the Hex perk or the Orb (without Hex).
  • 400%, with a 5 turn Poison source, using the Orb with the Hex perk combined.


If your hero's Poison Damage stat is:
  1. Lower than the threshold number using the respective source, before getting the Potent Toxins perk, your Total damage dealt will the increased.
  2. Equal to the threshold number, it will do an equal amount of Total damage with the perk, but will allow you to kill the enemies a turn faster.
  3. Higher than the threshold number, your Total damage dealt using Poison will be decreased.


Some math about the equal:
200%x3 = 300%x2 which is 600%,
300%x4 = 400%x3 which is 1200%,
400%x5 = 500%x4 which is 2000%
(the xMultipliers are the amount of turns the Poison will tick)


Final comments about Poison and how I see it

The 5 turns on Orb are not optimal in any scenario and it's already hard to utilise 4 turns, making it impossible to get proper evaluation on it, especially on Apoc 1 and Apoc 5, the former increasing HP meaning different damage thresholds for wounding and the latter increasing all move by 1 and 2 on corresponding enemies, which means you need a faster kill time, even if it's one turn sooner.


There's also the fact how far the Mist is from the Haven, as if it's at the closest 1 turns is max what you can get after they come out before enemies are already inside vs max fog distance on a map like Elderlicht where Fog gets pushed by 3 compared to other maps which is 2, so you get total 12 tile difference from closest to farthest, making it more possible to tick 2 more turns, even 3 sometimes, allowing all poison sources to get full value.


When reading this you can argue I didn't take into account Septic Shock and how it can stall enemies both outside & inside the Haven, making the extra ticks on poison easier to make use out of, but I went into with the context you're playing on a difficult map and on high apocalypse level, meaning you don't have much of a wiggle room to use poison on the same enemy twice without getting punished by not damaging the rest of the horde. An example is Night 6 on Glintfein where there are so many enemies that with 6 heroes and good builds it's not smooth sailing.


As there are other nuances when it comes to Poison sources, Bee sting and Poison knives, like actually having the accuracy to hit the enemy and the direct damage allowing for wounding earlier etc.


About spreading, I didn't mention Contagion because personally I've just shelved it after it was changed in the 0.95->0.96 betas making it unable to spread on itself, meaning getting Epidemic is whatever if you don't have the Debuff tree for Sadiat to get more Opportunism stacks. Which leans into making Poison just another debuff in an Opportunism build rather Poison build.

But if you manage to do something like double cast Putrid Acid in the middle of the horde with enough Poison damage and having applied Stun, at the end of your turn those enemies will die and spread the Poison to tick into the adjacent enemies for the next turn, while also possibly stunning them, meaning you can premonish the lockdown of 12 extra possible targets with stun, which might have more value than casting Putrid Acid in 2 seperate locations, that is assuming you have enough Poison damage for it to spread to the turn you applied it to more enemies.


Economy
Another question that gets asked frequently, is on how to set up the best economy in a run.

People tried different approaches, explaining with global progress and the payback of building a certain type of economy. The problem is, that with Apocalypse 4 the numbers do not add up anymore. (Another reason on why it is so hard to make a proper guide.)

When playing through a run, I'll go with that personal plan:

1. 2 Weapon Sets per Hero
2. High Level Weapons (ideally Level 5)
3. Equipment (and sometimes lower than Level 5 Weapons) with
3.1 +Multihit, +Propagation, +AP
3.2 +MP, +Crit, +DMG
3.3 +Isolation, +Opportunism, +Momentum
3.4 Rest
4. A Teleportation Skill/Perk/Scroll per Hero

Ideally you want to prioritize to get access to Level 5 Gear as fast as possible, but getting there is difficult and should be approached with the concept of "Value per Worker".

If you get a Mountain of Corpses, that Mountain is worth 40 Gold + 70 Materials or 2 Items that can be converted into gold. Your workers compete against this. If you manage to consistently get Mountain of Corpses (like we discussed it in the Wall section), you will not run into this problem.
This needs to be updated as Corpse Generation and Corpse Pillagin got nerfed, but the plan remains the same, you want to get a decent Value per Worker.

Theory: Going with that strategy, you want to have enemies as close to the haven as possible. Building a Seer is unnecessary, so by not building it you have more Gold for your economy.


But if you can't afford a decent generation of Mountain of Corpses, we have to switch to alternatives.

1. Gold Mines

Gold Mines provide 40 Gold per Worker and are a direct competition to Mountain of Corpses.

2. Shop Keepers Friend

You don't need to sell Items immediatly. If you wait for the max Level of the Shopkeepers Selling Price (also paired up with the Shopkeeper Omen) you can make your items worth selling.
In the lategame a rare Level 5 Items Selling Price starts with 60 gold.
Another reason to get to Level 5 Items as fast as possible, the value per worker will increase to 60 Gold.

3. Low Panic Level

Yes, playing good is another factor for consistent Gold Income. If it means sacrificing a worker here and there to give your heroes more mana or health, so be it. Every Gold that gets compensated with low panic level is a well invested worker.


A good approach on how to start an economy is to sell all unnecessary Items, get 1-2 Gold Mines up and focus on scavenging Mountain of Corpses.
You want to invest a Worker on 40 Gold per Gold Mine use, to use that gold to get more workers.
You can buy back Items, that you sold for the same price.
So you can ideally invest your items into economy, to get gold out of the economy to rebuy your items.

Having a decent Value per Worker, you straight up invest into Gear Level of any Production Building.
I would put Magic Shop on top of the most valueable Production Buildings.
Followed by Bowyer and Armor Shop.
Then comes Weapon Smith and Jeweler.


And actually while I am writing this, someone else on the discord is figuring out an economy strategy that requires 0 Workers to pull of.
Meta Progression
I figured, that going for the Apoc Hardcore Challenge pretty much lets you obtain 80% of all Meta Progression. The amount of Essences you'll get is insane.

If you are having trouble with the game, then of course it will take more time, so priorities are the key here.
You will eventually understand, that some playstyles will be better for you than other playstyles, so your priorities will differ from player to player and definitly from difficulty to difficulty.

But here is, what's really important: The rarer the better.

Once available, you should definitly Focus on "More Uncommon Level Up" and "More Rare Level Up", and on "More Uncommon Items", More Rare Items" and "More Epic Items" Meta Progressions.

Rare Level Ups provide you access to increase AP, Propagation Bounce and Multihit Attributes.
Epic Items are the most expensive weapons for you to sell in the Store.
Heroes and Trivia
I do not provide you a guide for a specific hero, because as of right now, the only thing that was consistent in my runs where my Poison Druids, and I don't need to tell you on how they function.
All other heroes were completely different from the others and also completely situational.
I had a Tome, Wand User with Propagations and Opportunism. (Which was by far the deadliest Wand User, I've ever made.)
I had a Power Staff, Scepter User with Momentum and Sadist.
I had a LB, Hammer User with Meteor Ring and Isolation.
I had a Wand, 2H Axe User with High MP as a Supporter with Lone Wolves on each side.

No, you cannot drive the same strategy every game, it is way too situational.
(Except for Poison Druids...)

I want to give you this approach, which still helps me a lot in my runs:
1. Get your Heroes Leapfrog and Potion Throw (Best via Omen)
2. Get your Heroes at least 10 Accuracy and Resistance Reduction (Best via Omen)
3. +10% Damage of a Multiplicator ACTUALLY IS +10% more Damage
4. +13% Experience IS NOT +13% more damage (and it hardly will be)
5. Have your 3 (or 4) starting heroes reach an efficient high level, so you can buy High Level Heroes
6. Even Heroes that seem completely useless can turn into absolute power houses, if you give them a try
7. You ultimately want to look for Kills per Action Point
8. Don't underestimate this, but averaging 1Kill per Action Point really is above average
9. Never pet a burning dog
10. Keep good weapons, especially good weapons
11. Build your heroes around your weapons, not the other way around


Also here are some trivial theoretical thoughts, that I might update on a regular basis.

Bosses

Bosses have high damage and high resistances.
Propagation bounces, if there are bouncable targets.
Propagation does not bounce on isolated targets. (Except if they are diagonal and you've got the diagonal bounce trait.)
Tomes 2nd Skill reduces Resistances and Damages.
Having a unit stand next to a boss, does not make him isolated.
Casting Tomes 2nd Skill on the boss, makes the skill bounce between him and the unit.
A hero is also a unit, that can be placed next to a boss.
All Debuffs can be dispelled with immunity or a Healing Potion.
The Cap on Resistance Reduction is -50%.
Resistance Reduced below 0% is Damage increasing.

Theory: Following this strategy a Boss will get -50% Resistance and a negative alliteration, therefor guaranteing Opportunism and Isolation Modifications.

Some Elites and a few Bosses have Magical Mirror.
Death Denial makes your hero immune for the turn he died.
A hero can die, while it is his turn.
Attacking a Magical Mirror can kill the hero.

Theory: Use the Death Denial Perk for Magical Mirror Enemies, to kill them without dieing.

If you go with both theories that has been mentioned prior:
You can manage to get a hero killed.
Place that invulnerable hero next to a boss.
Cast Tomes 2nd Skill on the Boss to let it bounce between him and the invulnerable hero.
Cast Tomes 4th Skill on the Boss.

Theory: Yes.


2. Catapults

Most efficient Physical Damage Heroes require Blood Magic.
In the early Magical and Ranged Damage is more effective.
Both Types will have problems against Shielded enemies.
Catapults deal Physical Damage.

Theory: If you concentrate on Catapults first, you get easy access to Physical Damage, compensating Physical Damage Heroes


Also if this wasn't obvious to you:
End Nights fast, especially Boss Nights
Alt+F4 Exploits
What are Alt+F4 Exploits?

The game does not save on hardresets, but rather has checkpoints on where the game saves automatically (at the end of a phase).
Or if you manually quit the game to the main menu.

You think that sounds like someone is just lazy in the code team?

Wrong.


What is so exploitable about Alt+F4?

There are 2 main Exploits: Save Restart and Ability Queue.

The first one obviously, the game saves after a phase or when you quit to menu. So in a way, you can hardreset out of the game, when you've done a mistake and restart where you softreseted.

The secod one is a hidden queue. The queue was never fully discovered, but it pretty much set a number of events, that are always quaranteed to repeat, if you would hardreset the game. But there were also corruptions of the savefile happening, so keep that in mind, if you try to test it.

What you want to do is to create a bunch of items, note the order of rarities and attributes down, hardreset the game and produces the items in a different order, to apply queued rarities and attributes to the item of your liking.

You can also alter the level up queue, as they have a similiar queue.

And also you can intertwine different queues. But that goes too deep for people to explore. Maybe you are the one and you are willing to report on how it works, but as far as I observed it, no one has reported it yet.
Sources
TLS Strategies and TLS General: https://discord.com/channels/412974735966863360/608312842218635298
Of Ishtar Games Discord: https://discord.gg/ishtargames

Ic0n Gaming: https://www.youtube.com/playlist?list=PLkHfUAaH9nIflxZGxPGt--Z6n8xfVt0Px

Letsatsis, DrakenKins and Tertulians Guides.

The Community's Theorycraftings and Limit Testings: https://discord.com/channels/412974735966863360/850979848066826260
And the wiki task force: https://thelastspell.fandom.com/wiki/Special:AllPages
Conclusion
The Experience Section had to be changed (Being in Discussion almost daily=) 13 times. This proofes, that if you want to create anything specific regarding The Last Spell, you will always find another variable, that needs to be adressed.

I want to thank everyone, who supported me on my Apoc Hardcore Challenge and crafted with me all those theories.
And thank you Ilya/BloodSorrow for contributing to the Guide.

If you have a specific question, I would highly recommend to join the discord and ask there in the general or strategies channels. If you ask specific questions here in the comment section, I will pretty lowly priotize answering them. I am trying to get common questions answered, as they are as mentioned the best way to approach this game.

Also, If you want to quote me or contents of this guide, feel free to, but please give me credits.


Thank You!
5 Comments
abaoabao2010 24 Feb, 2024 @ 11:43pm 
Also, a couple of math things (aka not opinion, but actual maths)

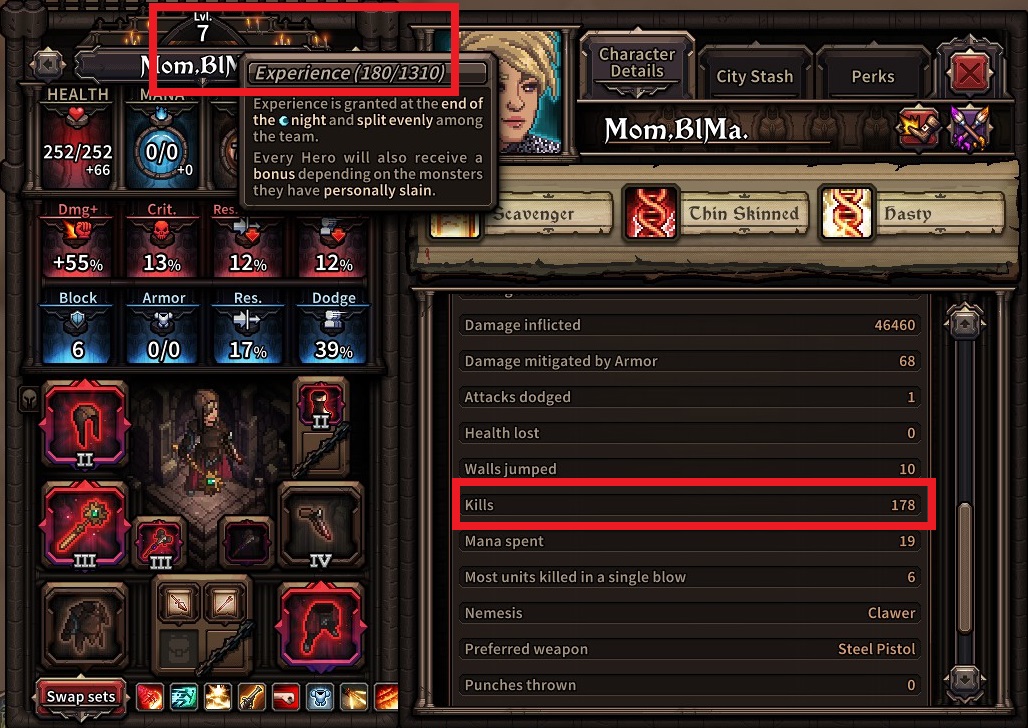
1: in the part that you argue that a rare exp mod of +20%, 25% from perk and 15% from meta progression makes it a +60% bonus and calculating how soon the upgrade is worth it, you are comparing 100% base exp intake to 160% base exp intake. You should instead be comparing 140% to 160%. As such, the effective increase from taking the rare upgrade is
160/140=114%
The rare upgrade only provides 14% increase compared to not having that upgrade.

2: Your entire calculation assumes you take the 20% extra exp upgrade on leveling to lvl 2 for the first calculation, and taking that upgrade on lvl 3 for the second calculation. I'll post a link to a google sheet for a more flexible document.
https://docs.google.com/spreadsheets/d/1EqC9XEYjdrTCcKsGBVuLgAOroVY7d2hkKMlnK5oSVnA/edit?usp=sharing

Click on the instructions on how to use (I made it pretty easy to use)
abaoabao2010 24 Feb, 2024 @ 11:41pm 
"Propagation does not bounce on isolated targets."
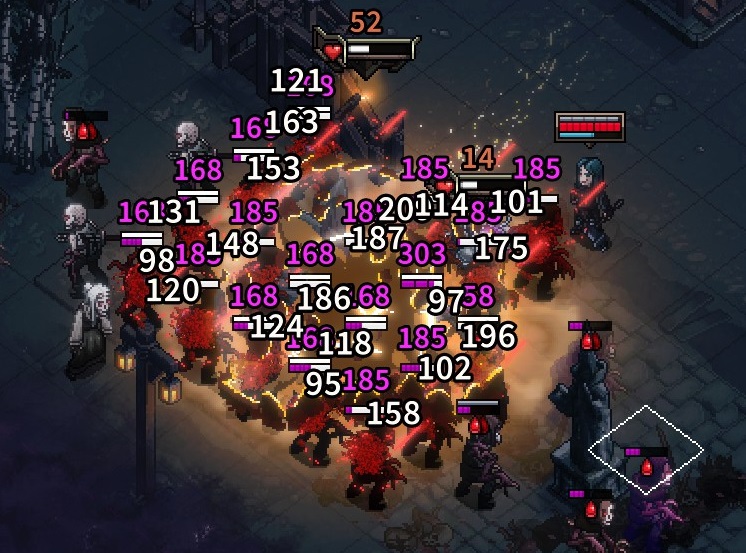
Isolation only requires horizontal and vertical cells to be empty. Diagonal propagation can bounce on them.

On that rare exp upgrade discussion: a level up provides, in addition to the secondary stat you sacrificed to get the rare exp upgrade:
primary stat
earlier perk
better inn recruits

I'd consider a level up to be worth 3 secondary stat points.
Gryphon 19 Jun, 2023 @ 11:15am 
Also, you are missing the fact, that while it takes a while to get an "extra" level, in the meantime all your "regular levels" will "arrive sooner". In practice this may well mean the difference between getting and not getting a level-up at the end of a night.
Gryphon 30 Apr, 2023 @ 7:14am 
I think you are overlooking something very important in your concept of "compensating" the level you pick up the +20% XP on: You are NOT giving up the whole level. In fact, depending on build you give up only the least valuable part of the level up (secondary stat). imo, the extra perk point alone is worth giving up that in almost all cases, and the extra primary stat is just gravy.
peterstevens 9 Apr, 2023 @ 7:59am 
Thanks for taking the time to write this up.