Meet Your Maker

Meet Your Maker

49 ratings
Ohm's Beginner Guide [Updated 2024]
By Ohm is Futile
Everything you need to know to start out, raid successfully, and build bases that are fun and generate kills.
6
4
4
2
   
Award
Favorite
Favorited
Unfavorite
Resources
Genmat
It's essentially experience for your advisors. The symbols you see next to a base or when buying a plot correspond to which advisor will get experience if you raid or build this location. Leveling up your advisors leads to leveling up the Chimera which is your main source of red cells. It will also extend the duration of their boost.

Red cells
This is the bottleneck for basically all the permanent upgrades and it is used for some advisor boosts.

Parts
This is mostly used to upgrade raiding equipment or buying consumables. More often than not, you also need red cells. You get those semi-randomly from raiding when you kill enemies and destroy traps. People dying in your outposts can also drop parts.

Synthite
This is mostly used to maintain outposts. You get this semi-randomly from raiding when you kill enemies and destroy traps. People dying in your outposts can drop synthite.

Tombs
The tombs emit a dim light and make loud noises when you are close. Destroying them grants a decent amount of parts and synthite. When you are building, avoid blocking them. They are good bait for traps and you lose nothing if the raider gets them. Try not to make the resources that drop inaccessible though or you might lose accolades in the long run.
Raiding
Maintaining outposts is a nice source of passive genmat, but raiding is the faster way to progress. It's also good to go out there between builds for inspiration and you'll need to raid to get synthite if you like building. Besides, what else will you do once you have the maximum number of outposts online? Go outside? Work? Come on.


Tips for raiders

Equipment

- The starter gun (Volt) can break traps and armour, which the other gun cannot do. You can usually retrieve your ammo if you're careful, but I still recommend using melee first and using the gun as a last resort.

- The starter sword (Fury) can deflect many projectiles with a well-timed block, but cannot break armour. Be careful about hitting armoured enemies. Aiming your strikes matters as you can bypass armour if you're accurate enough.

- The bigger sword (Sledge) cannot block, but it can shatter armour. It's great with a gun or the other sword as it allows you to kill enemies very quickly and you don't have to be as careful about armour.

- The purchased gun (Falconic) has a lot of ammo, but it cannot break armour or traps. It's probably the most situational piece of equipment in the game right now. It's mostly useful for dealing with rooms with lots of enemies when you think you might lose some of your ammo.

- The demolition cannon's ammo can be picked back up for infinite "grenade" and can be very powerful but also dangerous to yourself. However, the ammo drops and rolls, so it's easy to lose it in some outposts.

- The shield (Arc) is a powerful tool. It lets you ignore damage briefly, but be careful as you can put yourself in a lot of trouble by rushing ahead.

- Grenades are great for clearing a cluster of traps or enemies. The bounce and area of effect are a little finicky sometimes, but they are definitely worth it.

- The flash barrier hardware is really powerful and will block *almost* everything, but it is stationary and limited in supply compared to the weapon version. This is a good unlock to get early.

- The stim hardware buffs your speed, it's good if you're good at moving around.

- The phoenix pod is a respawn but if you place it before grabbing the genmat, it will despawn once you pick it up. If you drop it afterwards, it will stay there. This is to prevent abuse.


Tactics

- Patience and knowledge are your strongest weapons. You can clear basically any map with basic gear if you know what you are doing and take your time.

- Ignoring traps and enemies and just grappling through a room is a valid strategy sometimes. The key is to recognize when it's safe to do so. If you unlock the shield and/or practice your timing and reflexes with the starter sword, you can get away with a lot.

- Check your corners or be prepared to quickly grapple out of the way. Favour going up over going down otherwise bombs might follow you.

- Holding W can work on some outposts, but the real trick to speedrunning is mastering the grapple, having a decent sense of direction, and good reflexes to break pistons.

- Use your enhancements, especially the common and uncommon ones. Extra hardware for phoenix pods is very good. Speed and ammo pickup range can also make a big difference.
Building
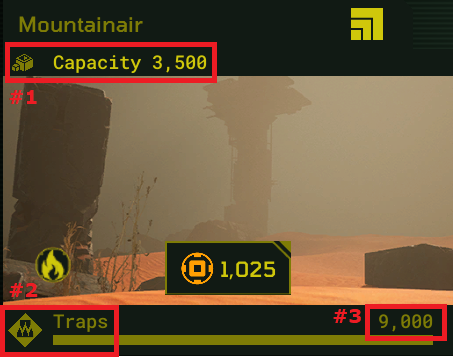
Active outposts provide genmat passively based on its location. You can see the icon corresponding to an advisor when buying a plot.
#1 is the capacity for blocks, traps, mods, guards, augments, etc. Capacity increases with prestige.

#2 is the advisor tied to the outpost. Both raiders and you get genmat for this advisor when the base is running.

#3 is the total genmat capacity of the outpost before you need to refill it. This is how long the outpost will run before running out! Avoid buying plots with less than 9000.


There's a few things to be mindful of:

- You can only have 5 outposts active at one time.

- You can have 200 outposts saved however, so once they are depleted, you can set them to social and challenge your friends or the internet in general.

- Prestige refills the genmat you get and gives you a small increase in build capacity. The main reason to prestige is to keep the outpost active as long as possible, so it's best to wait until it expires before prestiging.

- Accolades give some progress towards prestige; making your base fun or cool-looking will help ensure you can prestige every time it runs out.

- Unless you specifically set your base to that mode (overdrive), people getting your genmat doesn't lose you anything; if you make it so you wouldn't like raiding your own base, chances are others also won't; it's a balance.

- If people are having fun in your outpost, they are less likely to quit early and may die more in the end, granting you more drops and prestige.

- Make sure to visit outposts every once in a while when they get kills to collect resources (not sure why you have to load in the map and look for stuff; plz fix devs)


Here are some general pointers as to what people like and don't like

- People either hate or are indifferent to mazes; I don't recommend building them or at least keep the maze part short.

- Having more than one path can be fun; use decals and/or geometry that HRV cannot traverse to indicate optional paths (the little box guy that wanders between the entrance and the genmat).

- Do your best to make the tombs accessible; even better if they are part of your base; avoid making it so resources fall into acid, this will annoy people and reduce your odds of getting accolades.

- Killboxes, i.e., rooms with large amounts of acid cubes, enemies, and traps usually leave people indifferent or annoyed. That said, if you're clever and original, people will often reward you for it. If you're just wasting their time with repeated patterns and cookie-cutter setups, you probably won't get as many accolades and people may even just quit outright. Again, it's a balance.

Building Tips
Aesthetics

- Using as many different decals and cubes as possible can help you hide traps in plain sight, but it also makes people's eyes bleed. If you want to overwhelm people with this strategy, at least try to use it sparingly instead of throughout the entire base.

- Using a limited palette of 2 or 3 cubes, 2 or 3 colours, and a handful of decorations makes your base look more cohesive and appealing.

- If you are after artistic accolades, try to think of a story for your building. Maybe certain rooms look like they serve a specific purpose. Maybe you built this into an abandonned building, if so, what kind of building was it? Having a sense of direction will help a lot in making cool and unique bases.


Fun

- Movement in MYM is very satisfying. While it may not lead to the most kills, try to have at least one open room in your base where people can grapple around while avoiding traps and/or guard fire.

- Slowing down speedrunners doesn't have to feel bad. Whenever you have a trap to block the way (e.g., AoE plasma, incinerator) you can offer an alternate route. It might actually take as long as waiting, but it feels better than sitting there waiting for a particle effect to expire.

- Alternate paths, shortcuts, and including tombs in your bases can be a lot of fun. Just because HRV has to have a simple path to the genmat doesn't mean it has to be the only path.

- Do not use the same trap/guard setup more than 2 or 3 times per map. Even 3 times might be pushing it if it takes long enough to disarm/get through. Repeating patterns are usually just tedious and they become less and less likely to get kills as people get used to it.

- Higher capacity doesn't mean better. I find the sweet spot is 1500 to 2500. I don't recommend going above 3000 unless you have a pretty decent bag of tricks and unlocks or your base will just end up being a lot of the same. 1000 and below can be hard to work with though.

- Be wary of making long empty corridors. Nobody likes a walking simulator and, again, every raider who quits because they are frustrated or bored may actually result in fewer kills overall.


Making deadlier bases

- Understanding human psychology and the fact that the brain is great at figuring out patterns are your best assets for catching people off guard:
  • Put a trap in an obvious place to draw people's attention and blindside them with another trap.
  • Design the map in such a way that there are nooks where it feels like there should be a trap and put nothing there to lull them into a false sense of security.
  • Put acid cubes in plain sight but somewhere harmless; some people will basically forget about them since they're not immediately threatening and then walk/fall in them while avoiding something else.

- Spice things up with different trap mods or exploding enemies. Have one or two bolt shot fire twice or have homing bolts for example.

- Point traps at other traps to catch people trying to recover ammo or just being greedy trying to break everything.

- Use guards to draw attention away from traps; patrols can be really useful for delaying the appearance of a guard and get them to either completely blindside the player or cause a panic reaction.

- Use slopes with bomb guards/traps to create chaos.

- Consider using wider corridors and having holo-cube trap floors.


Dealing with speedrunners

- Corridors with enemies, AoE plasma, having incinerators/bolt shots around corners can really mess with someone trying to ignore everything in your base; all you need is to either force them to stop or pressure them longer than a shield can protect them.

- The Death Blossom trap can be more economical than pistons and force people to stop, swing, or shield which leaves them open to other traps. Bounce pads can also punish hesitation.

- Pistons is the most effective traps at slowing speedrunners, but avoid placing more than 3 in a row. They don't generate more kills if you have a lot, it just takes longer to take them apart.

- Mazes are usually a bad idea, but making the path forward less obvious can force people to slow down enough for them to be vulnerable to traps.

- Some people are just that good; don't re-arrange your whole base because of that one guy.

- Be careful to balance pressure and obstacles; you don't want to make your base tedious or boring; after all, if people leave before dying you don't get anything.
Farming Tips
Here are a few tips if you need resources for unlocks or synthite for maintaining outposts:

- Tombs are a good source of parts and synthite, but they don't really help with red cells which are the bottleneck for unlocks. Get them if they are marked or nearby, but don't spend several minutes looking for them.

- Outposts provide genmat which is one of the main ways of getting red cells. Even the worst outpost with 9000 genmat will help transform synthite into more red cells for unlocks.

- Outposts are expensive in synthite. If you like building, then making good outposts will reduce your costs indirectly via more kills. More kills means more synthite and genmat, but it will pretty much always be a synthite expense to run an outpost. On average, expect to pay at least 500 synthite per genmat cycle per outpost.

- Carefully clearing outposts that are difficult for you is, unfortunately, probably the worst use of your time if you are trying to unlock things. As such, raiding normal or dangerous outposts quickly tends to be faster than raiding brutals.
Difficulty Ratings
Short version
tl;dr, there are a lot of good analyses out there providing specific numbers. The main thing you need to know is each trap and guard is worth a number of points. Their value decreases the further away they are from HRV's path.

The length of the path also plays a small role.

Bottom line is: the more traps/guards and the closer they are to the main path, the higher the perceived difficulty. This means a normal base can be really hard, but probably very short, and a brutal base can be very easy but very long.

You can activate a boost to have intel on bases before you raid by talking to one of the advisors.

Long version
Overlapping trap coverage, placing traps near/on the path will increase your difficulty rating quickly. Holocubes also tend to add a lot of "difficulty points" to bases if they are near other traps and near the path so use them wisely.

Note that you can manipulate the difficulty rating by a decent amount by creating larger rooms where HRV has to take a longer path which the player is not likely to follow. This works because you can then place traps that are far from the path and do not threaten directly even though it's more likely that players will cross through there.

Also, adding any patrol to a guard will increase its contribution to the difficulty. If you see a blue outline for a guard, that guard is considered to be "more difficult."

Trap and guard mods contribute as well. Make sure to choose mods that actually make your base more difficult.
F.A.Q.
Q1: Do I need to manually pick up all the drops from my outposts?
A: No, once you have loaded into an outpost, all the loot will be collected when you leave.

Q2: Why is my outpost not getting a lot of raids?
A: Currently, if your outpost is rated brutal, it's just competing against a lot more outposts. Dangerous outposts get slightly more and normal outposts get by far the most raids, but must be reasonably easy or the dynamic difficulty system will increase their rating.

Q3: Why are there so many impossible outposts?
A: The game rewards making deadly outposts the most. Accolades do not provide much value which means there's basically no direct incentive for making fun outposts. However, all outposts are possible, though some might be impossible without shields or phoenix pods.

Q4: Why do I need to give HRV a path?
A: HRV is a necessary evil to prevent impossible outposts, though you could certainly argue that HRV's movement is currently too restricted and limits creativity.

Q5: Why is it that builders don't need to validate their outposts?
A: Because I could make a hidden entrance through opaque acid cubes that require you to choose the right acid cube, at the right angle, and to bring a shield. The game also encourages making small changes after watching replays and having to run your outpost after every change would get annoying.
About Me & The Guide
I will be streaming this game sometimes on my Twitch channel, but I'm more of a Youtuber. I am planning on creating more in-depth tips and tricks videos along with guides. There is a definite possibility I will also do outpost showcases down the line.

If that sounds interesting to you, check out my channel:
https://www.youtube.com/channel/UCXjzJXurqJJWQB9fNll2W_w

https://www.twitch.tv/ohmisfutile

Version history:
April 4: V1
April 5: Minor corrections; removed disclaimer; added section on difficulty ratings
April 26: Added pictures for key things; rewrote some sections; added more tips; added FAQ section; added farming section
Feb 2024: Minor corrections and additions due to game updates
Upcoming: Quick trap description; more Youtube stuff??
7 Comments
Thugonz 5 Apr, 2023 @ 6:15pm 
good guide
Pezz 5 Apr, 2023 @ 1:08pm 
+1 Super nice guide :happy_yeti:
Ohm is Futile  [author] 5 Apr, 2023 @ 9:04am 
@amanda_bhvr Thank you! I put way too much time on this game behind the scenes analyzing it as I really want it to succeed lol
amanda_bhvr  [developer] 5 Apr, 2023 @ 6:18am 
Thanks for creating this guide! This is super helpful and it's clear you put a lot of time into this <3
craffity 5 Apr, 2023 @ 5:07am 
Tyvm!
Ohm is Futile  [author] 4 Apr, 2023 @ 8:12pm 
Thank you, and all I know about the ranking is that I think it's not finalized. During the dev stream they said they could be adding it down the line. Number of deaths definitely plays a role. Dunno what else.
craffity 4 Apr, 2023 @ 5:28pm 
Nice guide!
Do you know how the ranking system works? Going from Bronze through silver, gold and finally master?