Meet Your Maker

Meet Your Maker

94 ratings
Trap Mechanics + Stats
By Reddie Systeem
Description of the functioning of all the current traps, guards and upgrades
4
4
14
3
2
   
Award
Favorite
Favorited
Unfavorite
Introduction
Since the game is sometime vague over what and how some things work.
I decided to visually show how they work.

If you think something is not correct, please let me know in the comments and i will test it out.
For simplicity sake i only showcase horizontal activation ranges with the exception of the bomb dispensor. If you feel the vertical distances of other traps vary from these, please let me know and i might add those aswell.
What will cause outpost difficulty to go up?
So i did some testing on an empty large map without any prestige or kills what will increase the difficulty of the outpost when adding traps.
These are my simple conclusions:

You need atleast 350 resources in total spent with the regards to where they are on the route to meet the minimum trap requirement regardless of mapsize or resource capacity

There are "caps" for total resources spent on traps and mods depending on where you place them.
-Normal = 350-1250
-Dangerous = 1250-2500
-Brutal =2500+

Depending on how many blocks away the trap is they count less towards the "cap".
-On the route = 100% cost towards cap
-1 block away from route = 50% cost towards cap
-2 or more blocks away from route = 25% cost towards cap

For example, you can place up to 4 times as many traps when placed 2 blocks or more away from the route before the difficulty goes up.

Sidenotes
-The so-called discount does not mean your resource capacity, only towards your difficulty "cap"
-The Incinerator and Bomb Ejector will contribute 15% in addition to their cost towards the cap.
-There is no modifier for overlapping, hugging traps or placing them near the genmat, that i could reliably find.
Legend
This guide will use images where decals depict the different zones of a trap.
They are as follows:

These squares will trigger the trap.

These squares are safe before and after triggering the trap

These squares will kill you if you are not moving (Or moving enough)

These squares could kill you depending on where you stand

These squares indicate where a guard can hear you jumping and running
Trap: Boltshot
Boltshot
Activation Range: 8 Blocks in front (9 with Overshot)
Projectile Range: 10 Blocks in front (14 with Overshot)
Triggers: 1 Trigger (2 with Double Down)
Cost: 50 Resources
Mods:
-Overshot 15 Resources (Extend range by 1 and Projectile range by 3)
-Double Down 15 Resources (+1 Extra Trigger)
-Hunter 15 Resources (Arrows will follow the player after being triggered) (Will also slow down projectiles)
-Second Wave 5 Resources (Trap will appear after the Genmat has been stolen)
-Relentless 15 Resources (Arrows will fire one after another instead of all at once)


Sidenote: Normal projectile speed is 2,2 seconds for 8 blocks after activation.
The Hunter mods increases this to 2,6 seconds for 8 blocks after activation.

Normal activation range versus activation range with Overshot.

Activation range with only the Hunter mod installed.

Activation range with the Hunter and Overshot mods.
Trap: Impaler
Impaler
Activation Range: 1 Block in front
Projectile Range: 1 Block in front
Triggers: 1 Trigger (Infinite Trigger with Unrelenting)
Cost: 50 Resources
Mods:
-Self Destruct 10 Resources (Will explode after being destroyed)
-Blockade 10 Resources (Trap stays activated for 5 seconds from activation)
-Unrelenting 10 Resources (Trap will trigger until destroyed)
-Second Wave 5 Resources (Will appear after the Genmat has been stolen)


Activation range for Impaler
Trap: Iron Claw
Iron Claw
Activation Range: 4 Blocks in front
Projectile Range: 5 Blocks in front in a cone shape
Projectile Speed: 3 seconds for 4 blocks (2,5 second for 4 blocks with a speed upgrade)
Triggers: Infinite until destroyed or the claw has been destroyed
Cost: 30 Resources
Mods:
-Double Down 10 Resources (Trap will trigger one additional time after the claw has been destroyed)
-Greased Chains 10 Resources (Increase speed for pulling in by 0,5 second for 4 blocks)
-Quick Launch 10 Resources (Increase speed for grabbing by 0,5 second for 4 blocks)
-Second Wave 5 Resources (Trap will appear after the Genmat has been stolen)
-Catch & Release 5 Resources (Claw will release immediately after being pulled in)

Activation and Projectile range for the Iron Claw:
Trap: Death Piston
Death Piston
Activation Range: Periodicly activated by itself
Projectile Range: 1 Block in front
Projectile activation time: 2 seconds idle and 1 seconds activation (3 second activation with Blockade)
Triggers: Infinite until destroyed
Cost: 50 Resources
Mods:
-Burning Piston 15 Resources (The sides of the Piston become lethal on touch aswell)
-Blockade 15 Resources (Trap stays activated for 2 seconds longer)
-Unstable 15 Resources (Trap will trigger for 1 second at random intervals)
-Second Wave 5 Resources (Trap will appear after the Genmat has been stolen)
-Self Destruct 10 Resources (Trap will explode after being destroyed)

Sidenote: Touching the front of the piston is always lethal.

Activation range for the Death Piston:
Trap: Incinerator
Incinerator
Activation Range: 4 Blocks in front (5 with Dragon Breath)
Projectile Range: 4 Block in front (5 with Dragon Breath)
Projectile activation time: Trap will fire for 5 seconds after activation
Triggers: Infinite until destroyed
Cost: 70 Resources
Mods:
-Dragon Breath 20 Resources (Increase activatrion and projectile range with 1 (5 total))
-Napalm 20 Resources (Leaves a patch of flames on the area of impact)
-Eruption 20 Resources (Trap will create an explosion after being activated)
-Second Wave 5 Resources (Trap will appear after the Genmat has been stolen)

Sidenote: The eruption mod does not destroy the trap itself, but will destroy anything adjacent to it.


Normal activation range versus activation range with Dragon Breath.
Trap: Bomb Ejector
Bomb Ejector
Activation Range: 5 Blocks in front (7 with Eagle Eye)
Projectile Range: See overview down below
Projectile Speed: Heavily dependent on surrounding environment and orientation
Triggers: 1 Trigger that will drop 8 bombs that detonate after 3 seconds
Cost: 70 Resources
Mods:
-Eagle Eye 20 Resources (Increases activation range by 2 (7 total))
-Chaos Bombs 20 Resources (Bombs will bounce further)
-Heavyweight Bombs 20 Resources (Bombs will bounce less)
-Second Wave 5 Resources (Will appear after the Genmat has been stolen)
-Spring Load 20 Resources (Bombs are ejected at higher speed)

Sidenote:
-Bombs do not collide with the player.
-Bombs can be deflected or shot.
-Due to the bombs being unpredictable, below overviews are an aproximate indication.

Normal activation range versus activation range with Eagle Eye.

Activation and Projectile range for the Bomb Ejector:
Zone where bombs drop indicated by Lights


Activation and Projectile range for the Bomb Ejector + Heavyweight Bombs:
Zone where bombs drop indicated by Lights


Activation and Projectile range for the Bomb Ejector + Chaos Bombs:
Zone where bombs drop indicated by Lights

Projectile range for the Bomb Ejector when Vertically Positioned + Mods:


Projectile range for the Bomb Ejector when Diagonally Positioned + Mods:
Trap: Plasma Sentinel
Plasma Sentinel
Activation Range: 6 Blocks from any side, 4 diagonal. (8 From side and 5 Diagonal with Eagle Eye)
Projectile Range: Infrinite after being fire in a straight line
Projectile Speed: 4.5 blocks per second
Triggers: infinitely until destroyed
Cost: 70 Resources
Mods:
-Eagle Eye 20 Resources (Increases activation range by 2 to a total of 7)
-Plasma Cloud 20 Resources (A ball of plasma 1 block big will linger on impact for 4 seconds)
-Self Destruct 20 Resources (Trap will explode after being destroyed)
-Second Wave 5 Resources (Trap will appear after the Genmat has been stolen)


Plasma Sentinel Normal activation range versus Eagle Eye:


Trap: Holocube
Holocube
Activation Range: 1 Block from any side. (3 From any side with Eagle Eye)
Triggers: 1 Trigger
Cost: 10 Resources
Mods:
-Eagle Eye 5 Resources (Increases activation range by 2 to a total of 3)
-Masquerade 5 Resources (Prevents guards from passing through the block)
-Picture Perfect 5 Resources (Reduces the flickering effect)
-Second Wave 5 Resources (Will appear after the Genmat has been stolen)

Sidenote:
-Explosions and weapons will also trigger the holocube.
-Guards can pass through the holocube without triggering it unless modded with Masquerade.

Holocube Activation Range versus with Eagle Eye

Subtle differences between the holocube's flickering effects.
Left: Holocube+Masquerade --- Middle: Holocube ---- Right: Normal block
Trap: Corrosive Cube
Corrosive cube
Activation Range: None
Triggers: Triggers constantly when inside the cube
Cost: 20 Resources
Mods:
-Splatter 5 Resources (Creates a puddle of acid on the floor, 1 block away from the side it was struck)
-Hardened Skin 5 Resources (Object cannot be pierced or entered)
-Opaque 5 Resources (Object cannot be seen trough)
-Second Wave 5 Resources (Will appear after the Genmat has been stolen)

Sidenote:
-Guards cannot aim or trigger through the cube.
-A single cube can be grappled through safely.

Corrosive cube Splatter activation range:
Trap: Sentry Beam
Sentry Beam
Activation Range: About 6 blocks in front (90 degree cone-shaped)
Projectile Range: Infinite
Times projectile will deflect: 2 times (4 with Overamplify)
Target locking time:
Cost: 50 Resources
Mods:
-Overamplify 5 Resources (Beam deflects 2 additional times to a total of 4)
-Pinball 5 Resources (Changes the angle at wich the beam will deflect)
-Target Lock 5 Resources (Increase tracking speed of trap)
-Second Wave 5 Resources (Trap will appear after the Genmat has been stolen)

Normal activation range.

Overamplify Mod number of times the beam will deflect.

Pinball effect roughly indicated:


Sidenote:
-Will shoot at last visible location of the player if player hides
-Does not activate Splatter modded corrosive cubes
-Sentry Beam will track any visible part of the player, when the player is fully visible this is defaulted to the wast/legs, making the laser aim slightly down.
-Without Pinball mod will deflect at the same angle relative to the block it hit at.
Guards Line of Sight/Hearing
Since the 4 current guards all share the same field of vision they all share the same overview:

  • Boundry between normal vision and with optical implant is indicated by the row of lights.
  • Hearing distance is indicated by the yellow hazard stripes (running and jumping will trigger the guard)


    Bloodlust range (will work regardless of intervening blocks):
Guard: Enforcer
Enforcer
Activation Range: 7 Blocks forward (10 with Optical Implant)
Hearing Range: 5 Blocks backward
Cost: 50 Resources
Augments:
-Adrenal Converter 15 Resources (Increase movement speed in combat)
-Reflex Manipulation 15 Resources (Increase fire rate)
-Bloodlust 15 Resources (Will rush to battle when other guards in range are engaged)
-Optical Implant 15 Resources (Increase field of vision by 3 blocks)
-Short Leash 15 Resources (Guard will stay within 1.5 blocks from patrol path)
-Dead Man's Switch 15 Resources (Guard will explode on death)
-Plating 15 Resources (Will add armor that deflects Plasmabow and Fury's Edge, otherwise will take extra hit when hit on armor)
Guard: Warmonger
Warmonger
Activation Range: 7 Blocks forward (10 with Optical Implant)
Hearing Range: 5 Blocks backward
Cost: 50 Resources
Augments:
-Adrenal Converter 15 Resources (Increase movement speed in combat)
-Reflex Manipulation 15 Resources (Increase attack speed)
-Bloodlust 15 Resources (Will rush to battle when other guards in range are engaged)
-Optical Implant 25 Resources (Increase field of vision by 3 blocks)
-Short Leash 15 Resources (Guard will stay within 1.5 blocks from patrol path)
-Dead Man's Switch 15 Resources (Guard will explode on death)
-Plating 15 Resources (Will add armor that deflects Plasmabow and Fury's Edge, otherwise will take extra hit when hit on armor)

Guard: Cannonback
Cannonback
Activation Range: 7 Blocks forward (10 with Optical Implant)
Hearing Range: 5 Blocks backward
Cost: 70 Resources
Augments:
-Adrenal Converter 20 Resources (Increase movement speed in combat)
-Reflex Manipulation 20 Resources (Increase fire rate)
-Bloodlust 20 Resources (Will rush to battle when other guards in range are engaged)
-Optical Implant 20 Resources (Increase field of vision by 3 blocks)
-Short Leash 20 Resources (Guard will stay within 1.5 blocks from patrol path)
-Dead Man's Switch 20 Resources (Guard will explode on death)
-Plating 20 Resources (Will add armor that deflects Plasmabow and Fury's Edge, otherwise will take extra hit when hit on armor)
-Grand Sacrifice (Guard will explode when you get within 1 block range of the guard)
Guard: Hornet
Hornet
Activation Range: 7 Blocks forward (10 with Optical Implant)
Hearing Range: 5 Blocks backward
Cost: 70 Resources
Augments:
-Adrenal Converter 20 Resources (Increase movement speed)
-Reflex Manipulation 20 Resources (Increase fire rate)
-Bloodlust 20 Resources (Will rush to battle when other guards in range are engaged)
-Optical Implant 20 Resources (Increase field of vision by 3 blocks)
-Short Leash 20 Resources (Guard will stay within 1.5 blocks from patrol path)
-Dead Man's Switch 20 Resources (Guard will explode on death)
-Plating 20 Resources (Will add armor that deflects Plasmabow and Fury's Edge, otherwise will take extra hit when hit on armor)


Guard: Ravager
Ravager
Activation Range: 7 Blocks forward (10 with Optical Implant)
Hearing Range: 5 Blocks backward
Cost: 50 Resources
Augments:
-Adrenal Converter 20 Resources (Increase movement speed in combat)
-Reflex Manipulation 20 Resources (Increase fire rate)
-Bloodlust 20 Resources (Will rush to battle when other guards in range are engaged)
-Optical Implant 20 Resources (Increase field of vision by 3 blocks)
-Short Leash 20 Resources (Guard will stay within 1.5 blocks from patrol path)
-Dead Man's Switch 20 Resources (Guard will explode on death)
-Plating 20 Resources (Will add armor that deflects Plasmabow and Fury's Edge, otherwise will take extra hit when hit on armor)
Changelog
18-4:
-Added new "Relentless" mod for Boltshot, arrows will fire one after another instead of all at once.
23-4:
-Added Projectile speed slowdown for the Boltshot Hunter mod. (thanks to Shiny cursed Potato)
-Addes vertical and Diagonal bomb ejector ranges
28-4:
-Added finding on overlapping traps and traps near genmat where none were found (thanks to reek)
-Added a warning for a bug that will still increase the difficulty rating for mods on traps that were un-selected.
22-6:
-Added remaining mod costs
-Formatting and spelling errors
-Prepwork for Sector 1 (New trap costs are not active yet and thus not changed in the guide)
-Added visual aid for Holocube flickering effect
27-6:
-Added testing results for Sentry Beam
-Changed Trap costs for Sentinel and Corrosive Cube
21 Comments
Reddie Systeem  [author] 21 Aug, 2023 @ 2:42am 
@legomenleboss the grand sacrifice augment triggers when you get within 1 block of the Cannonback, so it will suicide itself when you get to close. The usual explosion only happens after the guard gets killed by whatever means.
legomenleboss 21 Aug, 2023 @ 1:48am 
can you explain for cannonback what does grand sacrifice do vs just the usual suicide pls
Reddie Systeem  [author] 11 Jul, 2023 @ 5:27am 
True, nothing will penetrate the block, but the sides will stay corrosive upon touch and splatter also will trigger anything touching the block.
Hokucho 10 Jul, 2023 @ 4:49pm 
I was concidering the bomb splat tactic. The way it was phrased made it seem that nothing permeated the coating so it was just a fancy block lol
Reddie Systeem  [author] 10 Jul, 2023 @ 12:35am 
@Hokucho_TTV Thank you for your kind words and i will be keeping the guide up-to-date when new traps are added.

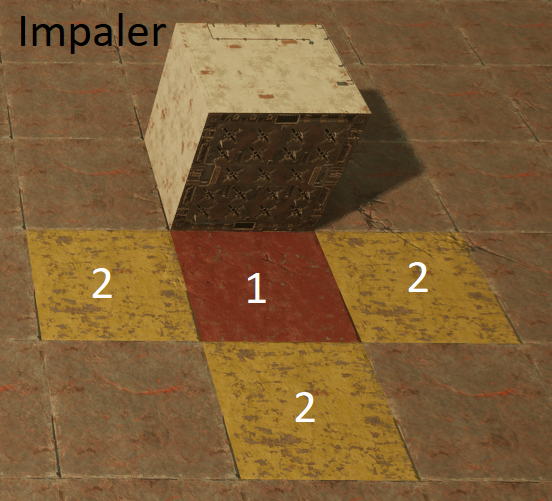
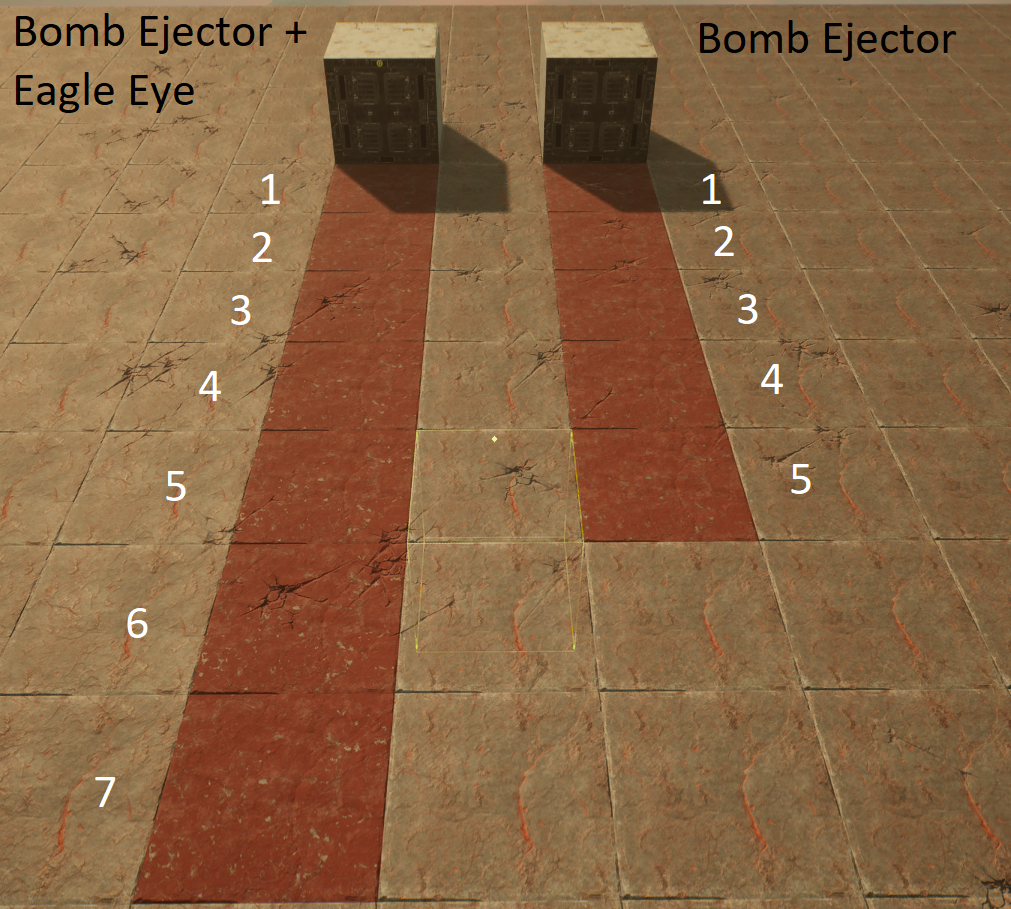
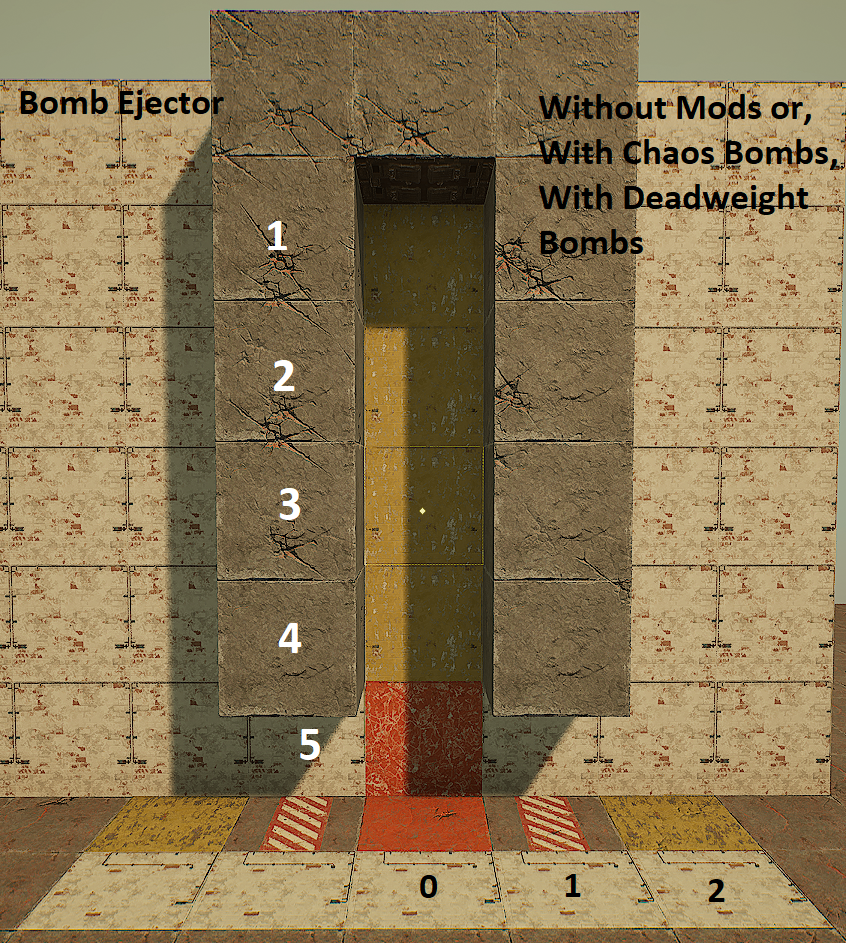
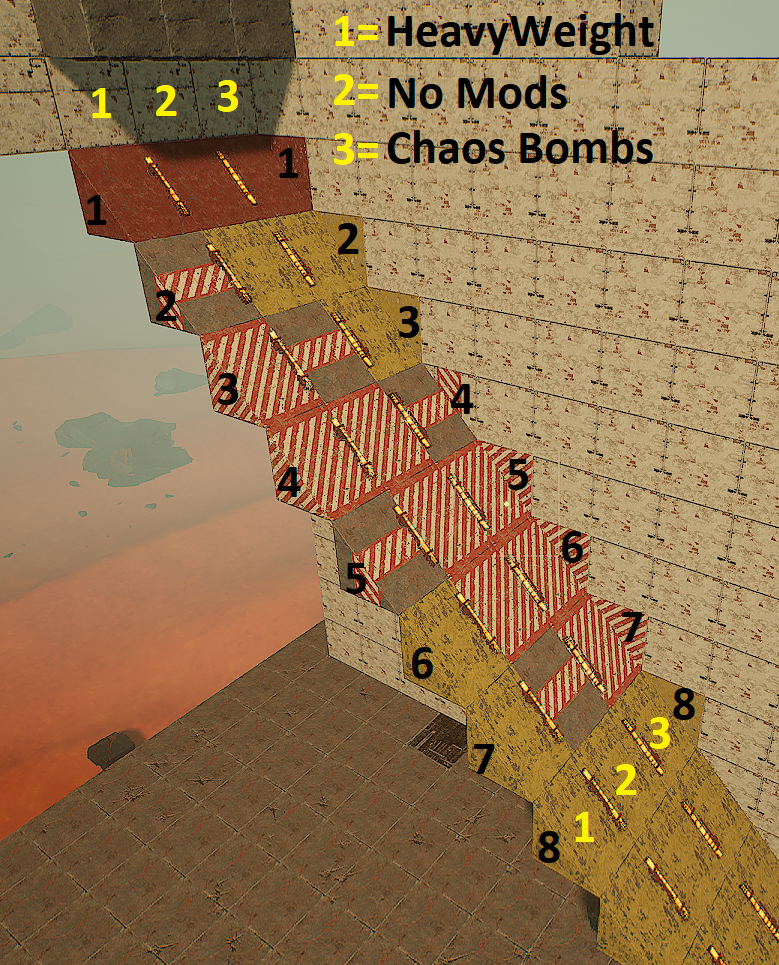
As for the hardened corrosive cube:
-When using splatter mod but do not want the player to be able to move through.
-Place them behind another layer of normal corrosive cubes for when they think they can shield grapple through.

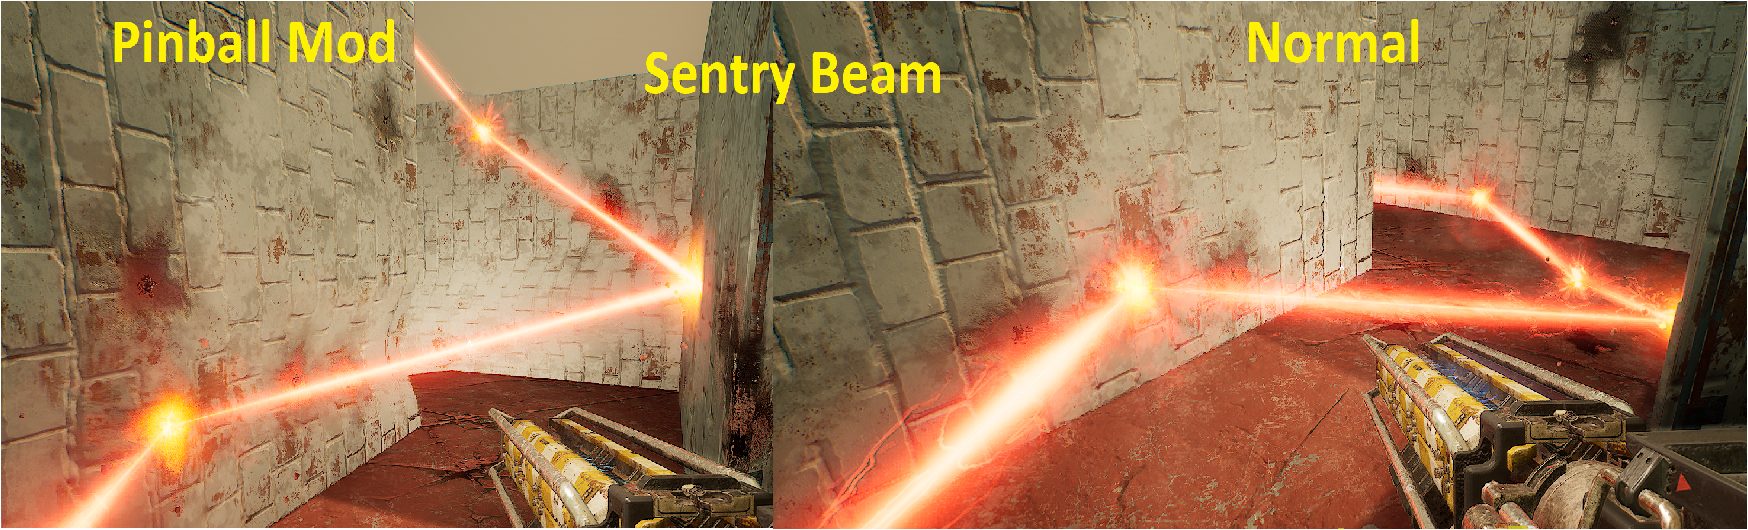
P.S. Chaos Bombs that bounce of a Splatter cube in a tight corridor will drop alot of Acid, making that stretch of hallway a real death trap.
Hokucho 10 Jul, 2023 @ 12:14am 
This is such a good resource. Thank you for all the legwork and hope you keep it active.

Does anyone have a good idea why hardened corrocubes are useful at all? Why not just use a regular block in that case?
Reek 28 Apr, 2023 @ 7:12am 
Thank you Reddie! That bug might have contributed to the strange difficulties I was getting. and good to understand the genmat is always 1 space away. If I can replicate, I will take a screenshot after wiping my test level of all blocks.
Reddie Systeem  [author] 28 Apr, 2023 @ 12:59am 
@reek, i have ran some tests on the genmat and overlapping traps. These factors did not change the amount of traps i needed to increase difficulty at all.

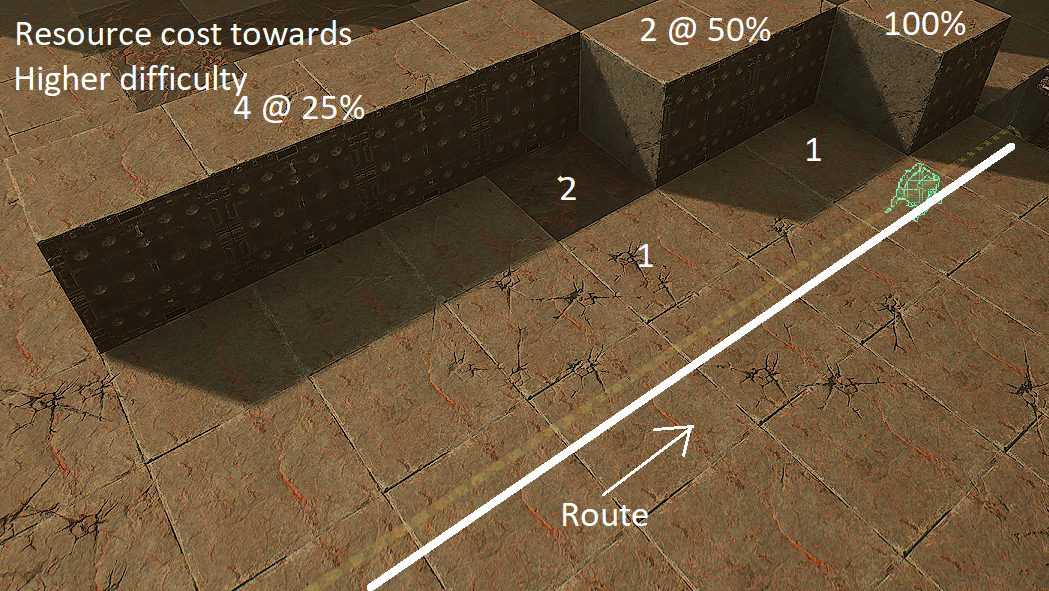
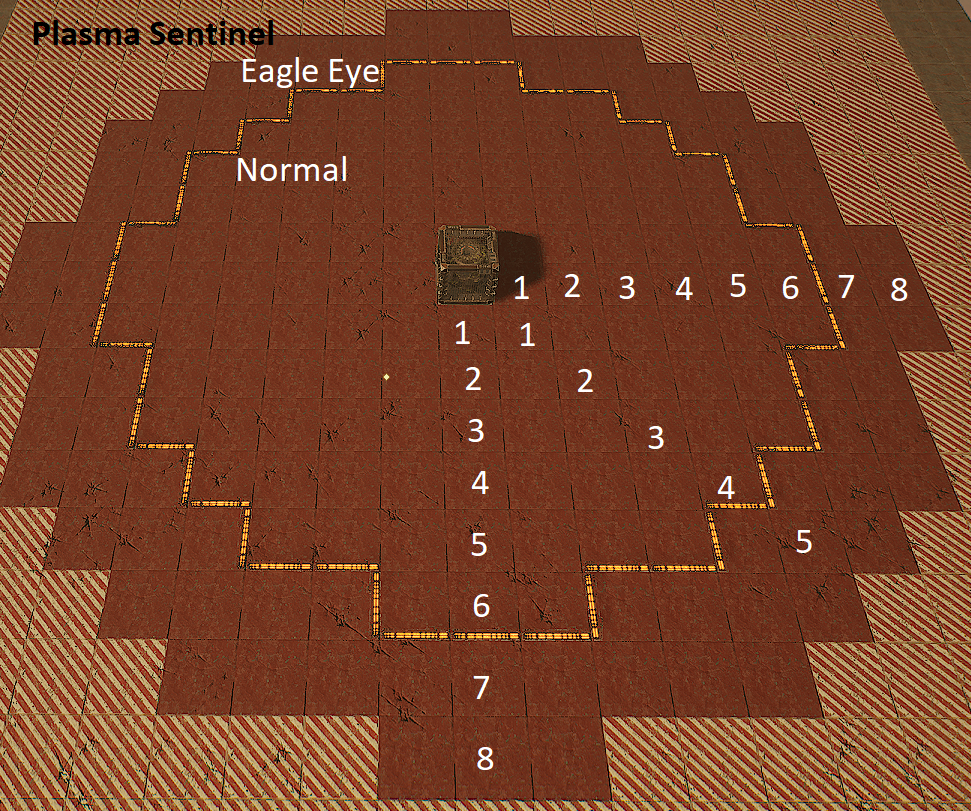
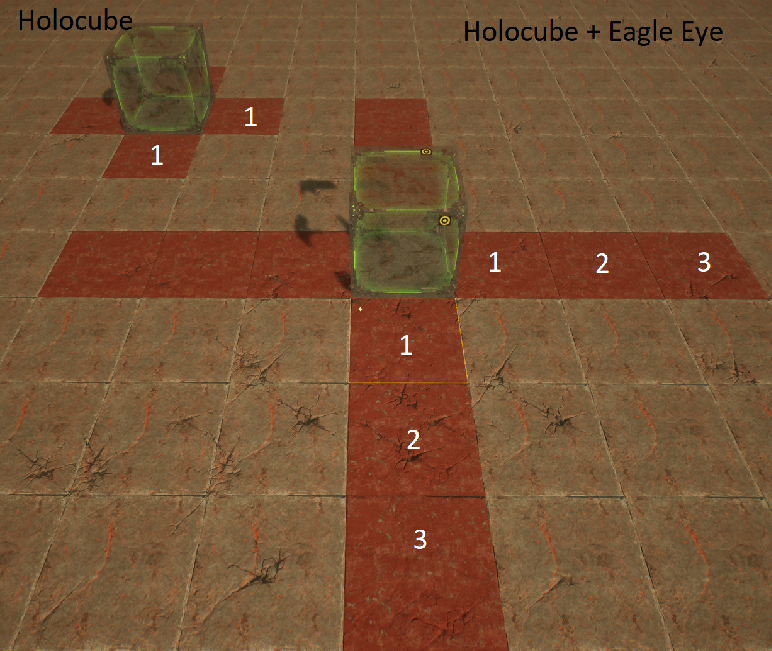
-Traps around genmat are always 1 block away from the path or genmat (except for entrance) and these traps will count for 50% towards the difficulty cap. So they should be cheaper and not more expensive.

-There is no difference in the amount of bolttraps i can place wether they are packed, overlapping or spaced out over the map. 25 bolttraps is normal and the 26th will increase it to dangerous. Same goes for unmodded Plasma Sentinels. Placing 3 of those 25 next to the genmat will also not increase the difficulty more.

-There IS a bug with mods that when you un-select any mod on any trap it will still count towards difficulty until you remove the trap and place it again.
Reek 27 Apr, 2023 @ 1:22pm 
I've been researching little more and others think the length of the path as well as overlapping traps can add to difficulty. Next Ill try putting 3 or more boltshot in the same square to see it that changes things.
Reddie Systeem  [author] 27 Apr, 2023 @ 1:05pm 
@reek, Thank you for the number crunching. There are still alot of modifiers, bugs and hidden mechanics regarding the difficulty rating.

I will do some testing regarding your genmat findings and add them to the list.