Fallout 2

Fallout 2

33 ratings
The Navarro Run: How to get Advanced Power Armor and Other Goodies VERY Early (Potential Spoilers!)
By Odawgitty
So, you're tired of getting your ass kicked by the Northern Californian Wasteland over and over again- or you just want to grab some of the best gear right out of the gates of starting Fallout 2 so you can cause some chaos in the early/mid-game. Well, Chosen Ones, I'm going to show you how to get some of the best equipment in this jolly old game through the magical and wonderful world of sequence breaking!
   
Award
Favorite
Favorited
Unfavorite
Preparations - The Long Road South
Character Creation and Arroyo
Before we begin our trek to Navarro, we need to actually start the game. Make whatever kind of character you'd like, though I would recommend tagging the Outdoorsman skill to make traversing the wasteland a bit easier, Speech so you can get into Navarro without a fight, and Energy Weapons so you can make use of a weapon we'll get at the base. Once you get out of the Temple of Trials and conclude any business you'd like to in Arroyo, it's time to enter the wasteland and make our way southwards.

To San Francisco!
We won't be heading for Navarro right of the bat, though- we need to mark it on our map first. It will not be present even if we explore the map grid it's supposed to be at. Instead, we'll head much further south to San Francisco. Remember to save frequently while traversing the areas to and around San Fran/Navarro! There will be many dangerous randoms encounters a character who just left Arroyo will be in no position to fight back against- especially the Enclave Patrols around Navarro itself. If you can, try to run away. If you can't, reload you save.
If you'd like a more consistent route to San Fran, head south from Arroyo until you hit the coast (a journey of no less than fifteen squares)- you'll know it when your map dot stops next to the water. From there, head east seven or eight squares and continue heading south. You might run into some more water along the way; just move around it. After you travel nine squares south from your eastern checkpoint, head two or three squares west and you'll be in San Francisco!

Here's an idea of the route you should take to get to San Francisco, starting from Arroyo:
Matt's Request - Blueprint Theft and Marking Navarro
San Francisco
Upon entering San Francisco, we'll find ourselves in Chinatown, home of the Shi, the descendants of a Chinese nuclear submarine crew who eventually found their way to San Francisco. Ignore the gathering of people near a fighting ring to the north (or don't) and head west towards the high-tech bunker with a man in metal armor guarding it. Talk to this man, who's name is Matt, and you will learn that he is a member of the Brotherhood of Steel (any Fallout veterans should be familiar with them; they are remnants of the US military who dedicate themselves to gathering and preserving pre-war technology, keeping it away from outsiders).
If you ask him about the Brotherhood, Matt will go into the organization's history and eventually tell you about the Enclave, a militant branch of the former US government who have been making some moves in the region. Matt says that this is because of their vertibirds, twin-rotor helicopters that allow them to fly deep into strategic positions in the wastes. After this exposition, Matt will ask you to infiltrate Navarro, the Enclave base across the bay to the northwest and steal a set of blueprints for the vertibirds so he can had them over to his fellows so they can study them. Agree to his task and he will mark Navarro on your map and give the quest to obtain the vertibird plans, recommending you pretend to be an Enclave recruit so you can sneak into the base.
Before you head to Navarro, it would be useful to have a decent Speech skill (around 65%) so you can reliably pass a check to get into the base without trouble.

Trek to Navarro
Once you get Navarro marked on your map, it's back to saving/reloading on the world map until you reach the base. Here's a route you could take to get there:
Navarro At Last - The Main Event
Gas Station
The moment you step foot in Navarro, you'll arrive at a gas station and be accosted by the one man welcoming party, Chris. Ask him if he knows anything about the Enclave; he'll try and play dumb, but tell him that you want to join and he'll mention that they won't want a tribal in their ranks. Insist that you want to join and (if you pass this speech check) he'll give you the password to enter the base: Sheepshead. Move to the north through the forest towards the green exit grid on a strip of pristine road- just watch out for the landmines littered between the trees.

Navarro Base
Here we are- Navarro! Try to head through the gate, where you'll be stopped by an Enclave soldier wearing power armor and a wielding a plasma rifle. This guy, along with his fellow soldiers, are very deadly in a fight, especially against a level 1/2 character, so avoid a violent confrontation if possible. To do that, tell him you're a recruit and give him the password you conned out of Chris. He'll let you though and tell you to see the drill sergeant, the legendary Arch Dornan. You can head down to the subterranean level of the base right off the bat if you'd like- head over to the north side and enter the small white building next to the radar dish. Inside there will be a large elevator you can walk on to, which can take you to the underground section of Navarro.

Navarro Underground
Take a turn through the first door on the left down the hallway you find yourself in after reaching the underground level. This is the armory- the place where we'll find our haul. Head past the quartermaster and into the room with the lockers. Open them all, and this is what you can walk away with:
  • A Suit of Advanced Power Armor
  • A Plasma Rifle with 250 Microfusion Cells
  • A Combat Shotgun with 40 Shells
  • A 10mm SMG with 24 AP Rounds
  • A Plasma Pistol with 400 Small Energy Cells
  • 2 Pulse Grenades
  • 4 Plastic Explosives
  • The Blue Memory Module
Talk about a good haul! Now how can we put this stuff to use?
A Little Bit of Questing - Things to Do Before and After Leaving Navarro
A Deathclaw Named Xarn
Before we leave the underground, let's head down the hall to the room with a scientist and a pair of stasis tanks. The scientist is named Doctor Schreber; He's got a deathclaw (an incredibly large and strong mutated Jackson's Chamelon) locked up. The Enclave has been trying to turn deathclaws into obedient slave soldiers for their forces, and have increased their intelliegence to the point where they could understand their orders, but the deathclaws have become much more intelligent than they had anticipated. Schreber has one such intelligent deathclaw locked up, but wants it put down. Head further down the hallway and try to open the door to the big room with the deathclaw in it. The female guard will stop you, but just tell her you're there to put the deathclaw down and she'll let you by. Talk to the deathclaw, Xarn, and he'll think you're his executioner. Despite Schreber wanting you to kill the deathclaw, insist that you're here to save Xarn and he'll tell you that the door on the south end of his cell leads to a secret passageway he can use to escape. The only problem is that it's locked with a key card reader.
Agree to help Xarn escape, then head back to Schreber's room; He's got the key card you need. You can either kill him (if you do this, make sure the door to the hallway is shut! The room is soundproof, so if you attack him while the door is open, the base will turn hostile.) or steal the key card from his inventory. Once you obtain the key card, head back to Xarn and use the key card on the southern door to unlock it. Once it's opened, Xarn will thank you and leave down the newly opened hallway towards his freedom. You'll earn 1500 experience points and some good karma for completing the quest this way.

BTW, for any of you playing the Restoration Project, completing the quest by killing Schreber and releasing Xarn will also earn the good ending for Vault 13.

The Best Laid Plans...
Say, didn't Matt tell us to retrieve some vertibird plans? Guess we'd better go get them. Head topside and enter the garage (it's the large white building to the east, in front of the radar dish.). There, you'll find Quincy the mechanic. Ask him if you can see the vertibird plans (preferably without mentioning that some friends down south want them), and he'll tell you that you need authorization to do so. Head to the hangar (the building just north of the vertibird outside) and talk to Raul, another mechanic. He's busy working on a vertibird. Next, head to the building the gate guard instructed you to, entering via the top door. You'll find two technicians here; talking to them, you can ask about the vertibird plans- this is the dialogue you'll need to get Quincy to give up the plans. Head back to Quincy, and upon asking to see the plans at the request of a technician he'll question if Raul sent you. Say that he did, and Quincy will cuss the mechanic out but allow you to take the plans anyway: They're in the locker closest to the right.
Once you get the plans, leave Navarro and head back to San Francisco. Be sure to keep saving and reloading on your way back, as the Enclave Patrols will still be a pain to deal with. Return to Matt with the plans and you'll get to keep a copy of the plans along with a whopping 25000 experience points! Can you smell the level ups, perks, and skill points? You'll also gain access to the Brotherhood of Steel bunker here in San Francisco, which has some great loot, namely:
  • A Suit of regular Power Armor, which you could give to a companion down the line
  • A Suit of Brotherhood Armor, a unique, stronger version of Combat Armor
  • The YK32 Pulse Pistol and YK42B Pulse Rifle; both some of the strongest energy weapons in the game, with the strongest being the Pulse Rifle, along with some small energy cells and microfusion cells for each
The bunker is also home to ACE, a medical supercomputer who can install implants to increase some of your SPECIAL stats by one point each. However, these implants require modules that are scattered all over the wasteland. Fortunately, we've already found the blue module at Navarro, which will increase our Charisma. I'll leave you to find the rest on your own. Any equipment you don't want, you can sell or trade at the stores in San Francisco.

Love That Plasma, Part 1
So, now you've got both Plasma and Pulse Rifles. The Pulse Rifle may be the best in terms of damage output, but it doesn't have the Long Range weapon perk that the plasma rifle has, making it harder to hit your targets with it, though it does penetrate armor. Let's say, for the sake of argument, that you do want to use your plasma rifle alongside the pulse rifle: In that case, we've got to get it upgraded.
To meet the man who will upgrade our plasma rifle, we'll have to head to New Reno, the biggest little city in the world. It's northeast of San Fran. Here's a route you could take:
Love That Plasma, Part 2
Once you get to New Reno, you'll end up on Virgin Street. Head to the green exit
grid north to go to 2nd Street. At the intersection between Salvatore's Bar and the Shark Club, head west towards another green exit grid and you'll get to Commercial Row. Our man is holed up in the basement of New Reno Arms. If it's night, wait until morning for the arms dealer Eldridge to head into his store and out of his bedroom. Navigate towards the northwestern wall of the building and use your Lockpicking skill to covertly open the door- this may take a few tries. Once you've cracked it, head into Eldridge's bedroom; there are some dogs here, but Eldridge will just tell them to shut up if they bark at you, not suspecting someone is breaking in to his store.
Head down the staircase hidden behind the shelves to enter the basement of New Reno Arms. Inside, you'll find a man named Algernon- he's not very bright, but he's a master of all things involving weapon mods. This is our guy. A word of warning: If your character has 3 or less Intelligence when talking to Algernon, the two of you will engage in a "game" that results in his death, preventing you from engaging his services entirely.
Give Al your plasma rifle, and after a few hours, he'll hand you the Turbo Plasma Rifle. The TPR was supremely overpowered in Fallout 1, dealing incredibly high damage and having the potential to cost only 2 AP per shot, if you had both the Fast Shot trait and the Bonus Rate of Fire perk. It's base AP cost was increased from 4 to 5 in Fallout 2, but it's still an incredibly powerful weapon because few entities in the game can resist the huge plasma damage and you can still fire three to four (if you have two ranks in Action Boy/Girl) shots per turn if you have Fast Shot and BRoF.
Conclusion
And that's the Navarro Run and some of the things you can do after completing it. Whether you're a classic Fallout veteran looking to have some fun or a rookie who's eager to get their hands on some great gear right off the bat, I hope this guide makes your experience in Northern California more entertaining or that much easier. Now get out there and find that GECK, Chosen Ones!
Bibliography
Nukapedia: The Fallout Wiki[fallout.fandom.com] (See articles related to Navarro, the San Francisco Brotherhood of Steel Outpost, the Turbo Plasma Rifle from Fallout 1/2, New Reno Arms, and Algernon)

Map Images Created From: https://fallout.fandom.com/wiki/World_map

Guide Icon Created From: https://m.media-amazon.com/images/M/MV5BMzJlMjhlZGUtMmJlZi00NzM5LWFjNDktZDgxY2QxYjc5NTM0XkEyXkFqcGdeQXVyMTA0MTM5NjI2._V1_FMjpg_UX1000_.jpg

The Map Images and Guide Icon were created using Microsoft Paint.
5 Comments
UNATCO Trooper 15 May @ 4:59pm 
Navarro isn't tagged for me
Damon 26 Aug, 2024 @ 2:44pm 
I think the guide was not clear about you should press 1 key fast before random encounter to be in sneak mode which makes it easier to run away. Imo tagging the outdoorsman skill is a waste, just put few points into Sneak to around 50 or more.

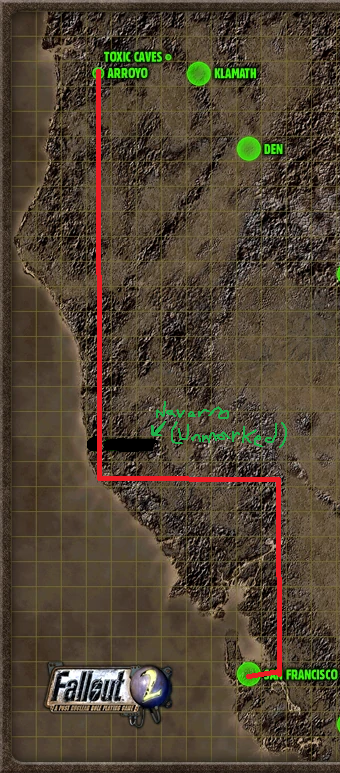
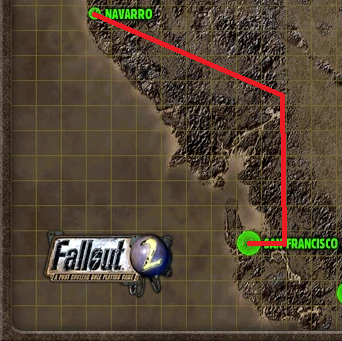
Also in my opinion tagging Energy Weapons is not needed. Can take Small Guns instead and steal the Gauss Rifle and some ammo from NPCs in the hangar in San Fran. That weapon is no joke and works for much pretty much any enemy in the game.

While hanging around San Fran you can also take the advantage of common encounter with hooded mens fightning bandits for easy money and bomb loot.
DiabloKidFan 15 Aug, 2024 @ 10:07pm 
Good, worked for me
2ʎllıɥds 2 Feb, 2024 @ 6:18pm 
keep getting killed by fire geckos
a meme lover 24 Sep, 2023 @ 2:54am 
i can't get to navarro without being killed by an enclave patrol but thats most likely because im only like level 2 and have only the vault jumpsuit