NEBULOUS: Fleet Command

NEBULOUS: Fleet Command

70 ratings
Container Liners and You
By Arofire
A short novel on container liner design, staging effective attacks, survival, and a bunch of other notes I only figured out with time.
3
4
5
4
2
2
   
Award
Favorite
Favorited
Unfavorite
Preface
Though much of this guide may be broadly applicable to missiles or even Nebulous in general, it discusses missiles only so far as they are relevant to an indirect fire, cruise missile container liner. If you're just starting out with missiles, the container liner might not be the best entry point. It's not a very forgiving ship, and successful attacks take more time and effort to pull off than with any other missile. However, defeating hundreds of containers is the only joy comparable to launching them, and I want more of that. So for the brave and the foolish, I want you to play a container liner, and I want you to have a fighting chance while you’re at it!

Feedback and criticism on this guide is encouraged, you can find me in the Nebulous discord @Arofire, or leave your thoughts in the comments here.

Ship Design
The container liner is a more limited hull in terms of options, but a lot will still come down to personal preference. For example, I value a faster drive to move more aggressively throughout the game, and a suspiciously large quantity of offensive S1 missiles for close-in threats. Generally speaking, I've found these extra capabilities tradeoff with fewer containers carried. When making these design choices, there are a few points to note:

Intel Center
*Not updated for the Carriers release version, going to wait until the dust settles*

In my view the container liner is the hull best able to mimic the job of the Intel Center, and do so without trading off combat power for intelligence advantage. The Intel Center costs 90 pts. The same price can buy a full stack of 24 2pt containers with points to spare that provide similar capabilities as an Intel Center, and additionally: consume enemy chaff and decoys, visual spotting on ships, PD information, and defeats the Masquerade device. An Intel Center can’t do these things, and it can't shift its weight to combat power if required. I don’t recommend taking an Intel Center.

Programming Channels and Time
Whether or not your containers penetrate a ship’s PD network is not dependant on how many containers arrive in a sequence, but rather how many arrive at the same time. The aim is to saturate their PD defences

Programming channels don’t increase the density of the containers in a salvo at any point, but the length of the salvo. Programming channels in effect are actually buying margin of error in your timings for ToT attacks. A larger salvo elongates the distance between the first and last container, and with it the window in which to execute a ToT attack, as well as potentially lowering the total number of salvos that must reach a target at once to breach its' defence. This enables shorter paths and an overall easier time with fewer moving parts to execute a successful attack.

So, we come to the point: There is a balance between salvo size vs your own skill, and the margin of error you need. Fewer programming channels are preferred up to the point that you personally are still able to execute a successful attack, this saves substantial points that can be put elsewhere.

Containers have a 20 second programming time, and this can be reduced with Strike Planning Center (SPC) and Container Datalink Array (CDA) components as well as Missile Parallel Interface modules. Realistically you won't have space for the latter and the CDA is a bad deal and only fits in your largest compartments, but adding at least one SPC will cut down the extra delay you need to account for in your ToT attacks. 1 SPC reduces programming time to 12.5 seconds, 2 SPC down to 9.3 seconds, and 3 SPC down to 7.7 seconds. I use two because I'm used to it, it's nice, but if I were starting over I'd use one to save 70 points. Don't take three.

I want to make sure this part in particular is clear: the container datalink array is a scam very bad use of your precious points.

When I started I used a salvo size of 12, then 10, 8, and now 6. If your issue with ToT attacks is that they just don't quite arrive together, you can compensate with more programming channels. The only way to gain more programming channels is with the very expensive CDA component.

include datalink arrays are such a laughably bad deal like wow look what balcon did to my boi

Defence
Considering defence against a deliberate missile attack, the survivability onion for a container liner is two layers thick, and hollow: don’t be there, and don’t be seen. In my view, missile defence just isn't worth it here. If someone wants to kill your ship (everyone wants to kill your ship) and you aren't actively moving around to prevent that, they're going to succeed. If you want to bring defence anyway, bring CMD based AMMs. For the container liner that doesn't rely on additional programming channels however, DC capabilities have become very accessible through the Damage Control Complex (DCX) and Large DC Storage components. I find a lot of value in DC teams personally, but I'll leave that choice up to you. Add restores to taste, I bring 10.

Hull Geometry
Unfortunately, as cool as some of the container liner variations look, there is a best option for a CLN forgoing craft. This BestHull™ arranges your container banks to eject all of your containers upwards, in the same direction. It also launches them in the densest cluster compared with any other layout, which very subtly increases PD penetration. Finally, this configuration will allow you to park the underside of your ship on terrain to minimise the enemy’s ability to detect and kill you without limiting your firing arcs, and it allows your salvos to reliably launch in close proximity to the rock on which you’re attached without risking containers hitting the rock. Linked is mine, feel free to use it or build yours on top of it if you like, just so you don't have to get lucky rolling this layout.

https://steamhost.cn/steamcommunity_com/sharedfiles/filedetails/?id=3035877153
Container Design
*Not updated for the Carriers release version, going to wait until the dust settles*

You’ll need to balance bringing a sufficient quantity of containers to last a game with enough varied seeker combinations and decoy penetration aids to reach the target in the first place. The solution? Bring several kinds of containers. Roughly 180-200 containers is a good place to start, though you might lower this with experience. All of your cruise guided offensive containers should be hot launched so they don't waste time getting on the way to the target, and this will also make your ToT attacks more reliable.

At the time of writing I'm using three kinds of containers in each of my attack salvos, all of which have roughly 20km range and 200m/s speed. You can experiment with your own seeker combinations, though I'll list mine also. I decided that for any attack salvo I send towards a target, I want it to have to employ as many methods of soft-kill as possible to defend from the attack, but also that any of these containers could also hit any target were it to take no action at all. I've settled on the following missile designs:

• Anti-radiation - reject unvalidated / Steerable Active - accept unvalidated / [Wake]

• Steerable Active - accept unvalidated / [Wake], with a Decoy Launcher
Absent jamming, these will launch decoys 2-3km from the target

• Anti-radiation / Extended Active, with a Decoy Launcher
Absent jamming, these will launch decoys 5km from the target

A mixed salvo including each of these ensures that decoys remain close to the main body of missiles for a significant portion of the terminal flight, and that decoys are a factor in the engagement from the earliest possible time, maximising their effect in a saturated hard-kill environment.

The 10 point rocket container with six rockets is a decent choice, though the 12 rocket variant at 35 points is too expensive to use on a CLN, and has it's place as a sidearm on other ship hulls. Mine containers fill a unique role with their ability to destroy many components otherwise resistant to missiles, and can be used to kill an immobilised and defenceless ship.

Setup
This is the process I generally use no matter what game. It is also only what is necessary. Playing a container liner will often let you fall into the role of very generally assigning forces to regions they'll be most effective, as you should have the most comprehensive picture of the battlespace of anyone on your team. Obviously, not everyone appreciates this, nor is everyone good at it. But, if they do and you are, coordinate it with your team!

Recon
At the start of a game you should be deploying your container liner close enough to areas of interest or capture zones with respect to the range of containers. Deploy in concealment because a lone large flare seen by the enemy is a pretty safe bet to be a missile LN or a container liner, either assumption is equally bad for you.

Assuming you didn't buy that Intel Center (good job), you should have a whole bunch of containers for just this purpose. Deploy the cheapest containers you have that can reach the area you want to look at - a full salvo isn't needed, but more than one container is wise. You want to keep an eye out for any point defence (especially Sarissas), where it comes from, and in what density. Likewise note the number and rough position of distinct groups of chaff/flare countermeasures deployed, their dispersion and quantity may give you a decent idea what kind of ships are there even if you can't visually see them and they don't shoot your containers down. Be sure to inform your team of this information, and if you feel confident also include your deductions on what kinds of ships are where.

Assessment
Once you have a visual track, you should be zooming to the enemy ship and scraping every detail you can. What weapons do they have, what size of missiles, more than one bank of missiles and you have a serious threat, what point defence do they have and on which facings, what point defence do they have, specifically defenders - count those. In practice you can get past perhaps three defenders with a well executed two salvo ToT attack. More salvos at the same time will do better or survive more defenders. Auroras and flak aren't a big deal, they're good at killing the decoys from your containers but they can be easily ignored except in truly large volumes.Tell your team about what kind of hulls they are, in what numbers, and with what weapons.

You need to keep in mind how fast they can go, and if you can break through their point defence, and perhaps if some angles of approach are more vulnerable than others. A Light Cruiser for example with a S1 launcher on one side is likely to only defend that arc with one gun, a fantastic target, if not for that they can move as fast as a corvette and and might easily end up 3km or more away from your point of intercept in the time it takes your containers to fly the distance.

Repositioning
The distance between you and your targets often needs to shrink as their expected speed increases. Predicting the position of fast targets up to a minute and a half in the future is hard, reducing the time of flight for your strikes will increase your hit rate. Corvettes and Light Cruisers are particularly difficult targets, though you can always ask your team for help too. Mask your movements well and a container liner can travel 50km through a game while being shockingly sneaky.

Survival
Container liners are premium targets, they're valuable and often defenceless. You need to move away from where you deployed immediately. Ideally you need to be constantly moving. If the situation doesn't permit that then you can use the BestHull™ to land on a rock to limit how visible you are. Freshly launched containers have a pretty obvious pattern before they fall into a uniform line and that can often give away your position. You shouldn't be sitting still for extended periods out in open space no matter how safe it seems to be.

Attack
In an ideal situation, when both time and the enemy permit it, you'll be able to use all of what's contained here in any single attack. Keep in mind that even with all of this information, some targets simply can't be beaten. Multiple enemy fleets balled up together might just have too much hard kill PD to break through. Don't waste your potential on attacks against targets that confidently won't succeed.

Concealing attacks
Whenever possible, concealing your attacks by pathing them as close to obstacles restricts your enemy from being able to shoot down your containers in flight, and if you can conceal the attack at terminal ranges, it also limits the effective PD response from the target ships. This can also help you live a little longer by obfuscating the origin of the attack


Evasive cruise
You can path your containers on a three dimensional spiral to the target when crossing open space to dodge either or both long range and low velocity threats (sarissas and RPF, primarily). This will also have noticeable increases to survival if your containers happen to pass through the range of some defenders en route. The spiral can start out at relatively low frequency, but should increase in frequency as the distance to target closes. Some people opt for a two dimensional weave or zigzag, but spirals are best. A weave is often not enough when anticipating a threat from the direction of travel. Keep in mind that the time of flight that is shown to you when planning the waypoints works as if the missile stuck to the path exactly, there will always be some deviation. However, if your spirals are tighter than your containers can actually turn, they'll deviate significantly, and the time of flight will not be reliable.

This is a really easy way to improve your odds with other missiles too. Note the spirals and weaves mentioned are not those you can choose as terminal manoeuvres.

Time on Target (ToT) attacks
ToT attacks involve setting up multiple salvos to fire with a known delay between each one, such that they arrive at a target (roughly) simultaneously. When planning out the waypoints for the first salvo, you want to include as much extra distance and thus time as is required to allow you to launch every following salvo. You can figure this out if you know your programming time from back when you added a number of Strike Planning Centers.

To use an example: Containers have a 20 second programming time. My container liner has two Strike Planning Centers, increasing the programming speed to 215.3%. My effective programming time is 20/2.153 = 9.3 seconds. I'll round that up to 10 to account for the time the containers take to separate and launch. This tells me that if I can have my second salvo queued and ready to go before the first is launched, I need the second salvo to have a 10 second shorter time of flight to the target than the first to arrive simultaneously. The method I use these days is to take the time of flight of my first salvo, subtract my programming time, and as soon as I send the first order to fire, start counting down the seconds. When my next planned salvo indicates a time of flight equal to the time I've counted down to, we fire that one, subtract the programming time again, and keep counting down.

This ends up with roughly a 15 to 20 second launch frequency depending on the distance to the target. Any additional delay that you need should be achieved with a more evasive cruise path, or performing a loop or two en route. Achieving a delay with an erratic waypoint forming a spike in the path lowers the flight time accuracy.

Ideally you'll do this live, setting up salvos to accommodate the required delay less the time you've taken so far to make the next path, mentally counting down the seconds of your targeted time of flight. Bonus points if you're in motion while you're doing this - the best way to not get hit is to not be there. If you're just starting on learning this process however, it may be useful to halt your ship and set your WCON to Hold while you plan out each of the salvos, and then back to Free or Tight when you're ready. Moving around while on WCON Hold will mess with the time of flight for the salvos you've already planned, and I don't recommend that.

*note that due to a bug setting WCON to hold may result in salvos being fired out of order, and so I recommend against it.*

Figure out the total time of flight for any salvo by extending the final waypoint all the way to the target or the expected intercept point - this is the most precise way to determine a baseline time of flight. Alternatively it's often good enough to have your final waypoint be roughly in the same area of space, and just cross your fingers the rest works out. Perhaps that will take some time to master.

Attack profile
When firing containers the first waypoint should be along the pitch axis, launching out in front, upwards, or downwards relative to the ship. This will keep the containers clustered together compared to launching them out sideways.

Looking at the terminal phase of a ToT attack, the intent is to engage with as few containers as required to penetrate defences and deal damage, and so we want to be engaged by as few defences as possible. You should attack from the least defended angle if there is one. Each salvo you send should engage the same face of the target but from another angle, because we want each defensive gun to have to turn between engaging different targets, because that gives more time for the containers to approach their target.

Likewise even in a single salvo, provided it's of a single container type, you don't want the containers to arrive all in a straight line, defender point defence can kill multiple targets accidentally while only targeting one of them. The final waypoint in a missile path should have the salvo spread out, in a line if the target is moving to account for your own error in predicting the intercept, or in a circle against a relatively static target. This cannot be done for mixed missile salvos, however the behaviour can be somewhat replicated by having a variety of seekers in a salvo that acquire the target at different distances, thus spreading themselves out immediately before impact.

Wake seekers or validators need to be approaching roughly from the rear half of a target to be able to follow the wake to the target. Rocket containers will stage on the first target they see, make sure they approach from the target's direction of travel, so any chaff they drop will be behind them relative to the container.


Give extra care to targets with defenders if they are moving in the same direction as your containers. The extra time they'll have to defend from the strike due to the lower relative speed means they can defeat many attacks that would otherwise hit.

Advanced stuff
Adding to the noise
Arranging some containers to orbit a point in space is an effective method to accomplish a couple of things. In order, It'll provide targets to enemy long range point defence that are, at range, impossible to hit. This will continuously drain ammo as long as the enemy has PDZONE set to Area. Point defence will automatically take the closest targets in my experience, so, this formation when well placed will completely remove an effective automated response from offset enemy allied PD, and force them to manually target each container in any strike you're screening.

It has limited effectiveness directly against the ships you intend to target, however when kept at the limit of their point defence weapons range it can also drain 20mm and flak until the target changes their PDZONE to Point. If targeting a formation, this is still a success, as each ship in the formation that set their PDZONE to Point will not deliberately aid any other ship in the formation unless also threatened by the same strike. This can be exploited with a considered axis of attack that threatens as few ships as possible.

This is a significant time investment to set up, in the range of several minutes, where you also can't respond to other threats. Ships with auroras are a real threat to this tactic, likewise if you misplace this formation or the enemy ships simply drive into it, any point defence will be able to take it down. This is most useful for a static fight or if you can set it up in advance of an expected attack.

Setting this up involves a lot of waypoints at minimum range from each other. You should arrange them in squares, not triangles, to get a more accurate time of flight so as to not waste time on waypoints that will never be reached. They really don't need to be perfect and it doesn't matter if you reverse the direction of travel, change the angle or anything. You just need good enough. This idea does not work if you arrange it in a line that repeatedly doubles back on itself.

Surviving ambush
S1 missiles fired in bulk are an unexpected threat that can punch through defender 20mm defence. They threaten up to a light cruiser, and are very hard to intercept when hot launched. I like a S1 load split 1/4 on steerable active radar, and 3/4 on semi-active, just to make up the mass. There's a lot of corvettes to kill, after all. If you only want self defence then CMD seekers are nice, if you can afford them. Use a seeker of your choice, but this missile config is what peak performance looks like. Note that semi-active seekers require you to bring an illuminator which should normally be mounted on the furthest forward top mount for best visibility.


Decoy containers
Decoy (Line ship) and Decoy (Clipper) containers are really useful. They'll show you the enemy positions and capabilities when they're engaged, and they regularly pay for themselves and then some after just a couple of hybrid missiles are launched at them. Further, these decoys make for your most effective active point defence. Keep one or two in orbit of your position when in danger or send them in the direction of an enemy missile ship, these containers will cause missiles to stage early and they'll take several hits otherwise intended for you.

10 Comments
Arofire  [author] 24 Jan @ 2:00am 
I think you can take your pick at this point, options are plentiful. Mines still work and they have the benefit of staggering their activation slightly from each other. I find it's cost-effective with two mines in the box. KBU-22 with your choice of delivery between craft or containers is another option, rapid delivery if you go the container route, deeper stores with craft. Another option are R3 rockets, they get 60cm penetration too. Best bet with that option is craft, not containers imo.

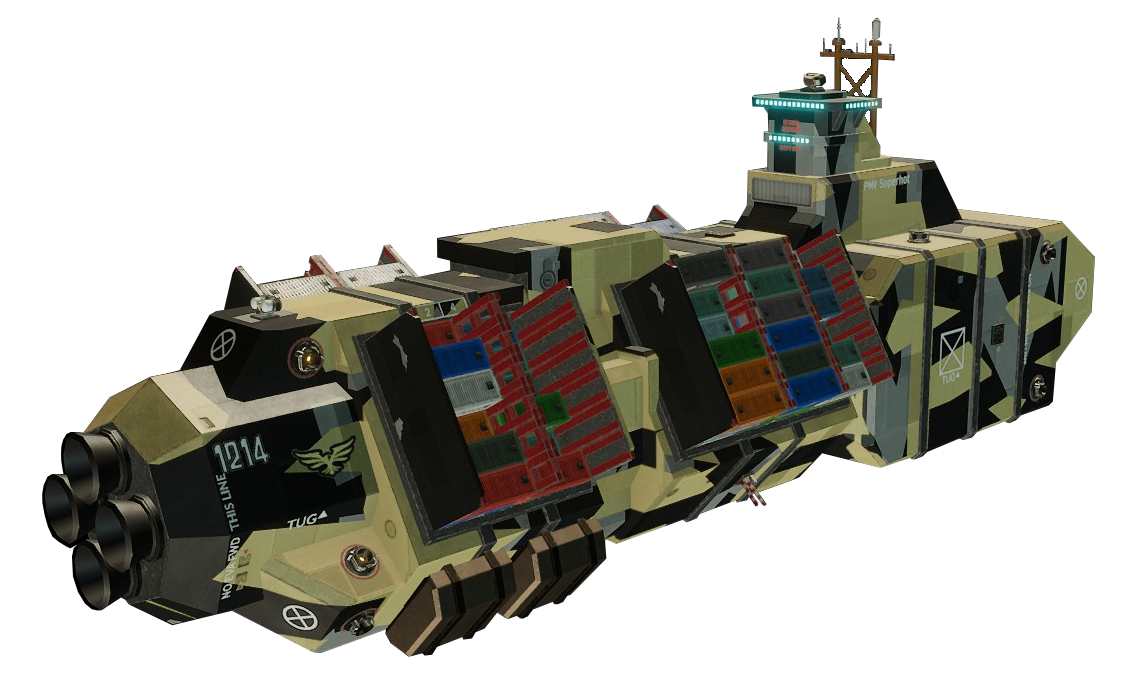
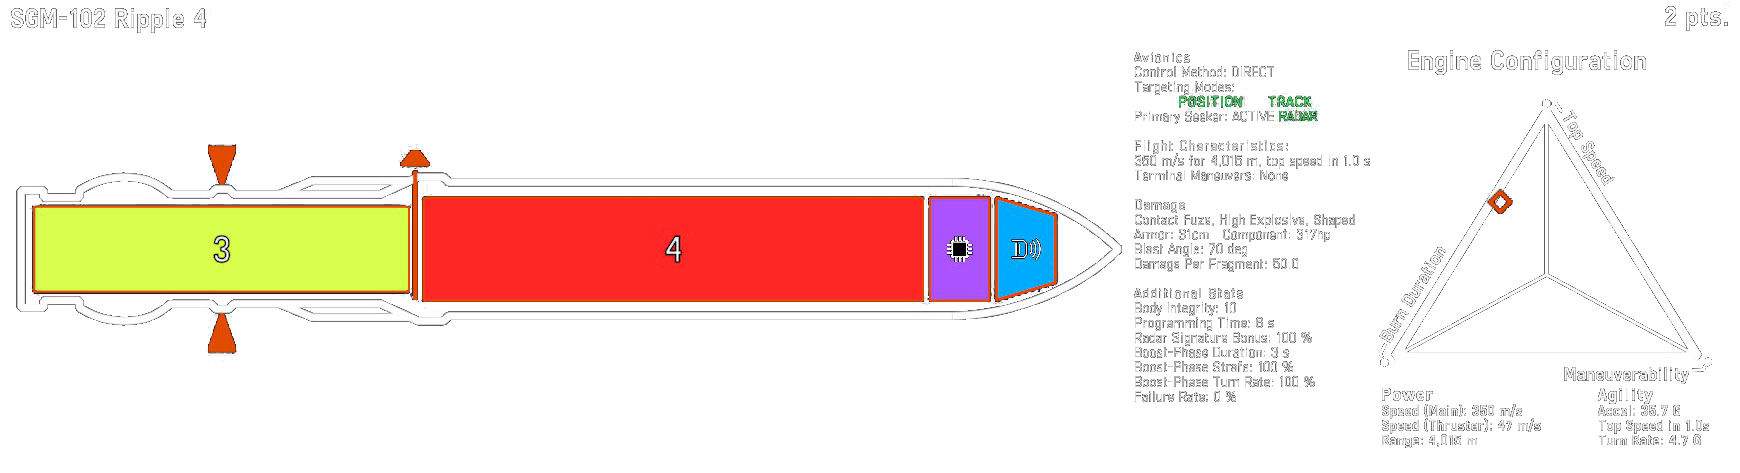
Personally I use the craft/KBU22 option. I'm finding I need even fewer containers now, and I've got two whole container bank sized mounts that were sitting empty. Right now in this fresh out of the oven state, craft offer so many advantages that they're worth taking a look at even for a Moorline dedicated to containers. Pikes are incredible (too incredible, perhaps), Bombs are cheap.

If you're set on submunition container delivery, I'd stick with basic mattock mines x2 for 14 points and 20km.
natsafu74 23 Jan @ 10:33pm 
Since the old mine containers have been removed, do you plan on making your own custom mine containers or using the new KBU-22 Bombs to finish off the capitals? A big reason I ask is because I'm an aspiring container player and I'm looking for advice/guides on how to use these after having left the game back when they introduced the mines to the game. I'm not sure how to outfit the new sub-munition dispenser in a way that is cost effective while still getting the job done, considering how expensive containers have gotten recently, I mean.
FantasticMrFaust 26 Oct, 2023 @ 7:38am 
haha Arofire you are fucking my Solomon
Dloe 4 Oct, 2023 @ 4:06pm 
You have unleashed a power you cannot comprehend. The forbidden hybrid shall rain supreme.
CityScraper 1 Oct, 2023 @ 1:28pm 
Finally! I love you!
<#000>MXYFX-<#F00>71400 25 Sep, 2023 @ 2:54am 
其他的,还是要多舰队协同
<#000>MXYFX-<#F00>71400 25 Sep, 2023 @ 2:53am 
爆反会出手
<#000>MXYFX-<#F00>71400 25 Sep, 2023 @ 2:53am 
还行
Arofire  [author] 23 Sep, 2023 @ 3:52am 
Thanks :)
KAT 22 Sep, 2023 @ 9:04am 
Nice article bro:p2wheatley:, will be a great help :)