Galactic Civilizations IV

Galactic Civilizations IV

30 ratings
Space Combat and You (Obsolete)
By Illauna and 1 collaborators
Galactic Civilizations IV : Supernova makes some changes to the combat system. It can help to know what is happening behind the scenes. This guide dives into the combat system and attempts to explain all the underlying mechanics.
2
2
3
4
   
Award
Favorite
Favorited
Unfavorite
Summary
Note: With the Warlords coming out today much of this guide will be out dated. I'm working to add the new information to the guide as time permits. Once finished I will upload a new version of the guide. For now I'm leaving the guide on steam because some mechanics did not change and is worth having a reference for it.

Whether you're planning on defending your territory or crushing your opponents beneath your heel, its important to have at least a small navy. Its one thing to have a military; its another to have a good one. To create a well-designed navy, its important to understand how combat works.

This information is mostly gathered through observations and testing. There are many ways to design your fleets so use this information as a guide and not a to-do list. Also, overtime you can expect some of the information in this guide to change. I'll try to update as often as time permits.

Finally, I get pretty deep into the formulas... you really don't need to memorize these things since the game will handle this for you.
Glossary
It helps to establish some of the terms used in this guide.

Phase – A single round of combat. In each phase ships can move and attack.
Phase Limit – Maximum duration of combat. Currently 100 phases. If this limit is reached, the battle is considered a draw and all remaining combatants will retreat.
Ship – Can represent any type of vessel. For simplicity’s sake, this will also include monsters.
Fleet – Multiple ships are combined into a fleet. These are considered a single element on the strategic map. Together all ships in a fleet will participate in the attack. A tile can have multiple fleets but only one fleet can participate in combat at a time.
Role – Class of ship such as Probe, Fighter, Bomber, etc.
Logistic Capacity – Determines how large your fleets can be. Each ship has a logistics value with larger ships typically costing more than smaller ships.
Tactical Battle – In this guide it refers a battle that initiates with an attack order.
Strategic Attack – Attacks on the strategic map such as beam and missile volley. This also includes antimatter bombs.
Regarding Tactical Battles
Galactic Civilizations is a strategic level war game. Unlike Master of Orion, you do not have direct control over your individual ships once combat begins. Instead, each of your ships follows orders based on their role and equipped weapons when an attack order is given. There are also a few long-range volley attack options using beams, antimatter bombs, and missiles.
The Basics of the Attack Order
To initiate combat, select the ship or fleet using the left mouse button and right click the enemy fleet. If you’re not already at war, you will be asked if you want to declare war on that fleet's faction. In the event more than one fleet is located on the same tile, your opponent will be chosen at random. Once the attack order is issued the results are calculated automatically. Depending on your game settings you may have the option to review the results of the attack in the battle viewer, otherwise a quick animation will take place and there will be a notification located in the GNN where you can find all your per turn notifications.

If the GNN doesn't appear, click on the Monthly News Report icon found on the top left corner of the screen.

Quick Explanation
Combat in Galactic Civilizations takes place in phases. In each phase ships will move and fire. When weapons connect, damage is adjusted based on the target's defenses and any remaining damage is applied to the hull. Ships are removed from combat when their hull points are depleted. This will repeat until one side is the victor or the phase limit has been reached causing both sides to retreat.

Detailed Explanation
Pre-battle
1. Fleets are arranged based on their role.
2. Armor and shields are set to their maximum levels.

Battle Phase (1 – 100 phases)
1. Each ship will move forward based on its tactical speed.
2. Ships will choose a new target from the roles at the top of it's priority list regardless of how far away it is.
3. Ships will perform only one attack with each of their weapon types that are in range and off cooldown. These will only be used against their chosen target.
4. Damage is calculated and applied to ships. Any ships that end with <= 0 hp will be destroyed.
5. If one side loses all of their ships, the other is declared the victor. If both sides have remaining ships after 100 phases, both sides will retreat and the battle is considered a draw. Otherwise, it continues to the next phase.

Notes
  • Ships will move then fire. This means they will sometimes fly past and circle each other. This should have no effect on combat.
  • Core ships stop moving once in range of one of its weapons allowing for long range bombardment. This gives larger ships more time to continue their attack without joining the melee.
  • Both sides will move and attack at the same time. The attacker does not gain any special advantage.
  • Ships do not attack targets of opportunity along the way and reserve their shots for their primary target.
Battle Lines
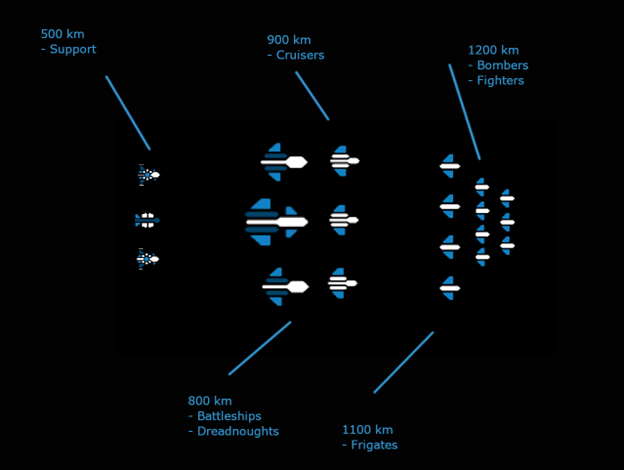
This is not specified in the game, but it can be helpful to consider there being 4 battle lines: front line, core ships, support, and starbase. With a few notable exceptions, ships will fight other ships in the same battle line before moving on to attack ships in another line.

Front Line
This is the front row. Composed of fighters, bombers and frigates, these are generally very cheap ships with low logistics cost. All these ships have a combat ability. Individually they are weak, but are deadly as swarms. This is a great option for shipyards without a lot of manufacturing.

Core Ships
These are your Cruisers, Battleships and Dreadnoughts. The ships in this row tend to have the mass for a lot of weapons and armor as well as some of the support modules such as antimatter bombs and carrier modules. These also will only close to the maximum range that allows them to hit with all of their weapons.

Support
All other ship types fall in this category such as Transports, Siege Frigates, Colony Ships, etc… These hang back until the core and front line ships have been destroyed.

Starbase
Stationary platforms of various kinds. These are the last to be attacked and will not fare well if all the ships defending it have been annihilated.

 
Here is a chart of all the combat roles currently in the game

Row
Role
Details
Front Line
Fighter
Combat Ability: +50% Evasion
Targeting Priorities:
  1. Bomber
  2. Fighter
  3. Capital Ship
  4. Frigate
  5. Cruiser
  6. Support
  7. Starbase or Shipyard
Logistics: 1
Tactical Speed: 300 km/s2
Front Line
Bomber
Combat Ability: +50% Evasion
Target Priorities:
  1. Capital Ship
  2. Cruiser
  3. Frigate
  4. Fighter
  5. Bomber
  6. Support
  7. Starbase or Shipyard
Logistics: 1
Tactical Speed: 300 km/s2
Front Line
Frigate
Combat Ability: +50% Accuracy
Targeting Priorities:
  1. Bomber
  2. Fighter
  3. Frigate
  4. Cruiser
  5. Capital Ship
  6. Support
  7. Starbase or Shipyard
Logistics: 2
Tactical Speed: 150 km/s2
Core
Cruiser
Combat Ability: none
Targeting Priorities:
  1. Capital Ship
  2. Cruiser
  3. Frigate
  4. Bomber
  5. Fighter
  6. Support
  7. Starbase or Shipyard
Logistics: 6
Tactical Speed: 150 km/s2
Core
Battleship
Combat Ability: none
Targeting Priorities:
  1. Capital Ship
  2. Cruiser
  3. Frigate
  4. Bomber
  5. Fighter
  6. Support
  7. Starbase or Shipyard
Logistics: 12
Tactical Speed: 131 km/s2
Core
Dreadnought
Combat Ability: none
Targeting Priorities:
  1. Capital Ship
  2. Cruiser
  3. Frigate
  4. Bomber
  5. Fighter
  6. Support
  7. Starbase or Shipyard
Logistics: 18
Tactical Speed: 113 km/s2
Roles
Ship roles, or classes, define the ship’s behavior in battle. It determines the targeting priority and various stats. It also determines the starting location in each fleet’s deployment zone.

Fighters – Defenders of the fleet. They are critical in intercepting enemy bombers without your capital ships taking too much damage.
Bombers – Will rush past your fighters and frigates and attempt to destroy the capital ships.
Frigates – Have high accuracy to negate the evasion of fighters and bombers. One of the first ship roles you may consider adding some defenses.
Cruisers and Capitals – Will close to the maximum range to hit with all of their weapons. Cruisers are very versatile, having more mass than the smaller ships, but have a lower logistics cost than that of the other capital ships.
Carrier FIghters – Created by Carrier modules. They are fighters. These are refreshed after every combat.
Support – Non-combat craft. These will not move forward until all combat craft on their side has been destroyed. Generally, they will not have any combat worthiness.
Starbase/Shipyard – Cannot move but can fire its weapons once ships get into it's range.
Ships Stats
Every ship has various attributes that affect their performance in and out of battle. Here a list of some that affect a ship/fleets combat performance.

Combat Stats

Tactical Speed – How fast the ship moves per phase in tactical combat.
Acceleration – Time it takes for ships to reach maximum speed. This is mostly flavor and has little impact on the actual battle.
Logistics Cost – Each player has a logistics limit. The player can add ships up to its logistics limit.
Hull Integrity – Lose all of your hull points and the ship is destroyed.
Combat Rating – I recommend ignoring the number here and hovering over it to get a detailed summary. This is expected to change.

Weapons
Beam Attack - sum of all beam attack values from beam ship components. This is your ship's beam attack strength.
Kinetic Attack - sum of all kinetic attack values from kinetic ship components. This is your ship's kinetic attack strength.
Missile Attack - sum of all missile attack values from missile ship components. This is your ship's missile attack strength.

Defenses
Shield Rating – combined total strength of your shields. Affects ability to absorb damage.
Armor Rating – combined strength of a ship's armor. Affects ability to mitigate damage.
Evasion Rating – combined total of all evasion points on a ship. Affects chances to dodge an attack entirely.

Non-Combat Stats
Moves – Number of hexes a ship can travel per turn. A fleet is limited by the slowest ship.
Ship Range – maximum distance from a Starbase or owned planet a ship can travel. A fleet is limited by the ship with the lowest range.
Sensor Range – maximum number of hexes away a fleet has vision. Only one ship needs to be equipped with this. Good idea for Support ships to hold onto these.
Conquest Rating – Used for sieges.


Weapons
From the lowly Star Cannon to the Nightmare Torpedoes, weapons are the tools of the navy. The currently available weapon types are Kinetics, Beams, and Missiles. Each one has its own strengths and weaknesses. Here is a quick summary of their differences.

Kinetics
Short range, High Cost, Fast Cooldown, Medium Accuracy
Beam
Mid range, Low Cost, Medium Cooldown, High Accuracy
Missiles
Long Range, Long Cooldown, Medium Cost, Low Accuracy

Weapon Stats
Accuracy – chance to hit the target.
Attack Power – combined total of attack values of all the weapons of a given category. Each category of weapon can only fire once.
Cooldown – each phase the cooldown of each weapon is reduced by one. Once the cooldown is completed the weapon is ready and will fire. Once fired the cooldown will be reset.
Range – maximum weapon range. If the ship’s target is within this range it will fire.

In any given phase, the combined attack rating of all of a ship’s weapons of a given type will fire one time. It doesn’t matter how many weapon hardpoints the ship is equipped with and what variant of the weapon types are being used.

Example:
A ship equipped with 2 x lasers (1 damage each) combine (1 + 1 = 2) for an attack roll between 1 to 2 damage.
A ship with 1 x laser (1 damage) and 1 x particle beam ( 2 damage) combine (1 + 2 = 3) for an attack roll between 1 to 3 damage.


Weapon Tips
  • Remember, ships can only fire once per weapon type.
  • You do not need to create some designs with all resource based weapons and other designs with no resource based weapons. Adding an enhanced railgun or 2 can give your ships a little extra punch while keeping their strategic resource cost low. All the late game weapons require resources but you can outfit the ship with the previous tier weapons to balance resources verses attack power.
  • Weapons will improve over time through research, even without upgrading the variant used.
Defenses
In Galactic Civilizations 3, defenses worked like a rock paper scissors system. This has been scrapped in favor of a system one can interpret from watching a show like Star Trek. When an attack comes in, the defender can dodge it, absorb it with their shields, or mitigate some of the damage with their armor. Any remaining damage is applied to the hull. When the player runs out of hull points the ships are destroyed.

Evasion is the chance to avoid the attack entirely. It represents all the jinking and electronic counter measures of the ship. Also, fighters and bombers are very small and maneuverable, so they have a +50% bonus to their evasion rating. If the attack is evaded, no damage is applied and it's noted in the Evaded column of the battle log. Some ways of increasing evasion are weapon jammers, precursor artifacts, and events.

Shields are like a shell around the ship, think Star Trek. They always start fully recharged at the beginning of combat. As long as the ship has shield remaining the ship does not take any damage. It’s costly and very limited but it’s damage you do not have to repair after combat. This can be increased by shield modules, artifacts, and techs.

Armor deflects all or some of the incoming damage. This can be the plating on ships or the tough hides of organic beings. Armor can stack very high, but a bad roll can spell doom for your ship. After each attack, armor is reduced by 5%.

Hull Points (HP) once this depletes the ship is destroyed. At the end of the turn each ship will regain a few hit points. Most ships do not fight long when their defenses drop.

Defense Tips
  • Shields and armor repair after combat. Consider putting at least a couple shield modules on your ships. This will prevent having to repair light damage after combat. This is important for attacking multiple fleets in a turn and overall efficiency.
  • Armor will generally mitigate more damage than shields, but will get wiped out quickly to a swarm of cheap fighters. Shields will hold up until they are depleted but can easily be wiped out by a large damage roll. Generally your ships will be more well rounded by having some of each.
  • Some defense is better than no defense. Glass Cannons typically do not work.
  • Typically ships with 33%, 50% or 66% of their mass devoted to defenses work well. The actual values you choose are going to entirely depend on your fleet composition. I generally stick to 50%. If I find I'm loosing a lot of ships of one role I increase their defenses to 66%. If I feel one role is safe I reduce their defenses to 33%. You may find this approach best so avoid memorizing complex layouts. You can also roleplay this and say the Klingons have 2/3 offense to 1/3 defense. The federation ships have 2/3 defense to 1/3 offense.
Damage Calculation
For this, the attacker is considered to have fired the weapon. The defender is considered to be receiving the hit. Each attack is handled separately. In a given phase both sides handle their attacks simultaneously.

Each time a ship attacks it rolls accuracy and calculates damage. Then the damage is reduced by the defending ships evasion, armor, and shields to determine how much damage is applied to the hull.

Here is a more detailed look at that process.
  1. An attack rolls between 1 and 100 for accuracy and up to the total attack value of a given weapon type.
  2. If the roll is <= Accuracy the attack hits. Otherwise, it misses.
  3. The defending ship rolls between 1 and 100 for evasion. If the roll is <= it's evasion stat the defending ship avoids the attack, doesn't take any damage and this ends the rest of the damage calculation.
  4. If the attack lands, any damage is applied to the shields until they deplete. If shields have been depleted, skip this step.
  5. Any remaining damage is now handled by armor. A random roll up the defender’s armor value is rolled. The result is subtracted from the damage. The defender's armor is reduced by 5%. Which means after 10 attacks, the ship's armor will be reduced to half strength. After 20, it will be fully depleted.
  6. What remains is applied to the hull until the hull is depleted. Once the hull is depleted the ship is destroyed.
Military Starbases
If you're coming from Stellaris, you might think of starbases as these massive defense platforms that you have to destroy in order to take a sector. However, Galactic Civilization series starbases have always functioned more like fleet beacons, enhancing your fleets and undermining your enemies. These modules can affect all ships located inside the starbase's area of effect circle. The range can be extended using various methods such as the Vigilant ability or the Support Field Stabilization module.

Support Modules
These have different effects on the ships located in their area of effect. Some help, some hinder, some do both. For example:

Slipstream Generator: Lowers the movement cost of your ships allowing faster movement in the area of effect. Also increases tactical speed in battle.
Fortification Module: Increases shields, armor and evasion for your fleets.
Gravity Field Generator: Increases the movement cost of your opponents on the galaxy map and reduces their tactical speed in battle.
... plus many more

Weapons
Starbases can be equipped with various weapon and defense modules. Missiles and Beams are important for long range volley attacks. You can add missiles and interceptors to contribute to the fight along side of local garrison forces since beams and kinetics will generally be out of range for most of the fight.

However, do not forget these are stationary platforms. They start in they extreme back of the formation and cannot move during battle, so they do not contribute to anything if the enemy doesn't attack or go near them. You are better off having a mobile fleet instead of putting too many resources in outfitting them with better weapons.

It might be better to reserve some resources and invest in sensor range. Using this advanced warning system, you can more efficiently allocate resources to your empire's defense on demand. Sensor upgrades also come with the perk of boosting the influence per turn your starbase generates.

Volley
Once Space Doctrine is researched, as well as the proper modules are equipped, such as the Harpoon Salvo, Military starbases will be capable of performing one of its volley attacks per turn.

It's up to you if you want to have direct control of this attack or not. At the end of your turn, any remaining starbases that have not used their volley attack will do so automatically if a target is in range.

Influence
Easily overlooked, all starbases generate a small amount of influence per turn. When built, Military starbases immediately generate 20 influence on their home tile. You can also build modules to increase your influence per turn at the starbase such as the Starbase Defense System, Omega Starbase Defenses, Perimeter Scanners, etc...

While being nowhere near as strong as a communication starbase, they sometimes can claim an asteroid field or annex nearby colonies. However, they are easily overtaken by most other influence sources. A side benefit is your ships will enjoy a +2 movement buff while inside your influence borders and also get a 50% movement buff when starting their turn inside your influence.

Other Modules
All starbase types have modules for increased sensor range. This is important for volley attacks. It's also important for your local forces so they have time to protect them. Most importantly, they increase your influence generation rate by +5 per turn per sensor module upgrade.

Strategies
Super Highway - If you are coming from Galactic Civilizations 3, then you maybe familiar with Hypergates. These are no longer in the game, instead this feature is handled by Military starbases. By chaining the area of effect range of Military starbases and installing modules like the Slipstream Generator your new ships are able to rapidly get to the front line.

Combat Engineers - Include a constructor with your invasion fleets. When you are about to face a difficult battle it's time to build a military starbase. You'll then upgrade it with fleet buffs like the Zalon Defense System for a great combat bonus. You can also build a Slipstream Generator and or a Gravity Field Generator to kite your opponents with volley attacks.

Subspace Gate defenders - Building a Military starbase at a subspace gate along with a small fleet of defenders can lock down a sector and enemy ships from getting in or out. Add modules such as increased range, slipstream and gravity generator, the Zalon Defense System, and missile attack modules for a formidable guardian. It's actually not a bad idea to build every possible module on these starbases. Ideally build these away from the subspace gate to maximize their coverage area and buy time for your local forces to get into range.

Additional Notes
  • Tiles with any starbase on them have the logistics capacity of 60, even at the start of the game.
  • All starbases increase the maximum range of all your empire's ships.
  • Considering Military starbases increase the stats of ships in their area of effect, this also increases your factions military power score. Not very effective but sometimes is just enough to deter war. This is more effective with ships with 3 types of weapons since each one will get a small boost.

Overall, this is a very useful tool for your fleet.
Supply Range
Ships require fuel and provisions for a long trip. This is reflected as Supply Range. This is the distance away from a Starbase or a controlled planet that a ship can travel. The Minister of Exploration and various techs and ship components can increase your supply range. Do note that your fleet is limited to the ship with the lowest range.
Invasion
Each ship contributes to the fleet's conquest rating which is the invasion power of the fleet. Siege Frigates and Transports are the largest contributors to the total conquest rating. Transports require a citizen and will use that Citizen’s resolve stat to calculate the conquest rating of the transport.

To start an invasion on a planet, click on your ship and right click on the planet your wanting to invade. This will start the siege animation and display the invasion progress screen. An invasion must be able to complete within 10 turns or less, else the invasion will not be be able to proceed. If successful this counts as the first turn of the invasion so all movement is expended and the planetary defenses is reduced.

Conquest Rating – The invasion power of the fleet. Used to reduce the Planetary Defense.
Planetary Defense – Based on citizens, improvements, and other bonuses. When this is reduced to zero the planet changes hands. As long as the planet is not currently being invaded it will regenerate a portion of it's Planetary Defense each turn until it reaches it's maximum capacity.

Invasion Mechanics
Invasions are handled using a simple mechanic
  1. At the start of the turn any ships currently invading a planet will consume all of their movement points to continue the siege.
  2. Every turn, the Planetary Defense is reduced by the conquest rating of the invading fleet.
  3. If the planetary defense is depleted the conquering civilization gains ownership of the planet.

Invasion Tips
  • Since movement is expended for the invasion it’s recommended to have a garrison fleet nearby guard the planet immediately after conquering it.
  • Typically siege frigates can take a colony, but transports are more effective at taking a core world. Fleets of 5+ siege frigates may be required to take core worlds under the 10 turns limit.
  • If you have space superiority around the area you may want to split your invasion fleet into multiple elements to take a system as a whole. Send your frigates to take the colonies and transports to take the core worlds.
  • You can cancel your invasion in order to respond to other events or to increase the size of the invasion fleet. Only a small amount of planetary defense is regenerated each turn.
  • Protect your transports and siege frigates! Try to have a few escorts in the fleet. You cannot “cover” your fleet with another fleet since the defender is chosen at random. If you have space superiority you can consider splitting up your fleet into multiple elements to invade more targets at a time.
  • Taking the core before the colonies avoids the problem of taking a world and having it annexed through influence.
  • Don't hesitate to equip your transports and siege frigates with some weapons if they have space for them. They could make all the difference if your invasion fleet is surprised by a sneak attack along the way.
Strategic Combat
In addition to the battle viewer, where most combat will take place, there is also various long-range bombardment attacks you can perform while on the galaxy map.

Volley
Volley is a long-ranged attack that can strike a single ship in the opposing fleet. The attacking fleet suffers no retaliation. This is a very useful tool to soften a very strong fleet in preparation for battle.

Another use is to eliminate a target when en route to another destination without losing much movement changing course or getting in more attacks overall. Great for wiping out pirates and monsters.

Mechanics
Ships may expend a movement point to perform a volley attack. This comes in two flavors Beam and Missile. Beam volley has a maximum range of 2 hexes. Missile volley has a maximum range of 4 hexes. Due to their base damage missile volley has higher potential damage than beam.

For both attacks, damage is determined by rolling a random number between 0 and the combined total of all the attack values matching the chosen type. Next, this damage is reduced by -20% for each tile away from hex the attacker is located in. The simple way to determine the range multiplier is count the hexes from the attacking tile to the target and multiply it by -20%.

Range
Damage
1 or adjacent
-20%
2
-40%
3
-60%
4
-80%

* You may have counted 2 hexes away, then looked at the tooltip and see -35%. The reason for this is how distance is calculated on a hex grid. If your attacking along the grain it will be -20% per tile, otherwise this is going to be less. It's not very important, just take -20% damage per hex and run with it.

Example
A battleship with a missile attack of 100 is attacking a cruiser adjacent to it. It will roll a number 0 to 100 and then multiply the result by 80%. Let's say it rolled 40, it will then take 40 * .80 = 32 damage. However, if this attack was from 4 hexes away it would be 40 * .20 = 8 damage.


Volley Notes
  • Missiles have higher base damage then beams. However, you may have seen it doing less damage. The reason for this is it can target a fleet up to 4 hexes away, which is a -80% damage penalty. Ideally you want to attack from the adjacent hex, but you do have an option to attack further if needed.
  • Volley can destroy up to one ship per attack.
  • Ships that have not used their attacks will do so when you hit end turn. However, you will not be able to select the target, so it’s recommended to manually perform the attack if you have a specific target in mind.

Volley Tips
  • Expecting to overkill your opponent with a volley? Consider splitting up your fleet into smaller elements then attack with each separately.
  • Ideally you want to volley from 1 hex away. However, it’s sometimes worthwhile to fire from maximum range and avoid a battle viewer battle given beams and kinetics are much weaker verses kinetics in tactical combat.

Antimatter Bombs
Antimatter bombs found in the late missile tree deserve special attention. They deal 12 damage to all ships within a 12-hex radius for the cost of 1 antimatter. This is very useful when attacking fleets with large amounts of Frigates, Fighters and Bombers. It's difficult to protect yourself from such an attack. You can use Orbital Academies to increase the raw hp of your fighters, but the best method is just to not get caught in a position your opponent is able to use this on you.
Strategy
Combat Doctrine
When you’re creating your civilization, think of what their ship design and battle doctrines might be.
In Star Trek, the Federation designed their ships primarily for science and exploration and were very defensive in nature. The Klingons used wolf pack tactics which focused on offense, but sacrificed defense. Romulans attacked from the shadows and relied on sneak attacks. The Dominion had swarms of ships.

Sometimes it's just fun to design your ships around an inherent weakness. Not only does this help create more immersion, it gives you a template to quickly put together a new ship design and not get overwhelmed by min-maxing. My only recommendation is don't completely go for glass cannon, 100% weapon, designs. These generally don't perform very well with anything larger than a frigate.

Fleet Composition and Task Forces
Task Force, a concept who finds its origin with the United States Navy in the 1920 to 1930 on Earth, the Terran Alliance’s homeworld, stipulate that a fleet should be designed to perform a particular task. Since your logistics per fleet is limited, it pays to design fleets for a specific function.
  • a fleet of missile ships that can snipe enemy starbases.
  • an invasion fleet with siege frigates, transports and their escorts.
  • a moving fleet of interceptors equipped with prometheon drives to get behind the enemy fleets and take out targets of opportunity such as a forward starbase that is extending your enemies supply range. In destroying this, you force your opponent to cancel their siege and return to their space.
  • a cheap fodder fleet that doesn’t use special resources.
  • an elite fleet that you call in if you really want to knock something out. This may have a lot of resources invested into it.
  • a construction fleet with constructors to drop a military starbase at a moment’s notice.
What composition is correct? This is heavily debated, but for the most part, just create your own ship design doctrine and battle doctrine. I encourage you to try a completely different approach to ship design for each game. However, do try to avoid building fleets around a singular ship class. Generally this approach is hard countered by every mixed fleet design.

When in doubt adopt a pyramid style of composition, which simply put double the amount of ships in the next hull size as you go from largest to smallest.

Example:
1 Capital
2 Cruisers
4 Frigates
8 Fighters / Bombers
Total = 40 logistics. From here you can tinker with the numbers or keep your task forces small.


Other Strategy
  • Talk softly, carry a big stick! Even when playing a more peaceful game, you want to consider building a fleet after you have setup early game infrastructure. This will help your military score and make your neighbor think twice before declaring war on you. I have a rule of thumb that on turn 25 I need to stop what I'm doing and build a fleet.
  • You don’t need every fleet maxed on logistics. It just needs to be big enough to take on what you’re fighting. Generally, early in the war I focus on Space Superiority, charge in with a huge fleet and split off a couple fighters to chase down any constructors or colony ships. I try to attack with just enough ships to destroy the enemy fleet without taking losses. When faced with a large fleet I recombine into a large fleet. Finally, at the end I split up my fleets to smaller components and try to siege multiple colonies at the same time to end the war quickly.
  • Don’t forget your volleys. Even removing a couple of ships can change the outcome from some losses to total victory.
  • Don't get too fixated on the battle predictions. They are mostly accurate, but will never be 100%. You will see predictions stating you'll take no losses only to loose half your fleet due to RNG variability.
  • Use two fleets when besieging a planet. One attacks, the over covers the planet after the attack. I cannot tell you how many times I've taken a planet only to lose it the next turn.
  • There are many ways you can do a combined arms approach. Consider giving bombers multiple weapon types. Individually they are weak, but you can have your bombers race ahead and attack the AI’s capital ships and shred its armor allowing your capital ships to finish them off quickly. Sometimes a ship's power is not just the damage it can do but how it does it.
  • If you’re struggling in a war even a couple +1 bonuses to your weapons or armor can help swing the results to your favor. Always be building something in your shipyards. You can use repeat orders and rally points to reduce micro.
  • Pay attention to the battle viewer results. The smaller battles can teach you a lot about how the system works.
  • A real basic ship design guideline is take the total mass. Allocate 50% to attack, 25% to shields, and 25% to armor. This can be highly effective in most cases when playing against the AI.
Conclusion
I hope this guide was useful to you. The battle system is surprisingly deep the more you dig into it. There are many other tips and I’m still learning more and more of this new system. If you have any questions feel free to ping me in the discord.

The number one tip I can give is "Have Fun!!!" Don't min-max the game to death. In my opinion the new system is somewhat meta proof.

Special thanks to Stardock for these great game, as well as Draver and my poor wife for helping edit this monstrosity.
17 Comments
CavityCommunion 17 Apr @ 6:36pm 
alright, ty again.
Illauna  [author] 17 Apr @ 5:25pm 
Certainly. I created this in 2.0. While many of the concepts are still true there is some aspects that are no longer correct. It's missing all of the Warlords content which greatly adds options.

From a game mechanics standpoint everything is still valid except shields function a little differently. I explain some of the key differences in my Oct 14, 2024 reply to this. I monitor a Combat Talk thread on discord if you have any questions.

Discord.gg/GalCiv .
CavityCommunion 17 Apr @ 4:25pm 
Ty for this guide. Can you share why you consider it obsolete?
deciBelle 14 Oct, 2024 @ 5:02pm 
Gotcha, thank you for the intel!
Illauna  [author] 14 Oct, 2024 @ 2:19pm 
Mechanically its mostly the same. Shields changed where the fully block an attack but deplete by sqrt(1 + dmg) with each attack. Warlords adds doctrines that have different effects on ships. Also there is a host of new modules.

Finally assault shuttles were added. Each shuttle attacks at 3km range once per combat. When it hits it does 1...100 assault attack damage per pod. If you have enough to deplete a ships assault defense you capture the ship if your side is the victor after combat.
deciBelle 13 Oct, 2024 @ 11:06am 
Are there some cliff notes as to what has significantly changed with warlords? I recently got back into the game and I'm wondering if the kinetic/beam/missile weapon characteristics are still generally the same with regards to range, cooldown and accuracy? Can ships still only fire once per weapon type in combat?
Illauna  [author] 19 May, 2024 @ 5:10pm 
There was significant updates to the game I'm still actually playing around with the mechancis before updating the guide. Also, work has been a bit busy.
paxis 30 Apr, 2024 @ 8:39am 
When you plan to update this guide? All are waiting for it!
Illauna  [author] 18 Jan, 2024 @ 12:06pm 
Ill be starting to update the guide for 2.3 and time permitting Warlords
Illauna  [author] 28 Nov, 2023 @ 9:17am 
Yeah personally i use a mod i created that makes fighters not safe against other fighters if you have bombers