Bellwright

Bellwright

49 ratings
So you think you can... Be a Lord!
By Skorpn
A comprehensive guide to help you from your newfound humble beginnings to an unstoppable force. I will walk & talk you through basic things to get you movin' on up quickly and perhaps teach a few of you some new tricks.
6
5
2
2
   
Award
Favorite
Favorited
Unfavorite
Introduction
So, for those of you who skipped the opening sequence. The story is pretty much at the age of 10 you slew the Prince, and it is fact because the Princess said she witnessed it. Likely story, but who would believe you? So you ran away home. The King, so riddled with anger decreed that death come to any child resembling the description of you which by medieval standards is any child,. All the citizens formed a counter-movement to protect all the children being needlessly slaughtered. Your father still had worries and sent you away that same night to keep you safe. Your fathers friend kept you safe until one night, a dastardly assassin killed your guardian. You once again fled, but this time back to your previous homeland...


In the first moments of the game essentially you lose everything. You need to start over and do better!
I will throw you to the wolves as soon as I can, because I'll help you make your small camp into your empire (or at least something more worthy).

First, I'll introduce you to some music to help your reading be a little more fun
So your a commoner now...
Your new life begins now. You start with nothing but the clothes on your back, it sucks. But I'll get you moving along and help you become an unstoppable force.

First things first, turn around and do a quick exploration of the ruins. You'll find a few things. After your done there, go talk to the elder in Hearndean. He will pretty much tell you to get lost and he wants no trouble, but he's a sympathetic soul deep down. He tells you to build yourself a camp outside of town. The only issue is he hopes you won't be back, taken by wolves or some other force. He tests you quite a few times like this until he warms up to you. After a while you can hire some of his villagers for your own benefit. Accept his missions and show him how you do it!

You can build your shack anywhere outside of city territories, but the safer you are the longer it will take to get better.
Build yourself a camp at or near the spot above. While your heading out to claim your new home, you need to think about collecting materials. Few things are needed. First on your agenda should be an axe, then a club. The materials required for an axe is 2 rocks and 6 sticks (Find sticks and rocks on the ground). Hit the "I" inventorykey and on the bottom right you will see 3 things your character can always bulid (Axe, Club, and Torch). Once you have your axe you can now chop young trees down to get 3-4 sticks per. After building the axe, gaining sticks will be much easier then just finding them while strolling merrily through the woods. For the club it is 4 sticks only. Now to create your new abode, you'll need 2 materials, 6 flax and 10 wood (sticks).

You are now ready to wait out the evening until the next morning... Blah. Might as well be productive and build everything you can now. Hit "B" on your keyboard and look up what you want to build and how much materials you will need to harvest. The image on the right is where you store the material gained until you have everything needed. Now this isn't necessary on small projects, but on larger ones you just simply won't have enough room in your inventory.

I have played through the spot below, and while it is difficult if you get caught, as long as you are not within aggro range no harm will come to your new home if you run away.
Building up your community (Tier 1)
So, you've woken up from your first nights rest in your shack. It's about time you start working on building up your city. If you haven't already gotten Lubomir, now would be time. Head over to Hearndean and talk with the mayor and get the quest find Lubomir and get him to make traps for the city because for some reason they are useless.
Once you get Lubomir head back to your village and get him working on the research station (if already built) while you build a home for him. Go to the build menu (B) and select the housing tent. Place it where would would like. After you gather all the material required for it, you can start building other things such as a simple workbench and research station. After those are built you may want to start building some storage containers (build 2 or 3). Once you have the traps completed you can use a few to start getting meat and pelts. Send Lubomir to research the foraging camp. This will open up more things useful to research after. You can research what you wish but if you pull up the tech tree, you can see what steps would be best suited to you I will list my preferred research order in researching. While you're doing all this Lubomir will be setting up your village with resources and research (only you can place buildings), Lubomir can also construct your buildings you wish to place. It will be a lot for him, so eventually you will have to hire villagers from cities you form relationships with to gain villagers, please read "Relationships and Villagers".
After researching all the buildings you can now work on researching the Village Hall. This will advance you to tier 2. Things start to get fun now.
Controlling your character - Hunting & Fighting
So the basic controls are simple, a mouse click here, a mouse click there and your good. However, Bellwright is slightly more complex then that and takes some practice to get used to.

Harvesting
During your harvesting you use the left mouse button, it will pick up everything you need. Now, if you drop something or your inventory is full you don't use the mouse to pick it up, you will use the F key.

Hunting with a bow
When hunting animals you generally use a bow, its hard to run after a rabbit or deer when you spook them, you will try but there is a 99% chance you will not strike them. Foes like foxes and boars are different, they will attack you which is much preferred when you want some meat or hide, but they do hit quite hard if you aren't prepared. The bow is a fun tool but take practice as well, unlike most FPS games, this is not CoD or Fortnite. Your arrow has a trajectory and is not being release at 2000+ ft/s, so you will have to aim accordingly.
Deer are probably the hardest to hunt mainly because they become spooked quite easily and dash off to be untraceable in a wooded area. What I do when I'm out hunting for deer is run around mainly and wait for the eye to pop up in the middle of the screen. Once I see that I cease all forward movement and back step, if it is a wooded area you need to scan around to find your buck, once you spot it you need to line it up with a side shot so you can go for its head. Now if you aim for the deer's head, your trajectory will graze its chin hairs which will scare the dingle-berries out of it and it will dart and be hard to find and follow after. If you catch up with it or find a new deer to hunt, you need to do this, and you will quickly have success. Same steps as above until your release. You will watch/follow the deer until it stops, you aim a little over its head. Now, do not shoot. 9 times out of 10, it will graze and you WILL curse (I still do), just a moments of patience and victory is yours. The deer usually grazes for 2 seconds, when it lifts its head is the moment you strike. Look where your aiming just before release to be certain of the drop compensation and blamo, if you got the red x, you just bagged yourself some meat, hides and hopefully a Trophy.

Melee Combat
Combat is where the complex comes in, if you have a shield a simple block will suffice holding the right mouse button, but if you were hunting or attacking your enemies with a bow, it's more difficult to equip your shield while running away. I prefer to stand and fight, but attention and timing is everything. Enemy swings are as fast as yours and eventually gets easier to defend if you just practice. Combat and defense is 4 way directional. Up, down, left, and right. Your shield is not directional, its just click and use.
Defending
The blocking with your weapon or shield is done through your RMB (right mouse button), and it is not generic But you can make it, see link below. If your enemy swings right (your left), you have to block left. If he swing overhand, you block up, etc. This is done by holding down the right mouse button and moving the mouse in the direction of your opponents attack. The more difficult part is when there are 2 or more enemies, which is common. This is harder to block and gives your very little room to attack. A way to overcome this is to walk backwards and wait for an enemy to swing, when they swing you block followed by a swing (usually a side swing). If there are more then 2 enemies you can run. Even if you are using your shield to defend, you can only take so many hits before it breaks. What I have noticed was that the scene in this is true for attacks from behind.

https://en.wikipedia.org/wiki/Troy_(film)
Attacking
Attacking is a little more forward and easier, unless they block it, which does happen quite often. Using your LMB (left mouse button) and direction, you can control where your swing come from. Also recently changed holding the LMB will charge up your attack (damage increase).
The Devs also introduced Feint and Riposte. With feint you can cancel your current attack using RMB and initiate another from a different direction. However, if you wait until too far into your swing, you won’t be able to cancel it. This is helpful when you have initiated a swing into a direction that you see an enemy is already blocking. You can feint to try to make them miss their next block.
The riposte mechanic works like this. You must attack in the direction from which you are receiving an attack. If you time it correctly, you can both block an incoming attack and initiate your own.

For more combat details
https://steamhost.cn/news/app/1812450/view/6851744408517481172
There are two blocking modes - fluid (default) and non-fluid, which can be toggled in game settings
How and where to get skill points and read books
How you get skill points is simple. It is in every action you take (except movement) Every swing of the sword, every craft you create and every arrow you shoot. The only exception to those are, it has to have an end result.
Your sword must hit the enemy, and your arrow must strike its target.

Breaking it down further. You will get your 1H skill point from using a one handed weapon, whether it be a sword, club or axe. 2H, a two handed weapon and so on.

Along with most of your base skills you get a secondary. With 1H and 2H you get Str as well, with Archery you get Agi.

With harvesting, farming, hunting, cooking, and crafting you get the associated skill. You can also increase these skill quicker with books. There are a range of books dedicated to each skill you can gain. The fun part is there are 5 tiers of books.
  • Apprentice 500 skill
  • Journeyman 1500 skill
  • Proficient 3000 skill
  • Master 6000 skill
  • Expert 9000 skill
The Apprentice book is the easiest to acquire and these can be used at all skill levels. These books can be acquired from Hearndean for 150 coin. As well, you will get a lot of them in battles with bandits and brigands.
The Journeyman book is also simple to acquire and can be used at skill levels 3 and above. The books can be acquired from Padstow for 300 coin. This book you will also get a fair amount in battles with bandits and brigands.
The Proficient book is harder to gain and can be used at skill levels 5 and above.
The Master book is difficult to get and can be used at level 7 and above.
The Expert book is harder to get then a villager with 10 skill level, they can be used at level 9 and above.

There are also skill books for your villagers. There are currently 2, and they are labour and research skills. The villagers can also use all the skill books available.
Relationships and Villagers
Your first relationship with usually be with Hearndean, seeing as the are the starting quest givers. Building a relationship with other villages is important as this is how you can hire villagers to become your citizens.
You build your relationships through quests, gifts, and trade trade after liberation. The quests you do can range in "Trust and Renown" points. You can earn renown by completing quests, building, and vanquishing enemies at your gate (or near you). Renown is how you hire villagers. There are 6 stages of relations with a village,
  • Stranger
  • Associate
  • Friend
  • Protector
  • Liberator
  • Bellwright
As a stranger there is not much to do but quests, walk around the city and on your mini-map in the lower right hand corner you will see "?" for villagers who offer quests. Once you become an asssociate, you can start to hire villagers for your city I wait until friend status. Your hiring choices are bottom of the barrel, they can help you get stuff started and sorted. The stats are generally random, but I've gotten one or two that were decent at early stages. When you get to friend rank you start to see how much better stats are and usually you can narrow it down to what type of job you want your villager to do. Protector will give you better quality citizens, you may have to sift through them, but it is worth it.
Liberation is your first goal, once you get that, you can hire job specific villagers such as Blacksmith, Weaver, Carpenter etc. This will vary from city to city, please see DreXav's Guide under "Useful links & fellow guides".
Bellwright will be your end goal for relationships. You will get the cream of the crop to choose from, they will have higher job stats, as well as higher combat stats. You will soon be on your way to take down the bad boys and girls of Karvenia.
Everything about outposts and deliveries
Outposts
A means to an end and less travel for all your villagers. Creating outposts is a fairly simple task, the reasoning behind it is as well. The reason you should build outposts is simple. It will keep your villagers close by. It will keep your villagers from walking half a map to return with a handful of resources. It will give you piece of mind.

An outpost needs housing of course, and then what ever you want extracted from the area. This could be iron, copper, granite, etc. Or it could be peat, berries. So choose what extraction building you may need. The main thing it needs in order to transport your locally sourced goods now is, a storage area. It will have to be a stockpile at minimum, this will be your go to storage for any OP unless you plan to do large scale things with it.
Creating an outpost is simple.

For example, you want to mine some copper. The first thing you do is pull up your building menu (B). You then select a mine. Now you have to create a new outpost with this build so you will then hit (N) to bring up the overview. Go to the building tab and find the mine you just built It will contain a number corresponding to the mine you just built. On the right side you will find the switch settlement icon, you click that and hit create under the select new outpost section. Then every new building you build will automatically be under the outpost.

Delivering your goods
Deliveries will be fairly simple after you read this. Setting up a delivery starts in the overview tab (N), within there along the top there is a delivery tab, click it. From there you will come across a blank screen with a search function at the bottom. So lets say you wanted to deliver some copper ore back to your village.
Along the top in the left corner you can see your village name above it you can use the arrows on either side to change the village (This lets you know the village that will be acquiring the resource you input). Now in the search bar type in copper ore, and select it from the pop-up word. This now creates a delivery order, from there you choose the blank drop down and select the outpost that produces copper ore.
Then you can select the time frame you want deliveries to happen. You can have then once, daily, weekly or top up. Make your selection. Then you will choose how many you wish to import from your outpost to your village. And done!
This will need to work both ways, the outpost villager will need supplies whether it be pickaxes, axes or food. You need to set him up with those so he can do his job for you. Simple way to accomplish this is the same manner we set up our delivery already, the only difference is... you need to change the city in the overview tab to one you wish to supply.

Note Other things to consider would be to hasten your output and not halt production. With your tier 1 resources such as copper or peat. You can also create a workbench and either transfer resources in daily to be able to repair your tools or you can create a foraging hut to gain your basic sticks and rocks. This will of course need more then one villager to have it running well.

For more advanced settings and how to automate your outpost, please see Dairuka's link in "Useful links & fellow guides"
Getting your villagers fight ready
Personally I started out researching pretty much all the useful buildings and in between I researched weapons and only the Adventurer's Garb. The rest of the armor in my opinion is useless, focus your straps gathering on weapons. Now if you hired decent villagers they can at lease hold a Str +1 weapon, I make the Rondel for those villagers. For the higher strength villagers I go for the Short Sword. Make sure all your villagers have a shield, if they don't have a shield, make them have a bow. For all of this there is a great deal of collecting to be done, you'll need a lot of wood.
If you're moving along at a good pace and nearly completed building your Village Hall (T2) then you need to start researching and building up armors. Your primary focus will be body, legs and head, mainly because of the values of defense. Now you can focus on just armors, which is what I do in T2, but you also need to work on bulidings. So make sure that you have supply of what you need before you research so its as seamless as possible. If not, get to hunting and harvesting.
What I like to do when hiring villagers is make sure they're strength is greater than 0, this way they can hold a shield. But make sure most of their other stats (craft/harvest/etc) are 4 or above until you have a good relationship to find better villagers.
Be sure to find a high level capable researcher as well, this will make researching quick, until you need job specific researchers.
When you are ready to fight and equip your guys, prior to having the staging ground, you can have all your weapons, food, and armor in a stockpile. When you bring them under your charge, you can push the "E" button and click on the stockpile and they will equip themselves they however will not upgrade to better weapons and armor. What I normally do is strip my villagers when I hire them, most of their gear is +10 defense at best. This way they will upgrade to the proper armor when it is available. Weapons you have to manually change out.
Survive a raid & roving bandits
Raid levels vary based on your village progress, each new building you place will generally increase it, but very minimal at lower levels.
Surviving a raid is not hard, but if you are in a high bandit zone it may be a arduous task. Make sure your villagers are equipped with a weapon and a shield, this will keep them alive until you get there to help.
First thing you need to do is make your villagers become reservists (I have 1 with 0 fighting skill so I didn't include them), then after they are, assembling them is simple. In the top right next to guard and under hold ground is where you click reservist to active. Do this for all villagers, or ones you want to fight anyway.
To assemble your villagers in haste, and perhaps while you are running, is to hit the "K" key. This will bring up the call to arms menu, from there click on guard (middle) or companion (right).

There are 3 levels of villager service:
The reservist will only attack if you have agro'd an enemy, and only the immediate area reservists will come to your aid.
The guard will just put them on guard duty to attack any enemy, as with a NPC village if you have seen, other guards will come to help when alerted.
The companions will bring them right to your location, good if you're in a sticky spot.
Personally I use the companion feature the most.
How to make friends... Liberating
So the best way to make friends is do things for them without question or fear in game only. So you've already done quite a bit of quest, but it's so slow to gain protector status. Well, good news. You can trade coins and wolves teeth to help you gain quicker. While coins are hard to come by, teeth are much easier, and if you have a hunting lodge you can accumulate quite a stipend of them.
Now this can go for any level of trust with a city, it does take a while but it is worth it to do this until you get protector status. The benefits in villager selection is vast.
Some of the previous is covered in "Relationships and Villagers" section.

So now your ready to liberate a village. Don't rush into talking to the elder, you need backup first because all of the city's Brigands will gang up on you. So before you make the mistake I did, bring along a few of your friends. I did it with 8, but you should have more companions to overtake the reclamation party. After you beat the Brigands of the city, you need to build the bell tower. This can take a day to 3 days depending on distance and/or materials on hand. Once it is built you talk to the Elder again and the reclamation party will start gathering troops it seems on march on that city.

They will be coming from a great distance and usually get there in 10-15 mins or greater I would recommend not sleeping. If they destroy the bell tower then you have failed and need to talk to the elder again, and rebuild the bell tower. The battle can be easily won with 12 villagers with weapons appropriate to each villagers tier and shield. Armor will not be a major factor, they hit really hard. I would recommend you also carry a shield (If you prefer bows). 2 hits will probably take you out.

Once your battle is complete talk to the village elder once more and voila. You have gained Bellwright status in the city. This will allow you to hire professionals in your city, and as long as you have renown high enough you can do it before leaving the city. See "Relationships and Villagers" section for more detail.
How to barter (trade) (work in progress)
Bartering in Bellwright is a tad complex first time around, but I'll make sure you understand by the end of this section.
How to manage your priorities... you slacker
Priorities feel complex when you need everything done, it understandable. I will show you a simple way to understand the priority system.
Under your city management tab (N) and under the buildings section it lists all of your buildings built and in construction. With the picture (below right) this will help you understand what is within each category when you assign a villager to specific task types.
The crafting, gather, hunting, etc. are categories that your villagers have. Some have higher skill then others so find a villager suited to the tasks at hand. We'll take a look at Lubomir and see the things that he can do.
I generally do all my task assigning from the left image, although you can use the right as well. In the left image you can see the tasks he can do, his current level and what he caps out at. He can do all tasks but his harvesting, cook and labour are the highest. So looking at the jobs available you can select him for anything. I selected him as my lackey, so he does all the basic jobs that are quick or need quickness (such as building).
Now if you look at these pictures below and select the crafting category from the drop down menu, you can see how your crafting buildings are seperated. My bronze, tin, and copper are smelters. But the rest are self explanatory. Within this I can set how I want my crafters to prioritize the village workload. What I deem important is usually marked with a 1 and so on and so forth. To each their own, but this is just a general idea.

To summarize, what you've seen here was the tasks that my assigned crafters would be doing. If they have other priorities as you see some do. When they finish the tasks within their category, they will move on to the second category if work is still available to be done. If not, they will jump to the tertiary category listed and so on
Food Stats (work in progress)
Food w/no effects (Sorted by time)
Berry - 2h 30m (+8 HP (0.1/s Regen)) (Stam (+20 Stamina (3/s Regen))
Mushroom - 3h 30m (+16 HP (0.1/s Regen)) (+14 Stam (2/s Regen))
Berry Jam - 4h 30m (+14 HP (0.25/s Regen)) (+40 Stam (7/s Regen))
Mushroom Stew - 5h (+15 HP (0.4/s Regen)) (+45 Stam (7/s Regen))
Cooked Meat - 5h (+35 HP (0.25/s Regen)) (+12 Stam (3/s Regen))
Meat Stew - 6h (+40 HP (0.5/s Regen)) (+13 Stam (5/s Regen))
Smoked Meat (Large) - 6h (+60 HP (0.5/s Regen)) (+20 Stam (5/s Regen))
Cooked Mushroom -
Cooked Meat (Small) -
Cooked Meat (Large) -

Smoked Mushroom -
Smoked Meat (Small) - 5h (+45 HP (0.25 Regen)) (+15 Stam (4 Regen))
Smoked Meat - 5h 30m (+55 HP (0.4 Regen)) (+18 Stam (4 Regen))


Multiple Buffs
Fish Stew - 7h (30% Productivity 20% Experience) (+35 HP (0.4/s Regen)) (+35 Stam (7/s Regen))

Experience Buffs
Cranberry - 3h (30% Experience) (+13 HP (0.1/s Regen)) (+40 Stam (3/s Regen))


Productivity Buffs
Dried Mushroom - 4h 30m +(20% Productivity) (+20 HP (0.2/s Regen)) (20 Stam (2/s Regen))
Grilled Fish - 4h 30m (+20% Productivity) (+45 HP (0.25 Regen)) (+15 Stam (4 Regen))

Hunger Buffs
Dried Berry - 4h (-20% Hunger Speed) (+16 HP (0.25/s Regen)) (36 Stam (3/s Regen))
Smoked Fish - 4h 30m (-30% Hunger Speed) (+30 HP (0.3 Regen)) (+60 Stam (6 Regen))

Combat Buffs
Fine Stew - 8h (+20% Combat) (+40 HP (0.75/s Regen)) (+45 Stam (6/s Regen))
Repairing your tools & weapons
Repairing your weapon or tool is a simple task with a few steps to ensure it does get eventually fixed to an acceptable durability. We need to get this task rolling by opening up your army tab (helmet symbol on the top of the HUD).
Once you've opened up your army tab you will go ahead and add squad, then click on the squad tab itself. Within the companions menu you will see the food slider and the durability slider. You can choose your minimum acceptable durability and then there you have it. The weapon or tool in question that is below your acceptable percentage will be labelled as to be repaired now.
When one of your delivery villagers get a chance they will automatically take them to the toolmaker or appropriate repair station.
Outpost repairs if you do not have a station there will work the same way through deliveries. Please read up on "Everything about outposts and deliveries" section.
Resources (work in progress)
Tips & Tricks
Oupost help:
Make a chest or 2 (or stockpile) for material storage at a far away location. Want to build a bell tower and not have everyone walk across the map to drop off materials. Use it to ease your building process and store hard to craft materials for your building without it getting stolen.
Make it an outpost, temporary or permanent. Don't forget your travel sign.

Useful links & fellow guides
DreXav's guide - This guide is fantastic on where to find the professions needed as well as a spreadsheet with information on what villages stock and buy. The amount of work DreXav has put into this is commendable.
https://steamhost.cn/steamcommunity_com/sharedfiles/filedetails/?id=3242900119

Dairuka's guide - Dairuka did a fantastic job with their easy explanation on how to automate your outposts. Consider this a more advanced way to set up your workers and deliveries to feed your main city.
https://steamhost.cn/steamcommunity_com/sharedfiles/filedetails/?id=3268721127
Guide Updates
So, for the time being I believe I have given you a good look at the basics of the game. Please if you have any questions or suggestions I am open to them and will do my best to accommodate requests. Until then I'm gonna do like Baymax and chase the butterflies.

https://en.wikipedia.org/wiki/Big_Hero_6_(film)

Thanks for your support and I hope I've helped you out

Check back soon for updates
Revisions
Notes
* anything underlined within section means it was edited with the lastest date

    11-07-24
  • Repairing your tools and weapons

  • 29-06-24 Tips & Tricks
  • 26-06-24 How to manage your priorities... you slacker
  • 23-06-24 Controlling your character - Hunting & Fighting
  • 21-06-24 Guide Release


I will give permission to someone who wishes to translate this into their language, send me a discord message @ Skorpn#0296 or place a comment
5 Comments
seePyou 5 Jan @ 12:15am 
Current version of the game doesn't allow for axe crafting from the start, instead one must first research the logging camp, and then one can craft an axe.
Ahlund 8 Oct, 2024 @ 7:43am 
U should add this for gaining reputation with each cities.
Build "Village Shrine" for 15 stone each, eachone gives 75 rep and u can build an infinite amount in each town.
LastHazzerd 7 Sep, 2024 @ 12:23am 
Thank you very much, if only for the first few paragraphs, my previous saves were all in very safe locations far from resources and i wasn't having a lotta fun. Your starting place recommendation def made these first several in game days much more enjoyable.
By god you were not kidding about thought, I had to learn the combat system real quick. Thank goodness that new update seems to have made it more doable for me.
Skorpn  [author] 13 Jul, 2024 @ 3:54pm 
@Lunasol Hey, for sure.
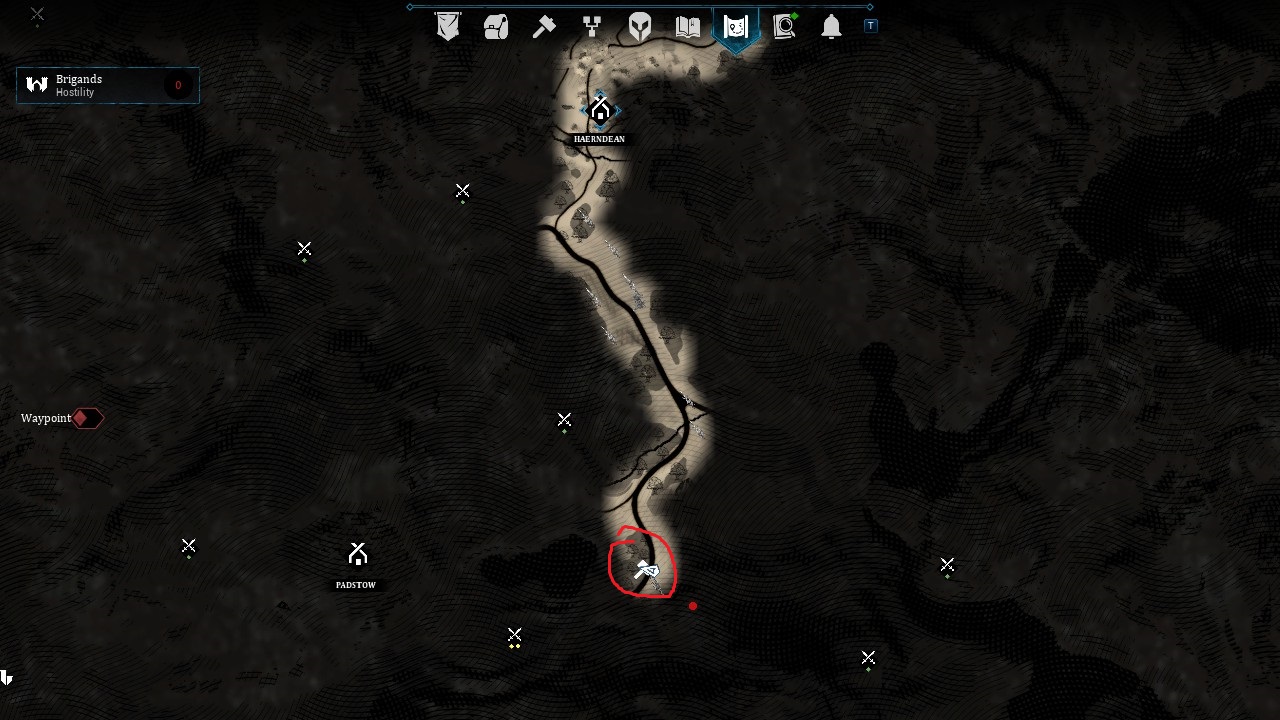
So the reason for that spot is generally for material gain. The first few days will be slightly difficult since the Devs changed the way bandits roam, but it is still do-able. In that section there you are close to lots of great resources including reeds, in the small forest to the west you can set up 2 or 3 rabbit traps to get you meat and fur as well (try not to chop down too much there). After the few days you should have Lubomir and yourself better equipped to take on the bandits that roll through, work on getting the bow as fast as you can to help with the boars if they hang around there as well.
Thank you for the heads up, I'll add more into the guide to give my reasoning.
Goodluck =D
City312 13 Jul, 2024 @ 1:29am 
Can you explain why you chose that spot for building camp in particular?