SILENT HILL 2

SILENT HILL 2

257 ratings
Best Performance & Quality Optimizations - Visibility Improvements And Other Fixes
By 0p3r4t10n CHAOS
Compiled information from my own testing, discussions and videos on maximum optimization without compromising on the game's identity. Don't lose hope with your older hardware yet. Achieve your performance without having to sacrifice image quality.
24
6
2
10
5
2
2
2
3
2
   
Award
Favorite
Favorited
Unfavorite
Introduction
Please don't forget to LIKE if this guide was helpful for you. If you're happy with the results and feel generous leave a Steam points award. Commenting your experience will also be appreciated. Thank you and I really hope you find success with it.

Hours and hours of testing have led me to, what I believe, are the best settings for the current state of the game. Even the most powerful GPU like the 4090 can struggle to maintain 60fps on max settings in 4K, due to obvious development shortcomings in the performance optimization of the game.

I'm now getting around 50-60 fps stable on 2560 × 1440 in most parts of the game with a mid tier GPU from 2017. It's quite unbelievable and it looks absolutely gorgeous.

A lot of people with the latest series graphics cards might not even understand what the problem is with some of the stuff discussed here, because they don't experience it. The problems seem to occur mostly for people with older cards and playing on low resolutions, since the game seems to be built around 4K and the latest hardware. So maybe only apply and fix what you feel like you are having issues with.

These settings combined seem to be the best it's gonna get in terms of hitching, blurring and ghosting problems that a lot of people experience. Furthermore maxing out on image quality without diminishing returns to keep the performance high.


EDIT:
Quick Start Guide
I'm gonna save you a whole lot of time here and straight up tell you the by far most effective things to achieve the greatest performance and quality difference right now:
  • Shadow Quality Low, Shader Quality Medium. Rest has very little performance impact.
  • Enable DLSS or FSR3.1 with Frame Generation, otherwise I'm a fan of TSR - Normal preset
  • DLSS Mod for ALL GPUs all the way down below, if you want it on AMD or Intel.
  • Use DLSS Swapper to update all upscaler dll files for better performance
  • If you aren't opposed to mods, install Silent Optimizer & Enhanced Silent Visuals (Links all the way down below). The rest of this you can comb through later for additional improvements, but these are some easy mods that will already take you 75% of the way there. They take an insane amount of blur out of the game, unlock and set graphics options higher that are not available through the menu, improve your FPS by a lot and most importantly let you experience the game the way it should be without deviating from the developer's vision.

But seriously, ...don't forget to leave a rating! Lots of people view guides, but sadly never leave a rating.
Thumbs up now and if it doesn't work the way I said, come back and thumbs me down as hard as you want. You can tell me off in the comments too.


EDIT:
Since I created this guide there have been some updates that might render a few things in here obsolete. I added a comment to the sections I think might be affected or have become obsolete. I will still keep them in, in case problems still do pop up or if you might be trying to still improve on the foundation of the game.
A detailed explanation of the technical issues the game suffers from
Making DX12 Work If You Crash Upon Launch
You might encounter this error:
LowLevelFatalError [File:D:\SilentWorkspace\501T-BL\Engine\Source\Runtime\D3D12RHI\Private\D3D12Util.cpp] [Line: 868] hr failed at D:\SilentWorkspace\501T-BL\Engine\Source\Runtime\D3D12RHI\Private\Windows\WindowsD3D12PipelineState.cpp:856 with error DXGI_ERROR_DEVICE_REMOVED with Reason: DXGI_ERROR_DRIVER_INTERNAL_ERROR
Somehow the d3d12.dll is missing, I can't tell you why or how, but I've found a fix for this.

You go to www.dll-files.com and search d3d12.dll, you download the latest version and drop the d3d12.dll file into
D:\Programs\Steam\steamapps\common\SILENT HILL 2\SHProto\Binaries\Win64

Boom. It works. Crazy. Give the game a moment to collect itself, but then it should boot up fine.

Updating your drivers is also recommended of course.

Depending on your hardware you might have troubles running the game in dx12. Navigate to the Steam library > Rightclick on Silent Hill 2 > Properties > Launch Options >
-dx11

That will yield you a 10-20 fps increase in native resolution, but you are missing out on the upscaling and frame generation like DLSS and FSR3.1 that should give you even more than that and run considerably better. See for yourself.
Improve DX12 Performance

It is a known thing that people do, more commonly known in multiplayer games where everybody's desperate for every fps they can get. Here another article explaining the same thing, so you don't have to take some random Youtuber's opinion at face value:
https://www.toolify.ai/hardware/unlock-the-full-potential-of-dx12-games-improve-performance-and-stability-2856272

I got around 8% of performance gain out of this. It will depend on your system though how much this does for you. It's said to improve FPS and resolve stutters some systems might experience with DX12. You can do this for all games you know that run on DX12.
My System Specs:
-OS: Windows 10
-GPU: Sapphire AMD Vega 64 Nitro+ 8GB (comparable to an RTX 1080 or 2060), overclocked to the limit
-CPU: i9 -9900K, overclocked to 4.8gHz on all 8 cores
-RAM: 48GB HyperX 3466 mHz
-Mainboard: Gigabyte Z390 Designare


My own settings for my gear to get the best balance of performance and image quality:


See a more detailed explanation for every setting further down below to best tailor it to your hardware.
Optimized Graphics Settings:
Display Settings
-Resolution:
As high as possible to still reach at least 50-60fps on average.
-Frame Rate Cap:
I cap at 60fps to preserve some resources for performance dips, so that the picture doesn't fluctuate rapidly in fluidity.
The frametiming can still be bad though, which is why I recommend capping your framerate with RTSS for maximum smoothness.
-Frame Generation:
Frame Generation causes more input lag and stuttering the lower your base fps is. So for the best results it's recommended to already have at least 40-60+fps before enabling frame gen.

Using RTSS and Frame Generation together can cause problems with frame pacing
-V-Sync:
off/on, depending if you see screen tearing or not, might also help stutters, but introduces input latency. Better would be enabling your GPU Driver's V-Sync function, called Radeon Enhanced Sync or NVIDIA Fast Sync. These have 3 times less latency doing them same thing.

Even more ideal is disabling all of these functions and cap your framerate with RTSS to your monitor's refresh rate to achieve the same effect with the least input latency possible.
-Supersampling:
It depends on what you want. If you are hard pressed for the most amount of frames then FSR 3.1 with frame generation seems to be the best. Followed by DLSS.
If you are conncerned with the best image quality, stick to DLSS, TSR and Intel XeSS.
The updated DLSS mod further down below seems to be the best option. Otherwise I've had the best results with TSR - Normal.
-Raytracing:
Off (24% fps cost)
-Renderer Quality Preset:
Custom
-Global Motion Blur:
OFF
Advanced Quality Settings
-Shadow Quality:
Low
-Texture Quality:
Medium/High - Go as high as you have VRAM. For 8GB go either medium or high, the quality difference is nearly imperceptible to high.

When VRAM is full, it can lead to the following issues:
  • Low FPS (frames per second) in games.
  • Poor overall PC performance in terms of speed and responsiveness.
  • Bottlenecking.
  • Hanging during rendering.
  • Thermal throttling.
So choose Medium or Low to be safe if you have to.
-Shaders Quality:
Medium - (High has a 15% fps cost, Low has no performance gain, while being a significant visual downgrade)
-Effects Quality:
High - (1 to 2% fps cost)
-Separate Translucency:
On
-Lens Flares:
High - (no cost)
-Global Motion Blur:
Off
-SSAO:
On - (costs only 3%)
-SSR:
On (no cost), some people prefer them off though, because they think it looks bad.
-SSS Quality:
High - (no cost)
-Image Sharpening:
Sharpen High

Watch BenchmarKing's Video to actually see the differences and what each setting does.
Performance Settings For The Most FPS On Older Hardware
These are aimed at getting the most fps and stability to just make the game run, without quality being the main priority:
  1. Apply the things mentioned in the introduction

  2. Use the optimized graphics settings

  3. Go down to the lowest resolutions like 1600x900 or even lower and settle for how grainy you can tolerate it to be as long as you reach the 50-60fps mark. I think 900p with supersampling can still be playable, but everybody feels differently about that.

    If quality is your highest priority, you could also try another approach of going as high res as you can and cap at 30fps. That's apparently also the way the console does it in quality mode. Console doesn't look all that impressive in both versions compared to the optimized pc settings, if you ask me.

  4. If you can run the game regularly in DX12, enable DLSS or FSR3.1 and Frame Generation for a massive FPS increase. FSR providing more frames, but less quality.
    Frame Generation causes more input lag and stuttering the lower your base fps is. So it's recommended to already have at least 40-60+fps before enabling frame gen. Enabling V-Sync further increases input lag. See for yourself.

    For everybody else: Running the game in DX11 will also give you an FPS boost, as shown here. You won't be able to use DLSS or FSR 3 though. Navigate to the Steam library > Rightclick on Silent Hill 2 > Properties > Launch Options >
    -dx11

    Set Supersampling accordingly. Presets correspond to different percentages of downscaling. For example:
    -TSR - Normal is 75%, while TSR - Low downscales to 50% of the resolution you selected. For DLSS and FSR it would probably be 90%/75%/50%. You can try different resolutions and supersampling presets based on your hardware to find the best in between for the highest quality/performance maximization you can achieve.
Color Fringing & Ghosting Fixes By Editing The Engine File
First seen on mish's post

Navigate to C:\Users\YourUsername\AppData\Local\SilentHill2\Saved\Config\Windows and open Engine.ini to edit as a text document

Copy the code below to the end of the ini file and save it:

[SystemSettings] r.SceneColorFringe.Max=0 r.SceneColorFringeQuality=0 r.motionblurquality=0 r.Distortion=0 r.DisableDistortion=1

This disables Chromatic Abberation and Motion Blur for clearer vision.

EDIT: I used to have some other commands in here that I no longer recommend. There is a lot of stuff that you can play around with, but after testing back and forth, I think the commands from above are the only ones really necessary to minimize it as best as possible.

Additional mods expand upon the ghosting issue, like Silent Optimizer and Enhanced Silent Visuals (links down below). They also make the engine edits unnecessary, so you can leave the file at default.

In case you wanna reset the file, just delete it. It'll be auto created upon next launch.

More Engine Editing Options
Anti Aliasing modifications from the tech issues video in the beginning of the guide:
r.TemporalAA.Quality 2 r.TemporalAACurrentFrameWeight .6 (with vsync) r.TemporalAASamples 2 r.TemporalAAFilterSize 0.09 r.TemporalAA.Upsampling 0 r.TemporalAA.R11G11B10History 1 r.TemporalAA.HistoryScreenPercentage 100 r.TemporalAACatmullRom 0

You can experiment by adding these, but they will disable features that some people might perceive as integral to their experience:
r.VRS.Enable=0 r.DepthOfFieldQuality=0 r.FilmGrain=0
Variable Rate Shading works in a way to simulate human vision, blurring everything that is not in the center of focus. So by disabling this the sides and corners will become clear also. Which I prefer personally.
Depth of Field was a similar thing for me, it's there for a cinematic efffect, but it's clouding up the screen sometimes when it doesn't need to, so I prefer to have it off too for better performance.
FilmGrain is just personal preference. I don't feel like you need to disable this, but you could do so for better performance and streaming quality.

More edits on the experimental side of things, if you wish to try them
https://www.pcgamingwiki.com/wiki/Silent_Hill_2

If you wanna customize your game even further to tailor it to your needs, there is a lot more that you can do with these engine commands. So if you wanna experiment yourself and go crazy with it, look here for all the Unreal Engine 5 commands: https://framedsc.com/GeneralGuides/ue5_commands.htm
New Engine Edits Attempting To Mitigate Stuttering
Seen on https://www.nexusmods.com/silenthill2/mods/30?tab=description from Sarrawi

EDIT: With the new update and pre shader compilation, this might be unnecessary. Only apply if you still keep having lags and are looking for fixes.

New performance enhancing mods now make use of commands that do a solid job of fixing stuttering as best as possible. Two that seem to be specifically significant are:
r.ShaderPipelineCache.Enabled=1 r.ShaderPipelineCache.Precompile=1

Add these to the engine.ini file like mentioned above.

The mods I listed all the way down below do a lot more though, further unlocking graphical fidelity and giving more fps.
Changing DLSS Presets To Maximize Quality & Minimize Ghosting
["Updating DLSS 3.5.10 to 3.7.20 To Fix Ghosting" - this has apparently already been implemented with Patch 1.04, this section however might remain relevant for you to change presets]

S2 GamesBench just did a video on this:
Instructions are from his video description.


How to use DLSS Tweaks mod to change preset:
1. Go to https://www.nexusmods.com/site/mods/550?tab=files
2. Select Manual Download
3. After downloading, extract and you will find 6 files
4. Run EnableNvidiaSigOverride reg file and confirm (This step is only required once, you don't need to repeat this when modding new game)
5. Now copy 3 files - nvngx dll, dlsstweaks ini, DLSSTweaksConfig exe
6. Go to game folder and paste these files in same folder that has game exe files
(This will be Game folder - SHProto - Binaries - Win64)
7. Open DLSSTweaksConfig exe
8. Scroll down to 3rd section - DLSSPresets
9. Use pull down menu to change default to whichever preset you intend to use. Do it for every quality level you intend to use and hit save at top
That is it, all done
Game should be closed when you change values
If mod worked you will see dlsstweaks log file in same folder where you copied these files (after you play the game at least once)
You can also run DisableNvidiaSigOverride to reverse the effects of step 4 if you don't want to use the mod anymore.
2nd link for mod - https://github.com/emoose/DLSSTweaks/releases


Alternate method to change preset - How to use Nvidia Profile Inspector to change preset:
1. Download NPI from https://github.com/Orbmu2k/nvidiaProfileInspector/releases
2. Under assets, click on nvidiaProfileInspector zip file to download and then extract files
3. Go to https://www.nexusmods.com/site/mods/781?tab=files
4. Scroll down to optional files and select "Manual Download" under NVIDIA Profile Inspector XML
5. Extract and you will find CustomSettingNames xml file
6. Copy this file to where you extracted NPI, this file has to be pasted in same folder that has nvidiaProfileInspector exe file
7. Update DLSS to version 3.6 or higher
8. Open nvidiaProfileInspector exe and search for game name by typing at top left where GLOBAL_DRIVER_PROFILE is written
9. Now refer to 2nd section " #2 - DLSS " and select desired preset in "Forced DLSS3.1 preset letter" then select apply changes at top right
All done, preset will be changed as you selected.


He has another interesting video about Ray Reconstruction, if you're interested.
Disable Fullscreen Optimizations
From all the odd stuff people like to engage in around gaining fps, this one can actually work. Depends on your machine though. This is a trick I know from competitive CS2, where you can gain a few fps by disabling the fullscreen optimization. It sounds counterintuitive, I know. But try it and see if it makes a difference for you.

Navigate to D:\\Programs\Steam\steamapps\common\SILENT HILL 2\SHProto\Binaries\Win64, rightclick the SHProto-Win64-Shipping.exe > properties > compatibility > check "disable fullscreen optimizations" > click "Change high DPI settings" > Check "Override high DPI scaling behavior. Scaling performed by: Application", click apply.

I gained 1-2fps from this. Not much, but might be much more if you've got a beefy system and are way past the 60fps.
Task Manager Process Set To "High Priority"
Press Ctrl + Shift + ESC to open the task manager. Right click on the Silent Hill 2 process and "go to details", the task manager now marks "SHProto-Win 64...", which you right click "priority > high". Possibility to run more stable, I gained maybe 1-2 fps from it. Marginal. Depends on your PC and how much stuff you're running in the background. Might cause crashes. You'll have to test it.
Vulkan API Mod For Stutter Mitigation
EDIT: With the new update and pre shader compilation, this might be unnecessary. Only apply if you still keep having lags and are looking for fixes, but considering the other problems it can cause I can't recommend it anymore.

I'd advise you to only do this though if you've done all the other optimization and are deeper into the game with persisting stuttters that you just can't suffer through anymore.

There is not that many people using it yet, but I found a random video where you can see how much straighter it performs for him over time.

This mod is definitely a good solution so far to make your FPS more consistent altogether with like 80% less stutters.

In this state of the game it should be noted though that nobody can fully eliminate stutters altogether at this time. It is not tied to your hardware or any secret setting. It's traversal stutters that have to do with loading content. This is the game we have, lads. Sorry to say.

-DISCLAIMER-: This mod unfortunately breaks Steam Screenshots.
They look all look like James had taken too much LSD. So if Screenshots are important to you, ya gotta leave it be and deal with the stutters.


You can try it out to see what you get out of it. It's a really easy non-destructive mod that you can just take off again by deleting the 2 files out of the folder to be back to normal.

⚠WARNING⚠: In my testing I've sometimes experienced some color and brightness problems, among other visual bugs that can start to occur the longer your playing session is or depending on the location that you're in. Essentially ruining the atmosphere when the game starts to look 300% brighter than it should, with colors all washed out and shadows seemingly have been erased. Hard to say if these bugs are exclusive to my hardware or settings, but you'll have to test it for yourself.

Installation:
1. Download dxvk-gplasync-v2.4-1[gitlab.com]
2. Unzip "dxvk-gplasync-v2.4-1.zip"
3. Go to "dxvk-gplasync-v2.4-1\x64" and copy Copy d3d11.dll, dxgi.dll to folder "SHProto\Binaries\Win64"
4. Add the -dx11 launch option on Steam. Navigate to your Steam library>Rightclick on Silent Hill 2>Properties>Launch Options>
-dx11
EDIT: new command file added from omgzLAZERpewpew
5. Create a text file and copy and paste the following code into it:
dxvk.enableAsync=true dxvk.gplAsyncCache=true dxvk.numCompilerThreads = 0 dxvk.enableGraphicsPipelineLibrary = Auto
Save and close it. Now rename the file to dxvk.conf

You can't use DLSS or FSR3 with Vulkan though. If you don't have DLSS modded with its own ghosting fixes, TSR is my recommendation anyway.
Play Past The Intro To Test The Full Potential
Don't judge the graphics and performance in the game too early, because the starting zone is not exactly the best measure to judge the overall performance by. It's the 2nd most demanding scene in the game. Once you're in the city you will see the full potential or shortcomings of the settings you dialed in.

If you get to The Appartments section and you get tired of harsh fps drops, you should probably drop down your resolution a bit. Depending on your needs, I myself would even go down to 1600x900 with Supersampling on Low / Performance Mode at some point, just to make it work in there. That should definitely get you there with most cards. You can raise the settings again immediately after you're done with The Appartments. They are by far the worst area for performance in the entire game. The scenic shots outdoors can be suprisingly less demanding than some dark'n'dirty otherworldly interiors. So it's not really all that tragic for the quality loss, because it's so dark anyway.

-I recommend you play on controller, because it feels smoother and looking around on mouse might worsen your fps through quicker turns and so on-

It should be expected that in some areas you will still see some hitches, minor ghosting and still some fps drops, while in others it's perfectly solid without hiccups for a long while. That's the unfortunate reality of an unoptimized game, but that's the best we're gonna get for now.
Silent Hill 2 Cutscene Improvements
I can see the purpose the original 25-30 fps cutscenes serve, because they try to be like a cinema movie that usually runs at 24fps. And it definitely has something to it, but the problem is the terrible ghosting if you're playing on low res with supersampling enabled, which a lot of us do, and the transition from playing way higher fps can be super choppy. I completed the game vanilla, because I thought it was better that way and now that I see the difference with these mods, it's quite crazy. I maybe should've done it earlier. Decide for yourself:

Cutscenes 60fps unlocker - Removes the black bars from the cutscenes in anything other than 16:9 and fully unlocks the FPS from 30.

AI Upscaled - 4k 60fps Movies - looks crisp as hell
If this was in any way helpful to you, I'd appreciate a thumbs up, as this was my first ever guide! :)
If you got some Steam points to spare, I'd appreciate that too. Leave comments how it worked for you and I will try to keep this updated with new fixes and improvements as we all go about uncovering what works best in this game.

I went through lots of testing on my own part, to reading tons of steam discussions in the forums, watching Youtube videos, that I then, mainly for myself at the time, went about compiling, after trying out what works and what doesn't. On the fly I saved my findings into a text file to further tinker with my performance. Only as an afterthought did I now clean this up and format it step by step to make it more accessible, so that other people could profit off of it too.
For me this was mainly about alleviating the frustration people might feel when they first launch the game, can't get it to run properly and maybe even dismiss this masterpiece due to their performance problems, only because they didn't know they had any other options. Take this as a good baseline until we uncover some more fixes further down the road.

⠀⠀⠀⠀⠀⠀⠀⠀⠀ ⣼⡄
⠀⠀⠀⠀⠀⠀⠀⠀ ⣼⣿⣧
⠀⠀⠀⠀⠀⠀⠀⣼⣿⣿⣿⣧
⠀⠀⠀⠀⠀⢀⣼⣿⣿⣿⣿⣿⣧⠀
⠀⠀⠀⠀⠀⣛⣿⣿⣿⣿⣿⣿⣿⣷⡀
⠀⠀⠀⠀⣼⣿⣿⣿⣿⣿⣿⣿⣿⣿⣷⡀
⠀⠀⠀⣰⣿⣿⣿⣿⣿⣿⡟⠙⠛⠿⠿⣿⡄
⠀⠀⢠⣿⠋⠈⢻⣿⣿⣿⣿⡄⠀⠀⠀⠀⠈
⠀⠀⢸⡟⠀⠀⢸⣿⣿⣿⣿⣿⡀
⢀⣄⣿⡇⠀⠀⣸⣿⣿⣿⣿⣿⣧ -The Executioner commands you to give up some Steam points now...
⠚⢻⣿⣧⡀⠀⣿⢿⣿⣿⣿⣿⣿⡆ ... to grant you absolution for the sins you have committed...
⠀⠈⠉⠉⠻⣿⣿⡗⣯⣿⢿⣿⣿⣿
⠀⠀⠀⠀⢰⣿⡋⠺⣿⣿⣿⣯⡻⣿⣇
⠀⠀⠀⠀⢸⣿⡟⠒⠄⠙⣿⣿⣿⣷⣝
⠀⠀⠀⠀⣾⡟⠀⠀⠀⠀⠀⠙⠻⣿⣿⣿⣦⡀
⠀⠀⠀⣸⣿⠀⠀⠀⠀⠀⠀⠀⣶⣮⣙⢿⣿⣿⣷⣄
⠀⠀⢰⣿⣿⠀⠀⠀⠀⠀⠀⠀⠉⠉⠛⠓⠉⠻⢿⣿⣷⣦⡀
⠀⠀⠀⠀⠀⠀⠀⠀⠀⠀⠀⠀⠀⠀⠀⠀⠀⠀⠀⠀⠉⠒⠬⠭⠿⠵⠄

Promising New Mods
If you've taken inspiration from all of the above, then try some of these, because the difference will be night and day. I recommend using the Vortex Mod Manager for all of these, because you can easily enable and disable them without having to manually drag or delete any files:
  • Silent Optimizer ver 3.0 - HIGHLY RECOMMENDED (1/2) - perfectly expands on the performance tips and settings I've shown.
    https://www.nexusmods.com/silenthill2/mods/1?tab=description

  • Enhanced Silent Visuals - HIGHLY RECOMMENDED (2/2) - Will make your game prettier, less blurry and much sharper, but includes disabling some visual effects. These effects have mostly to do with masking the image in a way to try to make it more cinematic and movie-like, but can be very taxing on the machine and can unfortunately cloud up the experience. Decide for yourself.
    https://www.nexusmods.com/silenthill2/mods/3?tab=description

    If you do any of these mods you can technically skip the engine.ini edits shown above, because all the important stuff is already included in these. I didn't notice any difference when I just left the engine file at default.
    Of course you can experiment and add on to it with other additional commands, but keep in mind that the engine.ini file will overrule any conflicting settings within mods. The file has the last say about what gets executed.


  • Ultra Plus Fixes and Visual Improvements - Good alternative to the Enhanced Silent Visuals Mod, but can introduce slight visual bugs under certain circumstances with lower graphics and supersampling presets. The mod should probably only used as advertised, when your PC is powerful enough to handle the epic preset.
    https://www.nexusmods.com/silenthill2/mods/24?tab=description
    I couldn't figure out why, but no matter the settings I tried, I always had more object ghosting when using this mod by itself, as opposed to the Silent Optimizer and Visuals Combo. Also doesn't work with FSR, because the fog distance visibility is broken.
Patch 1.04
BenchmarKing made a new video on some of the changes concerning performance, new graphics options and stuttering.
DLSS Enabler for all GPUs
This mod has been an absolute gamechanger for me with other games like Hogwarts Legacy, RDR2, Cyberpunk 2077 and it's also compatible with this game:
https://www.nexusmods.com/site/mods/757?tab=description

UPDATE: I recommend you now try the Beta-3.03 version first. It works well as far as I've tested, it's a good ugprade compared to FSR.
I've only tested this on AMD and you can't use V Sync or Frame Generation with it. That might be possible though on older NVIDIAS.

The Steam Overlay might also not work anymore as long as you have DLSS selected in the options.


"This all-in-one package allows the users of any DX12 compatible GPUs (from NVIDIA / AMD / Intel) to enable DLSS upscaler and DLSSG Frame Generation in most of the games implementing NVIDIA DLSS 2 / DLSS 3 features."

For NVIDIAS have this checked during installation:


For AMD / Intel have this checked during installation


If you have an AMD / Intel: After installation find the "DisableNvidiaSignatureChecks.reg" file in that folder and run it.

If you do encounter stuttering and input lag, Frame Cap and V-Sync have a big impact on smoothness, so if you run into stuttering, try setting the cap at 60fps and have V-sync OFF.
If you encounter screen tearing and need V-Sync, don't enable it ingame, but through your graphics driver in Nvidia Control Panel or AMD Adrenaline. In the AMD Driver it's called Radeon Anti Lag and Radeon Enhanced Sync. Radeon Enhanced Sync can cause problems with performance if used together with MSI Afterburner frame capping.

I haven't spent much time trying to optimize it. I suggest combing through the forum posts on the nexusmods page to find out how people are combating certain abnormalities in mod behavior for the specific games.

Uninstall:
If you wanna uninstall it, run the "unins000.exe" in the folder.
DLSS Swap for better visuals and performance
"DLSS Swapper is a tool that allows you to conveniently download, manage, and swap DLSS, FSR and XeSS dlls allowing you to upgrade or downgrade DLSS, FSR and XeSS version in a game without the game needing an update."

https://github.com/beeradmoore/dlss-swapper?tab=readme-ov-file


This is an insanely great tool, I am so impressed with it. It could not be easier and reverting the changes is also an inbuilt function.

NOTE: If you're using the DLSS Enabler, the swapping should be done after the installation.
DLSS3 Frame Generation swap for FSR3 Frame Gen (NVIDIA only)
Swapping the DLSS frame generation for FSR frame gen, still providing the same picture as DLSS, but more frames are generated from it. So the best of both worlds. Only works for NVIDIA.

https://www.nexusmods.com/site/mods/738?tab=description

NOTE: I recommend you make a backup folder to copy the original files into, in case it doesn't work for you and you can just copy and overwrite them back.
Optiscaler Frame Generation as an alternative
The latest DLSS Enabler Beta version includes Optiscaler with an interactive overlay, so in case you don't get the ingame frame generation option working for you, you can use the overlay instead to customize it to your needs.

(hit "insert" key during the game to open Optiscaler menu).

Now check the "Frame Generation" and "Hud Fix" boxes. This game doesn't have much of a hud, but also dialogue and subtitles lines will start glitching when you don't have this enabled.

How well this works is entirely dependent on your system, but also if you've updated your DLSS to the latest version. After updating to the latest version with DLSS Swapper, it should run super smooth and actually become a viable alternative to use.
Straighten out frame timings for a smoother experience

https://www.msi.com/Landing/afterburner/graphics-cards

If you cap to your refresh rate and given that your average fps never dips below that, you will have the lowest input latency with no screen tearing and no need for any additional features like V-Sync, Radeon Enhanced Sync / NVIDIA Fast Sync, Radeon Anti Lag / NVIDIA Low Latency (NULL).
A lot of those will in fact make it worse, if combined unfavorably and cause more stutters and have higher input latency, than just capping your Framerate with RTSS. It is hard to believe, since they all sound so good and you'd think everything's cross compatible, but no. There's no one size fits all answer, but I'd say turn everything else off to start off with, cap your FPS with RTSS and then go from there.
53 Comments
0p3r4t10n CHAOS  [author] 3 Aug @ 7:29am 
Hmm, I'd be guessing here, but if I have to: Mods and engine edits. And secondly maybe upscalers (DLSS, FSR, TSR) and frame generation. What are you running?
weed puppy 3 Aug @ 12:11am 
Any clues what could cause certain objects, such as leaves on the deck's road, to have a white aura around their textures? It only seems to appear when at a greater distance and fades away as I approach. thx <3
F1lth 14 Jun @ 3:13pm 
I should have come to the guides first. no where on google or reddit had the fix for the dx12 crash issue. Thank you so much my dude.
0p3r4t10n CHAOS  [author] 14 Mar @ 12:14pm 
I've tried the DLSS Enabler for AMD again and can confirm that it works perfectly fine so far, just not with Frame Generation or V Sync for me. It will also make your steam overlay unavailable. It's a great upgrade over FSR though.
Riot Radio 7 Mar @ 8:48am 
Unfortunately, that's not what I'm getting. It's more like they're flickering and changing between white, green and purple.

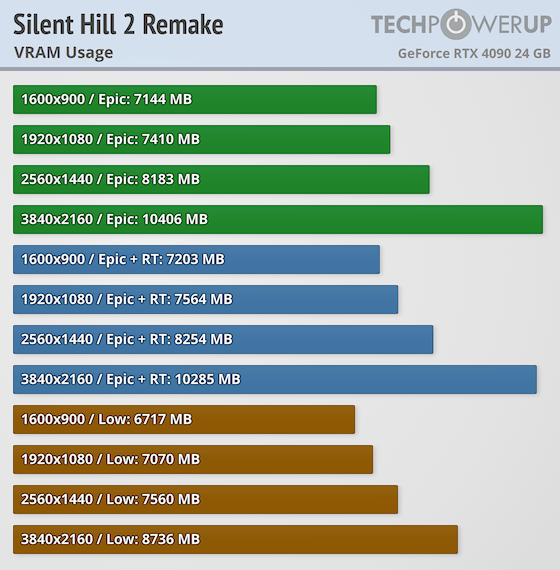
However, I fiddled with the Supersampling settings in the in-game graphics, and found that turning it off fixed it. I'm still playing through the game with Supersampling off, so I can't confirm if it's 100% gone.

In any case, thank you for the guide! Really helped me gained frame rate and less stuttering.
0p3r4t10n CHAOS  [author] 7 Mar @ 2:55am 
You mean something like this? https://youtu.be/mkqzoaqISLA

I used to have that a lot in the beginning when I ran the game on vanilla version. It started happening to me also a lot more with the Vulkan mod, but I believe it's caused by the auto exposure lighting from UE5 as explained here: https://youtu.be/cZRrt4y9M54

I think the mods Silent Visuals and Silent Optimizer fixed that, because after applying more or less everything I've written down here, I never had any of these issues again.
Riot Radio 7 Mar @ 12:07am 
Anyone else have flashing lights appear at the edge of their screen during gameplay and cutscenes? They're very jarring, and often come in white, purple, and green.
MC_Miro 15 Feb @ 3:53pm 
Amazing works. Thx Man...
Limygeorge 16 Jan @ 9:14am 
Thanks for your hard work. Great guide. :steamthumbsup:
0p3r4t10n CHAOS  [author] 2 Dec, 2024 @ 4:52pm 
I just booted it up and tried it out a bit. Still works fine. Even better than before, I believe. Running Silent Optimizer, Enhanced Silent Visuals with FSR 3.1 and Frame Generation. Very smooth, no visual bugs.
Other mods I've tried and dismissed were FPS boost image clarity stutter reduce, TSR Presets, Ultra Simple Engine ini overrides, Ultra Plus Fixes and Visual Improvements and some more, but all of them had some kind of visual bugs or worse performance overall. So I just always came back to Silent Optimizer and Enhanced Silent Visuals.
There are probably new mods popping up every day and I haven't tried any in a month, so there might be something that yields better results at this point, but I couldn't tell you.
Other than that after completing the game once I slapped on "Original Maria Outfit (Custom Model with Optional Faces) - Original Styled Face With Make Up". Looked decent enough. And I applied "Angela Face Change".
That's it.