Killing Floor

Killing Floor

Not enough ratings
Custom Character Guide
By {ST}jkcrmptn
This is a full guide on making custom characters for Killing Floor.
   
Award
Favorite
Favorited
Unfavorite
𝓣𝓱𝓮 𝓟𝓻𝓮𝓪𝓶𝓫𝓵𝓮
This tutorial will help you set up your first Killing Floor custom character. I have templates I have made to help where they can and have provided some tutorials for programs. I have also provided where to download some programs that will be useful for this process.

I made this because I was tired of this info being scattered around the internet on different websites. If you need any help leave a comment.

Before I start the guide here are some tips I would just like to share.

Name all files with your characters name.

Keep file size as small as you can if you are going to publish a mod.

Don't give up during any rigging you need to do.

Anyways lets get to it!
Prerequisite Programs
Before I begin explaining the process of making a custom character here are some programs you will need for making said character. You will need each one of these for making your character. All programs I will share are free but you can use paid alternatives if you have them.

Here are the programs:

Killing Floor SDK
You need this for putting together, compiling and publishing your mod. Comes for free with Killing Floor on Steam, it will be in your library in the tools tab.

Killing Floor

Modeling Software
You will need one for preparing your model to be imported into Killing Floor. There are a few choices like Blender and 3ds Max(Paid), for this guide I will be using blender with a plugin for importing and exporting .psk files and .ase files. Blender is free on steam and the plugin is free from the web.

Blender

Blender .psk Plugin[extensions.blender.org]

Blender .ase Plugin[extensions.blender.org]

Image Editing Program
You will need some image editing program with the ability to export as .dds with compression settings of DXT1, DXT3, or DXT5 with generated mipmaps. There are 2 nice free ones you can choose from with native .dds support, PaintDOTnet or GIMP. I use PaintDOTnet for converting after working on my textures in Photoshop. Modern versions of Photoshop do not have .dds support.

PaintDOTnet[www.getpaint.net]
(For PaintDotNet you will need a plugin for later. You can do this with base Photoshop without any and I don't know for gimp.)
Halftone Plugin[forums.getpaint.net]
How to install PDN Plugins[www.getpaint.net]

GIMP[www.gimp.org]

Audio Editor
You will need an audio editor if you plan on adding a voice to your character that's not an official one. The only one I know and used is Audacity, which is a free program.

Audacity[www.audacityteam.org]

Text Editor/Code Program
You will need a text editor or coding program for making your character. If you don't want to get a coding program you can either use the default Notepad (I don't recommend doing this) or the slightly better Notepad++ (Still don't recommend it but it is better). If you want to get a coding program I highly recommend getting Visual Studio Code for free with the UnrealScript extension. It's not perfect and has some issues but it overall is better than a text editor.

Visual Studio Code[code.visualstudio.com]

VSC UnrealScript Extension[marketplace.visualstudio.com]

Notepad++[notepad-plus-plus.org]

UE Viewer/Umodel
You will need this to extract a default player model to make your custom model like it. This program can extract skeletal meshes from Unreal Engine packages.

UE Viewer[www.gildor.org]

Server Perks
A mod you need to use custom characters. Install from steam workshop or directly from another source. You need it to test your mod later.

Steam Workshop

Direct Download[gamebanana.com]
Part 1: Getting a Model
First and most important step is to get a model you wish to use for Killing Floor.

For this guide please get a model that already has bones as I will not be covering rigging a model by scratch as I do not know how to do that. I wont tell you where to get your model as there's many places and ways to get them but make sure you get the model and textures.

After you get it open Blender and delete the stuff that is added by default (Cube, Camera and Light). Import your model into Blender and make sure you have your model and bones. IF for some reason you cant find a rigged model here is a guide that hopefully can help you.


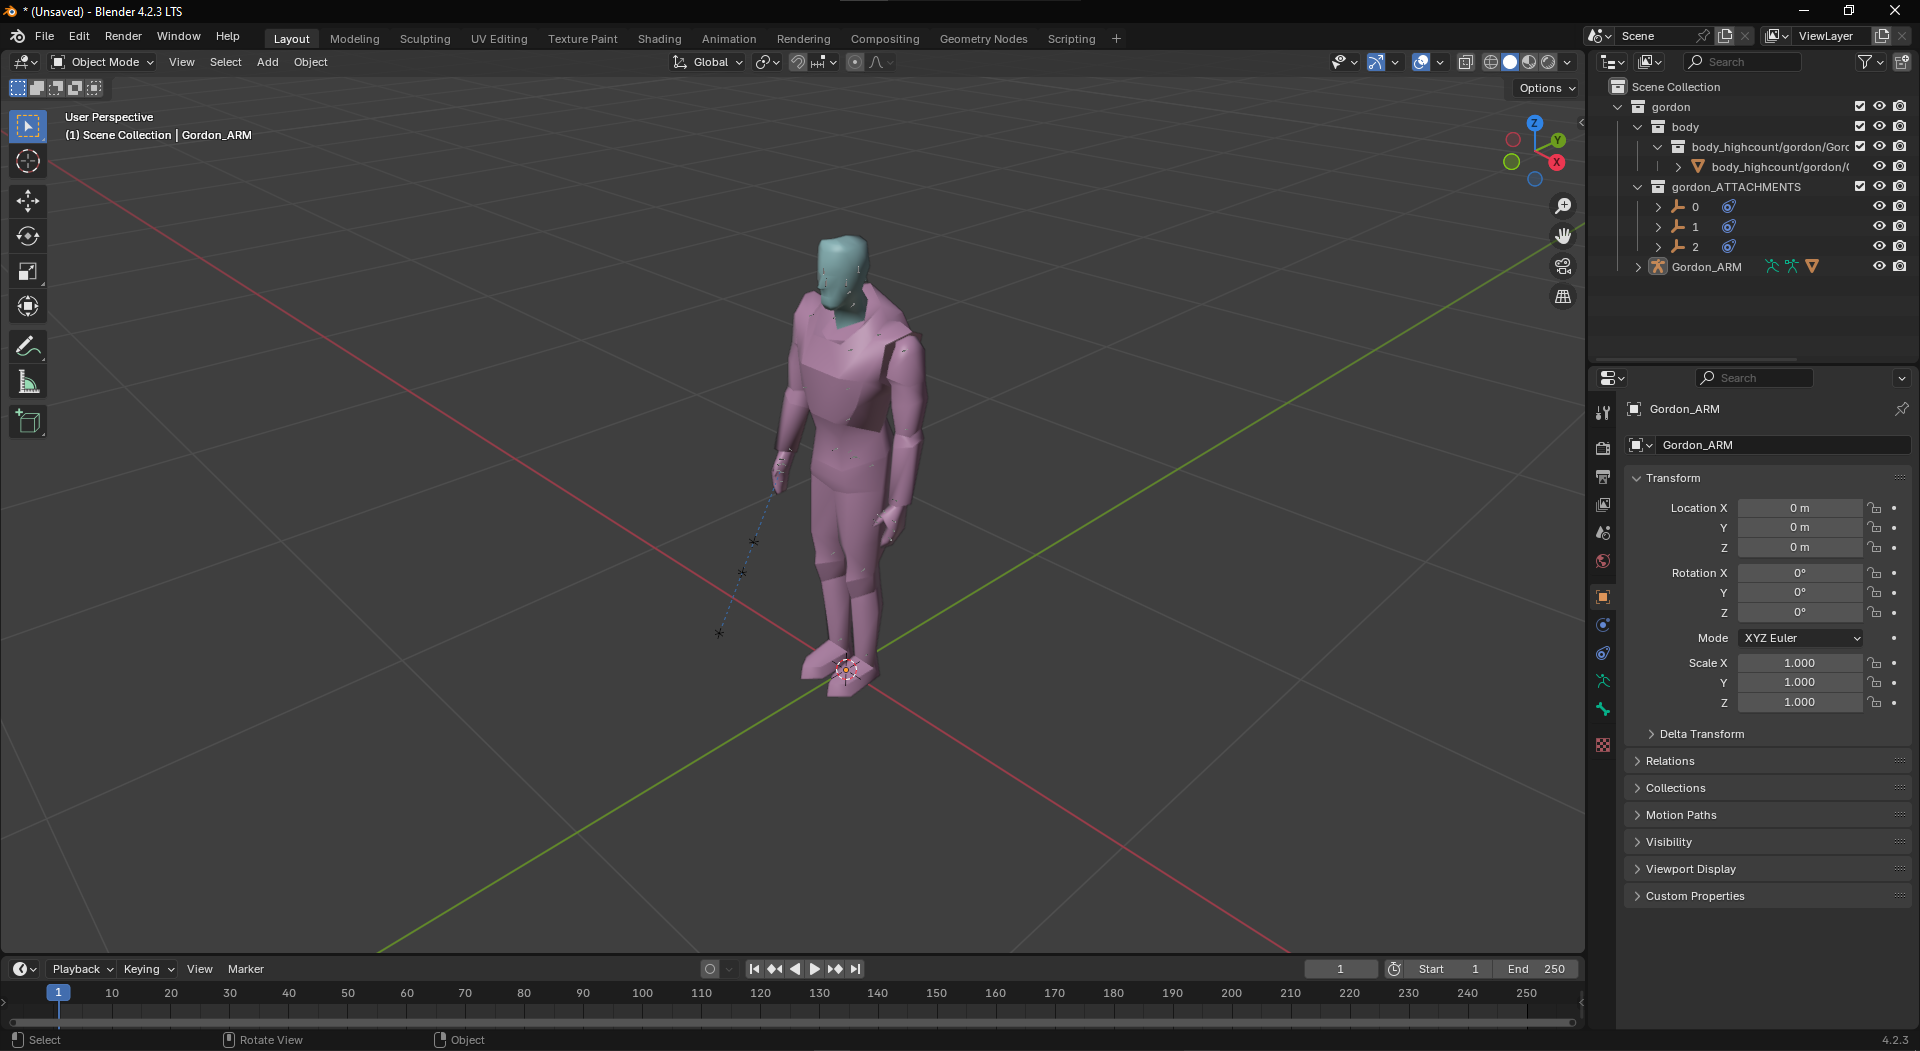
I will be doing Gordon Freeman for this guide. So you should now have your character model and its bones in your Blender. Save this as something like Character_Name.blend so I will have Gordon.blend.

Part 2: Getting the Killing Floor Model
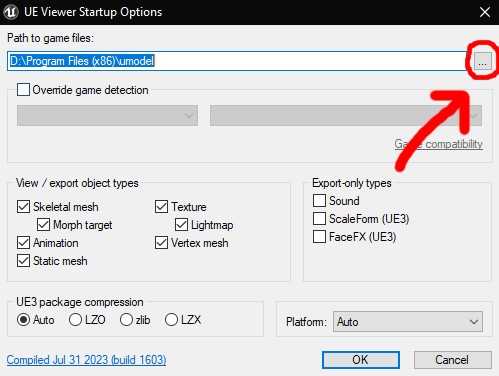
Now what you want to do is get a model from Killing Floor. To do so open UE Viewer. You will see this window you can ignore everything else and just press the browse folders button.


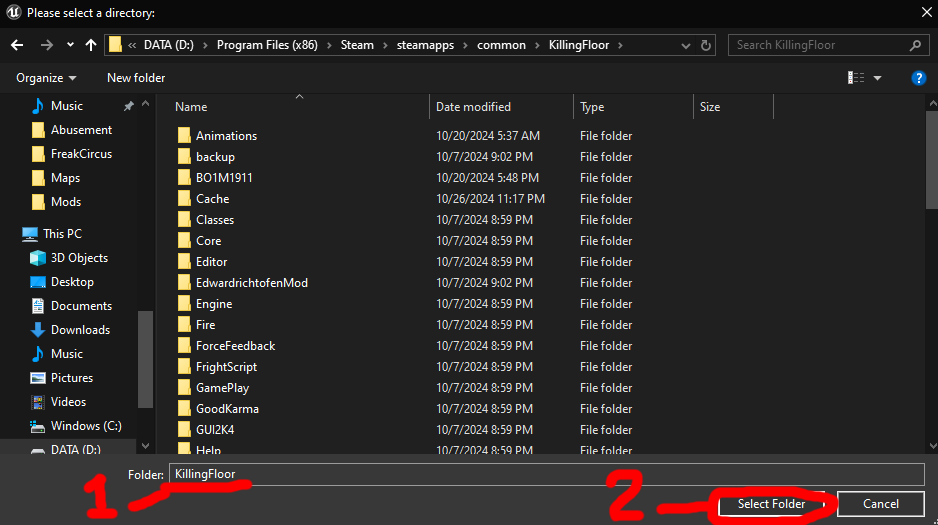
Next step is to find your Killing Floor root folder and select it. If you dont know how to find this you can right click Killing Floor on your library and do Mange>Browse Local Files. Most of the time it will be in a directory similar to this:
D:\Program Files (x86)\Steam\steamapps\common\KillingFloor


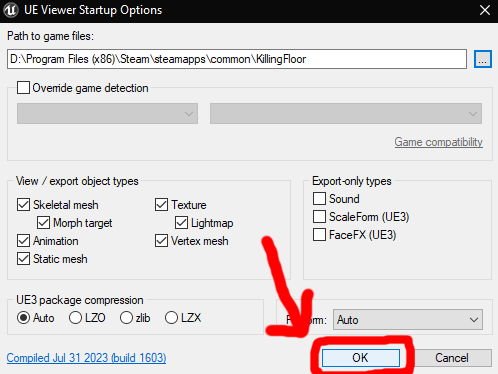
After you select your folder you will see the last window again but now with the path set. Now simply just press the OK button.


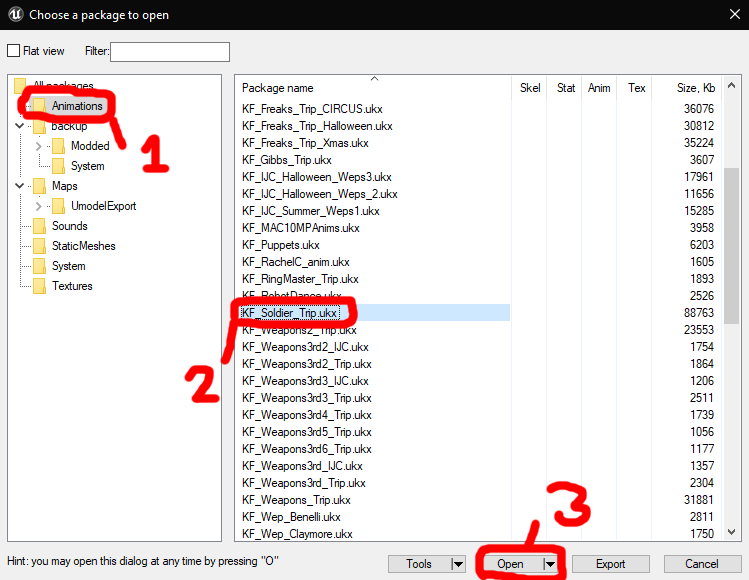
A window showing all packages will open. Select the animations folder. Then find the KF_Soldier_Trip.ukx file and click the open button.


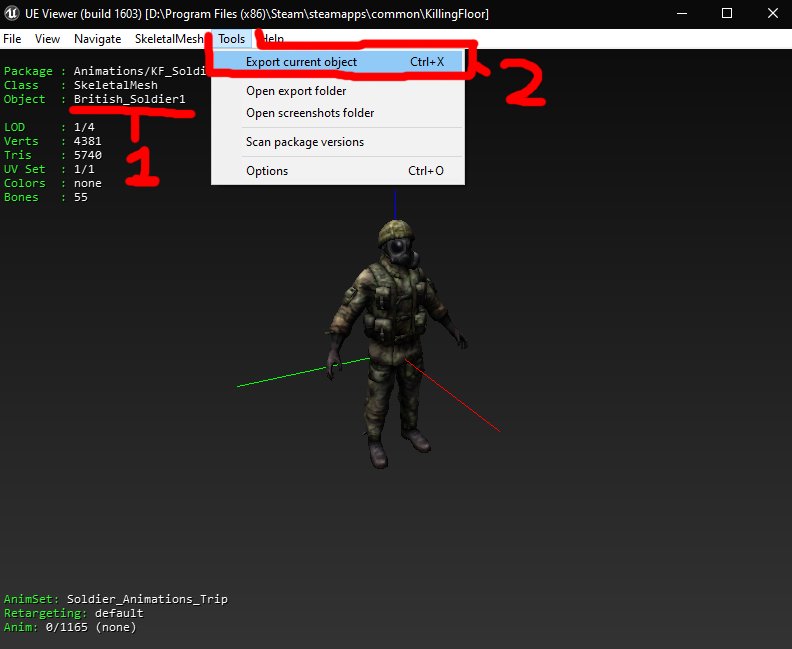
[/b]This will open up a window that you can browse models and the textures used by the models in.[/b] You can now pick any model (except trader I think she uses different scale and skeleton) by using PgUp and PgDn to scroll through models. I recommend using British_Soldier1 as it has a normal scale. Then you need to click Tools>Export Current Objects.


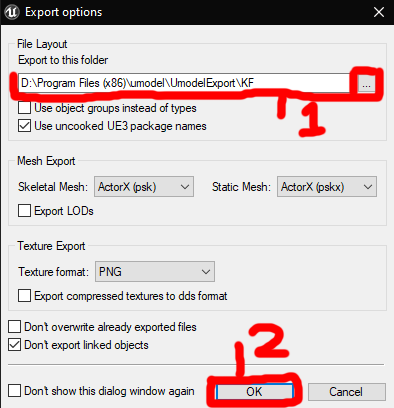
This will open an export window. Note where it is going to export so you can find the files later. You can leave every property default as long as skeletal mesh format is set to ActorX. Press OK to export the model. When its finished you can close UE Viewer.
Part 3: Merging the Models in Blender
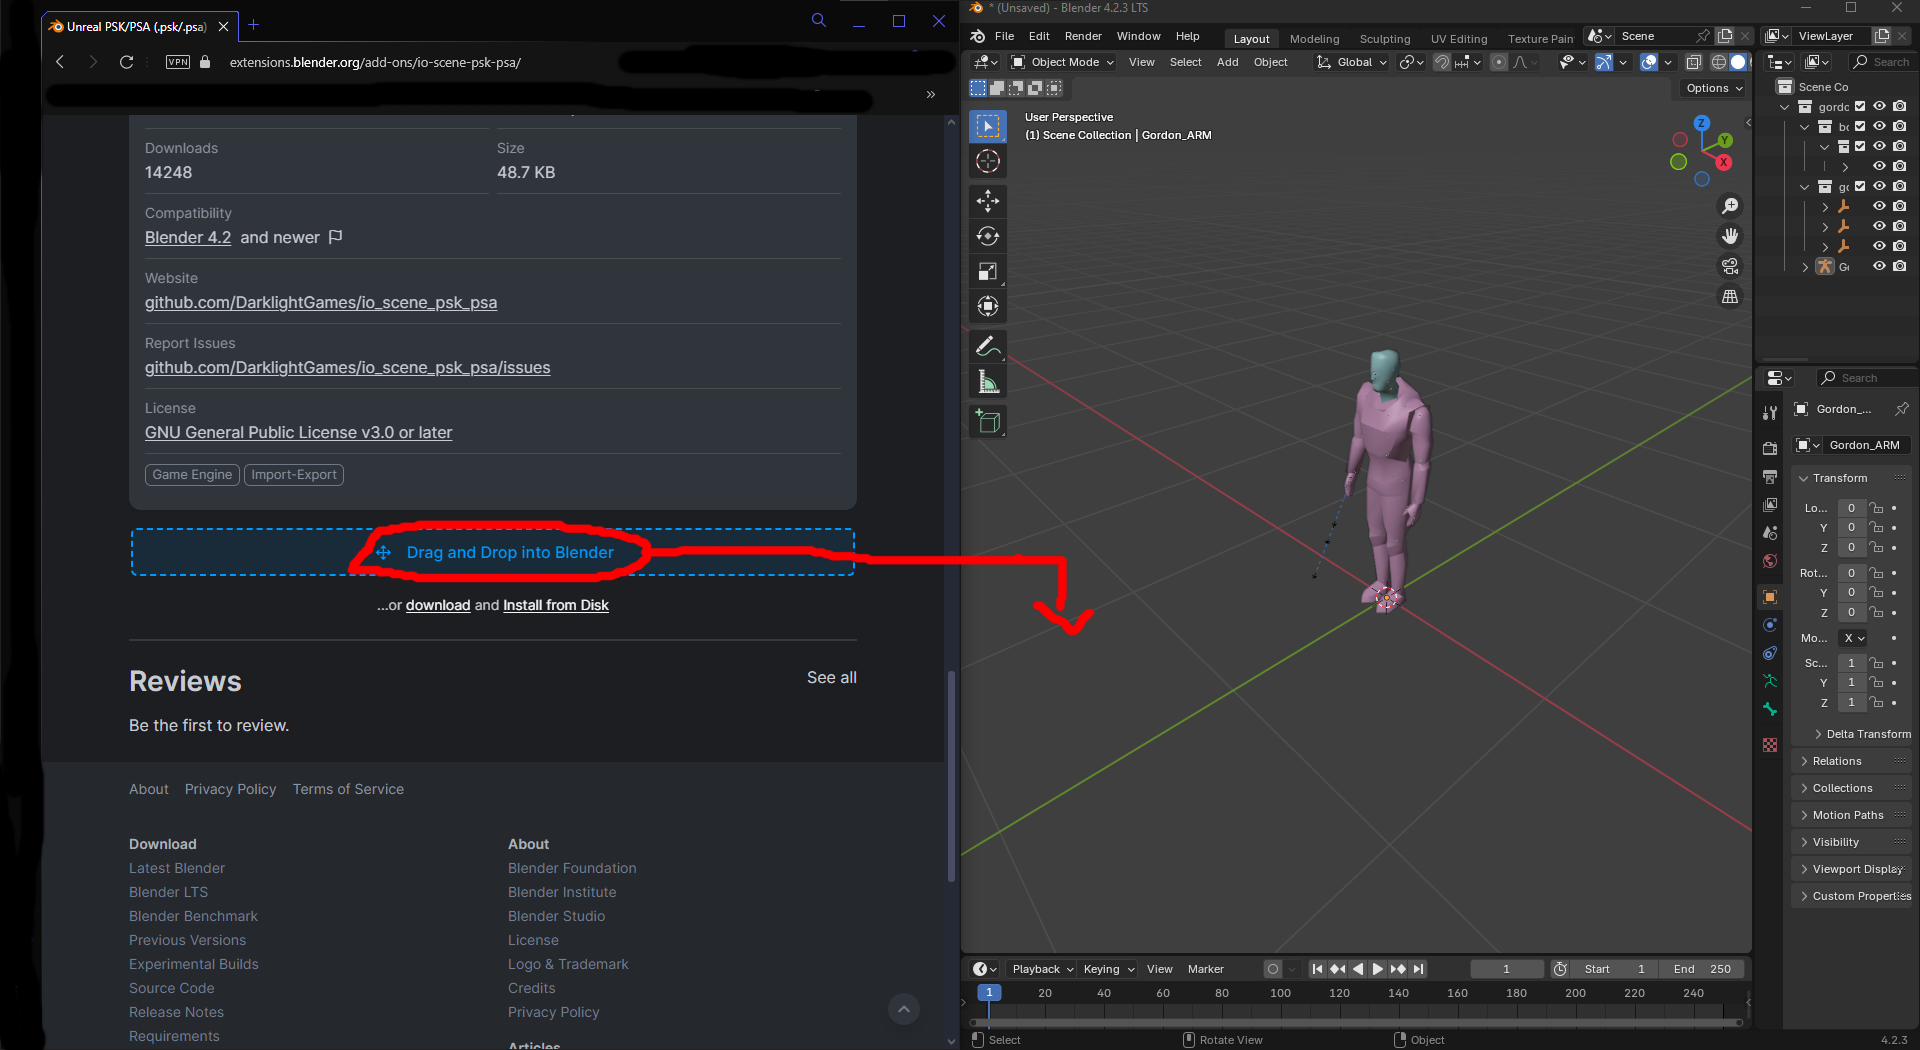
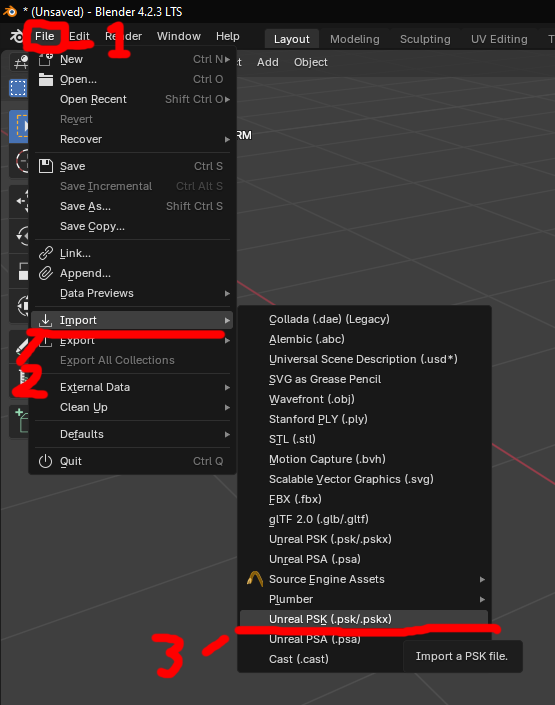
Now if you haven't already you need to install the .psk plugin for blender. Its a simple drag and drop to install.


After that import your .psk you exported from Killing Floor


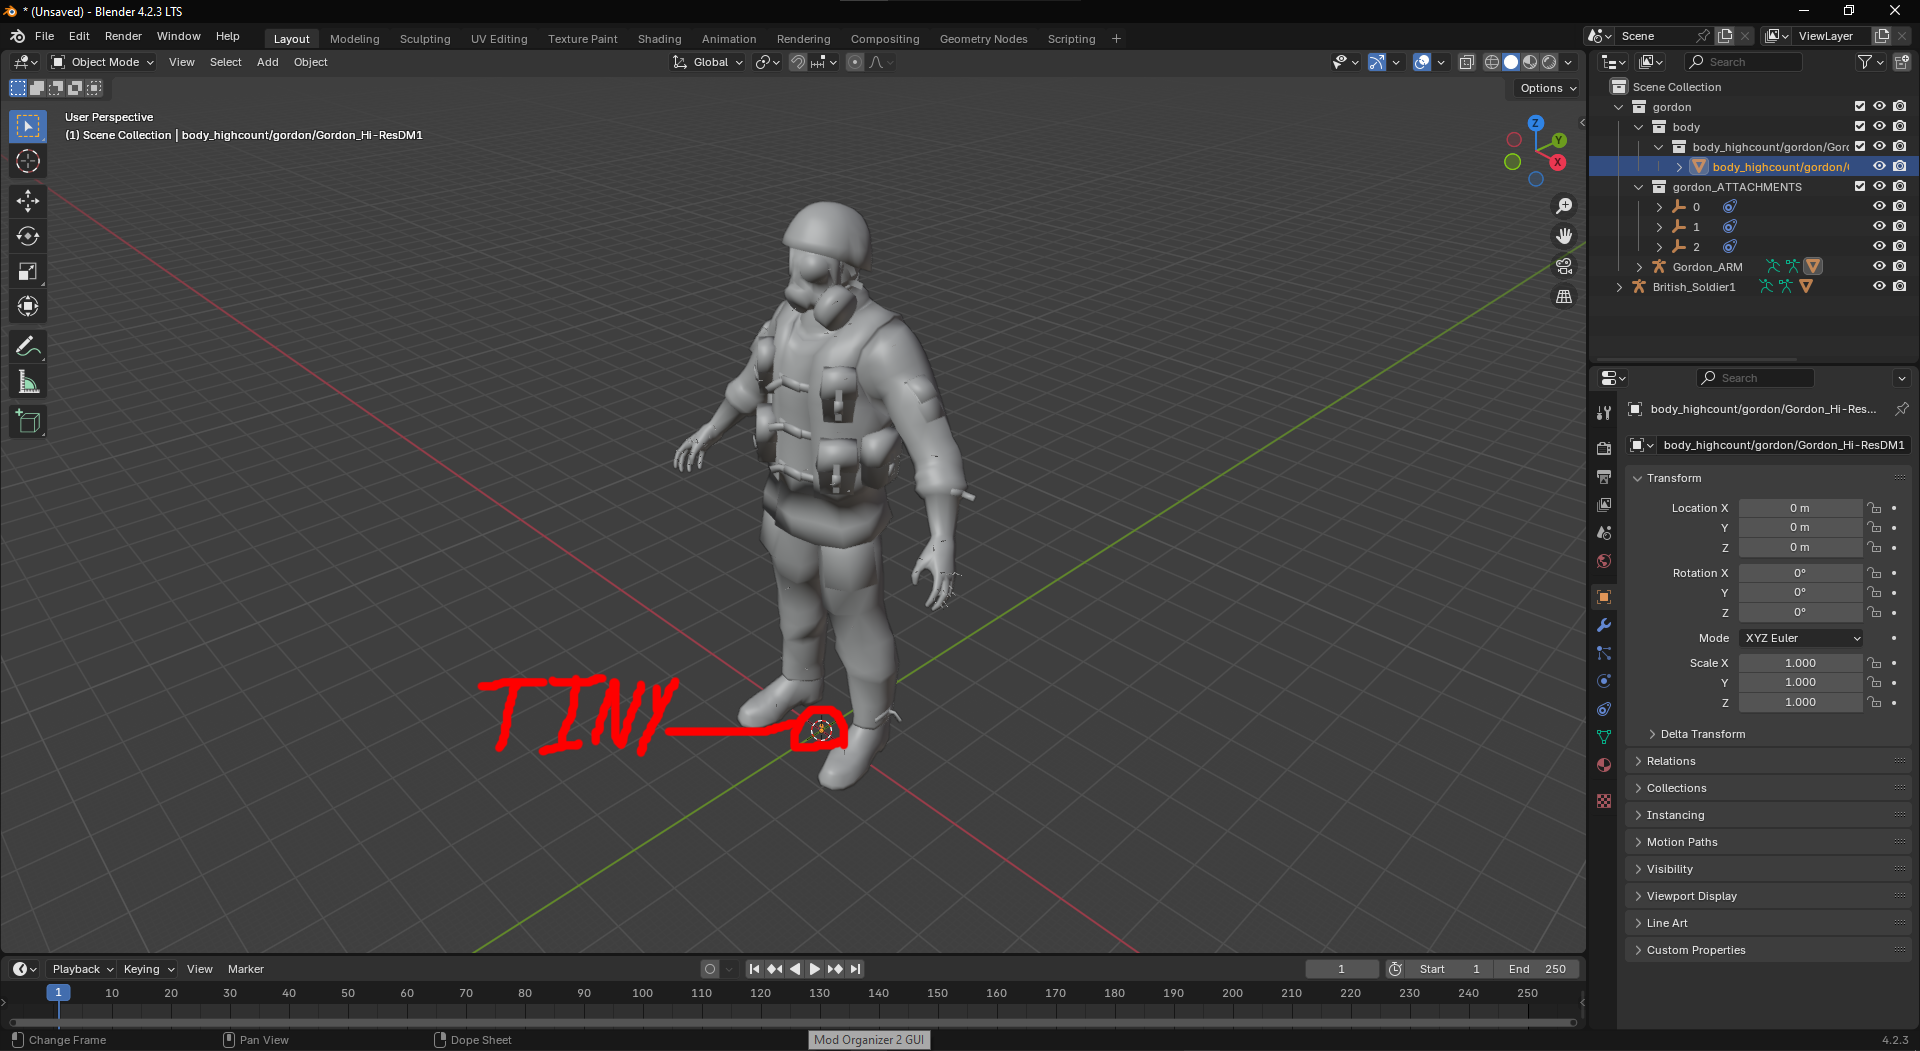
After importing the Killing Floor model you will likely notice a either subtle or like in my case HUGE scale difference. Also in some scenarios the custom model is rotated a different direction


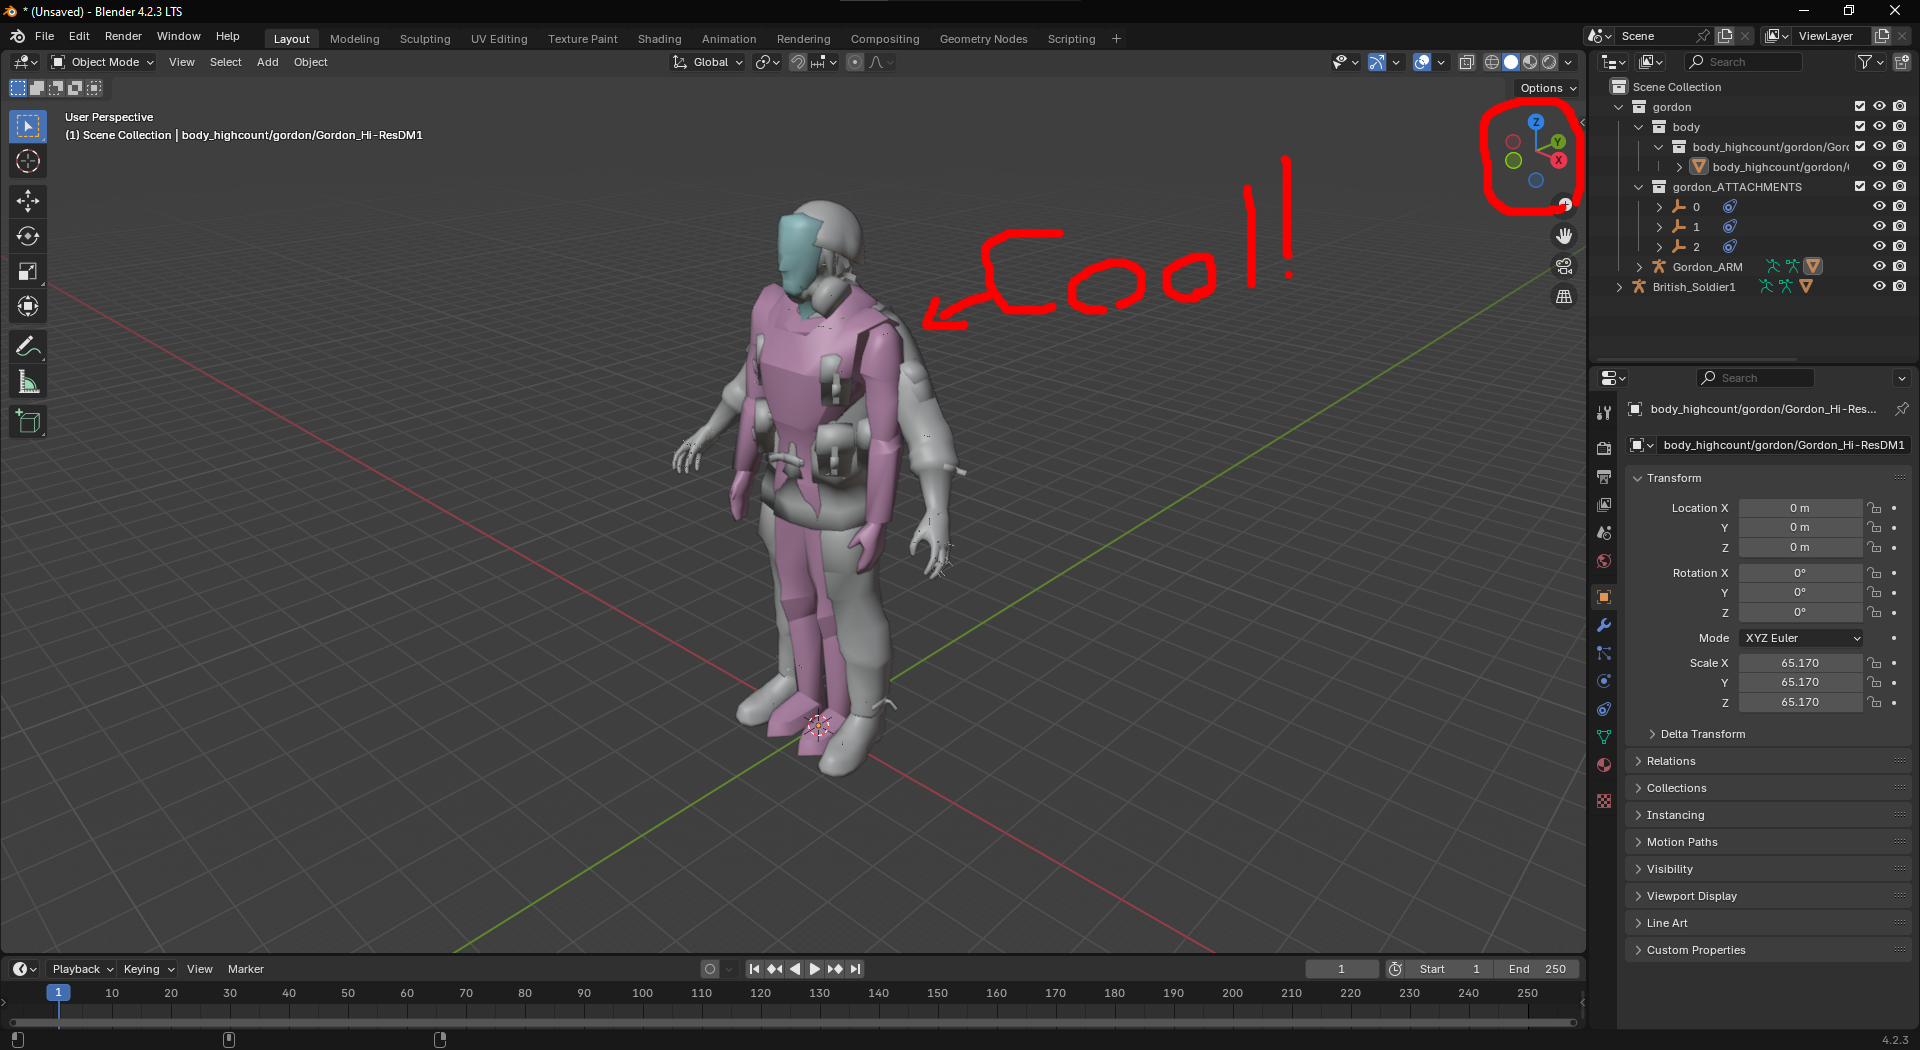
This is a simple fix you want to select your custom model and its bones and type S. This will enter scaling mode where you can move your mouse and change the models scale to the same size as the Killing Floor character. The easiest way to fix rotation is to click the positive Z on the camera rotation in the top right corner of the window. After this just type R. This enters rotation mode and you can type the number of degrees to rotate most situations it will be a right rotation such as 90 or 180. If it rotates the wrong way type - to change the number from positive to negative.


Save File

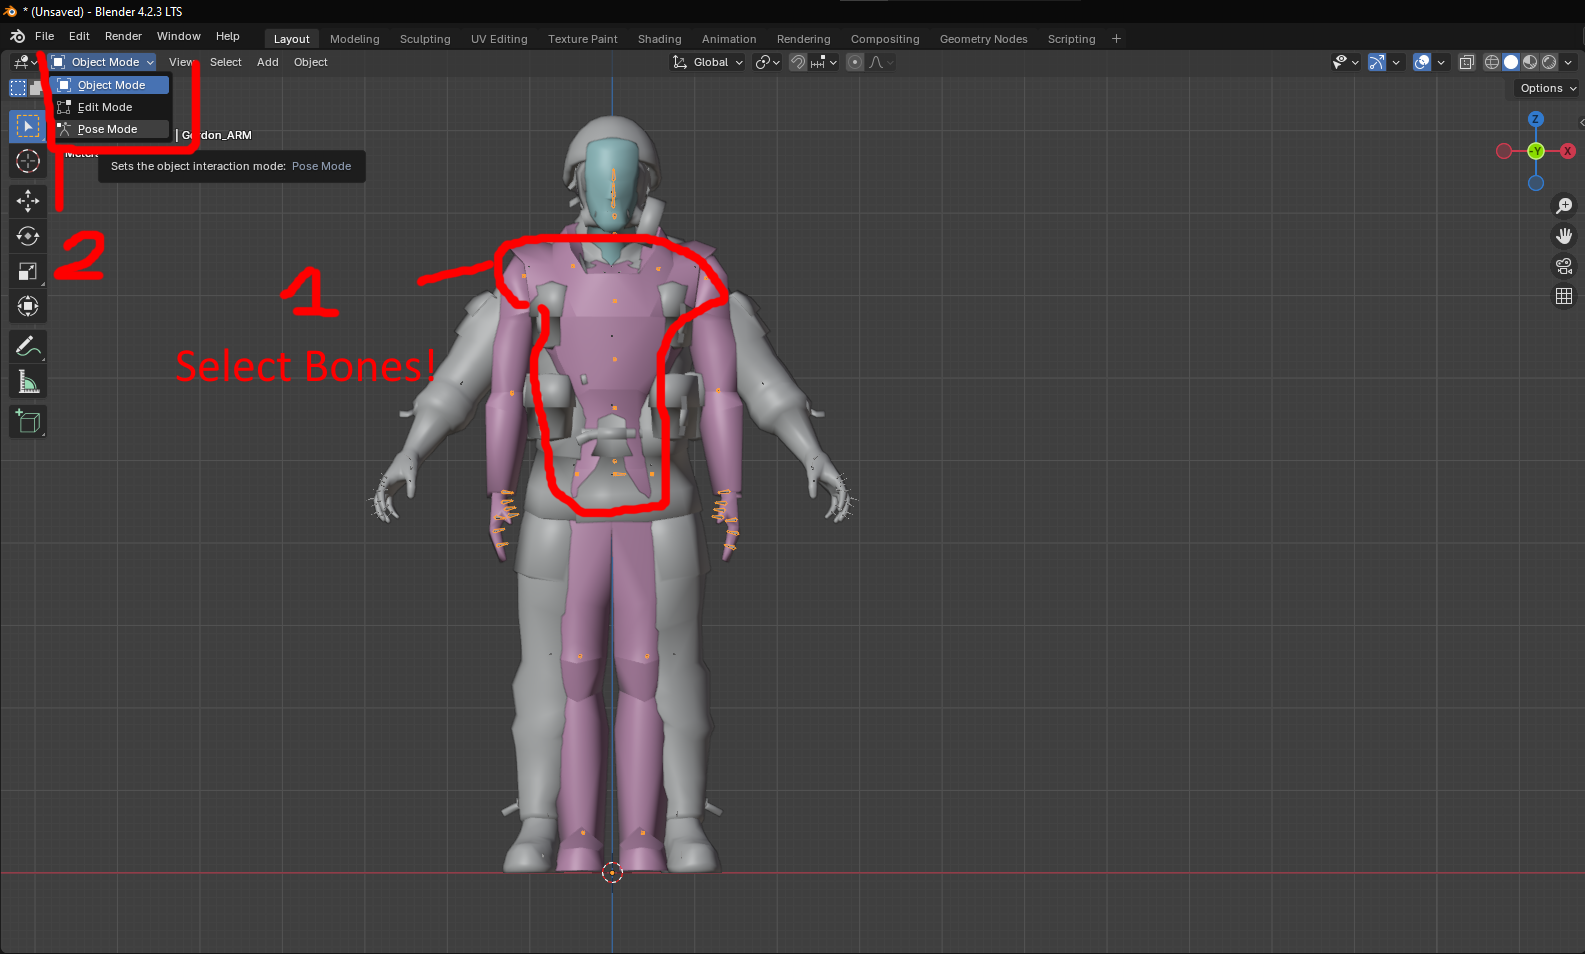
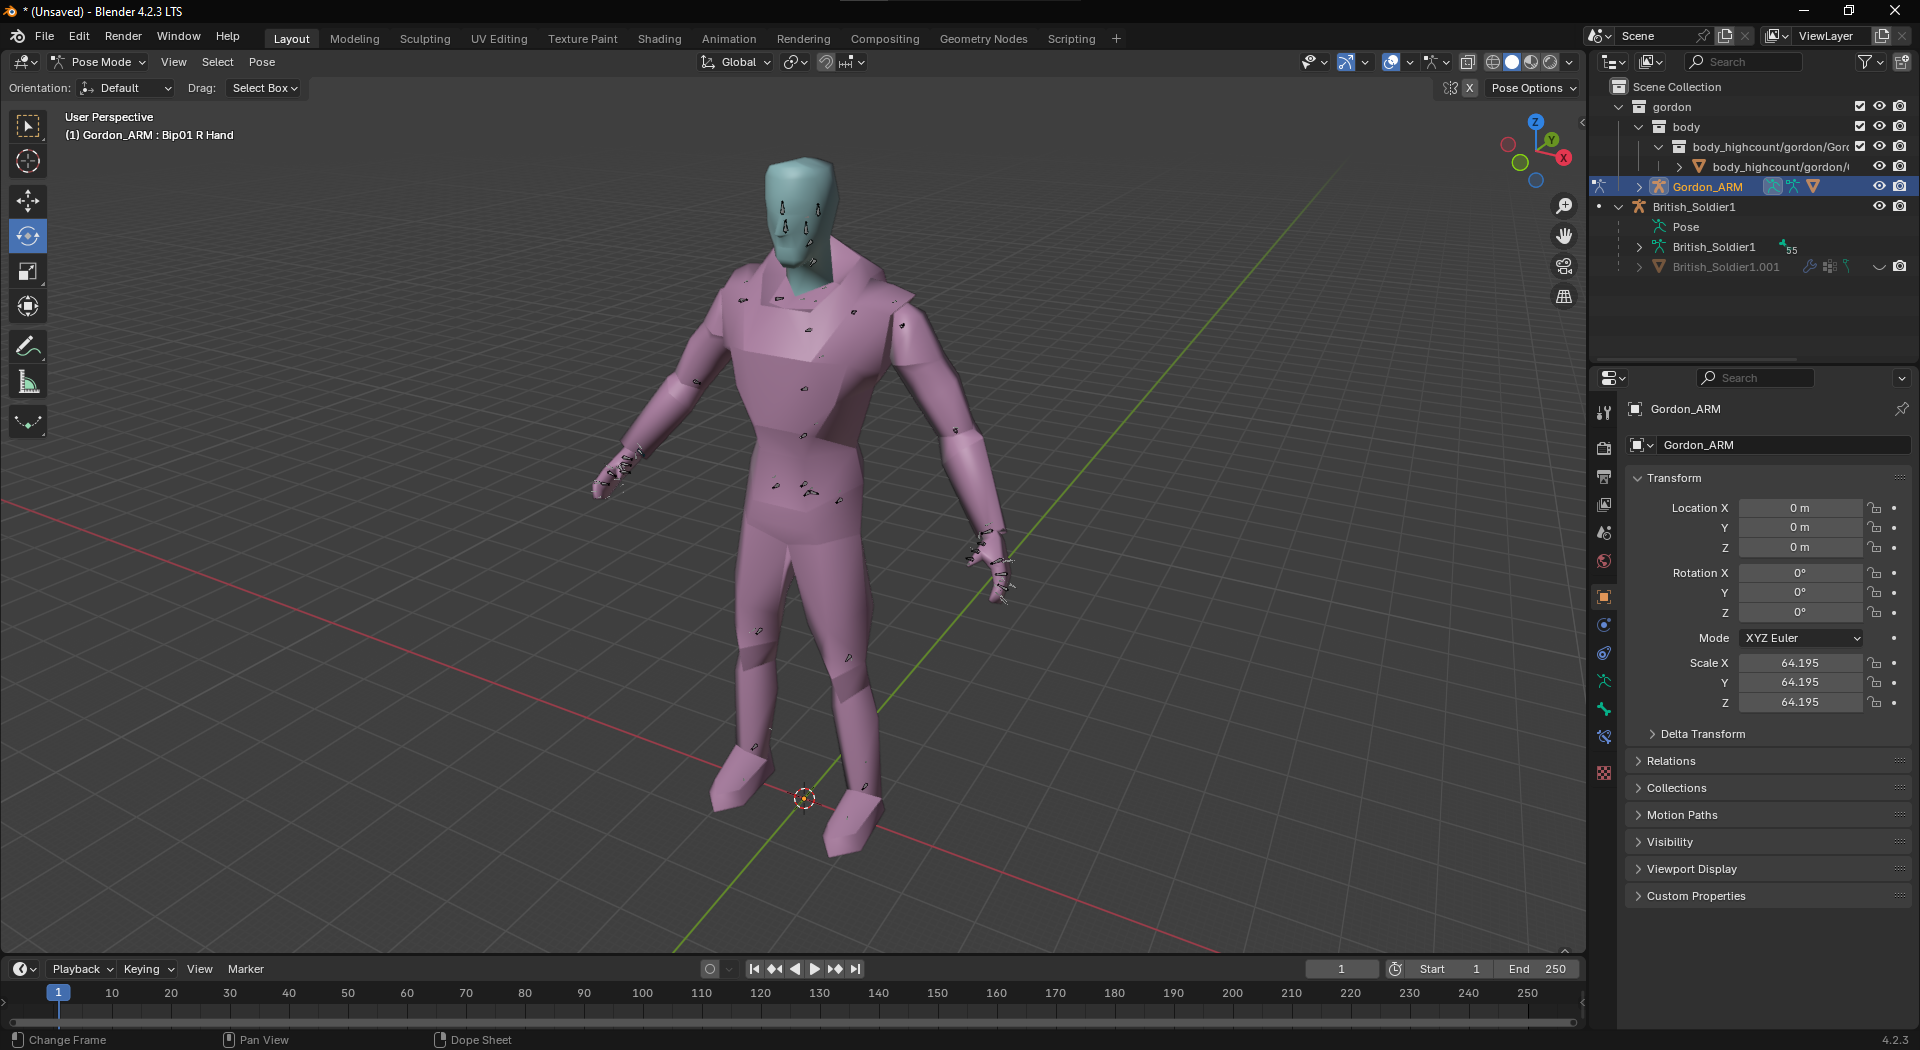
Now its time to make the pose match! To start you will need to enter Pose Mode. Click on your custom model's (NOT KF MODEL) skeleton and in the top left if you click on Object Mode you will get a dropdown where you can select Pose Mode. Now you can click on bones to rotate and move them to make your model match the KF one as much as possible(try not to deform the model too much!) Fingers will be tricky but they will be fine if you get it good enough looking. You can hide and unhide either model as you wish on the right side scene browser.


And after a bit of work...


ɪᴛ's... ᴀᴍᴀᴢɪɴɢ...

Save File

Now for the tedious part...
This is gonna be a pain we have to start merging the skeletons. First step is to match the Vertex Group Names and make any that don't exist, well exist.

TO START THIS PROCESS

I would make a backup save before this process incase you mess up and cant recover without tons of work.

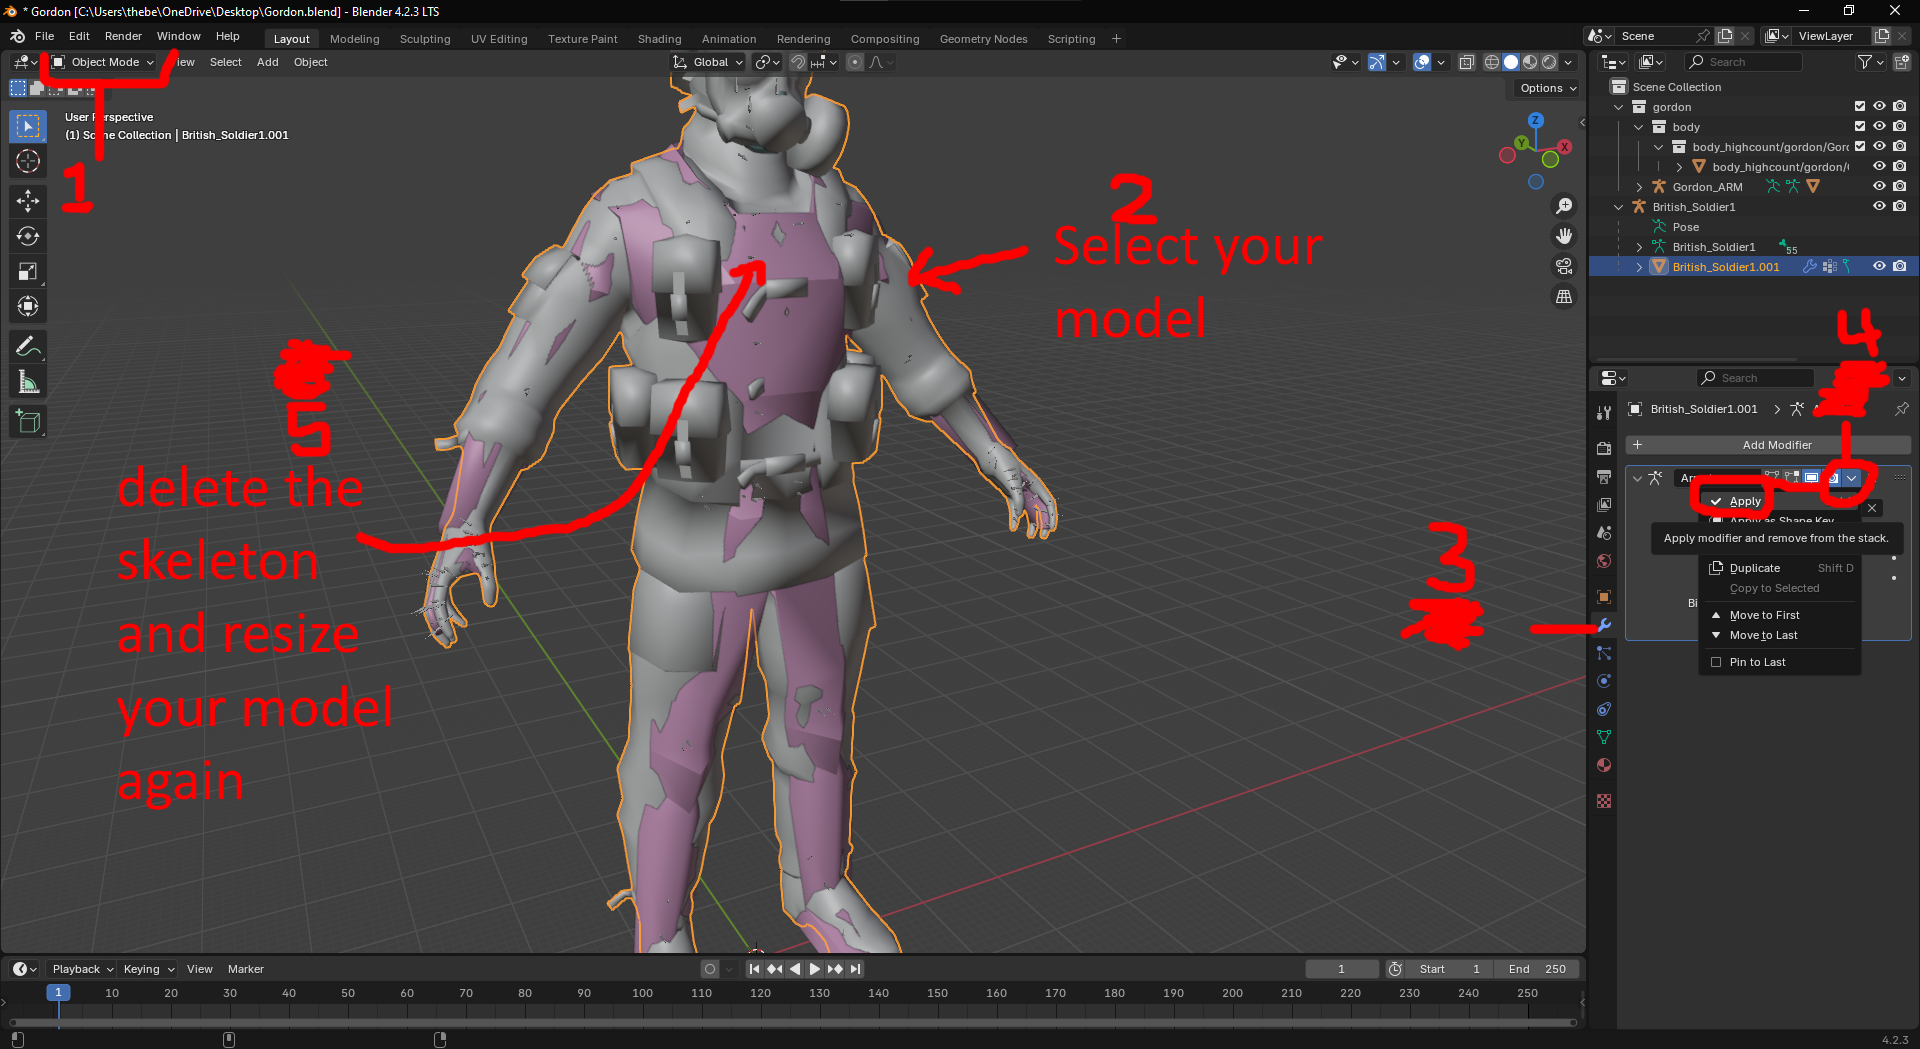
First you need to apply the pose on your model so that it doesn't lose its pose when changing the names of vertex groups. In Object Mode click on your mesh and go to modifiers. You should see an Armature modifier. Click the down arrow and press apply. Then select your custom models bones and delete them. Your models size and rotation will reset but if you resize them and rotate them again they should be in the pose you set them to.


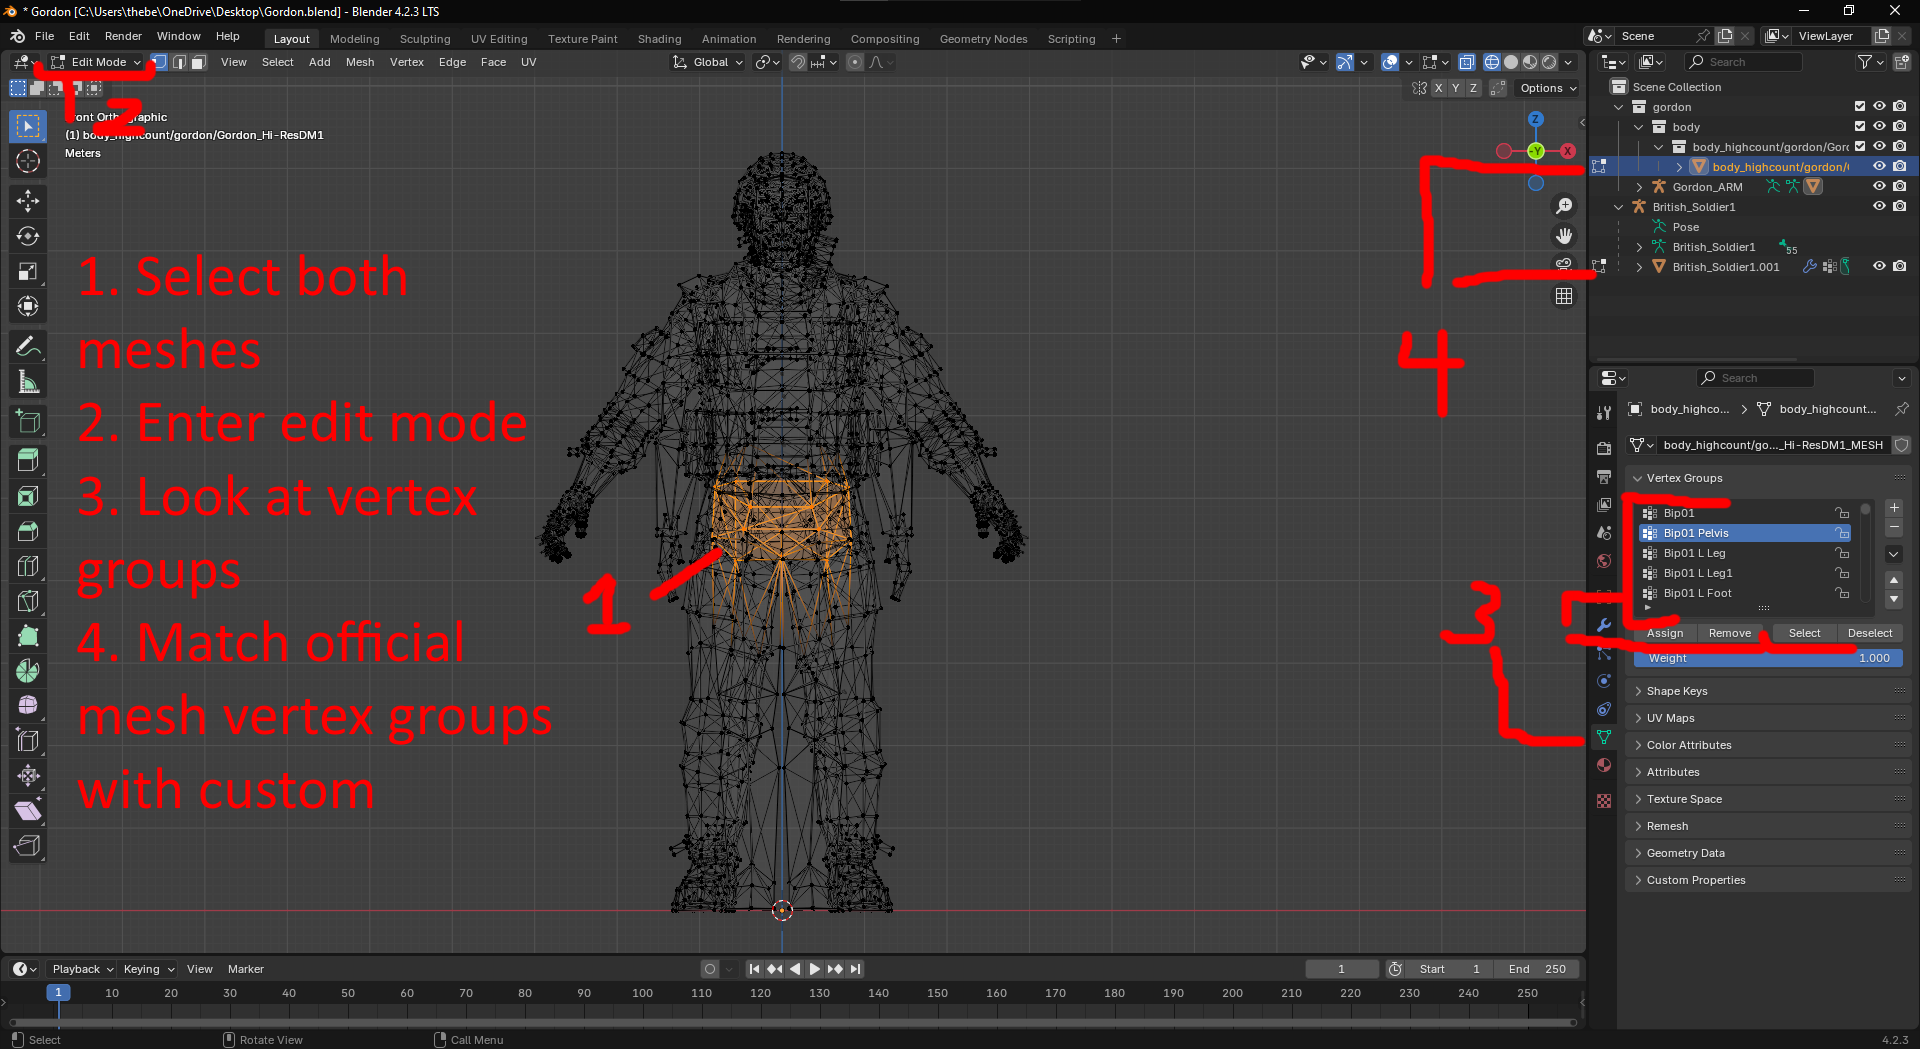
Select BOTH meshes. Go to Edit Mode. And in the right side panel go to Data and select which ever model you want to see the vertex groups of. You will see the vertex groups and can press select to see what part of the model that group is. I recommend going to wire frame view for this step as it makes the process much easier. And basically you match the names of the vertex groups for parts of the skeleton on your custom model with those of the official model. Order does not matter in the vertex groups and if you need to you can add or remove groups just know undo doesnt work for this.


Alright you will need all of these vertex groups in your custom model for it to work right!


  • CHR_Pelvis
  • CHR_Spine1
  • CHR_Spine2
  • CHR_Spine3 (Have this one be empty and use CHR_Ribcage instead)
  • CHR_Ribcage
  • CHR_LArmCollar
  • CHR_LArmUpper
  • CHR_LArmForeArm
  • CHR_LArmPalm
  • CHR_LArmDigit11
  • CHR_LArmDigit12
  • CHR_LArmDigit13
  • CHR_LArmDigit21
  • CHR_LArmDigit22
  • CHR_LArmDigit23
  • CHR_LArmDigit31
  • CHR_LArmDigit32
  • CHR_LArmDigit33
  • CHR_LArmDigit41
  • CHR_LArmDigit42
  • CHR_LArmDigit43
  • CHR_LArmDigit51
  • CHR_LArmDigit52
  • CHR_LArmDigit53
  • CHR_RArmCollar
  • CHR_RArmUpper
  • CHR_RArmForeArm
  • CHR_RArmPalm
  • CHR_RArmDigit11
  • CHR_RArmDigit12
  • CHR_RArmDigit13
  • CHR_RArmDigit21
  • CHR_RArmDigit22
  • CHR_RArmDigit23
  • CHR_RArmDigit31
  • CHR_RArmDigit32
  • CHR_RArmDigit33
  • CHR_RArmDigit41
  • CHR_RArmDigit42
  • CHR_RArmDigit43
  • CHR_RArmDigit51
  • CHR_RArmDigit52
  • CHR_RArmDigit53
  • CHR_Neck
  • CHR_Head
  • CHR_LThigh
  • CHR_LCalf
  • CHR_LAnkle
  • CHR_LToe1
  • CHR_RThigh
  • CHR_RCalf
  • CHR_RAnkle
  • CHR_RToe1

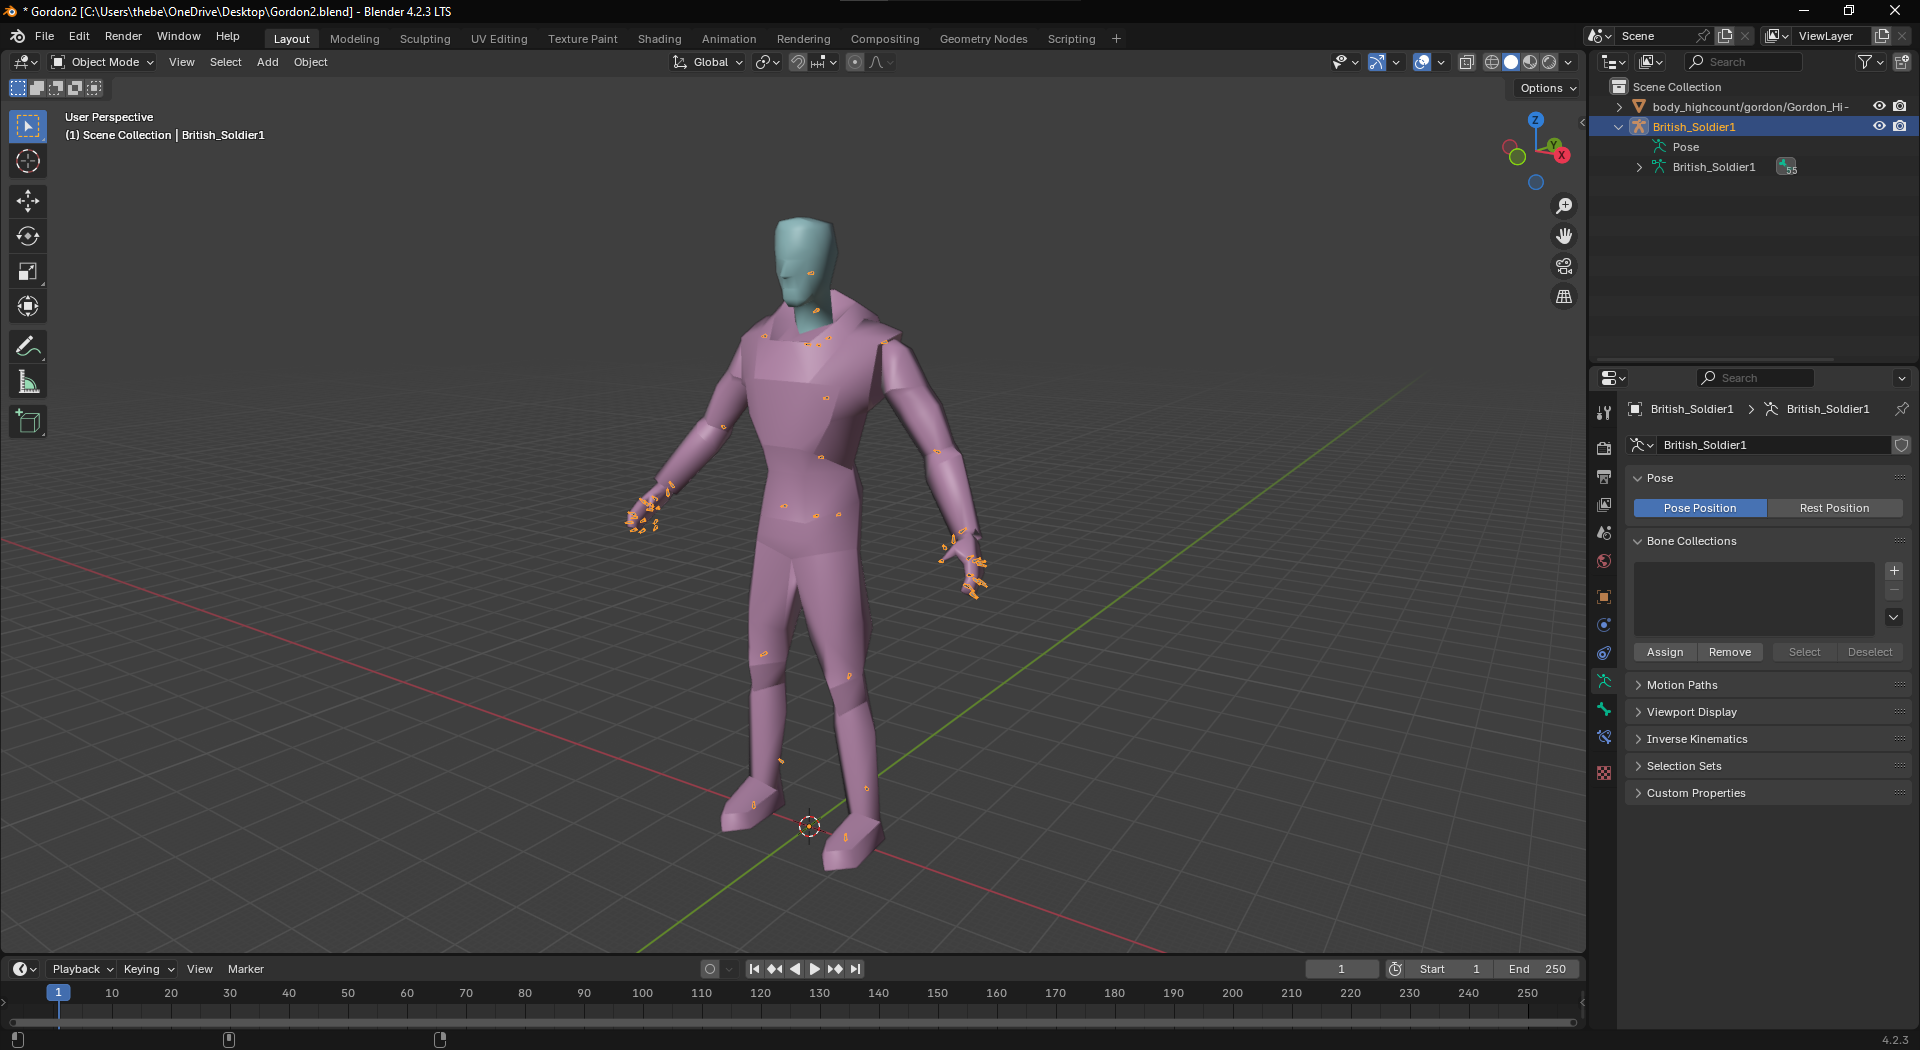
After all of this you will delete the official mesh and leave the bones and they should line up with your custom model.


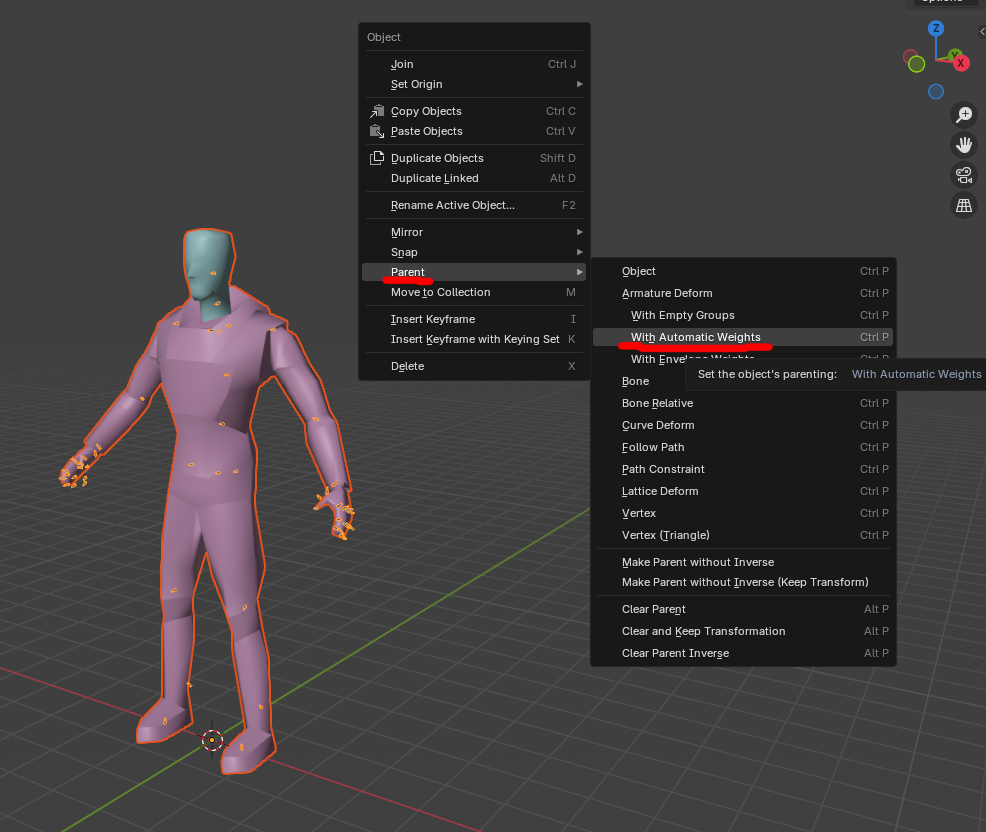
Now you want to select the mesh and bones in object mode with the bones being the primary target (yellow outline). Then right click and go to parent and select automatic weights.


Now your character and the skeleton are linked but you aren't done yet. You will likely notice errors if you use pose mode on the bones. Next is what I like to call the Mesh Cleaning process. Where you will mess with weights on the model, and get materials to as low a number as possible. Stay with me now the hardest and most tedious part is done. It gets easier for the most part from here!
Part 4: Mesh Clean Up
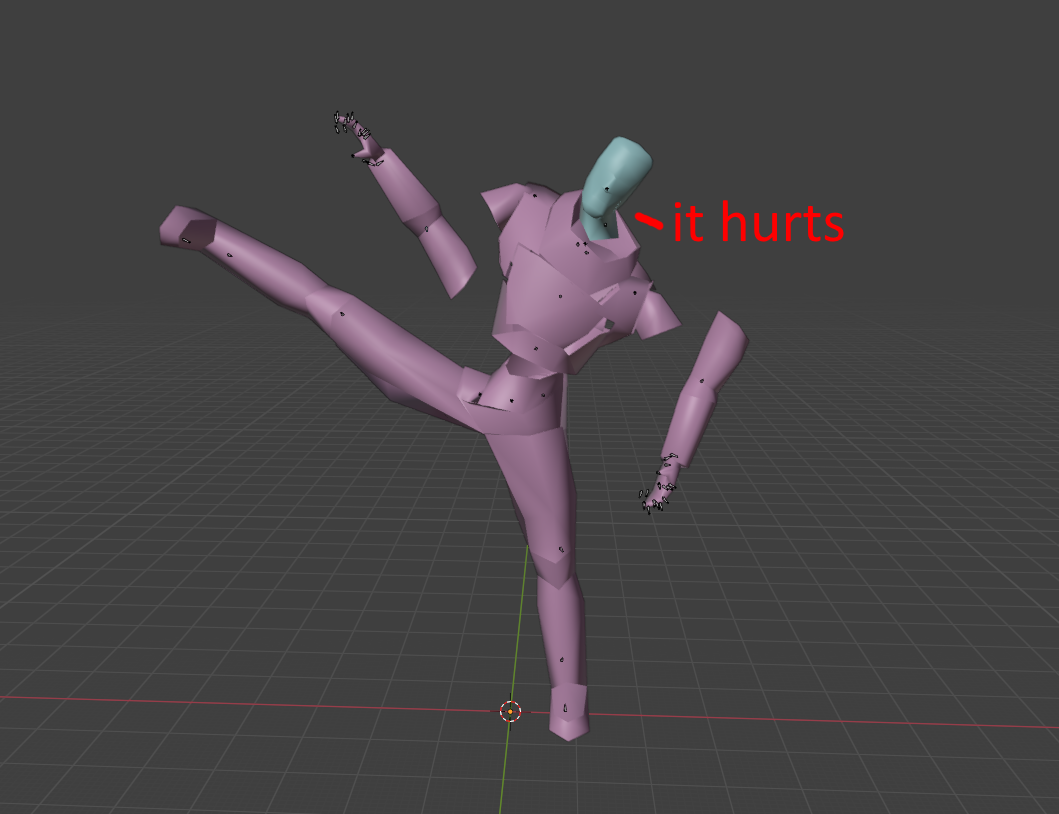
Now you might notice if you pose your bones on some models with automatic weights it will be messed up beyond comprehension.


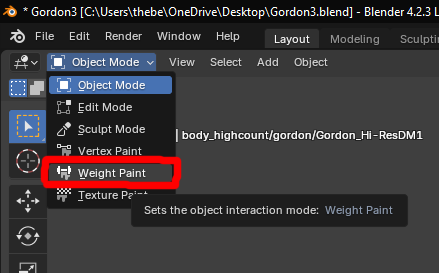
Fret not we can fix this! This is caused by the weights and to fix this we will have to enter the dark arts of weight painting. Honestly when you get the hang of it tho its not terrible. To start save your model again to be safe. Then select your model itself and under the mode selection choose weight painting.


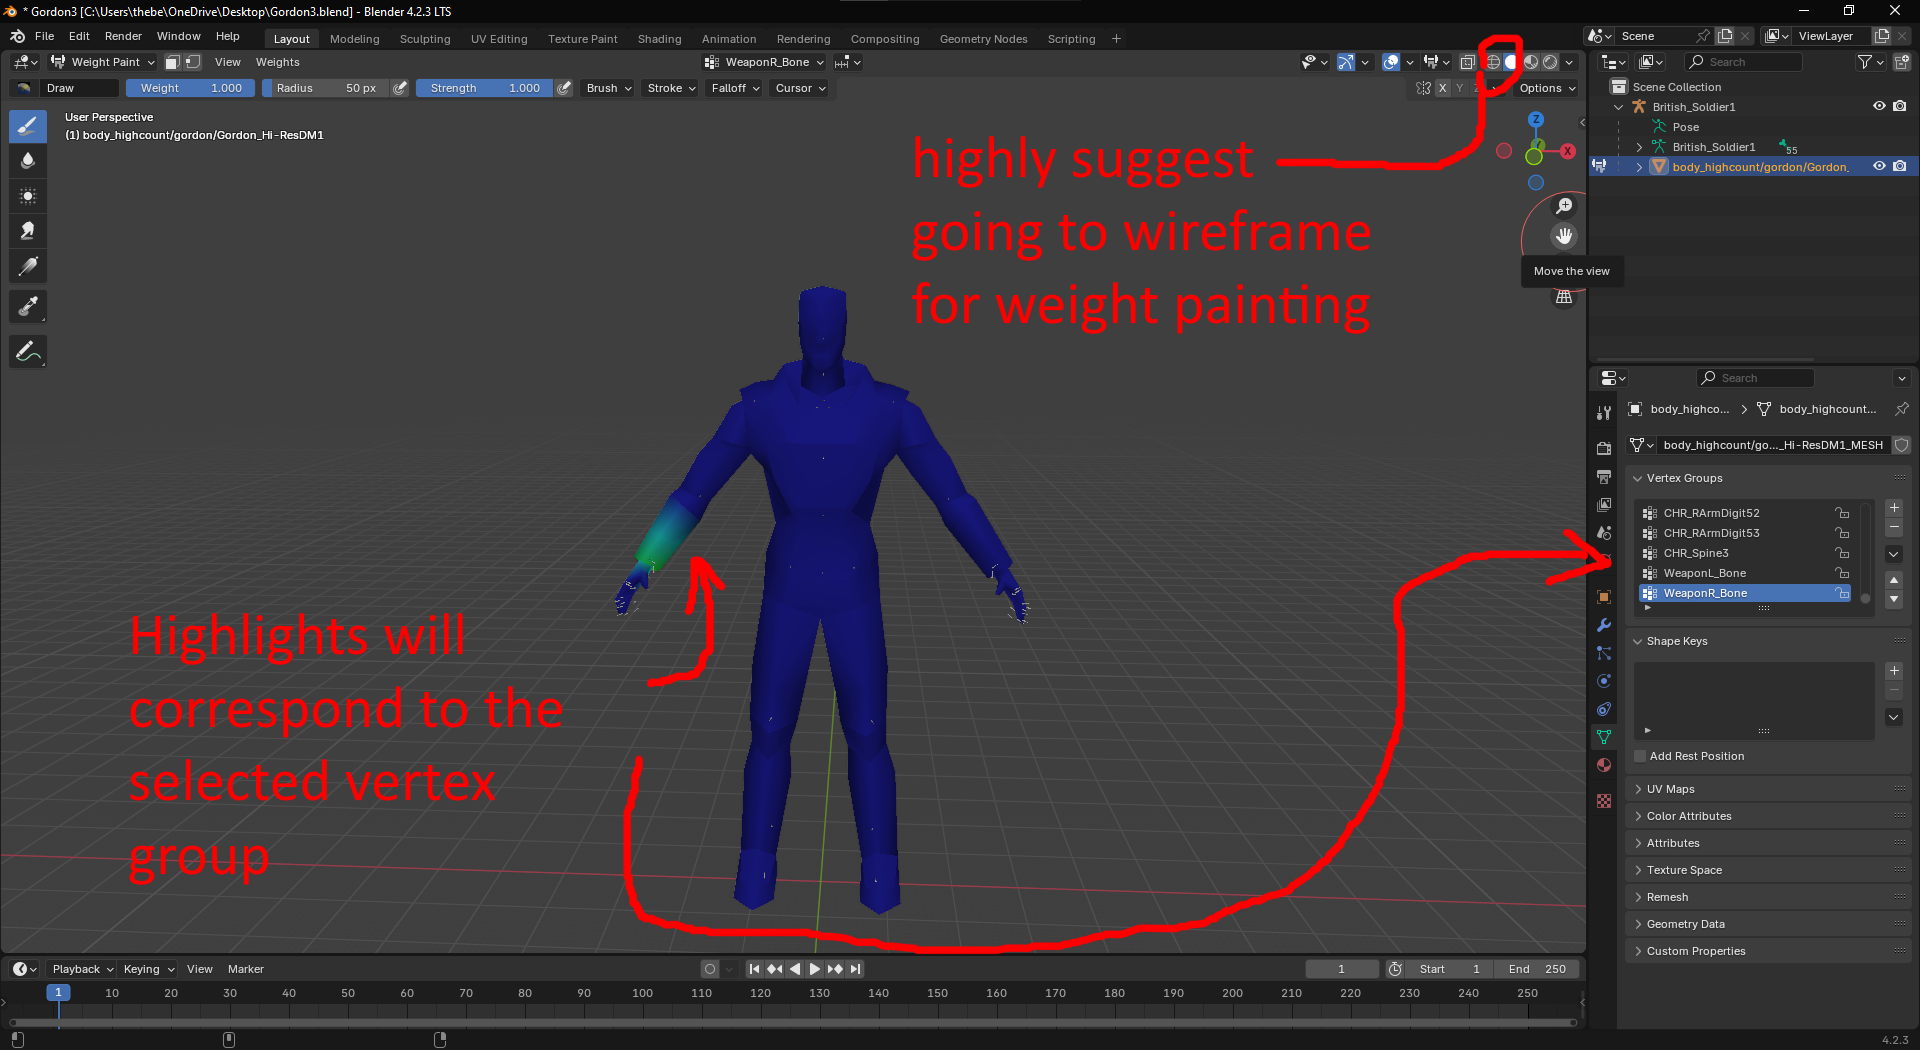
Your model will turn blue and you will probably see a red/yellow highlight somewhere on the model. This shows how much a selected bone influences that part of the mesh. Dark Blue = No Influence, Bright Red = 100& Influence. Your selected Vertex Group correlates to a bone.


If my explanation was poor I apologize this video might help you understand better:


basically you need to make sure each group shares a little influence with the one next to them to make sure no gaps show up and you also want to make it just so it doesn't look too sharp when you move a bone.

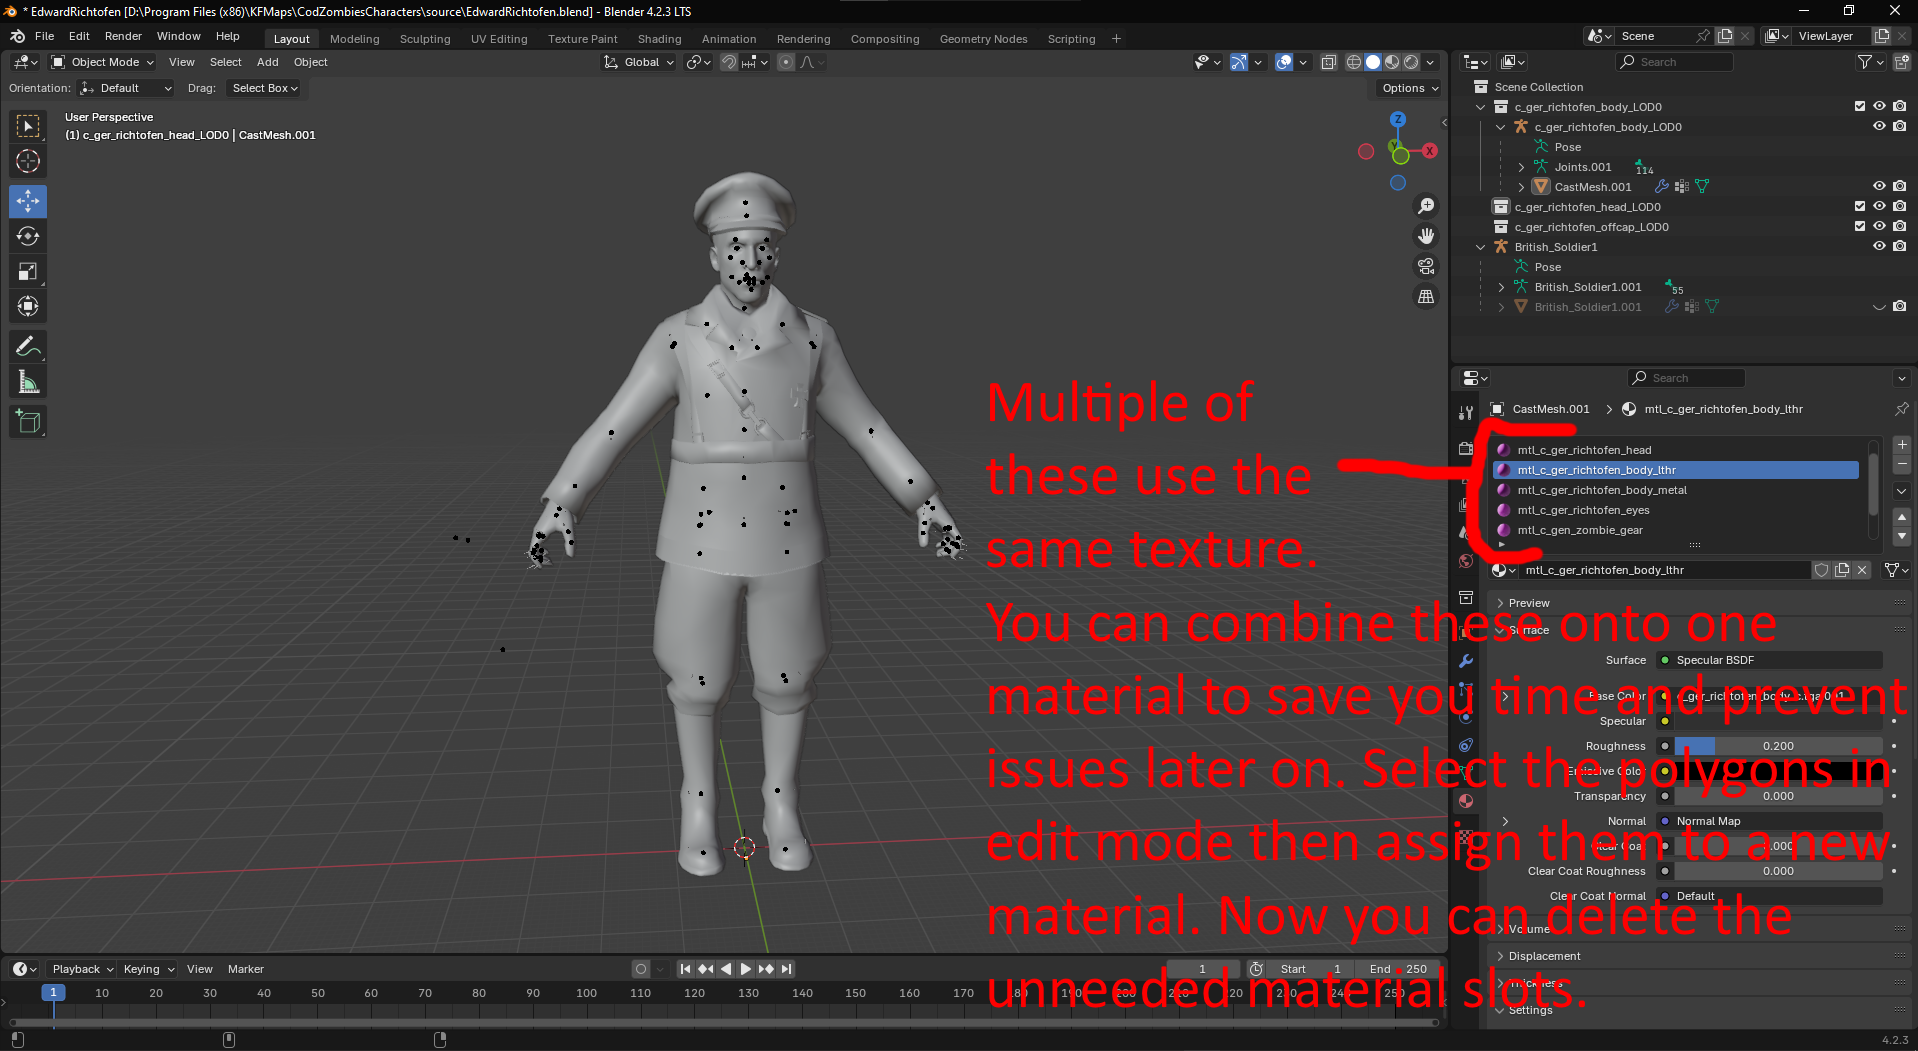
Some models might have multiple material slots for the same texture. For these you should try and merge them into one material slot for your own convenience. In edit mode you can select everything affected by materials then assign it to a new one to combine stuff you dont need to be seperate materials.


Now that your model is cleaned up weights may still not be normal and the best way to see so is to see the model in game so now we will start the process of adding the character into Killing Floor.
Part 5: Importing Mesh to KF SDK
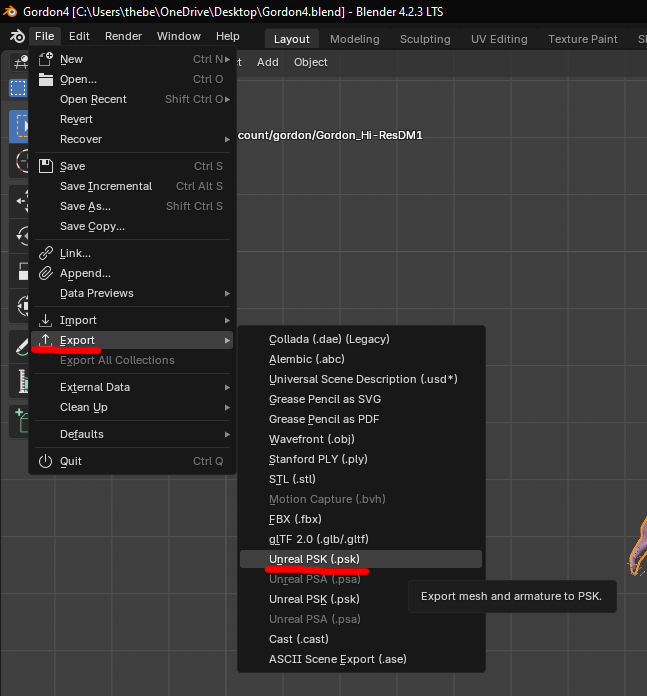
Now we will get into importing your mesh into the Killing Floor SDK. First step is to select you mesh in blender and go to File>Export>.psk and export it somewhere with it named along the lines Charactername.psk.


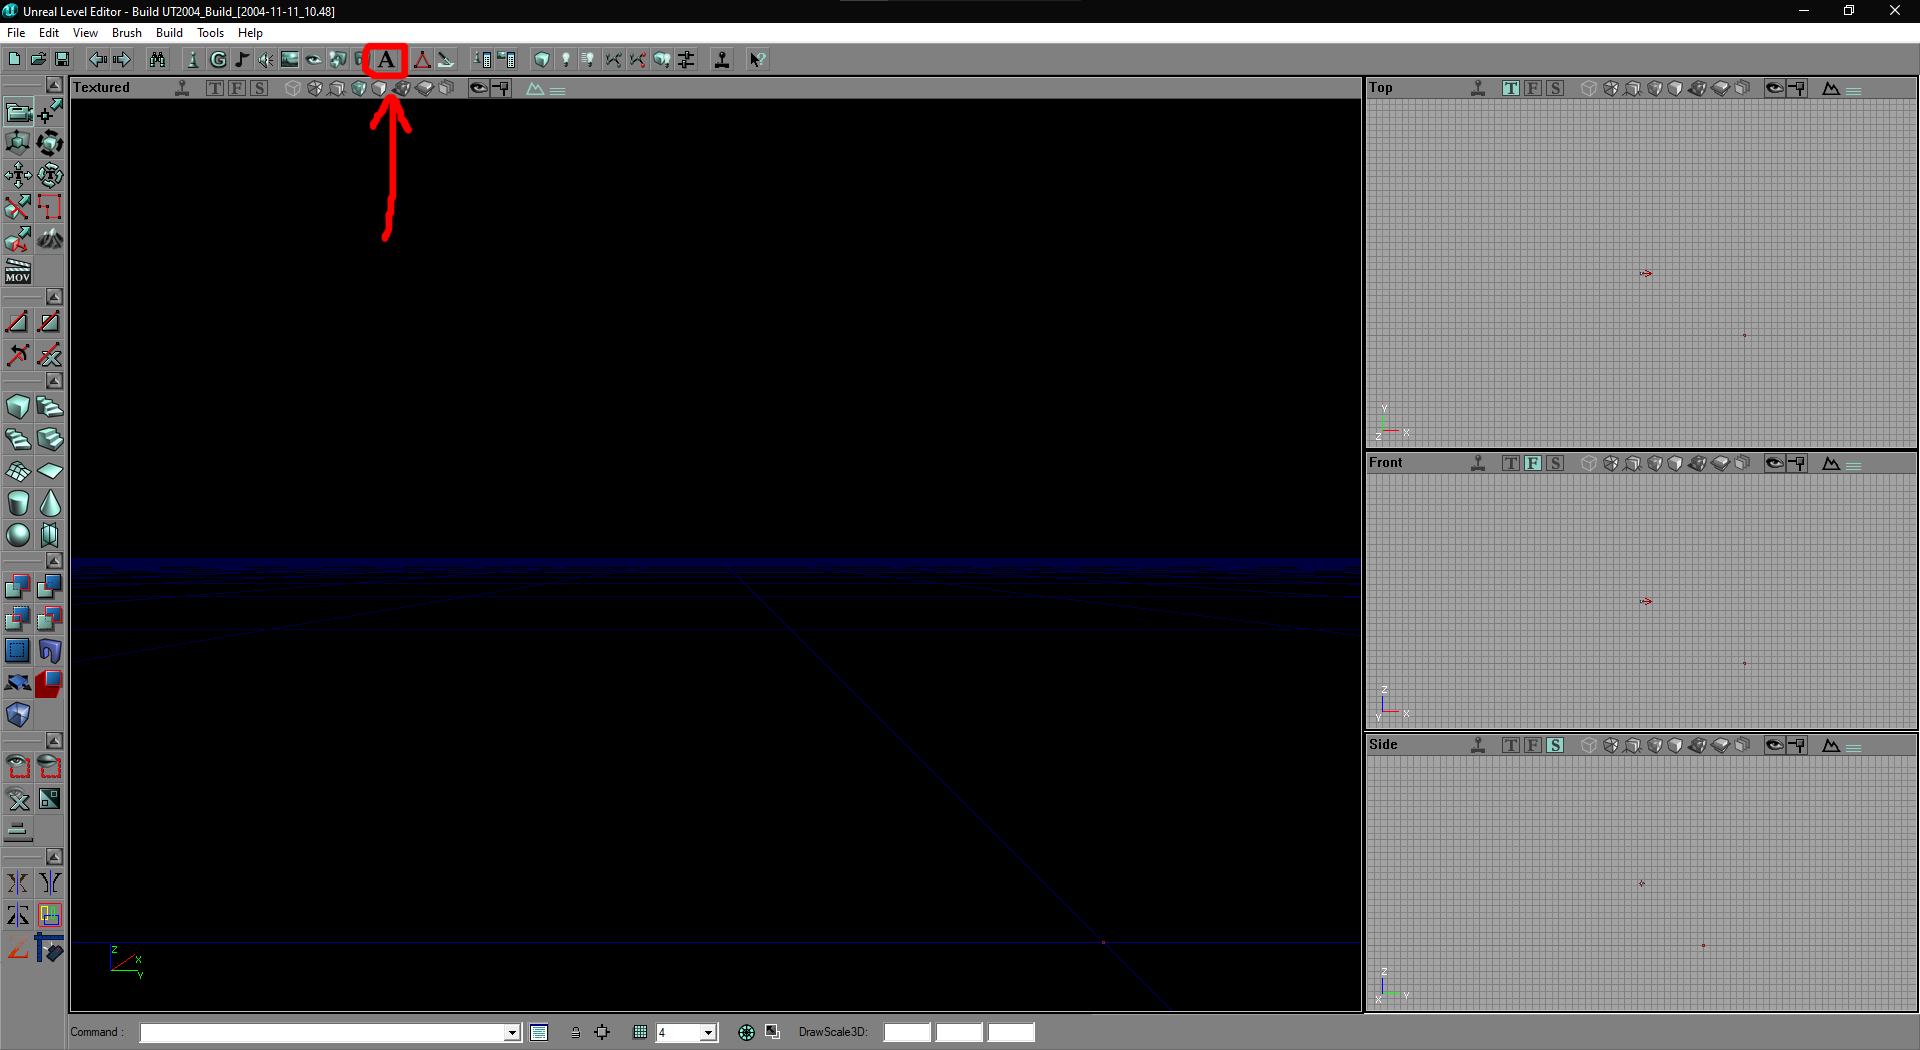
Now open KF SDK.

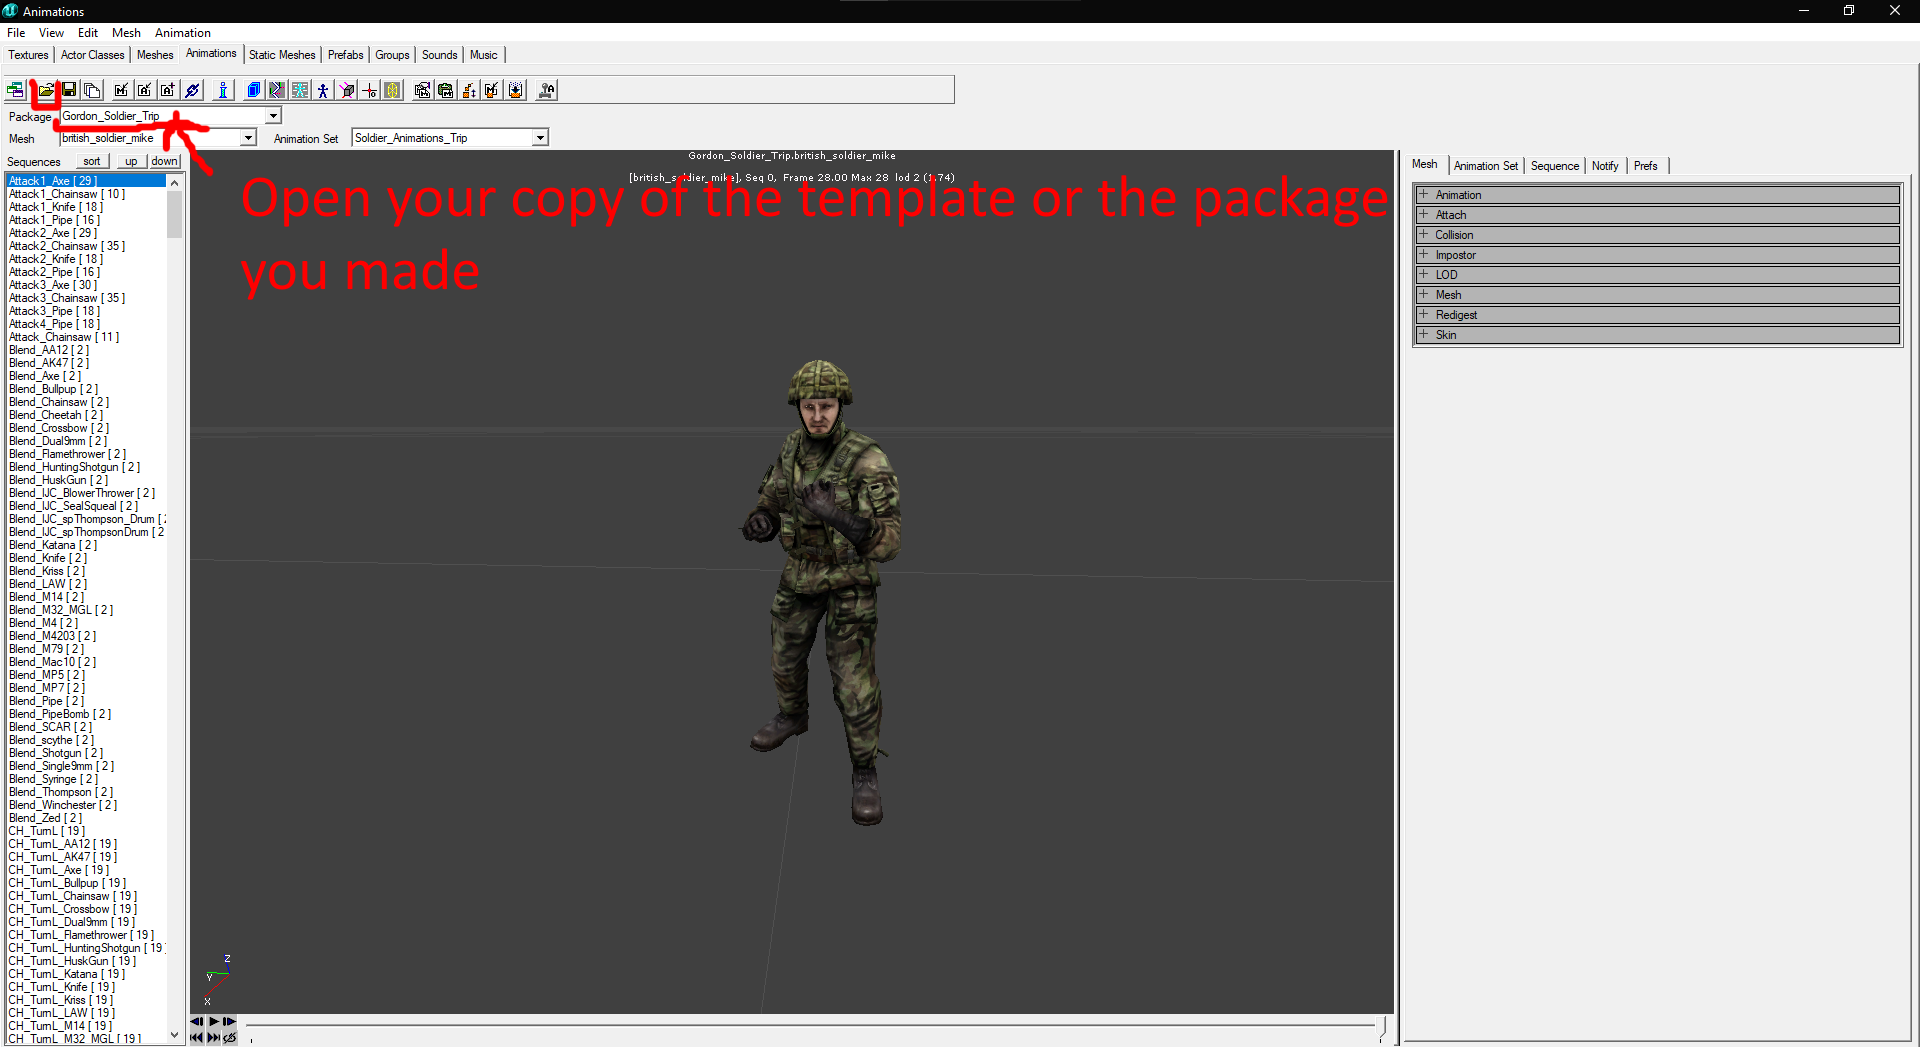
You can either make the animation package yourself by copying the official KF_Soldier_Trip and deleting all meshes but one and the non player animation sets. Or to save time I have created as a template.

Download the template I made here[drive.google.com].


Add the package to KillingFloor/Animations and rename the file to replace Charactername with your characters name.


Open the file in the SDK Animation browser.


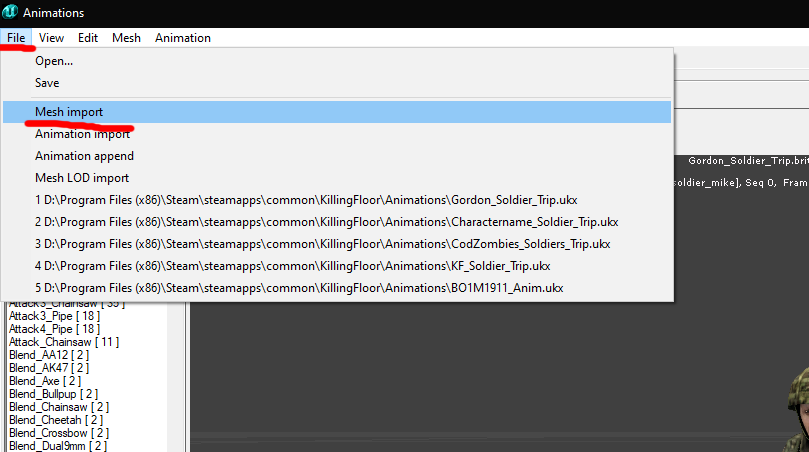
Import your mesh.


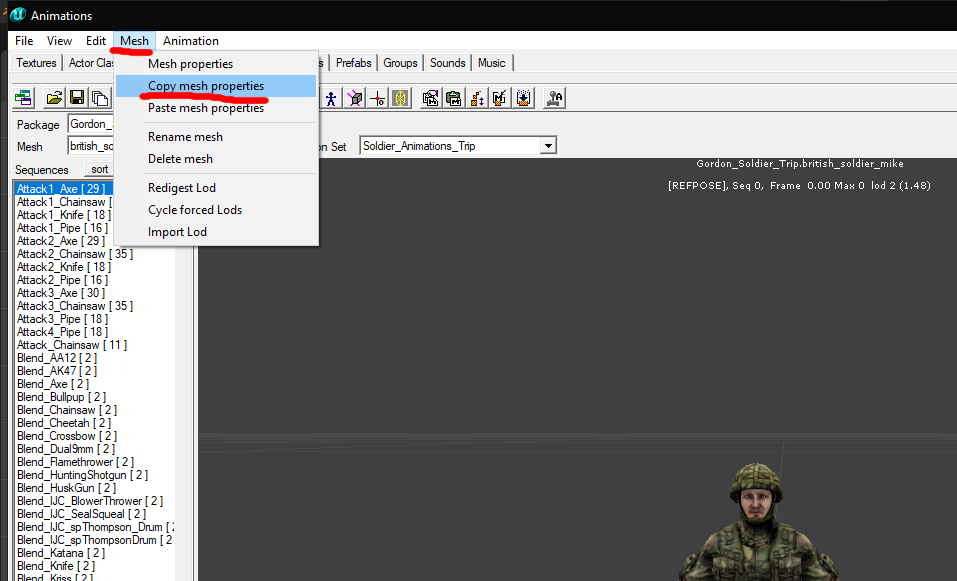
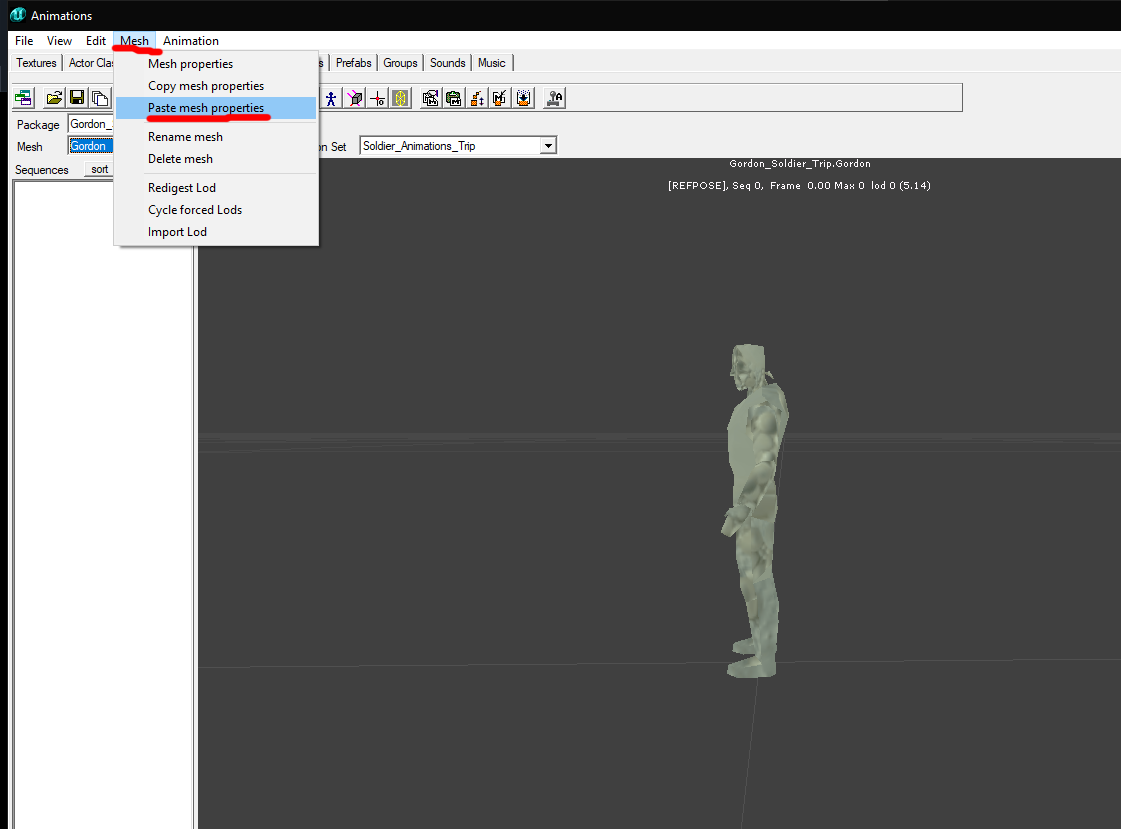
Copy mesh properties from British_Soldier_Mike and paste them onto your mesh.


Link your mesh to Soldier_Animations_Trip Animation Set. by setting DefaultAnimation to MeshAnimation'KF_Soldier_Trip.Soldier_Animations_Trip'.


You can either delete British_Soldier_Mike now or wait till you are 100% done with the weights since any time you reimport you will have to link the animation and copy the properties again. Also note any time you reimport to change weights you will have to save the package and close then reopen KF SDK due to a bug inside Unreal Engine 2 regarding skeletal mesh importing.

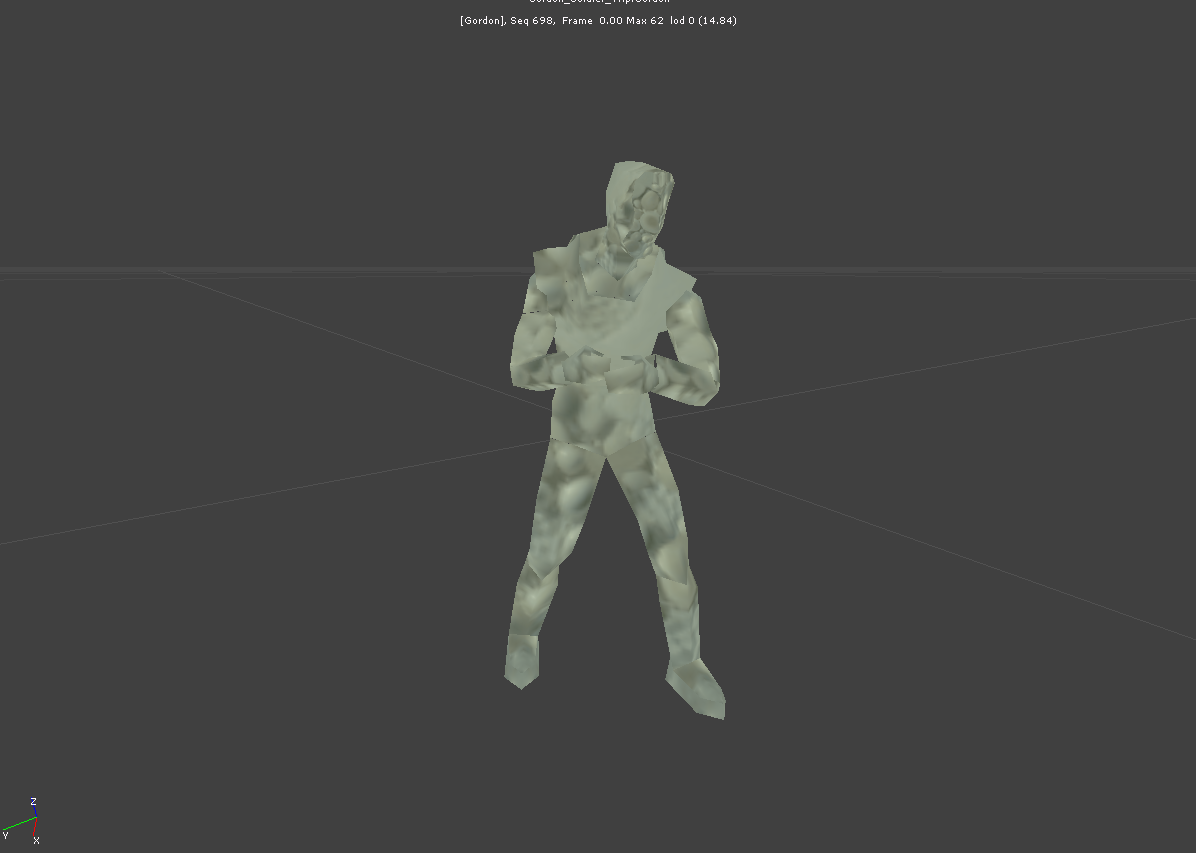
Now you can see your mesh when playing the animations but it might be difficult to tell with the default texture. you can either look at the animations like this or you can get to textures first so its easier to tell.

Part 6: Getting Textures
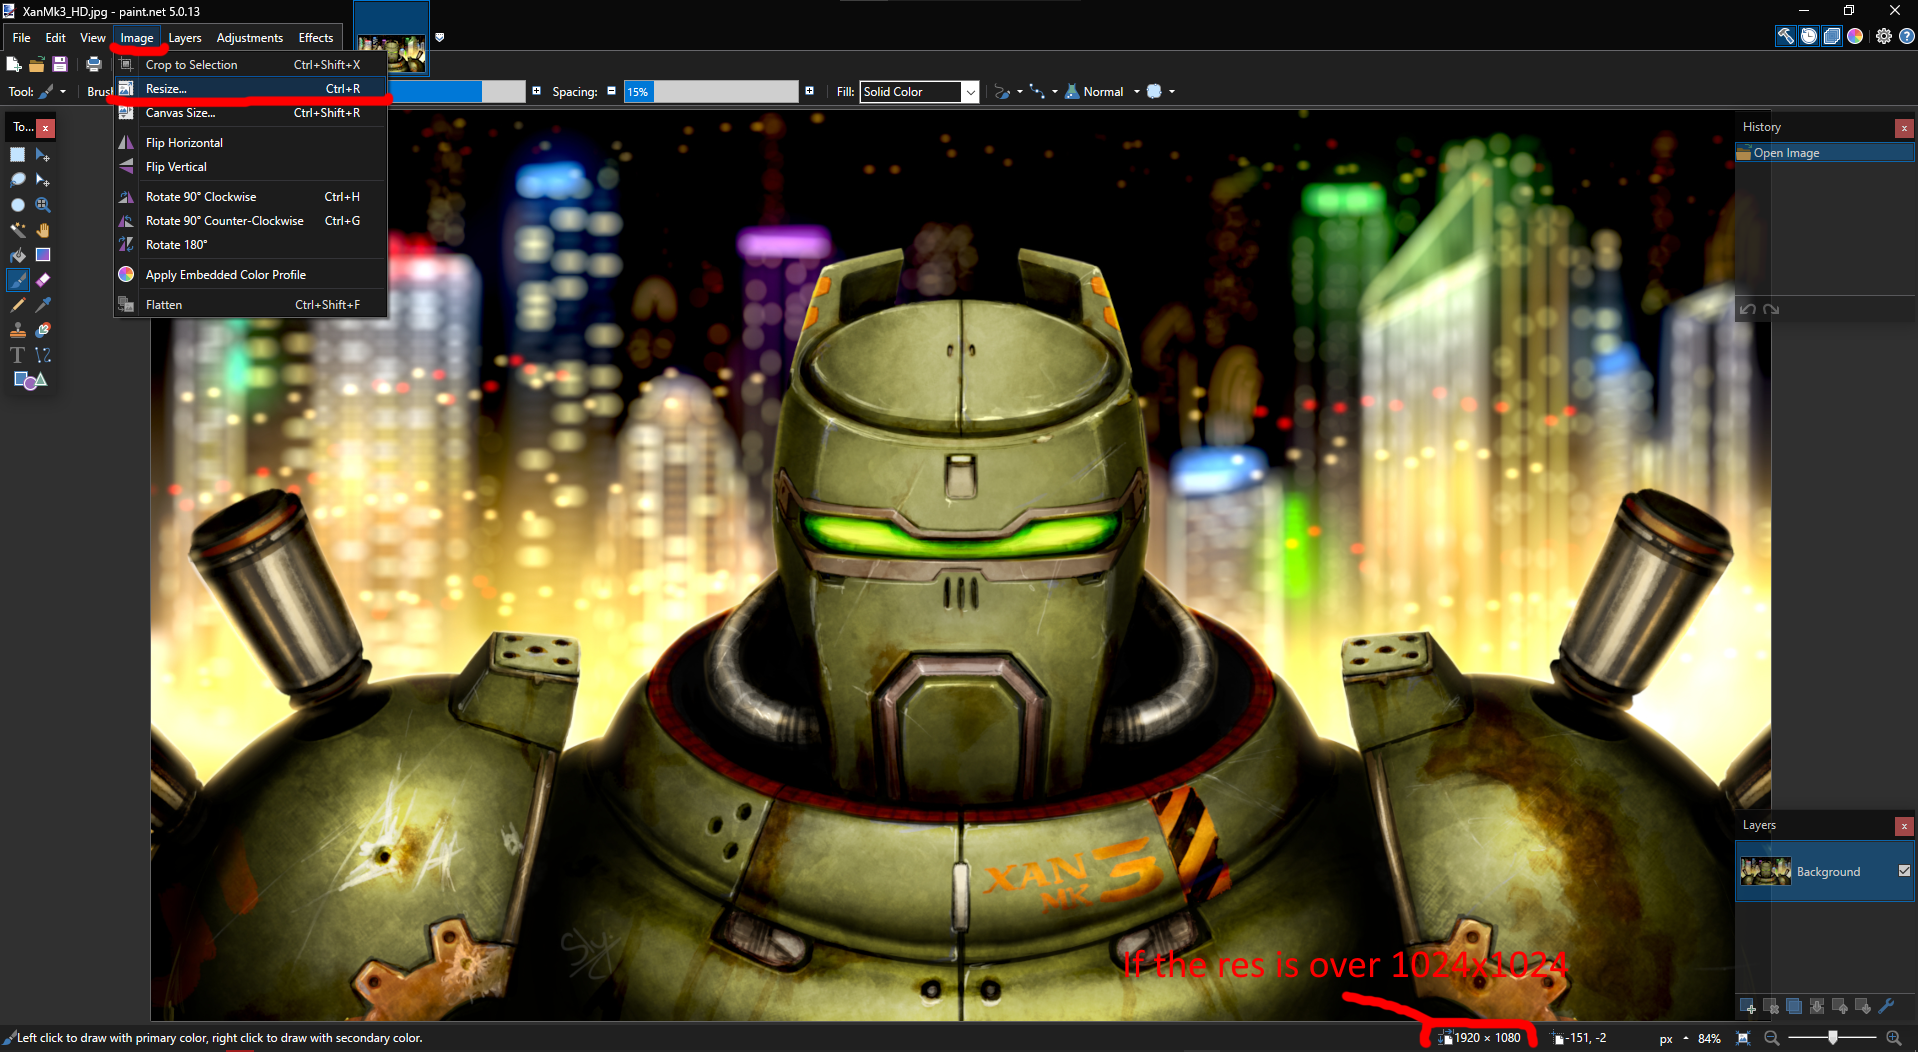
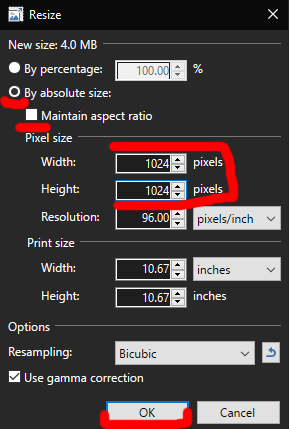
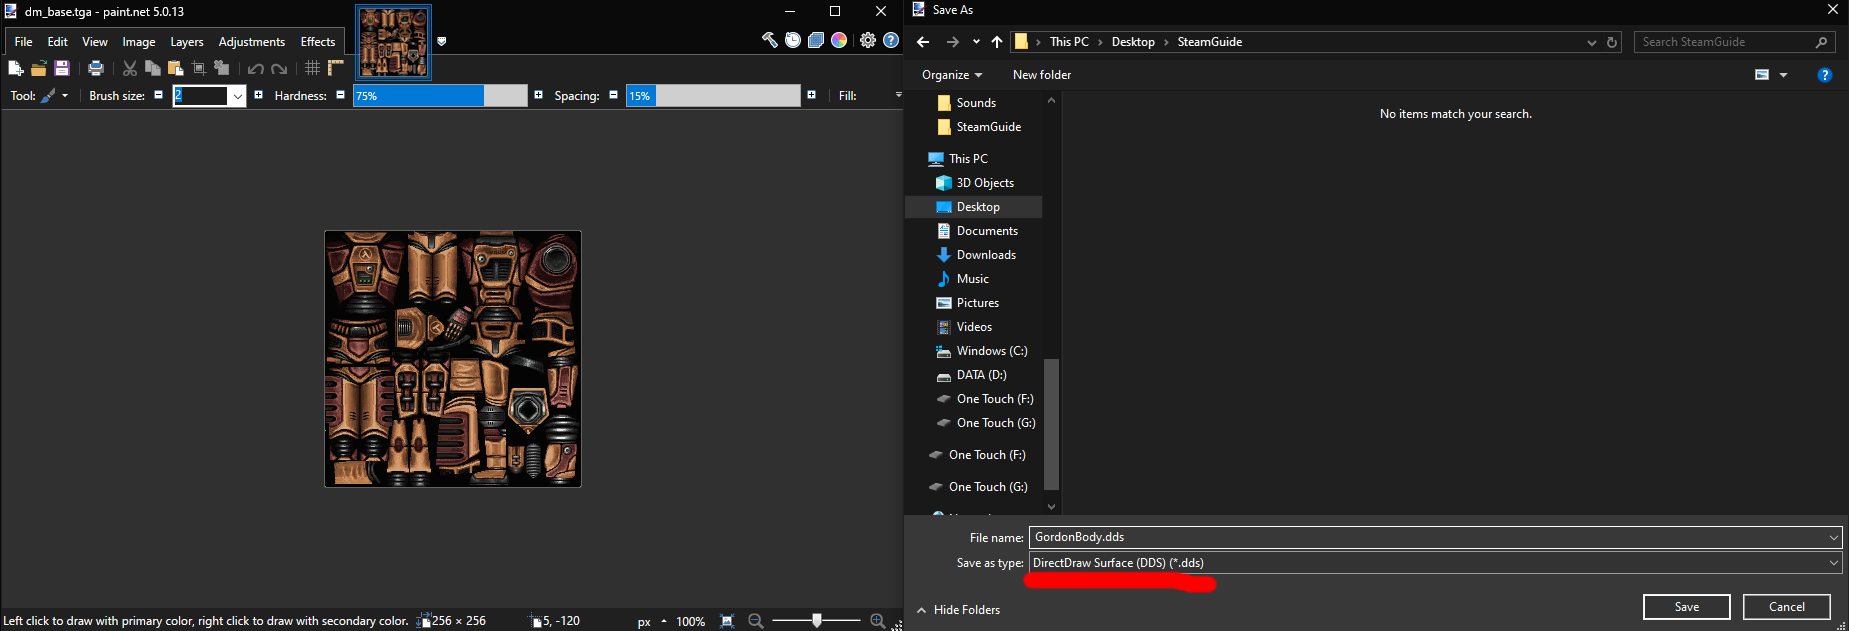
Now we will get to textures, like models sourcing the textures is on you. So after you get the textures open up your image editing program. I am using PaintDotNet for this tutorial. Now for all of your textures you need if their resolution is above 1024x1024 pixels I recommend down scaling to that as above that just adds unnecessary space to your mod. Now when that is done save your Image as a .dds file.


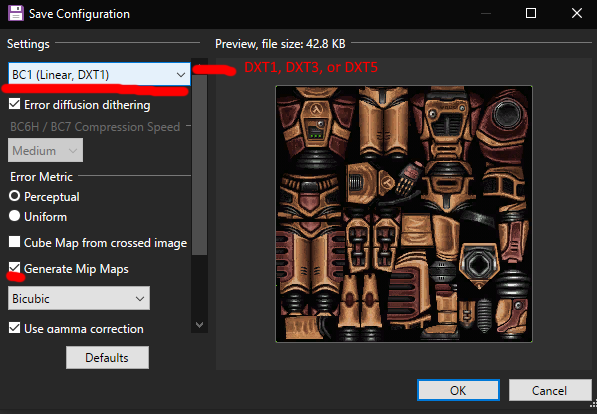
Now for the export settings you will need to change two things.

Compression option will be decided by what your texture will be. If your texture has no alpha channel and is meant simply for color choose DXT1. If you plan on using alpha for masked textures use DXT3. If you want to have a nice detailed alpha for stuff like specular maps use DXT5.

You will also need to enable generate Mip Maps.


Your textures will be ready for import into KF SDK now!
Part 7: Importing Textures and Making Materials
Go to the texture browser in KF SDK


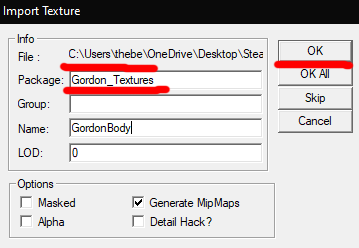
Now go to File>Import and choose your textures. In the import window after use the Package field to name your package. I would just use something like Charactername_Textures but its up to you. Then just press OK.


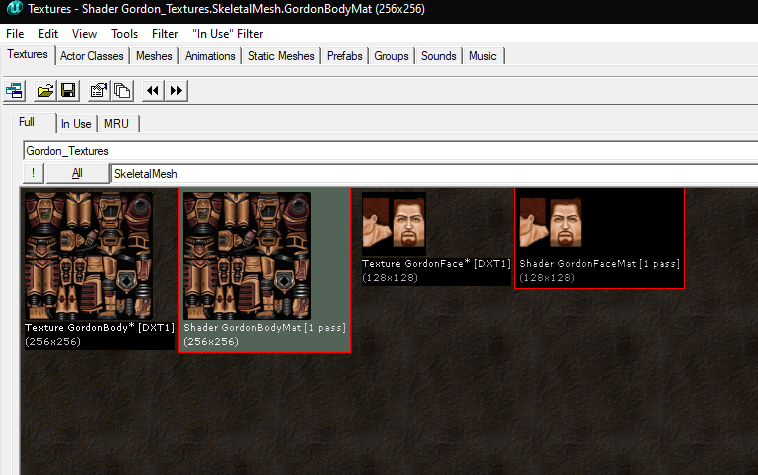
It will auto select your package after you import them. Save your package from File>Save. Now you can either just use these plain textures or if you want you can do some shader/material work on them. I wont teach you the material editor but here is the official documentation for the UnrealEd 2 material editor that you can look at here.

Official Documentation[docs.unrealengine.com]

Here are some things I do recommend for your properties however.

I like to make them 2 sided so in case there are seams they get hidden a bit. (This will only work if you make a shader.)

I also like to set the LODSET to PlayerSkin.

If the texture is of armor I like to make the surface type match.

Bonus option is if you want to have a normal map even though UE2 doesnt support them natively if you grayscale the normal map it can make a nice detail map to give your texture a bit more depth. Just remember to give it the detail hack flag on import.

After you are ready with the textures you can assign it to your model
Part 8: Assigning Materials
To start in the texture browser select the texture you wish to use. You can tell whats selected by the green highlight.


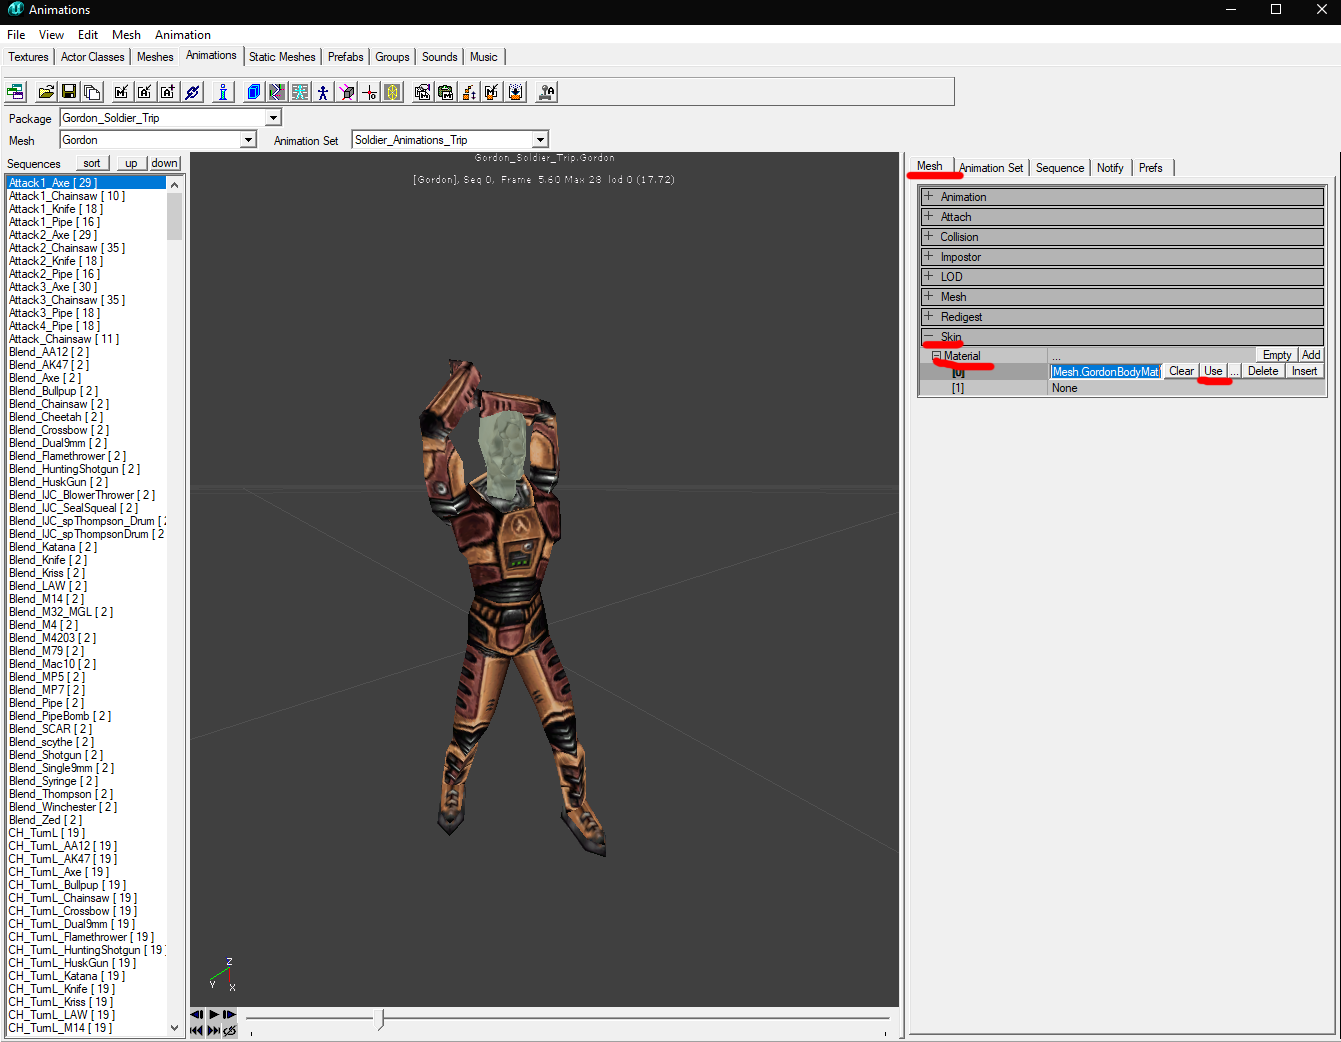
Now go to the animation browser. Select your mesh. Select in properties Mesh>Skin>Materials. Click on a material slot then press the use button. Repeat for how many material slots you have.


One last mandatory thing before we get the mod set up!
Part 9: Making Portrait
Now we will need a modeling program again to make the character portrait. I have created a template to add your character to for this.
If you don't have blender its a basic setup for it. Just have a camera pointed at the character that has a 256x512 resolution with a little bit of a washed out strong red light from the characters left in the front and a white strong light behind the character to their left.

Template for blender[drive.google.com]

To use this simply add your character model to the scene, scale it to the model thats already there and then delete my mesh. get the materials set up in the material tab. If you dont know how to use it heres a tutorial for it.

Blender Basic Material Tutorial[all3dp.com]

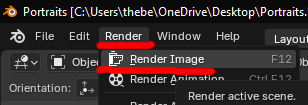
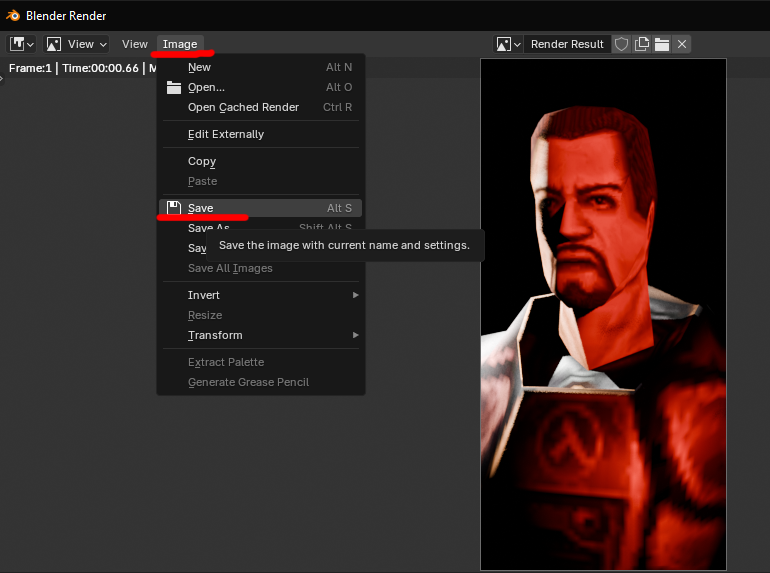
Now just go to Render>Render Image.


After a second a picture of your model with lighting should appear. If you like this save this image.


Now we will stylize this image so it fits even better with the default ones.
Part 10: Stylizing Portrait and Import
Now for this step open up your image editing program. If you have photoshop i reccomend following the steps on here for stylizing as thats the easiest platform to do it on.

Official Profile Texture Creation Page[wiki.tripwireinteractive.com]

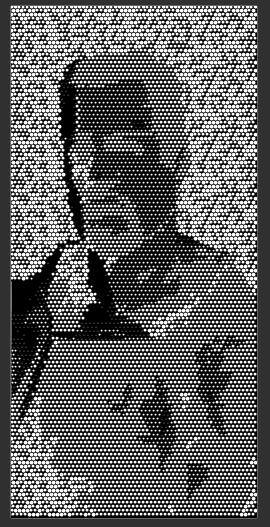
Now I will show how to do it in PaintDotNet. You will need the plugin from prerequisites. Open your render in paint and go to Adjustments>Black and White. Now go to Effects>Stylize> TR's Half Tone. This opens a window just leave everything default but flip the dots and background color and it should look something like this.


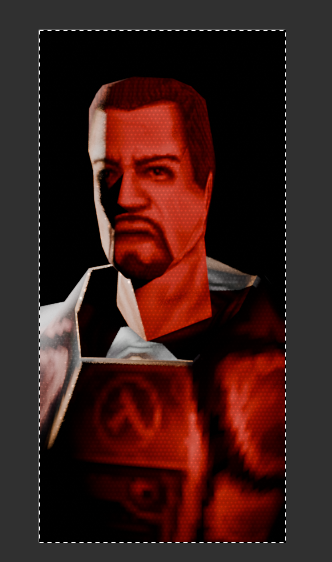
Save this as a seperate image. Open your original render in a seperate file and add the black and white one you just made as a layer above it. Make the layer properties 40 opacity and blend mode multiply and you should get a result like this.


Save this as a DXT1 .dds and import it to KF SDK. In the properties give it LODSET_Interface.

Now lets get this mod file set up.
Part 11: Making Mod Package and Character File
To start we will make the mod package and to do this you want to go to your Killing Floor root folder and make a folder to be your character mod. its very important for characters the folder is named exactly what your characters name will be in the game with mod added. For example mine will be GordonfreemanMod. The Mod part of the name is important if its not that it will NOT work. Inside of that folder make a folder called exactly Classes.


Now open your Code or Text editor. If you installed Visual Studio Code make sure you have the extension and go to File>Open Folder and select Killing Floor root folder. If you get a pop up trust the folder. go to the classes folder you made and make a new .uc file called Charactername.uc. I will make GordonFreeman.uc

Paste this in and modify it as needed. The comments will tell you what to do for each line. Leave the Species and VoiceClass as is for now.

If you are doing VSC you may notice red lines under lines that reference packages you can ignore this.

underlined things will be replaced
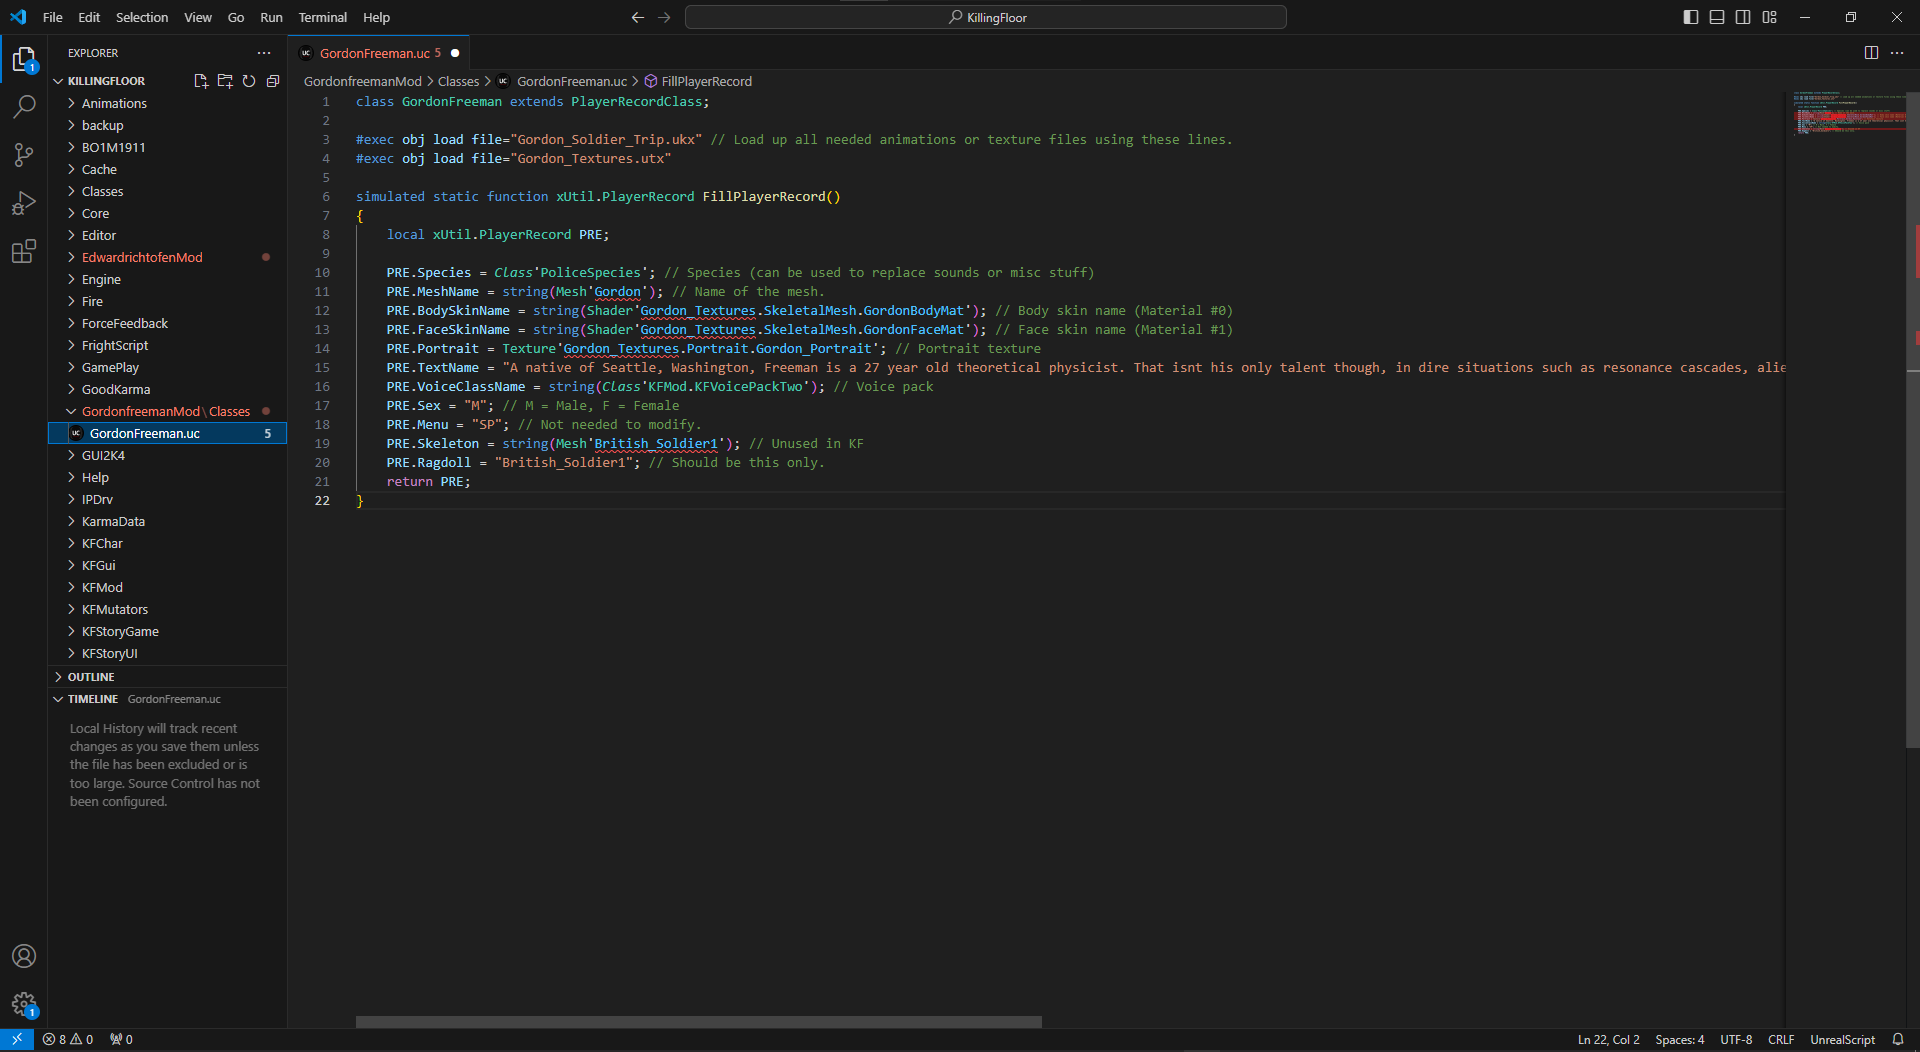
class Charactername extends PlayerRecordClass; //Replace character name with the name of your .uc file. #exec obj load file="Charactername_Soldier_Trip.ukx" // Load up all needed animations or texture files using these lines. Use file names of your packages and include the extensions #exec obj load file="Charactername_Textures.utx" simulated static function xUtil.PlayerRecord FillPlayerRecord() { local xUtil.PlayerRecord PRE; PRE.Species = Class'PoliceSpecies'; // Species, ignore for now. PRE.MeshName = string(Mesh'Meshnamehere'); // Name of the mesh in your animation package. PRE.BodySkinName = string(TextureType'TexturePackage.TextureName'); // Body skin name Material #0 can copy directly from anim browser. PRE.FaceSkinName = string(TextureType'TexturePackage.TextureName'); // Face skin name Material #1 can copy directly from anim browser. PRE.Portrait = Texture'Charactername_Textures.PortraitTexture'; // Portrait texture PRE.TextName = "DescriptionTextHere"; // Description text. PRE.VoiceClassName = string(Class'KFMod.KFVoicePackTwo'); // Voice pack ignore for now PRE.Sex = "M"; // M = Male, F = Female PRE.Menu = "SP"; // Not needed to modify. PRE.Skeleton = string(Mesh'British_Soldier1'); // Unused in KF PRE.Ragdoll = "British_Soldier1"; // Should be this only. return PRE; }

After modifying your code should look a little like this.


Now you could go on to compiling your mod and publishing it if you wanted. But if you want to change more stuff (Voice lines, pain sounds, view arms, gibs) I will show each of these. But if you wish to just compile now go on to Part 16.
Part 12-1: Making Other UnrealScript Files
There are 5 more files you will need to make for the rest of the stuff you can make. We will start with making these and modifying the templates as we can so far. When you make these reference the ones that they require in each other through the files. Go back and do it for main file too.

Species
class CharacternameSpecies extends SoldierSpecies; //make class name your characters name followed by species. defaultproperties { SleeveTexture=Texture'KF_Weapons_Trip_T.hands.hands_1stP_riot_D' //This will be view model arm texture we will go over this later DetachedArmClass = class'SeveredArmPolice' //make this the name of your arm gib class when you make it DetachedLegClass = class'SeveredLegPolice' //make this the name of your leg gib class when you make it MaleVoice="CharacternameMod.CharacternameVoicePack" //make this of the name of your voice pack when you make it MaleSoundGroup="CharacternameMod.CharacternameSoundGroup" //make this of the name of your sound group when you make it }

VoicePack
class CharacternameVoicePack extends KFVoicePack; //Replace Character name. Ignore rest of file for now. defaultproperties { SupportSound(0)=Sound'' //Medic SupportSound(1)=Sound'' //Help SupportSound(2)=Sound'' //NeedMoney SupportSound(3)=Sound'' //DropWeapon AcknowledgmentSound(0)=Sound'' //Yes AcknowledgmentSound(1)=Sound'' //No AcknowledgmentSound(2)=Sound'' //Thanks AcknowledgmentSound(3)=Sound'' //Sorry AlertSound(0)=Sound'' //LookOut AlertSound(1)=Sound'' //Run AlertSound(2)=Sound'' //WaitForMe AlertSound(3)=Sound''//WeldTheDoors AlertSound(4)=Sound'' //HoleUp AlertSound(5)=Sound''//FollowMe DirectionSound(0)=Sound'' //GetToTheTrader DirectionSound(1)=Sound'' //GoUpstairs DirectionSound(2)=Sound'' //HeadDownstairs DirectionSound(3)=Sound'' //GetInside DirectionSound(4)=Sound'' //GoOutside InsultSound(0)=Sound'' //InsultSpecimen InsultSound(1)=Sound'' //InsultPlayers AutomaticSound(0)=Sound'' //AutoWelding AutomaticSound(1)=Sound'' //AutoUnwelding AutomaticSound(2)=Sound'' //AutoReloading AutomaticSound(3)=Sound'' //AutoNoAmmo AutomaticSound(4)=Sound'' //AutoDropCash AutomaticSound(5)=Sound'' //AutoHealing AutomaticSound(6)=Sound'' //AutoDying AutomaticSound(7)=Sound'' //AutoFunBloatPuking AutomaticSound(8)=Sound'' //AutoFunPatriarchInvis AutomaticSound(9)=Sound'' //AutoFunPatriachChainGun AutomaticSound(10)=Sound'' //AutoFunPatriarchRockets AutomaticSound(11)=Sound'' //AutoFunGrabbedByClot AutomaticSound(12)=Sound'' //AutoFunSpotFP AutomaticSound(13)=Sound'' //AutoFunSpotGore AutomaticSound(14)=Sound'' //AutoFunSpotScrake AutomaticSound(15)=Sound'' //AutoFunSpotSiren AutomaticSound(16)=Sound'' //AutoFunSirenScreaming AutomaticSound(17)=Sound'' //AutoFunStalkerSpotted AutomaticSound(18)=Sound'' //AutoFunCrawlerSpottd AutomaticSound(19)=Sound'' //AutoFunKilledStalkerwithMelee AutomaticSound(20)=Sound'' //AutoFunZedBurned AutomaticSound(21)=Sound'' //AutoFunSelectDBshotgun AutomaticSound(22)=Sound'' //AutoFunSelectDualHandcannons AutomaticSound(23)=Sound'' //AutoFunSelectLAW AutomaticSound(24)=Sound''//AutoFunSelectAxe }

Sound Group
class CharacternameSoundGroup extends KFMaleSoundGroup; //Replace with your characters name. Ignore rest of file for now. defaultproperties { BreathingSound=Sound'KFPlayerSound.Malebreath' //Doesnt Always Replace //DeathSounds DeathSounds(0)=Sound'' DeathSounds(1)=Sound'' DeathSounds(2)=Sound'' DeathSounds(3)=Sound'' DeathSounds(4)=Sound'' //PainSounds PainSounds(0)=Sound'' PainSounds(1)=Sound'' PainSounds(2)=Sound'' PainSounds(3)=Sound'' PainSounds(4)=Sound'' PainSounds(5)=Sound'' }

Arm Gib
class SeveredArmCharacterName extends SeveredArm; //Replace character name ignore everything else for now. defaultproperties { StaticMesh=StaticMesh'kf_gore_trip_sm.limbs.british_riot_police_arm_resource' }

Leg Gib
class SeveredLegCharacterName extends SeveredLeg; //Replace character name ignore everything else for now. defaultproperties { StaticMesh=StaticMesh'kf_gore_trip_sm.limbs.british_riot_police_leg_resource' }
Part 12-2: Making Other UnrealScript Files
You should now have 6 .uc files and have them referencing each other. Here are all of my files right now.


class GordonFreeman extends PlayerRecordClass; #exec obj load file="Gordon_Soldier_Trip.ukx" // Load up all needed animations or texture files using these lines. #exec obj load file="Gordon_Textures.utx" simulated static function xUtil.PlayerRecord FillPlayerRecord() { local xUtil.PlayerRecord PRE; PRE.Species = Class'GordonfreemanMod.GordonFreemanSpecies'; // Species (can be used to replace sounds or misc stuff) PRE.MeshName = string(Mesh'Gordon'); // Name of the mesh. PRE.BodySkinName = string(Shader'Gordon_Textures.SkeletalMesh.GordonBodyMat'); // Body skin name (Material #0) PRE.FaceSkinName = string(Shader'Gordon_Textures.SkeletalMesh.GordonFaceMat'); // Face skin name (Material #1) PRE.Portrait = Texture'Gordon_Textures.Portrait.Gordon_Portrait'; // Portrait texture PRE.TextName = "A native of Seattle, Washington, Freeman is a 27 year old theoretical physicist. That isnt his only talent though, in dire situations such as resonance cascades, alien empire takeovers and zed outbreaks he can help in a not so scientific, but more ballistic way. He also has a natural leader energy to him and can help lead people to victory."; // Description text. PRE.VoiceClassName = string(Class'GordonfreemanMod.GordonFreemanVoicePack'); // Voice pack PRE.Sex = "M"; // M = Male, F = Female PRE.Menu = "SP"; // Not needed to modify. PRE.Skeleton = string(Mesh'British_Soldier1'); // Unused in KF PRE.Ragdoll = "British_Soldier1"; // Should be this only. return PRE; }

class GordonFreemanSoundGroup extends KFMaleSoundGroup; defaultproperties { BreathingSound=Sound'KFPlayerSound.Malebreath' //Doesnt Always Replace //DeathSounds DeathSounds(0)=Sound'' DeathSounds(1)=Sound'' DeathSounds(2)=Sound'' DeathSounds(3)=Sound'' DeathSounds(4)=Sound'' //PainSounds PainSounds(0)=Sound'' PainSounds(1)=Sound'' PainSounds(2)=Sound'' PainSounds(3)=Sound'' PainSounds(4)=Sound'' PainSounds(5)=Sound'' }

class GordonFreemanSpecies extends SoldierSpecies; defaultproperties { SleeveTexture=Texture'KF_Weapons_Trip_T.hands.hands_1stP_riot_D' DetachedArmClass = class'SeveredArmPolice' DetachedLegClass = class'SeveredLegPolice' MaleVoice="GordonfreemanMod.GordonFreemanVoicePack" MaleSoundGroup="GordonfreemanMod.GordonFreemanSoundGroup" }

class GordonFreemanVoicePack extends KFVoicePack; defaultproperties { SupportSound(0)=Sound'' //Medic SupportSound(1)=Sound'' //Help SupportSound(2)=Sound'' //NeedMoney SupportSound(3)=Sound'' //DropWeapon AcknowledgmentSound(0)=Sound'' //Yes AcknowledgmentSound(1)=Sound'' //No AcknowledgmentSound(2)=Sound'' //Thanks AcknowledgmentSound(3)=Sound'' //Sorry AlertSound(0)=Sound'' //LookOut AlertSound(1)=Sound'' //Run AlertSound(2)=Sound'' //WaitForMe AlertSound(3)=Sound''//WeldTheDoors AlertSound(4)=Sound'' //HoleUp AlertSound(5)=Sound''//FollowMe DirectionSound(0)=Sound'' //GetToTheTrader DirectionSound(1)=Sound'' //GoUpstairs DirectionSound(2)=Sound'' //HeadDownstairs DirectionSound(3)=Sound'' //GetInside DirectionSound(4)=Sound'' //GoOutside InsultSound(0)=Sound'' //InsultSpecimen InsultSound(1)=Sound'' //InsultPlayers AutomaticSound(0)=Sound'' //AutoWelding AutomaticSound(1)=Sound'' //AutoUnwelding AutomaticSound(2)=Sound'' //AutoReloading AutomaticSound(3)=Sound'' //AutoNoAmmo AutomaticSound(4)=Sound'' //AutoDropCash AutomaticSound(5)=Sound'' //AutoHealing AutomaticSound(6)=Sound'' //AutoDying AutomaticSound(7)=Sound'' //AutoFunBloatPuking AutomaticSound(8)=Sound'' //AutoFunPatriarchInvis AutomaticSound(9)=Sound'' //AutoFunPatriachChainGun AutomaticSound(10)=Sound'' //AutoFunPatriarchRockets ... goes on not enough space on the section.

class SeveredArmGordon extends SeveredArm; //Replace character name ignore everything else for now. defaultproperties { StaticMesh=StaticMesh'kf_gore_trip_sm.limbs.british_riot_police_arm_resource' }

class SeveredLegGordon extends SeveredLeg; //Replace character name ignore everything else for now. defaultproperties { StaticMesh=StaticMesh'kf_gore_trip_sm.limbs.british_riot_police_leg_resource' }

Now that you have all of your other .uc files lets start on making this other content for your character.
Part 13: Making Hand Textures
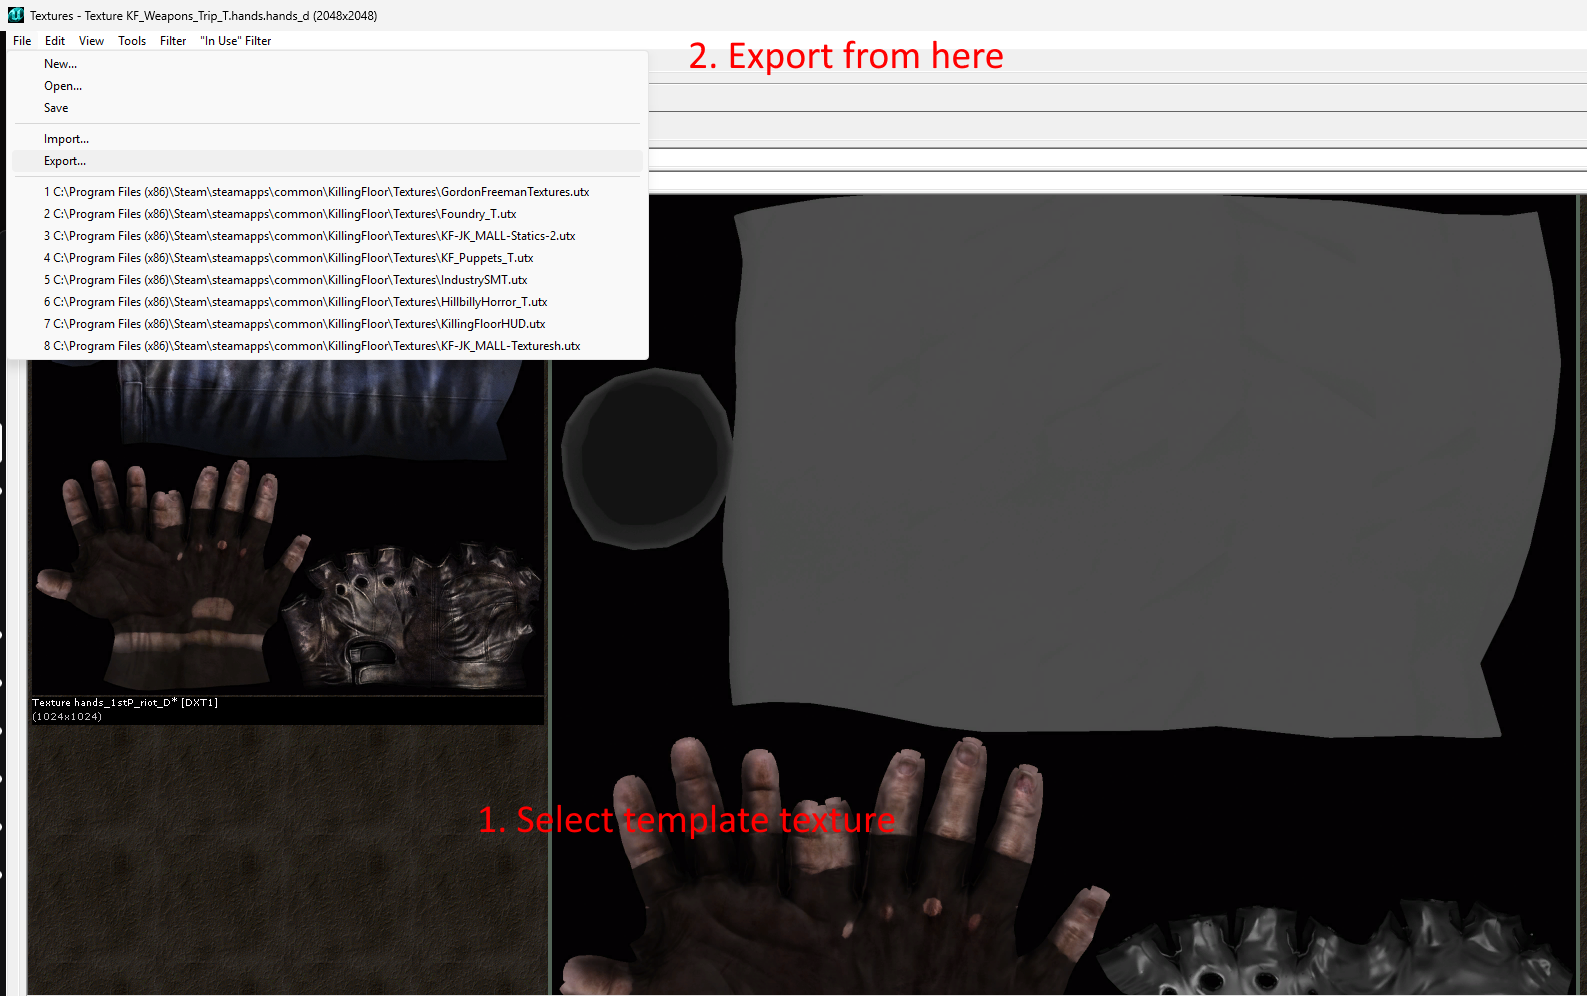
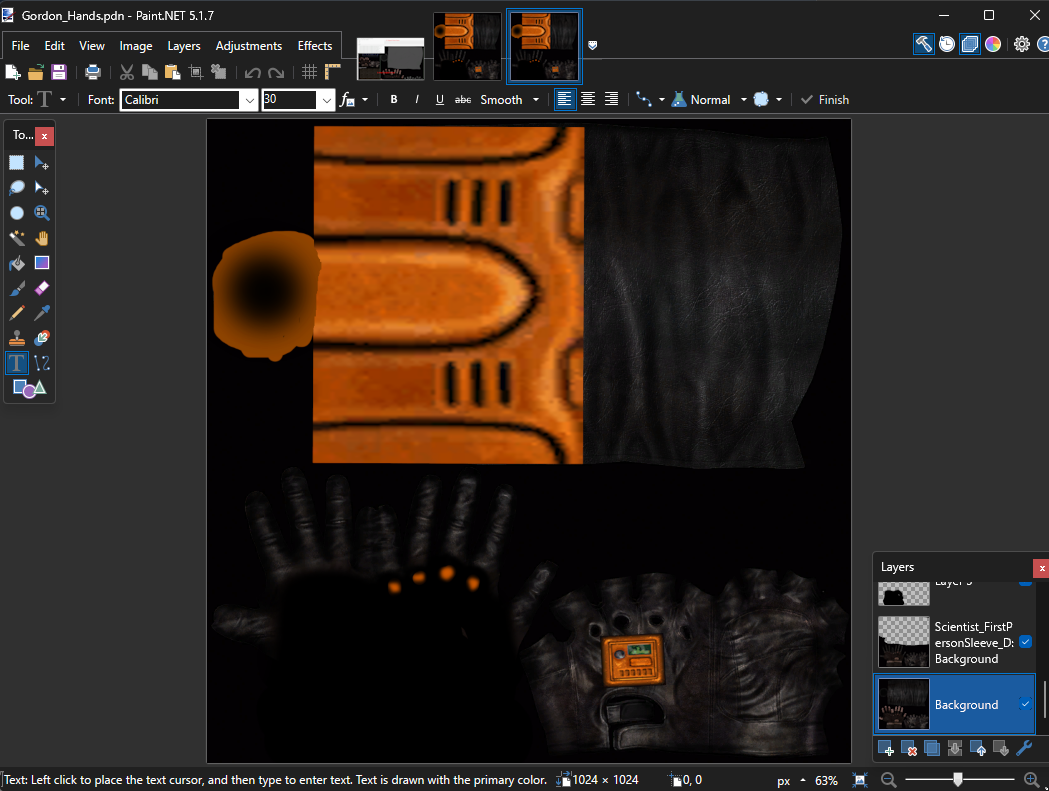
Unlike everything else so far you cant simply port something from another game for the hand texture. All hand models are attached to weapon animations so the hand textures are a specific UV map that you either have to draw on/edit or just find another default one that lines up well enough for your characters. All arm textures are in the various texture packages for weapons. There is sort of a template inside of KF_Weapons_Trip_T. You can export the texture from the editor.


When you either make or choose your texture add it to your texture package and in the Species file add it to the SleeveTexture. It can be any kind of material so just make sure you put the right type before the reference.

These can be hard to make look good, so if you just want to use a default one that is understandable.

Part 14: Adding Custom Sounds
You will be in charge of sourcing audio. For both voice lines, and pain and death sounds its the same general process. Voice lines will be in voice pack .uc, and the pain and death sounds will be held in the sound group .uc. To start prepping your audio import it into Audacity

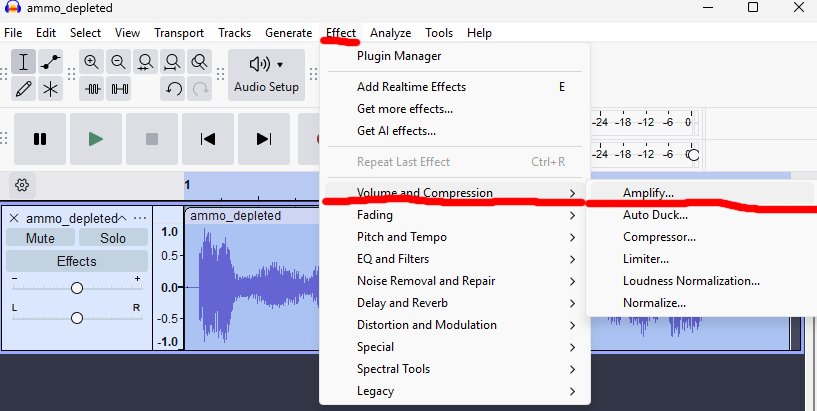
Something you will need to know, is that this games audio mixing is TERRIBLE! to have your voice audible it will need to be near peaking the thing constantly, and this can cause voice lines with very unequal volumes to be hard to balance. You don't want it to clip too much or it just sounds bad. This is how a default voice line looks.


I mainly just tweak the Amplify effect you can find it here, I will leave this part of the step to you.


Also trim any blank space in the beginning and end to save file size.

Make it mono, if its already 1 channel good to go if not do Tracks>Mix Stereo Down To Mono.

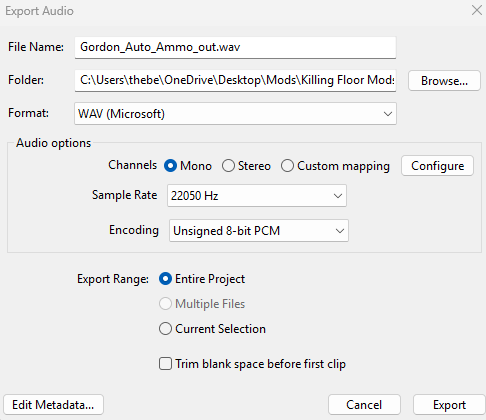
After you get it good and are getting ready to export, click File>Export Audio, name it something you will remember what line its for and choose the WAV(Microsoft) format. I use mono 22050 Hz sample rate and Unsigned 8-bit PCM encoding. Than I export.


When you have all the audio you want open KF SDK.

You want to open the sound browser and do File>Import.


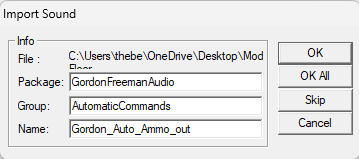
Select any files you have and open. This will open import window.


For package make a package for your characters voice lines/ sounds. For example like CharacternameAudio or CharacternameVoice. For group this is for organization and I highly reccomend using for voice lines. and name just leave as file name.

Press OK and it should appear in the sound browser, if it fails to import make sure the file path has no spaces, the engine can be picky with this.

When you have all of your files you will need to make a SoundGroup for your voice lines. One for each one. So go to File>New SoundGroup, and name it something that tells you what it is. These will show up on the top of the list with a * next to the name. Right click it and open properties. You ignore everything but the list of sounds where you add as many entries as sounds for a voiceline and than add them in by selecting the sound file and pressing use on the list.

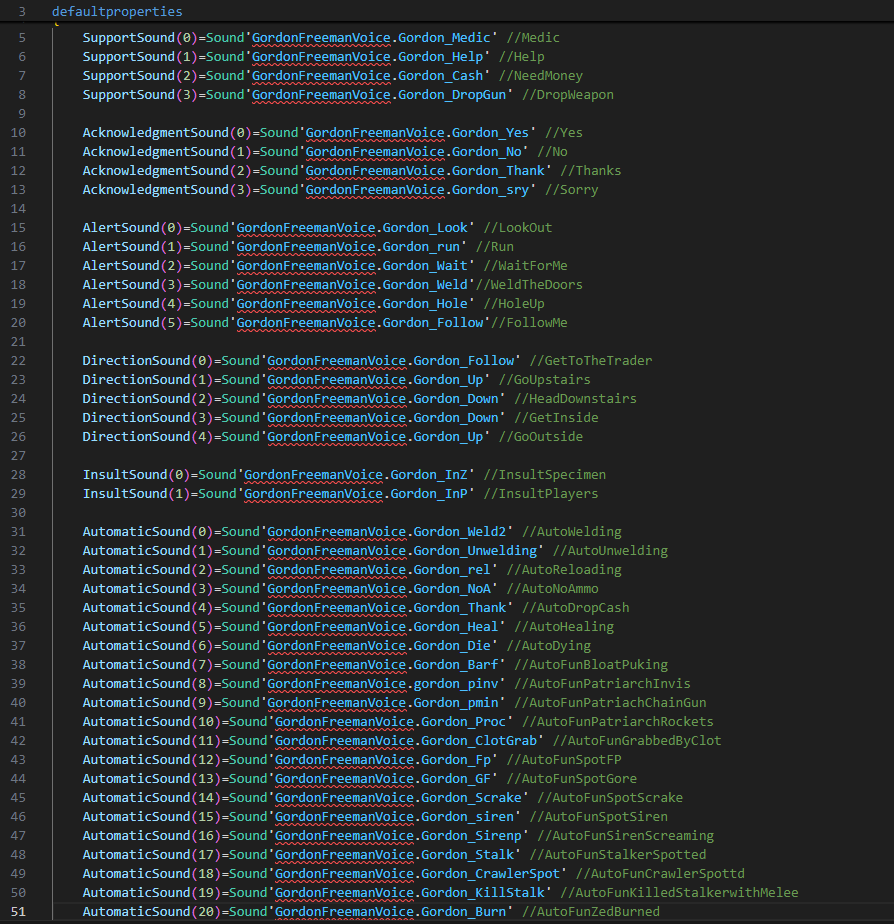
Last step when you have all of these is to assign them on your voice pack or sound group. You just put the reference to the sound group in the code. Sound'refgoeshere'.

Here is my voice class with all of them finished.


Audio should be good now.
Part 15: Making Gibs
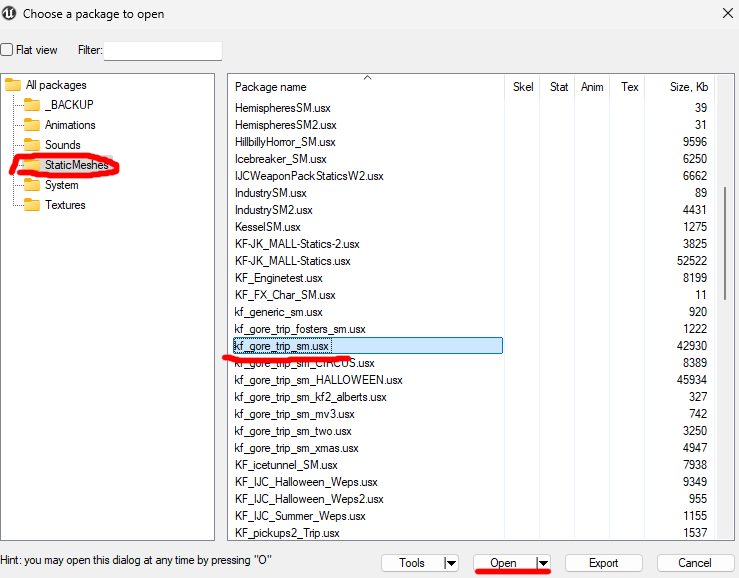
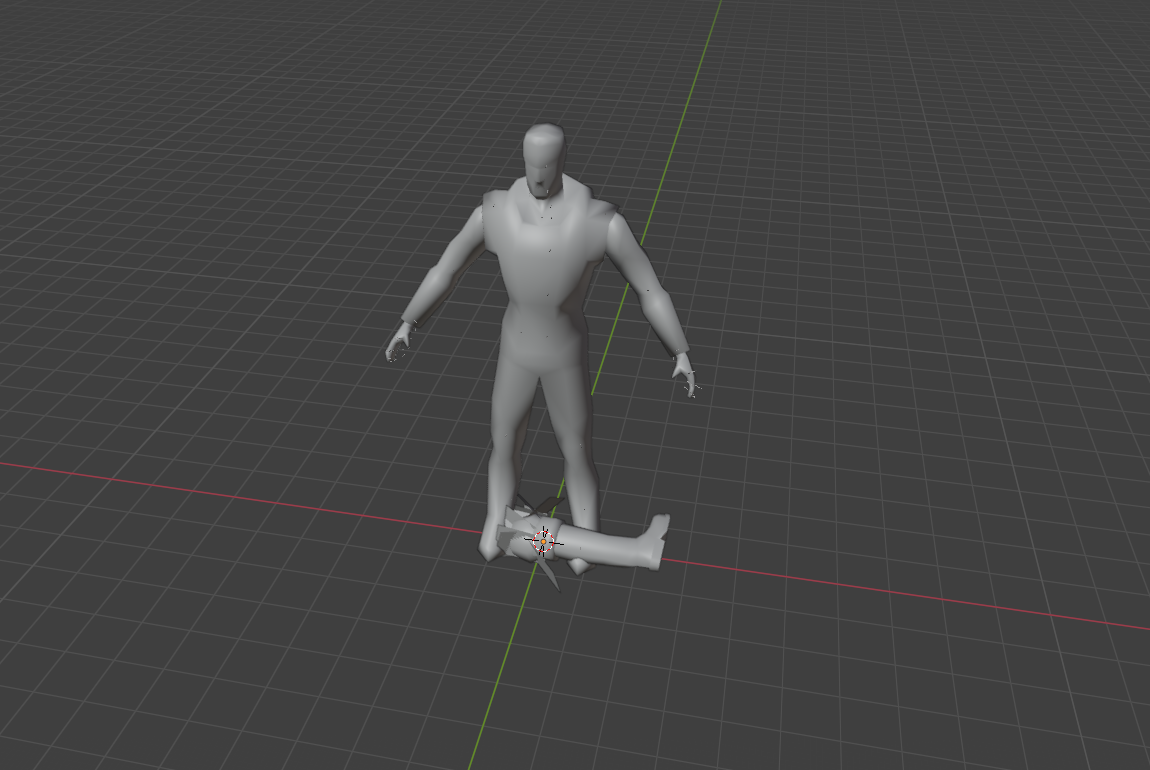
Last optional thing I will be covering is custom gibs, these are really easy to make. To start open up UE Viewer and do the same process as earlier to open the killing floor folder. Now this time you want to open the static meshes folder instead. Open up kf_gore_trip_sm.


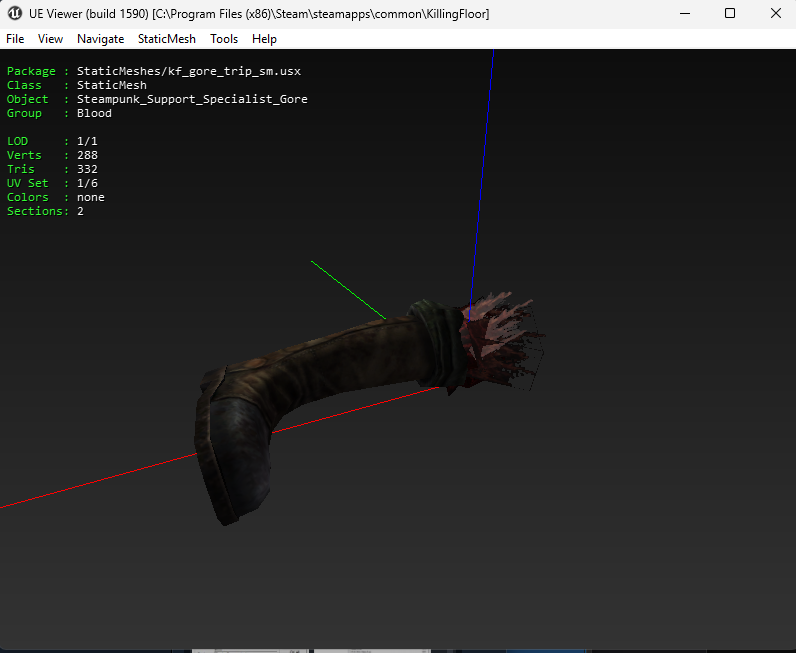
Find a model of an arm or leg gib for any dlc/achievment character. They will be easier to use as a base because they use multiple materials.

I will be using this model.


Ctrl-X to export.

Now open up this model in blender and also import your character model.


Delete the skeleton of your character so its just the plain model.

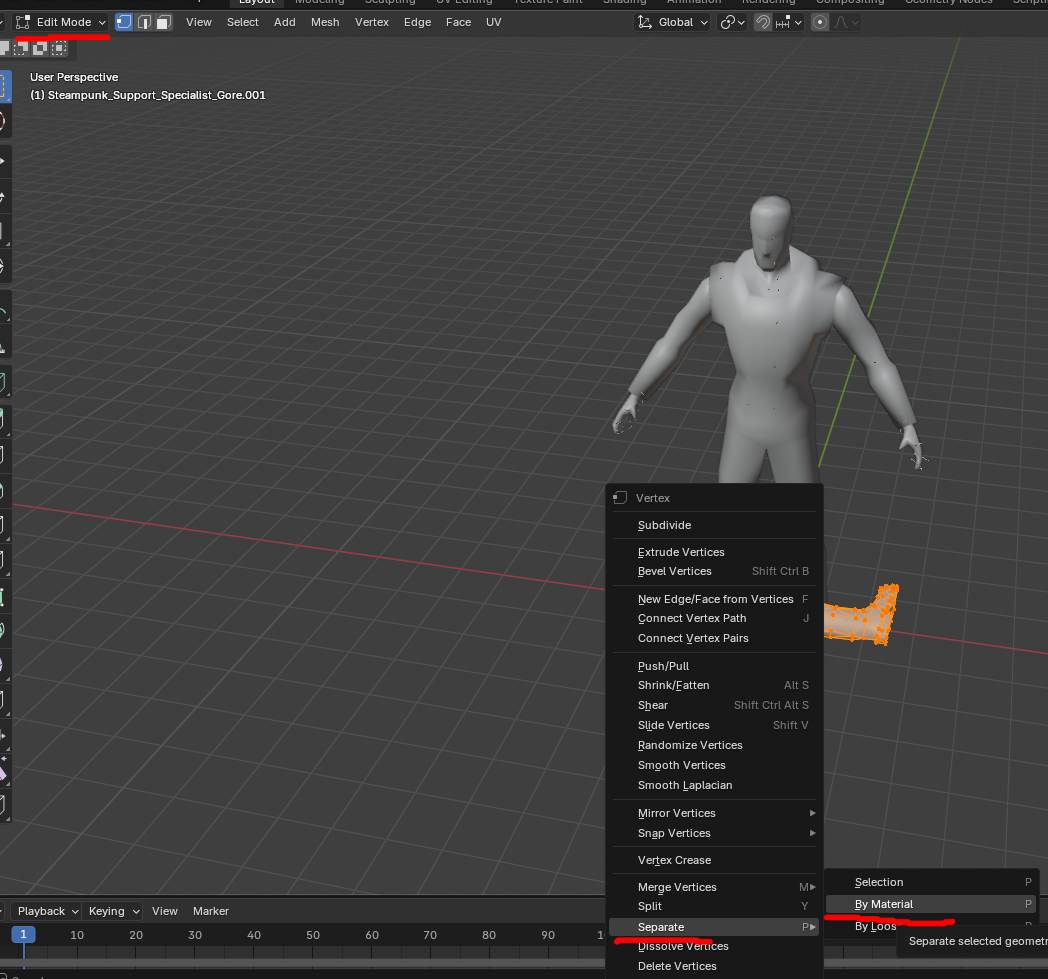
Now select the gib you exported, go to edit mode and select all of the models vertices. Right click and click Separate>Material.


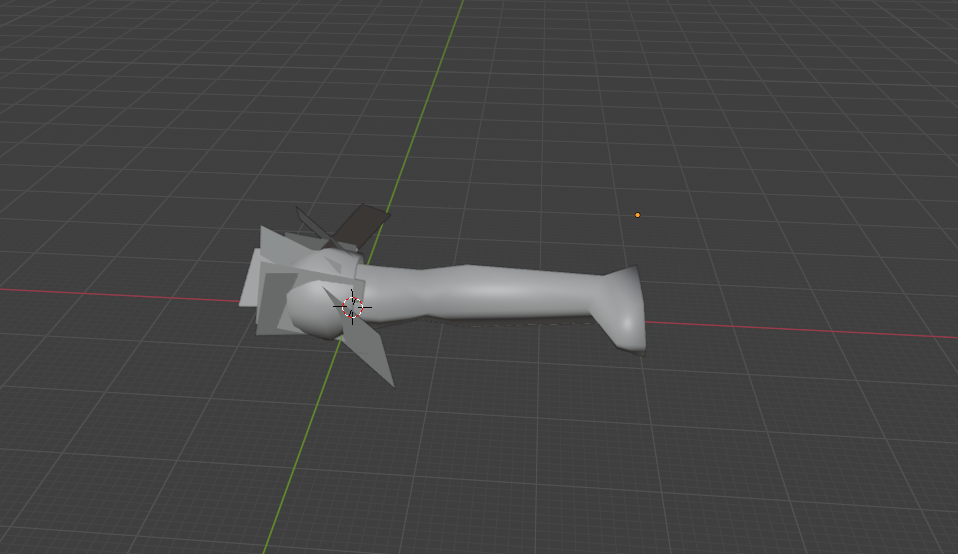
This will split the leg into 2 meshes, the leg and the blood. Delete the leg so you are left with just the blood. Now you want to go to your character and in edit mode delete everything but one of their arms or legs.

If you press C you can go into a brush mode for edit mode and right click to close it.

After you do that you can pose the limb to be inside the gib and should get something like this.


Now select your leg if it has more than 1 material slot to make sure its only whatever material is being used by the part of the body. Than you can join the models by selecting both and doing Ctrl-J.

Now export this model as an ASE file, the extension for it is linked above.

Repeat for arm or leg whichever is next for you.

After you export these open KF SDK.

Open the static mesh browser and do File>Import and find your models.


On the import menu for package create a new one for your character. Name is something like CharacternameStatics. Group just leave blank. and the named just leave like characternamearm characternameleg etc.

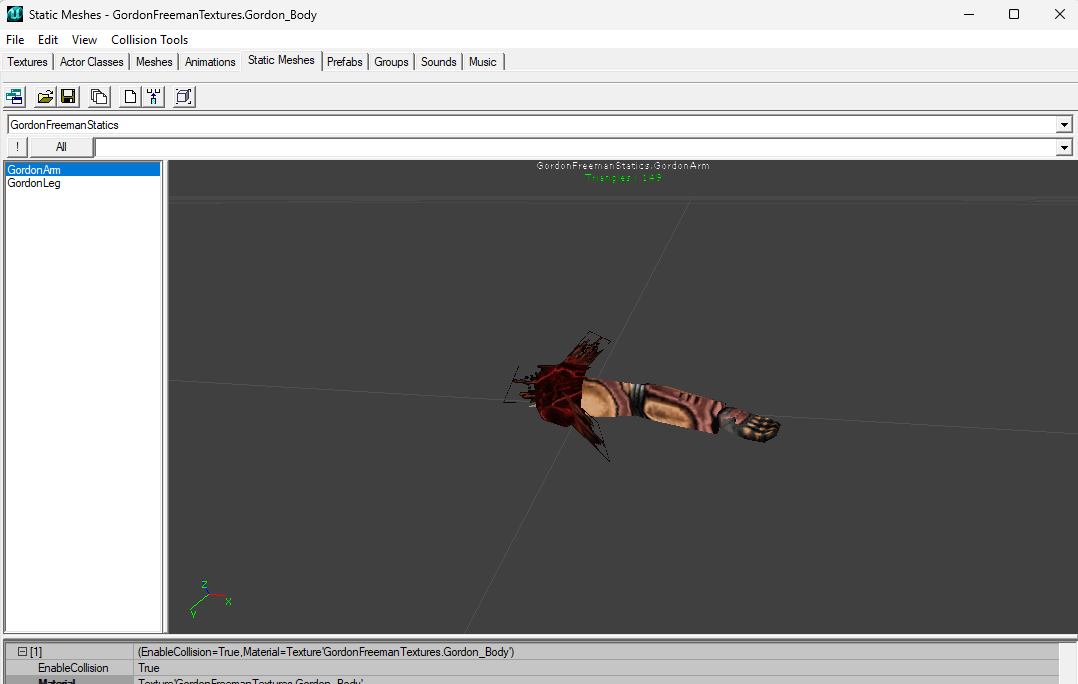
Now the only properties we are gonna touch are materials which will be in the window below the model. You might get lucky and the gib part's material imports on its own, but if you dont just make it Texture'kf_fx_trip_t.Gore.KF_Gore_Limbs_diff', and set the other slot to your characters materials.

You should get something like this.


Next step you will need to add references to your code.

Each gib class will have 1 static mesh reference, just fill that in with the path to that mesh. for example this is now my arm gib class.

class SeveredArmGordon extends SeveredArm; //Replace character name ignore everything else for now. defaultproperties { StaticMesh=StaticMesh'GordonFreemanStatics.GordonArm' }

This will be all you need for gibs.
Part 16: Compiling Character
For this the first step we will need to edit the KillingFloor.ini located in KillingFloor/System. Just open it with a text editor and locate all of the EditPackages= lines in [Editor.EditorEngine]. These handle which .u packages the editor (and therefor the compiler) has access to. Add a line with EditPackages=YourPackageName. So I would have EditPackages=GordonFreemanMod.

Important thing to note, when you are done compiling your mod remember to remove this line from the .ini. If you ever uninstall it from your game with it still in .ini it will prevent you from opening editor.

Now we are going to make a .bat file to run the compiler. To do this i just make a new text file, and change .txt to .bat. Name it something like ucc.bat and put it in KillingFloor/System folder, if you dont have it in system folder it wont work correctly.

Paste the following into the .bat file:
ucc make ::Runs the UCC program for compiling scripts pause ::Pauses so you can read if it compiled correctly del steam_appid.txt ::Deletes a file that auto generates and prevents online play

Now with both of those done you should be able to just run the .bat (just double click like a .exe). When you run it will open a command prompt which will start listing stuff like:

----------------------------Core - Release----------------------------
---------------------------Engine - Release---------------------------
----------------------------Fire - Release----------------------------
---------------------------Editor - Release---------------------------
--------------------------UnrealEd - Release--------------------------

This is it checking all of the edit packages, for default ones it should just say release because it wont recompile packages that are still located in system folder, than at the end it should start to compile your character. Watch it to see if it fails and if it does it will say an error on the window but you can also open ucc.log for a more detailed breakdown at the end. It will say which .uc it failed on and what line so its pretty straight forward.

If it works correctly you should be left with a ModPackageName.u file or for me GordonFreemanMod.u

If you ever change code and wish to recompile just make sure you delete the old .u file and refollow these steps.

If you wish for more info on compiling you can find some here, the text on the page is messed up on this wiki but you can just Ctrl-A and Ctrl-C Ctrl-V onto a text document to read it.

BeyondUnreal Wiki[wiki.beyondunreal.com]

Now I will show you how to test this mod.

Part 17: Testing
Now that you have compiled lets test this, now you will need server perks. If you have it installed you should have a file called ServerPerks.ini in your KillingFloor/System folder. If you dont it might be ServerPerksDefault.ini which you can rename to just ServerPerks.ini. Open up this ini and at the end add a line that says CustomCharacters=CharacternameMod.Charactername. For me I have CustomCharacters=GordonFreemanMod.GordonFreeman.

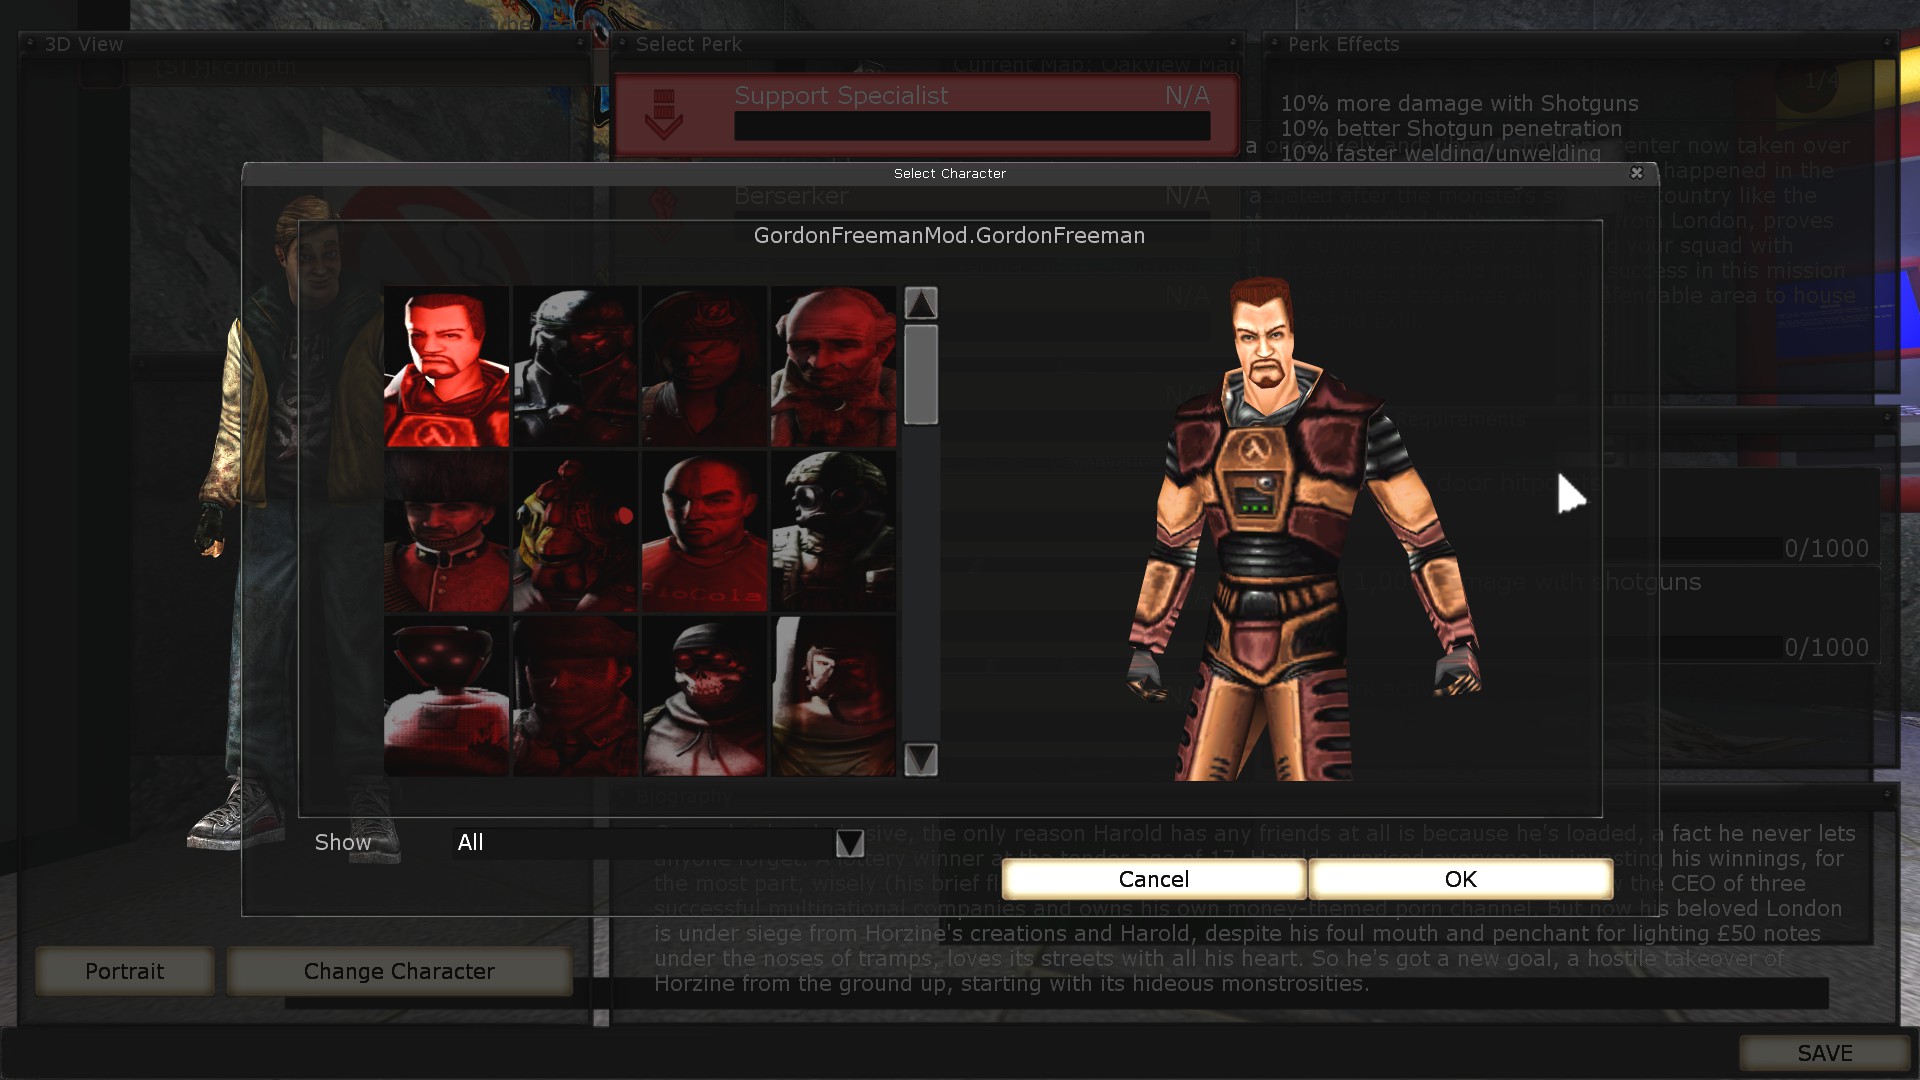
Now open up killing floor and open the Solo or Host menu, go to mutators tab and select Sever Veterency Handler and turn it on. Now if you start a game your character should appear inside the characters list.


If it doesnt work check the spelling on .ini.

Now if you got that working and are happy with it, lets get to releasing this mod.
Part 18: Release
I'm not gonna talk about workshop uploading, this guide by Holy Username Batman has a great guide for workshop:

https://steamhost.cn/steamcommunity_com/sharedfiles/filedetails/?id=2115290403

I will give some tips however,

1. Provide a direct download alternative (I use gamebanana but there are other options like Moddb, Gamemaps, Google Drive, Dropbox etc.)
2. Share what they need to add to ServerPerks.ini, so id add "CustomCharacters=GordonFreemanMod.GordonFreeman" somewhere.
3. Share all files included in the download.
4. Make sure you package ALL of the packages you created for your mod in the download.

For example this is the workshop page of my mod:

https://steamhost.cn/steamcommunity_com/sharedfiles/filedetails/?id=3475684066
Conclusion
Making characters can be tedious but fun, If you have any questions feel free to ask!

Share anything you make with me!

Good luck a have a great day, thanks for reading!
16 Comments
Ha3er_n3 20 Jul @ 7:25am 
This comment is awaiting analysis by our automated content check system. It will be temporarily hidden until we verify that it does not contain harmful content (e.g. links to websites that attempt to steal information).
{ST}jkcrmptn  [author] 20 Jul @ 6:50am 
Have you made sure that the material on the model is set in the animation browser, and the code? Also that in the code it is referencing the correct type of texture or material. Say its a shader it should be "Shader'path.here'". Also have you made sure to load the texture package in your code? #exec obj load file="TexturePackage.utx"
Ha3er_n3 20 Jul @ 6:46am 
Hi, this is a good:steamthumbsup: guide on how to add a character to the game.
But I encountered a problem where only the mesh is displayed in the game.
There's no texture, and I don't know what to do. I've searched all over the internet. Thank you in advance )
{ST}jkcrmptn  [author] 14 Jul @ 5:16pm 
I have no idea about that sorry. Can't help with this.
Anonamon 14 Jul @ 12:25pm 
Don't think that's it. With sharp edges in Blender you can split up the geometry so they're rendered as hard corners in-engine without creating physical gaps.

What I'm referring to, in GoldSrc for example, there's a render mode for the textures called flatshade that ignores the geometry in the model but is still affected by lightning. The model is lit in brighter areas and shadowed in darker ones but the ugly Phong shadows across the model don't show up. I would post some pictures but comments in Steam don't allow me to.
{ST}jkcrmptn  [author] 14 Jul @ 10:39am 
I would assume that's determined by the smoothing on the model, you would probably need to mark edges as sharp or something, not sure if the blender psk thing affects shading somehow though. I haven't messed with smoothing at all however and just use whatever the model im using comes with.
Anonamon 14 Jul @ 10:24am 
On another material and character rendering tangent, can Unreal Engine 2 do flat shaded models? As opposed to the smooth shading in-game with the Phong-like deep shadows all over the geometry.
Picture the model being rendered as with its plain textures applied and no shadows cast around the model. I've seen it work in good old GoldSrc for instance.
Anonamon 25 Jun @ 12:04am 
Yes, I knew about 3rd person mode in KF, as well as free camera mode. What I don't know about is how to place the camera in 3rd person mode any further away from the player model. It generally draws the view up to the shoulders of the character, but I've seen some Workshop submissions that lengthen that distance to show the model in full.
{ST}jkcrmptn  [author] 24 Jun @ 12:07pm 
You can go into 3rd person, f3 or f4 I believe by default iirc. Its not perfect for seeing the weapon since its behind but you might be able to get a good angle to see.
Anonamon 24 Jun @ 11:53am 
Thanks for your response. The character sizing in UnrealEd is inside the right window panel in the Animations tab, Mesh -> Scale. Since it's possible to scale the character mesh in any axis I tried to skin a model to a squished KF skeleton, scale it back to its proper size then scale it back inside UnrealEd.

I've got a hunch that, since the weapon is just another bone inside the character frame and weapons do seem to scale with the rest of the skeleton, scaling on the Y axis for instance would squish the weapon as well. I would try to check on this by scaling some model I've got but free camera controls inside KF are an enigma to me.