People Playground

People Playground

106 ratings
"How To Mod In People Playground" A Complete Tutorial
By 367 Days
Do you want to learn PPG modding ?
Do you want to be able to do (almost) anything ?

Well, future modder, this guide is for you ! I've myself modded in PPG for a complete year, and I'll share with you everything that I know.

Here, you'll find how to do characters, objects, modifying their properties, and more !

So buckle up, because that's gonna be a long ride !
4
2
3
   
Award
Favorite
Favorited
Unfavorite
Setting Up
Alright, so, first thing first, we're gonna need some programs to mod.
For the coding part, you'll need Visual Studio Code (you can always use notepad but you're deranged if you use it.).
And for the sprite-ing part, you can have paint, or anything like that, personnaly I use paint.net.

So, you have the applications needed, great ! Now let's go to where your mods will be stocked :

C:\Program Files (x86)\Steam\steamapps\common\People Playground\Mods

There we go, now you should see an empty folder, or almost empty (I have a steam autocloud file inside and I don't remember if it was here before I start modding, if you have it, or don't have it, you good.).

Now let's create a folder, note : the name of the folder counts in-game, at least for the modder, because if you have 2 files, they'll go in alphabetical order, but that's just an anecdote.

So, you created a folder, named it, and now, what ?

Well, before doing anything, here's another fun-fact (this one is important) :
steam cloud will, when lauching the game, save everything that is inside the mod folder, so if you delete useless files, it will recreate them.

So the best thing to do is to deactivate steam cloud for ppg.
To do that, go inside the proprietes of PPG in your steam library,


(here it's already deactivated)

So, now we'll need 2 files, the script one, and the detecting-mod one.
To create these, simply create a text file and change the ".txt" at the end.
(Ignore the file warning if you got one).

The detecting-mod one will be named (the name is important so please write the same) "mod.json".
Now for every file name you will be able to write anything you want.

The script one will be named here "script.cs".
Fun fact : every script file is in C# (the .cs ones) the mod.json is the only one is java.

So, it should look like that.


Alright, now, onto the json file.

Here's the code for it :

{ "Name": "Enter Name", "Author": "Your Name", "Description": "The description.", "ModVersion": "1.0.0", "GameVersion": "1.14+", "ThumbnailPath": "thumb.jpg", "EntryPoint": "Mod.Mod", "Tags": [ "Fun" ], "Scripts": [ "script.cs" ], "Active": false, "UGCIdentity": null, "CreatorUGCIdentity": "0" }
Here's what means what from what I know.
"Name": The name of the mod, is changeable in the steam workshop page after publishing.
"Author": Put you steam name.
"Description": The description of the mod, is changeable in the steam workshop page after publishing. Simply write something or nothing, DO NOT try to do things such as "press enter" to skip a line, it's going to break the script.
"ModVersion": Don't change it.
"GameVersion": Don't change it either.
"ThumbnailPath": How the thumbnail of the mod will be named, the thumbnail is not changeable in the steam workshop page after publishing.
"Tags": The tags that will be there.
"Scripts": the number of scripts taken into account.
"Active": will determine if, when charging the script, it will be active or not, "false" for no, "true" for yes, feel free to change it.

So, now after you modifing as you please the script, we'll be going into the script file, it's here that things are going to be interesting. (P.S. after creating and modifying the json file, you won't need to touch it (apart if you want to make an armor but we'll be going there later)).


using System; using System.Collections; using System.Collections.Generic; using System.IO; using UnityEngine; using UnityEngine.UI; using UnityEngine.Events; using UnityEngine; using UnityEngine.SceneManagement; using System.Linq; using TMPro; using UnityEngine.UI; namespace Mod { public class Mod { public static void Main() { } } }
Now, copy paste it into the file, and DO NOT modify anything, we are now all setup to add whatever we please. Every entity that we will add will go between the main() part and the 3 }

Optional
Let's you wanna write something more in the mod, well you'll need a text file named "readme".
Write what you want, skip lines, blah blah blah, and it will work. That's it you don't have to tweak the script for that.

Creating An Entity
Alright so, now, we wanna create a human, or an android, or a gorse (I've never created a gorse so follow these steps at your own risk).

P.S. when putting "//" whatever you put won't be taken into account, if you want to make it in a lot of lines, put :
/* (text here will be skipped)
(here too)
(here as well) */

Whatever, back to the tutorial.


Here is the script of a human with different tips that you can find on the PPG modding website :[www.studiominus.nl]

But you know what ? Here's the super-duper-better-cooler human/android/gorse code :
ModAPI.Register( new Modification() { OriginalItem = ModAPI.FindSpawnable("Human"), NameOverride = "Human [TUTORIAL]", NameToOrderByOverride = "Aa", DescriptionOverride = "Me when codding:", CategoryOverride = ModAPI.FindCategory("Entities"), ThumbnailOverride = ModAPI.LoadSprite("tuto man thumb.png"), AfterSpawn = (Instance) => { var skin = ModAPI.LoadTexture("tuto man.png"); var flesh = ModAPI.LoadTexture("NULL.png"); var bone = ModAPI.LoadTexture("NULL.png"); var person = Instance.GetComponent<PersonBehaviour>(); person.SetBodyTextures(skin, flesh, bone, 1); person.SetBruiseColor(86, 62, 130); person.SetSecondBruiseColor(154, 0, 7); person.SetThirdBruiseColor(207, 206, 120); person.SetRottenColour(202, 199, 104); person.SetBloodColour(108, 0, 4); } } );
So, how does it works ?

OriginalItem = ModAPI.FindSpawnable("Human"), This one will take an existing item and transform it with the script you make, to find all spawnable items, go here[www.studiominus.nl]. But it's only usefull for items. So don't touch it and only put "Human" or "Android" when you got a script like this.
NameOverride = The name the entity will have when putting a name, be sure that nothing has the same name, if it does, one of the entites will not appear.
NameToOrderByOverride = How the entity will be arranged, since it's in alphabetical order, useful (essential, even) when arranging your mod in a certain way.
DescriptionOverride = The description of the entity, if you want to know how to do colored text, please visit the category "What a colorful world".
CategoryOverride = The category the entity will be in.
ThumbnailOverride = The thumbnail of the entity

var skin/var flesh/var bone = The name of these sprites.
person.SetBodyTextures The sprite scale, I will talk about it later.

As for the bruise colors... ect... useful when you want to change the color, if you don't want to change it, feel free to delete this part of the script as it will automatically put the default ones. (The ones you see here are the default ones).

Alright, got everything, now, how do we modify the sprite of a human ?
Well, firstly, go here[www.studiominus.nl]. And search "human" in the search bar, or android, or whatever, you should see 3 sprites, the skin, flesh, bone.
Simply click on the one you want and download it.
To add it in you mod, drag the file in your folder, rename it as you have it in the script, and there you go !

P.S. if you want to make a folder inside of your mod folder, simply put
var skin = ModAPI.LoadTexture("foldername/tuto man.png");

And now you got your custom guy ! Yay !
Script Problem ?
Wait a minute, you put the script of the guy inside your mod, you launch the game, and there's a problem ?


Oh ! Good thing it's this error ! Sometimes, when changing the script, it will have this error, simply click "Recompile" and there you go ! It will work. Except if it gives you another problem, but right now it shouldn't happen if you followed the instructions
Creating An Object
Alright so, now, we wanna create an object, the official website provides one, but, it's kinda... horrible by my standards, so I'm giving you one that is way more complete.

Here's the script :

P.S. When adding a new entity, make sure it does go where it goes in the example. (don't struggle like an idiot for 15min like I did)


ModAPI.Register( new Modification() { OriginalItem = ModAPI.FindSpawnable("Plank"), NameOverride = "Object [TUTORIAL]", NameToOrderByOverride = "Ab", DescriptionOverride = "Scripting is as fun as a graveyard.", CategoryOverride = ModAPI.FindCategory("Misc."), ThumbnailOverride = ModAPI.LoadSprite("tuto object1 thumb.png"), AfterSpawn = (Instance) => { Instance.GetComponent<PhysicalBehaviour>().InitialMass = 1f; Instance.GetComponent<PhysicalBehaviour>().TrueInitialMass = 1f; SpriteRenderer SprRen = Instance.GetComponent<SpriteRenderer>(); SprRen.sprite = ModAPI.LoadSprite("tuto object1.png", 1f); foreach (var ColliderBoxDeleteVar in Instance.GetComponents<Collider2D>()) { GameObject.Destroy(ColliderBoxDeleteVar); } Instance.FixColliders(); SprRen.sprite = ModAPI.LoadSprite("tuto object1.png", 1f); } } );
Instance.GetComponent<PhysicalBehaviour>().InitialMass/TrueInitialMass = These two are the same things, basically, the more the value is high, the heavier it is, the more the value is low, the lighter it will be.
SpriteRenderer SprRen = Instance.GetComponent<SpriteRenderer>();
SprRen.sprite = ModAPI.LoadSprite("tuto object1.png" The one above is the hitbox, I'll talk about how to have a better hitbox later.

SprRen.sprite = ModAPI.LoadSprite("tuto object1.png", 1f); This one is the sprite that will show up in game.

The higher the value will be, the smaller the object, and the lower the value will be, the bigger the object.

Ok so, this one is an object, as we can see since it's a Plank and these cannot be taken by humans/android, but what about something that can be taken by them ?

Simply replace "Plank" by "Stick" and there you go !
More Than One
Adding more

So now we've got a human, we've got an object, but how can we put these two together in the mod ?

Well, if you already have a script of an object/entity, at the end of the script, you should have three "}" for the end of the script and the ");" for the end of the entity/human.

All we need to do is to is to put the second code of the object/entity between the end of the first script and the start of the end of the script itself.

Example :

); <-- end of the entity script
<-- place where you just have to paste the script
} <-- start of the end of the script
}
}

Keep in mind that in order to make any entity/object work, the name of it should be different than any other entity/object, the base game ones or the modded ones.
Making A Thumbnail
This is one kind of... IMPORTANT, and it's VERY simple.

For an entity

To do this, simply go into PPG, take your entity, screenshot it (you can also add a background, the "Resizable Housing" entity is more than useful for this, resize it and color it, add it to the bottom layer, and save it in your contraceptions)

After this go into your screenshots, right click an image to access the file that it's in, (I recommand copy and pasting it, and then deleting it in steam due to some bugs if you move the OG file) after this, resize the image to a square, and there you go ! You can also resize the image to save space, personally, I put them on a 100x100 pixels scale and put them to .jpg, since in the screenshots it's how they are and it's less heavy than a .png.

If it doesn't show up after quitting and relauching the game, check the script to see if it's the right name and if it's in .jpg or .png.

For the mod

Having a thumbnail is technically not mandatory but it would be stupid to not have one.
First, to know what should be the type and name of your thumbnail you need to go in the java file and see what the name of the "ThumbnailPath" is, here it's "thumb.jpg"

So now you need to do like you did for the entity, but this time you NEED to have a 512x512 size. No more, no less.
Creating A Category
Now, we got everything, humans, objects, whatever you put in it...

But what if we create our own category ? That would be better and more convenient right ? Well you bet it is !

First off, we're going to need a second script, remember in "Setting Up" how we created the files ? Well the process is the same

We'll name the file "CategoryBuilder" it's in .cs, like all the others.
Here's the script :


using System;
using System.Linq;
using System.Collections.Generic;
using UnityEngine;


public class CategoryBuilder
{
/// <summary>
/// Use this method to create your own category.
/// </summary>
/// <param name="name">New category name</param>
/// <param name="description">Description of the new category</param>
/// <param name="icon">New category icon</param>
public static void Create(string name,string description, Sprite icon)
{
CatalogBehaviour manager = UnityEngine.Object.FindObjectOfType<CatalogBehaviour>();
if (manager.Catalog.Categories.FirstOrDefault((Category c) => c.name == name) == null)
{
Category category = ScriptableObject.CreateInstance<Category>();
category.name = name;
category.Description = description;
category.Icon = icon;
Category[] NewCategories = new Category[manager.Catalog.Categories.Length + 1];
Category[] categories = manager.Catalog.Categories;
for (int i = 0; i < categories.Length; i++)
{
NewCategories[i] = categories[i];
}
NewCategories[NewCategories.Length - 1] = category;
manager.Catalog.Categories = NewCategories;
}
}
}

For this script please compare it to the image, it may have some parts that disappeared due to steam formatting, (there souldn't be any problems here though).
(click on the image to upscale it).


By the way, never modify this file. It will always work.

So now, we got the script, but, if you remember everything so far (I won't blame you if you don't) since we didn't said in the .json file that this script will be used, we'll modify the file right now.


After putting it, put a "," at the end of the first script, don't worry it's just java logic.

So now we got eveything for the two script, now, let's go to "script.cs".

CategoryBuilder.Create("Tutoral Category", "This is where the description is", ModAPI.LoadSprite("icon.png"));


Check the image to see where to put it.

So now, we need an icon, this needs to be a png file that has 50x50pixels Do not modify the scale because it will look worse.
If you don't put an icon the category won't show up.

After everything, go into the game, click the new "+" icon and you should find it.

And, if you followed eveything, nothing should be in there, well, simply go into where the entities goes into their category and change it into the category name you put it.

Hats, Capes, And More !
So, what if you want someone with a hat ? A cape ? A different leg ?

Well, first thing first, to have someone with hats and stuff, it's better to know what are the names of their limbs.

So, here it is :


Hat

For the layers :
Top : The hat/hair/whatever will always be on top. Not really recommended.
Mid : The layer by default, keep it, it's better that way.
Bottom : The hat/hair/whatever will always be on the bottom. Not really recommended either.


If you want to give your character more hair, or a hat, here it the script :

var head = Instance.transform.Find("Head"); var childObject = new GameObject("Helmet"); childObject.transform.SetParent(head); childObject.transform.localPosition = new Vector3(0.0f, 0.0f); childObject.transform.rotation = Quaternion.Euler(0f, 0f, 0f); childObject.transform.localScale = new Vector3(1f, 1f); var childSprite = childObject.AddComponent<SpriteRenderer>(); childSprite.sprite = ModAPI.LoadSprite("tuto hair.png"); childSprite.sortingLayerName = "Mid";
Capes, and more
var arm = new GameObject("arm"); arm.transform.SetParent(Instance.transform.Find("BackArm").Find("LowerArm")); arm.transform.localPosition = new Vector3(0, 0f); arm.transform.localScale = new Vector3(1f, 1f); var armSprite = arm.AddComponent<SpriteRenderer>(); armSprite.sprite = ModAPI.LoadSprite("tuto lowerarm.png"); arm.GetComponent<SpriteRenderer>().sortingLayerName = "Mid";
For the layers :
Top : The cape/arm/leg/whatever will always be on top. Recommended if this is a limb on front.
Mid : You shouldn't use it, except if it's on the upper/middle/lower body.
Bottom : The cape/arm/leg/whatever will always be on the bottom. Recommended if this is a limb on the back.

Do you see the "vector 3" where it gives two "1f" ? Well, it depends on the entity scale (see the part of HD humans/androids to know how to do it).
If you have a normal human don't change it.
If your human is, let's say 2 times bigger, you need to put the "1f" at "0.5f"
If it's 3 do "0.33333f"
If it's 4 do "0.25f"
And so on, it's basic maths.

The code for it needs to be below the "person.SetBodyTextures(skin, flesh, bone, 1);" code and above the three "}" (you never put code below or between the three "}" anyways.

The limbs

For convenience sake, here is all the limbs for the "instance.transform", simply copy and paste it in your script.
(Instance.transform.Find("Body").Find("UpperBody")); (Instance.transform.Find("Body").Find("MiddleBody")); (Instance.transform.Find("Body").Find("LowerBody")); (Instance.transform.Find("FrontArm").Find("UpperArmFront")); (Instance.transform.Find("FrontArm").Find("LowerArmFront")); (Instance.transform.Find("BackArm").Find("UpperArm")); (Instance.transform.Find("BackArm").Find("LowerArm")); (Instance.transform.Find("FrontLeg").Find("UpperLegFront")); (Instance.transform.Find("FrontLeg").Find("LowerLegFront")); (Instance.transform.Find("FrontLeg").Find("FootFront")); (Instance.transform.Find("BackLeg").Find("UpperLeg")); (Instance.transform.Find("BackLeg").Find("LowerLeg")); (Instance.transform.Find("BackLeg").Find("Foot"));
For the layers, when it's in front, put "Top" and when it's in the back, put "Bottom".
Yes, I said it before but I'll say it again to be sure you got it.

Also, just so you know the sprite that you add is an override, meaning that, if your arm on the base sprite is normal, and your new arm texture is like, thinner, the base arm will show up behind the arm if the layer is "bottom".
So, in that case put the thinner arm on the base sprite and the base one on the new arm texture.

Last thing, you need to change the variable and te object name for every new limb.
In other words, if we take the example, the "var arm" can become "var arm2" and "new GameObject("arm");" can become "new GameObject("arm2");"

DO YOU WANNA BE BRIGHT ?


Here is the code :
lowerbackarmSprite.material = ModAPI.FindMaterial("VeryBright");
Just so you know, you'll have to reduce the scale of the hat due to the brightness being BRIGHT AS ALL HELL, here's how to do it.

It's all fun and games but, how to you create the sprite ?

So, you made the lil' guy, now, select the head and create a new png. You're gonna make the immage bigger, make EVERY PIXELS the same distance, for example, you got a 11x11 pixels, it's gonna be 22x22 pixels. You got a leg by 5x16 pixels, it's gonna be 15x26 pixels (you just add +x pixels, dont multiplicate by x). You make the hat on another layer, it's just for convenience sake you don't have to do it, delete the base head and then you good to go !


SO HOW DO YOU TURN DOWN THE BRIGHTNESS ?

Simple, let's say you want their eyes to glow, simply follow the steps for the hat (without upscaling the image and all), and now to turn down the brightness, multiplicate the "hat" by 4 (this is only an example feel free to upscale more or less).
And now, (the dimensions here should be 44x44 pixels) we're going to go into the script.

Do you see the "vector 3" where it gives two "1f" ? Well, since we multiplicated the hat by 4, we'll divise the 1f by 4. Which gives 0.25f. So change 1f to 0.25f.
The color that you will choose will influence the color of the bright object.

And if you want a normal hat + another bright thing simply copy paste the hat script, and change the variable, which is here "head" to... let's say head2.

And there ya go, everything should be set for the accessories.

Technical issues

When having hats or capes, they won't act like limbs, they'll stay like this forever.
Which means, if you got a bracelet for example, you'll always have the bracelet in perfect condition, even if the human has been burned.
Object Collisions
Remember when I said we'll be talking about hitboxes later ?
Well now it's later so let's talk about them !

So, remember when I said that the first value is the collision and the bottom one is the sprite ?


Well it's going to be helpful here.


The higher the collision will be, the better the hitbox. (don't make some crazy collision though, simply make it by 3 or 4).

Alright so, you need to multiplicate the object by 2,3,4,5... I always use 3-4 now.

So you have a object with the value 3 for collision, now what ?

Well, take the base sprite you had, (you can put it all white it saves disk space, so it's cool) and multiplicate it by 3.


So here the dimensions are 50x180 for the shovel, and for the collision it will be 150x540

And there you go ! Simple as that !

Wait, you want to make something a bit more complicated ? Like having a different collision because you have a stage with curtains and you want people to go throught it ? You ain't helping me on this one, you know !

Fine, I'll guide you for it.

Simply, when you have your base sprite, delete the part you don't want anything to collide with.


Chairs and boxes

Oh and you want to do chairs ? And a box when you can put something in ? Well, that's going to be more difficult, and by that I mean that there is an extra step.

You see... PPG is weird sometimes on collisions, and it can happen that, if you got a box, even if there is no collision inside, nothing will be able to go through it, if you have a chair, the collision of the back of the chair will act as a big triangle instead of a straight line.
(The bug for the chair is not guaranteed to happen, but the box is).

To get rid of this annoying problem, simple put a hole in the collison at the bottom part of the straights lines that could cause problems.


You don't have do make a crazy hole, a small one fits just fine.
Object Properties
Well well well...
Congrats ! If you made it this far, you got all the tools to make a basic mod.

But...
What if we go further ?
Well we're going to go further !

Changing the layer

There is 3 layers that you can choose :
Top : The object will always be on top, useful when you have an object that has a certain collision and it's something like a stage with curtains so you can hide people in it.
Mid : The layer by default, if you want to change the layer and put this you're stoopid.
Bottom : The object will always be on the bottom layer, useful when you have an object that is a poster.


SpriteRenderer SprRen = Instance.GetComponent<SpriteRenderer>(); SprRen.sortingLayerName = "Top";
When adding it, delete the already existing SpriteRenderer script.

Making something weightless

To disable an object from having gravity, you can always put it weightless in your mod, but nah, let's just do it in the script.
(You cannot make an entity such as a human weightless).


Instance.GetComponent<PhysicalBehaviour>().IsWeightless = true;
You don't have to put it EXACTLY there, but it works here so, better safe than sorry.

Making something without collision

To disable an object from having collisions, just put this line :


Instance.layer = 10;
I don't know why this line has anything to do with collisions but here it is. Also don't touch the value. In fact, just put this line and that's it.

Different Physical Properties

You can always, if you want to have a metal prop, put "Metal Cube" instead of "Plank"
But what if you want to have a Stick that makes glass sounds ? Or flesh sound ?

Well, firstly, go here[www.studiominus.nl].


Instance.GetComponent<PhysicalBehaviour>().Properties = ModAPI.FindPhysicalProperties("Metal");
P.S. Every scripts can be added to each other, so you can have something thats has all of these scripts as long as you don't put the code in absurd places.
Entities Properties
Just so you know, by "Entities" I mean human and android. (and maybe gorse but let's forget about them).

P.S. We'll have lim behaviors, sometimes multiple behaviors will have the same name, so keep an eye out and if you find something with the same name, (like 2 times limbehavior) then put the script from the first limbehavior into the second, if it's not the same name, don't fuse anything.
Don't worry normally nothing has the same name here, but now you're aware.

Is that a midget or a giant ?


foreach (var limb in person.Limbs) { limb.transform.root.localScale *= 1f; }
Here, the smaller the value, the smaller the entity will be, the higher the value, the bigger the entity will be.

Alright I got two warnings for this one.

Be careful with the value, this thing is sensitive.
When making, I dunno a child, the value can be 0.985f, it's very good.

When making a big entity, the value can be 1.03f

Be careful with the value, or they're gonna be acting weird.
If an entity is too small or too big, they're going to have spasms when walking, but like, not little spasms, they're going to jump super high and kill themselves, which is stupid to have something like that.
So be careful if you don't want to have a rocket instead of a human.

[[STRONGER AND BETTER THAN EVER]]

Let's say you want something hard to kill, well, I'm sorry but it's still going to be weak... but ! It will last longer ! Useful for... something ? Maybe ?


foreach (LimbBehaviour limb in person.Limbs) { limb.Health = 10f; limb.InitialHealth = 10f; limb.ImpactPainMultiplier = 0f; limb.ImpactDamageMultiplier = 0.02f; limb.BreakingThreshold = float.PositiveInfinity; limb.BaseStrength *= 2f; limb.ShotDamageMultiplier = 0.02f; limb.RegenerationSpeed += 20f; }
limb.Health = limb.InitialHealth = same thing, it will just add more blood really, the flesh will still be as week as before.
limb.ImpactPainMultiplier = I believe this is the amount of pain the entity will have.
limb.ImpactDamageMultiplier = Same thing but for damage.
limb.BreakingThreshold = I think this prevents the limbs from breaking ? I ain't sure. limb.BaseStrength *= The amount of strength the entity will have, be careful though it can start acting weird if you put it too high, even 4 is much from what I remember.
limb.ShotDamageMultiplier = Same thing for the pain but... you know, for the gunshots.
limb.RegenerationSpeed += This one is useful, it will regenerate the body, it won't stop the bleeding but, if the entities just punch, they can be pretty durable.

Free amputations

When adding this script, it will only remove the limb or limbs selected. The entity will not be damaged.

Headless :
This script is special, as is it the only one to behave like that :


Instance.transform.Find("Head").gameObject.GetComponent<PhysicalBehaviour>().Disintegrate();
The entity will still behave normally. Even headless

Now, onto every other parts of the body :


foreach (var body in person.Limbs) { Instance.transform.Find("BackLeg").Find("LowerLeg").gameObject.GetComponent<PhysicalBehaviour>().Disintegrate(); Instance.transform.Find("BackLeg").Find("UpperLeg").gameObject.GetComponent<PhysicalBehaviour>().Disintegrate(); Instance.transform.Find("FrontLeg").Find("UpperLegFront").gameObject.GetComponent<PhysicalBehaviour>().Disintegrate(); Instance.transform.Find("FrontLeg").Find("LowerLegFront").gameObject.GetComponent<PhysicalBehaviour>().Disintegrate(); Instance.transform.Find("BackLeg").Find("Foot").gameObject.GetComponent<PhysicalBehaviour>().Disintegrate(); Instance.transform.Find("FrontLeg").Find("FootFront").gameObject.GetComponent<PhysicalBehaviour>().Disintegrate(); }
Here is an example of a script that removes the legs of an entity, to be able to do that on very part, please refer to the "Hats, Capes, And More !" Category to find the name of the limbs.

What about we move and resize their limbs ?

To do that, we first need to declare the variables, if you already declared them for the hats or the capes, for example you declared the head, you won't need to declare them again. (You can always declare them again on another variable name if you want to).


var UpperBody = Instance.transform.Find("Body").Find("UpperBody"); var MiddleBody = Instance.transform.Find("Body").Find("MiddleBody"); var LowerBody = Instance.transform.Find("Body").Find("LowerBody"); UpperBody.transform.localScale = new Vector3(1.125f, 1f); MiddleBody.transform.localScale = new Vector3(1.125f, 1f); LowerBody.transform.localScale = new Vector3(1.125f, 1f);
Here, it will make the entity fatter, the values on the left declare the x axis, the right is the one on the y axis.
On the x axis, a positive value will make the object go on the right, and the negative will make it go left.
For the y axis, a positive value will make the object go up, and the negative will make it go down.

To be able to do that on very part, please refer to the "Hats, Capes, And More !" Category to find the name of the limbs.

Now, here it only defines the scale, but if we want to move a limb, we need to declare the limb if it wasn't done already.


var LowerArm = Instance.transform.Find("BackArm").Find("LowerArm"); var UpperArm = Instance.transform.Find("BackArm").Find("UpperArm"); var LowerArmFront = Instance.transform.Find("FrontArm").Find("LowerArmFront"); var UpperArmFront = Instance.transform.Find("FrontArm").Find("UpperArmFront"); LowerArm.transform.localScale = new Vector3(1.125f, 1.525f); UpperArm.transform.localScale = new Vector3(1.125f, 1.525f); LowerArmFront.transform.localScale = new Vector3(1.125f, 1.525f); UpperArmFront.transform.localScale = new Vector3(1.125f, 1.525f); LowerArm.transform.localPosition = new Vector3(0.0f, -0.84f); UpperArm.transform.localPosition = new Vector3(0.0f, -0.21f); LowerArmFront.transform.localPosition = new Vector3(0.0f, -0.84f); UpperArmFront.transform.localPosition = new Vector3(0.0f, -0.21f);
Here the arms will be longer, and they're have been moved adequately, when the x axis is negative, it will go down, and if you want to make it go upward, you'll have to put it on the negative.

How can we know how to move them perfectly ?

You can't

Yeah, you'll have to put a value, reload the game, check if this looks good, repeat the process until it's good.
[MISC] Fatty Adopted Fatty Fatty Fatty
This section will only talk about the script for the anvil

Here's the script for an anvil :
ModAPI.Register( new Modification() { OriginalItem = ModAPI.FindSpawnable("Metal Cube"), NameOverride = "Anvil [TUTORIAL]", NameToOrderByOverride = "Ac", DescriptionOverride = "Fatty Fatty No Parents.", CategoryOverride = ModAPI.FindCategory("Tutorial Category"), ThumbnailOverride = ModAPI.LoadSprite("anvil thumb.jpg"), AfterSpawn = (Instance) => { SpriteRenderer SprRen = Instance.GetComponent<SpriteRenderer>(); SprRen.sprite = ModAPI.LoadSprite("anvil.png", 1f); foreach (var ColliderBoxDeleteVar in Instance.GetComponents<Collider2D>()) { GameObject.Destroy(ColliderBoxDeleteVar); } Instance.FixColliders(); SprRen.sprite = ModAPI.LoadSprite("anvil.png", 1f); PhysicalBehaviour physicalBehaviour = Instance.GetComponent<PhysicalBehaviour>(); if (physicalBehaviour != null) { physicalBehaviour.TrueInitialMass = 3000; physicalBehaviour.RecalculateMassBasedOnSize(); } } } );
The "trueinitialmass" will declare how heavy the anvil is.

That's it that was the category for the anvil.

By the way, as talked in "Object Collisions" category, you can change the collision for this one, it works the same.
HD Humans And Androids
I'm going to be real with you, making a human with that little amount of pixels can be a PAIN.
So, how do we change it ?

Scripting part


Here is where you'll have to modify the value. 1=normal, 2=normal multiplicated by 2, 3=the same as 2 but you replace it with 3, 4=you know the drill.

Warning, if you have your skin sprite multiplicated by 2 but the sprite of the flesh/bone is by 1, it will break the sprite.

Here's how to properly resize the skins that you can find here[www.studiominus.nl].

So, we got the skins, now onto the resize part.
Personally, since I use paint.net, I will talk about the only way I know how to do it.

Firstly, go to "image" then, click "resize", now multiplicate by 2,3,4,5,6,whatevervalueyouwant, for convinience sake, you can click the "maintain aspect ratio", now you got your values, but wait ! You need to put the "resampling" at "nearest neighbor"


Then, change your things, and there we go ! You got whatever you want at 2,3,4,5 times the amount of pixels !

But how can we know what amount you should have ?
Well, here's my opinion on the ones I used in my modding career :

1 = Not enough pixels, can't do anything.
2 = Good if you want to make something very simple, but I don't recommend it.
3 = Good for making details but not too much, my personal favorite.
4 = Good for making details, takes a while to do a character that has a lot of details though, I kind of recommend it.
5 = Very good if you want to make a lot of details but it genuinely takes a lot of time, I don't recommend it.
6,7,8,9... = I don't see why you would use it except if you want to make a mona lisa or something.

Scripting part, part 2

So, you got your upscaled human, great ! But it has a hat ? A cape ?
Well, we ain't done yet then !

If you followed my instructions for the hat and already have the script, here's how to change the scale for it as well :

See that script ?
childObject.transform.localScale = new Vector3(1f, 1f);
Well, we'll divise by two if you upscaled your human by two, by three it it's by three, blah blah blah...

So if it's by two it will be like :
childObject.transform.localScale = new Vector3(0.5f, 0.5f);
The process to make a hat in this situation is the same as before.
[MISC] Random Sprites
Objects

So, the random sprites are useful if you want to have multiple posters in one entity.

To do that, select the script for object and paste this code.


Instance.AddComponent<RandomSpriteBehaviour>().sprites = new Sprite[] { ModAPI.LoadSprite("prop1.png", 4f), ModAPI.LoadSprite("prop2.png", 4f), ModAPI.LoadSprite("prop3.png", 4f), ModAPI.LoadSprite("prop4.png", 4f), ModAPI.LoadSprite("prop5.png", 4f), ModAPI.LoadSprite("prop6.png", 4f), ModAPI.LoadSprite("prop7.png", 4f), ModAPI.LoadSprite("prop8.png", 4f), ModAPI.LoadSprite("prop9.png", 4f), ModAPI.LoadSprite("prop10.png",4f), ModAPI.LoadSprite("prop11.png", 4f), ModAPI.LoadSprite("prop12.png", 4f) };
Simply put it at the end of the script. If you want to modify it, you can always remove or add more sprites, but be careful, the last one ALWAYS needs to not have a comma.

People

So this one isn't supposed to exist but someone made it, so now you can have multiple humans in one human entity.
To start, put this script at THE END, LIKE THE END-END OF THE SCRIPT.


public class RandomHumanTextureBehaviour : MonoBehaviour { private void Start() { this.phys = gameObject.GetComponent<PhysicalBehaviour>(); chosenIndex = UnityEngine.Random.Range(0, Textures.Count - 0); NextTexture(); phys.ContextMenuOptions.Buttons.Add(menuButton = new ContextMenuButton("NextTexture", "Next texture", "Switches to the next texture", new UnityAction[1] { (UnityAction) (() => { NextTexture(); foreach (var limb in person.Limbs) { if (limb.GetComponent<RandomHumanTextureBehaviour>()) { limb.GetComponent<RandomHumanTextureBehaviour>().chosenIndex = chosenIndex; } } }) })); phys.ContextMenuOptions.Buttons.Add(menuButton = new ContextMenuButton("PreviousTexture", "Previous texture", "Switches to the previous texture", new UnityAction[1] { (UnityAction) (() => { PreviousTexture(); foreach (var limb in person.Limbs) { if (limb.GetComponent<RandomHumanTextureBehaviour>()) { limb.GetComponent<RandomHumanTextureBehaviour>().chosenIndex = chosenIndex; } } }) })); } private void NextTexture() { chosenIndex += 1; if (chosenIndex > Textures.Count - 1) { chosenIndex = 0; } person.SetBodyTextures(Textures[chosenIndex]); } private void PreviousTexture() { chosenIndex -= 1; if (chosenIndex < 0) { chosenIndex = Textures.Count - 1; } person.SetBodyTextures(Textures[chosenIndex]); } public List<Texture2D> Textures = new List<Texture2D>(); public int chosenIndex = -1; public PersonBehaviour person; private PhysicalBehaviour phys; private ContextMenuButton menuButton; }
Ok, so now the game will know how to act when we'll give him this behavior, by the way, just copy and paste it, never change it.

Here's where and what to put.


foreach (var limb in person.Limbs) { var HumanSprites = limb.gameObject.GetOrAddComponent<RandomHumanTextureBehaviour>(); HumanSprites.person = person; HumanSprites.Textures.Add(ModAPI.LoadTexture("guy1.png")); HumanSprites.Textures.Add(ModAPI.LoadTexture("guy2.png")); HumanSprites.Textures.Add(ModAPI.LoadTexture("guy3.png")); }
It works the same as the object one, but it has no comma so we don't care about the line at the end.
Weapons
Classic weapons that you can modify

To make a weapon, we need to refer to the object script.

Warning, do not make a custom weapon that originally has some parts that are bright, these parts will still be there after creating the custom sprite.

Warning, do not make a minigun, from what I know the original sprite is going to overlap on yours and make weird things.

Here's all the weapons and more that you can directly find here[www.studiominus.nl].

Now, you just need to select the object that will spawn and modify it with what you want.
OriginalItem = ModAPI.FindSpawnable("MODIFYHERE"),

And then you got peculiar cases

Sweet sweet bow.


ModAPI.Register( new Modification() { OriginalItem = ModAPI.FindSpawnable("Crossbow"), NameOverride = "Bow [TUTORIAL]", NameToOrderByOverride = "Aca", DescriptionOverride = "Lil' bow.", CategoryOverride = ModAPI.FindCategory("Tutorial Category"), ThumbnailOverride = ModAPI.LoadSprite("bow thumb.jpg"), AfterSpawn = (Instance) => { var SpriteTexture = Instance.GetComponent<SpriteRenderer>(); var Projectile = Instance.GetComponent<ProjectileLauncherBehaviour>(); var phys = Instance.GetComponent<PhysicalBehaviour>(); SpriteTexture.sprite = ModAPI.LoadSprite("bow.png", 2.85f); Projectile.projectileAsset = ModAPI.FindSpawnable("Heartsick's Baby Arrow [AR]"); //Projectile.launchSound = ModAPI.LoadSound("arrowshoot.wav"); Projectile.barrelPosition = new Vector2(0.0f, 0.0f); Projectile.IsAutomatic = false; Projectile.ScreenShake = 0.5f; Projectile.projectileLaunchStrength = 1.2f; //phys.Properties = ModAPI.FindPhysicalProperties("Weapon"); phys.TrueInitialMass = 0.10f; phys.InitialMass = 0.10f; phys.rigidbody.mass = 0.10f; foreach (var c in Instance.GetComponents<Collider2D>()) { GameObject.Destroy(c); } Instance.AddComponent<PolygonCollider2D>(); } } );
The two green scripts are just here to add content if you want to. Keep these on "notes" if you don't want to modify the sound or the physical propreties, you can find the physical propreties here[www.studiominus.nl].

You can add the weightless script to the bow. You need to put it like that though, if you put it like you do on normal objects it's not going to work.

Instance.GetComponent<PhysicalBehaviour>().IsWeightless = true;

Now, what will be a bow (even if here it's named "crossbow") without an arrow ?


ModAPI.Register( new Modification() { OriginalItem = ModAPI.FindSpawnable("Crossbow Bolt"), NameOverride = "Arrow [TUTORIAL]", NameToOrderByOverride = "Acb", DescriptionOverride = "Lil' arrow.", CategoryOverride = ModAPI.FindCategory("Tutorial Category"), ThumbnailOverride = ModAPI.LoadSprite("arrow thumb.jpg"), AfterSpawn = (Instance) => { Instance.GetComponent<PhysicalBehaviour>().InitialMass = 0.6f; Instance.GetComponent<PhysicalBehaviour>().TrueInitialMass = 0.6f; SpriteRenderer SprRen = Instance.GetComponent<SpriteRenderer>(); SprRen.sprite = ModAPI.LoadSprite("arrow0.png", 11.5f); foreach (var ColliderBoxDeleteVar in Instance.GetComponents<Collider2D>()) { GameObject.Destroy(ColliderBoxDeleteVar); } Instance.FixColliders(); SprRen.sprite = ModAPI.LoadSprite("arrow.png", 2.3f); } } );
I recommend, for the hit box of the arrow, to make it sharper.


Landmines

If you put "Landmine" on the script.
OriginalItem = ModAPI.FindSpawnable("Landmine"),

But if we just do that, the Instance.FixColliders(); script will make the landmine explode whenever it touches something, which isn't how a landmine works.

Here's the correct script.


ModAPI.Register( new Modification() { OriginalItem = ModAPI.FindSpawnable("Landmine"), NameOverride = "Landmine [TUTORIAL]", NameToOrderByOverride = "Ac", DescriptionOverride = "Watch your step !", CategoryOverride = ModAPI.FindCategory("Tutorial Category"), ThumbnailOverride = ModAPI.LoadSprite("mine thumb.jpg"), AfterSpawn = (Instance) => { Instance.GetComponent<PhysicalBehaviour>().InitialMass = 0.4f; Instance.GetComponent<PhysicalBehaviour>().TrueInitialMass = 0.4f; SpriteRenderer SprRen = Instance.GetComponent<SpriteRenderer>(); SprRen.sprite = ModAPI.LoadSprite("mine.png", 1.6f); } } );
Sadly you won't be able, from what I know, to change the scale for this sprite, so you'll have to stick to the original one.

Here's where you can find the landmine sprite to oversprite it :[www.studiominus.nl]

These stupid knifes

So here, it's just a tip for the knife, DO NOT modify the physical propreties, if you do, the knife won't act like a knife. But if you stick to the original script, you're all good.
[MISC] Grenades
This was supposed to be on the "Weapon" Category but there was too much text.

FIRE IN THE HOLE


ModAPI.Register( new Modification() { OriginalItem = ModAPI.FindSpawnable("Handgrenade"), NameOverride = "Grenade [TUTORIAL]", NameToOrderByOverride = "Ac", DescriptionOverride = "WATER ON THE HILL.", CategoryOverride = ModAPI.FindCategory("Tutorial Category"), ThumbnailOverride = ModAPI.LoadSprite("grenade thumb.jpg"), AfterSpawn = (Instance) => { Instance.GetComponent<SpriteRenderer>().sprite = ModAPI.LoadSprite("grenade.png", 3f); Instance.GetComponent<ExplosiveBehaviour>(); //Instance.GetComponent<PhysicalBehaviour>().Properties = ModAPI.FindPhysicalProperties("Metal"); ExplosiveBehaviour grenade = Instance.GetComponent<ExplosiveBehaviour>(); grenade.Range = 3.25f; grenade.Delay = 2f; grenade.FragmentForce = 0.15f; grenade.ShockwaveStrength = 0.05f; grenade.BurnPower = 7f; grenade.DismemberChance = 25f; grenade.BallisticShrapnelCount = 0; Instance.FixColliders(); Instance.transform.Find("HandgrenadeLever").gameObject.GetComponent<SpriteRenderer>().sprite = ModAPI.LoadSprite("NULL.png"); Instance.transform.Find("HandgrenadePin").gameObject.GetComponent<SpriteRenderer>().sprite = ModAPI.LoadSprite("NULL.png"); Instance.transform.Find("HandgrenadePin").localPosition = new Vector3(0.0f, 0.0f, 0f); Instance.transform.Find("HandgrenadeLever").localPosition = new Vector3(0.0f, 0.0f, 0f); } } );
So, here the pin and all are just sprites you can add, to make your grenade realistic, it's optional though.

For the values on the left :
A positive value will make the object go on the right, and the negative will make it go left.

For the values on the middle :
When the x axis is negative, it will go down, and if you want to make it go upward, you'll have to put it on the negative.

Now, for the value on the right :
Don't touch it I don't know how it works, but it's all fine if you don't touch it, I never did and my grenades are all good.

So, how does it works ?

grenade.Range = How far the range is.
grenade.Delay = The time it takes to explode.
grenade.FragmentForce = I don't remember.
grenade.ShockwaveStrength = Either it's the amount that the screen will shake or it's the power of the grenade. I don't remember either.
grenade.BurnPower = The amount of burn it's going to give, useful for molotovs
grenade.DismemberChance = The chance that there will be a dismemberment.
grenade.BallisticShrapnelCount = The amount of little... let's say "bullets" that will randomly appear when the explosion occur.
[MISC] Let There Be Light
We will only cover the flashlight

So, you want to make a flashlight and your first idea is to put the spawnable entity on "flashlight" ?
Well congratulation ! You used logic ! Sadly, this logic doesn't work because if you do that, the texture of the entity will be bugged.

So, what do we do then ?
Simple, we'll need two script, the first one is for entity.

ModAPI.Register( new Modification() { OriginalItem = ModAPI.FindSpawnable("Flashlight Attachment"), NameOverride = "Flashlight [TUTORIAL]", NameToOrderByOverride = "Aa", DescriptionOverride = "Flashlight goes brrr or something.", CategoryOverride = ModAPI.FindCategory("Tutorial), ThumbnailOverride = ModAPI.LoadSprite("flashlight thumb.jpg"), AfterSpawn = (Instance) => { { Instance.GetComponent<PhysicalBehaviour>().InitialMass = 0.15f; Instance.GetComponent<PhysicalBehaviour>().TrueInitialMass = 0.15f; SpriteRenderer SprRen = Instance.GetComponent<SpriteRenderer>(); SprRen.sprite = ModAPI.LoadSprite("flash1.png", 1f); foreach (var ColliderBoxDeleteVar in Instance.GetComponents<Collider2D>()) { GameObject.Destroy(ColliderBoxDeleteVar); } Instance.FixColliders(); Instance.AddComponent<Flashlight>(); SprRen.sprite = ModAPI.LoadSprite("flash1.png", 1f); //if you want a random texture, if not, delete everythig between this message Instance.AddComponent<RandomSpriteBehaviour>().sprites = new Sprite[] { ModAPI.LoadSprite("flash1.png", 1f), ModAPI.LoadSprite("flash2.png", 1f), ModAPI.LoadSprite("flash3.png", 1f) }; //if you want a random texture } } ); } } );

If you've seen the part where I talk about objects, you'll see the "("flashlight.png", 1f);" part.
To have the correct sprite, please, go here[www.studiominus.nl].
Now, we have the flashlight sprite, if you want to scale it by 2, simply transform the "1f" by "2f"
(and scale the sprite too, of course".

So, now, the last script.

See the last three "}" at the END-END of your mod ? You need to put the script there.

public class Flashlight : MonoBehaviour { public void Start() { Destroy(gameObject.GetComponent<FlashlightAttachmentBehaviour>()); gameObject.AddComponent<UseEventTrigger>().Action = () => { if (transform.Find("highlight1").GetComponent<SpriteRenderer>().enabled == false) { transform.Find("highlight1").GetComponent<SpriteRenderer>().enabled = true; } else { transform.Find("highlight1").GetComponent<SpriteRenderer>().enabled = false; } }; { transform.Find("highlight1").localRotation = Quaternion.Euler(0f, 0f, 0f); transform.Find("highlight1").localScale = new Vector3(0.4f, 0.335f, 1f); transform.Find("highlight1").localPosition = new Vector3(0f, 5.94f, 0f); } var grabber = ModAPI.FindSpawnable("Flashlight").Prefab.GetComponent<PhysicalBehaviour>(); gameObject.GetComponent<PhysicalBehaviour>().HoldingPositions = grabber.HoldingPositions; } }

This script transforms the entity into a real working flashlight.
Now, you have two "localX" that needs to be changed, the Scale, and the Position.
This script works for a flashlight by the scale of x3. So if you don't want to launch-quit the game to see if the scale and position works it's best just to put your flashlight scale by x3 and to change the sprite accordingly.

But what if you got time on your hand and don't want to just adapt your flashlight ? Well, in that case, you'll have to figure out which direction goes where.
Yes I know, it's my job to tell you how to do it but... I don't have my infos for the position and scale anymore.
I'm sorry for that, good luck.
[MISC] We're Vibing To The Music
Basic knowledge

Every sound file needs to be in a .wav format, if your file isn't in a .wav, it won't work, to transform it, simply go online or on audacity to change it, but don't rename the .mp3 for example, to .wav, it won't work.

Siren

We're going to take this script and put it at the END of the script, but not the END-END, below the last entity you made, and above the 3 "}"


} } public class SoundBehaviour : MonoBehaviour { public DamagableMachineryBehaviour damagableMachineryBehaviour; public AudioSource audioSource; public bool activated = false; private void Use() { if (this.damagableMachineryBehaviour.Destroyed) return; this.activated = !this.activated; if (this.activated) { this.audioSource.Play(); return; } this.audioSource.Stop(); } void FixedUpdate() { if (this.damagableMachineryBehaviour.Destroyed && this.audioSource.isPlaying) { this.audioSource.Stop(); this.activated = false; }
Now, onto the script for the siren entity. This script is unique to it so don't use it for anything else.
ModAPI.Register( new Modification() { OriginalItem = ModAPI.FindSpawnable("Siren"), NameOverride = "Siren [TUTORIAL]", NameToOrderByOverride = "Ac", DescriptionOverride = "DescriptionOverride", CategoryOverride = ModAPI.FindCategory("Tutorial Category"), ThumbnailOverride = ModAPI.LoadSprite("siren thumb.jpg"), AfterSpawn = (Instance) => { var sound = ModAPI.LoadSound("YourSoundHere.wav"); SirenBehaviour sirenBehaviour = Instance.GetComponent<SirenBehaviour>(); sirenBehaviour.enabled = false; //Instance.GetComponent<PhysicalBehaviour>().Properties = ModAPI.FindPhysicalProperties("Wood"); Instance.AddComponent<SoundBehaviour>(); SoundBehaviour behaviour = Instance.AddComponent<SoundBehaviour>() as SoundBehaviour; behaviour.damagableMachineryBehaviour = sirenBehaviour.DamagableMachineryBehaviour; behaviour.audioSource = sirenBehaviour.AudioSource; behaviour.audioSource.loop = true; behaviour.audioSource.clip = sound; UnityEngine.Object.Destroy(sirenBehaviour); Instance.GetComponent<SpriteRenderer>().sprite = ModAPI.LoadSprite("siren.png", 1f); foreach (var c in Instance.GetComponents<Collider2D>()) { GameObject.Destroy(c); } Instance.FixColliders(); Instance.GetComponent<SpriteRenderer>().sprite = ModAPI.LoadSprite("siren.png", 1f); } } );
It works like every object, the siren.png above is the collision one, and the one below is the sprite shown, for more information, please refer to "Object Collisions".
P.S. the green script, A.K.A. "note" is only there is you want to change the physical property, for more information, please refer to "Object Properties".

Object that do a sound when activated

So this one is a bit techniqual...

See the 3 "}" ?
Well, put it between the last one and the second-last one, (the yellow and purple one).


class ObjectSoundBehaviour : MonoBehaviour { private void Start() { this.renderer = gameObject.GetComponent<SpriteRenderer>(); UpdateState(); } void UpdateState() { if(this.Activated) { renderer.sprite = B; renderer.sortingLayerName = "Objects"; gameObject.layer = LayerMask.NameToLayer("Objects"); audio.PlayOneShot(audioclipB,0.75f); } else { renderer.sprite = A; renderer.sortingLayerName = "Objects"; gameObject.layer = LayerMask.NameToLayer("Objects"); audio.PlayOneShot(audioclipA,0.75f); } } private void Use() { if (!base.enabled) { return; } this.SetActivated(!this.Activated); } private void SetActivated(bool activated) { this.Activated = activated; UpdateState(); } public bool Activated = false; [SkipSerialisation] public SpriteRenderer renderer; [SkipSerialisation] public Sprite A; [SkipSerialisation] public Sprite B; [SkipSerialisation] public AudioSource audio; [SkipSerialisation] public AudioClip audioclipA; [SkipSerialisation] public AudioClip audioclipB; }
So now, there should be another } that you didn't moved when copy pasting, if it's there, congrats ! It should all be set ! If it isn't... well you screwed up somewhere.
[MISC] The Jukebox
Jukebox, A.K.A. the final boss of the music category

So, you want something that acts like a siren but has multiple sounds ? Well I got the script for you ! Now, even I can barely work with it... but I'll try to make it work with what I know.

So first, you see up there how we put a script at the end ? Well forget that, the entity alone will do the job.
P.S. The entity that you spawn should be an object, and not "Jukebox".
ModAPI.Register( new Modification() { OriginalItem = ModAPI.FindSpawnable("Plank"), NameOverride = "Jukebox [TUTORIAL]", NameToOrderByOverride = "Ac", DescriptionOverride = "Good luck.", CategoryOverride = ModAPI.FindCategory("Tutorial Category"), ThumbnailOverride = ModAPI.LoadSprite("jukebox thumb.jpg"), AfterSpawn = (Instance) =>{ SpriteRenderer SprRen = Instance.GetComponent<SpriteRenderer>(); SprRen.sortingLayerName = "Mid"; Instance.GetComponent<PhysicalBehaviour> ().Properties = ModAPI.FindPhysicalProperties("Metal"); Instance.GetComponent<PhysicalBehaviour>().TrueInitialMass = 0.55f; SprRen.sprite = ModAPI.LoadSprite("jukebox.png", 3f); foreach (var ColliderBoxDeleteVar in Instance.GetComponents<Collider2D>()) { GameObject.Destroy(ColliderBoxDeleteVar); } Instance.FixColliders(); SprRen.sprite = ModAPI.LoadSprite("jukebox.png", 3f); AudioSource Music01 = Instance.AddComponent<AudioSource>(); Music01.minDistance = 1;Music01.maxDistance = 6; Music01.loop = true;AudioClip[] data1 = new AudioClip[]{ModAPI.LoadSound("motorist1.wav")};Music01.clip = data1[0]; AudioSource Music02 = Instance.AddComponent<AudioSource>(); Music02.minDistance = 1;Music02.maxDistance = 6; Music02.loop = true;AudioClip[] data2 = new AudioClip[]{ModAPI.LoadSound("NULL.wav")};Music02.clip = data2[0]; AudioSource Music03 = Instance.AddComponent<AudioSource>(); Music03.minDistance = 1;Music03.maxDistance = 6; Music03.loop = true;AudioClip[] data3 = new AudioClip[]{ModAPI.LoadSound("motorist2.wav")};Music03.clip = data3[0]; AudioSource Music04 = Instance.AddComponent<AudioSource>(); Music04.minDistance = 1;Music04.maxDistance = 6; Music04.loop = true;AudioClip[] data4 = new AudioClip[]{ModAPI.LoadSound("NULL.wav")};Music04.clip = data4[0]; int Music1 = 1; int Music2 = 1; int Music3 = 1; int Music4 = 1; int Music5 = 1; Instance.AddComponent<UseEventTrigger>().Action = () => { if (Music1 == Music2) { Music01.Play(); Music02.Stop(); Music1 = 0; } else if (Music2 == Music3) { Music01.Stop(); Music02.Play(); Music2 = 2; } else if (Music3 == Music4) { Music02.Stop(); Music03.Play(); Music3 = 0; } else if (Music4 == Music5) { Music03.Stop(); Music04.Play(); Music4 = 0; Music1 = 1; Music2 = 1; Music3 = 1; Music4 = 1; Music5 = 1; } }; } } );
Ok so, how it works here is that everytime someone activate it, it does a sound, then when activating again, it shuts off (not really there is a sound named NULL.wav that is just silence) and then when activating it does a sound, blah blah blah...

Here's another script to add a notification of the sound that plays :
ModAPI.Notify("Notification");


You'll have to put it JUST THERE.

So, we got a jukebox with 4 sounds, what's the thing so hard ?
Well, if you wanna remove/add sounds, that's the hardest part.

I don't really know how to explain for this part, but, let's say you wanna add more.

Adding one more

See the "int music..." and "music" at the end ? There needs to be one more than the amount of sound you have. if you got 6tracks, there needs to be 7 sounds declared.
Doesn't make sense ? Don't worry, I can't explain it either.

So now copy paste a music previously used
} else if (Music3 == Music4) { Music02.Stop(); Music03.Play(); Music3 = 0; }
For example, replace the 2 by 3, the 3 by 4...
I don't know what the "Music3 = 0" does but... don't touch it... I guess ?

And at the end you got
else if (Music4 == Music5) { Music03.Stop(); Music04.Play(); Music4 = 0;
Simply do the same, add 1 to every value (except the music4 = 0 just in case)

Now, we go up, see when you have "audiosource" and the audiofiles name and all ?

Well simply copy paste one, add it like, if the last is music04, transform the pasted one into music05, (it's basic logic), also, the data needs to be changed all all, so here it's data5 for the new.

And finally, the minimum distance and maximum distance is just... well... the name says it all honestly.

Deleting one

Just, delete one in all of the things, like, music04 is deleted, music=5 is deleted, it's logic here.
Don't forget to keep one more "music" and "int music" than what you have, I've talked about it earlier.

Final thoughts

I know it may be badly explained, but I barely know how it works, but you can always try to figure it out, maybe you'll be smarter than me on this case.
[MISC] Hello, I Can Talk
So, you want your characters to talk ?

Well, if you saw the music tutorial, you should know about the .wav files, if you don't, please read the first part where I talk how to have them.


var head = Instance.transform.Find("Head"); var audio = head.gameObject.AddComponent<AudioSource>(); audio.outputAudioMixerGroup = Global.main.SoundEffects; audio.gameObject.AddComponent<AudioSourceTimeScaleBehaviour>(); audio.clip = ModAPI.LoadSound("moonvo/moon1.wav"); audio.clip = ModAPI.LoadSound("moonvo/moon2.wav"); audio.clip = ModAPI.LoadSound("moonvo/moon3.wav"); audio.clip = ModAPI.LoadSound("moonvo/moon4.wav"); audio.clip = ModAPI.LoadSound("moonvo/moon5.wav"); audio.clip = ModAPI.LoadSound("moonvo/moon6.wav"); audio.clip = ModAPI.LoadSound("moonvo/moon7.wav"); audio.clip = ModAPI.LoadSound("moonvo/moon8.wav"); audio.clip = ModAPI.LoadSound("moonvo/moon9.wav"); audio.clip = ModAPI.LoadSound("moonvo/moon10.wav"); audio.loop = false; audio.spread = 0.8f; audio.spatialBlend = 0.0f; audio.minDistance = 0.8f; audio.maxDistance = 0.8f; int index1 = 0; AudioClip[] AudioData1 = new AudioClip[] { ModAPI.LoadSound("moonvo/moon1.wav"), ModAPI.LoadSound("moonvo/moon2.wav"), ModAPI.LoadSound("moonvo/moon3.wav"), ModAPI.LoadSound("moonvo/moon4.wav"), ModAPI.LoadSound("moonvo/moon5.wav"), ModAPI.LoadSound("moonvo/moon6.wav"), ModAPI.LoadSound("moonvo/moon7.wav"), ModAPI.LoadSound("moonvo/moon8.wav"), ModAPI.LoadSound("moonvo/moon9.wav"), ModAPI.LoadSound("moonvo/moon10.wav") }; head.gameObject.AddComponent<UseEventTrigger>().Action = () => { audio.clip = AudioData1[index1]; audio.Play(); index1++; if (index1 == AudioData1.Length) index1 = 0;
Ok so, here it will talk when clicking the head, to change the body part, or to add new ones, please refer to the "Hats, Capes, And More !" category.

So, it works like the random objects/humans sprites, meaning that firstly, for "audio.clip" you don't care about the end, but for "ModAPI.LoadSound" you need to have a comma at the end of everything, except for the last one.

In this example the files are in another folder, hence why there is "moonvo/".

Adding more

You can add different sound for different parts, if you want to, you need to copy paste the "int index1", and the last one, NOT THE ONE WHERE YOU DECLARE THE AUDIO FILES (except if you have new audio files).

After copy pasting the two chunks, you're gonna make a new variable for a new limb, for example, you declare the variable "UpperBody" to the UpperBody limb, (please refer to the "Hats, Capes, And More !" for the limbs) And then, for the first chunk, change the second "int index 1" to "int index 2" and "audiodata1" to "audiodata2".

Now, for the second chunk, change the variable, here it's "head" for changing to the one you made, it will be "UpperBody".
And reapeat the change from "index 1 and audiodata1" to "index2 and audiodata2".

You can do that for all limbs, hope I was clear.
[MISC] What A Colorful World
Colored name and description

I've talked about this all the way back at the beginning if I remember correctly.

So, I'm gonna show you how to make a colored description.

Warning, when making a colored description or name (I don't really know if it works for the name), there will always be a period in white, it is not deletable
DescriptionOverride = "<color=#603f28>Me when codding:<color=white>",
So, for the color simply select in paint or wherever, the hex value of what you want. And then put the color=white part at the end.

And there you go ! Simple as that !

Oh ! You wanna add more ?
Well here's an example.
DescriptionOverride = "<color=white>It's the joy, <color=#603f28>The<color=white> <color=#303966>Joy<color=white> <color=#7f771a>Of<color=white> <color=#8e2f26>Creation<color=white>",
I don't think I need to explain how this works, you can figure it out with that.

I've always dreamed about pink blood !

Now, I know there is a code for the blood (you can check it out in the "Creating An Entity" category).

But it's only on the human, like, only on the body, not the liquid thing.

So here's how to make a custom blood.


Simply put it there.
Liquid.Register("Colored Blood", new BloodyHell());
And now, we'll have to also put it at the END, but like the END-END, past the 3 "}"


public class BloodyHell : Liquid { public BloodyHell() { this.Color = new Color32(216, 225, 22, 255); } public override void OnEnterContainer(BloodContainer container) { } public override void OnEnterLimb(LimbBehaviour limb) { } public override void OnExitContainer(BloodContainer container) { } public const string ID = "Colored Blood"; }
The "new color" is where the color will be changed, it's in RGB for the first 3, the last one is, I believe, the transparency, but I'm not sure, so don't change it.

Now, onto the one that will have the blood.


foreach (var limb in person.Limbs) { limb.BloodLiquidType = "Colored Blood"; limb.CirculationBehaviour.ClearLiquid(); limb.CirculationBehaviour.AddLiquid(Liquid.GetLiquid("Colored Blood"), 1f); }
If you want to have a second colored blood, simply redo all the steps, but see the "new Bloodyhell" ? Well "BloodHell" here is the ID of the liquid, simply click on it, do ctrl+D, select all instances and then rename them, same goes for the name "Colored Blood".

I've always dreamed about a pink sauce !

Now, onto making a liquid for a bottle.
This is going to be very similar to the blood steps.
ModAPI.RegisterLiquid(Tea.ID, new Tea());
Put it at the same place that the first blood code line. (You know, just below the category script ?).

Now, it's the exact same script for the script below the 3 "}". So, same place.

Here it is if you want to be sure you got the right script.
public class Tea : Liquid { public Tea() { this.Color = new Color32(169, 221, 113, 255); } public override void OnEnterContainer(BloodContainer container) { } public override void OnEnterLimb(LimbBehaviour limb) { } public override void OnExitContainer(BloodContainer container) { } public const string ID = "Cold Tea"; }
Now, what is changing this time, is the entity code.


ModAPI.Register( new Modification() { OriginalItem = ModAPI.FindSpawnable("Bottle"), NameOverride = "Tea Pot [TUTORIAL]", NameToOrderByOverride = "Ac", DescriptionOverride = "SLURP.", CategoryOverride = ModAPI.FindCategory("Tutorial Category"), ThumbnailOverride = ModAPI.LoadSprite("teapot thumb.jpg"), AfterSpawn = (Instance) => { FlaskBehaviour flask = Instance.GetComponent<FlaskBehaviour>(); flask.StartLiquid = new BloodContainer.SerialisableDistribution { LiquidID = Tea.ID, Amount = 1f }; SpriteRenderer SprRen = Instance.GetComponent<SpriteRenderer>(); SprRen.sprite = ModAPI.LoadSprite("teapot.png", 1.7f); foreach (var ColliderBoxDeleteVar in Instance.GetComponents<Collider2D>()) { GameObject.Destroy(ColliderBoxDeleteVar); } Instance.FixColliders(); GameObject.Destroy(Instance.GetComponent<RandomSpriteBehaviour>()); Instance.GetComponent<SpriteRenderer>().sprite = ModAPI.LoadSprite("teapot.png", 1.7f); } } );
To be able to see through the sprite, you need to put the glass in transparent.
And also the liquid collisions inside the bottle cannot be changed, it is highly recommanded that you check out the original sprite here[www.studiominus.nl].

Also the entity is "Bottle" here because it can break.
[MISC] I'll Take 4 Arms Please
So, you wanna have an entity that has 4 arms ?

Well, I'm warning ya, the arms will function, but they will be... lobotomized... and also they can only appear on the UpperBody, where the base arms appears.

(Trust me I spent an afternoon trying to make them spawn on the MiddleBody, didn't worked).

Here's what you need to add (yes, the two skins needs to be addeed, not just one more).


The following script needs to be added, like the hats, strengh and all, after the human scale part :
Also, this was made for an entity that is 3 times the scale of a human, as you can see the "3f" appears.
If you have a entity thats is 2 times or 4 times, simply replace 3 by the number desired.

var upper = Instance.transform.Find("Body").Find("UpperBody");

GameObject creationarm2 = GameObject.Instantiate(ModAPI.FindSpawnable("Human").Prefab);
creationarm2.transform.position = Instance.transform.position;
var person0 = creationarm2.gameObject.GetComponent<PersonBehaviour>();

person0.SetBodyTextures(skin3, flesh, bone, 3f);


foreach (var limbs in creationarm2.gameObject.transform.root.gameObject.GetComponent<PersonBehaviour>().Limbs)
{
if (limbs.gameObject.name.Contains("Head"))
{
limbs.gameObject.GetComponent<PhysicalBehaviour>().Disintegrate();
}
if (limbs.gameObject.name.Contains("MiddleBody"))
{
limbs.gameObject.GetComponent<PhysicalBehaviour>().Disintegrate();
}
if (limbs.gameObject.name.Contains("LowerBody"))
{
limbs.gameObject.GetComponent<PhysicalBehaviour>().Disintegrate();
}
if (limbs.gameObject.name.Contains("Leg"))
{
limbs.gameObject.GetComponent<PhysicalBehaviour>().Disintegrate();
}
if (limbs.gameObject.name.Contains("Foot"))
{
limbs.gameObject.GetComponent<PhysicalBehaviour>().Disintegrate();
}
if (limbs.gameObject.name.Contains("Arm"))
{
limbs.gameObject.GetComponent<PhysicalBehaviour>().Disintegrate();
}
else
{
if (limbs.gameObject.name.Contains("UpperBody"))
{
GameObject tank = limbs.gameObject;
creationarm2.transform.SetParent(Instance.transform);
tank.transform.position = upper.gameObject.transform.position;
tank.transform.eulerAngles = upper.gameObject.transform.eulerAngles;
tank.gameObject.AddComponent<FixedJoint2D>();
tank.gameObject.layer = 10;
tank.transform.root.gameObject.GetComponent<PersonBehaviour>().RandomisedSize = false;
tank.gameObject.GetComponent<SpriteRenderer>().color = Color.clear;
tank.gameObject.GetComponent<FixedJoint2D>().connectedBody = upper.gameObject.gameObject.GetComponent<Rigidbody2D>();
tank.gameObject.GetComponent<FixedJoint2D>().frequency = 10f;
foreach (var limbs2 in creationarm2.gameObject.GetComponent<PersonBehaviour>().Limbs)
{
var colldie = Instance.gameObject.AddComponent<NoCollide>();
colldie.NoCollideSetA = limbs2.GetComponentsInChildren<Collider2D>();
colldie.NoCollideSetB = Instance.gameObject.GetComponentsInChildren<Collider2D>();
}
}
}
}


GameObject creationarm = GameObject.Instantiate(ModAPI.FindSpawnable("Human").Prefab);
creationarm.transform.position = Instance.transform.position;
var person2 = creationarm.gameObject.GetComponent<PersonBehaviour>();

person2.SetBodyTextures(skin2, flesh, bone, 3f);

foreach (var limbs in creationarm.gameObject.transform.root.gameObject.GetComponent<PersonBehaviour>().Limbs)
{
if (limbs.gameObject.name.Contains("Head"))
{
limbs.gameObject.GetComponent<PhysicalBehaviour>().Disintegrate();
}
if (limbs.gameObject.name.Contains("MiddleBody"))
{
limbs.gameObject.GetComponent<PhysicalBehaviour>().Disintegrate();
}
if (limbs.gameObject.name.Contains("LowerBody"))
{
limbs.gameObject.GetComponent<PhysicalBehaviour>().Disintegrate();
}
if (limbs.gameObject.name.Contains("Leg"))
{
limbs.gameObject.GetComponent<PhysicalBehaviour>().Disintegrate();
}
if (limbs.gameObject.name.Contains("Foot"))
{
limbs.gameObject.GetComponent<PhysicalBehaviour>().Disintegrate();
}
else
{
if (limbs.gameObject.name.Contains("UpperBody"))
{
GameObject tank = limbs.gameObject;
creationarm.transform.SetParent(Instance.transform);
tank.transform.position = upper.gameObject.transform.position;
tank.transform.eulerAngles = upper.gameObject.transform.eulerAngles;
tank.gameObject.AddComponent<FixedJoint2D>();
tank.gameObject.layer = 10;
tank.transform.root.gameObject.GetComponent<PersonBehaviour>().RandomisedSize = false;
tank.gameObject.GetComponent<SpriteRenderer>().color = Color.clear;
tank.gameObject.GetComponent<FixedJoint2D>().connectedBody = upper.gameObject.gameObject.GetComponent<Rigidbody2D>();
tank.gameObject.GetComponent<FixedJoint2D>().frequency = 10f;
foreach (var limbs2 in creationarm.gameObject.GetComponent<PersonBehaviour>().Limbs)
{
var colldie = Instance.gameObject.AddComponent<NoCollide>();
colldie.NoCollideSetA = limbs2.GetComponentsInChildren<Collider2D>();
colldie.NoCollideSetB = Instance.gameObject.GetComponentsInChildren<Collider2D>();
}
}
}
}

person.SetBodyTextures(skin, flesh, bone, 3f);

Instance.transform.Find("FrontArm").Find("UpperArmFront").GetComponent<SpriteRenderer>().sortingLayerName = "Decals";
Instance.transform.Find("FrontArm").Find("LowerArmFront").GetComponent<SpriteRenderer>().sortingLayerName = "Top";
creationarm2.transform.Find("FrontArm").Find("UpperArmFront").GetComponent<SpriteRenderer>().sortingLayerName = "Decals";
creationarm2.transform.Find("FrontArm").Find("LowerArmFront").GetComponent<SpriteRenderer>().sortingLayerName = "Top";
creationarm.transform.Find("FrontArm").Find("UpperArmFront").GetComponent<SpriteRenderer>().sortingLayerName = "Decals";
creationarm.transform.Find("FrontArm").Find("LowerArmFront").GetComponent<SpriteRenderer>().sortingLayerName = "Top";

Now, if you have android, simply search for any "Human" in the script and replace it with "Android"

And there you go ! if you want your new arms to have different colors than the base skin, simply create a new skin and modify the arms, then say, for example in "skin2" and "skin3" the name of the file that has the correct arms.
[MISC] The Armor
Welp, we're almost done !

So, you want to do an armor ? A.K.A. THE SCRIPT THAT I TOOK 2 WEEKS TO FIGURE OUT.
Well, I'm going to spare you the pain of understanding how it works, and show you how it works.

We're gonna need two files, sadly, I can't give you these as the code is extremely long.
So, I have made mods using it, (for example postal playground, or fnaf SB, or fnaf ITP...)
Well, we're gonna steal from my mods the two scripts, please watch a youtube tutorial on how to access the workshop files, this one is very good


--SAVE ERROR--

Below there is the script for the armor, someone pointed out that, if you use this code, you will not be able to save it (like a contraption) as it will cause errors.
I will put the mods that apparently do not give errors below, they are a different way to make armors so if you don't want to have the save error use them (don't forget to check how their script.cs and mod.json files are made to not have any problems !).
The mods :
https://steamhost.cn/steamcommunity_com/sharedfiles/filedetails/?id=3443604959
https://steamhost.cn/steamcommunity_com/sharedfiles/filedetails/?id=3485538765

--SAVE ERROR--

So now we're onto the script that I worked with and that has the save error.

First off, remember how I said we won't touch the .json file ?
Well we're gonna do it.
See where it's written "Mod.Mod" ?
Simply write "Armor.Mod"

As for the scripts that the mod will use, add a new one


"ArmorBehaviour.cs",
Ok so, now onto our main script, you should see at the beginning "namespace Mod"
simply replace it by "namespace Armor"

Now, you should have two script, "ArmorBehaviour.cs" that we just talked about, but what about "AttachmentBehaviour.cs" ? Well, simply put it in your mod folder and that's it, yeah you don't need to declare it or anything.

How about a hat ?

Here is the script for an armor that goes into the head of someone.
ModAPI.Register( new Modification() { OriginalItem = ModAPI.FindSpawnable("Insulator"), NameOverride = "Sunglasses [TUTORIAL]", NameToOrderByOverride = "Ac", DescriptionOverride = "It's armor time baby.", CategoryOverride = ModAPI.FindCategory("Tutorial Category"), ThumbnailOverride = ModAPI.LoadSprite("sunglasses thumb.jpg"), AfterSpawn = (Instance) => { Instance.GetComponent<SpriteRenderer>().sprite = ModAPI.LoadSprite("sunglasses.png", 3f); int PartCount = 1; Instance.GetOrAddComponent<ArmorBehaviour>(); ArmorBehaviour armor = Instance.GetComponent<ArmorBehaviour>(); ArmorProperties prop = new ArmorProperties(); prop.armorPiece = "Head"; prop.armorTier = 3; prop.sprite = ModAPI.LoadSprite("sunglasses.png", 3f); prop.armorPoints = 10; armor.prop = prop; armor.SetProperties(); if (armor.spawn) { armor.SetPieces = new ArmorBehaviour[PartCount - 1]; } Instance.FixColliders(); } } );
Here, as you can see, the 3f indicates that it's has 3times more the pixels than the normal human.

So, to create the sprite it's exaclty the same for the steps I told you for the "Hats, Capes, And More !" category.

Now, what does what ?

int PartCount = The amount if part that will spawn
prop.armorPiece = Where it's going to go, you don't need to do like "BackArm" Find "LowerArm" or something like that, just putting "LowerArm" will work if you want to make a bracelet. (If you want to put it on the front it will be "LowerArmFront" but you can't do for both arms).
prop.armorTier = I don't know lol.
prop.armorPoints = I believe it's the amount of "strength" the armor will have, you can put it to 400/500 if you want something strong.

How about gloves ?
ModAPI.Register( new Modification() { OriginalItem = ModAPI.FindSpawnable("Insulator"), NameOverride = "Gloves [TUTORIAL]", NameToOrderByOverride = "Ac", DescriptionOverride = "Cool gloves or something.", CategoryOverride = ModAPI.FindCategory("Tutorial Category"), ThumbnailOverride = ModAPI.LoadSprite("gloves thumb.jpg"), AfterSpawn = (Instance) => { Instance.GetComponent<PhysicalBehaviour>().InitialMass = 0.2f; Instance.GetComponent<PhysicalBehaviour>().TrueInitialMass = 0.2f; int PartCount = 2; if (!Instance.GetComponent<ArmorBehaviour>()) Instance.AddComponent<ArmorBehaviour>(); ArmorBehaviour armor = Instance.GetComponent<ArmorBehaviour>(); ArmorProperties prop = new ArmorProperties(); Vector3 offset = new Vector3(0f, 0f); Vector3 scaleOffset = new Vector3(0f, 0f); prop.armorPiece = "LowerArmFront"; prop.armorTier = 2; prop.sprite = ModAPI.LoadSprite("gloves.png", 3); prop.offset = offset; prop.scaleOffset = scaleOffset; prop.armorPoints = 35; armor.prop = prop; armor.SetProperties(); ArmorProperties[] armProp = new ArmorProperties[PartCount - 1]; armProp[0].sprite = ModAPI.LoadSprite("gloves.png", 3); armProp[0].armorPiece = "LowerArm"; armProp[0].offset = offset; armProp[0].armorTier = 2; armProp[0].scaleOffset = scaleOffset; armProp[0].armorPoints = 35; if (armor.spawn) { armor.SetPieces = new ArmorBehaviour[PartCount - 1]; armor.SpawnOtherParts(armProp); } Instance.FixColliders(); } } );
If you want to add another, (from what I remember) you need to copy and paste the "armProp" thing, replace all the 0 with 1, make the "int partcount" to 3 instead of 2, change where the armorpiece goes, and it should be good, if not, please refer to the script of the suit below and delete the parts you don't want, while watching how many parts you will have, (you know for the "int partcount" script).
[MISC] The Armor (Suit)
How about a whole suit ?
ModAPI.Register( new Modification() { OriginalItem = ModAPI.FindSpawnable("Insulator"), NameOverride = "Suit [TUTORIAL]", NameToOrderByOverride = "Ac", DescriptionOverride = "A whole suit.", CategoryOverride = ModAPI.FindCategory("Tutorial Category"), ThumbnailOverride = ModAPI.LoadSprite("suit thumb.jpg"), AfterSpawn = (Instance) => { Instance.GetComponent<SpriteRenderer>().sprite = ModAPI.LoadSprite("suit head.png", 3); int PartCount = 9; if (!Instance.GetComponent<ArmorBehaviour>()) Instance.AddComponent<ArmorBehaviour>(); ArmorBehaviour armor = Instance.GetComponent<ArmorBehaviour>(); ArmorProperties prop = new ArmorProperties(); Vector3 offset = new Vector3(0f, 0f); Vector3 scaleOffset = new Vector3(0f, 0f); prop.armorPiece = "Head"; prop.armorTier = 3; prop.sprite = ModAPI.LoadSprite("suit head.png", 3); prop.offset = offset; prop.scaleOffset = scaleOffset; prop.armorPoints = 275; armor.prop = prop; armor.SetProperties(); ArmorProperties[] armProp = new ArmorProperties[PartCount - 1]; armProp[0].sprite = ModAPI.LoadSprite("suit upperbody.png", 3); armProp[0].armorPiece = "UpperBody"; armProp[0].offset = offset; armProp[0].armorTier = 2; armProp[0].scaleOffset = scaleOffset; armProp[0].armorPoints = 275; armProp[1].sprite = ModAPI.LoadSprite("suit middlebody.png", 3); armProp[1].armorPiece = "MiddleBody"; armProp[1].offset = offset; armProp[1].armorTier = 2; armProp[1].scaleOffset = scaleOffset; armProp[1].armorPoints = 275; armProp[2].sprite = ModAPI.LoadSprite("suit lowerbody.png", 3); armProp[2].armorPiece = "LowerBody"; armProp[2].offset = offset; armProp[2].armorTier = 2; armProp[2].scaleOffset = scaleOffset; armProp[2].armorPoints = 275; armProp[3].sprite = ModAPI.LoadSprite("suit upperleg.png", 3); armProp[3].armorPiece = "UpperLeg"; armProp[3].offset = offset; armProp[3].armorTier = 2; armProp[3].scaleOffset = scaleOffset; armProp[3].armorPoints = 275; armProp[3].clone = true; armProp[4].sprite = ModAPI.LoadSprite("suit lowerleg.png", 3); armProp[4].armorPiece = "LowerLeg"; armProp[4].offset = offset; armProp[4].armorTier = 2; armProp[4].scaleOffset = scaleOffset; armProp[4].armorPoints = 275; armProp[4].clone = true; armProp[5].sprite = ModAPI.LoadSprite("suit foot.png", 3); armProp[5].armorPiece = "Foot"; armProp[5].offset = offset; armProp[5].armorTier = 2; armProp[5].scaleOffset = scaleOffset; armProp[5].armorPoints = 275; armProp[5].clone = true; armProp[6].sprite = ModAPI.LoadSprite("suit upperarm.png", 3); armProp[6].armorPiece = "UpperArm"; armProp[6].offset = offset; armProp[6].armorTier = 2; armProp[6].scaleOffset = scaleOffset; armProp[6].armorPoints = 275; armProp[6].clone = true; armProp[7].sprite = ModAPI.LoadSprite("suit lowerarm.png", 3); armProp[7].armorPiece = "LowerArm"; armProp[7].offset = offset; armProp[7].armorTier = 2; armProp[7].scaleOffset = scaleOffset; armProp[7].armorPoints = 275; armProp[7].clone = true; if (armor.spawn) { armor.SetPieces = new ArmorBehaviour[PartCount - 1]; armor.SpawnOtherParts(armProp); } Instance.FixColliders(); } } );
Conclusion
Alright, and we are finished !
I legit spent 8 hours on this.

I hope you understood everything, if not, you can always... well, check on other mods to see how they work, here's a tutorial.

Now, I've spent the past year modding, this has been a wonderful experience, so, by transmitting my knowledge, I hope you won't struggle for hours, even days, trying to figure out a script to make shoes or something.

I hope there is not lots of typos, I'm french and I don't really see if I make any errors, so... you'll excuse me.

Now. I've finished modding, but maybe that you can be the next modder on the workshop.

I can only wish you good luck, and stay determined, future modder !
136 Comments
367 Days  [author] 30 Jun @ 10:37pm 
so this event is happening when a human has no skin, in other words, it's like saying in your code "take this png" but the png doesn't exist
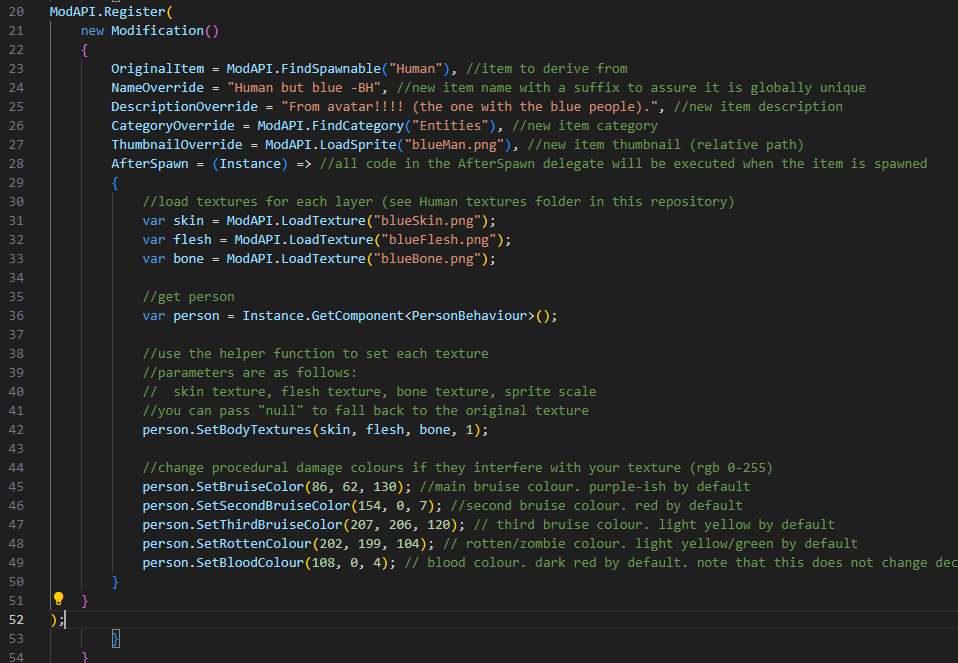
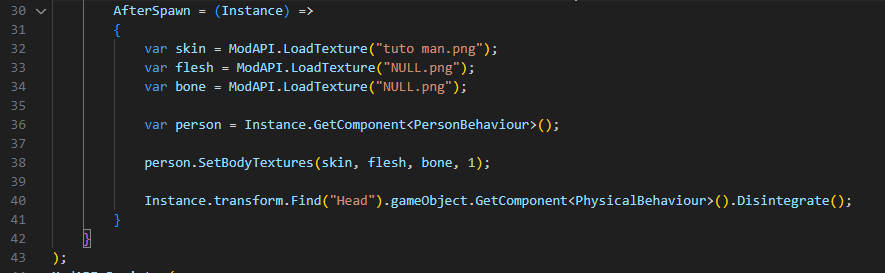
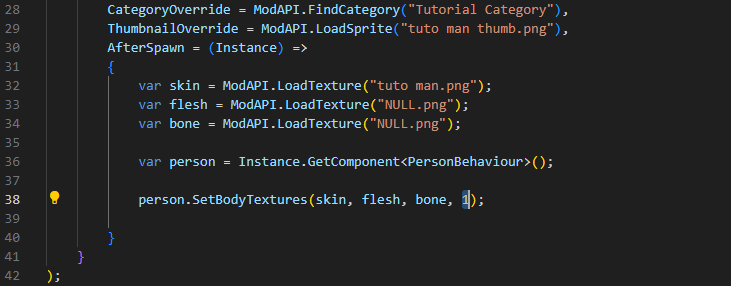
try to check the name for any typos, (also if it's in a folder or not)
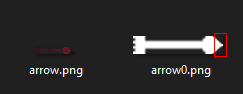
try to check if it's png or jpg, also if you ever converted a jpg to a png by simply changing the name (like human.jpg got renamed human.png) it won't work, convert it on paint or a website
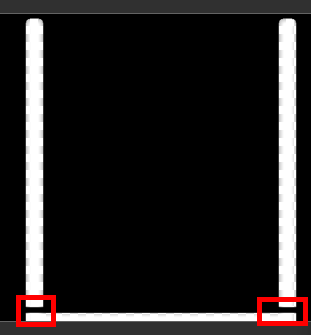
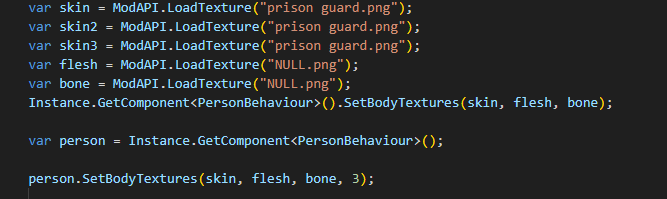
if all of these solutions are not helping, try to take a human sprite from another mod and see if it works (be careful of the skin ratio like if the pixels are x2, x3...)
womo 30 Jun @ 4:24pm 
Having a similar issue to thehalstead13, however I am doing it completely fine. The skin, flesh, and bone images are all pngs, and in the .cs file they are also put as pngs. The thumbnail is appearing as a regular human, so is the character. But, when I spawn the entity more than once, the limbs start disappearing one by one until the entity becomes completely invisible. Any clue what is happening?
367 Days  [author] 22 Jun @ 2:17pm 
if it's still about the category image thing try to download a mod, take the category image, and check if it works, if it does, overwrite it if it doesn't, idk man just compare your script to other mods
Vxcxntx 22 Jun @ 1:16pm 
i know i havent commented in a while but im back and i think ppg just hates me bc i dont know what did i do wrong at that moment
367 Days  [author] 17 Jun @ 1:10pm 
first off idk how to make that
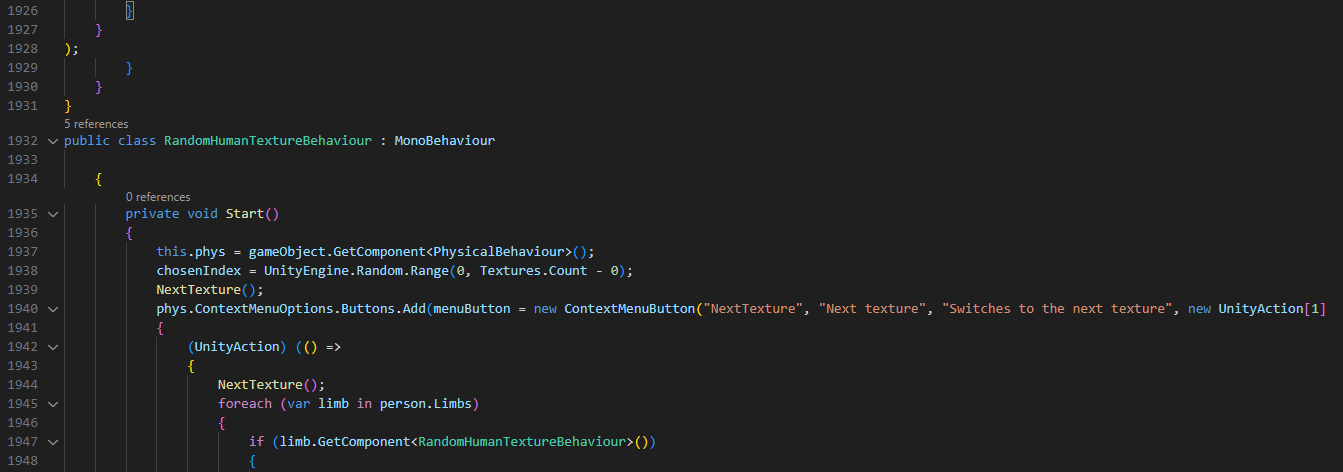
secondly I can't understand your request if it's just "transformation"
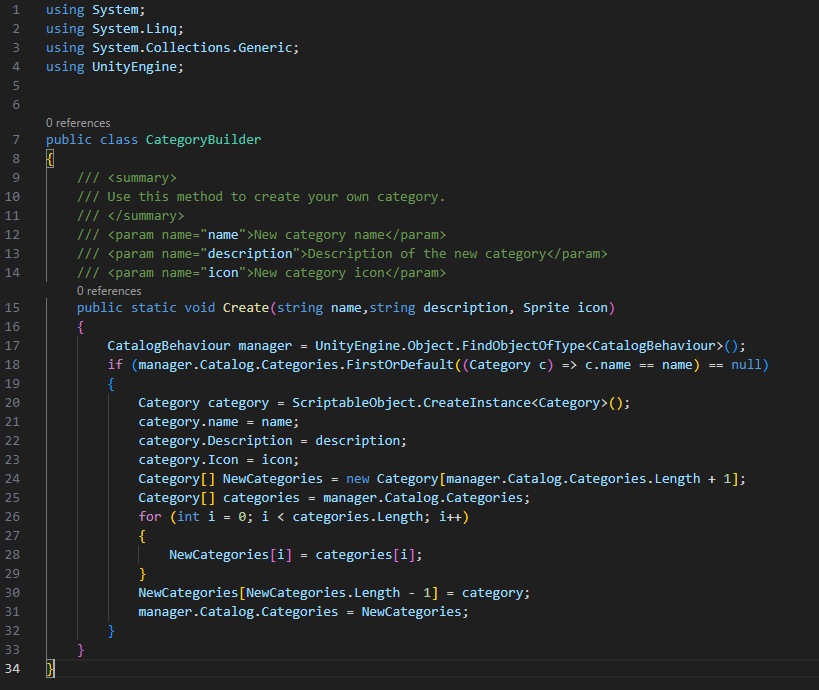
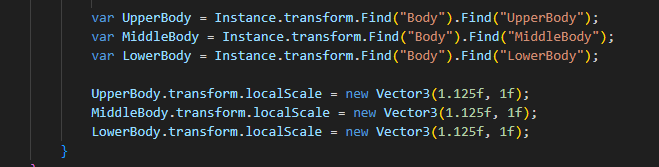
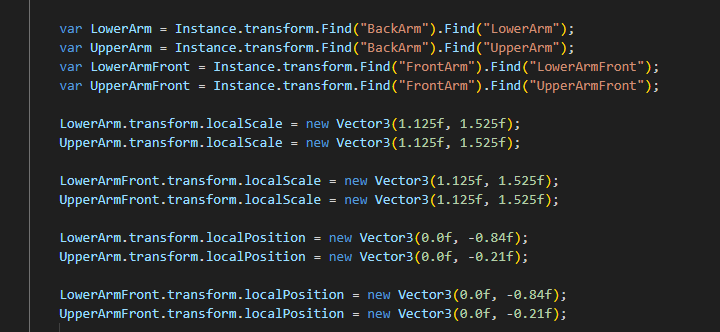
just check a mod that has this mecanic and take the scripts
Rin itoshi 17 Jun @ 9:14am 
can you add how to make a transformation or something like this pls
367 Days  [author] 15 Jun @ 12:51am 
so since I assume you have all the scripts and it doesn't work the reason should be because you modified the script for the armor in script.cs (if you didn't and it doesn't work idk where could be the problem)
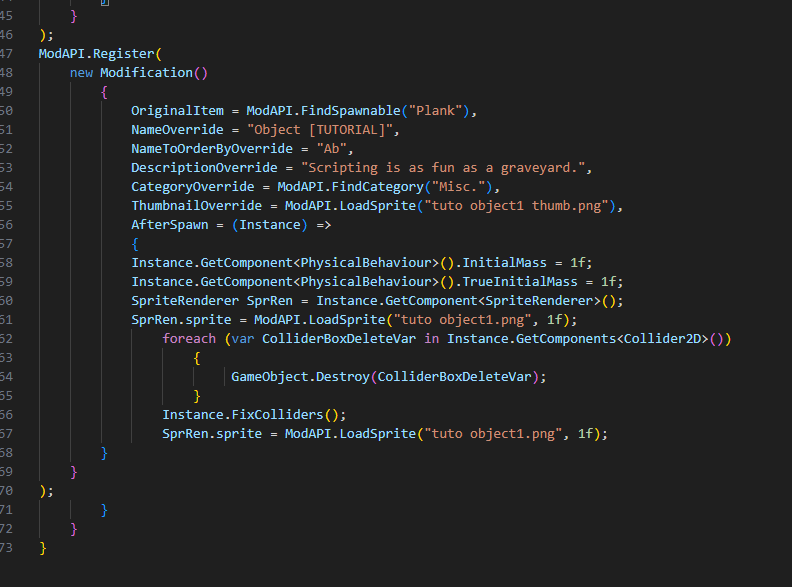
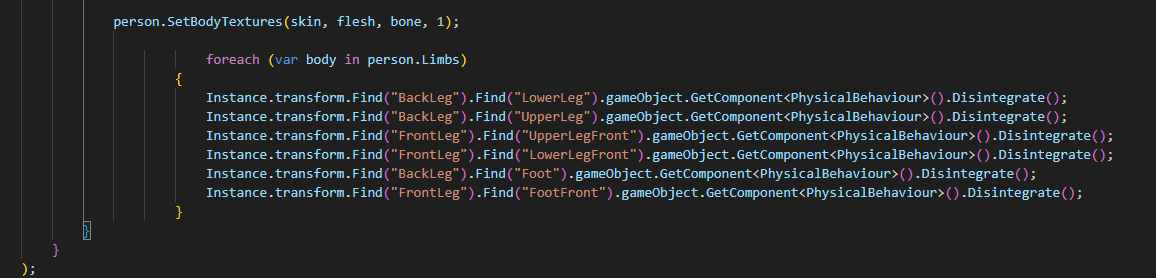
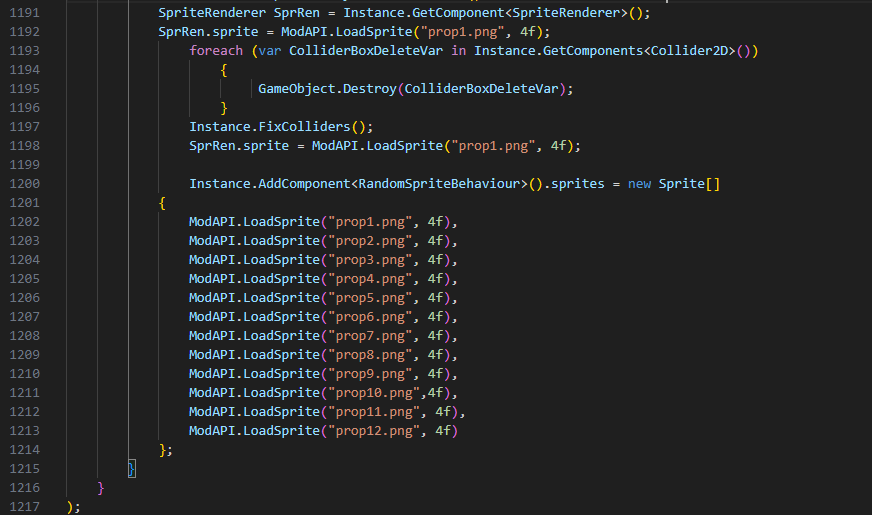
check for the category of the armor and if it doesn't share a name with anything
also check the amount of armor you have (like if it's 4 different pieces or something) in that case you need to replace the [2] with [3] and so on
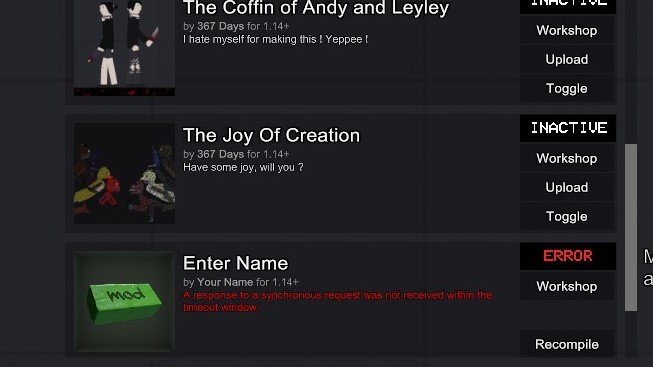
if you have a script error in PPG try to find the problem but if you have no errors and it doesn't appear then I'm out of ideas
stryder 14 Jun @ 11:00pm 
hi this is guy who made OLEN modpack, im just trying this out and followed the instructions on the save error part but it wont work? i changed mod.mod, namespace, and everything else
Ain ♤ 9 Jun @ 12:34pm 
Merci mec
Ain ♤ 9 Jun @ 12:06pm 
Holy shit, but I kinda need this so