Lorelei and the Laser Eyes

Lorelei and the Laser Eyes

Not enough ratings
Lorelei "Chill Speedrun" Walkthrough
By AaronsitoPB
A clear and organized roadmap to obtain the “Augenwalburg Race Winner” achievement!
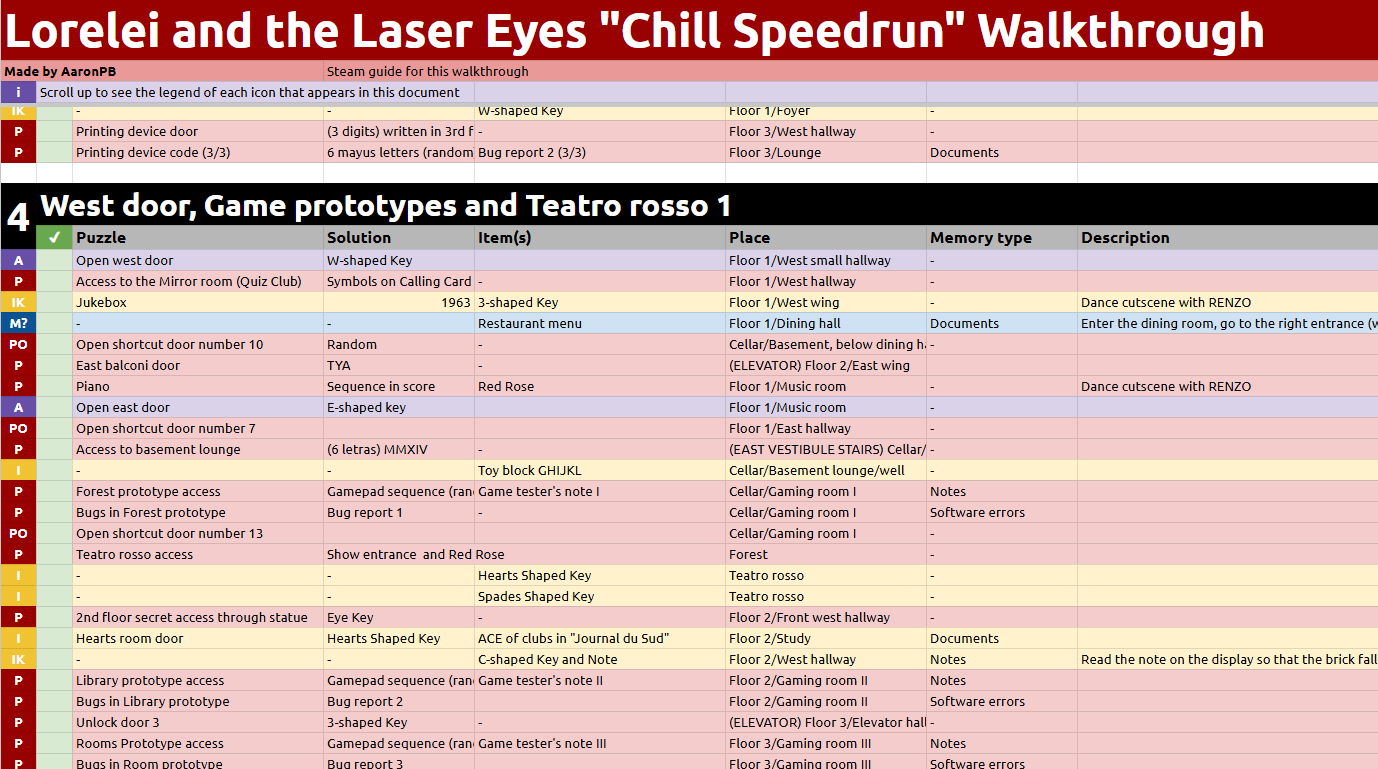
There is also a Google Sheet to follow this roadmap and mark your progress.
2
4
   
Award
Favorite
Favorited
Unfavorite
Introduction
This guide is a roadmap to get the “Augenwalburg Race Winner” achievement in an easy way, by completing your second game under 10 hours, knowing the puzzle solutions in advance.

It is not a difficult task, but bad organization could lead to time loss and a higher risk of not making it in time.

⚠️ Warning: Spoilers Ahead ⚠️
This guide is a complete walkthrough and includes puzzle solutions and major spoilers. Proceed with caution if you have not finished the game yet!

Google Sheet Roadmap
A Google Sheet copy of the roadmap detailed in this guide is included. It is easy to follow and you can keep it on a second monitor or on your phone to use it while playing.


[ENG] Lorelei and the Laser Eyes "Chill Speedrun" Roadmap[docs.google.com]

Things to keep in mind with this guide:
  • The solutions to some puzzles are not fully detailed, as their solutions are randomized in each playthrough, and it is assumed you have already played the game once.
  • Dollars are ignored, as they are not necessary to complete the game. Any additional content unlockable with dollars is avoided.
  • This is not an optimized speedrun/roadmap. The goal is to have clear objectives to be followed calmly and in an organized manner.

With this guide, the game can be completed in 3 to 4 hours, depending on how quickly you solve the puzzles. My playthrough took 5 hours, as I was also recording all the steps to create this guide. I did not use the in-game coffee power.

Special thanks to ReverendTed for reviewing this guide.
Game progression diagrams
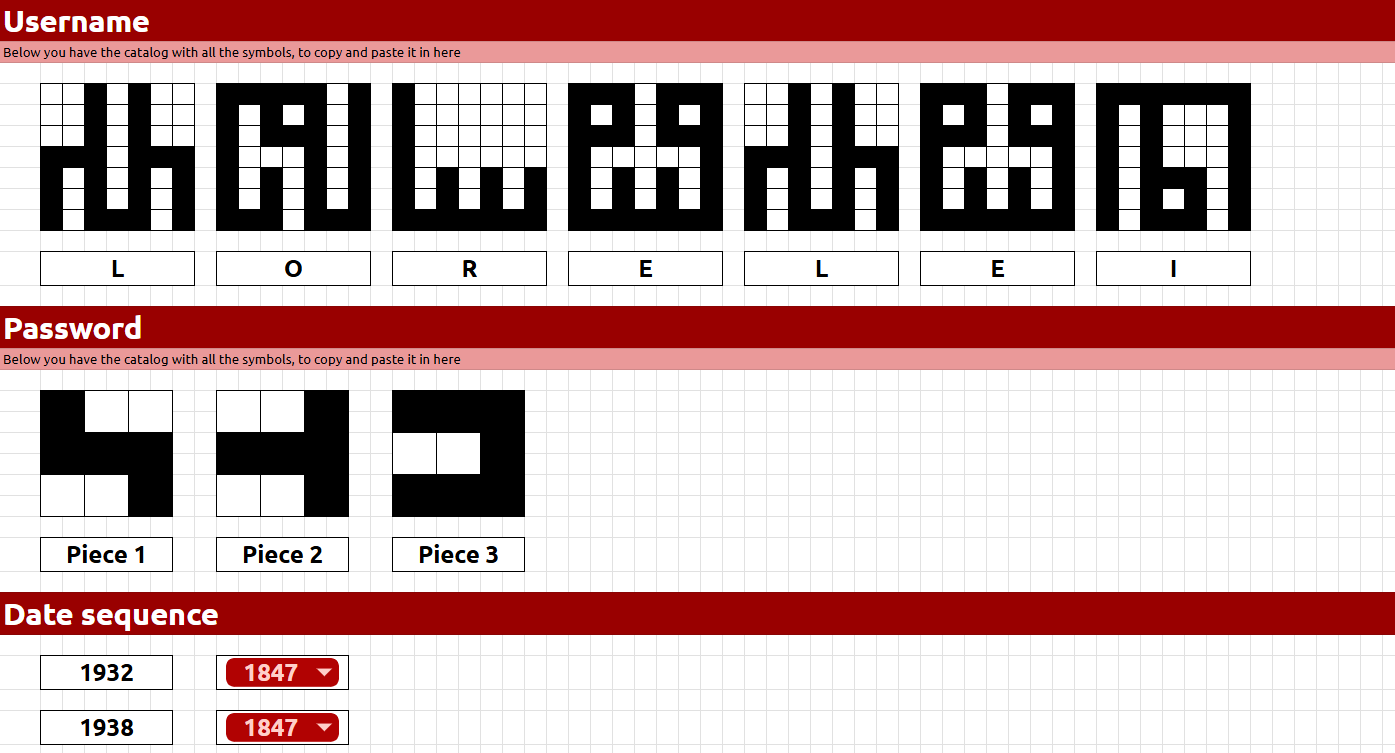
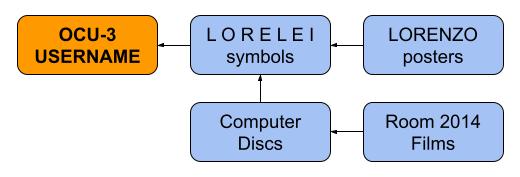
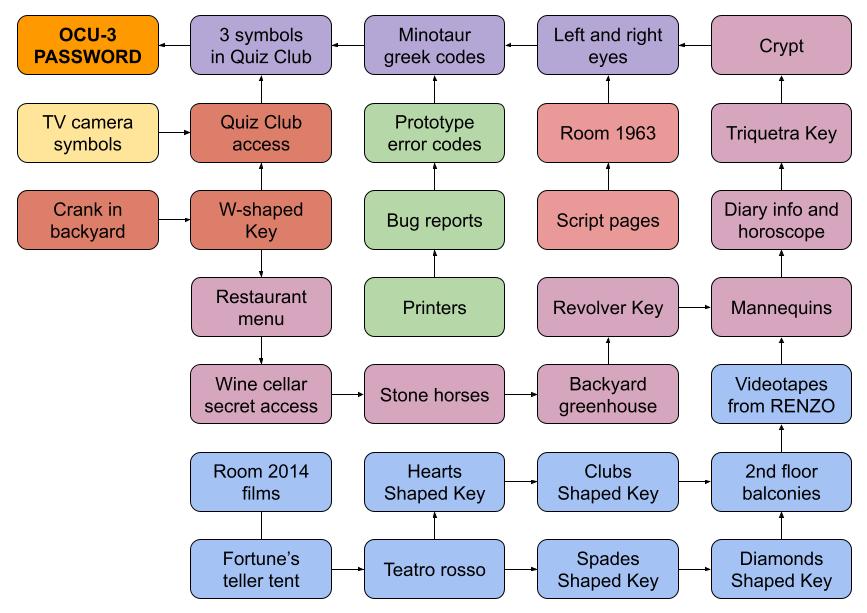
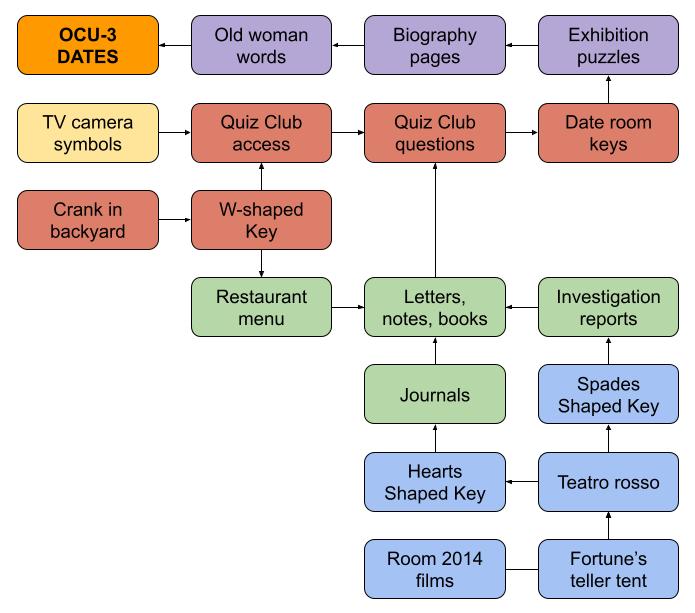
Here are three basic diagrams to give you a general overview of the game's progression towards accessing the OCU-3 supercomputer.

OCU-3 Username


OCU-3 Password


OCU-3 Date sequence
Organization and Strategies
This guide is divided into eight parts, breaking the playthrough into key areas of the hotel in order to gather the required information to access the OCU-3 supercomputer, located in the basement.
  1. Hotel entrance, Maps, LORENZO posters
  2. Room 2014, Backyard, Room 1847, Maze
  3. Computer discs and Bug reports
  4. West door, Game prototypes and Teatro rosso 1
  5. Maze center, Teatro rosso 2, Horses and Backyard
  6. Balconies, Revolver room, Diary and Crypt Key
  7. Crypt and Quiz Club
  8. OCU-3 access
Due to the nature of the game, part 2 and part 4 may feel somewhat confusing, as they involve collecting items across various areas of the hotel. This will keep the rest of the guide more organized.

Handling interrogations
The interrogations are those random puzzles where you obtain the script pages. These puzzles are time based and start appearing when you return from the Maze in Room 1847 (thanks to BorisBeast and Saudi Arabia to confirm this).

The playthrough is designed to lose some time, avoiding shortcut doors that connects the elevator to main hallways. Also, I delivered each script page to Room 1963 immediately after obtaining it, just in case it count towards the next interrogation spawn.

The interrogations might appear in different locations than those indicated in the roadmap. Do not worry as you should be able to get the remaining ones after saying all the words to the old woman in Room 2014. Maybe you have to wait a few minutes then...

Lastly, try to save your progress before getting caught by one of this nasty boys. A nice safe spot is the Reception Office (where the telephone is located), it always works for me when I have some trouble. Use the stairs instead of the elevator, I had some awkward teleports from the guy blocking the exit and you just get caught.

The pause menu
The game’s pause menu stops the timer, but it is not necessary if you follow this guide. You will need to spend some time to get the script pages, as those puzzles are time based.
Shortcut solutions
In the proposed route, it is recommended to unlock shortcuts 7, 10, and 13 to facilitate connections in the Basement and in the East Wing of the 1st floor (it is specified when to unlock each one). Even so, feel free to unlock any other shortcut if you find it easier.

Puzzle
Solution
Explanation
Geometric numbers
67
Number of sides of the external and internal shapes
14916__36496481100
25
Square values of: 1 2 3 4 5 6 7 8 9 10
NORTH, SOUTH, EAST+WEST
60
Imagine a circle. If south is 30, east will be 15 and west 45
Hidden number in maze
3
Magician's money
24
Equation x/2 + x/4 + 6 = x -> x = 6/(1-3/4) = 24
Human teeth
32
2 4 8 16 32 __ 128 256
Shortcut number
Value of ■ and ◆
42
Each row is double the value of the previous one: 1024, 2048, 4096, 8192.
V + L = 135, L = ?
90
They are not greek symbols, but two lines with a certain angle. The sum of their angles is the result. So L will be 90 degrees.
Minimum of turns in maze
42
Number between black bars
74
Y - X, numbers in areas
78
The sum of all numbers in an area needs to be 100
Names above 1847, 1963 and 2014
44
Count the number of dots on each word (including three dots or exclamantion/question marks)
Hour 210 degrees, for breakfast
7
Each hour are 30 degrees, so 210 degrees morning is 7:00 am
XYZ dice side values
8
Just identify the numbers with the three pictures of each dice. There is also a useful rule: each opposed sides of a dice needs to sum 7.
Octogonal room
90
Triangle with patterns
64
Trim horizontaly both patterns and match the internal symbols to get the hidden number.
RENATE LORENZO LORELEI RENZO
81
Each bold letter has a corresponding 1 or 2 digit number.
XY lines orientations
30
Imagine those lines in a clock-circle. Each end of the line is pointing at a certain minute. Those are their values.
Number __09
60
One of the strobogrammatical numbers (Memories/Books)
Part 1. Hotel entrance, Maps, LORENZO posters
Objective: unlock all maps and get the 5 LORENZO posters in the hotel. These posters are required for the username on OCU-3.

Start collecting the initial letter and the game instructions from the car. Take also the map of the Forest as this could be asked later on in the Quiz Club.

Go to the hotel entrance and take Rudi’s letter going to the right. This is not required but ignoring Rudi is just being RUDE :ccc

Open the Gatehouse using the code 1963, check the bulletin board, unlock the electrical panel with the code 1847 and rotate the dials to get the result of 2014. This last puzzle will open the gates.

Enter the Front yard and go to the other Gatehouse entrance, on the left-hand side. Adjust the dials of the camera TV to get a clear image of the Magician LORENZO. Leave and get the “Calling Card” from the bench where LORENZO was. This is required to open the Quiz club door.

Open the main doors of the hotel with the 1847 code and listen close to the Reception Office door to watch the initial cinematic. Next, check all the notes on the bulletin board located on the right side of the Reception room.

Now the idea is to collect all the possible things before RENZO’s cutscene where he meets LORELEI.

Go downstairs to the Cellars and enter the furthest room on the left. There you get the Architecht’s sketches. Solve the first Document tube in the same room to get the Cellars Map.

Then, go to the left to enter the Basement crafts room where the first LORENZO poster is located. Rearrange the pieces to get the symbol.
Finally, move to the Cellar hallway and enter the room to the left of the back stairs. There is the second LORENZO poster.

Now go upstairs using the staircase on the back of the hallway and check the three book piles to gather basic information and the shortcut puzzle book. Then, go to the 1st floor Foyer to unlock the 1st floor map by solving the Document tube located at the right-hand side.

Go to the 2nd floor and get to the front part of the hotel walking through the Front-west hallway. There you will find the third Document tube that contains the 2nd floor map and the third LORENZO poster, in the next small Crafts room study.

Then, go to the 3rd floor and cross the East hallway to solve the fourth Document tube. This unlocks the 3rd floor map. Return to the staircase of the 3rd floor and enter the small room located on the right side to get the fourth LORENZO poster.
Next, go to the West hallway, knock on the room's 1963 door (there will appear a message that nobody is there) and walk to the end of the hallway to get the last LORENZO poster.

With all LORENZO posters collected and 4 out of 5 maps unlocked, return to the Reception, where we meet RENZO.
Part 2. Room 2014, Backyard, Room 1847, Maze
Objective: get Backyard items, open rooms 2014 and 1847, get to the center of the Maze and enable Interrogation puzzles to begin collecting script pages.

Enter the Reception room, get the Telephone directory and call the Hausmeister GmbH to unlock the elevator. Adjust the camera TV dials to see a woman painting in the Front yard.

Go to the Reception desk, unlock the padlock with code 1962 and pick-up the 2014 Key. Leave the hotel to see woman’s painting and enter again to open room 2014 on the 3rd floor. Say hi to the old woman and collect all available items:
  • Maze map
  • Loft map, when going upstairs in the room 2014 study.
  • Films.
  • ACE of hearts.
Leaving room 2014 will trigger another cutscene where RENZO asks for the script pages. Going downstairs will unlock the Exhibition hall and the Backyard.

First, go to the Reception office to call LORENZO at number 1798 (it is possible to do it before discovering his note in the Fortune teller's tent) to get the directions taken in the cave.
Then, cross the Exhibition hall of the 2nd floor and unlock the Backyard access with the code 1847. The numbers are mixed and shown in the painting next to the number panel.

On the left side of the Backyard get the E-shaped Key from the tree and access the Fortune teller's tent by solving the padlock. The solutions of the N W E S equations are 1 8 4 and 7. The order of these variables can be mixed so be aware. Push the N W E S buttons in the correct order to form 1847.

Inside the Fortune teller's tent, check all the documents (you will get the ACE of spades) and answer the given directions in the Crystal ball to see the three cave paintings.

Then, go to the right side of the Backyard to get a crank below the tree and repair the 1847 Key close to the dead body.

Return to the Reception office to tell LORENZO the cave paintings (calling 1798). LORENZO will give you a Ticket to access Teatro rosso. Optionally we can call RENZO at 1963 to tell about the dead body, but I think this does not count towards the progression.

Next go upstairs to open room 1847 on the 3rd floor with the Dead Woman's Key. Enter the left room and throw the pile of toy blocks. Collect the remaining blocks YZAOUB and ABCDEF.
After that, enter the Maze and get to the center, collecting all the tiles. I suggest the following order:
  1. From N, get the E tile.
  2. From N, get the NE tile.
  3. From N, get the C (central) tile.
  4. Then, folIow the normal route to get to the center, collecting the tiles: N, NW, W, SW, S and SE.
In the center of the Maze there will be a puzzle where the error codes of the three greek symbols are required. Interact with the lady on the left to leave the Maze. This will trigger the first Interrogation, so try to save the game on the 3rd floor before solving it (if the man appears and you can not save there, try to go downstairs to the Reception office). Answering the Interrogation correctly will return Page 1 of the Script.
Return it immediately to RENZO, at room 1963.
Part 3. Computer discs and Bug reports
Objective: complete computer discs to match OCU-3 username letters with LORENZO poster symbols and obtain all three bug reports for game prototypes.
Note: Printer code orders (and maybe safe letters solution orders) differ between games. Keep that in mind.


Go to the 2nd floor and unlock the door with the rotated film poster to enter the Safe room IV. Solution from the letter signed "Your Brother", Jan 9 1847 is 18:47. This will open the safe that contains Computer Disc 4. Close to this room is the Safe room V (with four pieces of a film poster) to get Computer Disc 5. Solution from the letter signed "Your Brother", Jan 6 1847 is 1807.

After collecting those discs, cross the Exhibition hall and turn to the left to enter the West back hallway where there is a hole in the floor. Jump into the hole to discover the Secret Chapell. Read the Book of Revelation VI and put the toy block YZAOUB in the Y side at the presbitery to get the Crucifix Key.

Unlock the secret entrance interacting with the confessional on the left-hand side and open the Safe room III that has two splitted film posters to collect Computer Disc 3. Solution from the letter signed "Your Brother", Dec 13 1847 is 1846.
Next, go to the East small hallway crossing the 1st floor Foyer, where the Safe room II is located (it has an inverted film poster). To get the Computer Disc 2 you hace to enter the solution from the letter signed "Your Brother", Jan 10 1847, which is 1798.
Finally, go to the Elevator hallway of the 1st floor to open the last Safe room to get the Computer Disc 1. This has two film posters and a “+” sign between them. The solution from the letter signed "Your Brother", Jan 8 1847 is 2347.

With all Computer Discs collected, go to a computer and complete them in order to get the letters from the OCU-3 username: LORELEI:
  • Computer Disc 1: Plug in the TV and switch the channel until you find the magician show.
  • Computer Disc 2: Find your car in Augenplatz following the map. Interact with the car.
  • Computer Disc 3: Watch light flickers from the car behind you and tune the radio to those numbers.
  • Computer Disc 4: Fill tank, pay and get the phone number in the bathroom.
  • Computer Disc 5: Interact with the magician’s hat to make him appear and respond to his questions: TV, Dirt, Radio, Phone.

After that, take the elevator to the 2nd floor and activate the secret entrance by interacting with the left lamp. Place the crank at the end of the Front east hallway to lower the lamp where the W-shaped Key is hanging and open the printer door on the right using the 8-character roman numeral: MCMLXIII.
Check the rotated dates from top to bottom to obtain the three required letters: hEL (random order). Type them into the printer to get the Bug Report 1.
Lastly, go to the library room to trigger the horse’s secret room, by interacting with book 1847.

Return to the elevator and go to the 3rd floor. Open the secret door by ringing the elevator bell three times, and collect the Eye Key from the sculpture at the end of the Elevator hallway, on the left side of the secret room. Go upstairs to the printer located in the Loft and type the four required letters: Maze (random order indicated in Diorama next to the printer) to get Bug Report 3.
Go downstairs from the printer room to room 1963’s study and get the “Note found in typewriter” just in case this adds up to the game progress. This note allows you to unlock the side balcony doors on the 2nd floor.

With that done, take the elevator down to the 1st floor and grab the W-shaped Key in the Foyer. Go upstairs to the 3rd floor and cross the West hallway to open the last printer room using the red written numbers on the 3rd floor map. Enter the six required uppercase letters into the printer: ZO RE LO (random order) to obtain Bug Report 2.
Part 4. West door, Game prototypes and Teatro rosso 1
Objective: get game prototype error codes and playing card keys.

Go downstairs to the 1st floor and open the west door using the W-shaped Key. On the West hallway, go down to open the Quiz Club door with the symbols stored in Patterns & inscriptions and solve the music box with the code 1963 to trigger the dance cutscene with RENZO. He gives you the 3-shaped Key.

Go up to the Dining room (at the back of the West hallway) and exit through the entrance on the right. You will hear a loud noise in the room, but ignore it. Go downstairs to the Cellar and unlock Shortcut number 10, which leads to the central hallway.
Go back to the Dining room and pick up the Restaurant Menu, an important document for the Quiz Club and the Wine Cellar.

Head to the elevator and go to the 2nd floor, descend the spiral staircase in the East wing (from the elevator hallway) and solve the piano puzzle (by playing the piano score). This triggers another dance cutscene with RENZO, who gives you the Red Rose to access Teatro Rosso, at the carriage of magician LORENZO in the forest.

Open both East door using the E-shaped Key and Shortcut number 7, which connects the East hallway to the 1st floor Foyer. Enter the East hallway (where room 1962 is located) and go downstairs to the Cellar.

In the Cellar, open the Basement lounge (the billiards room) with the six-character roman numeral: MMXIV and collect the GHIJKL toy block located in the Basement well room (the left room inside the Basement lounge).

Then, leave the Basement lounge and enter the room on the left, where the Forest game prototype is located. Solve the access sequence for the prototype, which is found in the notes on the small table and perform the three actions mentioned in Bug Report 1.
It is recommended to unlock the shortcut at the left side of this room (Shortcut number 13), which leads also to the central hallway of the Cellar.

Next, head to magician LORENZO’s carriage to access Teatro Rosso, using the Show Ticket and the Red Rose. There, exchange the Ace of Hearts and the Ace of Spades for their keys.

Return to the hotel, go upstairs to the 2nd floor, open the secret entrance at the Front hallway using the Eye Key on the sculpture and open the heart doors with the Heart-shaped Key. Inside that room you get the Ace of Clubs by reading the “Journal du Sud”. Continue down the West hallway, read the note on the display to obtain the C-shaped Key, attached to a brick that breaks the window.

Move to the end of the West hallway and enter the game room where the Hallway game prototype is located. Unlock it with the random controller sequence and perform the actions detailed in Bug Report 3.

Finally, return to the 1st floor to take the elevator to the 3rd floor and open the room with the 3-shaped Key. Inside, enter the last game room where the Library game prototype is. Unlock and perform the actions detailed in Bug Report 2.
Part 5. Maze center, Teatro rosso 2, Horses and Backyard
Objective: Get to the minotaur’s room in the Maze basement and get the Revolver Key by unlocking all of the Backyard puzzles.

After obtaining the final error codes, take the elevator down to the 1st floor and go upstairs to the 3rd floor to re-enter the maze through room 1847. Access the Maze basement unlocking the greek symbols door with the error codes and the 9 maze tiles and get to the Minotaur’s room. There, unlock the hidden stairs and leave through the woman at the entrance of the Maze.

When leaving room 1847, the man from the second interrogation may chase you. Try to save beforehand and complete the interrogation to receive Page 2 of the script. Deliver it to RENZO.

Next, go down to the 2nd floor, go to the Backyard and collect the MNOPQR and STUVWX toy blocks that have fallen from the 3rd floor. They are located beneath the tree on the right (where you get the crank). Drop again through the hole to the secret chapel on the 1st floor and place the toy blocks on the paintings to receive the four medallions:
  • FAMES Painting: GHIJKL toy block, J side
  • MOHR Painting: ABCDEF toy block, E side
  • PESTILENTIA Painting: STUVWX toy block, W side
  • BELLUM Painting: MNOPQR toy block, P side
Then, take the elevator to the 2nd floor and open the spades door with the Spades-shaped Key to find the Ace of Diamonds among the “Evidence” documents.
Leave the hotel to enter Teatro Rosso one last time and exchange the Ace of Clubs and Ace of Diamonds for their shaped keys.

Return to the hotel and activate all the horses. Go down to the Basement lounge (the billiards room) to open the secret door to the first horse. Set the clock hands first to 18:47, and after the cutscene, to 18:XX (solution is written in a note located in the same room). Place the corresponding medallion on the horse based on the symbol on the center-left door in the Backyard.

Next go to the wine cellar to open the secret door to the second horse, using the ten-character roman numeral: MDCCCXLVII and interacting with the wines labeled on years: 1847, 1963 and 2014. Place the corresponding medallion on the horse based on the symbol on the center-right door.

Go up to the 2nd floor of the library via the spiral staircase on the 1st floor and pass through the secret door you previously activated with book 1847. Place the corresponding medallion on the horse based on the symbol on the left door of the Backyard.

Lastly, go to the Backyard to place the remaining medallion on the horse. With all the doors open, rotate the blocks to set 1847. This will lower the wall, granting access to the greenhouse.

Open the greenhouse door by pressing the 16 buttons to "draw" the year 1847 and interact with the red apple to trigger the cutscene with RENZO, who will give you the Revolver Key.
Part 6. Balconies, Revolver room, Diary and Crypt Key
Objective: get both videocassettes to open the mannequins, unlock the woman's diary and get the Trinquetra Key to access the Crypt.

Just in case it counts towards the game progression, open the Café on the 1st floor using the C-shaped Key and watch RENZO’s cutscene. If you have 10 dollars you can unlock the coffee boost to move faster, calling the provided phone number. This phone number is random.

Use the elevator to go to the 2nd floor and open the diamond door with the Diamonds-shaped Key. This will lead to the main balcony, which you can access by entering the code 167 (calculated by subtracting the statue dates, 2014 and 1847). On the balcony, activate the lever to lower the emergency stairs of the east balcony. Unlock this balcony by entering the code TYA and go down to the Basement to save RENZO using the code RENATE, which will reward you with the woman’s videocassette.

Return to the West hallway on the 1st floor to open the Clubs door with the Clubs-shaped Key. Use the emergency stairs to reach the west balcony and enter the code HTE. There, save RENZO using the code LORENZO to receive the man’s videocassette.

Now go upstairs, to room 2014 on the 3rd floor, to watch both videocassettes in the television room. There, you will find the random sequences needed to open the mannequins in the Revolver room.

Then, open the Revolver room on the Loft by taking the elevator on the 1st floor to the 3rd floor, using the Revolver Key. Retrieve both notes from the mannequins, which include the required information to unlock the woman’s diary and the horoscope clock, where the Trinquetra Key is located.

Take the elevator back down to the 1st floor, go up to the 2nd floor of the library via the spiral staircase on the 1st floor, and set the five lunar phases detailed in the note from the woman mannequin.

Next, go to the horoscope clock located at the west door on the 1st floor and match each year to the zodiac symbol indicated by the note from the man mannequin. To obtain the Triquetra Key, you must set the days of the week in the order they appear in the woman’s diary.

Upon obtaining the Triquetra Key, the third interrogation will likely occur. Save whenever possible and obtain Page 3 of the script, which will be delivered directly to RENZO in room 1963.
Part 7. Crypt and Quiz Club
Objective: obtain the Left Eye from the Crypt, collect all keys from the Quiz Club and solve all wooden boxes in the Exhibition room to get all the required words for the old woman. With all that done, you will get the remaining information to access the OCU-3 computer and end the game.

First, I recommend going down to the Cellar via the elevator to interact with the OCU-3 supercomputer and watch the cutscene with RENZO in that room.

Crypt
Leave the hotel and walk to the cemetery. Use the Crucifix Key to open the gate and unlock the Crypt entrance by activating the tombs with the Triquetra Key in the order indicated by the door:
  • Youngest person: 1924 - 1963
  • Fate after 40 years: 1807 - 1847
  • More than a century: 1932 - 2014
Inside the Crypt, solve the three corridor puzzles to reach the center and retrieve the Left eye from the woman’s corpse:
  • First puzzle sequence: Identify the position of the maze section projected on the ground.
  • Second puzzle sequence: Indicate the location of the pillar of the maze tile projected on the ground.
  • Third puzzle sequence: Indicate the orientation of the maze sections projected (order might be random):
    • For 1847, rotate the year plaque itself.
    • For 1963, rotate it 180 degrees.
    • For 2014, rotate it 90 degrees counterclockwise.
Return to the hotel and go up the stairs to the 3rd floor to place the eye in the room 1847 Maze so it counts toward the completion percentage.

Quiz Club
Next, go down to the 1st floor to gather all the keys from the Quiz Club. Follow the same path as in the room 1847 Maze, answering a minimum of 12 out of 20 questions to reach the center, where the minotaur is located:
  • NE: Key 1948
  • E: Key 1960
  • C: Key 1957
  • N: Key 1938
  • NW: Key 1932
  • W: Key 1953
  • SW: Key 1962
Exit to save and complete the fourth interrogation to obtain Page 4 of the script. Deliver it to room 1963 and return to the Quiz Club.
  • S: Key 1973
  • SE: Key 1982

Year Rooms
Exit through the central maze door to start unlocking all the year doors in the following order:
Doors on the 1st floor:
  • Door 1932: Point the camera at the room’s orthogonal symbols to identify the ones corresponding to the numbers 1, 9, 3, and 2.
  • Door 1962: Isolate the numbers 1, 9, 6, and 2 to relate each to a symbol.
Take the elevator to the 2nd floor:
  • Door 1973: Identify the position of the numbers 1, 9, 7, and 3 in the paintings.
Exit to save and complete the fifth interrogation to obtain Page 5 of the script. Deliver it to room 1963 and return.
  • Door 1953: Find the location of the sculptures for the numbers 1, 9, 5, and 3.
Take the elevator to the 3rd floor:
  • Door 1957: Position of the numbers 1, 9, 5, and 7 by connecting the wall paintings with those on the ceiling.
  • Door 1982: Locate the numbers 1, 9, 8, and 2 on the television.
Go upstairs to the Loft:
  • Door 1938: Match the numbers 1, 9, 3, and 8 to the corresponding paintings based on their size.
Exit to save and complete the sixth interrogation to obtain Page 6 of the script. Deliver it to room 1963. Once you have finished solving the 1938 door puzzle, take the elevator to the 1st floor and go up to the 2nd floor via the stairs:
  • Door 1948: Arrange the film reels for the numbers 1, 9, 4, and 8.
  • Door 1960: Position yourself to find the required numbers using the camera.
Exit to save and complete the seventh interrogation to obtain Page 7 of the script. Deliver it to room 1963 and return.

9 Year Sequence
Once all 9 year room puzzles are solved, go to the Exhibition room on the 2nd floor and access the wooden crates room by entering a random 5-digit code based on the location and order of the letters RENZO on the Exhibition sculpture.

Inside, solve the 9 wooden crates to receive the 9 torn biographies, revealing the 9 words you must say to the old woman in room 2014 to get the year sequence.
Important: Keep in mind that after exhausting all sequences, the remaining two interrogations will appear as soon as you finish speaking with the old woman. Quickly exit the room to save your game or go down to the 1st floor and save in the Reception Office, where I have never had trouble saving.

Once the game is saved, complete the eighth and ninth interrogations to receive Pages 8 and 9 of the script, which must be delivered to room 1963.
With all script pages delivered, the door to room 1963 will open, allowing you to get the Right eye from the man’s corpse.
Return to the Maze in room 1847 to place the Right eye and receive the minotaur’s error codes, which must be translated into four Greek symbols.

Exit the Maze and go down to the 1st floor to enter the Quiz Club and provide the 4-letter code to the minotaur in the center of the maze. This will allow you to go deeper and obtain the three symbols for the OCU-3 password.

With all these steps done, you can access the OCU-3 supercomputer in the Cellar and complete the game.
Part 8. OCU-3 access
Objetive: access the OCU-3 supercomputer and solve the last 10 puzzles.

Go to the Cellar using the elevator and access the OCU-3 supercomputer.

Solve the 9 access points:
  • Woman: LORELEI
  • Actual year: 2014
  • Man: RENZO
  • Fictional woman: RENATE
  • Fictional year: 1847
  • Fictional men: LORENZO
  • Year of incident: 1963
  • Deceased: RENZO
  • Responsible: LORELEI

Finally, solve the final puzzle rearranging all blocks depending on your position and interact with RENZO to watch the final cutscene.

And with that, the game is complete! The achievement should unlock after the credits.
Feedback
If you found this guide helpful or have any suggestions, I would greatly appreciate your feedback in the comments and your ratings for the guide.

Thank you for reading, and I hope you enjoyed this second playthrough of the game!
7 Comments
ReverendTed 9 Mar @ 12:49pm 
No credit necessary! Hope it's helpful, because your guide sure helped me!
AaronsitoPB  [author] 9 Mar @ 4:00am 
Wow ReverendTed, thank you so much for your feedback and corrections to the guide! I will add them and give you credit :cuphead:
ReverendTed 8 Mar @ 5:43pm 
Thanks for the guide! Completed in 5:06.
A few notes, some very trivial:
-Spreadsheet has 10 years for the OCU-3 sequence - an extra 1953
-It says to find Lorenzo's calling card on the "bank" instead of the bench
-The guide lists a specific number for Hausmeister Gmbh, but it's randomized and found in the Telephone Directory
-Entering room 1847, the toy blocks are in the room on the left, not right.
-In Part 2, upon entering the Maze it says "get to the center (where)"
-For me, the Safe codes for Computer Disk 3 and 1 were switched. Safes randomized?
-Shortcut 13 is on the left (not right) side of the Forest Prototype computer room
-My Hallway Prototype was in the West Wing and Bug Report 2, not 3
-For me, the Clock was slow by 17min (18:30), slowness seems randomized
-Black Arts Coffee Club phone number was different, seems randomized
-It's implied and super trivial, but you specifically mention delivering all other script pages, but not Page 2

Again, thanks so much! Super helpful!
AaronsitoPB  [author] 24 Dec, 2024 @ 12:08pm 
I'm glad you found it useful!! :slime_happy: Thanks for clarifying the interrogations issue, I will update the guide soon with that information. Happy Holidays!
oh wow 24 Dec, 2024 @ 8:37am 
Thank you so much for the detailed walkthrough! I finished in 3:27. As BorisBeast said I did have to wait several minutes for the remaining 4 or 5 interrogations after having done everything else.
AaronsitoPB  [author] 5 Dec, 2024 @ 3:16pm 
Ohh, I didn't notice those were time based. Thanks for your comments! I will quote them in the guide. :bearcat:
Maybe it takes playtime and progression into account, because in my case, the time gaps between the earlier interrogations were much larger than in the final ones. Interrogations 8 and 9 triggered one after the other, almost instantly.
BorisBeast 5 Dec, 2024 @ 2:41pm 
Very helpful thank you, the interrogations are time based. I managed to miss the 1847 key until VERY late and I ended up having the left eye before even finishing my third interrogation. Forcing me to just keep waiting until the others finally showed up...