
Install Steam
login
|
language
简体中文 (Simplified Chinese)
繁體中文 (Traditional Chinese)
日本語 (Japanese)
한국어 (Korean)
ไทย (Thai)
Български (Bulgarian)
Čeština (Czech)
Dansk (Danish)
Deutsch (German)
Español - España (Spanish - Spain)
Español - Latinoamérica (Spanish - Latin America)
Ελληνικά (Greek)
Français (French)
Italiano (Italian)
Bahasa Indonesia (Indonesian)
Magyar (Hungarian)
Nederlands (Dutch)
Norsk (Norwegian)
Polski (Polish)
Português (Portuguese - Portugal)
Português - Brasil (Portuguese - Brazil)
Română (Romanian)
Русский (Russian)
Suomi (Finnish)
Svenska (Swedish)
Türkçe (Turkish)
Tiếng Việt (Vietnamese)
Українська (Ukrainian)
Report a translation problem


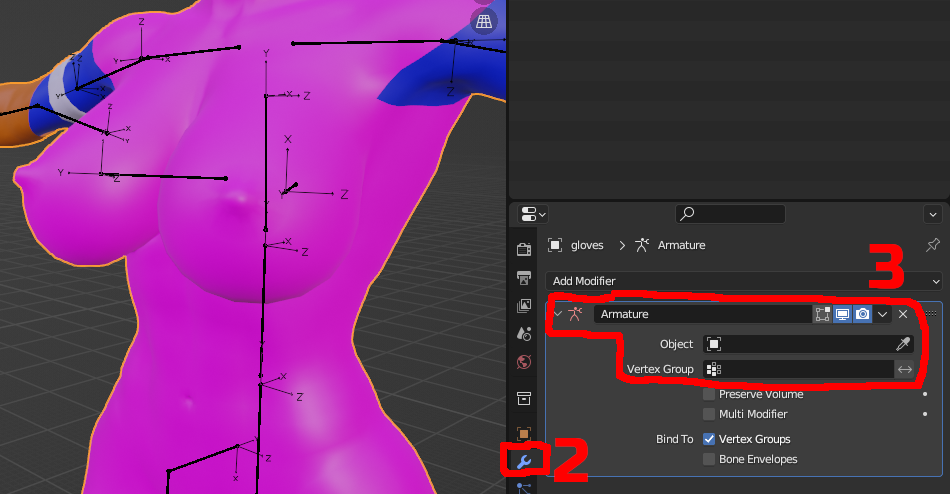


" Python: Traceback (most recent call last):
File "C:\Users\Lenovo\AppData\Roaming\Blender Foundation\Blender\4.0\scripts\addons\HaydeeTools-master\HaydeeExporter.py", line 672, in execute
return write_dmesh(self, context, self.filepath, self.export_skeleton,
File "C:\Users\Lenovo\AppData\Roaming\Blender Foundation\Blender\4.0\scripts\addons\HaydeeTools-master\HaydeeExporter.py", line 378, in write dmesh
group_name = ob.name + '_' + mat.name
AttributeError: ' Matrix ' object has no attribute 'name' "
"
Python: Traceback (most recent call last):
File "C:\Users\user\AppData\Roaming\Blender Foundation\Blender\4.4\scripts\addons\HaydeeTools-master\HaydeeImporter.py", line 1168, in read_mesh
mesh_data.use_auto_smooth = True
^^^^^^^^^^^^^^^^^^^^^^^^^
AttributeError: 'Mesh' object has no attribute 'use_auto_smooth'
"
I won't stop anyone if they upload it themselves though