Door Kickers 2

Door Kickers 2

92 ratings
Door Kicking 101
By Nightwolf
A basic run down of what you need to know when you are new.
2
3
   
Award
Favorite
Favorited
Unfavorite
---------What this is here for---------
My problem with DK2 was I just didnt know enough about what I was doing. There were some decent guides on steam and prob better stuff online. But a noob guide that was current I could not find so it was a lot of learning the hard way for me.

This is mostly here just because I learn better putting information to medium.

but if it helps other noobs out like me along the way. all the better.

If you find anything incorrect please let me know. I am still learning as I go.

I will keep adding as I go along. If anyone is interested in helping contribute to the noob guide, I would welcome it.
Controls
Reload

Right click on your character to bring up the action wheel and hit R to force your trooper to reload. Similarly you can right click on the portrait on the upper left and hit R to do the same thing.

In-Game Stats

Hold ALT and drag right click from your character. The same way you would draw out a direction to look but holding ALT while doing it will give you a stat window based on the dragged distance. Includes a lot of useful information.

Auto Go-Codes

Shift+1,2,3,4 will set Go-Codes to auto trigger. So instead of pressing 1,2,3,4 as soon as your trooper pauses for a go-code it will auto trigger on its own. Any go-code set to auto trigger will have a rotating arrow above it on the bottom right corner.

Stop Trooper

Shift+Click on a trooper will put a hold command on him forcing him to stop immediately. Useful if your guy is about to do something stupid. Shift+Click again to release him.

Go-Code Bypass

Click on a trooper and hit Keypad Period [.] to force a trooper to trigger a go-code but bypass the action. For instance if he's set to throw a grenade, it would force him to trigger the go-code but would NOT throw the grenade. Quicker than deleting the grenade action.

Distance Measurement

Hold right click on your trooper and drag in a direction. Will not only tell him where to look but will also give a distance measurement. Useful if you want to estimate sound range travel.

Force Fire Enemies Under Cover

Troopers will not fire on enemies hiding under full cover even while they are blind firing at your trooper. Hold right click on your trooper and drag the marker over the enemy and your trooper will fire on the enemy under cover.

Sync Speed Command

Click on a trooper and hold control and click on a 2nd trooper. This will tell trooper 1 to move at the same speed as trooper 2. Useful to keep faster troopers moving at the same speed as slower troops, especially the one that holds a shield or a support trooper.

This is really going to shine with Nowheraki Swat. Their shield guy is super useful at blocking bullets but shield guys move SUPER slow. Keeping them in sync helps keep shield guy soaking the bullets while someone behind him fires away.


Troop List

T key shows a list of all your troops along with their current clip amount. Good to keep an eye on them and keep them reloaded.

Delete Waypoints

Hold the Delete key and click on waypoints to quickly delete them.

Silent Toggle

Shift+F toggles all troopers to go loud / stay silent.

Wait for Clear

Shift+W toggles all troopers to wait until there are no enemies in sight before moving.
‎ ‎ ‎ ‎ ‎ ‎ ‎ Killing Things for Beginners
So the core of the game is pretty simple.

Make things dead before they make you dead. Understanding how and why that works in game is the trick.

The moment your guy stands in line of sight of an enemy things happen. In order for your guy to make a kill there are several calculations that go into play before they pull the trigger.


Is your weapon lowered/raised?
If your weapon is lowered, it will take time to raise it. That will delay your shot. There are things that will force your guy to lower his gun, allies/civilians in front of him or being too close to an object. Make sure his gun is raised before going into any area you think might have enemies.

A common mistake is players standing to the side of a door to stay out of the direct line of fire of the door, only to round the wall and burst through the door while your guy is still raising his gun. Not only did kicking the door open alert the guy inside his gun is already raised while you are sill raising yours as you enter.

Open the door then pull back from the wall safely to raise your gun before entering.

Weapon Type
What kind of gun you are using can be the difference between life and death. Everyone likes bringing a chunky rifle but that's not always the best option. The bigger the gun the longer it takes to engage an enemy. Pistols are quick to bring to bear on a target, rifles and MG's take longer. In CQB scenarios when you are clearing tight rooms, its sometimes better to swap to your sidearm than risk it with a rifle.

Pistols also allow your guy to hug a wall closer without having to lower his weapon.

Aiming and Accuracy
Aiming is how fast your guy can bring sights onto target. Still does not mean you will hit what you are aiming at. That is Accuracy. There are several aspects to aiming and accuracy.


Equipment
Equipment will be a big factor in how quickly you down a guy. We already mentioned about the type of weapon you bring, rifle, pistol etc. But this is about the stats of that type. If you open up your equipment screen and select a gun you get this. Aim, Accuracy, Crit Chance


Each box has dark vertical lines in the back. The box is showing range. 0m - 50m which each line being an additional 10. The white line is the current gun/equipment you have equipped. The orange line is the current bit you have selected. This is showing you the difference between the two guns or whatever you are looking at.

Important to note here: These boxes are HIGHLY inaccurate. There is a huge amount of stats that go into equipment that are never shown. You have to dig into the game files to see whats really going on. But for a very basic at a glance thing. We will make it work.

Whats important for these boxes is the range. It will take time but you will learn how to glance at a map and go well this is a lot of 10m or less stuff or 15m-25m. It will take time but these boxes will become more useful.

If you are doing a lot of CQB on a map. You want a gun that specializes in 10m or less. Maybe just 5m. So when you are looking at these lines this is what you want to keep in mind. A gun that does aims great at 20m+ doesnt really do you good clearing rooms. Similarly a 50m sniper is not a lot of good when you are sniping 10m-20m.

Aim is how fast you can bring sights to target, Accuracy is the likely hood you will hit what you are aiming at, Crit Chance is the chance to get a 1 shot kill.

Abilities and Doctrine
Each Squads stats can be further supplemented with skills that boost additional stats. Abilities are leveled up as each individual soldier is leveled up. They start off with random ability levels and early on you can adjust your loadout to maximize the use you get out of them. As each squad member levels up you gain points which you can then invest in squad Doctrine which in turn further boost each squad members stats. Once your squad members get around level 8 with a fully upgraded doctrine you basically have god tier squad members that no longer miss very often.

As you complete campaigns with a given squad you will get a Battle honor for every 6 stars you get in the campaign. These battle honors can further pad your squad members stats and can be swapped out at any time.

Recoil
Recoil is wonky. Basically the more your gun kicks, either from a more powerful round or from firing full auto, or having less stabilization, the less accurate you can be at increasing range. In general it affects the accuracy of your weapon.

The way the game deals with this is it has a fixed formula for each gun and ammo type. It says that for X gun, any target between 0m-15m, our guy can go full auto, at 16m-20m he has to use 3 round burst, and 21m-50m he has to use single shots. Now each gun has its own settings and not all guns can use the same settings. Some guns cant do 3 round burst for example.

Recoil increases that range. the less recoil your gun has the farther out you can go full auto with X gun for example. Instead of 0m-15m its now 0m-18m. Does not sound like a lot, but it can really matter. For weapons with low crit chance or targets with high armor, you might need to put a lot of rounds down range to take them down.

How do we reduce recoil?
Room Clearing for Dummies
Even when you know your gun is going to kill things, that doesn't mean you will not get killed first. Go blindly charging into a room and likely as not you will end up dead even on very simple maps, Go slow, be patient, always check your doors and corners.

There are a variety of ways to storm a room or building to minimize risk.
‎ ‎ ‎ ‎ ‎ ‎ ‎ Ch 1. Breaking Into your Neighbors
Before you can shoot anyone, you need to get inside. Thankfully you are provided with a variety of means to do so. There are very good reasons to use one over the other at times. So lets walk through some of the ways to make yourself at home.


Door Breaching
Do not ever breach a room solo when it can be avoided. Stack up with 2 people. The reason why is there is a delay between opening a door, raising your gun, and aiming at people inside. This delay might get you killed. 2 people minimizes this risk. One opens the door, the 2nd clears it.
<-------------------------

Opening a door vs Kicking a door open

Opening a door is very silent,good for stealth. Kicking it open is loud. Is it simply a question of quiet and loud? eh yes and no. Even once you go loud there are good reasons to silently open a door. Say you have a room of baddies and they all have their backs to you. Since you went loud they are on alert with their guns raised. If you kick the door open they will whip around to the noise. Not a problem if you 2 man stack it but say you are solo. Then you have a chance of being killed while you are raising your weapon.

But, if you silently open it, you might be able to shoot them all in the back. Kick a door open may also draw nearby enemies to you. Perhaps more than you were prepared for.

There's also the question of being exposed and speed. Kicking a door open is 35% faster than opening it by hand. Silently opening it forces your guy to lean into the doorway opening him for being shot as well as just taking longer in general. Something I will have to look into.


Grenade Breach: ------------>
Very simple, one guy opens the door and tosses in a grenade of some form and then you storm in and clear. Whats important here is the open and grenade action can be done with one action instead of click to open click to grenade. if you get close enough to open the door, it may take some fiddling, you can just select the grenade option and the guy will automatically open the door and toss in the grenade in one go. What is special about this is that if you attach it to a Go Code and have 2 people or more on the code, everyone will wait until the grenade has been tossed in before going forward. Very handy. Another is that the room might be too big for the grenade to cover, once you chuck in the grenade ,if someone is inside they will yell, even if the grenade does not get them you at least know for a fact someone is in there and can proceed cautiously.

Door Breach Charge------->
Breach charges come in different flavors, slap charges, breach charges, demo charges etc. They are very handy if you know there are a lot of guns in the room. That delay between the guy opening the door and raising his gun I spoke of, this removes that problem entirely. You can set the charge back safely away, raise your gun and be ready to start firing as soon as you detonate the charge. Further more if you attach a Go Code to the charge planting action it will transfer that code to the Detonate Charge action, very handy.

However....there are risk. You see that red and yellow zone. Those are super important. The red zone will kill anyone inside it. Friend or foe alike. The yellow is a concussive effect, a stun field. If the terrorist kicks open the door just as you are detonating it....it wont blow towards the bad guys, it will wipe out yours lol.


Dynamic Hammer/Bolt Cutter/Breacher Shotgun/Crowbar:
When you come across a locked door or gate, if you are not planning to blow it open with a breach charge and don't have a CIA lockpick, you need one of these to get through.

The dynamic hammer is for breaching locked doors and is heavy which means it will slow your guy down a lot and it takes FOREVER to swap out to and from, which means even after you open the door someone could come through and shoot you while you are swapping back to your gun. It is however slightly loud with a sound radius of 12m on use.

The bolt cutter is for locked gates and for cutting through chain link fences, very handy. Its also fairly quiet. Only 4.5m.

The Breacher Shotgun works on both doors and gates, is fairly quick to swap out to and from. However it is limited in the number of uses. Only 4 charges. Its also super loud at 25m so you trade the speed and flexibility for the fact that everyone will hear you coming. [Thanks Just Call me Takeshi for the sound info!]

The Crowbar is a default carry when you do not bring anything else and works similarly both on doors and gates. Its loud with a 12m sound radius and takes forever to open anything.


Wall/Window Breaching
Sometimes you need to get into a room faster than you could via a door, maybe due to snakey hallways. Sometimes you need to exfil a hostage/VIP and the hallway is unsecured or maybe its just a better line of attack to open up a window/wall rather than storm a risky door. Breaching a wall/window is the answer to your problem.

Its worth nothing anything can breach a window but only specific charges can breach a wall. i.e. a Breach Charge or Demolition Charge.

They make very large holes and are very loud. It is not usually a good idea to use them if you are unsure where a VIP/Hostage is. It is also risky to use them where nearby Doors/Windows will be blown open not only drawing the enemy to you but allowing them to pour into your room from adjacent rooms so instead of the 2-3 enemies you were ready for, 9 of them pour in from around the house and since there's no door they come in shooting.

But since the hole they make is so large you can stack multiple men at the entrance allowing for you to pour more firepower into a room or attack it from a direction the enemy is not looking. Because the blast radius is so large enemies may be killed or at least stunned and your troops by default focus on unstunned enemies first allowing you to clear a large number of enemies quickly.

On small maps with executioners, a breach charge will usually set them off and get the hostage killed if you are not prepared.

Again, learn to use it wisely.
In this example the room above is filled with enemies, attacking it via the door is dangerous. A wall breach to the side allows a path to attack the house safer but the breach charge will blow off the door on the other side potentionally exposing me to more enemies who now have a direct line of fire on me and the sound of the breach will draw the enemies above into my room below. But it also provides a safer path to attack the room from and i can simply sit and wait while the enemies stream into the tiny door right into my kill box from the left.
‎ ‎ ‎ ‎ ‎ ‎ ‎ Ch 2. Room Clearing
Getting inside is in fact half the battle. Once you make it in, sometimes that is a whole other can of worms in itself.


Here we have a problem.I have a group of sandbags with a line of sight on the door. Almost certainly going to be someone back there. I have a kitchen providing cover who may possibly have someone there, and then I have open areas above and to the right.

So here is the question. How do we enter the room without being cut down. Its too big for flash grenades to reach everywhere from the door. There are additional pockets enemies may be hiding that will pop out unaffected once the flash bang goes off. Both the sandbags and kitchen will provide cover lowering my chances to kill anyone without emptying a clip. If the guy in the sand bags has a rpg...I am done for.

This is where you have to use your tools to make a safe route for yourself. We have 2 options:

A) A breach charge through the wall to the right would bring me inside grenade range of sandbag guy. But the breach charge is almost certainly going to draw anyone in the living room and kitchen through my door and its going to blow off the adjoining door exposing me to people that might be taking cover behind the Rocket Cases to the right who would be unaffected and open fire immediately. I could toss a grenade through the door way and dash before the kitchen or living room people come for me. Then I would have a tight hallway to hold easily while clearing out sandbag guy. That would work.

B) I could toss a smoke grenade right above the rocket case blocking the line of sight of sandbag guy and anyone hovering around the rocket case, flash the living room and kitchen then push in murder those people and slip into that pocket through the blown out wall above the closet. Then deal with sandbag man. That could work too.


now in this case my CIA skillset lets me see everyone so I know exactly what im dealing with but when you do not, do not rush it. Think ahead. Plan ahead. Stay Aware and Stay alive.


Potty Safety
Now I know the lot of you frequently bypass small closets and toilets going "I'm not wasting my time checking every stall, nobody would hide in there" But it is a well documented fact that terrorist crave the comfort of a tiny cave and nothing reminds them of home like a cramped toilet stall or closet. Ignore them at your peril. Many a noob has fallen to a rpg in the back when a terrorist popped out of his potty to take you down.

Always check every room no matter how small.


.


Use Game Mechanics

You are not obligated to go to the enemy. You can bring them to you.

Who turned out the lights!

Some maps will have fuse boxes and generators on the map, usually denoted by a green light, that can be shut off to turn off power to a building. This may be temporary as I believe some maps have a backup power that kicks on. For unalerted enemies, shutting off the power will usually trigger them to come to the fuse box to investigate or it may outright alert them on the map. Shutting them off is usually noisy as well so do not shut them off until you are ready to go loud.

Once off it will be a debuff to your enemy making him unable to see you. You can then more easily sneak about engaging until you fire alerting them to your position. Some enemies do have night vision however. On some maps the enemy themselves will shut off the lights once alerted.


Silently cracking locks

Use sound to silently open a locked door/gate. Yeah you can go busting in there with a hammer waking up half the map but more often its better to stay stealthy as long as possible.
Here we have a locked gate. If you look at the last page in this guide nades make noise when they go off, usually enough to alert a good portion of the map, but smoke grenades only have a sound range of 10m. Hold right mouse button down, drag out 10m to get a general idea how big it is. Then toss one down outside a locked door. Assuming your enemies are unalerted, they might just be nice and open the door to investiage that noise!
a little pew pew and you just silently cracked a lock without the CIA lockpick!


Break Lines of Sight

If you have large groups of enemies or enemies behind cover, use smoke grenades to break sight lines allowing you to get closer or bypass them entirely. You can also use smoke to break groups of enemies into smaller chunks you can deal with individually. Pa always told me "son, an enemy that cant see you is an enemy that cant shoot you in the head!"

Necromancy and You!

Kill an enemy in sight of another or a passing patrol will cause that enemy to go investigate. Then you pew pew him too. You can use this to lure small groups of enemies out of position or clear them from entrenched positions! Be warned, enemies make sound when they die possibly luring larger groups nearby to their death screams.
Combat Tactics and Mechanics
‎ ‎ ‎ ‎ ‎ ‎ ‎ Mechanics

Aiming

This is your view cone. Now I presume your character defaults his sights down the middle. Any enemy that enters the view cone then forces your character to adjust his sights left or right. This triggers the aiming mechanic. Your aiming stat determines how quickly you can bring sights on target and leads to the Accuracy stat once the shot is fired.

Now here is something important. If a enemy fires on you outside your vision cone, then your character must rotate to bring the enemy into the vision cone to be aimed at. This brings the Mobility stat into play and factors into aiming. I think. The developer responses are little wonky to understand and not terribly clear.

Its also important to note the farther to the edge of the view cone your enemy is the longer it will take to aim. Essentially the closer to center your target is the quicker you take a shot. This makes it important to keep your view cone centered on hallways and doors where you think enemies might emerge from.

Mobility

Mobility affects aiming when needing to rotate, but mostly affects movement of any kind. Running, walking, climbing through windows. On the whole you are going to kill everything in front of you however there are times when you just need to run really fast and jump through a window really fast. Mobility is where this becomes important.

Important to note, when you use a disposable weapon like a Rocket Launcher or a Breaching Charge that reduces your mobility, you will regain that lost mobility after its use.

In theory high mobility means that with properly buffed aiming stats, you can sweep through a house faster than the enemy could react. On the other hand this game does not encourage that kind of gameplay lol.

Maneuverability

Maneuverability affects how fast you can aim, guard, change weapons. A general rule of thumb is the longer a gun is the less maneuverable it is. A pistol is more maneuverable than a sniper rifle or LMG. Something important to note is also, silencers lower maneuverability of a weapon since they add length and weight to the weapon. In CQB (close quarters combat) you will frequently see after kicking a door open that enemies with pistols will get shots off faster than your long rifle.

The Maneuverability of a weapon is shown at bottom in the equipment screen when you select it.


Cover

Cover is pretty straight forward. When you properly hide behind it, it makes you harder to hit in the direction of the cover. Meaning its not a 360 bonus unless the cover is 360. For Snipers and Machine Guns it adds a recoil bonus that lowers your guns recoil increasing accuracy. Cover provides a default of 50%.

Here we have 2 guys. Both are behind a car but the one on the left has no dashed lines while the one on the right does. The right guy will get a cover bonus when being fired at from beyond the car, the left guy will not. Just being behind something does not give you cover.

Now those dashed lines represent the arcs upon which you will receive cover from. if you get fired at from the sides or rear where the dashed lines are not. You get no cover bonus.

The stability bonus does seem to apply in all directions so long as you are in cover (the dashed lines).

Accuracy

So Accuracy is just a math formula in the game and numbers that adjust that formula determine your final result. In the data files or in other guides you will see this,

accuracyStart="85"
accuracyEnd="60"


What this says is that every shot fired has a max accuracy chance of 85% and a minimum accuracy of no less than 60%. An 85% chance that the bullet will strike the target. You might clip an ear, you might shoot off a little toe, the only thing it promises is you will hit him somewhere potentially 85% of the time. At 100% you have a 100% chance of striking the target. At 200% not only will you hit him you will hit him center mass 100% of the time. 100% encompasses the whole body, 200% is dead center of the body, any direction. 50% says you only have a 50% chance to hit him at all.

These are the default parameters. They can be increased or decreased with, abilities, doctrine skills, scopes, recoil etc. So +10% means your start accuracy would be 95% and your end would be 70%.

I want to say that the doctrine effects for accuracy are in % so +5 would be +5% but im not 100% certain. Another thing I will have to look into.
‎ ‎ ‎ ‎ ‎ ‎ ‎ ‎Tactics


Door Breach

Now we already covered a number of ways to breach a room. But there is more to it than that. How you stack up and enter can make a difference in being surprised killed or not.

This is probably how many of you breach. However, right behind the door could be a guy with a LMG, who will one shot you as soon as the door opens. Most of the time that will not happen but it can and it will, especially when things are going well and you get cocky and start ignoring good breaching rules and just go waltzing into rooms. Furthermore there could be a guy hiding just below the door in the perfect position to murder hammer guy while it takes him ages to change back to his gun while Dude#2 will not be able to see or shoot him.


To avoid that we do this. We put Dude#2 behind hammer guy because it takes FOREVER to put that hammer away and while he's doing that there might be a guy just on the other side that will kill him while hes switching. So Dude#2 will cover him. We set Dude#2 to stop and shoot mode (perm) so he does not just wander off in that event, he will murderkill the guy who might kill our hammer guy before moving on. Then he sweeps the room from the door while hammer guy pulls safely back. And just for good practice we turn off stop and shoot mode(perm). Now you could avoid all that with a breach charge as well but lets assume you do not have one of those.


Move and Shoot

Move and shoot is something that tends to fly under the radar in how useful it is. The idea is simple it tells your guy if he sees an enemy at a point, stop and murderkill said guy and only move after no more targets are visible.

The reason this is good is because moving throws off your aim and increases your time to shoot because the your guy is having to rotate to keep sights on target, he may just walk on out of sight range of an enemy that is still firing at him. If your mobility is high or aim time is low this will be less an issue than when your mobility is low or your squad is relatively new.

So it comes in 2 flavors, pause and permanently on. The pause is found to the left of your go-codes in your action wheel and the permanent is found beneath your troopers portrait.

The pause can only be used along a preset path and tells him to stop at a waypoint along said path kill anyone you see and move on.

The permanent one tells him that anywhere after this point, path or no path, he will always stop and murderkill people until there is no one left in his sight. Once the permanent is on it will stay on until you order it off.

The pause is useful to use in open fields where you may want to focus down a defensive position. The permanent is better inside buildings where you want to swing around doors and hallways. This kinda keeps your guy from taking on too many enemies at one time. It is not generally wise to use the permanent in open areas as while your guy is focused on shooting one person...he is standing in the middle getting shot at by 5 more he cannot see.

Important to note. Be absolutely careful when it is on and off along predefined routes. The icons look the exact same and you can easily turn it off without knowing possibly getting your trooper killed.


Use Sound

We already talked about using sound to get locked doors and gates open but even after you go loud you can still use it. Toss a flashbang outside a room and enemies might come out of an otherwise dangerous room to enter and you can safely gun them down as they pour through the doorway.

Similarly if you have a room with just too many enemies, bash a window on the far side, maybe drag a few of them out of the room. Make it safer to storm.

Each action has a range the sound will travel. Measure the map and use the last section of this guide as a reference.


Learning to love your Pistol

We all love our high powered rifles. But in CQB our precious can get us killed. We talked about maneuverability, if your guy is injured or near dead, being the fastest on the draw can be the difference between life and death. In CQB, doorways and tiny hallways our not our friends.


Here we have a doorway with a bathroom that has a Line of Sight (LoS) on the door. In order to cross the doorway while looking at the door we have to move sideways. Now we could flashbang or smoke the room to be safe but lets assume that's not an option.
If we went loud and the guy inside already opened the door, the moment we cross the door way he shoots us dead. The reason why is our big powerful rifle is too long to enter the doorway so we have to lower it to cross. The time to raise it, is more then enough for bad guy to murderkill us. Now we could go in straight through, but we would have to rotate and he would still murderkill us in that time.


So there are 2 ways we can deal with this without grenades.

1) Go in at an angle We go in at an angle keeping our gun raised, immediately rotate around as soon as we cross. Minimize the lag time between when we enter and when we engage. If your guy is low leveled or has practically zero mobility this may or may not work. At max level there is almost no risk.


2) Switch to your pistol your pistol will generally have a much higher maneuverability than your rifle. Meaning you can lower and raise it massively faster and be quicker to aim in CQB. In multiplayer I almost never see anyone using a pistol and frequently see them get shot dead because of it. Have your guy swap out before he enters the room, he will still have to lower it due to the door but he will whip it back and on target as soon as he crosses. As you level up this will get immensely faster, especially if you put points into a pistol doctrine. Since pistols are shorter it also means you can execute your rotate command closer to the door vs a rifle speeding up your reaction time.

sometimes .01s does matter.

The bulk of enemies in game can be taken down in CQB with just a pistol. Clip size does become an issue so you can't just ignore your trooper like you would with a rifle. But a proper pistol with proper sights will do you better more often than not and teach you to be more respectful of breaching vs just storming around with a rifle inside a building.
‎ ‎ ‎ ‎ ‎ ‎ ‎ ‎Enemy AI
So many players hate HVT/Hostage missions, they just go in hucking rockets and next thing they know the enemy is executing hostages or the HVT is fleeing. Makes them frustrated.

If you know how and why the AI will react it is much easier to do these missions.

Executioners:
<Behavior name="Executioner"> <!-- combat behavior, name is important, causes the countdown timer to appear -->
<Bind evt="IDLE_TICK" prio="0" activity="IDLE_COMBAT" />
<Bind evt="CMD_PATROL" prio="1" activity="IDLE_COMBAT" alwaysSwitch="true" />
<Bind evt="HEAR_SNIPER_SHOT" prio="4" activity="INVESTIGATE" />
<Bind evt="SEE_FRIENDLY_COMBAT" prio="4" activity="INVESTIGATE" />
<Bind evt="HEAR_SUSPICIOUS" prio="5" activity="INVESTIGATE" /> <!-- react when friendly dies nearby -->
<Bind evt="SEE_DOOR_OPEN" prio="5" activity="INVESTIGATE" />
<Bind evt="SEE_FRIENDLY_EXECUTING" prio="6" activity="EXECUTE_HOSTAGE" />
<Bind evt="SEE_ENEMY" prio="6" activity="EXECUTE_HOSTAGE" />
<Bind evt="HEAR_ALARM" prio="6" activity="EXECUTE_HOSTAGE" />
<Bind evt="SEE_DEAD_FRIENDLY" prio="6" activity="EXECUTE_HOSTAGE" />
<Bind evt="CMD_RUN_TO" prio="6" activity="IDLE_COMBAT" alwaysSwitch="true" />
<Bind evt="IN_BLAST_RADIUS" prio="12" activity="AVOID_RADIUS" />
<Bind evt="SET_ON_FIRE" prio="14" activity="AVOID_FIRE" />

What this says is, if an executioner hears a sniper shot, sees a friendly in combat, i.e. another bad guy, or hears a friendly's death scream, or sees a door open, hes going to poke around and find out what is going on. If he sees a friendly running off to kill a hostage, sees you, hears an alarm, or sees a dead friendly that's going to trigger him to go kill a hostage himself.


< Click to enlarge

The way we put this to use is, I have a problem here. The building is full of enemies. The map is only 20m square so even silenced I go in, I am going to make noise, people will start coming to investigate, these are glass doors. They do not block line of sight, I am going to start killing people through the glass doors, the executioner will see their dead bodies and move to kill the hostage.

The way I get around this is I toss a smoke grenade in the green box. That breaks line of sight, I can kill the bad guys in the front half of the building, then open the door, flashbang the room and storm the room before my smoke grenade wears off. The smoke grenade might draw the executioner to investigate but it will not matter since he will not be able to see. Either way it buys me time to storm the room and save the hostage.

What I usually do is toss the smoke, clear the front half of the building, plant a breaching charge to the left of the guy sitting on the couch. The breaching charge kills couch guy, stuns chair guy above him, toss a flash to the far side of the room and cut people down.
Doctrine Effects
There's a lot here so this is going to be a long term project.

Reset Time: is the amount of time in milliseconds must pass before another attack type can be executed. Basically if your guy fires 5 rounds and then stops for whatever reason, this is the amount of time you must wait before he can fire again. Anything that subtracts from it is good. This is most noticeable when you engage an enemy, stop and immediately another enemy rushes you while your guy does not shoot for a moment for this reason.

Aim Time: The amount of time in milliseconds between when your guy lines his sights on target to when he pulls the trigger. This number is randomly pulled between your min and max aim time I believe, fairly certain I saw a dev note somewhere lol. Again the larger this number the longer it can potentially take for your guy to shoot after sighting an enemy. Anything that subtracts from it is good. This number is in milliseconds.

Nearby Target Bonus Closeness: When you engage a second enemy within x distance of the previous one you killed you get this bonus which then uses your reset time instead of your aim time to determine how fast you shoot at your enemy. This helps when you are ambushed by another enemy after killing a previous one to gun him down quicker. Generally your aim time will be longer than your reset time I believe. This number is in %

Conditioning: percent increase in move and turn times. So conditioning="50" will make them move 50% faster, but still capped by their max move speed.

Recoil aka Follow-Up Accuracy: Recoil is a little funky. What you would think it means is every time you fire your weapon it jumps off sight. But that's not the way it works in game. If you fire a LMG it jumps all over the place. So with every round you fire your accuracy drops until you hit the AccuracyEnd or your minimum accuracy threshold. So with a LMG you start off with AccuracyStart with say 60% then every successive shot drops by a preset value. 60%-58%-56%-54% etc. until you reach AccEnd say 45% then it flatlines.

With single shots or small burst shots, you fire, miss, correct, fire again. So with every successive shot your accuracy goes up as an result of recoil.

Accuracy: I want to say that the doctrine effects for accuracy are in % so +5 would be +5% but im not 100% certain. Another thing I will have to look into.

Crit Chance: The chance to 1 shot kill an enemy. Late game this is pretty much the only stat that matters. This number is in %

Efficiency: Speed at which you execute skills like sabotaging, defusing, planting etc. Number is in %

Ready Time: The time to bring your weapon to a raised and ready to aim state from another state such as being blocked by an object, I think. Time is in milliseconds.

Reload and Empty Reload Time

Time in milliseconds to reload a partially empty clip (Reload Time) and time to Reload a fully empty clip + no round in the gun chamber (Empty Reload Time). Chambering a round into the gun increases the reload time vs just swapping out clips hence the 2 reload times.

Guard Time : Melee. Time in milliseconds.

Change In/Change Out: How long it takes to bring your weapon out and put it away. Time in milliseconds.

Being Spotted Rate: Number in %. How fast from when you do something suspicious under cover to when the enemy blows your cover. The lower this number is the longer it takes for an enemy to blow your cover. This is represented in game by the dotted line turning red as it approaches you. This changes a fixed time in milliseconds. So -90% would be a reduction of 90% of a Spot Rate of 20ms.
‎ ‎ ‎ ‎ ‎ ‎ ‎ ‎Rangers
‎ ‎ ‎ ‎ ‎ ‎ ‎ ‎ ‎ ‎ ‎ ‎‎ ‎ ‎ ‎ ‎ ‎ ‎ ‎ ‎ ‎ ‎ ‎ ‎ ‎‎ ‎ ‎ ‎ ‎ ‎ ‎ ‎ ‎ ‎ ‎ ‎ ‎
‎ ‎ ‎ ‎ ‎ ‎ ‎ ‎ ‎ ‎ ‎ ‎ ‎ ‎⁍ Handguns

  • Short Range Drills - Affects all pistols at ranges between 1m and 7m
    • -50 to minimum aim time
    • -100 to max aim time
    • -20 to reset time
    • +50 to Accuracy between 1m and 7m
  • Medium Range Drills - Affects all pistols at ranges between 7m and 15m
    • -50 to minimum aim time
    • -50 to max aim time
    • -20 to reset time
    • +20 to Accuracy
  • Controlled Pairs - Affects all pistols at 2 separate ranges. Between 1.5m and 4m and 4m and 8m.
    • 1.5m-4m
    • Crit Chance +5
    • Rounds per Second + 0.5
    • -25 to reset time
    • +5 to Accuracy
    • 4m-8m
    • Crit Chance +5
    • Rounds per Second + 0.25
    • -25 to reset time
    • +10 to Accuracy
  • Precision Shooting- Affects all pistols at ranges between 1m and 7m
    • Crit Chance + 20
    • +20 to Accuracy

  • Fast Reload - Affects all pistols.
    • Reload Time -250
    • Reload Empty Clip Time -450

  • Transition - Affects speed at which you auto switch to pistol after your main runs dry.
    • Change-In Time -250
    • Change-Out Time -100
    • -20 to ready time

  • Suppressed Shooting- Only affects pistols with a suppressor equipped.


‎ ‎ ‎ ‎ ‎ ‎ ‎ ‎ ‎ ‎ ‎ ‎ ‎ ‎⁍ Rifles
  • Short Range Drills - Affects all rifles including shotguns and dmr between 0m and 7m.
    • Minimum Aim Time reduced by -50
    • Max Aim Time reduced by -100
    • Reset Time -100 (for shotguns this is -50 instead)

  • Short Range Burst - Affects only rifles with automatic and burst fire modes. 2 separate ranges.
    • 1.5m-4m
    • Crit Chance +5
    • -25 to reset time
    • +10 to Accuracy
    • 4m-8m
    • Crit Chance +5
    • -25 to reset time
    • +5 to Accuracy

  • Room Clearing Drills - Affects all rifles between 0m and 7m.
    • Adjust nearby target bonus closeness by +20%. Which does not do you much good if you do not know what the original setting was lol. I will dig into it later. For CQB combat it will be useful however.

  • Medium Range Drills - Affects all rifles including shotguns and dmr between 7m and 15m.
    • Minimum Aim Time reduced by -100
    • Max Aim Time reduced by -200
    • Reset Time -100 (for shotguns this does not apply)
    • Accuracy +50 (for shotguns this does not apply)

  • Medium Range Burst - Affects all rifles between 7m and 15m that have burst fire mode.
    • Crit Chance +5
    • Reset Time -25
    • Accuracy +10

  • Surgical Shooting - Affects all rifles and dmr between 1m and 50m.
    • 1m-15m range.
    • Crit Chance +20
    • +25 to Accuracy
    • 15m-25m range.
    • Crit Chance +10
    • +20 to Accuracy
    • 25m-50m range.
    • Crit Chance +4
    • +10 to Accuracy

  • Obscured Targets - Affects all rifles and dmr between 0m and 25m. Reduces the effectiveness of cover for the enemy. (Makes them easier to hit behind cover). Possibly affects LMG's as well. Have to investigate further.
    • 0m-7m range.
    • Cover Reduction Min: 15
    • Cover Reduction Max: 10
    • 7m-15m range.
    • Cover Reduction Min: 10
    • Cover Reduction Max: 5
    • 15m-25m range.
    • Cover Reduction Min: 5
    • Cover Reduction Max: 0

  • Barricade Shooting - Provides additional recoil and cover bonuses from being in Cover. The cover bonus is a flat +15% add-on. The recoil bonus is range dependent and only applies to rifles.
    • 0m-7m range.
    • Recoil Bonus: 3
    • 7m-25m range.
    • Recoil Bonus: 2
    • Accuracy Bonus: +10
    • 25m-999m range. (Not a typo they did that to get around a coding issue.)
    • Recoil Bonus: 1
    • Accuracy Bonus: +15

  • Long Range Drills -Applies to all rifles between 15m and 100m.
    • 15m-40m range.
    • -200 to minimum aim time
    • -100 to max aim time
    • +20 to Accuracy
    • 40m-100m range.
    • -100 to minimum aim time
    • -20 to max aim time
    • +20 to Accuracy

  • Fast Reload -Applies to all rifles and dmr.
    • -300 reload time
    • -450 empty reload time
‎ ‎ ‎ ‎ ‎ ‎ ‎ ‎ ‎ ‎ ‎ ‎ ‎ ‎⁍ Support

  • Assault Saws -Applies to all LMG's.
    • Adds 5 to conditioning.
    • Ready Time -50

      These will modify LMG attack types. Hold Alt+Right mouse drag to see the current attack type for a given range.
      • [Rangers_LMGStrafeShort], [Rangers_LMGStrafeShortMounted], [Rangers_GPMGStrafeShort]
      • -50 to minimum aim time
      • -50 to max aim time
      • +5 to Accuracy


      • [Rangers_LMGStrafe], [Rangers_LMGStrafeMounted], [Rangers_GPMGStrafe]
      • -50 to minimum aim time
      • -70 to max aim time
      • +10 to Accuracy

  • Improved Suppression -Applies to all LMG's.
    • Suppression +0.5

  • Assault Marksmen-Applies to all DMR's.
    • Adds 5 to conditioning.
    • Ready Time -50

      These will modify DMR attack types between 0m and 7m. Hold Alt+Right mouse drag to see the current attack type for a given range.
      • -50 to minimum aim time
      • -100 to max aim time
      • +15 to Accuracy
      • +1% to Crit Chance

  • Language Skills- Straight up just allows you to give orders to civilians

  • Melee Practice - Makes enemies you bop in the head with your melee attack stay stunned for longer.
    • Melee Stun Bonus +100

  • Throwables Training - Let's you chuck grenades faster. Useful for breaching rooms.
    • Throw Time -180
    • Throw Time Corner - 250

  • Self First-Aid - Just for campaign. Lets your guys recover from injury faster. They heal at the end of a mission vs the next day it would normally heal at.
‎ ‎ ‎ ‎ ‎ ‎ ‎ ‎ ‎ ‎ ‎ ‎ ‎ ‎⁍ Elite Skills

  • Extra Conditioning - Increases move and turn speed.
    • Conditioning +10%

  • Advanced Language Skills - Gives you access to additional orders to civilians. Lets to tell them to haul a*s to the escape route or simply get out of the room.

  • Advanced Combatives - Lets you whack enemies you sneak up behind on the head. Does +50% melee damage and +100% stun duration bonus for backstabs.

  • Advanced Shooting - Affects Rifles and DMR between 0m-50m
    • 0m-15m range.
    • -60 to minimum aim time
    • -50 to max aim time
    • +10 to Accuracy
    • +10% to Crit Chance
    • 15m-25m range.
    • -50 to minimum aim time
    • -50 to max aim time
    • +5% to Accuracy
    • +7% to Crit Chance
    • 25m-50m range.
    • -50 to minimum aim time
    • -50 to max aim time
    • +4% to Accuracy
    • +5% to Crit Chance

  • Explosive Breaching - Makes you plant charges faster.
    • changeInTime -80
    • changeOutTime -50
    • Efficiency +35%

  • Violence of Action - For 8000ms gives a self buff to a trooper called Violent whenever a trooper makes a kill. Violent inflicts a debuff called ScaredShitless (I kid you not) that last for 5000ms on enemies within 7m of the trooper. ScaredShitless reduces an enemies ability to recover from suppression by -50.

    Assuming you build for suppression this would allow you to handle larger groups of enemies that might overwhlem you otherwise by quickly suppressing them. Might find this more useful in coop when paired with Nowheraki Swat who tend to be heavier in suppression with their weapons.
‎ ‎ ‎ ‎ ‎ ‎ ‎ ‎CIA

‎ ‎ ‎ ‎ ‎ ‎ ‎ ‎ ‎ ‎ ‎ ‎ ‎ ‎⁍ Handguns
  • Close Quarters Speed - Affects all pistols at ranges between 1m and 7m
    • -50 to minimum aim time
    • -100 to max aim time
    • -50 to reset time
    • +3% to Accuracy
    • +0.1 rounds per second
  • Close Quarters Precision - Affects all pistols at ranges between 1m and 7m
    • -10 to minimum aim time
    • -10 to max aim time
    • -10 to reset time
    • +4% to Crit Chance
    • +0.1 rounds per second

  • Double Taps - Affects all pistols. Replaces CIA pistol attack types with these.
    • CIA_DoubleTap9mil
      • minAimTime -10
      • maxAimTime -10
      • resetTime -15
      • critChanceAdd +4%
      • roundsPerSecond +0.3

    • CIA_ControlledPair9mil
      • minAimTime -10
      • resetTime -20
      • critChanceAdd +2%
      • roundsPerSecond +0.1

    • CIA_HKDoubleTap45
      • minAimTime -10
      • maxAimTime -10
      • resetTime -10
      • critChanceAdd +4%
      • roundsPerSecond +0.1

    • CIA_DoubleTap45
      • minAimTime -10
      • maxAimTime -10
      • resetTime -14
      • critChanceAdd +4%
      • roundsPerSecond +0.15

    • CIA_ControlledPair45
      • minAimTime -10
      • resetTime -15
      • critChanceAdd +2%
      • roundsPerSecond +0.1

    • CIA_HKControlledPair45
      • minAimTime -10
      • resetTime -15
      • critChanceAdd +2%
      • roundsPerSecond +0.1

  • Extended Range Accuracy - Affects all pistols at ranges between 1m and 25m
    • 1m-7m
      • minAimTime -10
      • maxAimTime -20
      • Accuracy +1%
      • roundsPerSecond +0.1

    • 7m-15m
      • minAimTime -20
      • maxAimTime -150
      • resetTime -50
      • Accuracy +35%
      • roundsPerSecond +0.1
      • critChanceAdd +1%

    • 15m-25m
      • minAimTime -150
      • maxAimTime -100
      • resetTime -50
      • Accuracy +30%
      • roundsPerSecond +0.1

  • Shooting from Retention - Affects all pistols. Basically this reduces the time it takes to bring your gun to a raised and aimed state after being in melee or getting too close to a obstacle that forced you to lower your gun.
    • readyTimeAddBlocked -50
    • guardTimeAddBlocked -25

  • Quick Draw- Affects all pistols. Allows you to draw you gun faster. Useful for stealth.
    • -150 to changeINTime
    • -50 to changeOUTtime
    • -10 to ready time

  • Extended Range Speed - Affects all pistols between 1m and 50m.
    • 1m-7m
      • minAimTime -10
      • maxAimTime -20
      • Accuracy +1%
      • roundsPerSecond +0.1

    • 7m-15m
      • minAimTime -40
      • maxAimTime -200
      • resetTime -50
      • Accuracy +1%
      • roundsPerSecond +0.1

    • 15m-25m
      • minAimTime -200
      • maxAimTime -250
      • resetTime -50

    • 25m-50m
      • minAimTime -250
      • maxAimTime 0


  • Draw from Concealment - Affects all pistols. Increases the amount of time it take for an enemy to blow your cover after doing something suspicious.
    • being spotted rate -90%

  • Transition - Affects all pistols. Auto Switches to pistol when your main runs empty.
    • -250 to changeINTime
    • -100 to changeOUTtime
    • -20 to ready time

  • Tactical Reload - Affects all pistols.
    • -150 to Reload Time
    • -120 to Reload Empty Time
‎ ‎ ‎ ‎ ‎ ‎ ‎ ‎ ‎ ‎ ‎ ‎ ‎ ‎⁍ Rifles
(It is worth nothing that the CIA data sets separate Western (US) and Eastern (Russia) rifles. Some stats only affect US guns, some only Russian Guns.)

  • Close Quarters Speed - Affects all western rifles, eastern rifles, and DMR at ranges between 1m and 7m
    • Western Rifles
      • minAimTime -40
      • maxAimTime -80
      • resetTime -50
      • Accuracy +0%
      • roundsPerSecond +0.1

    • Eastern Rifles
      • minAimTime -30
      • maxAimTime -60
      • resetTime -50
      • Accuracy +0%
      • roundsPerSecond +0.1

    • Western DMR
      • minAimTime -30
      • maxAimTime -50
      • resetTime -30
      • Accuracy +0%

    • Eastern DMR
      • minAimTime -20
      • maxAimTime -40
      • resetTime -30
      • Accuracy +0%

  • Close Quarters Precision - Affects all western rifles, eastern rifles at ranges between 1m and 15m
    • Western Rifles and Eastern Rifles
      • 1m - 7m
        • minAimTime -10
        • maxAimTime -10
        • resetTime -5
          [*Crit Chance +5%
      • 7m - 15m
        • Accuracy +5%
        • Crit Chance +2%

  • Medium Range Aim Speed - Affects all western rifles, eastern rifles, and DMR at ranges between 1m and 25m
    • Western Rifles and Eastern Rifles
      • 1m - 7m
        • minAimTime -20
        • maxAimTime -75
        • resetTime -60
        • roundsPerSecond +0.1
      • 7m - 15m
        • minAimTime -75
        • maxAimTime -125
        • resetTime -60
        • roundsPerSecond +0.1
      • 15m - 25m
        • minAimTime -125
        • maxAimTime 0
        • resetTime -30
    • Western and Eastern DMR's
      • 1m - 7m
        • minAimTime -20
        • maxAimTime -75
        • resetTime -45
      • 7m - 15m
        • minAimTime -75
        • maxAimTime -125
        • resetTime -45
      • 15m - 25m
        • minAimTime -125
        • maxAimTime -200
        • resetTime -30

  • Extended Range Accuracy - Affects all western rifles and western DMR's at ranges between 7m and 50m. Ranges are not a typo in game files differ from in game description.
    • Western Rifles
      • 7m - 15m
        • Accuracy +10%
        • resetTime -50
        • roundsPerSecond +0.1
      • 15m - 25m
        • Accuracy +20%
        • resetTime -30
        • roundsPerSecond +0.1
        • Crit Chance +2%
      • 25m - 50m
        • Accuracy +15%
        • roundsPerSecond +0.1
        • Crit Chance +1%
    • Western DMR's
      • 7m - 15m
        • Accuracy +10%
        • resetTime -50
      • 15m - 25m
        • Accuracy +20%
        • resetTime -50
        • Crit Chance +4%
      • 25m - 50m
        • Accuracy +15%
        • Crit Chance +3%
      • 50m - 100m
        • Accuracy +5%

  • Rifle Reloads - Affects all rifles and DMR's.
    • Western
      • Western Rifles
        • Reload Time -140
        • Reload Empty Time -200
      • Western DMR
        • Reload Time -100
        • Reload Empty Time -120
    • Eastern
      • Eastern Rifles
        • Reload Time -100
        • Reload Empty Time -150
      • Eastern DMR
        • Reload Time -70
        • Reload Empty Time -100

  • Burst Fire - Replaces CIA rifle attack types with these.
    • Enables CIA_BurstFireClose
    • Enables CIA_BurstFireHeavyClose
    • Enables CIA_VSSBurstFire

  • Fast Fire - Replaces CIA rifle attack types with these.
    • Enables CIA_FastFireClose
    • Enables CIA_FastFireHeavyClose
    • Enables CIA_AKRapidFire

  • Extended Range Fast Fire - Replaces CIA rifle attack types with these.
    • Enables CIA_FastFireMed
    • Enables CIA_FastFireHeavyMed
    • Enables CIA_AKRapidFireMed

  • Long Range Specialization- Affects all rifles and DMR's at ranges between 7m and 100m. Ranges are not a typo in game files differ from in game description.

    • Western and Eastern Rifles
      • 7m - 25m
        • minAimTime -20
        • maxAimTime -120
        • Accuracy +5%
      • 25m - 50m
        • minAimTime -120
        • maxAimTime -80
        • Accuracy +25%
        • Crit Chance +5%
      • 50m - 100m
        • minAimTime -80
        • maxAimTime 0
        • Accuracy +12%
        • Crit Chance +2%

    • Western and Eastern DMR's
      • 7m - 25m
        • minAimTime -20
        • maxAimTime -200
      • 25m - 50m
        • minAimTime -200
        • maxAimTime -250
        • Accuracy +35%
        • Crit Chance +15%
      • 50m - 100m
        • minAimTime -250
        • maxAimTime -250
        • Accuracy +25%
        • Crit Chance +10%

  • OPFOR Weaponry - Affects all Eastern Weapons.
    • Eastern RIfles
      • Equipment Modifiers for all Eastern Rifles. These are a flat modifier to all rifles regardless of range.
        • Reload Time -200
        • Reload Empty Time -500
        • Ready Time -100
        • Guard Time -100
        • Accuracy Start +10
        • Accuracy End +10

      • Eastern Rifles
        • 3m - 25m
          • minAimTime -100
          • maxAimTime -1500
          • Accuracy +5%
          • Crit Chance +1%

        • 25m - 50m
          • minAimTime -150
          • maxAimTime -30
          • Accuracy +10%
          • Crit Chance +1%


    • Eastern LMG's
      • Equipment Modifiers for all Eastern LMG's. These are a flat modifier to all LMG's regardless of range.
        • Reload Time -250
        • Reload Empty Time -350
        • Ready Time -50
        • Guard Time -50
        • Accuracy Start +10
        • Accuracy End +10

      • These modifiers are range dependent for LMG's
        • 3m - 25m
          • minAimTime -100
          • maxAimTime -100
          • Accuracy +1%

        • 25m - 50m
          • minAimTime -100
          • maxAimTime -50
          • Accuracy +10%

    • Eastern DMR's
      • Equipment Modifiers for all Eastern DMR's. These are a flat modifier to all DMR's regardless of range.
        • Reload Time -300
        • Reload Empty Time -550
        • Ready Time -50
        • Guard Time -50
        • Accuracy Start +5
        • Accuracy End +15

      • These modifiers are range dependent for DMR's
        • 3m - 25m
          • minAimTime -100
          • maxAimTime -100
          • Accuracy +2%

        • 25m - 50m
          • minAimTime -100
          • maxAimTime -150
          • Accuracy +10%
          • Crit Chance +4%


  • Ambush - So when you fire covertly, you get a x2 bonus to crit chance. Which is nice. That bonus goes away when you lose your covert status (the blue eye). This upgrade allows you to keep that bonus for 100ms longer after losing covert status. So for 100ms after they are on to you, you can still get that x2 crit chance bonus. I think. Not 100% certain how this works. It is also possible this applies to any enemy with an Unaware status, meaning not alerted. Now here's the rub, this ability is under Rifles, which usually assumes all abilities under this category apply only to rifles.... but it does not say that anywhere.

    So if it only applies to rifles, limited usefulness. Only Undercover troops can carry a rifle and remain covert status. Thing is once you go full auto you usually wake up half the building, so Rifles and Undercover troops not the best combo for stealth. For BlackOps, they lose their covert status the moment they shed their poncho and engage. So it is a one off for them.

    If this ability is based on your troopers status, limited usefulness. If it is based on the enemy being Unaware, you could make this work a little bit more.

    • Enable ability Ambush
‎ ‎ ‎ ‎ ‎ ‎ ‎ ‎ ‎ ‎ ‎ ‎ ‎ ‎⁍ Rifles pt. 2
  • Barricade Shooting - Gives bonuses to Eastern and Western Rifles for shooting from cover.
    • Western Rifles
      • 15m - 25m
        • minAimTime -50
        • maxAimTime -100
        • Accuracy +10%
        • Follow-Up Accuracy +10%
        • Crit Chance +100% (holy crap?!)
      • 25m - 50m
        • minAimTime -100
        • maxAimTime -80
        • Accuracy +10%
        • Follow-Up Accuracy +5%
      • 25m - 999m (not a typo they did this due to coding issues)
        • minAimTime -80
        • maxAimTime -0
        • Accuracy +5%
        • Follow-Up Accuracy +1%

    • Eastern Rifles
      • 15m - 25m
        • minAimTime -50
        • maxAimTime -100
        • Accuracy +10%
        • Follow-Up Accuracy +10%
      • 25m - 50m
        • minAimTime -100
        • maxAimTime -80
        • Accuracy +10%
        • Follow-Up Accuracy +5%
      • 25m - 999m (not a typo they did this due to coding issues)
        • minAimTime -80
        • maxAimTime -0
        • Accuracy +5%
        • Follow-Up Accuracy +1%

  • Speed is Life - increases move/turn speed when a rifle is equipped and is not firing and is in READY state, up and ready to aim. Except cannot find the value it boost by.... on the other hand this goes away the moment you start firing so...do we really care?

  • Death Dealing - Applies to all Eastern and Western Rifles between 0m and 7m. Head shots ignore body armor and deal x2 crit chance but can still be stopped by shields and helmets I believe. Still need to confirm it.


  • Short Stocking - Applies to all weapons. Reduces ready time by -200 and guard time by -100 when blocked by an obstacle that forces you to lower you weapon such as a wall.
‎ ‎ ‎ ‎ ‎ ‎ ‎ ‎ ‎ ‎ ‎ ‎ ‎ ‎⁍ Covert Skills
  • Concealment RIgs - Affects all pistols. Reduces the concealment penalty pistols give by a fixed amount. Percent? or the actual number? not sure.
    • Enables Concealing Pistols skill by 0.5
  • Local Customs - Once you are spotted doing something suspicious, a dotted line that fills as it gets closer to you denoting how long you have before you cover is blown. This slows the progress of that dotted line.
    • Being Spotted Rate -15
  • Improved Disguises - Gives you a flat bonus of +2 to concealment by default.
    • Concealment +2

  • Language Basics - Gives you the ability to give basic commands to civilians.

  • Advanced Language - Gives you the ability to give advanced commands to civilians. Order them to get the f*ck out.

  • Persuasion - Adds new order: persuade for Civilians and Surrendered Enemies, to reveal nearby enemies as red ghosts within 10m of the civilian.

  • HumINT Network - Reveals enemies at mission planning screen. Number of enemies is increased with each point in HumINT.

  • Advanced Intel - Make visible 1 objective/hostage/bomb, per level at planning stage. Duration of visibility is 10 seconds after mission start.

  • Hand 2 Hand - Melee does more stun and damage when striking an enemy from behind.
‎ ‎ ‎ ‎ ‎ ‎ ‎ Nowheraki Swat
The Nowheraki start off with a few basic skills enabled by default.

  • Basic Language
  • Advanced Language

Whenever the Nowheraki Milita is deployed, they give a buff to all Nowheraki? or everybody even in a coop? in single player it's everyone to be sure though. Not sure about coop, within 7m of them for 5000ms. This buff adds to their suppression recovery by 100.


Important Note: Like the CIA, Swat weapons are separated between Eastern and Western Weapons. Some bonuses apply only to East, some only to West.

Militia do not get bonuses from handgun doctrine.


‎ ‎ ‎ ‎ ‎ ‎ ‎ ‎ ‎ ‎ ‎ ‎ ‎ ‎⁍ Handguns
  • Basic Handgunnery - Affects all pistols between 1m and 15m. In-game desc is wrong. Says only up to 7m.
    • 1m-7m
      • minAimTime -25
      • maxAimTime -50
      • Accuracy +20%

    • 7m-11m
      • minAimTime -50
      • maxAimTime -25
      • Accuracy +10%

    • 11m-15m
      • minAimTime -25
      • maxAimTime -3
      • Accuracy +5%

  • Medium Range Practice - Affects all pistols between 1m and 15m.
    • 1m-7m
      • minAimTime -25
      • maxAimTime -50
      • Accuracy +10%
      • Reset Time - 5

    • 7m-15m
      • minAimTime - 50
      • maxAimTime -50
      • Accuracy +15%
      • Reset Time - 10


  • Long Range Contest - Affects all pistols between 7m and 50m.

    • 7m-15m
      • minAimTime - 50
      • maxAimTime -90
      • Accuracy +10%
      • Reset Time - 20

    • 15m-25m
      • minAimTime - 90
      • maxAimTime -120
      • Accuracy +20%
      • Reset Time - 20

    • 25m-50m
      • minAimTime - 120
      • maxAimTime -10
      • Accuracy +10%

  • Aim Small Miss Small - Affects all pistols between 1m and 15m.

    • 1m-7m
      • Crit Chance +10%
      • Accuracy +20%

    • 7m-15m
      • Crit Chance +8%
      • Accuracy +12%

  • Fast Reload - Affects all pistols.

    • Reload Time -250
    • Empty Reload Time -450
‎ ‎ ‎ ‎ ‎ ‎ ‎ ‎ ‎ ‎ ‎ ‎ ‎ ‎⁍ Rifles
  • Burst Fire - Replaces Nowheraki rifle attack types with these.
    • Enables NWS_RifleControlledBurst
    • Enables NWS_Rifle556ControlledBurst
    • Enables NWS_SMGControlledBurst
    • Enables NWS_RifleUntrainedAutoFireLong
    • Enables NWS_3rdRifleBurst
    • Enables NWS_SMGUntrainedAutoFire

  • Rapid Fire - Replaces Nowheraki rifle attack types with these.
    • Enables NWS_RifleFastFire
    • Enables NWS_Rifle556FastFire
    • Enables NWS_VulcanFastFire
    • Enables NWS_RifleFastFireMedium
    • Enables NWS_VulcanFastFireMedium
    • Enables NWS_CarbineAimedFireLong
    • Enables NWS_SMGAimedFire

  • Recoil Control - Applies to all Rifles East and West.
    • Eastern Rifles
      • 0m - 15m
        • Follow-up Shot Accuracy +4%
        • resetTime -55
        • roundsPerSecond +1.25
      • 15m - 30m
        • Follow-up Shot Accuracy +2%
        • resetTime -35
        • roundsPerSecond +0.5
      • 30m - 50m
        • Follow-up Shot Accuracy +2%
        • resetTime -25
      • 50m - 100m
        • resetTime -10

    • Western Rifles
      • 0m - 15m
        • Follow-up Shot Accuracy +4%
        • resetTime -55
      • 15m - 30m
        • Follow-up Shot Accuracy +2%
        • resetTime -35
      • 30m - 50m
        • Follow-up Shot Accuracy +2%
        • resetTime -25
      • 50m - 100m
        • resetTime -10

  • Long Range Practice - Applies to all Rifles East and West.
    • Eastern Rifles
      • 15m - 30m
        • MinAim Time -200
        • MaxAim Time -200
        • Accuracy +15%
      • 30m - 50m
        • MinAim Time -200
        • MaxAim Time -100
        • Accuracy +25%
      • 50m - 100m
        • MinAim Time -100
        • MaxAim Time -20
        • Accuracy +12%

    • Western Rifles
      • 15m - 30m
        • MinAim Time -220
        • MaxAim Time -230
        • Accuracy +18%
      • 30m - 50m
        • MinAim Time -230
        • MaxAim Time -100
        • Accuracy +20%
      • 50m - 100m
        • MinAim Time -100
        • MaxAim Time -10
        • Accuracy +10%

  • Spotting Shots - Applies to all Rifles, LMG's East and West. Applies only to Eastern DMR's.
    • Western and Eastern Rifles
      • 30m - 50m
        • Follow-up Shot Accuracy +10%
      • 50m - 100m
        • Follow-up Shot Accuracy +3%

      • All LMG's
        • 30m - 50m
          • Follow-up Shot Accuracy +5%
        • 50m - 100m
          • Follow-up Shot Accuracy +2%

      • Eastern DMR's
        • 30m - 50m
          • Follow-up Shot Accuracy +10%
        • 50m - 100m
          • Follow-up Shot Accuracy +10%

  • Reload Fun - Affects all rifles and DMR's Eastern and Western.
    • Eastern Rifles
      • Reload Time -300
      • Empty Reload Time -550

    • Western Rifles
      • Reload Time -150
      • Empty Reload Time -250

    • Eastern DMR
      • Reload Time -250
      • Empty Reload Time -400

    • Western DMR
      • Reload Time -150
      • Empty Reload Time -250
‎ ‎ ‎ ‎ ‎ ‎ ‎ ‎ ‎ ‎ ‎ ‎ ‎ ‎⁍ Shields
‎ ‎ ‎ ‎ ‎ ‎ ‎ ‎ ‎ ‎ ‎ ‎ ‎ ‎⁍ Veteran Squad
Learning to use the CIA
‎ ‎ ‎ ‎ ‎ ‎ ‎ ‎ ‎ ‎ ‎ ‎ ‎ ‎ ‎ ‎ ‎ ‎ ‎ ‎ ‎ ‎ ‎ ‎‎ ‎ ‎ ‎ ‎ ‎ ‎ ‎ ‎ ‎ ‎‎ ‎ ‎ ‎ ‎ ‎ ‎ ‎ ‎
Lot of players do not like pretty much anyone but the rangers for a couple of good reasons.

First is roughly 70% of the maps are just built for the rangers. Even the ones not built for them can be completed by them with a degree of ease. Second is the other factions require a little more effort be put into their use vs just running around the map with a rifle mowing everything down.

The CIA is certainly the case, they only have 4 troopers to start with. The core idea is to use them a bit more quietly. Be slower, more cautious. Use tricks like sound to draw guards out of position lure them out of rooms. The CIA are definitely more tedious to use and at the end of the day there is very little reason to use them when you can just run and gun a map with the Rangers. Co-op is definitely where they shine, where you can stack their talents with other factions to get very visible benefit.

But for things like campaigns currently that is not an option. So lets work out how to get the most out of our CIA friends in single player runs.

‎ ‎ ‎ ‎ ‎ ‎ ‎ ‎ ‎ ‎ ‎ ‎ ‎ ‎ ‎ ‎ ‎ ‎‎ ‎ ‎ ‎ ‎So what do our CIA friends do well?

Stealth...obviously. Some of the quietest weapons in game.

Door breaching. Their lockpicks are the quietest direct breach option in game and they can use local civilians to open doors for them as well!.

Some maps they can complete objectives without firing a shot.

‎ ‎ ‎ ‎ ‎ ‎ ‎ ‎ ‎ ‎ ‎ ‎ ‎ ‎ ‎ ‎ ‎ ‎‎ ‎ ‎ ‎ ‎ ‎ ‎ ‎ ‎ ‎ Now before we go into using them we need to be made aware a few things.


No Go Zone

You get spotted in these red zones in anyway you get made, no stealth allowed.


Zone of Suspicion
: When you whack a guy it creates a large yellow patch both over his dead body and where you fired from. If you get caught in this zone stealth or no stealth, enemies will immediately begin to suspect you, as indicated by the dotted line. The blood stains (where the bodies are supposed to be) will draw nearby enemies to investigate if they spot one and if you open a door while standing in the yellow zones an enemy might be just on the other side of the door and near instantly blow your cover.


These zones will only show when the game deems you need to know it. Maybe that works for us, maybe not. Better to know all the time when you are stealthing. Click this icon on the bottom of your screen to force it to always show.


Be mindful where you are shooting at. Here we 'had' a room full of guys. Most of whom were standing in line of a window. If my guys miss and blow out the window, not only does the window make a larger noise than my gun or the enemy death scream but the guy patrolling in back now has a clear sight line of me blasting away and he sounds the alarm and it just turns into a mess. ALWAYS check where you are shooting in case of a miss. An empty doorway means your bullets pass right into the next room potentially alerting enemies.
‎ ‎ ‎ ‎ ‎ ‎ ‎ ‎ ‎ ‎ ‎ ‎ ‎ ‎ ‎ ‎
‎ ‎ ‎ ‎ ‎ ‎ ‎ ‎ ‎ ‎ ‎ ‎ ‎ ‎ ‎ ‎ ‎ ‎ ‎ ‎ ‎ ‎ ‎ ‎ ‎ ‎ ‎ ‎ ‎ ‎ ‎ ‎ ‎ ‎ ‎ ‎ ‎ ‎ ‎ ‎ ‎ ‎ ‎ ‎ ‎ ‎ ‎ ‎
‎ ‎ ‎ ‎ ‎ ‎ ‎ ‎ ‎ ‎
‎ ‎ ‎ ‎ ‎ ‎ ‎ ‎ ‎ ‎ ‎ ‎ ‎ ‎ ‎ ‎
‎ ‎ ‎ ‎ ‎ ‎ ‎ ‎ ‎ ‎ ‎ ‎ ‎ ‎ ‎ ‎
‎ ‎ ‎ ‎ ‎ ‎ ‎ ‎ ‎ ‎ ‎ ‎ ‎ ‎ ‎ ‎

‎ ‎ ‎ ‎ ‎ ‎ ‎ ‎ ‎ ‎ ‎ ‎ ‎ ‎ ‎ ‎
‎ ‎ ‎ ‎ ‎ ‎ ‎ ‎ ‎ ‎ ‎ ‎ ‎ ‎ ‎ ‎
‎ ‎ ‎ ‎ ‎ ‎ ‎ ‎ ‎ ‎ ‎ ‎ ‎ ‎ ‎ ‎
‎ ‎ ‎ ‎ ‎ ‎ ‎ ‎ ‎ ‎ ‎ ‎ ‎ ‎ ‎ ‎
‎ ‎ ‎ ‎ ‎ ‎ ‎ ‎ ‎ ‎ ‎ ‎ ‎ ‎ ‎ ‎ ‎ ‎ ‎ ‎ ‎ ‎ ‎ ‎ ‎ ‎
‎ ‎ ‎ ‎ ‎ ‎
‎ ‎ ‎ ‎ ‎ ‎ ‎ ‎ ‎ ‎ ‎ ‎ ‎ ‎ ‎ ‎


Undercover or Black Ops?


‎ ‎ ‎ ‎ ‎ ‎ ‎ ‎ ‎ ‎ ‎ ‎ ‎ ‎ ‎ ‎‎ ‎ ‎ ‎ ‎ ‎ ‎ ‎ ‎ ‎ ‎‎ ‎ ‎ ‎ ‎ ‎ They both work.

Assuming a mission gives you free reign, you can start out as undercover and maybe bring a black ops for when it all goes wrong or maybe an undercover to scout or protect a VIP and a black ops to go in and clear the map once you know where everyone is.

However, if you intend to play the CIA for the way they are built, it's 100% undercover. If you are going to bring black ops you might as well just go for Rangers and be done with it.


Concealment 102


Concealment is just a flat number at the end of a math equation that says this is how long you have from when an enemy sees you till when they start shooting at you. Now the bar below your guy tells you roughly how long that is going to be.


  • Overt - means they shoot the moment they see you
  • Suspicious - means once they see you, you have x amount of time (denoted by the dotted line) before they start shooting. If you break line of sight before the orange bit reaches you, you can go back to being stealthy.
  • Covert - means you are being ignored, you could walk around in a thong with a LMG stuffed down your thong and they would ignore you all day, until you did something suspicious.

Concealment can be adjusted by a number of things. Certain doctrines increase concealment, what type of weapons you bring, basically the larger the gun the harder it is to hide down your pants. A Poncho is a one time use buff that gives you a huge concealment bonus, once you have been made however, it is discarded permanently for that level. Standing in zones of suspicion will also trigger the enemy to become suspicious of you even in a covert state. Even a hat will grant a concealment bonus.


Your concealment status in mission is denoted by an eye icon. Yellow means suspicious, blue means covert, red means you have been sighted. For undercover troopers that are full covert, if you are spotted and being suspicious (the yellow eye) you can break line of sight, get out of any suspicious zones, and holster your weapon to return to full covert.


Stat Building for Success

With the CIA, full auto is not your friend. Remember the idea is to limit the amount of sound you make. Every time you miss, your bullet is going to strike something. Namely a wall, which will generate sound. To maintain your stealth as long as possible, single shots are where your bread and butter are at. You want to make sure every shot is a kill shot. Which means Critical Chance is going to be the stat you live on. We want to crank that up as high as possible.

Secondly, you are going to make a mistake. You will be spotted. You want to be ready to draw your weapon when you do. Change In/ Change Out Time is another stat we want to minimize as much as possible. The faster the draw the faster you put a guy down before he cries out the alarm.

But Accuracy is important too right? Starting out it is. Definitely something you need to manage. Remember to hold right mouse button down and drag while holding alt to get stats related to accuracy at a given range before you take a shot. Once you get max level, accuracy will not be a problem.


The scout is a spy!

So now that we have a rough idea of the big factors that play into our CIA friends, how do we use them in mission?
Sound Radius
Sound is a super important part of the game and managing it well can often make even the most difficult aspects of the game much easier.

I will start posting sound range for various things here. I will clean it up in table format a little later.

Breaching Tools
  • Dynamic Hammer: 12m
  • Bolt Cutters: 4.5m
  • Breaching Shotgun: 25m
  • Crowbar: 12m
  • Slap Charge: Placement: 1m Detonation: 25m
  • Thermal Torch: 6m
  • Breaching Charge: Placement: 1.5m Detonation: 40m
  • Lockpick: 1.5m
  • Spy Camera: 1.5m

Grenades
  • Smoke Grenade: Launch Radius- 0m Detonation Radius - 10m
  • Frag Grenade: Launch Radius- 0m Detonation Radius - 30m
  • Flashbang: Launch Radius- 0m Detonation Radius - 25m
  • Stinger Grenade: Launch Radius- 0m Detonation Radius - 20m

Environment
  • Enemy Death Scream: 4m
  • Arresting an Enemy: 3m
  • Bullets Striking Something (walls for ex.): 3m
  • Silent Open Door: 2.5m
  • Kick Open Door: 7m
  • Breaking a Window: 7m
  • Landing after jumping over/through something: 5.5m
  • Running: 4m
  • Defusing a bomb: 1.5m
  • Sabotaging Equipment: 4m
23 Comments
Han-Tyumi 11 Apr @ 7:31am 
thanks this is awesome.
FacePwn64 26 Mar @ 10:30am 
Heads up: New URGI/M320 combo, tweaks to US holo and red dot sights, according to patch notes.
Nightwolf  [author] 10 Mar @ 12:43pm 
hold shift while view dragging right click to force your guy to stay fixed on a point. no matter how you move him he will stay looking at that point.

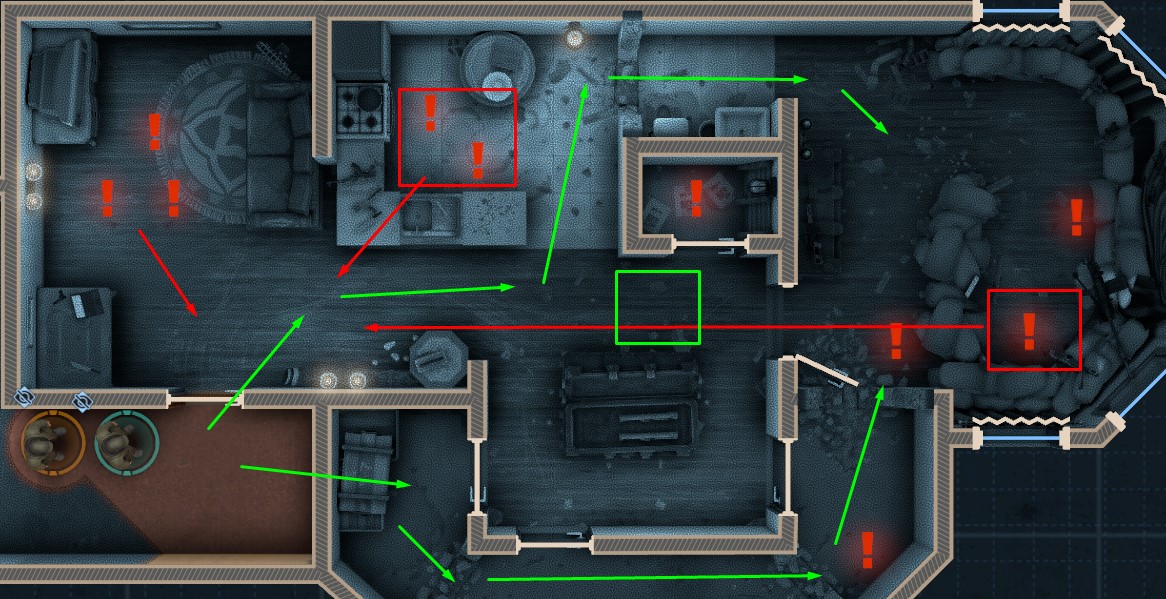
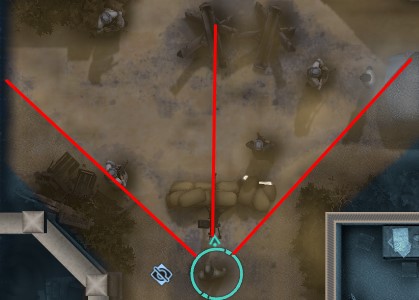
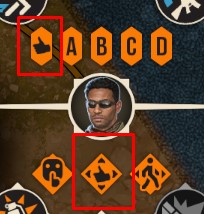
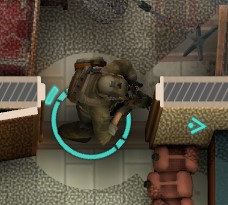
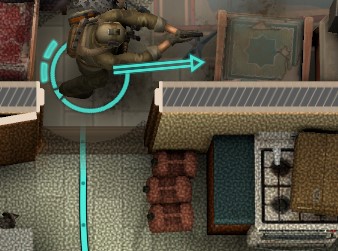
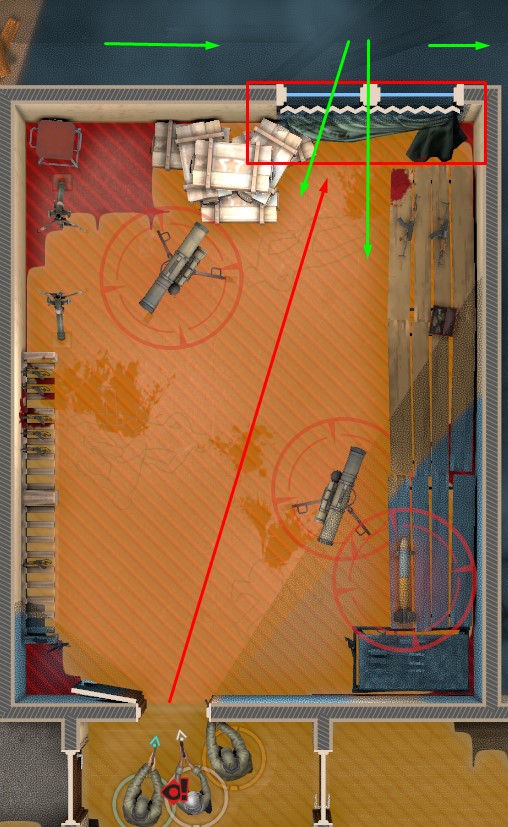
hold ctrl while view dragging to force your guy to stay facing a fixed direction. no matter how you move him he will always face that direction.
John_is_Cringe 10 Mar @ 12:56am 
I know this is a stupid question, but the in-game tutorial is so confusing. How do I keep a soldier moving whilst remaining to aim in the same location/ angle?
Nightwolf  [author] 6 Mar @ 4:41pm 
well they claim you can choose the two you want to sync with but in testing i only ever found it to sync with the slowest trooper in a fixed range regardless of who that is.
Is the sync speed function works like it can manually select the trooper sync with another trooper I chose (if I would like to select a group of different speed) or it can only sync with the slowest?
Nightwolf  [author] 25 Feb @ 12:41pm 
certain doctrines replace attack types with different ones. if there is anyone that wants the detail of the changes I can add those on request.
Dope 24 Feb @ 3:12pm 
Thank you for assembling this guide.
It is really unfortunate that the technical details (such as keybind modifiers) are not all present in the game menu.
Nightwolf  [author] 20 Feb @ 5:37pm 
I am waiting for the balance patch to come down the pipeline, when you dig into the data files the enemy is pretty heavily nerfed. Rangers are just overwhelmingly broken. I have a 130% crit chance with a rifle 20m and under. On the other hand most enemies have like a 10% crit chance point blank.
Chazz Maticus 20 Feb @ 9:38am 
Great guide! Honestly feels like those old-school game manuals they use to include in disc cases that goes over every mundane detail/mechanic that you would't naturally discover or is shown in the game.

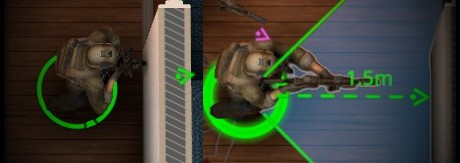
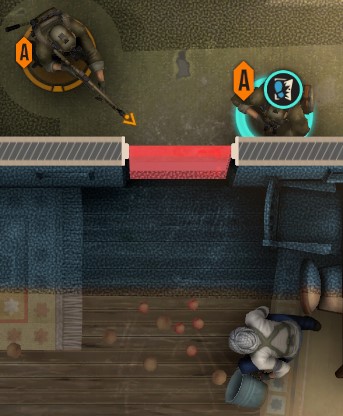
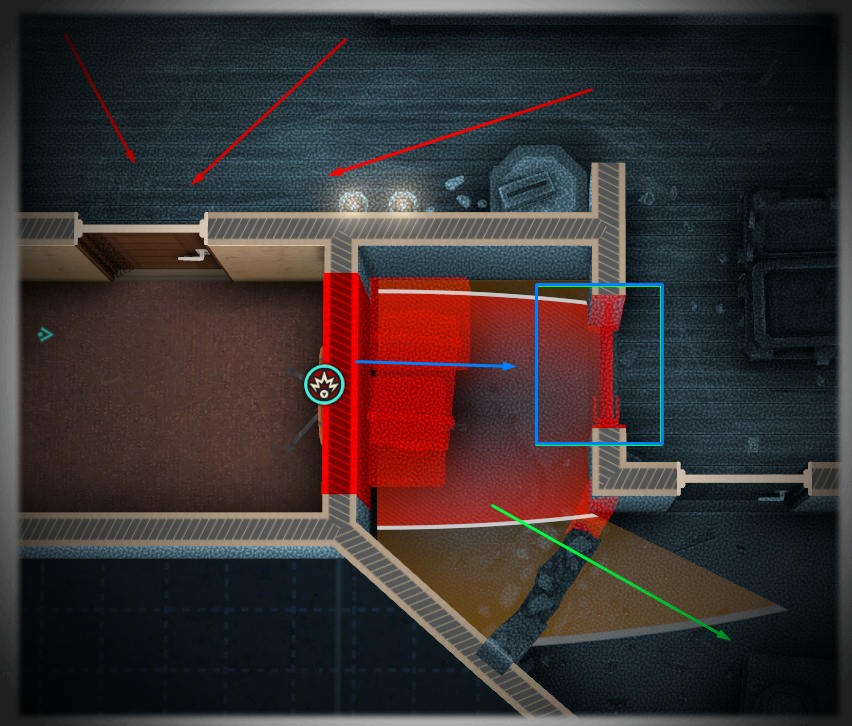
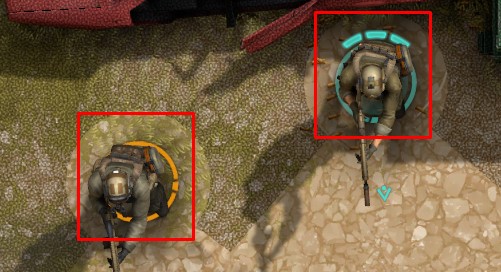
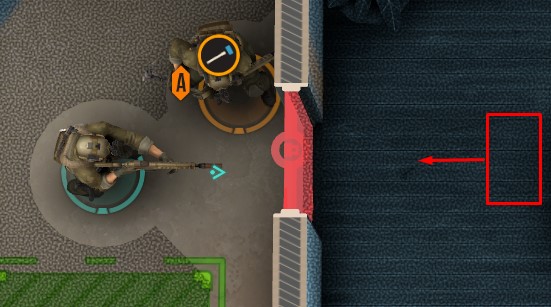
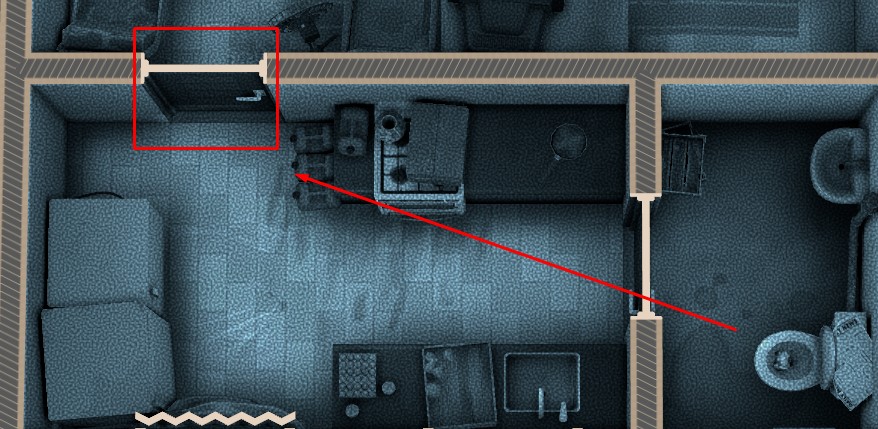
With regards to keeping your trooper's long-gun up while crossing any narrow threshold: I've found they're actually really good at button-hooking doorways/corners & keeping their guns up if you don't issue any manual aim commands until after they cross. You would only need to aim after they cross so they focus on their section to clear, and avoid auto-aiming/focusing at enemies in the center. Sadly, doesn't really work if there's barricades/furniture that mess with the pathfinding after the threshold, as the troopers aim/gun follows their move-path direction.

I also agree people sleep on pistols. If you run into a pistol wielding enemy (or god forbid a 1911 on custom maps) up-close, you're better off just nading them - crits work both ways, & pistols have a ton up-close.