Darksiders II Deathinitive Edition

Darksiders II Deathinitive Edition

703 ratings
Darksiders II Collectibles Guide
By Slayverine
A mostly spoilerfree guide without videos but lots of text and pretty pictures. And with "lots" I mean lots. About 600 different pictures, so some machines may take a while to load the whole guide.

It contains all obtainable Collectibles listed in an order that contains little backtracking. Separate lists of individual types of Collectibles can now be found in my -> Darksiders II Collectibles by type Guide. The guide also contains some sidequests which include "Collectibles", that do not feature any quest markers.

The guide does contain almost no spoilers. Neither storywise nor puzzle-wise, with very few exceptions for easy to miss secret locations. One video guide I watched, showed whole puzzles being solved before actually getting to the Collectibles, even though it was a Collectibles guide. You won't find that here.

Please note: There may be a bug which in rare cases makes Shaman's Craft impossible because you can't get carven stone to drop. It seems to only happen if you complete Shattered Forge before the Lost Temple. I only heard of it recently in the comments - and only once - and haven't looked into the issue. If you want to be extra careful, enter the Shattered Forge after clearing the Lost Temple. I plan to update the guide in the future for better usability by first time players of the game and will look into the issue then.

I did this guide mainly for myself, as the guides I previously followed were uncomfortable for me to use. I also don't like skipping through videos, especially if I only miss 2 coins and just want to have a quick overview of which ones I could be missing.
If the guide does help other people, that would be a pretty nice side effect though.

As I am not a native English speaker, expect lots and lots of shoddy Englsh. But I think the screenshots speak for themselves for the most part. This should help understanding the text, but I am also open for suggestions to improve not only the guide but also my English. Thank you for reading.
5
24
2
2
6
2
   
Award
Favorite
Favorited
Unfavorite
ALL IN ONE COLLECTIBLES IN ORDER OF APPEARENCE
What does "in order of appearence" mean for this guide? Everything will be listed in the order in which you will follow the story. The few other sidequests that this guide covers - those containing "Collectibles" that are not really Collectibles and don't have quest markers for their targets - will be dealt with on the way, but going out of the way too much will be avoided.
I will try to keep the guide mostly spoilerfree. That may be good or bad, as it makes describing the locations sometimes difficult, but the pictures will always help.

I always try to point the square cursor at the exact location of the Collectible on the left hand map picture!

[Tri-Stone (1), Baneswood (1), The Charred Pass (1), The Cauldron]
Tri-Stone (1)

Boatman Coin 01:

Follow the northern path from the Forge and jump into the water. The coin is just a bit beneath the surface.


-----


Baneswood (1)

Boatman Coin 02:

Follow a path leading uphill to the south west of the big tree and jump to the coin.


Book Of The Dead Page 01:

Hidden behind a statue in the ruins east from the big tree.


Boatman Coin 03:

Southeast from the big tree above the southern wall of the ruins. Jump at the wall and up from the wall to get the coin. It is also possible to get this one later with Deathgrip.


Boatman Coin 04:

Cross the gate to the southeast of the big tree and up the hill south of the path leading to The Charred Pass. You can get the coin, when jumping from the edge while riding Despair. Later in the game you can also use Deathgrip to get the coin.


-----


The Charred Pass (1)

Boatman Coin 05:

Just before entering the open area following the narrow path check out the hollow tree log to the left. The coin is inside the log.


-----


The Cauldron

Boatman Coin 06:

Leaving the room that has a locked door to the north through the eastern door and continuing straight, you will come across a short slanted ledge. At the end of it you will find the coin. This can also be collected when you return to the main room later, as you will jump to that ledge.


Boatman Coin 07:

On Floor 1's northern circular room inside a pot close to the north wall.


Boatman Coin 08:

Use a key to enter a narrow room. Jump from the right edge of the wooden ledge to the coin.


Book Of The Dead Page 02:

In the room with three indentations for blue orbs inside a small area in the southeast.


Boatman Coin 09:

After entering the southern room on Floor 1, turn to the left right after entering the room and destroy the crate. The coin is inside it.


Karn's Silver Platter (Lost And Found Part I):

In the southern room on Floor 2, you can find Pup's "dish" west from the stairs.


Book Of The Dead Page 03:

Inside a pot at the northwest end of the east balcony of Floor 2's northern room.


Boatman Coin 10:

In the center of the room with the long winding stairs. Jump to the coin or use Deathgrip later on.


-----


[Stonefather's Vale, Shadow Gorge (1), The Fjord (1), The Drenchfort]
Stonefather's Vale

Boatman Coin 11:

At the west gate leading to Shadow Gorge. The coin is in a corner a little bit to the west from the gate.


-----


Shadow Gorge

Boatman Coin 12:

Coming from Stonefather's Vale, climb the eastern wall of the keep to the west and to the left you can already see the coin.


Boatman Coin 13:

Coming from Stonefather's Vale, climb the eastern wall of the keep to the west, pass the keep chamber and turn right immeadiatly.


-----


The Fjord

Boatman Coin 14:

Floating in the air close to Blackroot. When dashing with Despair from the cliff this horse will jump automatically. This way you can get the coin. You can also use Deathgrip later on.


Mystic Stonebite 01:

On the western rock wall, close to Blackroot.


Boatman Coin 15:

After the branch in the road, follow the path to the Drenchfort a bit uphill, then go left in direction of the other path. You can jump down to the coin. It is also possible to get the coin later on with Deathgrip.


Mystic Stonebite 02:

On your way to the Drenchfort in the far east of the Fjord on a rock wall to the right.


-----


The Drenchfort

The Book Of The Dead 04:

In an alcove in the northeastern part of the main room.


Boatman Coin 16:

On a lower platform in the northwestern part of the main room.


Mystic Stonebite 03:

Above the main water canal to the south in the main room.


Karn's Helmet (Lost And Found Part II):

In the first room in the east area, go through the door to the south. Karn's helmet is in the southwest corner.


Boatman Coin 17:

In the big open room in the eastern area, floating above an arc to the north.


Boatman Coin 18:

Follow the flooded tunnel on B1. The coin is at the entrance of the adjacent room. This one can also be collected earlier, without all the water.


Boatman Coin 19:

In the adjacent room to the flooded tunnel on B1, climb up to Floor 1 and go through the door. The coin is in the southwest corner of the room inside a box.


Book Of The Dead Page 05:

In the northeastern part of the big open room in the western area wallrun and jump towards a ruined canal. You can also get this page once the area is flooded.


Boatman Coin 20:

Once the channels in the big open room in the western area are flooded, you can now jump to the coin in the nothwestern area of the room.


-----


[The Maker's Forge, The Fjord (2), Shadow Gorge (2), The Shattered Forge, The Weeping Crag]
The Maker's Forge

Mystic Stonebite 04:

Inside the Forge at the southside of the statue.


-----


The Fjord (2)

Boatman Coin 21:

Underwater, below the ruined bridge.


The Wandering Stone 1:

In a dead end to the south on the way to the Drenchfort.


-----


Shadow Gorge (2)

Boatman Coin 22:

Underwater, under the northern part of the ruined bridge just before the entrance to The Shattered Forge.


Mystic Stonebite 05:

On a wall east of the entrance to The Shattered Forge.


-----


The Shattered Forge

Boatman Coin 23:

In the room after the entry corridor jump into the water and dive in the northwestern area


Book Of The Dead Page 06:

The page is hidden in a vase in the northwest corner of the room to the far east on Floor 2.


-----


Shadow Gorge (3)

The Wandering Stone 2:

Halfway on the path from The Shattered Forge to Stonefather's Vale keep a close eye on the northern wall.


-----


The Weeping Crag

Boatman Coin 24:

The coin can be found underwater under the bridge leading to Baneswood.


Mystic Stonebite 06:

On a pillar southwest from Vulgrim.


-----


[Baneswood (2), The Charred Pass (2), The Nook (1)]
Baneswood (2)

Mystic Stonebite 07:

In an alcove inside the ruined keep to the northwest.


Mystic Stonebite 08:

On a cliff northwest from the giant tree.


Mystic Stonebite 09:

On one of the pillars of the small ruined shrine southeast from the big tree and the gate southeast from it.


Mystic Stonebite 10:

From the previous Mystic Stonebite go through the southeastern gate. The Stonebite is inside a keep to the east under the ceiling in the northwest corner.


The Wandering Stone 3:

After acquiring Mystic Stonebite 11, leave the keep and turn a bit to the left.


-----


The Charred Pass

Mystic Stonebite 11:

On the western cliff wall where the path to The Scar branches out.


The Wandering Stone 4:

A bit north from the entrance to The Scar.


Boatman Coin 25:

To the northwest in the open area, there is a well. Jump into it and when underwater inspect the outer edge of the tubular end of the well. The coin is hidden behind it.


Power Stonebite 01:

Inside the well to the north dive to a small cavern.


Mystic Stonebite 12:

Heading southwest from the well, the Stonebite is in a small room inside the ruined keep.


-----


The Nook

Boatman Coin 26:

Inside a vase in the southwest corner of the first room. To the left from the entrance door.


Boatman Coin 27:

In the big open space, look for a door to the north. A bit east from that door are some crates. In one of them is the coin.


Mystic Stonebite 13:

After taking the elevators on B1, look to the northwestern corner just above the first elevator.


Boatman Coin 28:

Passing the big open space through the northern door, jump into the water and dive into a sunken keep chamber.


-----


[The Lost Temple, Tri-Stone (2)]
The Lost Temple

Boatman Coin 29:

Inside a crate to the left of the door after the corridor with the first construct.


Boatman Coin 30:

Underwater on B1, west from the unactivted bridge.


Mystic Stonebite 14:

After controlling the construct back to the room with the locked door to the north, you can punch away some corruption to the west. Look down the gap and you can see the Stonebite.


Boatman Coin 31:

After jumping from wall to wall across the floorless corridor, look to you right.


Journeyman Compass (Lost And Found Part III):

Climbing up to some kind of garden, go east until you reach a pavilion.


Boatman Coin 32:

Climbing up to some kind of garden, go east until you reach a tree behind a pavillon. The coin is hidden behind the treeroots.


Book Of The Dead Page 07:

In the room with two constructs in the southern hollow.


Power Stonebite 02:

Coming back in from a large outer area, climb up to Floor 2 and look up to the southeast.


Book Of The Dead Page 08:

Coming back in from a large outer area, climb up to Floor 2and jump across the wooden beams and into the small room.


Boatman Coin 33:

Coming back in from a large outer area and continuing through the western door, find the coin inside a crate close to the south wall.


-----


Tri-Stone

Boatman Coin 34:

To the far west from the entrance to The Foundry.


-----


[The Foundry, Leviathan's Gorge, The Breach (1), The Maw (1), Serpent's Peak]
The Foundry

Resistance Stonebite 01:

In the second room, wait until a cauldron with the Stonebite on it moves through the room.


Boatman Coin 35:

After entering the first underwater bit of The Foundry, dive to the northwest of the room.


Book Of The Dead Page 09:

After acquiring Deathgrip, leave the room, walk softly to the gap, until Death drops down and hangs on the wooden ledge. Drop again and use Deathgrip, when the hoop on the wall starts to glow. You may die a few times. After successfully landing on solid ground, follow the corridor, climb up and go right. The page is floating there.


Boatman Coin 36:

After inserting the first of the Heart Stones, use Deathgrip to continue southeast. To the east in the next room the coin is waiting for you in a pipe.


Boatman Coin 37:

Behind some pots in the northeast corner of an open room to the far east of Floor 1.


Boatman Coin 38:

In Floor 1's big outdoor space to the southeast jump into the water and dive to the western wall. The coin is in front of a drainage pipe.


The Triple Lindy:

A hidden achievement - after climbing the high, eastern wall with the water gates in the southeast area, jump from the three viewing platforms down inside the big water area from where you came.


Boatman Coin 39:

After climbing the high, eastern wall with the water gates in the southeast area, jump into the eastern water area. The coin is underwater under a pipe.


-----


Leviathan's Gorge

Relic of Etu-Goth 01:

Just before reaching the bridge from the north, head to the eastern cliff.


-----


The Breach

Boatman Coin 40:

Entering B1, go through the door and look to your left.


Boatman Coin 41:

Behind the eastern statue in the room which exits The breach to the south.


-----


The Maw

Boatman Coin 42:

At the eastern crumbled part of the bridge.


Boatman Coin 43:

Crossing the bridge to the west, stick to the southern cliff wall.


Relic of Khagoth 01:

At the southern peak, turn the lever and quickly climb up the wall.


-----


Serpent's Peak

Mystic Stonebite 15:

Above the path leading to Vulgrim.


-----


[Eternal Throne, Gilded Arena, Eternal Throne (2)]
Eternal Throne

Resistance Stonebite 02:

On B1 at a wooden pole to the east, somewhat hidden behind a flag.


Boatman Coin 44:

On B1 a bit southwest from the tome inside a crate.


------


Gilded Arena

Book Of The Dead Page 10:

In front of the entrance to the Gilded Arena, west from the door.


Mystic Stonebite 16:

In the entrance room with a long stairway leading down, look to your right at a statue.


Relic Of Renagoth 01:

Exit the Gilded Arena through the lower exit and stick to the western cliff. The relic is floating to the southwest.


Relic Of Renagoth 02:

In the open arena get to the highest floor in the east. You have to use Deathgrip to access the relic. Look for a hoop on the highest eastern wall.


Mystic Stonebite 17:

Go down the stairway in the eastern area. On B2 go through the door and look at the ceiling.


Boatman Coin 45:

On B2 you will enter a room where you will notice a lantern beam coming from the west. Go towards the beam, keeping a close eye to your right for the coin in the corner of the room.


Mystic Stonebite 18:

On B2 continue north from the lantern until you reach a dead end in a cavern area. The Stonebite is on one of the hanging cages to the west.


Power Stonebite 03:

After acquiring the first Animus Stone continue through a narrow corridor. Go through the door and look up at the nook to your left.


Soul Arbiter Scroll 01:

After acquiring the first Animus Stone continue through a narrow corridor. Go through the door and to a nook to your left (Floor 5 - directions W - W - N - E).


Boatman Coin 46:

Entering the west wing from the open arena, you will find the coin floating in the northern corridor with the gaps next to the southern wall.


Book Of The Dead Page 11:

In the west wing inside the circular room with a drawbridge to the far west.


Soul Arbiter Scroll 02:

In front of the south wall underneath the bridge to the western staircase (Floor 2 - directions E - S - E).


Relic Of Etu-Goth 02:

On the edge of one of the broken stairs in the long stairway in the west wing.


Boatman Coin 47:

In the northeastern room on B3 hidden in a crate to the southwest.


-----


Eternal Throne (2)

Relic Of Etu-Goth 03:

Inside the throne room, behind the throne.


-----


[The Maw (2), Phariseer's Tomb]
The Maw (2)

Boatman Coin 48:

North from the entrance to Sentinal's Gaze.


Boatman Coin 49:

From Sentinal's gaze head west to the ruins, then go north through the ruins to the cliff and head east. You may have seen the coin to your right while crossing the big bridge earlier.


Soul Arbiter Sacred Scroll 01:

Climb up the ruins southwest from the big bridge. In one of the small chambers you will find the Sacred Scroll (Floor 2 - directions N - N).


Mystic Stonebite 19:

To the southeast of The Maw there is a keep named Mistmount. The Stonebite is on one of the outer windows.


-----


Phariseer's Tomb

Boatman Coin 50:

Once the elevator comes to a stop, go down the few stairs and take an u-turn to the left.


Mystic Stonebite 20:

In the room with the second elevator, look up at the recess of the curved wall to the southeast.


Book Of The Dead Page 12:

From the second elevator on Floor 4, go through the eastern door. Look behind the statue in front of the wall to the east.


Book Of The Dead Page 13

From the elevator on Floor 1, continue to the east. In the next room look up the wall to your left for a hoop to use Deathgrip at.


Boatman Coin 51:

Inside the northern room on Floor 1 the coin is floating high in the air, close to the switch in the western upper area.


Boatman Coin 52:

Inside a crate in the southwestern room on Floor 3, close to a pillar in the southeastern corner.


Relic Of Etu-Goth 04:

Inside a crate in the southwestern room on Floor 3, close to a pillar in the northwestern corner.


Soul Arbiter Sacred Scroll 02:

Continuing north from the southwestern room on Floor 3, look behind the hanging cage in the first nook to your left (Floor 3 - directions N - S - E).


Power Stonebite 04:

Inside the northeastern room on Floor 3 look at the head of the statue close to the east wall.


Soul Arbiter Sacred Scroll 03:

After everything is done inside the tomb, re-enter Floor 1 and continue to the southern room, blast through the corruption and go down. The maze directions are written on the northern wall on the east side of the room (Floor 6 - directions E - E - E - S).


-----


[The Spine]
The Spine

Boatman Coin 53:

Use the skill acquired in Phariseer's Tomb to continue through a keep from The Maw to The Spine. Take the right path inside the keep. When ascending the wooden ledge, look up.


Soul Arbiter Scroll 03:

When exiting the southwestern keep, you can't miss this scroll just before the stairs (Floor 3 - directions W - E - N - N).


Power Stonebite 05:

Climb up the keep und look above the ledges on the east wall close to the cliff.


Relic Of Etu-Goth 05:

A bit southeast from Soul Arbiter's Maze at the cliffwall.


Book Of The Dead Page 14:

On the bridge at the pedestal near the crossing point.


Boatman Coin 54:

A bit northwest from Judicator's Tomb, behind a rock formation.


Relic Of Renagoth 03:

South from the ruined tower to the east at the southeastern cliffwall.


Power Stonebite 06:

At the "summit" of the ruined tower on a broken wall.


Secret Skill Point 01:

At the summit of the eastern tower you can jump down next to the balustrade. While jumping direct Death to the hole inside the wall. It is a bit tricky. You can also get that skill point later with the Voidwalker (as it is intended, I guess).


Boatman Coin 55:

Having climbed the eastern tower, jump down inside the remains of that building. You can exit the tower now from a different point than the one you entered and can grab a coin with Deathgrip while at it (or try to jump to it, which is quite hard).


-----


[Judicator's Tomb, Psychameron]
Judicator's Tomb

Power Stonebite 07:

When entering the third room, look up at the hanging cage.


Soul Arbiter Scroll 04:

Behind a pillar next to the southern door in the third room (Floor 4 - directions E - W - N - S).


Relic Of Khagoth 02:

Underwater below the broken stairway in the westwing tower.


Boatman Coin 56:

In the open room in the eastwing with the locked door, in the northeastern corner inside a crate.


Soul Arbiter Scroll 05:

In the southeast chamber of the open room in the eastwing with the locked door (Floor 6 - directions S - E - E - E - N).


Book Of The Dead Page 15:

Inside the northeastern room on Floor 1 in the northeastern corner.


Relic Of Etu-Goth 06:

When you reach Floor 2 in the northeastern room, look for ledges on the wall to your right and follow them. Carefully drop half a floor down through a hole on the floor to reach the relic.


Boatman Coin 57:

Underwater, a bit north from the broken stairway on Floor 1 in the eastwing tower.


Book Of The Dead Page 16:

In the eastwing tower on Floor 2's eastern broken stairway.


Boatman Coin 58:

Underwater, in the center on Floor 3 in the southwing tower.


Book Of The Dead Page 17:

At the southside of the southwing tower's balcony (Floor 4).


Mystic Stonebite 21:

In Floor 4's circular room of the southwing tower. Look up at the cupola to your right when entering.


-----


Psychameron

Relic Of Renagoth 04:

When you enter the narrow cavern corridor on B1 close to the locked door, turn around and look up for a hoop and a ledge.


Mystic Stonebite 22:

Go through the door to the far southeast and enter the big cavern area. Now turn around and look up.


Relic Of Etu-Goth 07:

In the big cavern area, continue the long stairway down to the south. At the end of the stairs search the small area to the west.


-----


[City Of The Dead]
City Of The Dead

Book Of The Dead Page 18:

Inside the third room in the southeast corner.


Relic Of Renagoth 05:

In the main room on Floor 1 go down the few stairs in front of the door to the north and look to your right, where the steam rises.


Soul Arbiter Scroll 06:

On a pillar in the southwest corner inside the Floor 1 room with the bridge east from the main room (Floor 7 - directions S - W - E - E - E).


Book Of The Dead Page 19:

Reaching the southern balcony on Floor 2 in the eastern bridge room head to the eastern end of said balcony.


Boatman Coin 59:

On Floor 1 in the eastern bridge room, look at the eastern nook north from the bridge.


Book Of The Dead Page 20:

Bringing back the light to the soutwest room with the drawbridge, allows you access to a page to the south.


Relic Of Etu-Goth 08:

After entering Floor 2's western outdoor area go south. In the southeast corner of the walls is an alcove.


Boatman Coin 60:

After entering Floor 2's western outdoor area go south, then look up the eastern wall. Use Deathgrip while jumping or traverse the tower wall from the eastern area and jump at it from the wall.


Power Stonebite 08:

On Floor 2's western outdoor area go to the dead end southeast from the northeast door. Look at the west wall.


Resistance Stonebite 03:

After entering the eastern outdoor area on Floor 3, look up at the northern tower.


Boatman Coin 61:

On Floor 4's northern outdoor area place one shape at the eastern wooden ledge on the northwall, then turn the lever with the other. Inside the secret room, find the coin inside a crate in the western area.


GnoMad's Gnomes 01:

On Floor 4's northern outdoor area place one shape at the eastern wooden ledge on the northwall, then turn the lever with the other. Inside the secret room, find the gnome just next to the big chest.


Boatman Coin 62:

On Floor 5's western balcony, look up and use Deathgrip.


-----


Book Of The Dead Page 21:

Go through the eastern door on Floor 4's main room and destroy a crate in the northeast corner.


Soul Arbiter Sacred Scoll 04:

In Floor 4's southern area, check out the east wall in the southwestern room with the movable platform (Floor 8 - directions N - S - S - E - N).


-----


[Sentinel's Gaze, Boneriven, Leviathan's Gorge (2), Stonefather's Vale (2), Baneswood (3), Charred Pass (3)]
Sentinel's Gaze

Boatman Coin 63:

On B1 inside a crate close to the eastern wall in the northern area.


Relic Of Etu-Goth 09:

On Floor 1 of the small building to the north behind a torch close to the western balustrade.


Power Stone 09:

On Floor 1 of the central building look at the head of the statue.


-----


Boneriven

Mystic Stonebite 23:

Choose the path leading up to Floor 2. At the u-turn leading back to Floor 1 look at a bone in the center of the turn.


Boatman Coin 64:

In the next alcove to the north after passing the third gate on Floor 1.


Soul Arbiter Sacred Scroll 05:

In the first spine-like corridor on Floor 2 look inside the third alcove to your right (Floor 4 - directions W - E - N).


Boatman Coin 65:

In the second spine-like corridor on Floor 2 look inside the fourth alcove to your right.


Soul Arbiter Sacred Scroll 06:

In the spine-like corridor on Floor 3 look inside the fourth alcove to your right (Floor 5 - directions W - N - S).


The Bloodless 01:

After the spinelike corridor on Floor 3 at the dead end.


-----


Leviathan's Gorge (2):

Resistance Stonebite 04:

Under the northern part of the bridge. From the Lair Of The Deposed King head northwest to the cliff west from the southern part of the bridge and use the ledges and poles to traverse down. After reaching the chamber under the bridge the Stonebite is in the southwest corner close to the ceiling.


-----


Stonefather's Vale (2)

The Bloodless 02:

In the northeast corner of Stonefather's Vale.


Mystic Stonebite 24:

Close to a dead end in the northeastern area on the eastern wall.


Book Of The Dead Page 22:

Head to a dead end in the far northeast.


-----


Baneswood (3)

The Bloodless 03:

Pass through the gate southeast from the big tree and follow the path leading to the ruins to the south.


-----


The Charred Pass (3)

Boatman Coin 66:

In front of The Scar, look close to the western pole.


Power Stonebite 10:

South from the entrance door of the scar, look up north to the broken pipe.


-----


[The Scar, The Abyssal Forge/Shadow Helm, Lostlight]
The Scar

Boatman Coin 67:

In the western room on Floor 1, after taking a u-turn across lava pits just in front of you to get with Deathgrip.


Book Of The Dead Page 23:

In the western room on Floor 1, after taking a u-turn across lava pits, take the same u-turn back using the ledges on the southern wall.


-----


The Abyssal Forge/Shadow Helm

Secret Skill Point 2:

After you get the talisman, head north from the DLC starting area through the corrupted waters and enter Shadow Helm. The Skill Point is behind the locked door in an oval room to the northeast on Floor 1.


-----


Lostlight

Relic Of Etu-Goth 10:

Behind a bush close to Vulgrim.


Mystic Stonebite 25:

Just above the entrance door to Death Tomb 3.


Boatman Coin 68:

Behind a bush to the left from the entrance door to Death Tomb 3.


Book Of The Dead Page 24:

Behind a pillar to the south from the western end of the bridge.


Boatman Coin 69:

Go up the stairs to the entrance of the Crystal Spire and look to your left.


Mystic Stonebite 26:

Cross the bridge to the Crystal Spire and look up the angel statue to your left.


Mystic Stonebite 27:

Cross the bridge to the Crystal Spire and look up the angel statue to your right.


Relic Of Renagoth 06:

Cross the bridge to the Crystal Spire and head to the south eastern end of the courtyard.


Power Stonebite 11:

On Floor 1 of the Crystal Spire, at a statue northwest from the crack in the floor.


Boatman Coin 70:

On Floor 1 of the Crystal Spire, inside the crack to the southwest.


-----


[Earth (1)]
Earth

Boatman Coin 71:

In the starting area inside the southern building.


Boatman Coin 72:

In the starting area, behind a car to the northwest.


Mystic Stonebite 28:

In the starting area, go to the northwestern road blocked by rubble and look up the building to the east.


Soul Arbiter Scroll 07:

To the far northeast in the starting area (Floor 08 - directions N - W - N - W - E).


Light Of The Fallen 01:

Go through the building to the northeast of the starting area. While heading east, keep a close eye on the wall to your left.


Book Of The Dead Page 25:

In the northeastern area before a small passing leading from Floor 1 to B1, look behind the glowing crystals on the south wall.


Light Of The Fallen 02:

In the northeast area inside the southwest corner of the B1 room that you reach with the first staircase.


Light Of The Fallen 03:

In the northeast area, after going down two staircases on B1, head east and look to your right.


Mystic Stonebite 29:

In the big B1 room of the northeast area look at the ceiling close to the western "door".


Relic Of Renagoth 07:

In the big B1 room of the northeast area behind glowing crystals to the northwest.


Book Of The Dead Page 26:

After passing through the big B1 room in the northeast area, you reach a staircase. Turn right, look up and use Deathgrip.


Book Of The Dead Page 27:

From the central area, take the path to the souihwest and look east when reaching the ruined rectangular corridor.


Mystic Stonebite 30:

Passing the narrow tunnels south from the central area, look up the building to your right when reaching the next open area.


Relic Of Renagoth 08:

In a dead end to the northwest in the first open area south from the central area.


Light Of The Fallen 04:

Standing in a dead end to the northwest in the first open area south from the central area, look up the building to the southwest.


Book Of The Dead Page 28:

Leave the open area south from the starting area through a building. Find the page in another ruined building west from the exit.


Light Of The Fallen 05:

Leave the open area south from the starting area through a building. Head a bit west from the exit and look up the building to the east.


-----


[Earth (2)]
Earth (2)

Resistance Stonebite 05:

In the souwest area before dropping down the broken road look at the building to the north.


Boatman Coin 73:

After jumping down the broken road, find the coin in the southwest corner of the area before the tunnel to the south.


Power Stonebite 12:

Take the first curve inside the tunnel in the southwest area. Look at the ceiling of the collapsed smaller tunnel to the south.


Light Of The Fallen 06:

Take the first curve inside the tunnel in the southwest area. In front of the rubble blocking the tunnel, look to the southeast.


Light Of The Fallen 07:

Inside the small room, accessible from the second curve in the southwest tunnel.


Boatman Coin 74:

Inside the smaller tunnel north from the second curve of the tunnel in the southwest area.


Soul Arbiter Sacred Scroll 07:

Inside the hidden room at the southwest wall of the third curve of the tunnel in the southwest area (Floor 10 - directions N - S - E - W).


Book Of The Dead Page 29:

Getting out of the tunnel in the southwest area continue west to a small passing but keep a close eye on the wall to the south.


Boatman Coin 75:

Getting out of the tunnel in the southwest area continue west to a small passing. Before entering check out the nook to the north.


Light Of The Fallen 08:

In the northwestern area before passing the bridge head west and look down into the crevice.


Mystic Stonebite 31:

From the north side of the first gap on the bridge look down at the pier.


Boatman Coin 76:

In the small room west from the third gap on the bridge.


Light Of The Fallen 09:

Look up the northeast pier on Floor 2 of the bridge.


Relic Of Etu-Goth 11:

In a broken wall in the second room of the hotel.


Power Stonebite 13:

Inside the room spanning two floors in the hotel, look up the north wall.


Boatman Coin 77:

After the room spanning two floors in the hotel, inspect the west wall in the next room.


Light Of The Fallen 10:

Just before the exit of the hotel, look in the northwest corner of the last room.


-----


[The Ivory Citadel (1)]
The Ivory Citadel (1)

Boatman Coin 78:

Head north from the starting point and go through two doors. Inspect the ledge to your right in the next corridor.


Mystic Stonebite 32:

Reaching the first corridor on Floor 2, look at one of the windows in the southeast end.


Boatman Coin 79:

On Floor 2's southern courtyard behind a wall on the northern floating "island".


Boatman Coin 80:

On Floor 2's southern courtyard in a niche to the far southwest of the southwest floating "island".


Boatman Coin 81:

On Floor 1's eastern courtyard behind a tree on the floating "island" to the northeast.


Boatman Coin 82:

Between two big pillars at the southern base of the east tower.


Mystic Stonebite 33:

On the first arc above the stairs at the base of the east tower.


Relic Of Renagoth 09:

Follow the eastern tower's aqueduct to the north. After jumping to a lower level for the second time, look behind you.


Book Of The Dead Page 30:

On Floor 2 take the southern exit from the west tower, turn left and look at the corner to the northwest.


Relic Of Renagoth 10:

After you traversed along Floor 1's western wall, on Floor 2 a bit north from the west towerin a corner between a wall to the west and rocks to the eastern cliff.


Resistance Stonebite 06:

Look up at the vault of the west tower, on the arc above the northern exit.


GnoMad's Gnome 02:

After solving the west tower's secret, inspect the northern watertunnel in the western area.


Relic Of Etu-Goth 12:

Follow the western tower's aqueduct to the north. After jumping to the lower level, look behind you.


Power Stonebite 14:

On Floor 3 of the central hall Death is finally able to aim at the statue's chest.


Boatman Coin 83:

Dropping down to Floor 2 from Floor 3 after passing the central hall in the eastern direction, inspect the small water pool.


Boatman Coin 84:

In the northern uncharted area, after farming lots of environmental deaths with trying to wallrun after shooting out of a portal, the coin is in a corner south from the outer wall of the charted big circular room.


-----


[The Ivory Citadel (2), Lostlight (2), The Nook (2)]
The Ivory Citadel (2)

Book Of The Dead Page 31:

Behind a pillar of the room to the far northwest in the northern area.


Soul Arbiter Sacred Scroll 08:

In the southwestern area of the northern courtyard, close to the southeastern edge of the floating "island" (Floor 9 - directions S - W - E - E - N).


Power Stonebite 15:

On an arc south from the southern small circular "room" in the southwestern area of the northern courtyard.


Relic of Khagoth 03:

In the northeast of the big circular room in the northern area.


Boatman Coin 85:

In the B1 underwater area, accessible from the path in the small northwestern cavern.


Relic of Etu-Goth 13:

On Floor 1 leave the central hall to the north and look behind a statue to your left.


Resistance Stonebite 07:

On Floor 3 after leaving the central area on Floor 1 to the north, access a small room to the west.


-----


Lostlight (2)

Death Tomb 3:

To the west of Lostlight you can see a circular room on your map, that's the Death Tomb.


Boatman Coin 86:

Inside Death Tomb 3, look east from the chest platform and grab it with Deathgrip.


Boatman Coin 87:

Inside Death Tomb 3, look east from the chest platform and grab it with Deathgrip.


Secret Skillpoint 03:

Inside one of the big chests in Death Tomb 3.


-----


The Nook (2)

Book Of The Dead Page 32:

In the central open area climb up to Floor 2 to the southwest. The page is behind some corrupted crystals.


Secret Skillpoint 04:

In the central open area climb up to Floor 2 to the northwest.


Secret Skillpoint 05:

In the room with the blue orbs and the elevators you can access the northeast area once you obtained the Voidwalker. The other portal is in the big lava cave on B1 close to the door to the elevator room.


Boatman Coin 88:

On B1 use Deathgrip to swing east to a broken bridge segment.


Death Tomb 1:

Between The Nook and The Lost Temple look for the Tomb to the east.


Secret Skillpoint 06:

Inside the big chest in front of the statue in Death Tomb 1.


-----


[The Weeping Crag (2), The Fjord (3), Argul's Tomb/The Berth, Shadow's Edge (1)]
The Weeping Crag (2)

Secret Skill Point 07:

Take the portal to reach the northern room on Floor 3. The Skill Point is inside the big chest in the center of the room.


GnoMad's Gnome 03:

Take the portal to reach the northern room on Floor 3 and dive into the room's northern water area. The gnome is in an uncharted channel between the two water areas.


Boatman Coin 89:

Take the portal to reach the northern room on Floor 3 and drop down into the water in the room's southern area. Swim northwest and jump from the wall to reach the coin.


Book Of The Dead Page 33:

In the northwest region of B1, after walljumping through a corridor.


Power Stonebite 16:

After diving through a tunnel in the northwestern basement, you'll reach a cavern. The Stonebite is on the east rockwall.


-----


The Fjord (3)

The Bloodless 04:

Climb the building at the northeast side of the water area.


Boatman Coin 90:

Floating above the water between two wings of the building to the northeast side of the water area.


Power Stonebite 17:

Above the entrance inside the small keep in the northeast area of the Fjord.


Boatman Coin 91:

In a small alcove inside the keep in the northeast area of the Fjord.


Book Of The Dead Page 34:

Behind some bars inside the keep in the northeast area of the Fjord.


Book Of The Dead Page 35:

Under some corrupted crystals in the building in the south area.


Resistance Stonebite 08:

On Floor 2 of the building in the south area on the north wall.


-----


Argul's Tomb/The Berth

Secret Skill Point 08:

In a big circular area in the southeast of The Berth.


-----


Shadow's Edge

Book Of The Dead Page 36:

Passing the Serpent Tome to the left keep an eye out to your right, where you can reach a higher area.


Relic Of Khagoth 04:

Northeast from the Serpent Tome.


-----


[The Black Stone]
The Black Stone

Boatman Coin 92:

Entering the black stone, look behind the corrupted crystals to your left.


Book Of The Dead Page 37:

After reaching Floor 2 continue to the east balcony.


Boatman Coin 93:

Behind the east statue close to the southern door in the central room of the past.


Power Stonebite 18:

On the belly of the big statue to the north of the past's central room.


Boatman Coin 94:

After reaching a vertical tunnel in the past's northeastern area, climb down with Deathgrip equipped. When walking east you can see some glowing hoops on the wall. Climb up and find the coin in the northwest corner of the room on Floor 2.


Resistance Stonebite 09:

After reaching a vertical tunnel in the past's northeastern area, climb down with Deathgrip equipped. When walking east you can see some glowing hoops on the wall. Climb up and in the room on Floor 2 look up at the southern vault.


Book Of The Dead Page 38

After reaching a vertical tunnel in the past's northeastern area, climb up. The page is close to the tunnel opening.


Soul Arbiter Scroll 08:

To the northeast of the present time central room close to a portal (Floor 9 - directions E - N - E - N - S).


Power Stonebite 19:

In the big western open area of the present on the northern wall above a barred chamber.


Boatman Coin 95:

In the big western open area of the present on a long southern walkway.


Power Stonebite 20:

In the big western open area of the past on the southern wall above a barred chamber.


Boatman Coin 96:

In the big western open area of the past in front of a closed "door" in the southeast corridor.


Relic Of Etu-Goth 14:

In the south east corner of the northern room in the western open area of the past.


Soul Arbiter Scroll 09:

On the floor close to the north wall of the northern room in the western open area of the present, under some former corrupted crystals (Floor 10 - directions W - E - N - S - W).


Book Of The Dead Page 39:

In the south east corner of the northern room in the western open area of the present.


GnoMad's Gnome 04:

North from a circular platform on B1 of the present time's central area look for a pole to climb up on the northern wall and continue through the western door on Floor 1.


Book Of The Dead Page 40:

North from a circular platform on B1 of the present time's central area when standing on the northern end of the eastern ledge you can see a portal close to the page.


-----


[The Breach (2), The Maw (3), Lair Of The Deposed King]
The Breach (2)

Secret Skill Point 09:

In the northeastern area of Floor 1 look for a portal to reach a big chest on a higher floor.


Resistance Stonebite 10:

After playing around with the light in the keep west from Sentinel's Gaze, climb to the outdoor area of Floor 2 in The Breach. The Stonebite is above the northern wall east of the lantern statue.


-----


The Maw (3)

The Bloodless 05:

On the way to the northwest keep in a curve.


Boatman Coin 97:

Inside a crate in the northern nook in the northwest keep.


Power Stonebite 21:

On A window above an arch inside the northwest keep.


Secret Skill Point 10:

On a higher level inside the northwest keep.


-----


Lair Of The Deposed King

Boatman Coin 98:

Take the stairs down to B3 and continue through the door. Once you reach the balcony look up.


Power Stonebite 22:

Take the stairs down to B4 and continue through the door. The Stonebite is on the dragon head above the Death Tomb.


Death Tomb 2:

Inside The Lair Of The Deposed King. Take the stairs down to B4 and continue through the door.


Secret Skill Point 11:

Inside Death Tomb 2, which is located on B4.


Relic Of Etu-Goth 15:

Under some broken stairs to the east of B2.


Soul Arbiter Sacred Scroll 09:

On a big balcony on B2; reachable from the east area, then traversing the south wall (Floor 1 - directions S - E).


The Bloodless 06:

On B2, inside the northeast room with the locked door.


Boatman Coin 99:

On B2, Inside a crate in the northern room after crossing a deadly gap.


Soul Arbiter Sacred Scroll 10:

After taking the elevator down to B3, check out the southwest rock walls in the next room (Floor 7 - directions S - S - W - N - N).


-----


[Shadow's Edge (2), The Spine (2)/Soul Arbiter's Maze]
Shadow's Edge (2)

Death Tomb 4:

Southeast from the entrance to The Black Stone.


Relic Of Khagoth 05:

Inside Death Tomb 4, southeast from the entrance to The Black Stone.


Power Stonebite 23:

Inside Death Tomb 4, on the face above the door.


Power Stonebite 24:

Inside Death Tomb 4, on a corrupted spike, hanging from the ceiling.


Secret Skill Point 12:

Inside Death Tomb 4, in the big chest to the far east.


-----


The Spine (2)/Soul Arbiter's Maze

Boatman Coin 100:

Inside a crate close to the south wall in the entrance building of Soul Arbiter's Maze.


Power Stonebite 25:

Above a window on the west wall close to the ceiling in the entrance building of Soul Arbiter's Maze.


Soul Arbiter Scroll 10:

Inside the northeast room in the entrance building of Soul Arbiter's Maze (Floor 1 - directions N - W).


Mystic Stonebite 34:

Between Floor 7 and Floor 8, in the room with the portal to Floor 8 inspect the walls.


-----


info: BOATMAN COINS
Per savefile you can collect 100 in your first playthrough and another bunch of 100 in your New Game+.
info: THE BOOK OF THE DEAD
10 pages make a chapter which can be sold to Vulgrim who will give you a key for each sold chapter. These keys open a Death Tomb in each "world" of the game. The keys have to be used in order though. For example: The key from the first chapter will only open the Death Tomb in the Forgelands, while the key from the second chapter will only open the Kingdom Of The Dead Death Tomb. In some tombs are also Collectibles to be found, which will be covered in their respective sections of this guide.
info: STICKS AND STONES
For returning 3 Stonebites Blackroot can increase your stats. The following combinations are possible:

Stat Change
Stones Of Mystics (blue)
Stones Of Power (red)
Stones Of Resistance (yellow)
Arcane +5
3
-
-
Strength +5
-
3
-
Resistance +20
-
-
3
Arcane Critical Chance +2%
2
1
-
Arcane Critical Damage +10%
2
-
1
Critical Chance +2%
1
2
-
Critical Damage +10%
-
2
1
Wrath +20
1
-
2
Defense +20
-
1
2
Health +30
1
1
1
info: LOST RELICS
Don't forget to sell every set to Ostegoth, once it is completed, it is well worth the effort!
info: SOUL ARBITER SCROLLS
These are the directions for the maze mentioned in the scrolls. Note, that "Scroll No." means, which number the scroll has in my guide, so that you can find it if you need it!

NOTE: The only secret room worth visiting is on Floor 5, as you will find a unique weapon there! All the other secret rooms contain standard chests.


Floor
Floor Exit
Scroll No.
Floor Chest
S. Scroll No.
01 - Declination
N - W
10
S - E
09
02 - Apprehension
E - S - N
02
N - N
01
03 - Opposition
W - E - N - N
03
N - S - E
02
04 - Separation
E - W - N - S
04
W - E - N
05
05 - Deception
W - W - N - E
01
W - N - S
06
06 - Isolation
S - E - E - N - N
05
E - E - E - S
03
07 - Revulsion
S - W - E - E - E
06
S - S - W - N - N
10
08 - Inversion
N - W - N - W - E
07
N - S - S - E - N
04
09 - Benediction
E - N - E - N - S
08
S - W - E - E - N
08
10 - Ascension
W - E - N - S - W
09
N - S - E - W
07
73 Comments
goontastic freak 7 Aug @ 12:12pm 
sick guide ty man
Himmel Griffin 14 Apr @ 4:41pm 
Thanks for the guide, man. In my first playthrough, I focused on the rest of the achievements, and on ng+ I collected stones, pages, and relics. Thanks for the guide again, if it wasn't for the guide, I would have spent a thousand years to find them all.:steamthumbsup:
AspectOfJack 18 Feb @ 3:34pm 
Hey, great guide. Very helpful. Couldn't find anything else like this.
Slayverine  [author] 17 Sep, 2024 @ 6:33am 
Thank you for mentioning this! The thought went past me that the other commenter meant the way the guide is displayed on Mobile. True, Mobile wasn't a thing I considered at all when creating the guide. I was happy that everything kind of worked on PC with the formatting. Whenever I go to reworking the guide I will keep that in mind - I have an idea that could work for Mobile as well. Greetings!
CaptainGerg 16 Sep, 2024 @ 9:58pm 
Just wanted to thank you for this; it's been an absolute life saver as I've been achievement hunting for this game. I did maybe the worst option of trying to find as much as I could on my first play through without a guide, which meant I was about 80% done with all the collectibles at the end; I then had to go back through every single dungeon and get check every spot in the game to find the rest! Would have been absolutely impossible without this guide. Also, I don't know what dude below is talking about; the guide is formatted perfectly on PC. Mobile messes it up, true, but there's not much you can do about that.

Appreciate you man, and thanks again.

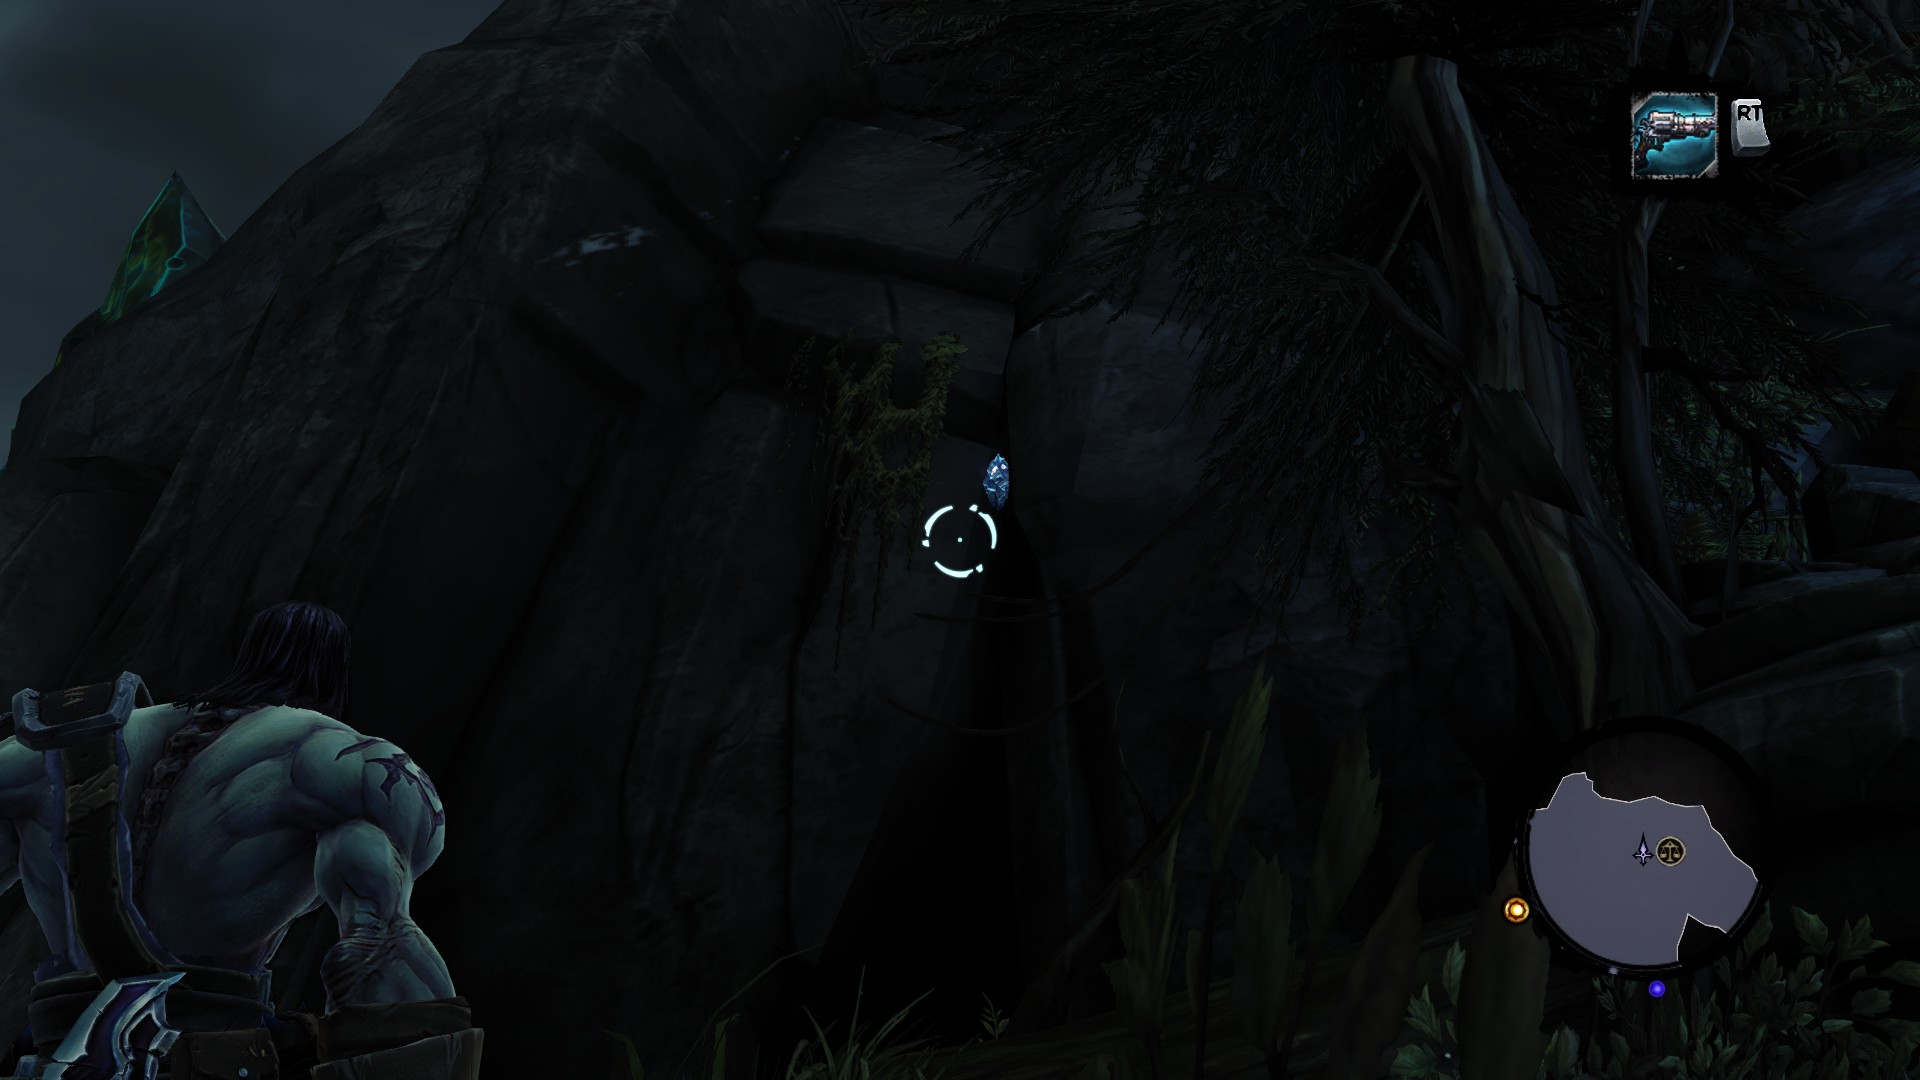
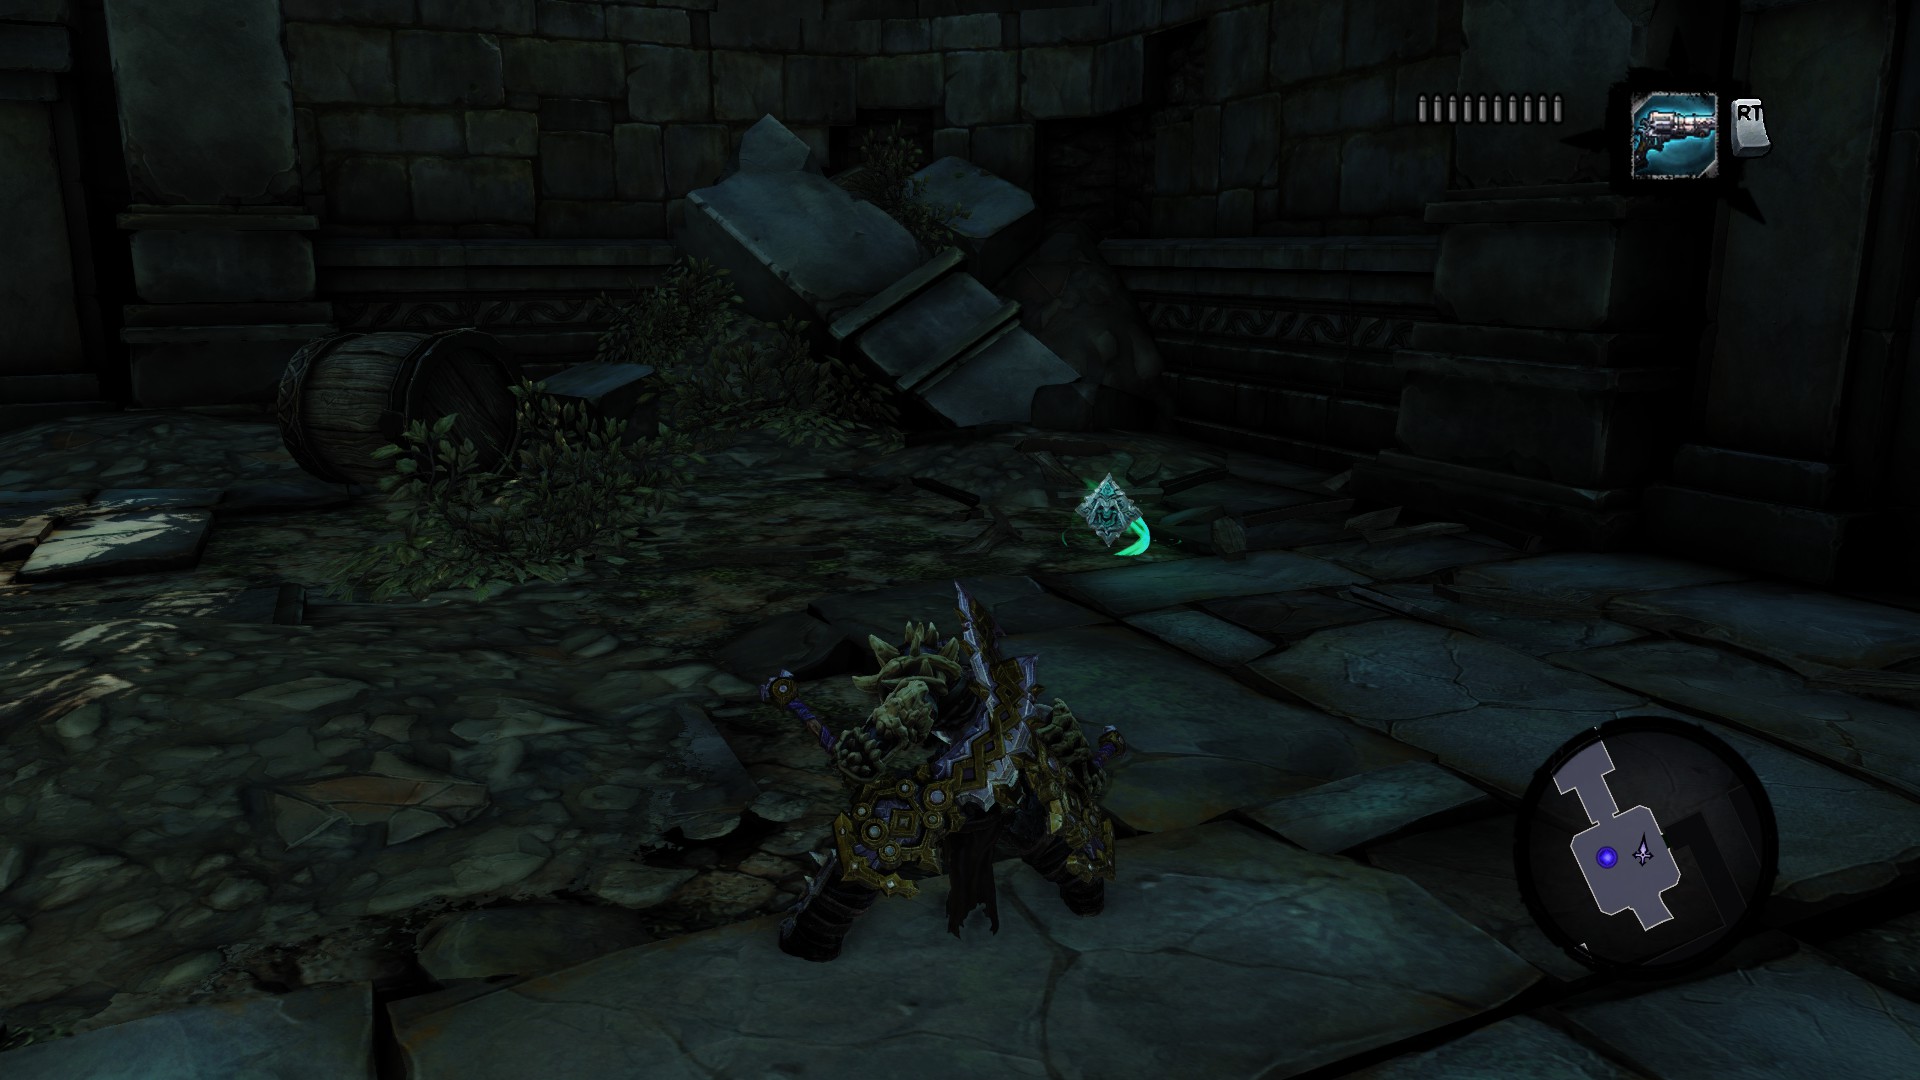
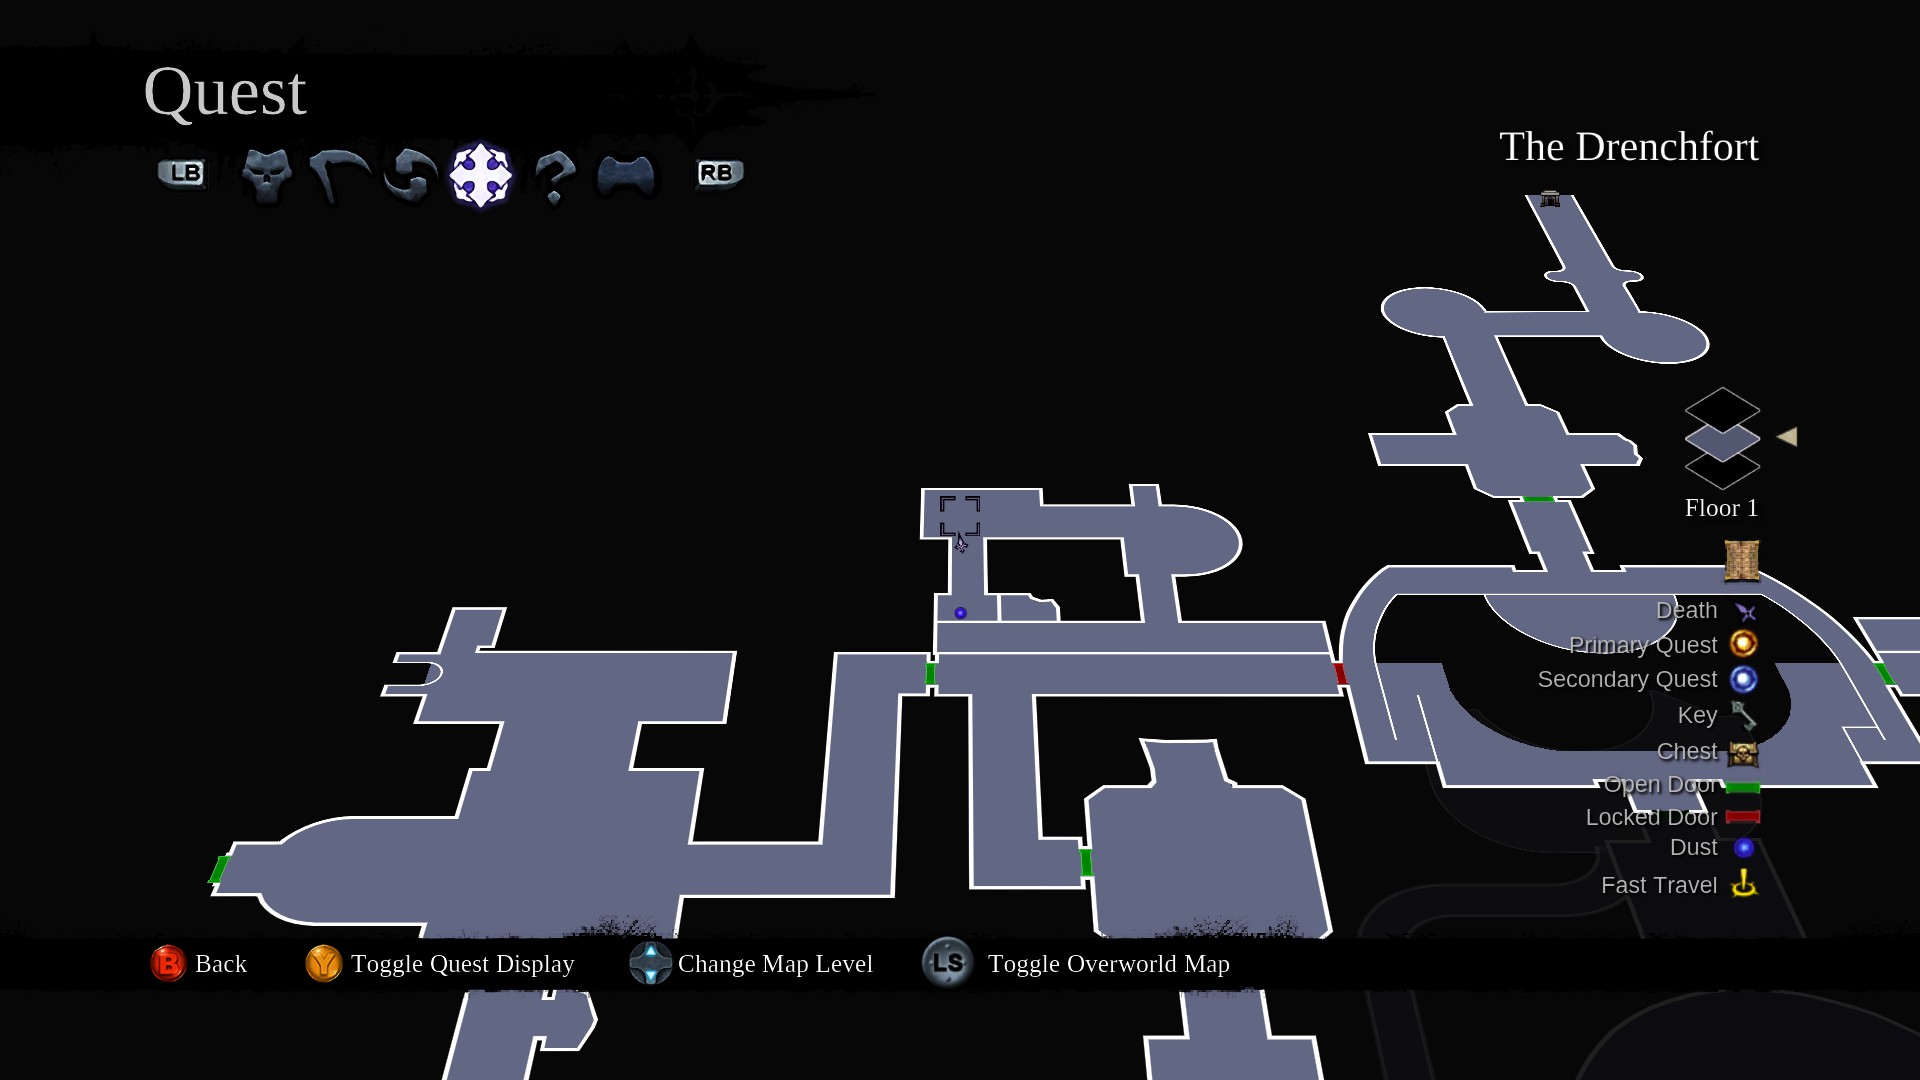
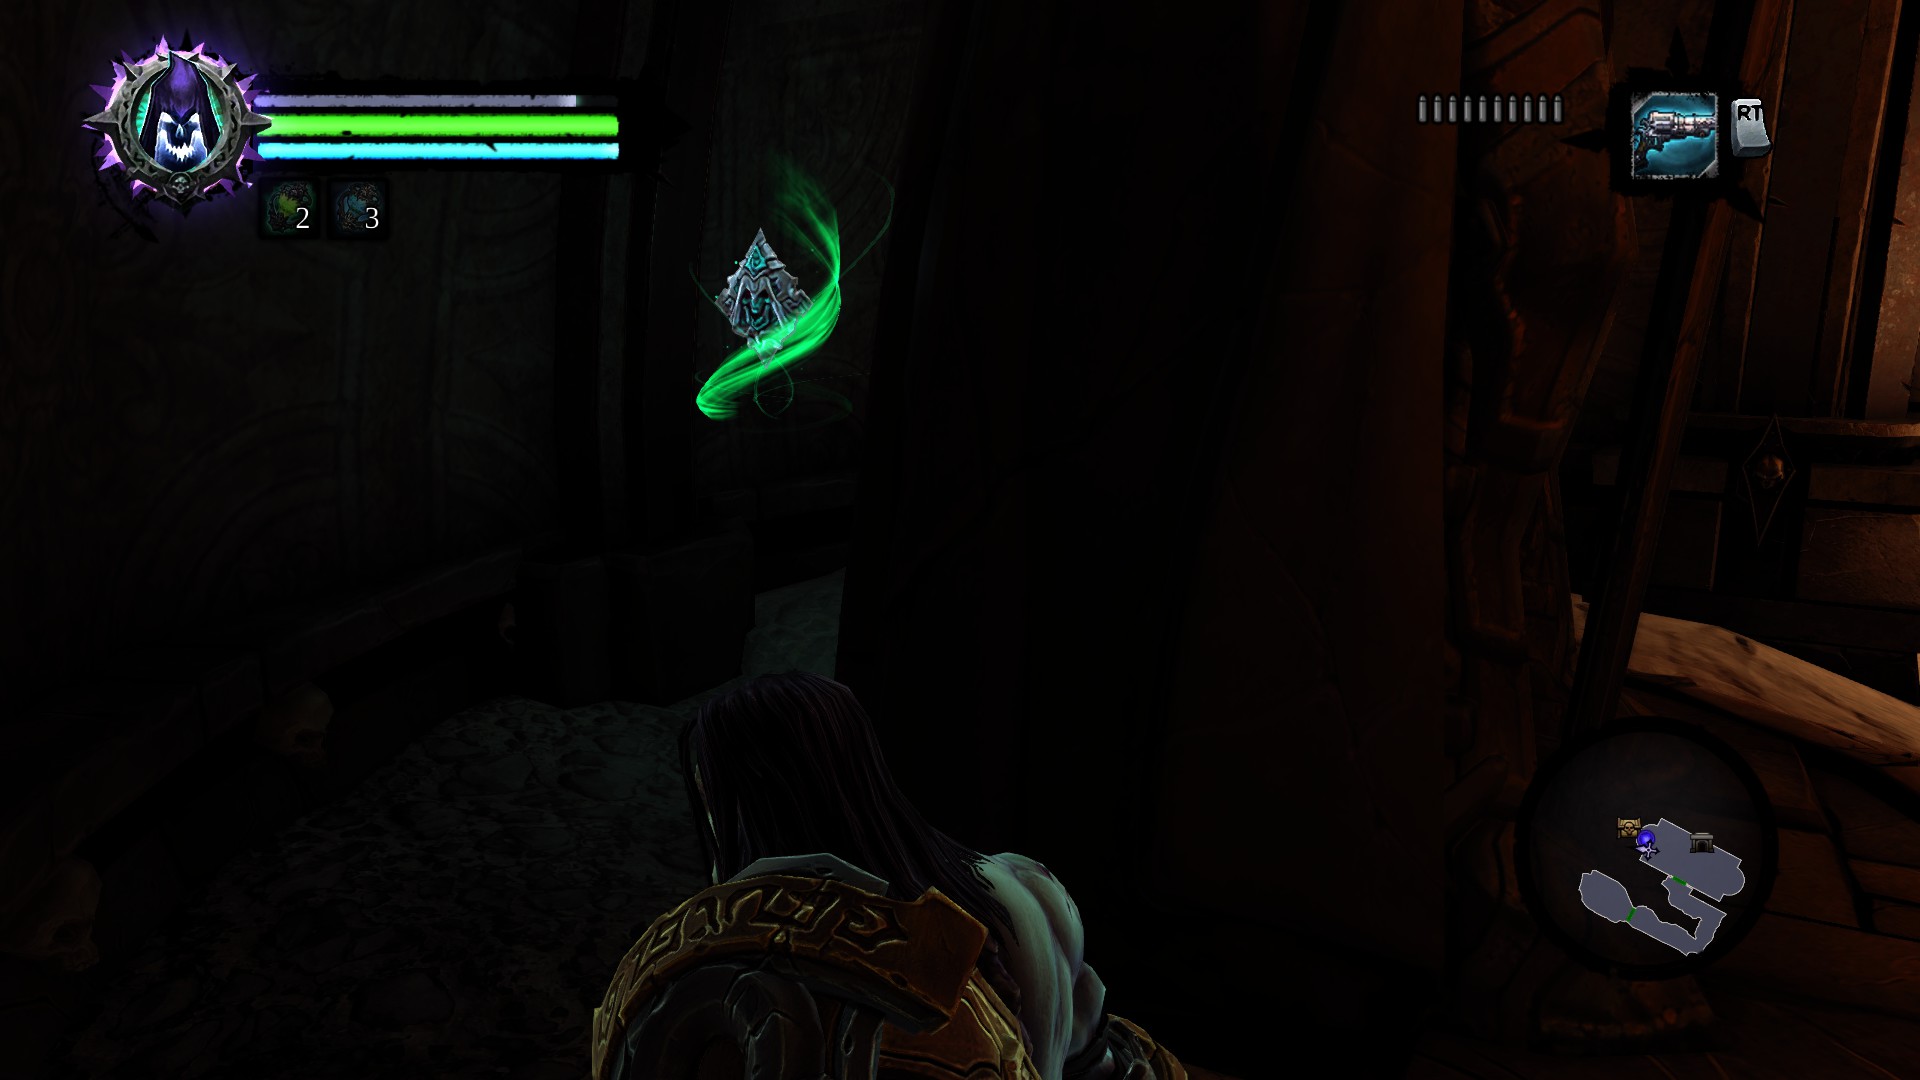
P.S. Almost forgot, Resistance Stone 04 doesn't have the correct in game (non map) picture with it; same area, but not quite where the Stone is: it's at the end of the under the bridge section of platforming. Not even complaining (1 mistake out of how ever many hundred is insanely good), just thought you might want to know. :)
Slayverine  [author] 8 Sep, 2024 @ 9:44am 
Especially these little pointers are missing when I left out items to later collect. But considering the time restraints, the big backlog of games to play, it may take some time. Also, in this guide one collectible oftentimes is the point of reference to go on to the next one, so changing the order around requires rewriting a lot of text. I have a concept on how to rewrite and restructure the guide and when playing through the game again I would get a feel where to give pointers on the route I took and above mentioned pointers to other collectibles, but I just know this will require 80 to 100 hours to play the game - once to write/restructure the guide along with it - and then do a second playthrough to check again, if the route does work and nothing is missing after the restructure. Hope you still can get some use out of the guide.
Slayverine  [author] 8 Sep, 2024 @ 9:44am 
Hey Vilis, I creatd the guide around 9 years ago and this is the last time I played the game, too. This here guide was also the first steam guide I created with an order in mind for an optimal route for myself, and not knowing of the limitations of steam guides - formatting and limitations how many characters one can type per chapter, which Steam doesn't tell you of when typing - beforehand. The latter being a main reason that I am not that eager to go back to it and change anything in it. I'd like to bring it up to par with guides I created at a later point in time, using spoiler tags regarding the route I took, which collectibles can be acquired earlier or left for later when a later return is necessary anyways.
Vilis 8 Sep, 2024 @ 8:11am 
You should look up joemadart to get some reference of a guide that's easy to follow please
Vilis 8 Sep, 2024 @ 8:10am 
Could you please put some time in to rearrange the order of the pictures? I'd love to use this guide since it's the only one with everything in one place but it's arranged so poorly why did you cut up the text and the pictures it would have been much better to just put the pictures under the coins or pages that they're supposed to help with. I shouldn't be running back and forth between rooms looking for a coin I already picked up...
Vilis 3 Sep, 2024 @ 5:57am 
God this is hard to follow...