Ys II
56 ratings
Mascot Guide (plus NPC List and Bestiary)
By Rin
This guide describes how to get all 157 mascots available in the game. Because of its content, it also doubles as a full list of NPCs for the Notorious A.C. achievement and a bestiary of the non-boss enemies for the Demon Duster achievement.
   
Award
Favorite
Favorited
Unfavorite
Introduction
Mascots are those little figurines on strings you can attach to your cell phone or keychain. In this game, they are basically the digital equivalent. You can place one on your screen anywhere you want, and they will bounce and sway as you move around.

In order to set your mascot, open the pause menu while playing (this will not work if done from the title screen) and go to Options. Then go to Display and select the bottom option, Mascot. When you turn it on, you will be able to see the chosen mascot on your screen.

There are a total of 157 to find, and this guide will help you with that task. There are only 2 Mascots that are missable in a single playthrough of the game, but if you got the Personal Trainer achievement, you've already unlocked them.

The best part is that the mascots you have unlocked are not tied to a specific save game but, rather, to your Steam profile itself. This means that as long as you've unlocked them at any time in any playthrough, you will be able to use that unlocked mascot in any save. In fact, you will need to play through four times (once on each difficulty) to unlock them all.
NPCs
For every NPC, all you have to do is give them gifts until they love you. The number of gifts you need to give them varies between 2 and 5, but if you burn them with Fire Magic before giving them any gifts, the required number goes up by 2. You could check after each gift to see if you have their mascot, but you'll be certain to have it when the NPC starts repeating the same thing every time you give them a gift.

Any item in the last two rows of your inventory (minus the Bestiary Potion) can be given as a gift.

After you talk to an NPC for the first time, anytime you approach them with one of these items equipped, you will be asked whether you want to talk to them normally or give them a gift.

As you can see, this will require a lot of walking around to pick flowers/apples/berries or a lot of gold buying them at the store. However, you can save before giving the gifts, max out their affection then reload your save. The NPC will go back to being ambivalent toward you, but you'll still have their mascot unlocked in your Steam profile. I've noted where having max affection is useful.

The following list attempts to have the NPCs in the rough order you'll be meeting them along with their original location. None of the NPCs ever become inaccessible until you start the fight with the final boss (which you can't save during or after anyway). You may have to search around a little to find them, though. I've tried to make note of any NPCs I'm aware of who move during the game.
Lance Village NPCs
Banoa - Lilia's House

Leonor Rall - Rall Family Wellness

Nurse Sarina - Rall Family Wellness

Elder Cornell - Siiting on the porch of his house in the middle of the village.

Lilia - Standing beneath the apple tree near the town gate.
Note: Lilia moves around a lot during this game. The first chance you have to give her gifts is while she's out in Moondoria Field picking apples. She'll then move back into Lance Village until you cure her illness. After that, you won't get another chance to give her gifts until you see her in the Core of Ancient Ys near the end of the game.
Note: Having max affection with her at the end of a Nightmare playthrough (or any playthrough after completing Nightmare mode), changes the ending a little bit.

Andy - Walking around near the town gate.

Larsen - Guarding the town gate.

Lucy - Guarding the pikkard pen in the Southwest corner of the village.
Note: Gives you her Meat Pie *ahem* after the third gift, though her affection goes up to 5. If you want more Meat Pies, burn her with Fire Magic (you monster) then give her a few more gifts. Eating it is part of the No Reservations achievement. It can also be used to feed the cat in Ramia Village later for The Hand That Feeds Them achievement.

Lucille - Walking around Northeast of the pikkard pen.

Bohtz - Walking around the Southern edge of the village.
Note: Bohtz will move to the Runaway's Hideout after you reach the Shrine of Solomon then return to the village after you cure the runaways of petrification. He also might be in Guido's Armory if you have recently given Guido some Iron Ore.

Esca - Walking around the Southern edge of the village.

Tita - Just East of the well in the center of town.

Colt - Just East of the well in the center of town.

Kate - Near the well in the center of town.

Lazlo - West of the well in the center of town.

Masontorch - West of the well in the center of town.

Saffron - West of the well in the center of town.

Polo - Walking around near the Elder's Residence.

Theo - Walking around near the Elder's Residence.
Note: Max out his affection to get his Smoked Meat *ahem*. Keep giving him gifts to get more Smoked Meats if you eat the first one. Eating it is part of the No Reservations achievement. It can also be used to feed the cat in Ramia Village later for The Hand That Feeds Them achievement.
Note: This is just for fun, but show him the Meat Pie his sister, Lucy, gives you.

Oseam - Walking around near the Elder's Residence.

Natasha - Elder's Residence

Tess - Lazlo's House

Tran - Lazlo's House

Guido - Guido's Armory

Jade - Jade's Oddities

Caesaria - Astal's House

Brody - Brody's House

Marina - Brody's House

Beth - Brody's House

Sheila - Bohtz's House

Kris - Bohtz's House

Celes - Bohtz's House

Gila - Gila's House

Leggs - Go to the Ruins of Moondoria. Go all the way East then North to find him.
Note: He will give you a Short Sword if you don't have any weapons. This is worth an achievement.

Astal - Go to the Ruins of Moondoria. He's guarding the entrance to the mines.

Special Note: Once you get to this point, you may want to look down at the Special Mascots section. You can get mascots from each of the Priests' Statues, and getting back to them through the mine is a pain.

Flair Rall - In the Rasteenie Mine. The directions to him are kind of a pain, but you have to find him to continue the game, so I won't bother listing them.
Note: Will move to Rall Family Wellness in Lance Village once you rescue him. You can even gift him a Wing to use for him to get back right away, but that means you'll be taking the long way back yourself.

Super Special Note: After you find Flair Rall, you can also use the Mattock you used to free him to get the Bestiary Potion from the Ruins of Moondoria. You'll see it in a chest behind the first wall to the North after entering the area from Moondoria Fields. Use the Mattock to break open the cracked section of the wall. Drinking this potion is essential to getting the Demon mascots later.
Colony of Lava NPCs
You will not be able to give gifts to most of these NPCs until you earn their trust. The ideal time for this is immediately after you bring Tarf back to the village. As such, I am listing the NPCs here as if you have just rescued Tarf.

Tarf - Next to the bridge mechanism.
Note: Will move to Ramia Village when you are in the Shrine of Solomon then to the Core of Ancient Ys when you first reach it.
Note: Any gifts you give him while he is following you back to the Colony of Lava do not count toward his affection for you. However, you will want to give him seven gifts at this time to level him up. Please see the Special Mascot section for more details.

Ruba - Next to the bridge mechanism.

Carson - At the Southern bridge to the village.

Noit - At the Southern bridge to the village.
Note: Will move to the Runaways' Hideout when you reach Shrine of Solomon then back to the Colony of Lava after you cure the Runaways' petrification.

Flonne - Next to the pikkard pens in the West.

Nash - Next to the pikkard pens in the West.
Note: Will give you his Raw Meat *ahem* when his affection is maxed. After you use it, you can more from him using another gift. Eating it is part of the No Reservations achievement. It can also be used to feed the cat in Ramia Village later for The Hand That Feeds Them achievement.

Ischt - In the middle of the village.

Meryl - North of the well in the middle of the village.

Kasim - Northeast of the well in the middle of the village.

Elle - Southeast of the well in the middle of the village.

Favre - Southeast of the well in the middle of the village.

Darie - Along the Southern end of the village.

Rafa - Noit's House

Fred - Fred's House

Natalie - Fred's House

Rex - Rex's House

Chelnie - Rex's House
Ramia Village NPCs
A lot of the NPCs will move around after curing the Runaways of petrification then entering the Core of Ancient Ys. You may need to search around a bit if you are using this guide at the endgame.

Zalem - Zalem's Battle Best
Note: For fans of the butt, Zalem has a Special Mascot. See that section for details.
Note: Max out Zalem's affection to get a Cruberry Pie. She will give you more every time you give her a gift afterward. Eating it is part of the No Reservations achievement.

Frith - Tending the goats on the East side of the village.

Jill - Toward the East side of the village.

Reise - Around the middle of the first level of the village.

Rimera - Around the middle of the first level of the village.
Note: Max her affection to get Cruberries from her. She'll give you another for every gift afterward. These can be used to feed the goats as part of The Hand That Feeds Them achievement.

Muto - Tending the graves in the Southwest of the village.

Faye - On the second level of the village.

Frau - On the second level of the village.

Hadat - Hadat's House

Blitz - Blitz's House

Paulie - Blitz's House

Tanya - Blitz's House

Lloyd - Gorto's House

Karen - Maria's House

Neal - Guardhouse on the second level.
Note: Just a fun thing to do, but maxing his affection teaches you something important about Zalem.

Regg - Regg's House on the second level.

Gorto - Guarding the gate to the Shrine of Solomon.
Note: Will move to the Core of Ancient Ys when you reach that area.
Shrine of Solomon / Runaways' Hideout NPCs
All of the NPCs here will move away after curing the NPCs of petrification.

Keith - You have to meet him during the course of the game. He's in second section of the Subterranean Canal. He then moves to the area before the Campanile of Lane (you will have to pass by him). After that, you won't see him until the Core of Ancient Ys toward the end of the game.

Kyle - On the first floor of the Runaway's Hideout. He's the only new NPC you can meet before the petrification spell is cast. Will move to Ramia Village after being cured.

Boris - After curing the petrification but before talking to Bohtz, he will be on the first floor of the hideout. After that, he will move to Ramia Village.

Ed - After curing the petrification but before talking to Bohtz, he will be on the first floor of the hideout. After that, he will move to Ramia Village.

Sada - After curing the petrification, he will be found in the second section of the Subterranean Canal. You will have to talk to him to continue in the game anyway. After that, he will move to Ramia Village.
Core of Ancient Ys NPCs
On top of the NPCs below, Tarf, Keith, Gorto, and Lilia will be here once you reach the area.

Maria - You saw her earlier, but this is the first time you can give her gifts.
Note: Keep talking to her (not giving her gifts) to get a Special Mascot.

Goban - In the room before the final boss.

Luta Gemma - In the room before the final boss.

Reah - In the room before the final boss.
Note: Having max affection with her will very slightly change the ending.

Feena - In the room before the final boss.
Note: Max her affection, and she will heal you completely. She will continue to do so for every gift thereafter.
Demons
There are a total of 46 Demon Mascots, one for each non-boss monster. In order to get their mascot, drink the Bestiary Potion to start adding their data to your Notes, then kill enough to fill in all the data on that given creature. As such, this task lines up exactly with the Demon Duster achievement. No monsters ever become inaccessible.

Chrace - Ruins of Moondoria

Cauction - Ruins of Moondoria

Godaago - Ruins of Moondoria

Warrizor - Sanctuary of Toal

Gnometh - Sanctuary of Toal

Zolgell - Sanctuary of Toal

Ripplet - Rasteenie Mine (the maze sections before the boss)

Tolpi - Rasteenie Mine (the maze sections before the boss)

Puroid - Rasteenie Mine (the maze sections before the boss)

K'nocks - Rasteenie Mine (the open section after the boss)

Carly - Rasteenie Mine (the open section after the boss)

Orihalcus - Rasteenie Mine (the open section after the boss)

Neeli - Ice Ridge of Noltia

Gercard - Ice Ridge of Noltia

Eggnid - Ice Ridge of Noltia

Galgata - Ice Ridge of Noltia

Gworter - Ice Ridge of Noltia

Swoff - Ice Ridge of Noltia (only just before the boss door)

Preliguard - Moat of Burnedbless

Onuman - Moat of Burnedbless

Scollun - Moat of Burnedbless

Xelbenoth - Moat of Burnedbless

Gene - Moat of Burnedbless

Topus - Moat of Burnedbless

Dirga - Moat of Burnedbless

Magnute - Moat of Burnedbless

Ashveil - Shrine of Solomon

Baocar - Shrine of Solomon

Nashzar - Shrine of Solomon

El Endes - Shrine of Solomon

Nustarl - Shrine of Solomon

Bearot - Shrine of Solomon

Malochius - Shrine of Solomon

Allomod - Shrine of Solomon

Trover - Shrine of Solomon

Godrup - Shrine of Solomon

Delpus - Subterranean Canal

Dyphthelloid - Subterranean Canal

Forkless - Shrine of Solomon, Central Shrine

Rewillvan - Shrine of Solomon, Central Shrine

Gearot - Shrine of Solomon, Central Shrine

Ceabith - Subterranean Canal

Charront - Shrine of Solomon, Central Shrine

Valkyria - Shrine of Solomon, Central Shrine

Zearot - Gatekeeper for the Shrine of Solomon. Can only be hurt by the Cleria Sword.

Zavanite - Only one in the game (though it respawns). Found in the room at the top of Mesa's Sector in the Shrine of Solomon. If you talk to other demons in Roo form, they will usually point you to this as "Zava's Room".
Special Mascots
These mascots fall outside either of the two methods above. You will have to do something special to get most of these.

Fortuneteller Sara
Hello Minea's Nurse
Troubadour Reah
Plainclothes Feena
Dogi
Dark Fact
Duckling
Tasty Rodentia
Priestess Feena
Priestess Reah
China-Dress Feena
China-Dress Reah
Rado's Annex Reah
The above mascots are all available right when you start a new game.

Chun-Lilia - Burn Lilia with Fire Magic 300 (yes, 300) times.
Note: This mascot was left out of the PSP version of Ys Chronicles, possibly because of a programming oversight. That makes this mascot a (possibly unintentional) PC exclusive!

Safety Charm
Luck Charm
Success Charm
Health Charm
Study Charm
Prosperity Charm
For the above six, you need to be healed five times each by the Priest Statues in the Sanctuary of Toal. Whenever you come to a statue and give it a book, leave the room, get hurt, go back in and get healed. Repeat for a total of five times at each statue.

Photogenic Lilia - Defeat a boss without taking any damage. The first boss is the easiest to do this with, but learning his pattern may take a little bit. You can also do this with the final boss if your Shield Magic holds out the entire time.

Roo - Enter the Roo village in the Moat of Burnedbless. To do this, use the Evil Bell near the Goddesses Statue near the entrance then follow the Roo that appears.
Note: Speak to all the Roos in here to add them to your Notes. They don't have individual mascots, but you will need to talk to them individually for the Notorious A.C. achievement.

Exploding Pumpkin - Blast the pumpkins in Colony of Lava with a fully charged fireball to break them. Repeat this 20 times to get this mascot.

Tailed Tarf - This one is MISSABLE in a single playthrough. When Tarf is following you, give him seven gifts to level him up once.

In Sifu Tarf - This one is MISSABLE in a single playthrough. When Tarf is following you, level him up to level 25. This will require you to give him seven gifts to level him up to level 2. After that, he will start throwing rocks at your enemies. He has to land the killing blow on an enemy to get the EXP for the kill. The easiest way to do this is to beat an enemy close to death then transform into a Roo to hold its attention while Tarf finishes it off. Getting him to level 25 will also earn you the Personal Trainer achievement.

I Heart Zalem - Talk to Zalem 5 times. Make sure to leave her shop and re-enter each time for it to count.

Imprisoned Maria - Talk to Maria in the Core of Ancient Ys 4 times (until she changes her dialogue).

For the following four mascots, finish the game on a specific difficulty level. These DO NOT stack, you will have to complete the game four times to get all of them.
Gussied-Up Lilia - Easy
Priestess Lilia - Normal
Maid Lilia - Hard
Swooned Feena - Nightmare
Numbered List
Below, the mascots are listed in the order which they appear while pressing right (or left) in the Mascots menu. Using it, you can quickly figure out if you are missing any and which ones you are missing by seeing which mascots in the below list are skipped while scrolling through your list.

The method for getting a mascot will not be listed here, so use the find function (CTRL+F) to search for the names of any you're missing to find out how to get them from earlier in this guide.

000 - Colt
001 - Tita
002 - Andy
003 - Brody
004 - Masontorch
005 - Larsen
006 - Marina
007 - Saffron
008 - Oseam
009 - Beth
010 - Lucille
011 - Bohtz
012 - Elder Cornell
013 - Leonor Rall
014 - Flair Rall
015 - Lazlo
016 - Jade
017 - Guido
018 - Gila
019 - Noit
020 - Neal
021 - Nurse Sarina
022 - Banoa
023 - Natasha
024 - Astal
025 - Leggs
026 - Kris
027 - Ceres
028 - Elle
029 - Ruba
030 - Karen
031 - Hadat
032 - Regg
033 - Zalem
034 - Sada
035 - Roo
036 - Kyle
037 - Boris
038 - Ed
039 - Favre
040 - Lilia
041 - Tarf
042 - Gorto
043 - Keith
044 - Maria
045 - Luta Gemma
046 - Goban
047 - Meryl
048 - Feena
049 - Reah
050 - Fred
051 - Carson
052 - Natalie
053 - Rafa
054 - Rex
055 - Chelnie
056 - Sheila
057 - Caesaria
058 - Kate
059 - Frith
060 - Jill
061 - Reise
062 - Frau
063 - Lloyd
064 - Blitz
065 - Paulie
066 - Tanya
067 - Tess
068 - Tran
069 - Lucy
070 - Theo
071 - Esca
072 - Polo
073 - Ischt
074 - Kasim
075 - Flonne
076 - Darie
077 - Nash
078 - Muto
079 - Faye
080 - Rimera
081 - Chrace
082 - Cauction
083 - Godaago
084 - Warrizor
085 - Gnometh
086 - Zolgell
087 - Ripplet
088 - Tolpi
089 - Puroid
090 - K'nocks
091 - Carly
092 - Orihalcus
093 - Neeli
094 - Gercard
095 - Eggnid
096 - Galgata
097 - Gworter
098 - Swoff
099 - Preliguard
100 - Onuman
101 - Scollun
102 - Xelbenoth
103 - Gene
104 - Topus
105 - Dirga
106 - Magnute
107 - Ashveil
108 - Baocar
109 - Nashzar
110 - El Endes
111 - Nustarl
112 - Bearot
113 - Malochius
114 - Allomod
115 - Trover
116 - Godrup
117 - Delpus
118 - Dyphthelloid
119 - In Situ Tarf
120 - Forkless
121 - Rewillvan
122 - Gearot
123 - Ceabith
124 - Charront
125 - Valkyria
126 - Zearot
127 - Zavanite
128 - Safety Charm
129 - Luck Charm
130 - Success Charm
131 - Health Charm
132 - Study Charm
133 - Prosperity Charm
134 - Fortuneteller Sara
135 - Hello Minea's Nurse
136 - Troubadour Reah
137 - Plainclothes Feena
138 - Dogi
139 - Dark Fact
140 - Imprisoned Maria
141 - Photogenic Lilia
142 - Gussied-Up Lilia
143 - Maid Lilia
144 - Priestess Lilia
145 - Chun-Lilia
146 - Tailed Tarf
147 - I Heart Zalem
148 - Duckling
149 - Exploding Pumpkin
150 - Tasty Rodentia
151 - Swooned Feena
152 - Priestess Feena
153 - Priestess Reah
154 - China-Dress Feena
155 - China-Dress Reah
156 - Rado's Annex Reah

If you're curious why the list is zero-indexed (begins at 000), it's because this also translates to the decimal number the game uses to represent each mascot where 00 is Colt and 156 (9C in hexadecimal) is Rado's Annex Reah. This is useful if you're using a hex editor to find where the current mascot is stored, but I won't get into that in this guide.
Version History
1.0.0 - 2016-02-05 21:22 UTC
First version written in about three hours. Pretty rough for right now, but all the info necessary is here. Will probably do more with the Demon section later at the very least (like give more specific locations for each monster). Updates will come if anyone provides me with new information.
Acknowledgements
My friend, EL Vengador, who told me to make this guide and compensated me well for it.

The GameFAQs user A Backdated Future for making the walkthrough[www.gamefaqs.com] I used when making this list.

The GameFAQs user CelestinPL who made a complete list[www.gamefaqs.com] of mascots so I know I'm not missing any.

The GameFAQs user FrankieDuck who found the Japanese list[home.e-catv.ne.jp] of how to find special mascots.

The GameFAQs user ShadowWolf401 who found out how to unlock[www.gamefaqs.com] Chun-Lilia in the PC version.

Falcom for making this game and XSEED for bringing it to us.
4 Comments
SirFrankums 18 Feb, 2024 @ 8:44pm 
Oh hey I used to go by FrankieDuck. I had completely forgot about this. Thanks for the acknowledgement.
Bers 15 Jan, 2023 @ 2:47am 
Thank you for this nice guide!
Korzic 1 Dec, 2019 @ 6:07pm 
Where did you get your info about the special ending scene with Lilia? To clarify, I'm assuming you're talking about the part where Lilia moves in close to Adol as they're looking over the cliff outside Lance Village, if you've given her enough gifts. As far as I can tell, it has absolutely nothing to do with difficulty, as I've not only gotten the scene on Easy difficulty, but with "1st playthrough" settings as well (I didn’t see an extra cutscene just before Darm, for instance).

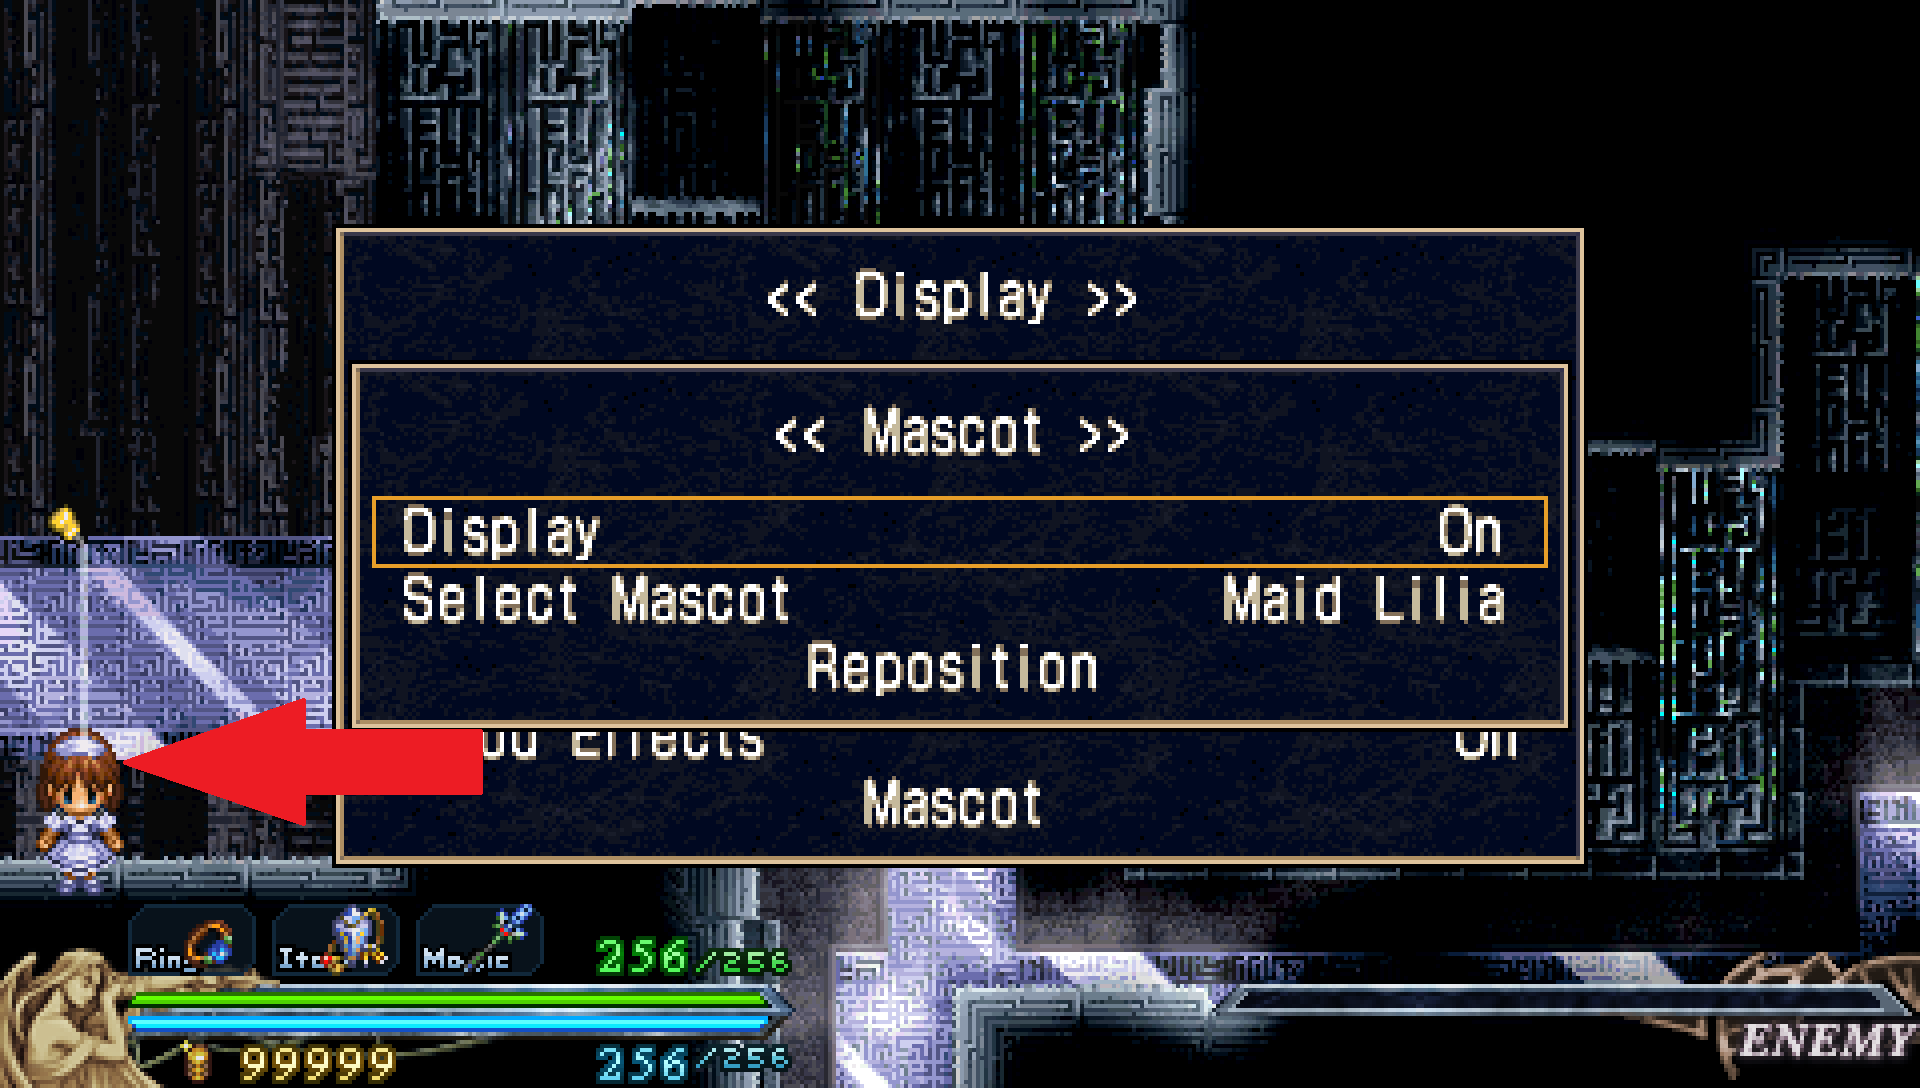
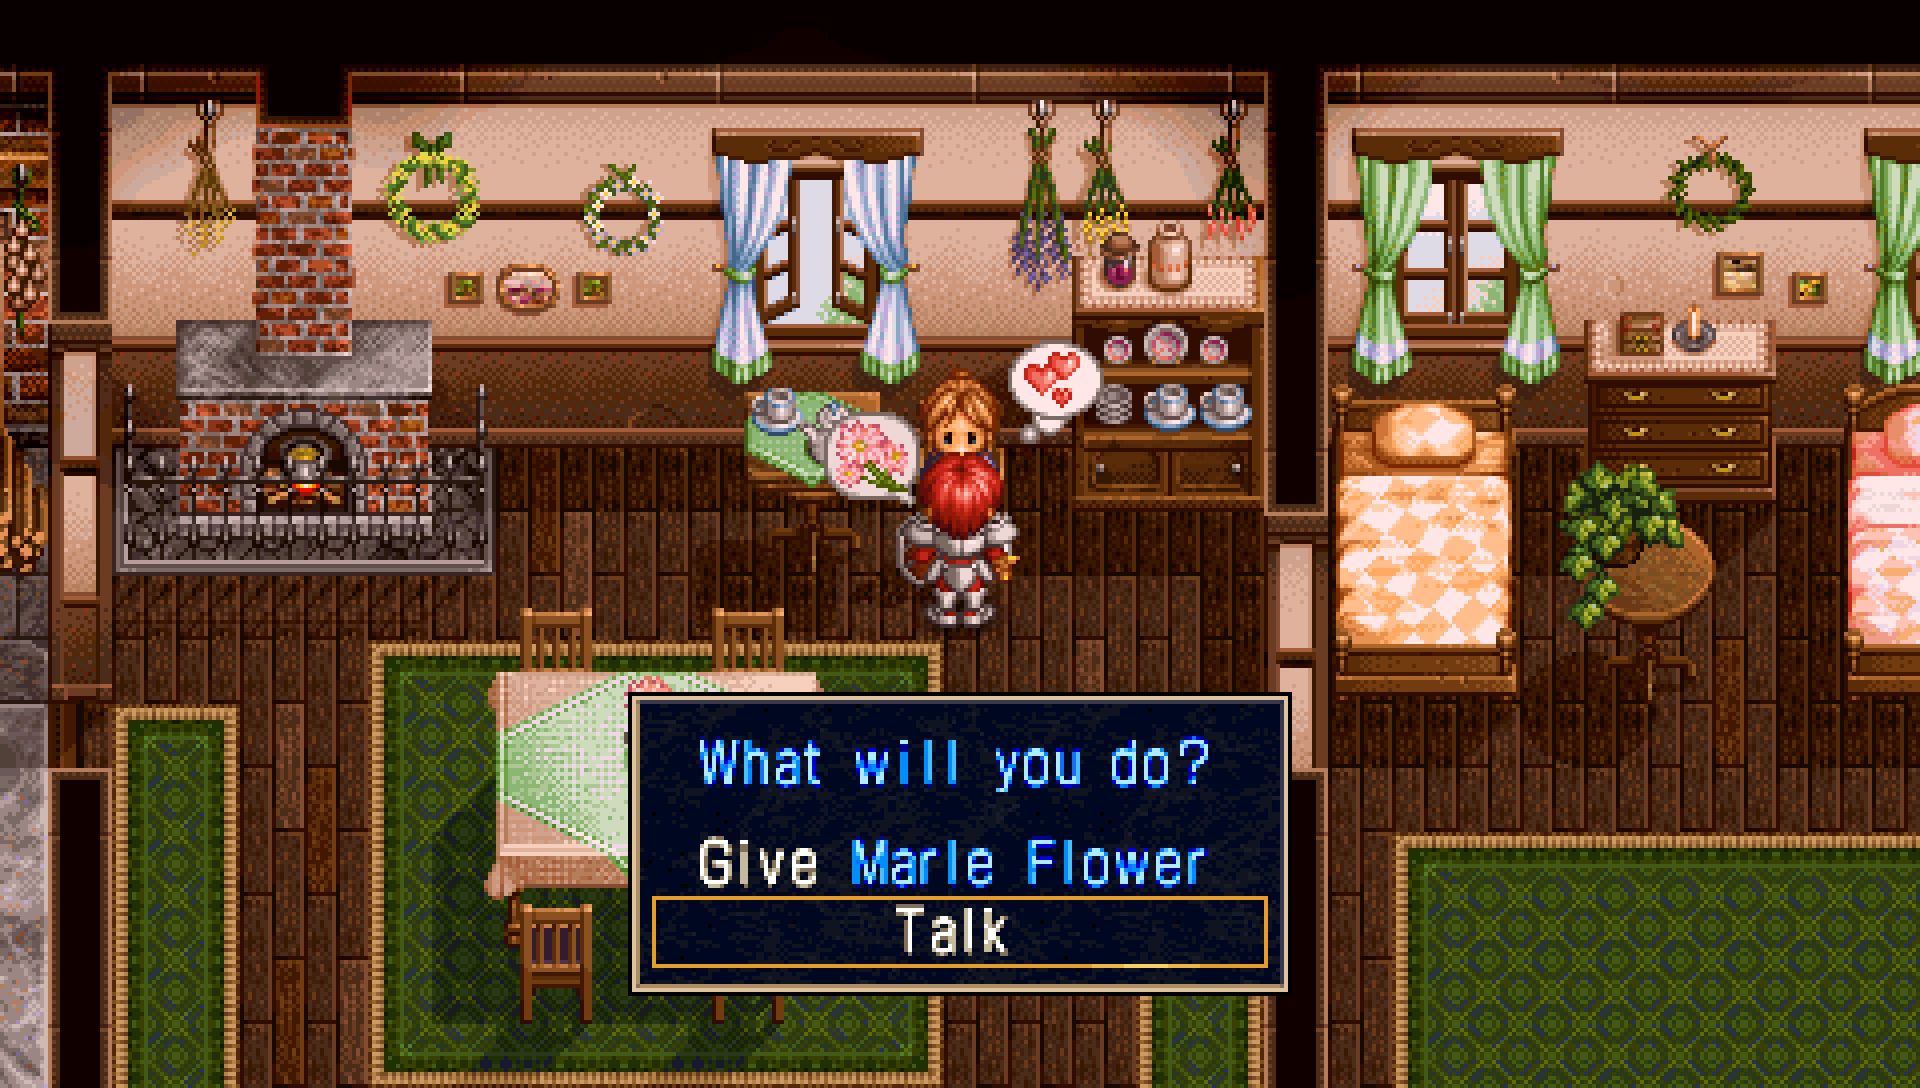
Unfortunately, it seems like that scene is only available in the Eternal and Complete versions of the game; it seems to have been removed from Chronicles and Chronicles+, even when selecting the "Complete" option for artwork. I'd guess this is because the Chronicles versions seem to play some sort of movie file for the ending, whereas Eternal and Complete seem to have those scenes coded as part of the game itself (hence why in Complete, you can see Luta Gemma walking around with the Cleria Shield.
Ikagura 2 May, 2018 @ 3:45pm 
Great guide thanks